TYPO3 Upgrade Guide
- Version
main
- Language
en
- Author
TYPO3 contributors
- License
This document is published under the Open Publication License.
- Rendered
2024-03-29 15:10
This document explains how to upgrade TYPO3 and migrate from Legacy to Composer mode.
Patch/bugfix updates contain bugfixes and/or security updates. This section details how to install them using Composer.
This chapter details how major upgrades are installed using Composer and highlights what tasks need to be carried out before and after the core is updated.
Just like TYPO3's core, extensions also need to be regularly updated. This chapter details how to upgrade extensions using Composer.
Tools and resources developed by the community that can assist with common upgrade and maintenance tasks.
Using TYPO3 without Composer? This chapter details how to upgrade TYPO3 manually.
Learn how to apply Core patches in a future proof way: Automatize
patch application with cweagans/composer-patches. Download
a patch for the Core.
Migrate a TYPO3 installation to Composer
Information on how to migrate a legacy installation of TYPO3 to a Composer based installation.
This chapter details how pages and content can be exported and then imported into another installation of TYPO3.
Patch/Bugfix update
What are patch/bugfix updates
Patch/Bugfix updates contain bugfixes and security updates. They never contain new features and do not break backwards compatibility.
For example, updating from TYPO3 version 11.5.2 to 11.5.3 is a patch/bugfix update.
Before updating
The pre-upgrade tasks chapter contains a list of tasks that should be actioned prior to upgrading to a major release.
The only tasks that need to actioned for a patch/bugfix update are making a backup and updating the reference index.
Check if updates are available
There are two ways to check if a patch/bugfix update is available for an installation of TYPO3.
All supported versions of TYPO3 and their version numbers are published on get.typo3.org.
Alternatively, running composer outdated -m "typo3/*" will present a list of any TYPO3 packages that have patch/bugfix updates.
Execute the update
To execute the update, run composer update --with-all-dependencies "typo3/*".
This will update all TYPO3 packages, the --with-all-dependencies signals that any dependencies of TYPO3 should also be updated.
Post update
Once Composer has finished updating the installation of TYPO3, log in to the backend and clear all caches.
Admin Tools > Maintenance > Flush TYPO3 and PHP Cache
Major upgrade
Before upgrading TYPO3 to a major release, there are several tasks that can be performed to help ensure a successful upgrade and help minimise any potential downtime.
This chapter details how to perform a major upgrade using Composer.
Once TYPO3's Core has been upgraded, there a few tasks that need to be actioned to complete the process.
Pre-upgrade tasks
Before starting the upgrade check your system for compatibility with a newer TYPO3 version.
Before you upgrade to the next major version, make sure you have run all Upgrade Wizards of the the current TYPO3 major version.
Check for deprecations: Enable the deprecation log and let it log all deprecations for a while.
Alternatively (or additionally) run the extension scanner and handle deprecations (below).
Check installed extensions for versions compatible to the target TYPO3 version
Try the upgrade on a development system first or create a parallel instance
Check that all system requirements for upgrading are met:
Make A Backup
Make a backup first! If things go wrong, you can at least go back to the old version. You need a backup of
all files of your TYPO3 installation (by using FTP, SCP, rsync, or any other method)
the database (by exporting the database to an SQL file)
Also, you may prefer to upgrade a copy of your site first, if there have been a lot of changes and some of them might interfere with functions of your site. See the changelog to check that.
For more detailed information about TYPO3 backups see Backup strategy in TYPO3 Explained.
Update Reference Index
Tip
As the reference index might take some time, especially on instances not running it regularly, an upgrade via command line (CLI) is recommended to avoid a timeout.
With command line (recommended)
To run the reference index update, execute in the root folder of your project:
vendor/bin/typo3 referenceindex:update
typo3/sysext/core/bin/typo3 referenceindex:update
Tip
Use referenceindex:update 2> /dev/null to suppress the progress
output, for example, if the command is executed by a cronjob.
Without command line
Still in your old TYPO3 version, go to the System > DB check module and use the Manage Reference Index function.
Click on Update reference index to update the reference index. In case there is a timeout, and you do not have CLI access (see above) you might have to run the update multiple times.
Note
The lowlevel system extension must be installed for the mentioned backend module.
Check the ChangeLog
In addition to the deprecations you may want to read the information about important changes, new features and breaking changes for the release you are updating to.
The changelog is divided into four sections "Breaking Changes", "Features", "Deprecation" and "Important". Before upgrading you should at least take a look at the sections "Breaking Changes" and "Important" - changes described in those areas might affect your website.
Tip
Breaking changes should be of no concern to you if you already handled the deprecations before upgrading.
The detailed information contains a section called "Affected Installations" which contains hints whether or not your website is affected by the change.
There are 3 different methods you can use to read the changelogs:
Look through the changelogs online. This has the advantage that code blocks will be formatted nicely with syntax highlighting.
Read the changelogs in the backend: Upgrade > View Upgrade Documentation. This has the advantage that you can filter by tags and mark individual changelogs as done. This way, it is possible to use the list like a todo list.
Read the changelog in the Extension Scanner (as explained above).
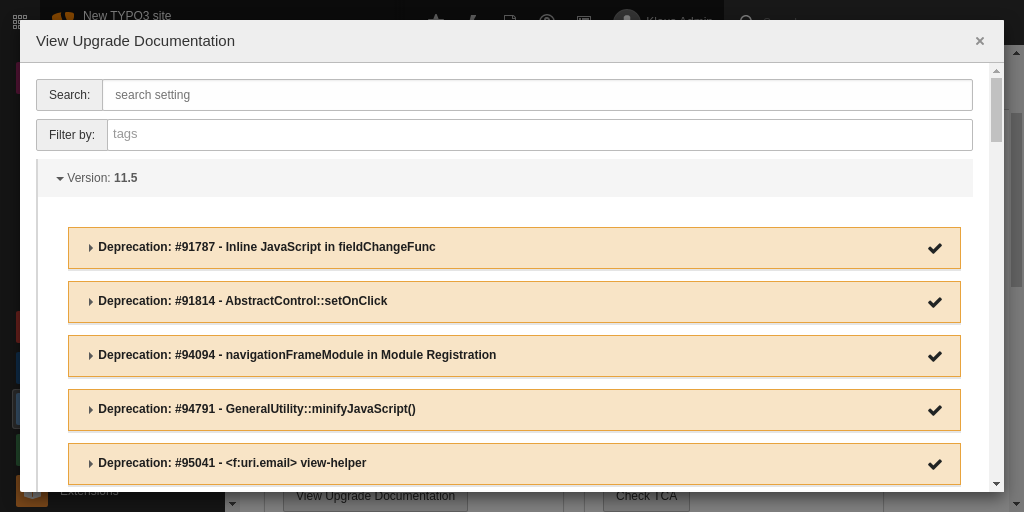
The "Upgrade Analysis" in the Install Tool
Resolve Deprecations
If you notice some API you are using is deprecated, you should look up the corresponding changelog entry and see how to migrate your code corresponding to the documentation.
Since TYPO3 v9 an extension scanner is included, that provides basic scanning of your extensions for deprecated code. While it does not catch everything, it can be used as a base for an upgrade. You can either access the extension scanner via the TYPO3 admin tools (in the Backend: Module "Upgrade" > "Scan Extension Files") or as a standalone tool (https://github.com/tuurlijk/typo3scan).
The extension scanner will show the corresponding changelog which contains a description of how to migrate your code. See Check the ChangeLog for more information about the changelogs and how to read them.
In addition, you can use the tool typo3-rector to automatically refactor the code for a lot of deprecations.
Note
TYPO3 aims at providing a reliable backwards compatibility between versions:
Minor versions are always backwards compatible - unless explicitly stated otherwise (for example in case of security updates)
Major versions may contain breaking changes - normally these are deprecated one major version in advance
Most breaking changes usually happen in the first Sprint Release
If PHP classes, methods, constants, functions or parameters are to be removed, they will be marked as deprecated first and not removed until the next major release of TYPO3. For example: a method that gets deprecated in version 12.3.0 will remain fully functional in all 12.x.y releases, but will be removed in version 13.
This strategy gives developers sufficient time to adjust their TYPO3 extensions, assuming many agencies upgrade from one LTS release to the next (usually 1.5 years).
Upgrade the Core
Upgrading to a major release using Composer
This example details how to upgrade from one LTS release to another. In this example, the installation is running TYPO3 version 11.5.34 and the new LTS release is version 12.4.10.
Check which TYPO3 packages are currently installed
TYPO3's Core contains a mix of required and optional packages. For example,
typo3/cms-backend is a required package. typo3/cms-sys-note is an optional
package and does not need to be installed for TYPO3 to work correctly.
Prior to upgrading, check which packages are currently installed and make a note of them.
Running composer info "typo3/*" will output a list of all TYPO3 packages that
are currently installed.
Running composer require
To upgrade a Composer package, run composer require with the package name and
version number.
For example, to upgrade typo3/cms-backend run
composer require typo3/cms-backend:^12.4.
When upgrading to a new major release, each of TYPO3's packages will need to be upgraded.
Given that a typical installation of TYPO3 will consist of a number of packages, it is recommended that the Composer Helper Tool be used to help generate the Composer upgrade command.
Note
With TYPO3 v12 the typo3/cms-recordlist package was merged into
typo3/cms-backend. With TYPO3 v13 the typo3/cms-t3editor package was
merged into typo3/cms-backend. Therefore, if you have one of them
installed, remove them in your composer.json file before upgrading:
composer remove "typo3/cms-recordlist"
composer remove "typo3/cms-t3editor"
Assuming that the packages below are installed locally, the following example would upgrade each of them to version 12.4.
composer require --update-with-all-dependencies "typo3/cms-adminpanel:^12.4" \
"typo3/cms-backend:^12.4" "typo3/cms-belog:^12.4" "typo3/cms-beuser:^12.4" \
"typo3/cms-core:^12.4" "typo3/cms-dashboard:^12.4" "typo3/cms-felogin:^12.4" \
"typo3/cms-filelist:^12.4" "typo3/cms-filemetadata:^12.4" "typo3/cms-fluid:^12.4" \
"typo3/cms-form:^12.4" "typo3/cms-frontend:^12.4" "typo3/cms-info:^12.4" \
"typo3/cms-install:^12.4" "typo3/cms-linkvalidator:^12.4" "typo3/cms-lowlevel:^12.4" \
"typo3/cms-recycler:^12.4" "typo3/cms-rte-ckeditor:^12.4" "typo3/cms-setup:^12.4" \
"typo3/cms-t3editor:^12.4" "typo3/cms-tstemplate:^12.4" "typo3/cms-viewpage:^12.4"
A typical TYPO3 installation is likely to have multiple third-party extensions installed and running the above command can create dependency errors.
For example, when upgrading from TYPO3 v11 LTS to v12 LTS an error can occur
stating that "helhum/typo3-console": "^7.1" is only compatible with v11 LTS,
with the new version ^8.1 supporting TYPO3 v12 LTS.
For each of these dependency errors, add the version requirement
"helhum/typo3-console:^8.1" to the end of your composer require string
and retry the command.
Monitoring changes to TYPO3's Core
The system extensions that are developed and exist within TYPO3's Core are likely to change over time. Some extensions are merged into others, new system extensions are added and others abandoned. These changes are published in the system extensions chapter and can also be found by searching in the changelogs for the extension by its key name.
Next steps
Once the upgrade is complete, there are a set of tasks that need to actioned to complete the process. See Post-upgrade tasks.
Post-upgrade tasks
Run the upgrade wizard
Enter the Install Tool at https://example.org/typo3/install.php on your
TYPO3 site.
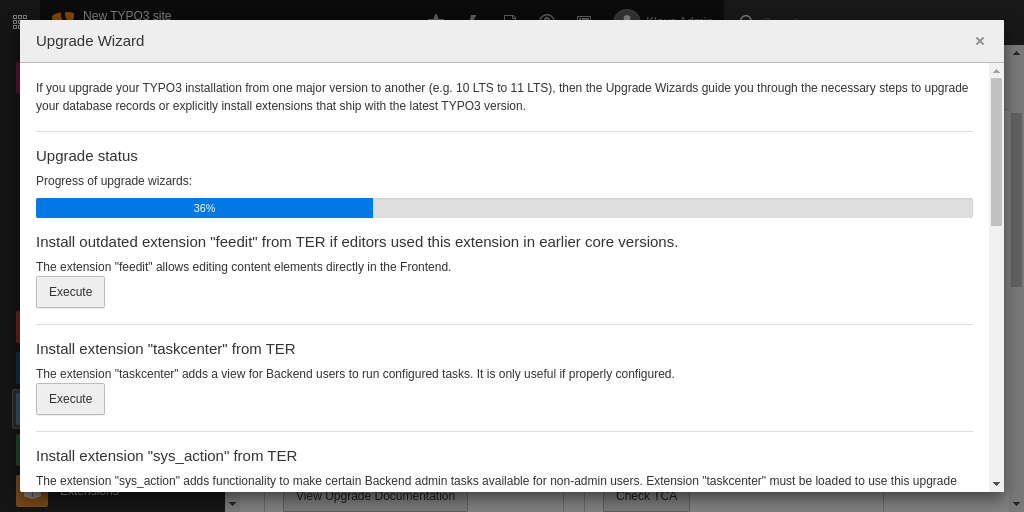
The "Upgrade Wizard" in the Install Tool.
TYPO3 provides an upgrade wizard for easy upgrading. Go to the Upgrade section and choose Upgrade Wizard. Take a look at the different wizards provided. You should go through them one by one.
You must start with Create missing tables and fields if it's displayed, which adds new tables and columns to the database.
Click Execute. Now all ext_tables.sql files from core and extensions
are read and compared to your current database tables and columns. Any missing
tables and columns will be shown and you'll be able to execute queries
sufficient to add them.
After you added these tables and columns, go on to the next wizard.
Hint
If you have CLI access you can run the update wizards on command line, too. This allows you to run all upgrade wizards at once and might help with long-running wizards that may fail because of webserver timeouts otherwise.
For Composer mode
Run ./vendor/bin/typo3 upgrade:list -a to show a complete status of
upgrade wizards.
Use ./vendor/bin/typo3 upgrade:run <wizardName> to run a specific wizard.
Use ./vendor/bin/typo3 upgrade:run to run all wizards.
For legacy mode (non-Composer mode) replace ./vendor/bin/typo3 with
./typo3/sysext/core/bin/typo3.
The "Version Compatibility" wizard sets the compatibility version of your TYPO3 installation to the new version. This allows your frontend output to use new features of the new TYPO3 version.
Note
This wizard might affect how your website is rendered. After finishing the upgrade, check that your website still displays the way it is supposed to be and adjust your TypoScript if necessary.
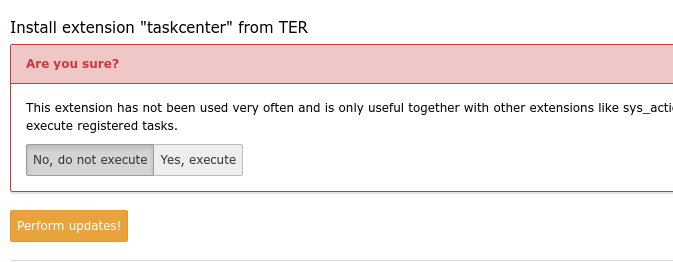
Go through all wizards and apply the (database) updates they propose. Please note that some wizards provide optional features, like installing system extensions that you may not need in your current installation, so take care to only apply those wizards, which you really need. Apply the optional wizards too - just be sure to select the correct option (e.g. "No, do not execute"). This way, these wizards will also be removed from the list of wizards to execute and the upgrade will be marked as "done".
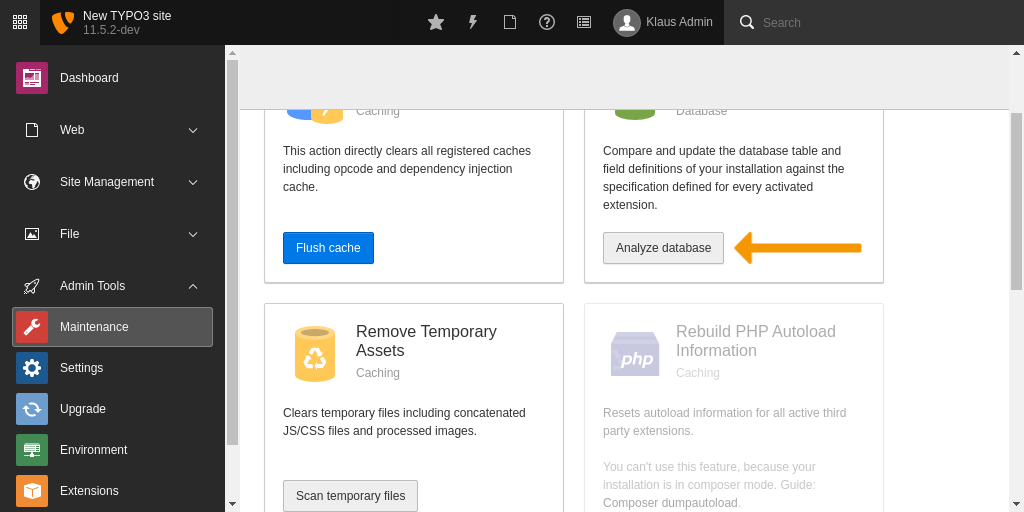
After running through the upgrade wizards go to Maintenance > Analyze Database Structure. You will be able to execute queries to adapt them so that the tables and columns used by the TYPO3 Core correspond to the structure required for the new TYPO3 version.
Note
If you don't know the current Install Tool password,
you can set a new one by entering one in the Install Tool login screen,
hitting enter and then setting the displayed hash as value
of $GLOBALS['TYPO3_CONF_VARS']['BE']['installToolPassword']
in config/system/settings.php.
Run the database analyser
While in the previous step, tables and columns have been changed or added to allow running the upgrade wizards smoothly. The next step gives you the possibility to remove old and unneeded tables and columns from the database.
Use the "Maintenance section" and click "Analyze Database".
You will be able to execute queries to remove these tables and columns so that your database corresponds to the structure required for the new TYPO3 version.
Warning
Be careful if you have deliberately added columns and/or tables to your TYPO3 database for your own purposes! Those tables and columns are removed only if you mark them to be deleted of course, but please be careful that you don't delete them by mistake!
Note
TYPO3 does not directly remove tables and fields, but first renames them
with a prefix zzz_deleted_*. This allows checking whether the fields and
tables really are not needed anymore or were accidentally marked as deleted
by wrong configuration.
When you are sure you aren't going to need them anymore, you can drop them via the wizard.
Select the upgrades you want and press "Execute":
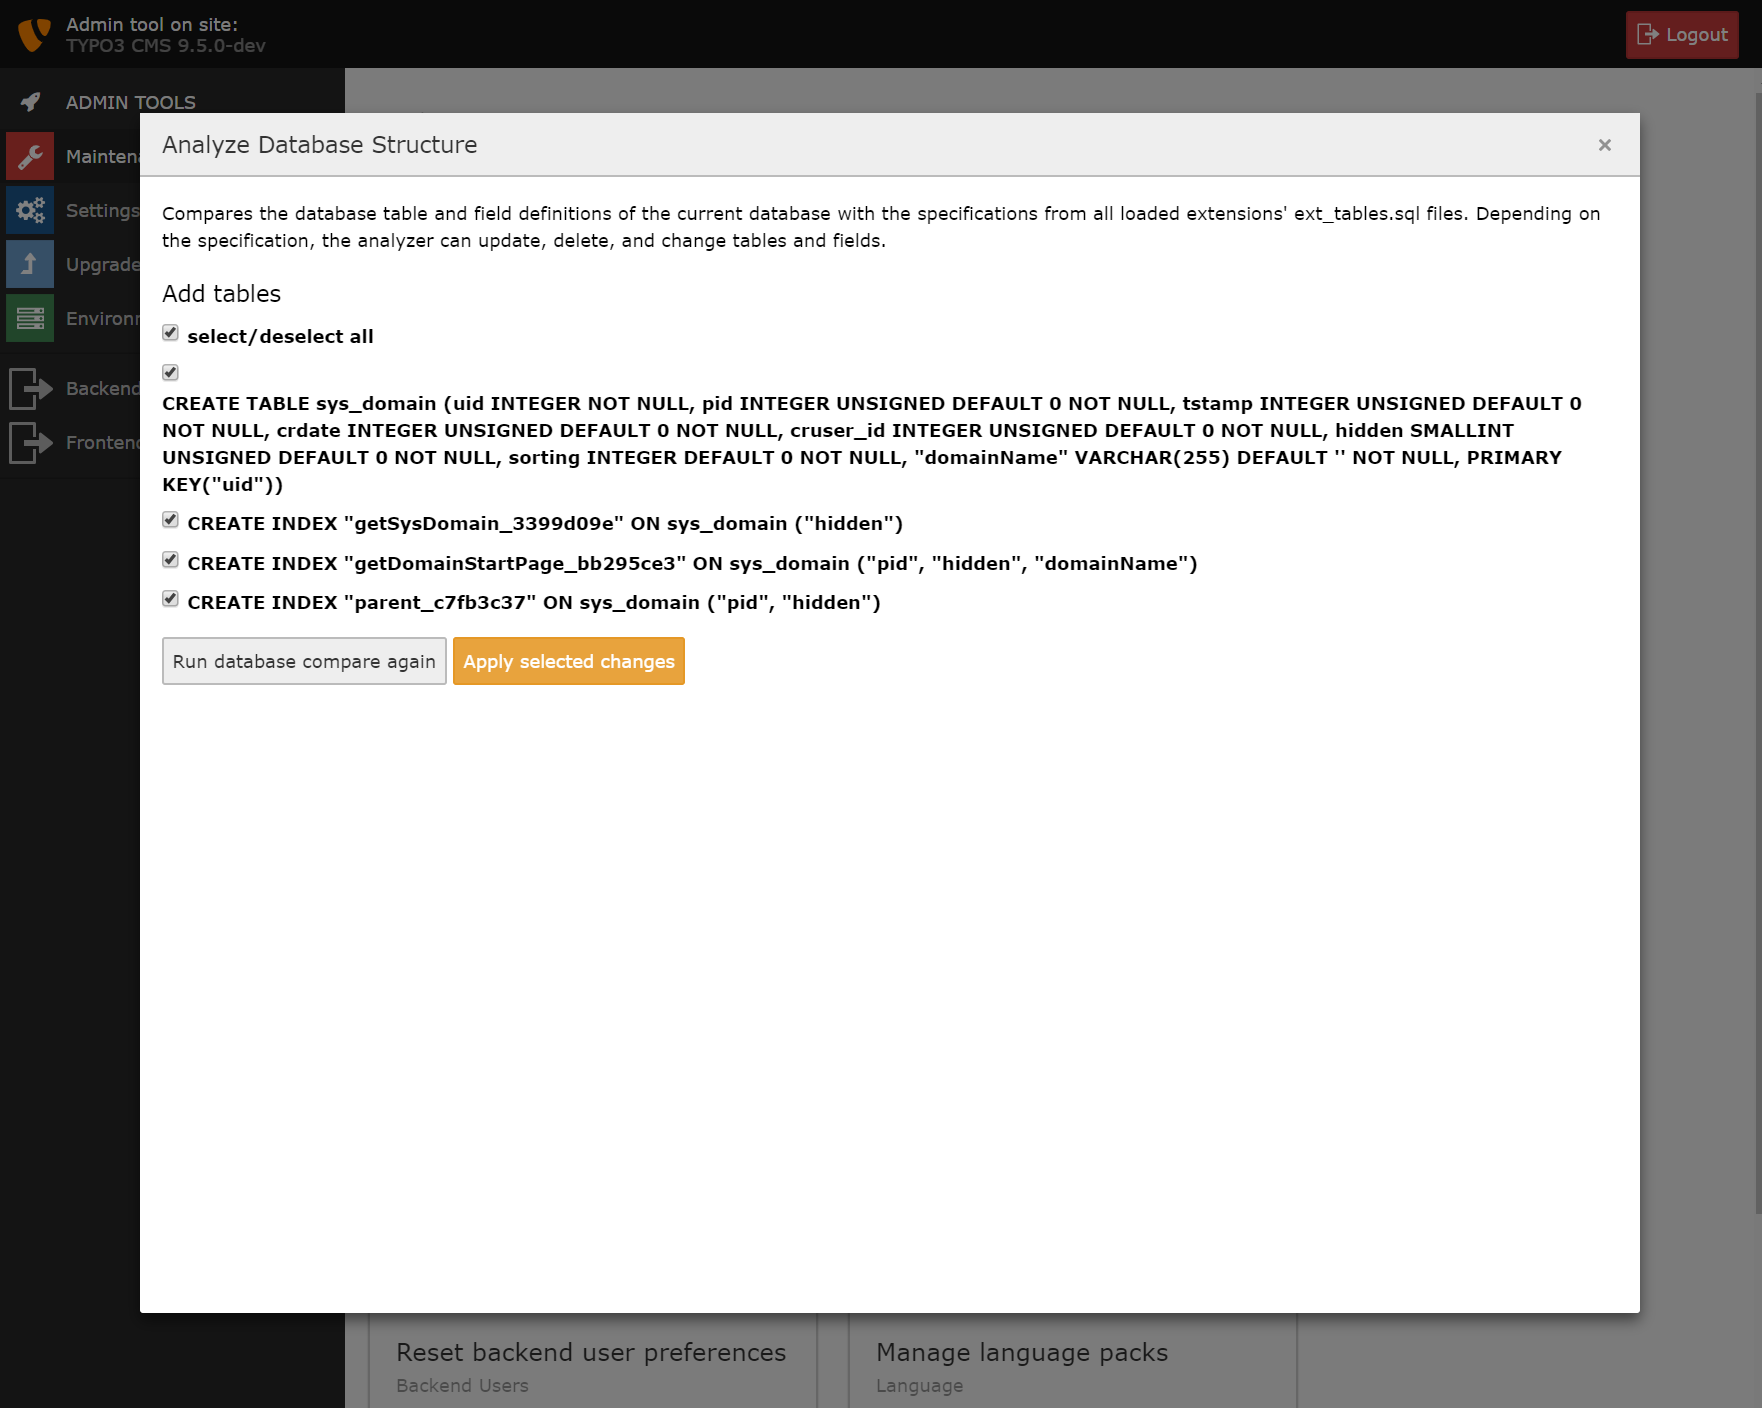
The Database Analyzer
When you then click "Compare current database with specification" again and you only see the message
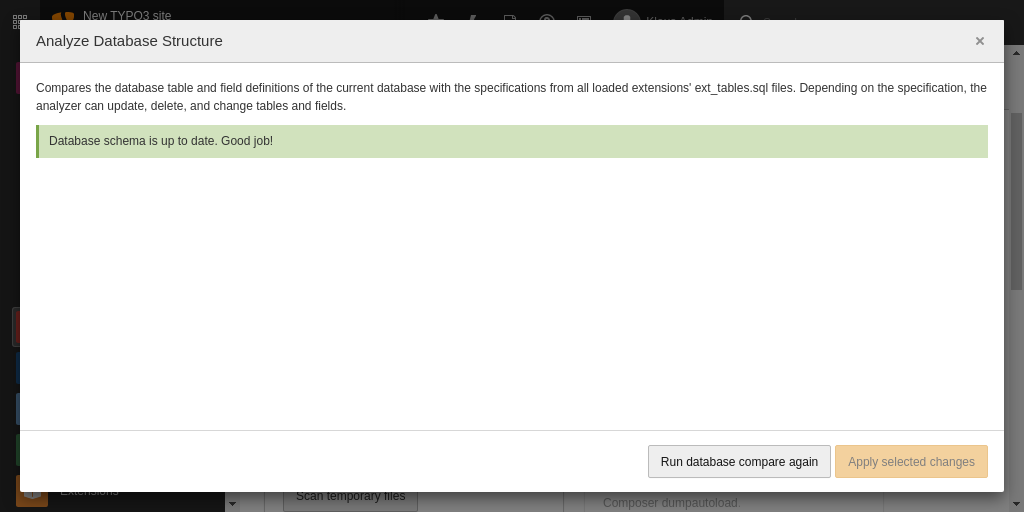
The Database Analyzer with no updates to do
then all database updates have been applied.
Clear user settings
You might consider clearing the Backend user preferences. This can avoid problems, if something in the upgrade requires this. Go to "Clean up", scroll to "Reset user preferences" and click "Reset backend user preferences".
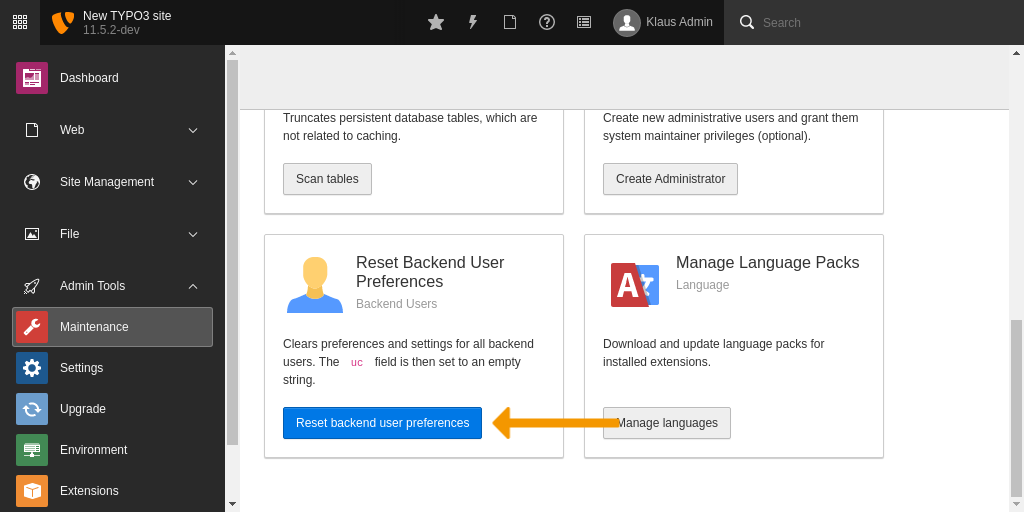
The option "Reset Backend User Preferences" in the Install Tool
Clear caches
You have to clear all caches when upgrading.
Go to the Admin Tools > Maintenance backend module and click on the Flush cache button:
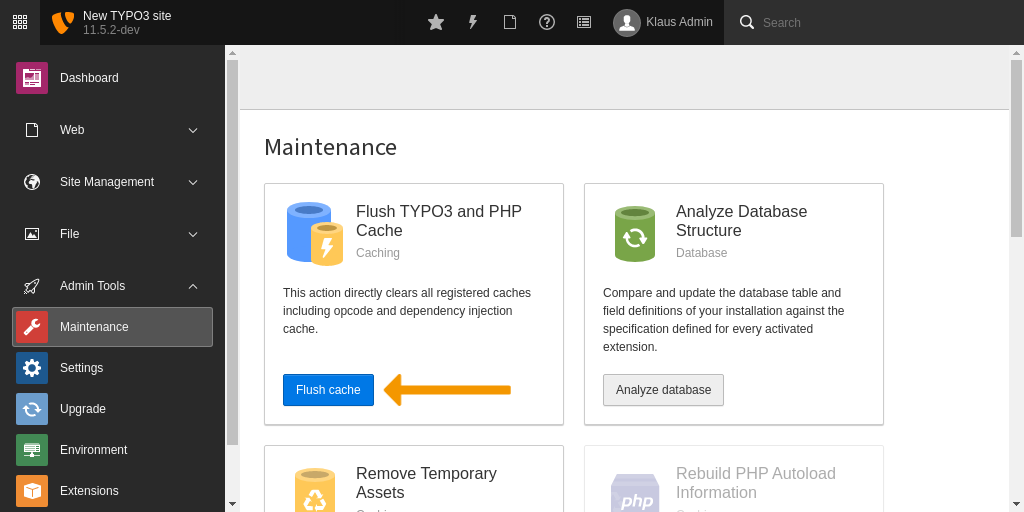
The option "Flush" in the Admin Tool.
Additionally, after an upgrade to a new major version, you should also delete
the other temporary files, which TYPO3 saves in the typo3temp/ folder.
In the Admin Tools > Maintenance module click on the
Remove Temporary Assets > Scan temporary files button and select the
appropriate folders.
Note
When you delete the _processed_/ folder of a file storage all scaled
images will be removed and the according images processed again when
visiting a webpage the next time. This may slow down the first rendering of
the webpage.
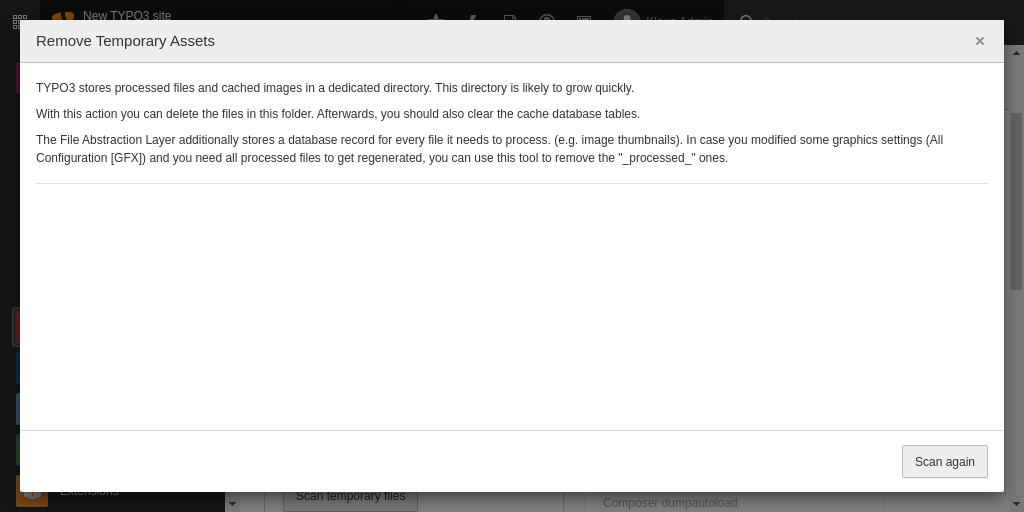
The option "Remove temporary assets" in the Install Tool.
Update backend translations
In the Install tool, go to the module "Maintenance" -> "Manage languages" and update your translations. If you don't update your translations, new texts will only be displayed in English. Missing languages or translations can be added following the section Internationalization and Localization.
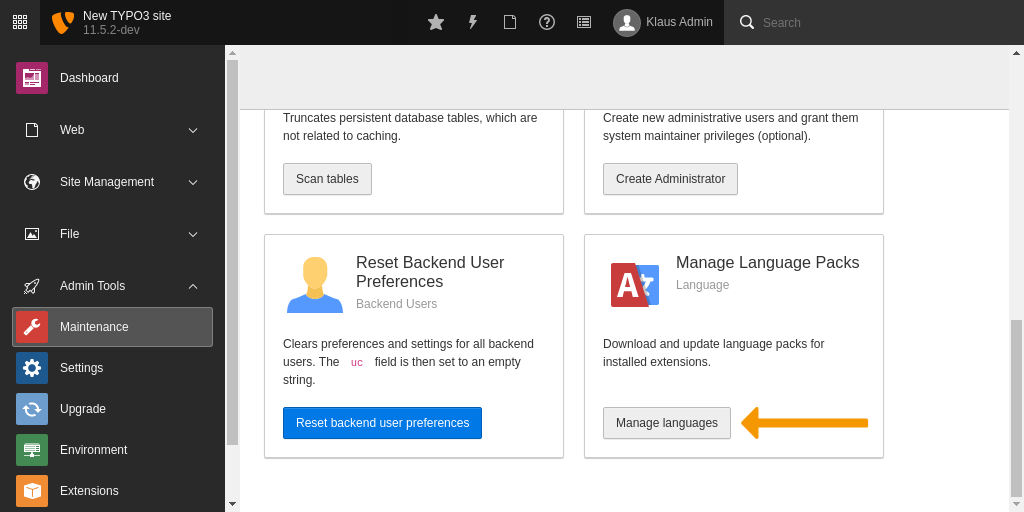
The option "Manage language packs" in the Install Tool
Upgrading extensions
List extensions
Like TYPO3's core, extensions are also composer packages. The composer info command will list all
extensions that are currently installed including their name and current version number.
Check for updates
To check if any extension upgrades are available, composer outdated can be used to display a list
of packages that have updates along with their new version number.
Upgrade an extension (minor)
Minor upgrades of an extension can be done with the composer command composer update vendor/packagename.
Upgrade an extension (major)
Major upgrades of an extension can be done with the composer command composer require vendor/packagename:<new version>.
Third-party tools
A collection of third-party resources that can assist with upgrade and maintenance tasks.
Rector for TYPO3
Rector for TYPO3 was created to help developers upgrade their TYPO3 installations and ensure their extensions support the latest versions of PHP and TYPO3. Rector scans your code base and replaces any deprecated functions with an appropriate replacement. Rector can also help ensure better code quality by means of automated refactoring.
Rector can run as a standalone package or it can be integrated with your CI pipeline.
Resources
Support
Visit the TYPO3 Slack and search for the #ext-typo3-rector
channel. You can also open an issue or start a discussion on the projects GitHub page.
Legacy Upgrade
Minor Upgrades - Using The Core Updater
The "Install Tool" in the section "Important Actions" provides a function to update the TYPO3 Core.
In the section "Important Actions" scroll down to "Core update" and click the "Check for core updates" button. If the requirements are met, TYPO3 will automatically install the new source code.
Note
For the Core Updater to work, the following setup is required:
It only works in Unix-like systems (including macOS).
typo3_srcmust be a symlink.This symlink needs to be writable (and deletable) by the web-server user.
The document root needs to be writable.
One path above document root (
../) needs to be writable (creation of new directories must be allowed).The tar command must be available (for extracting the Source package).
Major Upgrades - Symlink The Core
Go to https://typo3.org/download/ and download the source package of the new TYPO3 version.
Extract the package on your web server and, in your TYPO3 document root,
adjust the typo3_src symlink.
Important
Make sure to upload the whole TYPO3 source directory including the
vendor directory, otherwise you will miss important dependency
updates.
Disabling the Core Updater
The Core Updater functionality can be turned off, in order to avoid users using it, i.e. if you use your own update mechanism.
This feature is already disabled when TYPO3 is installed via Composer.
To disable the Core updater, you can set this environment variable:
TYPO3_DISABLE_CORE_UPDATER=1
For example in Apache:
SetEnv TYPO3_DISABLE_CORE_UPDATER 1
or for NGINX:
server {
  location ~ path/to/it {
    include fastcgi_params;
    fastcgi_param TYPO3_DISABLE_CORE_UPDATER "1";
  }
}
This will remove the button and all related functionality in the Install Tool.
What's the Next Step?
In case you performed a minor update, e.g. from TYPO3 12.4.0 to 12.4.1, database updates are usually not necessary, though you still have to remove the temporary cache files. After that your update is finished.
Note
Make sure to read the release notes of even the minor versions carefully. While great care is taken to keep the minor updates as easy as possible, (especially when releasing security updates) more steps might be necessary.
In case of a major update, e.g. from TYPO3 11.5 to 12.4, go ahead with the next step!
Also check out any breaking changes listed in the changelog for the new version.
Applying Core patches
At some point you may be required to apply changes to TYPO3's core. For example you may be testing a colleague's feature or working on a patch of your own.
Never change the code found in the Core directly. This includes all files in
typo3/sysext and vendor.
Any manual changes you make to TYPO3's Core will be overwritten as soon as the Core is updated.
Changes that need to be applied to the Core should be stored in *.diff files
and reapplied after each update.
Automatic patch application with cweagans/composer-patches
See also
Note
Automatic application of patches with this method only works with Composer.
To automatically apply patches first install cweagans/composer-patches:
composer req cweagans/composer-patches
Choose a folder to store all patches in. This folder should ideally be outside
of the webroot. Here we use the folder patches on the same level as
the project's main composer.json. Each patch can be applied to exactly
one composer package. The paths used in the patch must be relative to the
packages path.
Edit your project's main composer.json. Add a section patches
within the section extra. If there is no section extra yet,
add one.
 1"extra": {
 2  "typo3/cms": {
 3    "web-dir": "public"
 4  },
 5  "patches": {
 6    "typo3/cms-core": {
 7      "Bug #98106 fix something":"patches/Bug-98106.diff"
 8    }
 9  }
10}
The patch itself looks like this:
diff --git a/Classes/Utility/GeneralUtility.php b/Classes/Utility/GeneralUtility.php
index be47cfe..08fd6fc 100644
--- a/Classes/Utility/GeneralUtility.php
+++ b/Classes/Utility/GeneralUtility.php
@@ -2282,17 +2282,24 @@
      */
     public static function createVersionNumberedFilename($file)
     {
+        $isFrontend = ($GLOBALS['TYPO3_REQUEST'] ?? null) instanceof ServerRequestInterface
+            && ApplicationType::fromRequest($GLOBALS['TYPO3_REQUEST'])->isFrontend();
         $lookupFile = explode('?', $file);
         $path = $lookupFile[0];

-        if (($GLOBALS['TYPO3_REQUEST'] ?? null) instanceof ServerRequestInterface
-            && ApplicationType::fromRequest($GLOBALS['TYPO3_REQUEST'])->isFrontend()
-        ) {
+        if ($isFrontend) {
             $mode = strtolower($GLOBALS['TYPO3_CONF_VARS']['FE']['versionNumberInFilename']);
             if ($mode === 'embed') {
                 $mode = true;
Apply the patch by running the following command:
composer install
Note
Changes to the patch file after the patch was applied successfully will
not be automatically applied. In that case delete the installed sources
and execute composer install once more.
If applying the patch fails, you may get a cryptic error message like:
Example error message

Could not apply patch! Skipping. The error was: Cannot apply patch patches/Bug-98106.diff
You can get a more verbose error message by calling:
composer install -vvv
Creating a diff from a Core change
You can choose between two methods:
Apply a core patch manually
In case a new Core version has not been released yet, but you urgently need to apply a certain patch, you can download that patch from the corresponding change on https://review.typo3.org/.
Choose Download patch from the option menu (3 dots on top of each other):
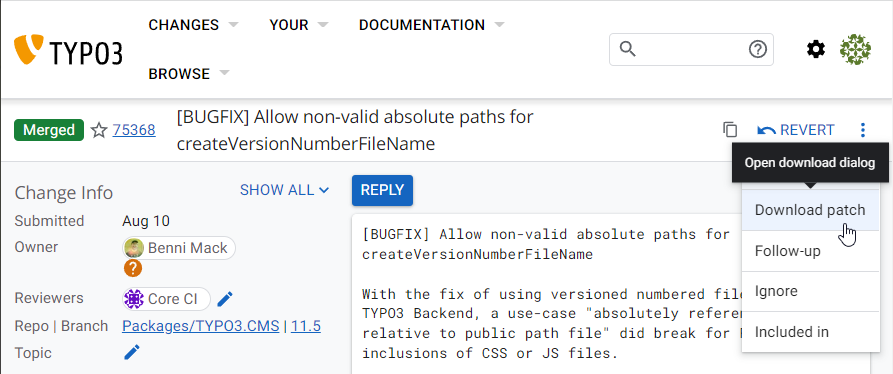
Download patch in the option menu
Then choose your preferred format from the section Patch file.
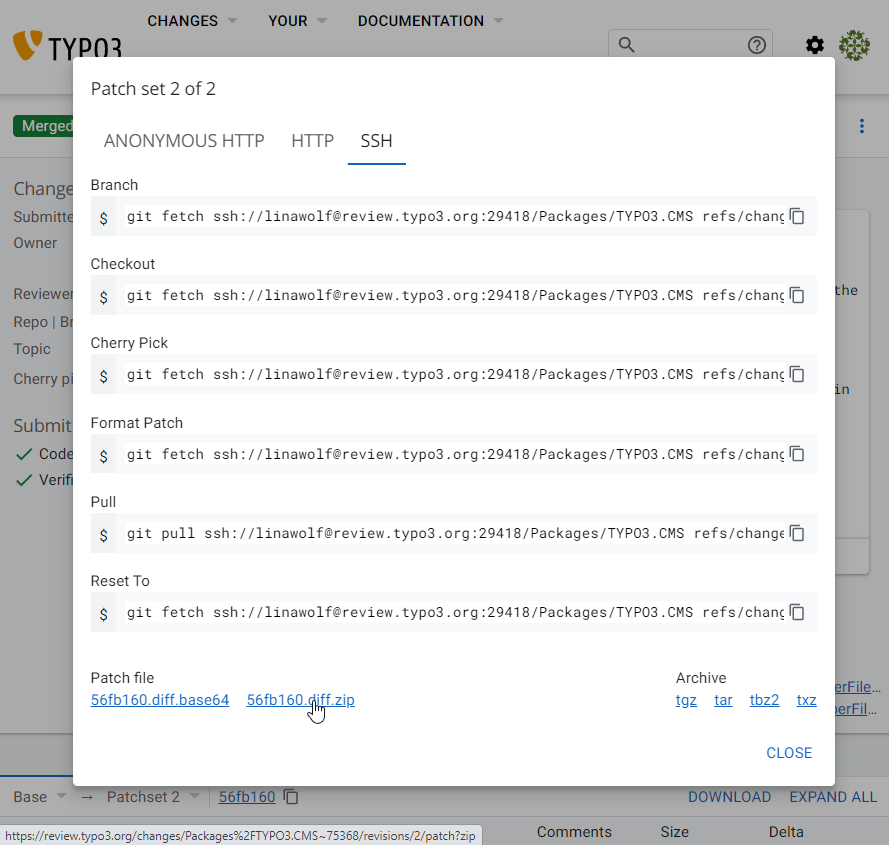
Download Patch file
Unzip the diff file and put it into the folder patches of your project.
Core diff files are by default relative to the typo3 web-dir directory.
And they can contain changes to more than one system extension. Furthermore
they often contain changes to files in the directory Tests that is not
present in a Composer based installation.
When you plan to apply the diff by Automatic patch application with cweagans/composer-patches you will need to manually adjust the patch file:
Remove all changes to the directory Tests and other files or directories
that are not present in your installation's source. Change all paths to be
relative to the path of the extension that should be changed. If more then
one extension needs to be changed split up the patch in several parts, one for
each system extension.
For example the following patch contains links relative to the web root and contains a test:
diff --git a/typo3/sysext/core/Classes/Utility/GeneralUtility.php b/typo3/sysext/core/Classes/Utility/GeneralUtility.php
index be47cfe..08fd6fc 100644
--- a/typo3/sysext/core/Classes/Utility/GeneralUtility.php
+++ b/typo3/sysext/core/Classes/Utility/GeneralUtility.php
@@ -2282,17 +2282,24 @@
      */
     public static function createVersionNumberedFilename($file)
     {
+        $isFrontend = ($GLOBALS['TYPO3_REQUEST'] ?? null) instanceof ServerRequestInterface
+            && ApplicationType::fromRequest($GLOBALS['TYPO3_REQUEST'])->isFrontend();
         $lookupFile = explode('?', $file);
         $path = $lookupFile[0];
-        if (($GLOBALS['TYPO3_REQUEST'] ?? null) instanceof ServerRequestInterface
-            && ApplicationType::fromRequest($GLOBALS['TYPO3_REQUEST'])->isFrontend()
-        ) {
+        if ($isFrontend) {
             $mode = strtolower($GLOBALS['TYPO3_CONF_VARS']['FE']['versionNumberInFilename']);
             if ($mode === 'embed') {
                 $mode = true;
diff --git a/typo3/sysext/core/Tests/Unit/Utility/GeneralUtilityTest.php b/typo3/sysext/core/Tests/Unit/Utility/GeneralUtilityTest.php
index 68e356e..0ef4b80 100644
--- a/typo3/sysext/core/Tests/Unit/Utility/GeneralUtilityTest.php
+++ b/typo3/sysext/core/Tests/Unit/Utility/GeneralUtilityTest.php
@@ -4099,4 +4102,42 @@

         self::assertMatchesRegularExpression('/^.*\/tests\/' . $uniqueFilename . '\.[0-9]+\.css/', $versionedFilename);
     }
+
+    /**
+     * @test
+     */
+    public function createVersionNumberedFilenameKeepsInvalidAbsolutePathInFrontendAndAddsQueryString(): void
+    {
+        doSomething();
+    }
Remove the tests and adjust the paths to be relative to the system extension Core:
diff --git a/Classes/Utility/GeneralUtility.php b/Classes/Utility/GeneralUtility.php
index be47cfe..08fd6fc 100644
--- a/Classes/Utility/GeneralUtility.php
+++ b/Classes/Utility/GeneralUtility.php
@@ -2282,17 +2282,24 @@
      */
     public static function createVersionNumberedFilename($file)
     {
+        $isFrontend = ($GLOBALS['TYPO3_REQUEST'] ?? null) instanceof ServerRequestInterface
+            && ApplicationType::fromRequest($GLOBALS['TYPO3_REQUEST'])->isFrontend();
         $lookupFile = explode('?', $file);
         $path = $lookupFile[0];

-        if (($GLOBALS['TYPO3_REQUEST'] ?? null) instanceof ServerRequestInterface
-            && ApplicationType::fromRequest($GLOBALS['TYPO3_REQUEST'])->isFrontend()
-        ) {
+        if ($isFrontend) {
             $mode = strtolower($GLOBALS['TYPO3_CONF_VARS']['FE']['versionNumberInFilename']);
             if ($mode === 'embed') {
                 $mode = true;
Apply a core patch automatically via gilbertsoft/typo3-core-patches
With the help of the Composer package gilbertsoft/typo3-core-patches a Core
patch can be applied automatically. It works on top of
cweagans/composer-patches. You need at least
PHP 7.4 and composer 2.0.
First, install the package:
composer req gilbertsoft/typo3-core-patches
Then look up the change ID on review.typo3.org <https://review.typo3.org/>.
You can find it in the URL or left of the title of the change. In the example
it's 75368.

Look up the change id
Now execute the following command with your change ID:
composer typo3:patch:apply <change-id>
You can find more information about the package and its usage in the documentation.
Migrate a TYPO3 project to Composer
Requirements
TYPO3 version
Composer packages for TYPO3 can be found on packagist.org down to version 6.2.0: typo3/cms-*.
Composer
Composer is a program that is written in PHP. Instructions for downloading and installing Composer can be found on getcomposer.org.
Your host needs to be able to execute the composer binary.
Folder structure
If the root folder of your project is identical to your web root folder, you
need to change this. Composer will add a vendor/ folder to your project
root, and if your project root and your web root are identical, this can
be a security issue: files in the vendor/ folder could be directly
accessible via HTTP request.
Bad:
$ tree typo3_root
├── index.php
├── fileadmin/
├── typo3/
├── typo3conf/
└── typo3temp/
You will need a web root folder in your project. You can find many
tutorials with different names for your web root folder (e.g. www/,
htdocs/, httpdocs/, wwwroot/, html/).
The truth is: the name does not matter because we can configure it in the
settings in a later step. We will use public/ in our example.
Bad:
$ tree typo3_root
└── cms/ (web root)
    └── public/
        ├── index.php
        ├── fileadmin/
        ├── typo3/
        ├── typo3conf/
        └── typo3temp/
Here you would access the installation via https://example.com/cms/public/index.php,
which would also be a security issue as any other directory outside of the
dedicated project root directory could be accessible.
Also having a directory structure like that can create file and directory resolving issues within the TYPO3 backend.
Good:
$ tree typo3_root
└── public/
    ├── index.php
    ├── fileadmin/
    ├── typo3/
    ├── typo3conf/
    └── typo3temp/
If you do not have such a web root directory, you will have to refactor your
project before proceeding. First, you create the new directory public/ and
basically move everything you have inside that subdirectory. Then check all
of your custom code for path references that need to be adjusted to add
the extra public/ part inside of it. Usually, HTTP(S) links are relative
to your root, so only absolute path references may need to be changed (e.g. cronjobs,
CLI references, configuration files, .gitignore, ...).
Please be aware that you very likely need to tell your web
server about the changed web root folder if necessary. You do that by changing a
DocumentRoot (Apache) or root (Nginx) configuration option. Most hosting
providers offer a user interface to change the base directory of your project.
For local development with DDEV or Docker <https://docker.com>
you will also need to adjust the corresponding configuration files.
Git version control, local development and deployment
This migration guide expects that you are working locally with your project and use Git version control for it.
If you previously used the TYPO3 Legacy installation (from a release ZIP) and did not yet use Git versioning, this is a good time to learn about version control first.
All operations should ideally take place in a separate branch of your Git repository. Only when everything is completed you should move your project files to your staging/production instance (usually via deployment, or via direct file upload to your site). If you do not yet use deployment techniques, this is a good time to learn about that.
Composer goes hand in hand with a good version control setup and a deployment workflow. The initial effort to learn about all of this is well worth your time, it will make any project much smoother and more maintainable.
Local development platforms like DDEV, Docker or XAMPP/WAMPP/MAMPP allow you to easily test and maintain TYPO3 projects, based on these git, docker and composer concepts.
Of course you can still perform the Composer migration on your live site without version control and without deployment, but during the migration your site will not be accessible, and if you face any problems, you may not be able to easily revert to the initial state.
Code integrity
Your project must have the TYPO3 Core and all installed extensions in their original state. If you applied manual changes to the files, these will be lost during the migration steps.
Note
If you need to apply hotfixes or patches to system extensions or publicly available extensions, this tutorial about applying patches via Composer could help, but requires some advanced steps.
Migration steps
Note
If you are not familiar with Composer, please read the following documents first:
It is recommended to perform a Composer migration using the latest TYPO3 major release to prevent facing bugs and issues that have been solved already in newer versions. In case you are using an older TYPO3 version in Legacy installation mode, you have two viable options:
Upgrade TYPO3 Legacy first, then do the migration to Composer. This is probably more straight-forward, as you can follow the Legacy Upgrade Guide, and then this guide.
Migrate old TYPO3 version to Composer first, then perform the major upgrade. This might cause some friction, because you have to utilize older versions of
typo3/cms-composer-installersand dependencies likehelhum/typo3-consoleor outdated extensions on Packagist. You will also need to inspect older versions of this guide that matches your old TYPO3 version, using the version selector of the documentation.
Delete files
Make a backup first! If things go wrong, you can at least go back to the old version. You need a backup of
all files of your TYPO3 installation (by using FTP, SCP, rsync, or any other method)
the database (by exporting the database to an SQL file)
Also, you may prefer to upgrade a copy of your site first, if there have been a lot of changes and some of them might interfere with functions of your site. See the changelog to check that.
For more detailed information about TYPO3 backups see Backup strategy in TYPO3 Explained.
Yes, that's true. You have to delete some files, because they will be created by Composer in some of the next steps.
You have to delete public/index.php, public/typo3/ and all the
extensions inside public/typo3conf/ext/ that you have downloaded from the TYPO3 Extension Repository (TER) or any
other resources like GitHub. You even have to delete your own extensions, if
they are available in a separate Git repository and, for example, included as
Git submodule.
Please keep only your sitepackage extension or any other extension, which was explicitly built for your current project and does not have an own Git repository.
Configure Composer
Create a file with name composer.json in your project root, not inside your web root.
You can use the composer.json from typo3/cms-base-distribution as an
example. Use the file from the branch which matches your current version, for
example 12.x.
However, this may require extensions you don't need or omit extensions you do need, so be sure to update the required extensions as described in the next sections.
You can also create the composer.json file via a composer init command.
Or use the TYPO3 Composer Helper.
Also advanced project builders like CPS-IT project-builder
help you to initialize this most vital file of a Composer project with a
guided approach.
Hint
If you see versions of the composer.json for versions older than TYPO3 v12,
you may see references to a scripts section that would make use of
helhum/typo3-console, and which
also would need to be required as a package in your newly created composer.json.
This is optional.
You can look at previous versions of the Base Distribution's composer.json, for differences between the TYPO3 versions.
Add all required packages to your project
You can add all your required packages with the Composer command composer
require. The full syntax is:
composer require anyvendorname/anypackagename:version
Example:
composer require "typo3/minimal:^12"
This will utilize the Packagist repository by default, which is the de-facto standard for any Composer package.
Composer packages usually rely on a concept called SemVer <https://semver.org/ (semantic
versioning). This splits any version number into three parts:
Major version (1.x.x)
Minor version (x.1.x)
Patch-level (x.x.1)
Only a major version should have intentional breaking changes (like new API, changed configuration directives, removed functionality).
New features can only be introduced via a new minor version (unless it is breaking).
Patch-level releases only fix bugs and security issues and should never add relevant features or even breaking changes.
By relying on this, the Composer version constraints of any installed package allow you to continuously update involved packages with an expected outcome (no breaking changes or non-working functionality).
There are different ways to define the version of the package you want
to install. The most common syntaxes start with ^ (e.g.
^12.4) or with ~ (e.g. ~12.4.0). A full documentation can be
found at https://getcomposer.org/doc/articles/versions.md
In short:
^12.4or^12.4.0tells Composer to add newest package of version12.\*with at least12.4.0. When a package releases version12.9.5, you would receive that version. A version13.0.1would not be fetched. So this allows any new minor or patch-level version, but no new major version.~12.4.0tells Composer to add the newest package of version12.4.\*with at least12.4.0, but not version12.5.0or13.0.1. This would only fetch newer patch-level versions of a package.
You have to decide by yourself, which syntax fits best to your needs.
This applies to both the TYPO3 Core packages as well as extension packages, or even TYPO3-unrelated dependencies.
As a first step, you should only pick the TYPO3 Core extensions to ensure your setup works, and add third-party dependencies later.
Install the Core
Once the composer.json is updated accordingly, you can
install additional system extensions:
composer require typo3/minimal:^12.4
composer require typo3/cms-scheduler:^12.4
composer require ...
Or in one line:
composer require typo3/minimal:^12.4 typo3/cms-scheduler:^12.4 ...
To find the correct package names, you can either take a look in the
composer.json of the related system extension or follow the naming
convention
typo3/cms-<extension name with dash "-" instead of underscore "_">,
e.g. typo3/cms-fluid-styled-content. You can also go to Packagist
and search for typo3/cms- to see all listed packages.
Note
To find out all TYPO3 Core packages, you can visit the TYPO3 Composer Helper website. https://get.typo3.org/misc/composer/helper From this website, you can select TYPO3 Core Packages you need and generate the Composer command to require them.
Install extensions from Packagist
You already know the TYPO3 Extension Repository (TER) and always used it to install extensions? Fine. But with Composer, the required way is to install extensions directly from Packagist.
This is the usual way for most extensions used today. Alternatively, some extension
authors or commercial providers offer a custom Composer repository that you can
use (see below). The usage via composer require remains the same.
To install any TYPO3 extension, you need to know the package name. There are multiple ways to find it:
Notice on extension's TER page
Extension maintainers optionally can link their TYPO3 extension in TER with the according Composer package name on Packagist. Most maintainers already did that and if you search the extension in TER, you will see a message, which command and Composer package name you can use to install this extension.
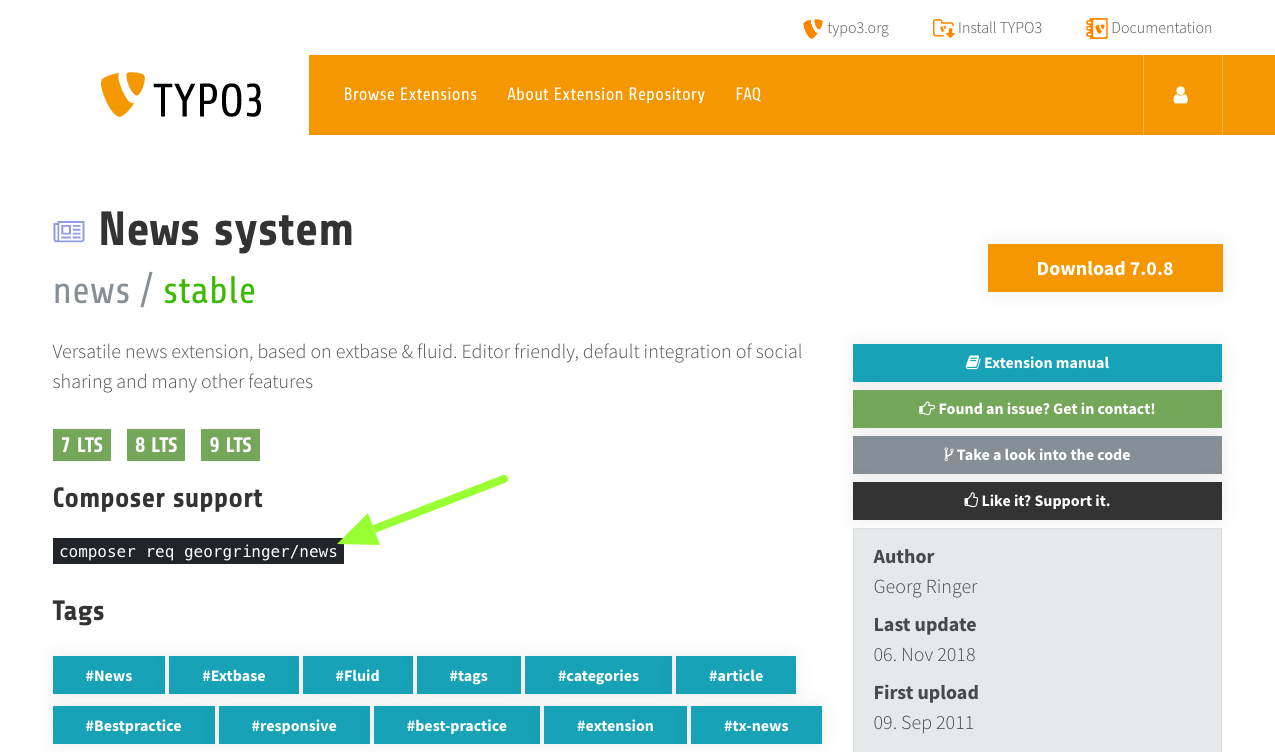
Note
The command composer req is short for composer require. Both commands
exactly do the same and are interchangeable.
Search on Packagist
Packagist provides a flexible and quick search. Often you can search for the known TYPO3 extension key or name of the extension, and you will most likely find the package you are looking for.
Check manually
This is the most exhausting way. But it will work, even if the extension maintainer does not provide additional information.
Search and open the extension, you want to install, in TER.
Click button "Take a look into the code".
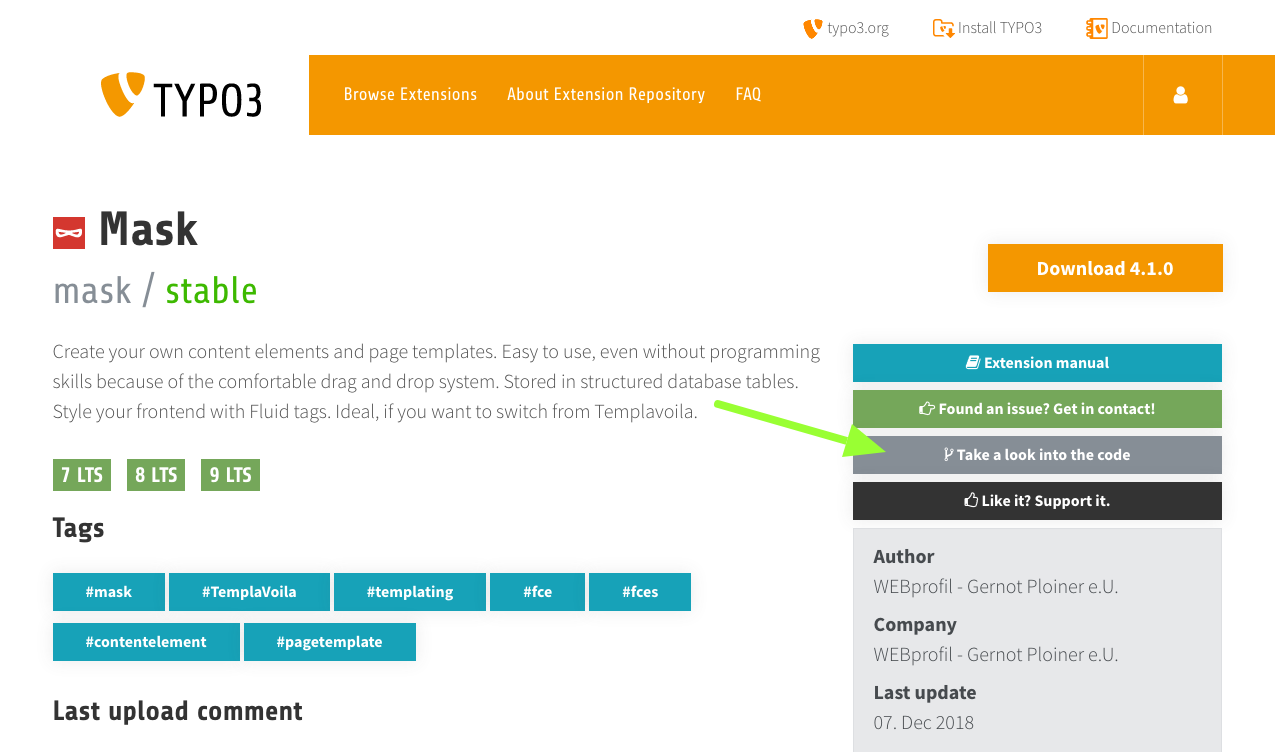
Open file
composer.json.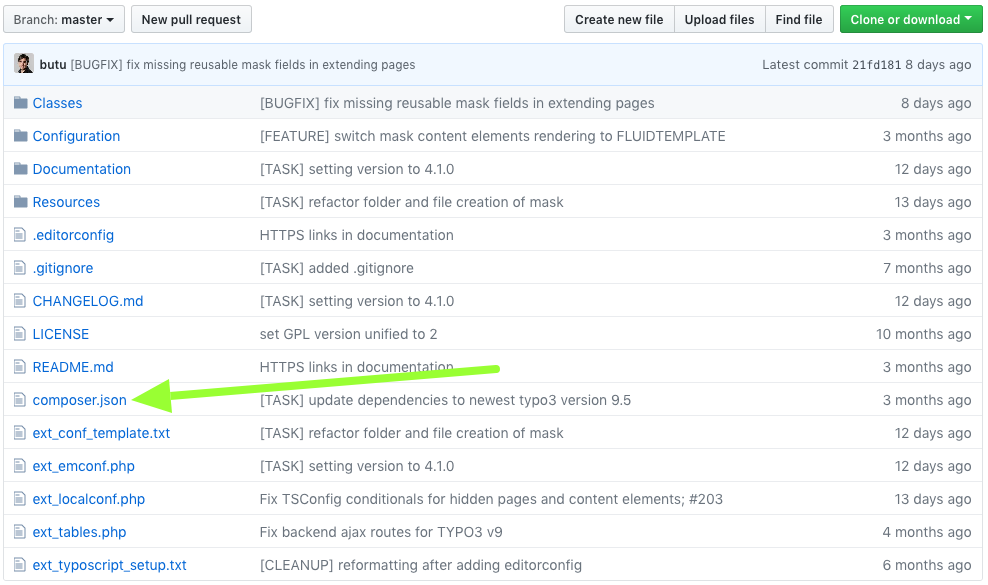
Search for line with property
"name", it's value should be formatted likevendor/package.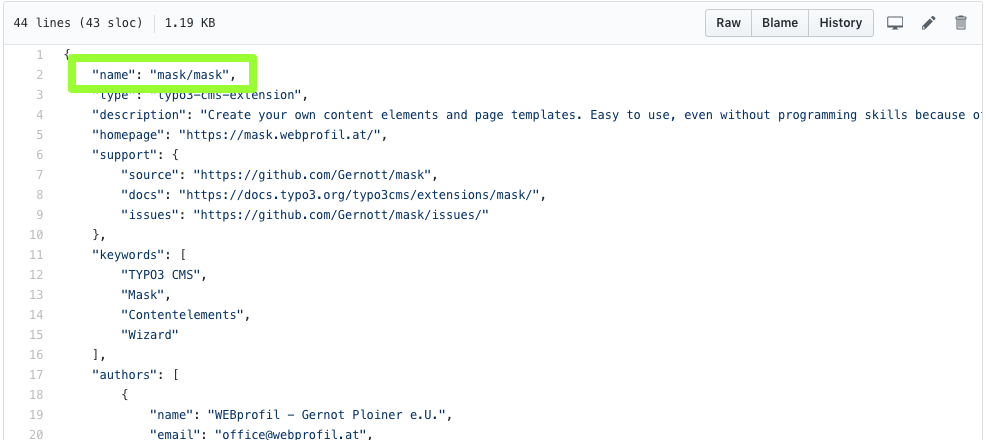
Check, if the package can be found on Packagist.
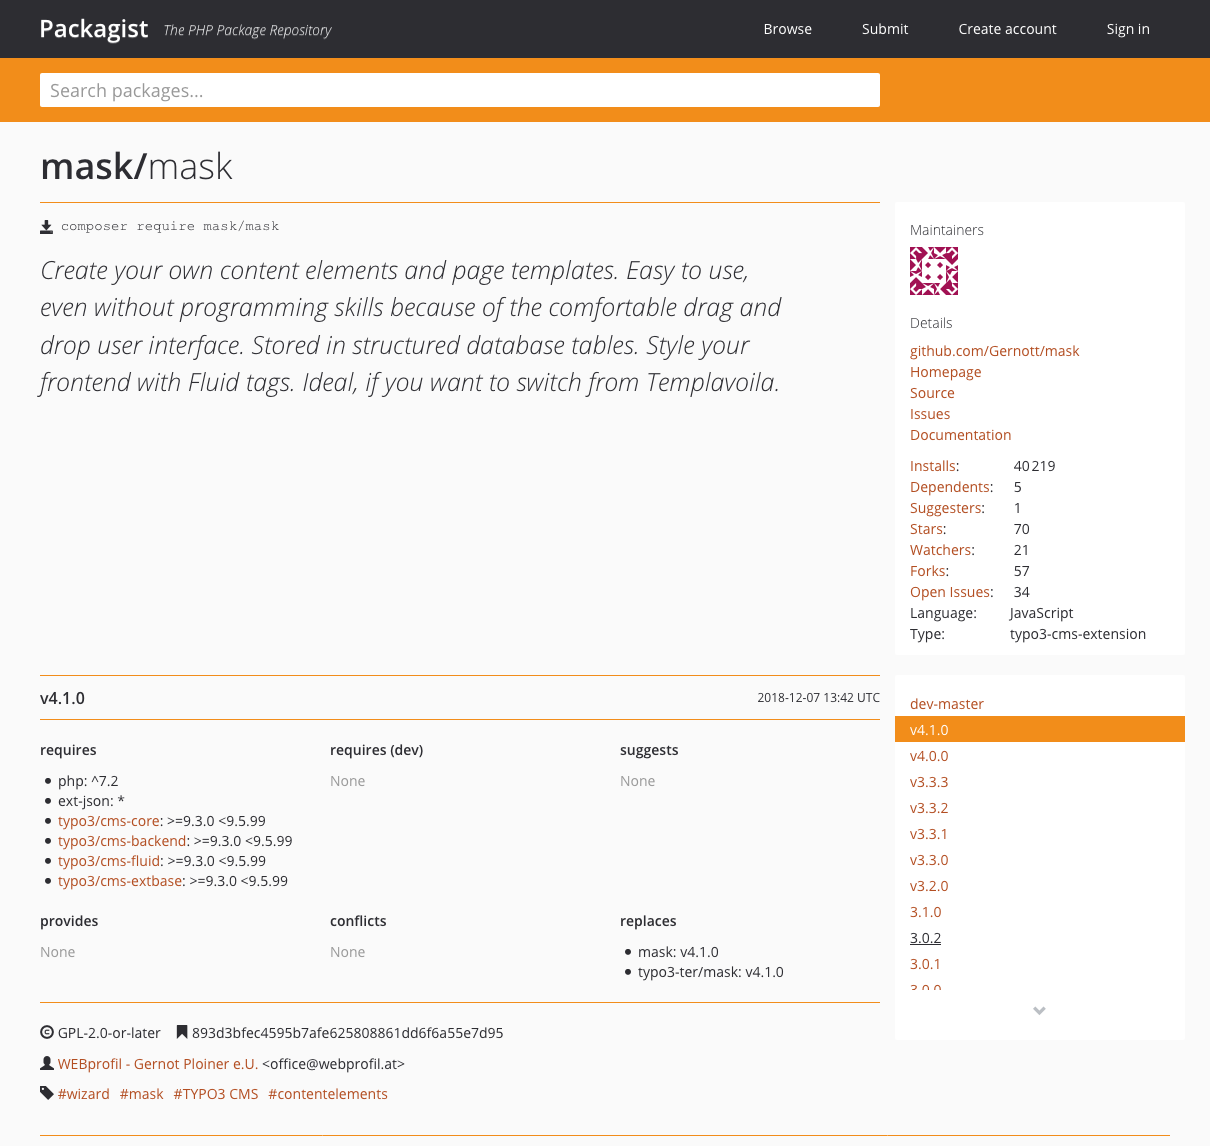
Example: To install the mask extension in version 8.3.*, type:
composer require mask/mask:~8.3.0
Install extension from version control system (e.g. GitHub, Gitlab, ...)
In some cases, you will have to install a TYPO3 extension, which is not available on Packagist or in the TER. Examples could be:
non-public extension only used by your company.
you forked and modified an existing extension.
commercial plugin / licensed download / Early Access (EAP)
As first step, you have to define the repository in your
composer.json section repositories. In this example, you find the
additional lines added to the composer.json from above:
 {
     "repositories": [
         {
             "type": "vcs",
             "url": "https://github.com/foo/bar.git"
         }
     ],
     "extra": {
         "typo3/cms": {
             "web-dir": "public"
         }
     }
 }
Ideally you should not manually edit a composer.json file, but instead
utilize the Composer command to manipulate the file, like this:
composer config repositories.foo-bar vcs https://github.com/foo/bar.git
The Git repository must point to a TYPO3 extension that provides a
composer.json itself.
See composer.json for details on how these files should look like.
Git tags of the repository will be used as version numbers.
Apart from only adding a single Git repository, you can also add Composer repositories that aggregate multiple packages through tools like Satis, or also Private Packagist repositories.
If you fulfill these requirements, you can add your extension in the same way like the other examples:
composer require foo/bar:~1.0.0
Include individual extensions like site packages
A project will often contain custom extensions, and at the least a sitepackage that provides the TYPO3-related project templates and configuration.
Before TYPO3 v12, these extensions were stored in a directory like typo3conf/ext/my_sitepackage.
In Composer mode, you can easily add a custom repository within your project
of the type path. This allows you to require your sitepackage as if it was
a normal package. By doing this, you do not need to publish your sitepackage to a repository like
GitHub, or publish a package on Packagist.
Usually these extensions are saved in a directory like <project_root>/packages/
or <project_root>/extensions/ (and no longer in typo3conf/ext/), so you would use:
composer config repositories.local_packages path './packages/*'
composer require myvendor/sitepackage
This also means that your sitepackage needs to be contained in its own directory like
<project_root>/packages/my_sitepackage/ and provide a composer.json file
within that directory. That composer.json file would also list all the possible
autoloading information of PHP classes that your sitepackage uses:
{
     "autoload": {
         "psr-4": {
             "MyVendor\\Sitepackage\\": "Classes/"
         }
     }
}
Directory locations are always relative to where the extension-specific composer.json is
stored.
Do not mix up the project-specific composer.json file with this package-specific composer.json
file. Since autoloading information is specific to an extension, you usually do not list it in the
project file.
To complete our example project's composer.json, it would look like this:
{
    "repositories": [
        {
            "type": "vcs",
            "url": "https://github.com/foo/bar.git"
        },
        {
            "type": "path",
            "url": "./packages/*"
        },
    ],
    "extra": {
        "typo3/cms": {
            "web-dir": "public"
        }
    }
}
After adding or changing paths in the autoload section you should run composer dumpautoload. This command
will re-generate the autoload information and should be run anytime you add new paths to the autoload section
in the composer.json.
After all custom extensions are moved away from typo3conf/ext/ you can remove the directory
from your project. You may also want to adapt your .gitignore file to remove any entries
related to that old directory.
New file locations
As final steps, you should move some files because the location will have changed for your site since moving to Composer.
The files listed below are internal files that should not be exposed to
the webserver, so they are moved outside the public/ structure,
in parallel to vendor/.
You should at least move the site configuration and the translations.
Move files:
mv public/typo3conf/sites config/sites
mv public/typo3temp/var var
mv public/typo3conf/l10n var/labels
Important
The var directory may already exist. In that case, move the files
individually. You can also delete the "old" files in
public/typo3temp/var, unless you need to keep the log files
or anything else that may still be relevant.
These locations have changed, note that TYPO3 v12+ moved some more configuration files to a new directory than TYPO3 v11:
Before |
After |
|---|---|
|
|
|
|
|
|
|
|
|
|
|
|
|
|
|
|
|
removed |
|
removed (replaced by |
N/A |
|
Have a look at Directory structure in "TYPO3 Explained". As developer, you should also be familiar with the Environment API.
Version control
Add to version control system
If you use a version control system such as Git (and you really should!), it is
important to add both files composer.json and composer.lock
(which were created automatically during the previous steps). The
composer.lock file keeps track of the exact versions that are installed,
so that you are on the same versions as your co-workers (and when deploying to
the live system).
Note
It is always good practice to exclude passwords from checked-in files
(for example, config/system/settings.php). A solution may be to add
the setting containing sensitive information to
config/system/additional.php and use an .env file in the
project directory to configure the password and other configuration along
with helhum/dotenv-collector.
Additionally, some files and folders added by Composer should be excluded:
public/index.phppublic/typo3/public/typo3conf/ext/vendor/
A .gitignore file could look like this:
/var/*
!/var/labels
/vendor/*
/public/index.php
/public/typo3/*
Checkout from version control system
All your co-workers should always run composer install after they have
checked out the files. This command will install the packages in the appropriate
versions defined in composer.lock. This way, you and your co-workers
always have the same versions of the TYPO3 Core and the extensions installed.
Maintaining versions / composer update
In a living project, from time to time you will want to raise the versions of the extensions or TYPO3 versions you use.
The proper way to do this is to update each package one by one (or at least grouped with explicit names, if some packages belong together):
composer update georgringer/news helhum/typo3-console
You can also raise the requirements on certain extensions if you want to include a new major release:
composer require someVendor/someExtension:^3.0
For details on upgrading the TYPO3 Core to a new major version, please see Upgrade the Core.
While it can be tempting to just edit the composer.json file manually,
you should ideally use the proper composer commands to not introduce
formatting errors or an invalid configuration.
You should avoid running composer update without specifying package names
explicitly. You can use regular maintenance automation (for example via
Dependabot) to regularly update dependencies
to minor and patch-level releases, if your dependency specifications are set up
like this.
After any update, you should commit the updated composer.lock file to your
Git repository. Ideally, you add a commit message which composer command(s) you
specifically executed.
Migrate content
Maybe you have already done a lot of work on your TYPO3 installation and even built more than one homepage with it. Now you want to copy parts of one homepage to another installation.
This method won't copy any of your installed extensions. You have to take care of moving them yourself. Records stored on root level (such as sys_file) records don't get exported automatically.
Prerequisites
If the menu entries Export and Import are missing
from your page tree's context menu check that the system extension
impexp is loaded and installed.
On composer based installations it can be required via
composer req typo3/cms-impexp
Export your data
Via CLI command
Exporting a TYPO3 page tree without php time limit is possible via Symfony Console Commands (cli).
vendor/bin/typo3 impexp:export [options] [--] [<filename>]
Note
If your TYPO3 installation is not based on composer you can run the command
with typo3/sysext/core/bin/typo3 impexp:export instead.
and exports the entire TYPO3 page tree - or parts of it - to a data file of format XML or T3D, which can be used for import into any TYPO3 instance.
The export can be fine-tuned through the complete set of options also available in the export view of the TYPO3 backend: You can see the complete list of options by calling the help for the command:
vendor/bin/typo3 help impexp:export
Manual export from the TYPO3 backend
Go to the export module
On the page tree left click on the page from where you want to start the export. Select More options ...:
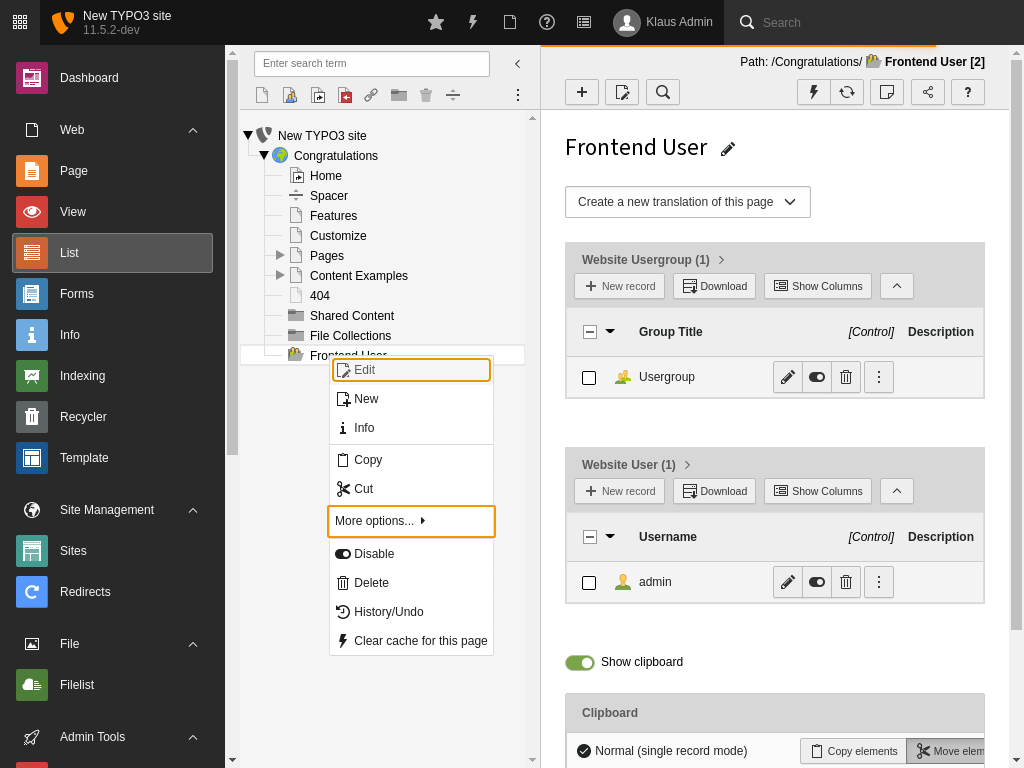
Select "More options..." from the context menu of the page tree
Then select Export from the context menu.
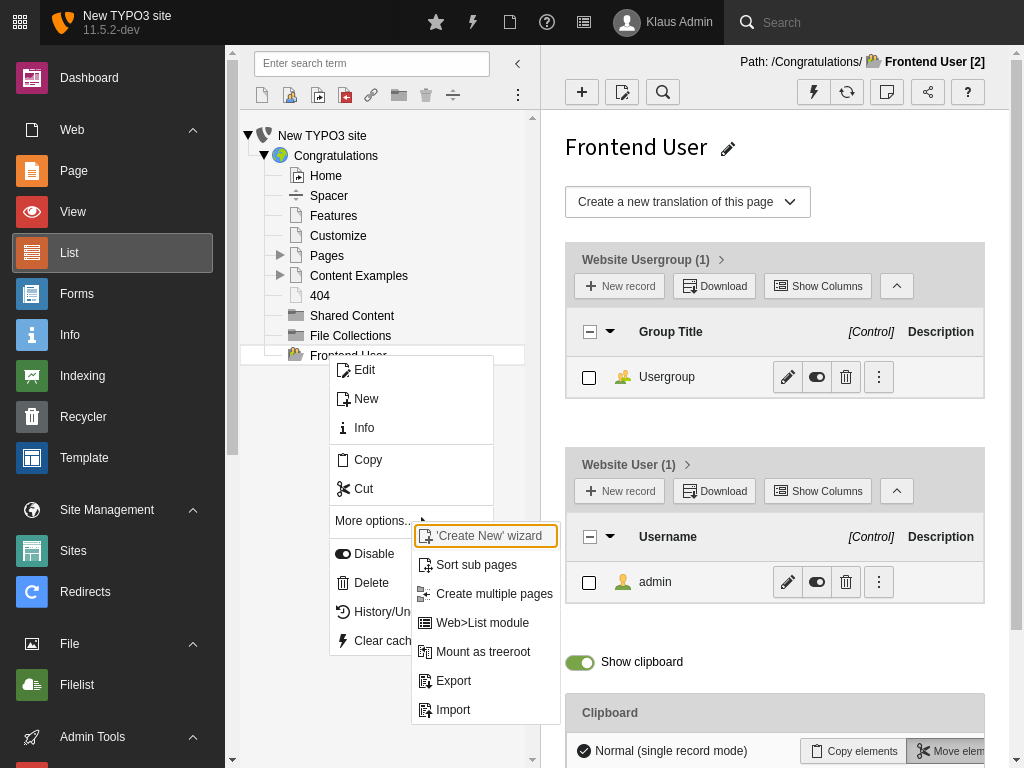
Select Then select "Export"
Select the tables to be exported
You can select the tables manually, from which you want to export the entries correlated with the selected page. It is also possible to include static relations to tables already present in the target installation.
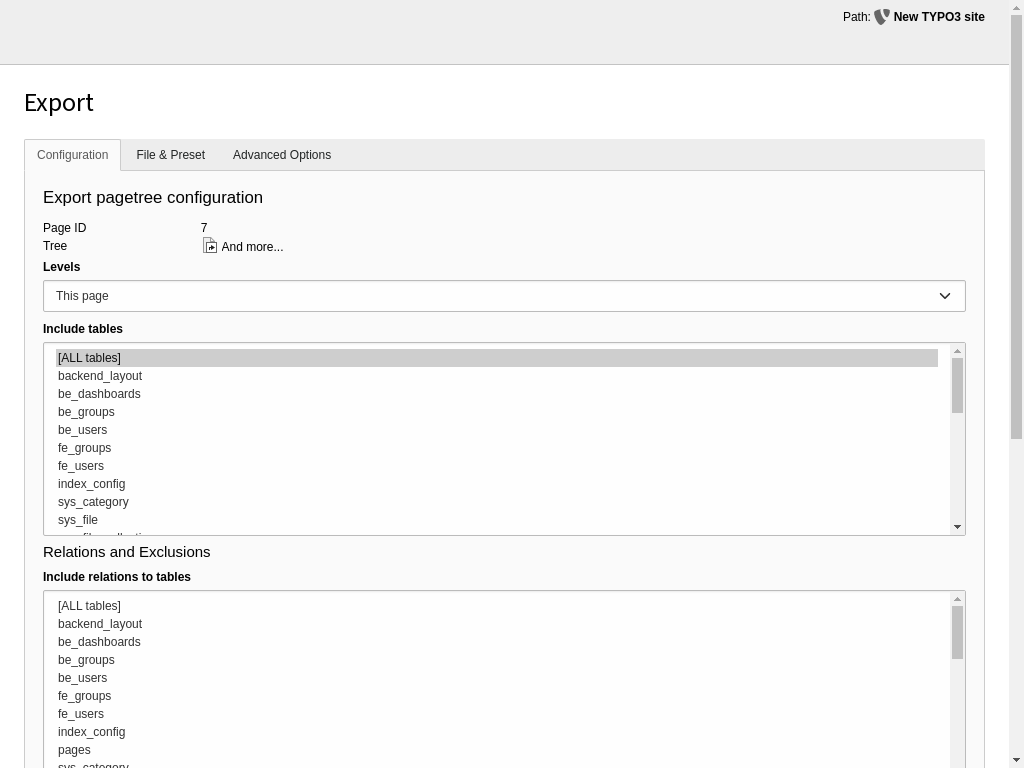
Select the tables to be exported
Choose number of levels to be exported
If you want to save all your data, including subpages, select 'Infinite' from the Levels select box and hit the Update Button at the end of the dialog.
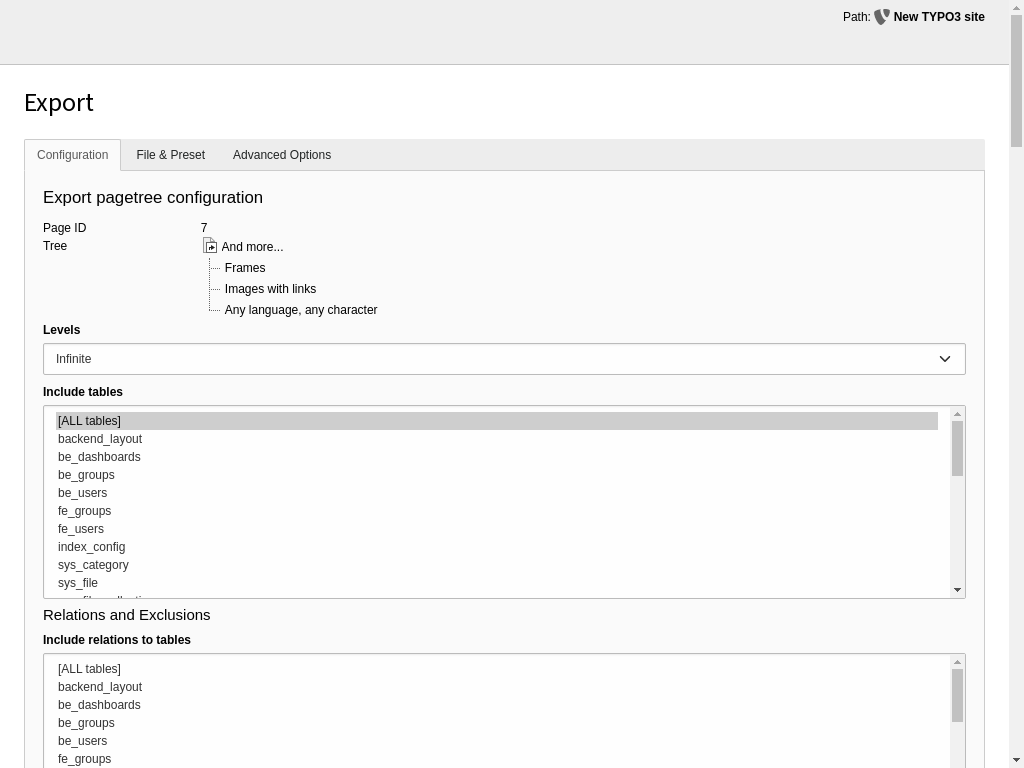
Select the page levels to be exported
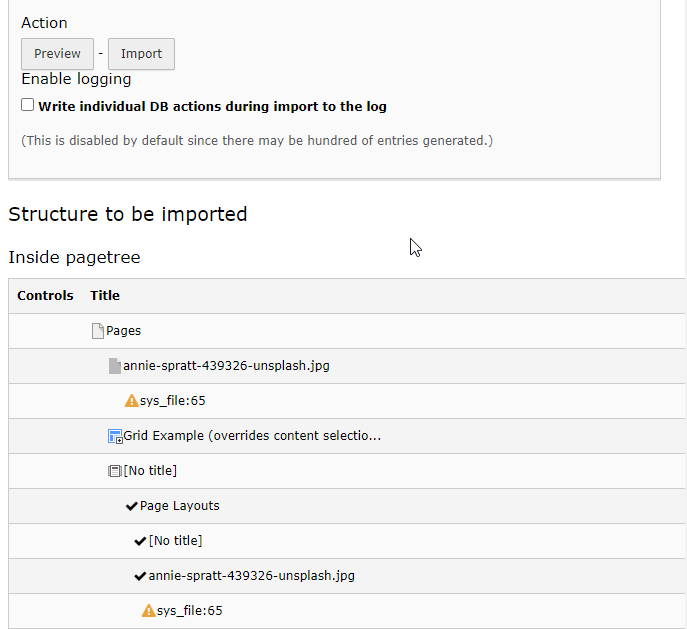
Check the included records
All included pages can be seen at the top of the dialog. Below the dialog there is a detailed list of all data to be exported. It is possible to exclude single records here. With some data types it is possible to make them manually editable.
When the relation to records are lost these will be marked with an orange exclamation mark. Reasons for lost relations include records stored outside the page tree to be exported and excluded tables.
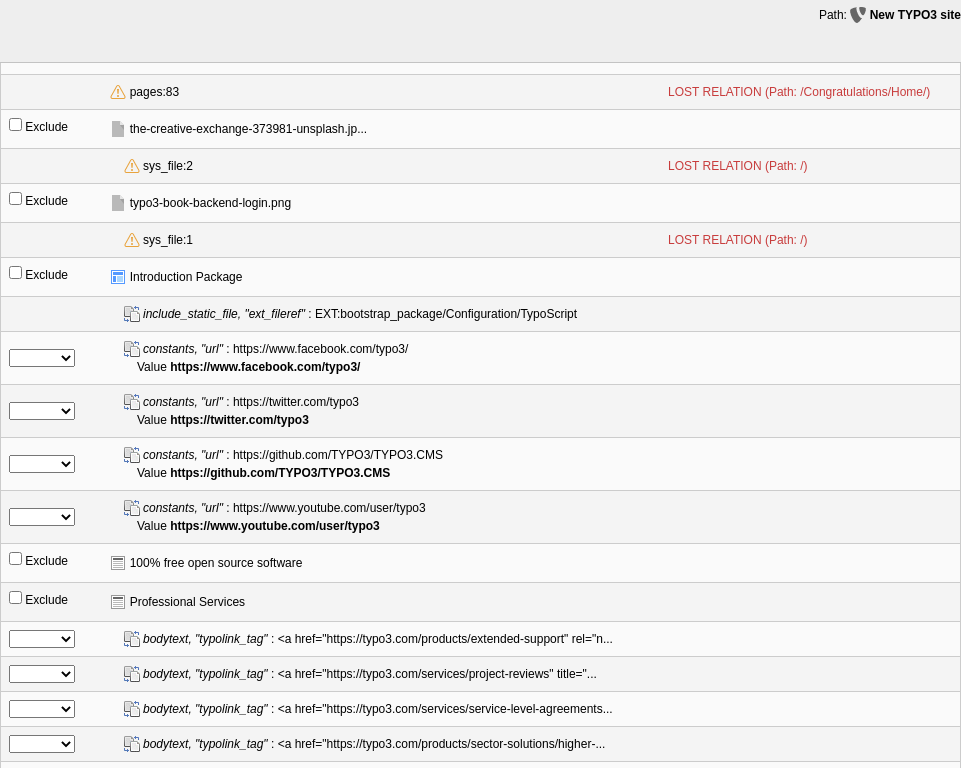
Check the exported data
Save or export the data
You can save the exported data to your server or download it in the tab File & Preset.
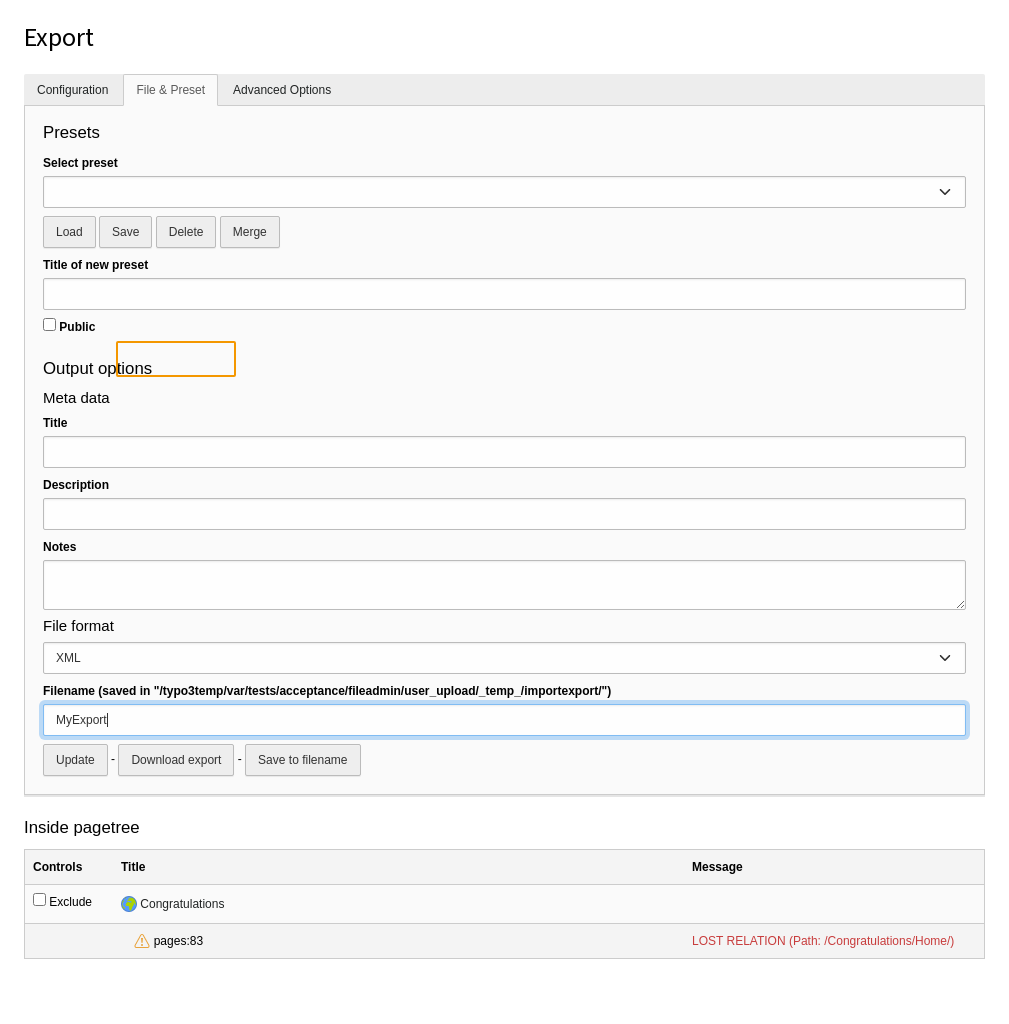
Download the export data
Import your data
Note
Make sure all needed extensions are installed and the database scheme is up to date before starting the import. Otherwise the data related to non-existing tables will not get imported.
Via CLI command
Importing a TYPO3 page tree without php time limit is possible via Symfony Console Commands (cli).
vendor/bin/typo3 impexp:import [options] [--] [<filename>]
Note
If your TYPO3 installation is not based on composer you can run the command
with typo3/sysext/core/bin/typo3 impexp:import instead.
The import can be fine-tuned through the complete set of options also available in the import view of the TYPO3 backend. You can see the complete list of options by calling the help for the command:
vendor/bin/typo3 help impexp:import
Manual import from the TYPO3 backend
Upload the export file
Upload the file to your destination TYPO3 installation. Just like the export module you find the import module in the page tree context menu More options... -> Import. Choose the page whose subpage the imported page should be as starting point for the import. If you want to import the data at root-level, choose the
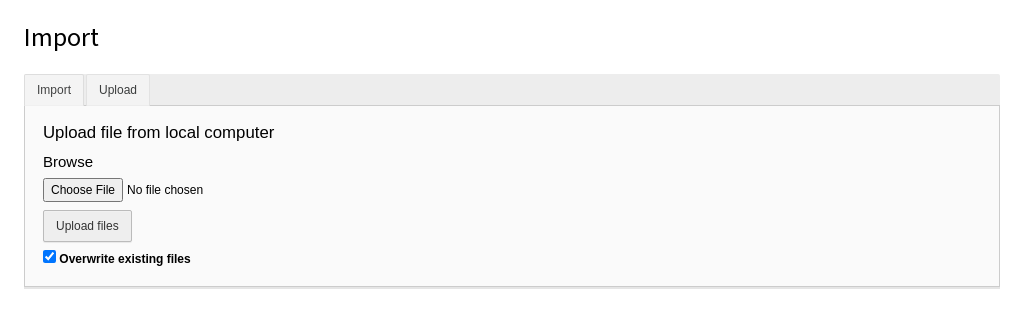
Upload the export data
Preview the data do be imported
A tree with the records to be imported gets displayed automatically. If you change some options you can reload this display with the preview button.
Preview the data
Import
Click the import button.
Importing data from old TYPO3 versions
The data structure for content exports has hardly changed since the early ages of TYPO3. It is possible to export content from TYPO3 installations that are 15 and more years old into modern TYPO3 Installations.
The following shows the export dialog of TYPO3 installation of version 3.8.0. It is often more feasible to use the Import / Export tool then to attempt to update very old TYPO3 installations.
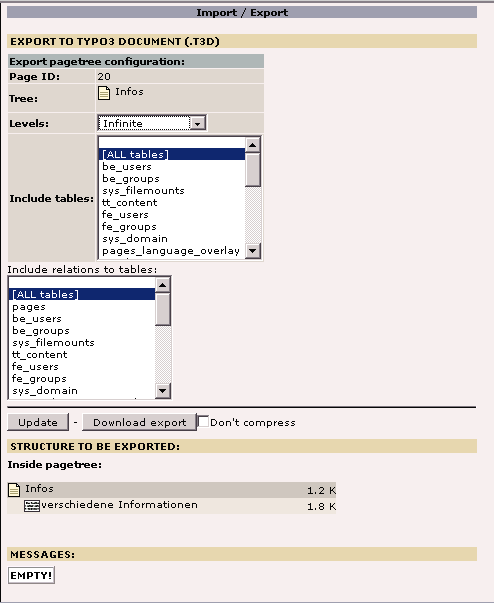
Export module of TYPO3 3.8.0 (year 2005)