DEPRECATION WARNING
This documentation is not using the current rendering mechanism and is probably outdated. The extension maintainer should switch to the new system. Details on how to use the rendering mechanism can be found here.
Frontend editing with aloha
| Created: | 2010-02-18T17:33:18 |
|---|---|
| Changed by: | Georg Ringer |
| Changed: | 2011-10-06T11:17:09.030000000 |
| Classification: | aloha |
| Keywords: | forAdmins, forBeginners, forIntermediates |
| Author: | Georg Ringer |
| Email: | aloha@cyberhouse.at |
| Info 4: | |
| Language: | en |

 Frontend editing with aloha - aloha
Frontend editing with aloha
Extension Key: aloha
Language: en
Keywords: forAdmins, forBeginners, forIntermediates
Copyright 2000-2011, Georg Ringer, <aloha@cyberhouse.at>
This document is published under the Open Content License
available from http://www.opencontent.org/opl.shtml
The content of this document is related to TYPO3
- a GNU/GPL CMS/Framework available from www.typo3.org
Table of Contents
`Introduction 3 <#__RefHeading__631_1515241928>`_
`Users manual 6 <#__RefHeading__639_1515241928>`_
`Configuration 7 <#__RefHeading__647_1515241928>`_
`Extended 9 <#__RefHeading__2454_786103024>`_
Introduction
What does it do?
This extension implements a powerful frontend editing by integrating the awesome Aloha . For the first time, true inline editing is possible within TYPO3 v4.
Features / What is possible
- Inline editing of text of the content elements “Text”, “Text with Images”, “Table”, “List”
- Inline editing of all headers of content elements.
- Inline editing wherever it is enabled by using
- TypoScript for pibased based extensions & fields.
- An integrated ViewHelper for fluid based extensions
- Different possibilities for saving changes:
- Directly: Every change is directly saved in the database
- Intermediate: Changes are saved only if a Save-Button is pressed.
Screenshots
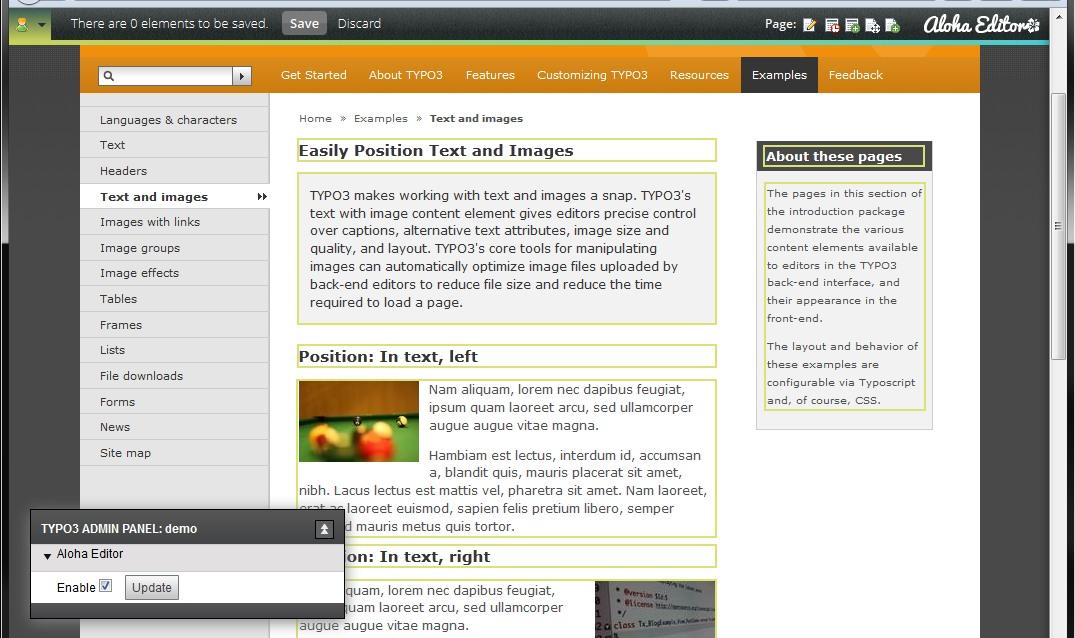
Image 1 : Editable areas are outlined
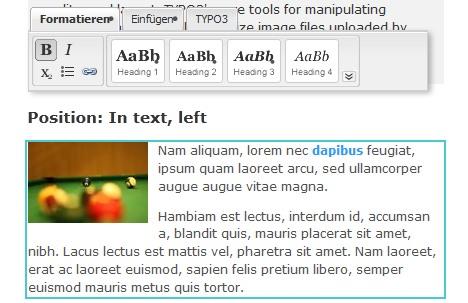 Image 2 : Inline editing let you see the impact of the
changes without any drawbacks
Image 2 : Inline editing let you see the impact of the
changes without any drawbacks

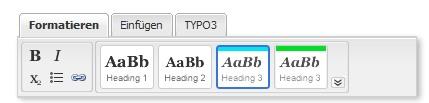
Image 3 : Available options depend on the editable area. Headers must not be styled by the editor but by the CMS

Image 4: TYPO3 specific actions
Presented by CYBERHOUSE
This extension has been created by CYBERHOUSE, a TYPO3 agency from Linz, Austria: http://www.cyberhouse.at/
Bugs & Features
Please use the bugtracker at forge to send your bug reports and feature requests: forge.typo3.org/projects/extension-aloha/issues .
Users manual
Installation & Enabling
The extension needs to be installed as any other extension of TYPO3. If you got a T3X file, just upload it in the Extension Manager and install the extension.
Add the Static TypoScript. There are 2 entries you need to select: “Aloha Basic” & “Aloha Modification”. You need both. More about those in the chapter “Configuration”,
Enable aloha in your TypoScript (Setup) by adding the lineconfig.aloha = 1
Enable aloha in your UserTsConfig by adding the linealoha = 1
If your editor wants to use aloha, he needs to actiivate it in the Admin Panel, therefore, the Admin Panel needs to be available too. You can use this lines in the UserTsConfig:
admPanel {
        enable.edit = 1
}
Configuration
TypoScript
The integration of aloha requires a custom stdWrap option. It behaves similar to the property editIcons which is used to render the old frontend editing icons. Looking at running code is sometimes the fastest way to explain something, therefor you should take a look at the file Configuration/TypoScript/Modification/setup.txt .
All you need to get aloha running for the content element “Text” are those lines:
01 tt_content.text.20.editIcons.beforeLastTag = 0
02 tt_content.text.20.alohaProcess = 1
03 tt_content.text.20.alohaProcess {
04      field = bodytext
05      allow = all
06 }
For explanation :
Line 01: removes the icons of the old frontend editing.
Line 02: enables Aloha
Line 04: adds the field which holds the value. This field is used to save the changes.
Line 05: sets the actions which are allowed.
field
Property
field
Description
Field of the table where the content comes from and where it should be saved.
allow
Property
allow
Description
Comma separated list of allowed actions. Possible values are: move, edit, link, hide, unhide, newContentElementBelow, delete. You can also set “all” to allow all.
nostyles
Property
nostyles
Description
Set it to 1 to allow no formatting styles of the content. This is e.g. useful for headers which must not be styled with bold, italic or whatever.
class
Property
class
Description
Add an additional class which can be used in the frontend for an additional styling
style
Property
style
Description
Similar to the property “class” but for setting an inline CSS style.
tag
Property
tag
Description
Define which HTML element is used for adding the aloha editor. Default is div but you can set e.g. a span
Aloha configuration
As aloha is done in JavaScript, the whole configuration is taking place in JavaScript too.
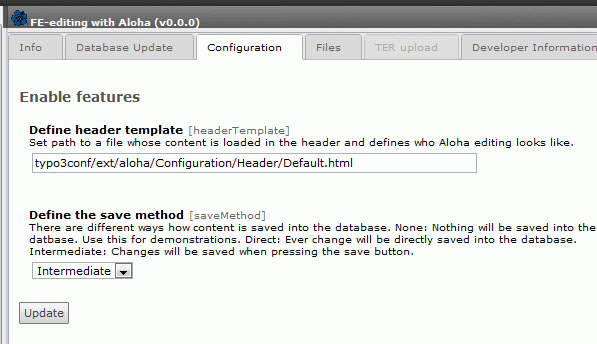
If you want to change the configuration, you need to change the template inside the Extension Manager's settings. The following screenshot shows the essential part.
Change the path of the template to one of your files.
The header templates holds the following files:
AlohaIntegration.css
File
AlohaIntegration.css
Description
Styling of the integration, especially the top bar
Aloha.css
File
Aloha.css
Description
Styling of aloha itself
Configuration.js
File
Configuration.js
Description
Configuration of integration of Aloha
Loading.js
File
Loading.js
Description
General JS stuff needed for aloha to work
Extended
Using Aloha with Fluid
There is a custom ViewHelper if you want to make your fluid based extension editable through aloha.
Using it is very simple:
<aloha:editable table="tx_news_domain_model_news" field="teaser" uid="{newsItem.uid}" configuration="{nostyles: 1}">
        {newsItem.teaser}
</aloha:editable>
table
Argument
table
Description
Name of the database table
field
Argument
field
Description
Name of the field inside the table
uid
Argument
uid
Description
UID of the record
configuration
Argument
configuration
Description
Optional configuration, see chapter “Configuration” for an explanation.
Adding custom headers
The default implementation makes it possible to use h1-h6 tags. Sometimes tags with additional classes are needed to allow more styling options for an editor.
For adding headers with classes, you need to change the settings inside the configuration.js.
01 "format": {
02      'h3' : ['fo', 'bar'],
03      config : [ 'b', 'i', 'sub', 'h1', 'h3','h3-1', 'h3-0','h2'],
04      editables : {
05              // no formatting allowed for title
06              '.nostyles'     : [ ]
07      }
08 },
Explanation
Line 02: There are 2 different h3 tags available: One with class “fo” and another one with “bar”.
Line 03: Those 2 need to be enabled by adding “h3-0” and “h3-1” to the allowed tags.
Styling
CSS is used to change the image in the panel to visualize the different output. An additional class which is built out of the tag name and the additional class can be used:
ul.aloha-multisplit button.h3-fo {
        background-image:url(../Images/h3-a.png) !important;
        background-position: center center !important;
}
ul.aloha-multisplit button.h3-bar {
        background-image:url(../Images/h3-b.png) !important;
        background-position: center center !important;
}
9