DEPRECATION WARNING
This documentation is not using the current rendering mechanism and is probably outdated. The extension maintainer should switch to the new system. Details on how to use the rendering mechanism can be found here.
EXT: BZD Staff Directory
| Author: | Kasper Skårhøj |
|---|---|
| Created: | 2002-11-01T00:32:00 |
| Changed: | 2012-05-19T00:28:29 |
| Classification: | tx_bzdstaffdirectory |
| Description: | The keywords help with categorizing and tagging of the manuals. You can combine two or more keywords and add additional keywords yourself. Please use at least one keyword from both lists. If your manual is NOT in english, see next tab "language" ---- forEditors (use this for editors / german "Redakteure") forAdmins (use this for Administrators) forDevelopers (use this for Developers) forBeginners (manuals covering TYPO3 basics) forIntermediates (manuals going into more depth) forAdvanced (covering the most advanced TYPO3 topics) see more: http://wiki.typo3.org/doc_template#tags ---- |
| Keywords: | staff, team, person, group, club, members, forAdmins, forEditors |
| Author: | Mario Rimann |
| Email: | typo3-coding@rimann.org |
| Info 4: | |
| Language: | en |

 EXT: BZD Staff Directory - tx_bzdstaffdirectory
EXT: BZD Staff Directory
Extension Key: tx_bzdstaffdirectory
Language: en
Keywords: staff, team, person, group, club, members, forAdmins, forEditors
Copyright 2005-2012, Mario Rimann, <typo3-coding@rimann.org>
This document is published under the Open Content License
available from http://www.opencontent.org/opl.shtml
The content of this document is related to TYPO3
- a GNU/GPL CMS/Framework available from www.typo3.org
Table of Contents
`Introduction 3 <#1.1.Introduction|outline>`_
`Users manual 7 <#1.2.Users%20manual|outline>`_
`Configuration 9 <#1.3.Configuration|outline>`_
Wrap the tasks field with a stdWrap 11
Opening the detailed view as a pop up 11
Updating all staff records to a new domain 12
`Tutorial 13 <#1.4.Tutorial|outline>`_
`Upgrading to version 0.8.0 14 <#1.5.Upgrading%20to%20version%200.8.0|outline>`_
`Known problems 15 <#1.6.Known%20problems|outline>`_
`To-Do list 16 <#1.7.To-Do%20list|outline>`_
`Changelog 17 <#1.8.Changelog|outline>`_
Introduction
What does it do?
This extension produces “Person Lists” to show on your website. These can be your company staff, friends, club-members or which persons you need.
You might think, this could be solved by using the TYPO3 (FE/BE) User- Objects. That's right for some situations. But it wasn't for my situation. Our company wanted to show something around 130 persons, organized in many groups and sub-groups. The main problem was: These persons were no TYPO3 users.
There were some other extensions that do this job also. But they lacked some functionality we wanted to have. As an example: One extension could only show all records from a given starting point. No filtering or selection was possible. This works for some situations, when every person belong to exactly ONE organizational unit. But where I work, there are persons that belong to one, two and some important persons belong to five or six groups. How to select that? It's not possible (OK, there's one way: create multiple records of the same persons - so that's no way).
That's why I decided to try to develop this extension. I'm no programmer in my daily business. If you find an error in this extension, I would be happy to hear from you, so that I can try to repair/correct this extension.
And now: Happy working with my first extension ever! Have fun!
- mario
Credits
I'd like to thank
- Sven Wächli from Screenteam (CH) for the support I got
- Florian Elischer (DE) and Patrick Gaumond (CA) for the French translation
- Markus Russ (AT) for the sponsoring of development
- Sven Reuter (DE) for the input on the extension
- Boris Hinzer from web vision (DE) for sponsoring the vCard feature
- Rik Willems (NL) for the input and patch I got
Another big “thank you” goes to the Berufsbildungszentrum Dietikon (www.bzd.ch) that spent some of my work-time for developing this extension.
Also big thanks go to Oliver Klee, Lars Houmark and Rupert Germann for giving some advice! And last but not least I'd like to thank my brother Claudio for designing the new dummy images (the cowboy and his wife) that I included in version 0.2.5.
Screenshots
The screenshots are taken from a v0.2.5 installation.
Creating a record
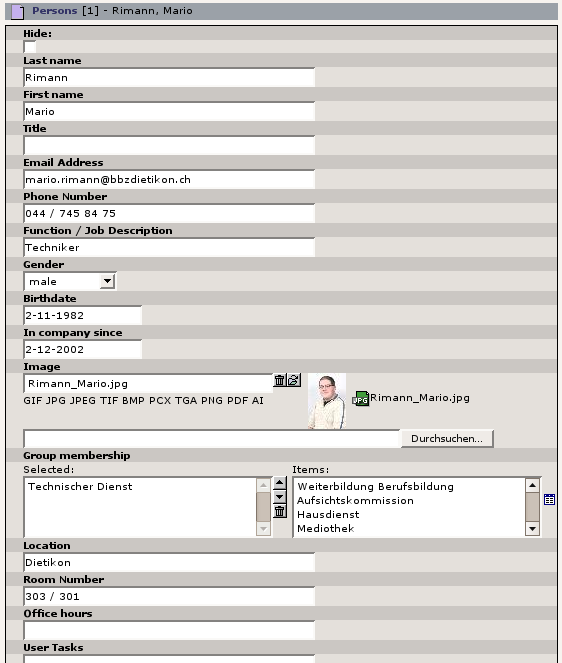 This shows only a part of the whole form.
Teamlist (without images)
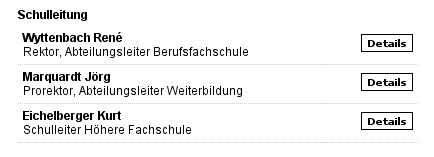 Teamlist (with images)
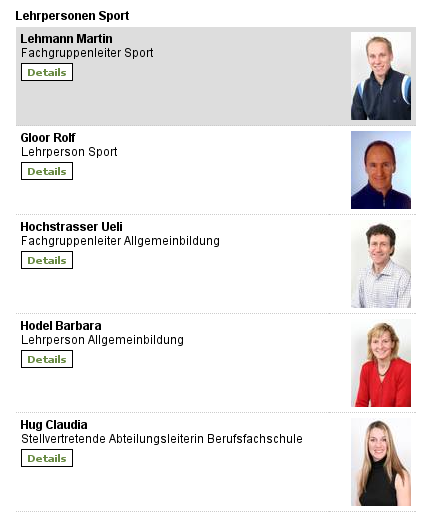
The Single-View
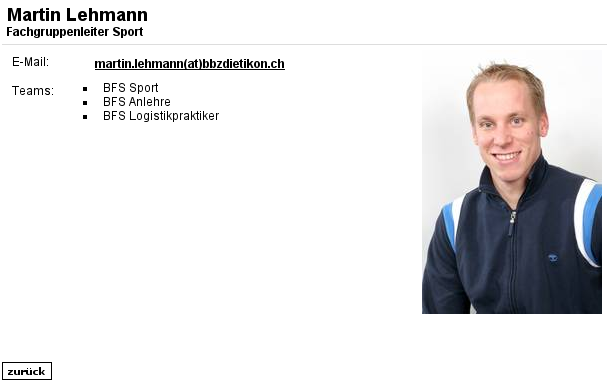
As soon as more fields are filled with information, those fields will get shown in the single view! Empty fields just get hidden.
Users manual
Possible Views
You can add the following views to your pages:
Team list (in different styles)
- default list view (may be configured)
- grouped by team (with a jump-menu)
Single view (= detailed information of one person)
now including the ability to download a vCard file of this person
BOX (= contact person for this page / department)
Possible Record-Types
You can create
- persons
- groups
- functions
- location
Every person can be added to none, one ore multiple groups. The groups represent the teams or organizational units of (for example) a company. For each team, you may select none, exactly one or multiple team leaders (they may be team members, too – but the don't need to be).
Field description
Groups
You can enter the following information to a group record:
- Group name (no HTML allowed)
- Team leader(s) (Select none, one or multiple team leaders)
- a page (pointing to a page that contains additional information about this team, will be linked in the singe view)
Functions
Title
Locations
- Title
- Street
- ZIP
- City
- Country
- Page (pointing to a page that contains additional information about this location, will be linked in the single view)
Persons
You can enter the following information to a person record:
- Hidden (default: no)
- Last name (no HTML)
- First name (no HTML)
- Image (You can upload a picture of this person or select an existing file from the fileadmin directory; up to 1M in size)
- Groups (Select the teams in which this person is a member)
- Function (The job title, like “CEO”, no HTML)
- Email address (an Email address, no HTML)
- Tasks (Enter some descriptive words on the job this person does, no HTML)
- In company since (enter a date since when the person is in the company)
- Birthdate (enter the date of birth)
- Opinion (Enter some thoughts or a citation, no HTML)
- Location (If you'r company is spread over the world, note the city where this person works, no HTML)
- Room (Enter the room number of the office where this person works, no HTML)
- Phone (The phone number, no HTML)
- Office hours (Enter the times when this person is available, no HTML)
- Files (You can upload up to 5 files, up to 1.5M each. This can be a CV for example. The files can be uploaded directly or chosen from the fileadmin directory.)
Multi language sites
As from version 0.1.0, this extension supports localization of it's records. So it's possible to have multi language sites with a one- tree-fits-all concept. What you need to do for this to work:
- Create a “Website language” record on page 0 (the root).
- On each page that you like to translate, add a “alternative language” record. Configure this record to point to the new language you created in the root of the site. Also fill in the field “page title”, and write it in the translated language (that's the page title that will be shown on the translated frontend).
- Important: Also create such an “alternative language” record in the sysfolder where your records are stored.
- Now you can begin to localize your page content (including the plugin of this extension) by clicking on the flag shown next to the record title.
By default, non translated records will be shown in the default language. If you want to be more strict, you can change this behaviour in the TypoScript setup of your site. Just add the following line to your template:
plugin.tx_bzdstaffdirectory_pi1.sys_language_mode = strict
With this activated, non translated records will be invisible to the frontend. In the teamlist, they are hidden. In the contactperson and detailed view, an error message will be shown.
Available markers
The template for the detail view that ships with the extension contains all markers that are available to show in the frontend. To use some or even all of these markers in the list view, you can copy paste them. All markers that are generated for the detailed view can also be shown in the list view.
Just one change is needed: You must rename the wrappers: In the detailed view, the wrappers are named like ###FIELD_WRAPPER_XYZ### - to use them in the list view just rename them to ###LISTITEM_WRAPPER_XYZ### (where XYZ is the effective name of the field).
Configuration
Spam prevention
This extension lists E-Mail addresses on the frontend, which is always a security problem due to persons and bots that collect those addresses for spam. To prevent the addresses you have the following possibilities (configure this in the settings of you plugin):
- no protection, plain text
- encrypted with the default TYPO3 JavaScript function
- as an image (not linked)
- as an image (with encrypted mailto link)
For the second and fourth entry of this list, it's very important, that you activate the default TYPO3 JavaScript encryption with the following two lines of TypoScript in your setup:
config.spamProtectEmailAddresses = 1
config.spamProtectEmailAddresses_atSubst = (at)
The second line is optional. It's value can be changed to whatever you want the @ sign to be replaced in the visible address in the frontend.
RealURL configuration
When you have a working realurl setup, it should be a small step to add the following lines to your localconf.php file. After clearing the cache you should get beautiful URLs for staff records like: http://domain.tld/staff/staff-detail/showstaff/rimann/3/
[...]
'postVarSets' => array(
'_DEFAULT' => array(
'showstaff' => array(
array(
'GETvar' => 'tx_bzdstaffdirectory_pi1[showUid]',
'lookUpTable' => array(
'table' => 'tx_bzdstaffdirectory_persons',
'id_field' => 'uid',
'alias_field' => 'last_name',
'addWhereClause' => ' AND NOT deleted',
'useUniqueCache' => 1,
'useUniqueCache_conf' => array(
'strtolower' => 1,
'spaceCharacter' => '-',
),
),
),
),
),
array(
'GETvar' => 'tx_bzdstaffdirectory_pi1[backPid]' ,
),
),
[...]
Universal fields
Every company is unique and has therefore it's own requirements. Instead of adding special fields for every company that uses this extension, I added five universal fields that can be used flexible on the requirements of your company.
By default, those fields are deactivated. Follow these steps to activate them:
- Open the Extension Manager and click on the title of this extension.
- Mark each field you will use, and enter a field title in the text field. Click on the “update” button to save your changes.
- Open the Template Module. Add the following to your TypoScript setup (These fields have NO labels in the locallang files. What you configure here as field names will be shown in the frontend!)Add more language sections if needed.
plugin.tx_bzdstaffdirectory_pi1 {
# Overwrites the locallang labels for certains labels. This is used for the universal fields,
# that can be used for different values.
_LOCAL_LANG {
default {
label_universal_field_1 = Universal field 1
label_universal_field_2 = Universal field 2
label_universal_field_3 = Universal field 3
label_universal_field_4 = Universal field 4
label_universal_field_5 = Universal field 5
}
de {
label_universal_field_1 = Universelles Feld 1
label_universal_field_2 = Universelles Feld 2
label_universal_field_3 = Universelles Feld 3
label_universal_field_4 = Universelles Feld 4
label_universal_field_5 = Universelles Feld 5
}
}
}
- Save your changes
- Now flush all caches – including the configuration cache!
- As soon as you enter something into the new fields in a person record, it will be shown on the frontend.
Possible problems: If the field label and it's value isn't shown in the frontend, check these three things:
- Is the / Are the field(s) you want to use activated in the Extension Manager's configuration of this extension?
- Did you enter somethings into the field(s) in the backend?
- Did you flush ALL caches?
kj_imagelightbox2
If you want to show the images in the single view in the well known imaglightbox, just install the extension “kj_imagelightbox2” and change your TypoScript setup according to this example:
This is the default configuration that comes with the extension:
plugin.tx_bzdstaffdirectory_pi1.DETAIL {
image {
file.maxW = 180
file.params =
popup.maxW = 800
popup.maxH =
popup.params =
}
}
You can override it by copying the following lines into the setup field of your TypoScript template.
plugin.tx_bzdstaffdirectory_pi1.DETAIL {
image {
file.maxW = 180
file.params =
imageLightbox2 = 1
imageLightbox2.imageset = xyz
imageLightbox2.saveImageShow = 1
imageLightbox2.printImageShow = 1
imageLightbox2.presentMode = 1
}
}
Please don't edit the typoscript_setup.txt file in the extension directory. Allthough this seems to be an easier solution, it will be lost with the next update of the extension (file will be over- written)! You are on the safe way, if you set this stuff in the TypoScript setup, this will be untouched on updates!
Enable the vCard download
For the vCard icon/download-link to be shown in the single view, the following requirements need to be fulfilled:
- The person as a phone number
- The person has a function assigned
- The person has a location assigned
- The assigned location has an address set
- Of course, the person needs to have first- and last name along with an email address. But these fields are required in the Backend anyway.
This will basically allow the icon to appear in the single view. To finalize the setup, you should define the following option in the Typoscript setup. This company name will be shown in the vCard files.
plugin.tx_bzdstaffdirectory_pi1 {
companyNameToShowInVCard = FooBar Industries
}
Wrap the tasks field with a stdWrap
The tasks field is a plain text field. But it can be handled with stdWrap now. Thus allowing to split the field content at every line- break and list those entries in an unordered list. By default it's done like this – if you want to avoid that, just unset the stdWrap stuff in your template by adding a line like:
plugin.tx_bzdstaffdirectory_pi1.DETAIL.tasks >
Opening the detailed view as a pop up
By default, the single view is shown as a normal page. Since version 0.5.0 you can configure the extension to show the single view in a pop-up window. Follow these steps to change the configuration:
Change the configuration option “showSingleViewAsPopUp” in your TypoScript Template or via the Flexform of the frontend plugin to true
Clear all cache
The links and the pop-up should already work now. But the pop-up shows exactly the same page as before, including menus and stuff you probably don't want to see in the pop-up.
As the pop-up window is called with the GET parameter “popUp = 1”, we can evaluate this with TypoScript and change our template accordingly. Just add an extension template on your single-view page and add the following block of code to the setup field:[globalVar = GP:popUp = 1]page >page = PAGEpage.typeNum = 0page.10 < styles.content.get[GLOBAL]Everything between the two [] condition markers will only be used, if the condition in the first line is true. Theoretically you can define a completely new template for this case, or just hide some elements for the pop-up view.
Updating all staff records to a new domain
Today I came across a problem with an installation of the BZD Staff Directory Extension where about 150 records with email addresses were stored. The company running the website is now changing their domain name from somewhatverylong.ch to short.ch - and now of course has to update all their staff records (and no one wants to do this manually).
This SQL query does this with one step:
UPDATE tx_bzdstaffdirectory_persons as pSET p.email=concat(left(p.email,length(p.email)-19),'short.ch')WHERE p.email LIKE '%@somewhatverylong.ch';
But take care to adapt it to your needs (especially with the length parameter which has to be exact as long as "somewhatverylong.ch" (19 in this example)).
Tutorial
I didn't write a full step-by-step tutorial yet. May be I'll find the time to write something - if someone else wants to write, that would be appreciated! This should just give a short overview of starting the work with this extension. If you have questions, problems or feedback, please feel free to contact me.
Create a page/sysfolder to store your records (users, groups)
Go to the List Module, select your page/sysfolder and create some groups.
Create some persons in the same place.
Create a page to show one single person (SingleView)
Add the Fontend-Plugin to that page. Select the view “DETAIL” to be shown.
Create a new page on wich you want to show your team-list
Add the Frontend-Plugin to that page.
Configuration tasks
Configure it to show the “TEAMLIST”.
Select the startingpoint (if not set, records from all sysfolders are taken into account and the list is just filtered through the teams you select later)
Select one or more teams that should be shown (If you let this field empty AND don't check the “ignore group selection” checkbox this will result in error).
To show all persons from the given startingpoint and ignore any group relations, just check the checkbox “ignore group selection”.
Select a template file if needed (if empty, the default template-file defined in the ext-manager will be used)
Select, if there should be thumbnails shown in the list, or if just the names should be listed.
To define the page for the singleview, just enter the page-id (pid). This would be the page you created some steps before! You can set the pid in this field - it will just work for THIS content-object - to set this value “global”, enter it in the extension-Manager.
If you did it right, and there are no other problems around, your teamlist should now show some entries. And if you click on the name/image of a person, the detail-view should be shown.
Upgrading to version 0.8.0
This affects every installation that should be updated from before 0.8.0 to 0.8.0 as there are some important changes!
Version 0.8.0 of this extension brings some major changes to the architecture. Primarily the extension key has changed which results in some changes that need to be done when upgrading:
- Make sure all requirements are met! (e.g. TYPO3 4.2 is minimum requirement!)
- Make a current backup or try the following steps on a staging server
- Switch all pages with the plugin inserted to invisible during the transition (if you fear to break something)
- Uninstall the extension “bzd_staff_directory”
- Install the extensino “bzdstaffdirectory”
- In the extension manager, click on the extension name and then select “UPDATE” from the drop-down on top
- The Update-Script provides you with a list of things, that possibly needs to be changed after the upgrade. To perform the changes, you can either use the TYPO3 Backend or (especially if we're talking about bigger amounts of plugins) do it directly in the database.
- You can use this page to re-check, if everything is fine now after you changed something.
- Test everything
- Switch all affected pages to be visible again.
If you encounter any problems with upgrading, don't hesitate to contact the author or open a bug report in the bugtracker.
Known problems
In some cases, the Extension Manager does not recognize the requirement of the extension “bidirectional”. If you continue to use bzd_staff_directory without the extension “bidirectional” installed, you'll see some MySQL errors in the back-end. Please ensure that the extenion “bidirectional” is installed – this solved the problem in all cases!
This requirement will be changed in the future. As I read, the TYPO3 Core starting from version 4.1 will contain the possibility to use bidirectional M-M relations between tables and with that make the extension “bidirectional” needless.
IMPORTANT: The extension bidirectional is no requirement starting from version 0.6.0 of this extension (which requires TYPO3 4.1.0 or higher that has this functionality built in).
The second problem is the limitation of all date fields within TYPO3 to dates >1.1.1970 and <x.y.2038. This means, that you can not use the birthday field for persons born before 1970. This is no extension specific problem but a global problem in TYPO3. There have been many discussions on that issue in the mailinglists and newsgroups – but with no solution until now.This issue is solved since version 0.8.0 of this extension respectively since TYPO3 version 4.2
IMPORTANT: The extension now requires TYPO3 4.2!
Those are the only problems I know at the moment. Do you have problems? If yes, please follow one of these two ways to report the problem:
Bugtracker
I use a bugtracker to keep track of all the things that should be fixed or implemented in this extension. To report a bug, you need an account on the bugtracker – don't panic, it's free!
When you enter a new bug, I will instantly get notified by email to have a look on it.
E-Mail
There are some persons that don't like bugtrackers or creating new accounts on another system – that's ok. Please send your bug report or a description of the problem you encounter to my E-Mail address: mario@screenteam.com
To-Do list
Moved the todo list to the file todo.txt in the extension folder and the bugtracker at https://bugs.oliverklee.com/