DEPRECATION WARNING
This documentation is not using the current rendering mechanism and is probably outdated. The extension maintainer should switch to the new system. Details on how to use the rendering mechanism can be found here.
Create a Calendar Record
The first step in creating an online calendar with the Calendar Base extension is to create a calendar record.
Refer to Illustration 17. Using the List Module, click on the Create new record icon ( 1 ).
 Illustration 17: Adding a Calendar Record (1)
Refer to Illustration 18. Click on the Calendar link ( 2 ) in the New record form.
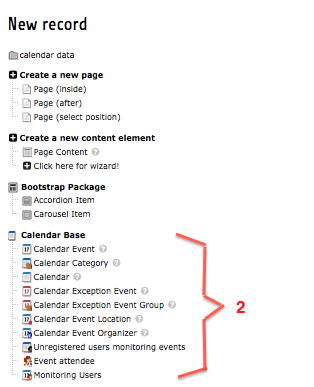
Illustration 18: Adding a Calendar Record (2)
Refer to Illustration 19. Complete the Calendar record’s form as outlined below. When you’re finished, save and close your work.
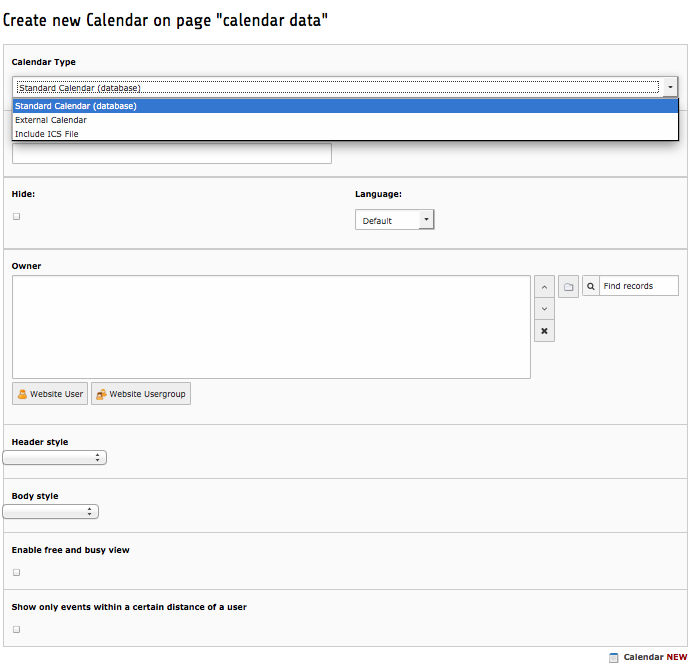 Illustration 19: Adding a Calendar Record (3)
- Calendar Type: There are three types of calendars within the Calendar Base extension. Each type indicates how Calendar Event records are generated.
(1) Standard Calendar: The Standard Calendar (database) is the default record. It depends on manual entry to generate Calendar Event records (see Create Calendar Events).
(2) External Calendar: The External Calendar depends on an ICS feed for the creation of Calendar Event records. The External Calendar’s form is identical to the Standard Calendar’s form (Illustration 18), with the exception that it provides a field for the URL of a web-based ICS calendar feed.
 NOTE: Google, Yahoo, and others provide online calendars that allow exports of their data. Look for links about “sharing your calendar.” You will need the provided URL - look for their ICS or Ical URLs. They will be files with an .ics extension.
(3) Include ICS File: The Include ICS File Calendar allows you to upload an .ics file for the creation of Calendar Event records. The Include ICS File Calendar’s form is identical to the Standard Calendar’s form (Illustration 18), with the exception that it provides a field for uploading or attaching a previously uploaded file.
NOTE: Desktop applications such as Microsoft Outlook and Apple iCal are able to export ICS files, which can then be uploaded for use with Calendar Base.
- Header Style: You can assign each category a different colored bullet that precedes the events in the Month View and the Header colors in the Day and Week views. To use the out-of-the-box bullet colors, simply enter the corresponding style in the Header Style field:
Blue Bullets:      default_catheader
Green Bullets:     green_catheader
Grey Bullets:        grey_catheader
Orange Bullets:       orange_catheader
Pink Bullets:       pink_catheader
Red Bullets:  red_catheader
Yellow Bullets:        yellow_catheader
- Body Style: You can assign each category a different colored “Busy Time” in the Day and Week views. To use the out-of-the-box Busy Time colors, simply enter the corresponding style in the Body Style field:
Blue:            default_catbody
Green:               green_catbody
Grey:          grey_catbody
Orange:         orange_catbody
Pink:         pink_catbody
Red:            red_catbody
Yellow:          yellow_catbody
Note: If you would like to expand or change the color choices, you can do so by modifying the default style sheet (see Modifying the Default CSS).
Note: Starting with version 1.2.0 there is the possibility to define the according colors for the header- & body style fields in the page TS config. Per default there is already:
options.tx_cal_controller.headerStyles = default_catheader=#557CA3,green_catheader=#53A062,orange_catheader=#E84F25,pink_catheader=#B257A2,red_catheader=#D42020,yellow_catheader=#B88F0B,grey_catheader=#73738C

options.tx_cal_controller.bodyStyles = default_catbody=#6699CC,green_catbody=#4FC464,orange_catbody=#FF6D3B,pink_catbody=#EA62D4,red_catbody=#FF5E56,yellow_catbody=#CCB21F,grey_catbody=#9292A1'
The syntax is: “css_style=color”
As a result, you’ll get a drop down box, to choose the according color.
- Owner: If you leave this field blank, any Frontend user can view the calendar. If you select users or user-groups from the Items, the calendar will only generate the events of this calendar for them. This is useful for creating Staff or Members-Only calendar events. See Using Multiple Calendars in the Advanced section for more information.
- Enable free and busy view: When used in conjunction with the Owner field, appointments for the owner group will not be shown, but in the Day and Week views the time will be shown as “busy.”
- Limit the free and busy view: When used in conjunction with the above options (Owner and Enable free…), you can limit the generated free and busy views to the users or user-groups you select. Leaving this field blank will allow the free and busy view to be generated for all calendar users.