DEPRECATION WARNING
This documentation is not using the current rendering mechanism and is probably outdated. The extension maintainer should switch to the new system. Details on how to use the rendering mechanism can be found here.
Backend Programming
| Author: | Kasper Skårhøj |
|---|---|
| Created: | 2002-11-01T00:32:00 |
| Changed by: | Kasper Skårhøj |
| Changed: | 2002-11-29T23:18:38 |
| Email: | kasper@typo3.com |
| Info 2: | |
| Info 3: | |
| Info 4: |
Backend Programming
Originally used on the snowboard tour 2002.
Copyright 2000-2002, , <kasper@typo3.com>
This document is published under the Open Content License
available from http://www.opencontent.org/opl.shtml
The content of this document is related to Typo3
- a GNU/GPL CMS/Framework available from www.typo3.com
Table of Contents
Backend Programming 1
Introduction 1
The Photo Marathon case 1
Configuring a custom database table 6
user_photomarathon 6
$TCA: The [ctrl] section 7
Mandatory fields: uid and pid 8
The root page 9
$TCA: The [columns] section 10
The INPUT type: 10
The TEXT type: 10
The CHECK type: 10
The GROUP type / file: 11
The GROUP type / db: 12
Making real MM relations 13
The “exclude” fields 14
$TCA: The [types] and [palettes] section 15
Multiple “types” entries 17
Configuring the Rich Text Editor (RTE) 19
Browsing the configuration in Tools > Configuration 20
Creating records on pages 21
Adding context sensitive help to custom table fields 24
Adding a translation to the custom table descriptions 26
Custom Backend Module 28
Introduction 28
The location of default and custom modules 28
Basic requirements to (custom) modules 29
Parameters passed to the module script 31
The Web and File main modules 31
The main script 32
Mandatory initialization 32
Typo3 Project Guidelines and “GPvars” 32
Page access 33
Header and footer 33
Language specific labels ($LANG object) 34
A selector box menu 34
Using “module TS config” 35
Introduction
This document deals with issues regarding customization of the Typo3 backend. More specifically this involves
adding a custom database table to be edited by Typo3.
adding a module in the backend, in this case a submodule under the Web main module.
basing the whole thing on a standard Typo3 installation to maintain upgradeability in the future.
This document does not deal with the frontend implementation (eg. the websites look and feel). This topic is covered by “Templates, TypoScript and Beyond” in addition to the documents “TSref” and “TypoScript by example”.
The document “Inside Typo3” is used as a reference in this document and it's supposed to be the authoritative reference in general regarding these backend related issues.
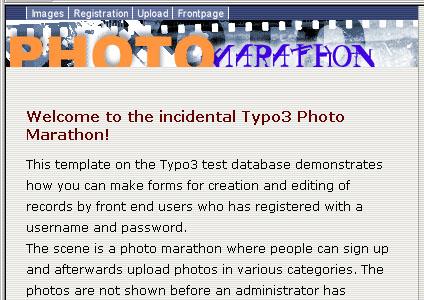
The Photo Marathon case
The examples in this document is taken from the Photo Marathon on the testsite you can download with Typo3. So you should be able to keep track of the events if you download the testsite and use that.
The Photo Marathon example includes three main issues:
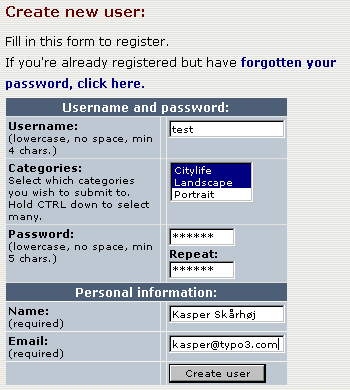
Automatic registration of frontend users. This is taken care of by the default module for this purpose.
Upload of and editing of meta data for images for each user. This is also taken care of through the powerful fe_adminLib from media/scripts/ (see TSref). The thing of particular interest here is that the upload happens to our own customly defined table!The upload process is combined with an approval process following thereafter.
Finally the display of the images.
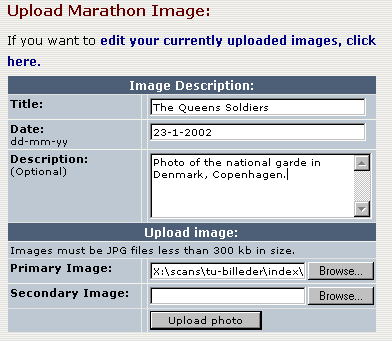
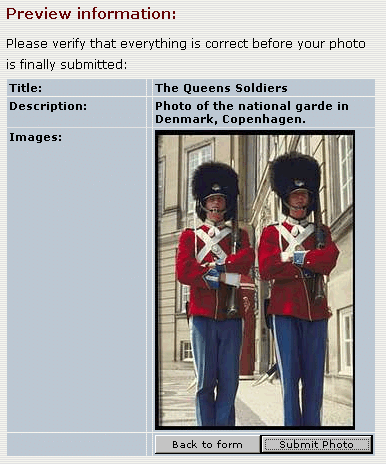
First you register as a user and login:
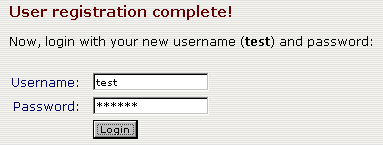
Then upload an image:
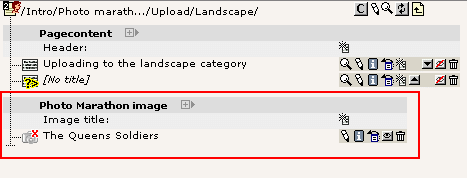
In the backend's list module we now see the newly created record. So far it's hidden (which it will be until the approval is done or we simply unhide it!).
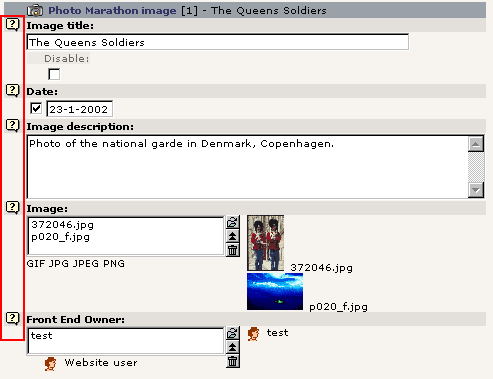
... and clicking the edit-icon (pencil), this is the form used for rendering:
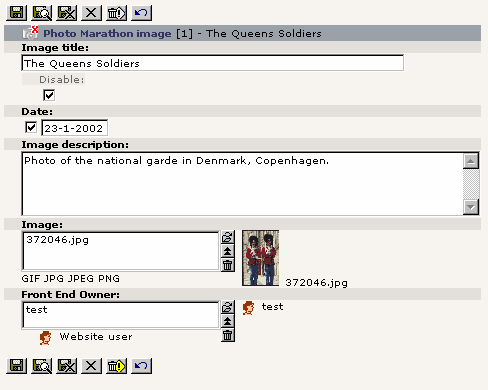
Now, what you see here is an example of a custom table configured so that Typo3 knows how to handle it! Looking at the same record in eg. phpMyAdmin looks like this:
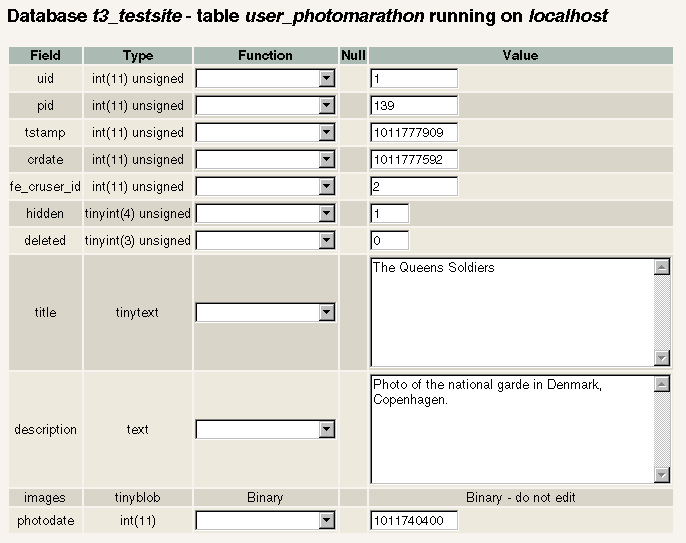
As you see everything except the text fields are pretty useless here. The dates are in UNIX-time (seconds since 1970) and in particular Typo3 handles the upload of files and integrity of their relations seemlessly plus relations to other records - in this case the field “fe_cruser_id” points to the Website user (uid=2 here) who created the record. Look at the presentation in Typo3 - here you get that information visually!
Now, this is not pointed out to downgrade phpMyAdmin which is a fine application and in fact integrated as a third-party module inside Typo3. The point is that phpMyAdmin handles raw database values - Typo3 provides you with a streamlined interface including certain layers to proces the values - like keeping track of files and relations for you! On the downside this comes at the cost of configuration.
Configuring a custom database table
user_photomarathon
This is the structure of the user_photomarathon table used on the testsite:
CREATE TABLE user_photomarathon (
   uid int(11) unsigned DEFAULT '0' NOT NULL auto_increment,
   pid int(11) unsigned DEFAULT '0' NOT NULL,
   tstamp int(11) unsigned DEFAULT '0' NOT NULL,
   crdate int(11) unsigned DEFAULT '0' NOT NULL,
   deleted tinyint(3) unsigned DEFAULT '0' NOT NULL,
   title tinytext NOT NULL,
   hidden tinyint(4) unsigned DEFAULT '0' NOT NULL,
   photodate int(11) DEFAULT '0' NOT NULL,
   description text NOT NULL,
   images tinyblob NOT NULL,
   fe_cruser_id int(11) unsigned DEFAULT '0' NOT NULL,
   PRIMARY KEY (uid),
   KEY parent (pid)
);
Notice the red lines - those are fields which are not editable but rather used for system information and the database index.
The remaining black lines are the fields configured for editing in the backend.
The configuration of a custom table is officially done in typo3conf/tables.php. However the best solution is to always use the default tables.php file (found in t3lib/tables.php) and configure a custom script to be included immediately after tables.php. In this script you cannot only modify the $TCA array set in tables.php but also add more tables as you like.
This is how the testsite typo3conf/localconf.php file is configured:
$typo_db_extTableDef_script = "extTables.php";
... and in the file typo3conf/extTables.php this is what we find (extract):
<?php

/**
 * Setting up Typo3 to work with Photo Marathon table in the database
 */
$TCA["user_photomarathon"] = Array (
    "ctrl" => Array (
        "label" => "title",
        "tstamp" => "tstamp",
        "crdate" => "crdate",
        "fe_cruser_id" => "fe_cruser_id",
        "delete" => "deleted",
        "title" => "Photo Marathon image|Photo Maraton Billede|Photo Marathon Bild",
        "iconfile" => "../fileadmin/photomarathon/user_pm_icon.gif",
        "enablecolumns" => Array (
            "disabled" => "hidden",
        )
    ),
    "interface" => Array (
        "showRecordFieldList" => "title,description,images,hidden"
    ),
    "feInterface" => Array (
        "fe_admin_fieldList" => "title,description,images,hidden,photodate",
    ),
    "columns" => Array (
            // Title is set up as an ordinary input-field, one line.
        "title" => Array (
            "label" => "Image title:|Billedtitel:|Bildtitel:",
            "config" => Array (
                "type" => "input",
                "size" => "40",
                "max" => "80",
                "eval" => "trim"
            )
        ),
            // Image description is set up as a textarea form element in the backend
        "description" => Array (
            "label" => "Image description:|Billedbeskrivelse:|Bildbeschreibung:",
            "config" => Array (
                "type" => "text",
                "cols" => "48",
                "rows" => "5"
            )
        ),
            // Images are stored in a tinyblob where the filenames from
            // uploads/photomarathon are stored comma-separated
        "images" => Array (
            "label" => $LANG_GENERAL_LABELS["image"],
            "config" => Array (
                "type" => "group",
                "internal_type" => "file",
                "allowed" => "gif,jpg,jpeg,png",        // Allowed extensions
                "max_size" => "1000",            // Max 1000 kb pr. image
                "uploadfolder" => "uploads/photomarathon",
                "show_thumbs" => "1",        // Yes, show thumbnails in backend
                "size" => "3",                // The image list box is 3 items high
                "maxitems" => "6",            // Max 6 images pr. record!
                "minitems" => "0"            // Min 0 images.
            )
        ),
            // Hidden field
        "hidden" => Array (
            "label" => $LANG_GENERAL_LABELS["disable"],
            "config" => Array (
                "type" => "check"
            )
        ),
            // Photo date
        "photodate" => Array (
            "label" => "Date:|Dato:|Datum:",
            "config" => Array (
                "type" => "input",
                "size" => "7",
                "max" => "20",
                "eval" => "date",
                "checkbox" => "0",
                "default" => "0"
            )
        ),
            // This field is loaded with the uid of the fe_user
            // who created the photomarathon image.
        "fe_cruser_id" => Array (
            "label" => "Front End Owner:|Website-bruger ejer:|Frontend Besitzer:",
            "config" => Array (
                "type" => "group",
                "internal_type" => "db",
                "allowed" => "fe_users",
                "size" => "1",
                "maxitems" => "1",
                "minitems" => "0",
                "show_thumbs" => "1"
            )
        )
    ),
    "types" => Array (
        "0" => Array("showitem" => "title;;1,photodate,description,images,fe_cruser_id")
    ),
    "palettes" => Array (
        "1" => Array("showitem" => "hidden")
    )
);

?>
(From testsite: typo3conf/extTables.php. The original file contains comments which are stripped in this listing.)
$TCA: The [ctrl] section
The “ctrl” part of the $TCA configuration of a table determines how Typo3 handles the table generally.
$TCA["user_photomarathon"] = Array (
    "ctrl" => Array (
        "label" => "title",
        "tstamp" => "tstamp",
        "crdate" => "crdate",
        "fe_cruser_id" => "fe_cruser_id",
        "delete" => "deleted",
        "title" => "Photo Marathon image|Photo Maraton Billede|Photo Marathon Bild",
        "iconfile" => "../fileadmin/photomarathon/user_pm_icon.gif",
        "enablecolumns" => Array (
            "disabled" => "hidden",
        )
    ),
This is a list of comments on the “ctrl” section of the user_marathon table as shown above:
- “ label” contains a stringvalue, namely the fieldname from which the record title shown in record listings in the backend should be fetched. Required for all tables.
- “ tstamp” contains a stringvalue, namely the fieldname which will be updated with the current time value on each update through TCE (See Typo3 Overview drawing).The “tstamp” field is configured for almost all tables, the field should be an integer and basically this field will contain the “last modified” value.
- “ crdate” contains a stringvalue, namely the fieldname which will be set to the date when the record was first created. This value should never change thereafter. The “crdate” field should be an integer.
- “ fe_cruser_id” contains a stringvalue, namely the fieldname which will hold the reference to the Website user (from fe_users) which created the record through the fe_adminLib! This is totally related to the frontend plugin fe_adminLib and so has no significance for the backend.
- “ delete” contains a stringvalue, namely the fieldname which - if set - will totally hide the record from (almost) any function in Typo3. This means in turn that deleted PhotoMarathon records are not really deleted but merely hidden so they can be recovered.
- “ title” is a stringvalue; the title of the table as shown in the backend. This string value is exploded by the | (vertical line) character and each part represents a specific language (as configured in t3lib/config_default.php). This value is required. If you do not specify any language specific values, the default (english) will be used.
- “ iconfile” points to the icon file (currently GIF) to use. If no path prefix is set, the icon will be searched for in the typo3/gfx/i/ folder. The icon must be a 18x16 pixels icon and will be manipulated with overlaid graphics by the backend if needed to.
- “ enablecolumns” is an array with four fixed associative keys.
They has impact on the look of the icon in the backend but does not
hide the records in the backend though. The fields rather determines
visibility of the record in the frontend (where the API function
enableFields should be used to retrieve a correct WHERE-clause for the
selection of records from any Typo3 configured table).The full range
of enablefields are used by such tables as “pages” and “tt_content”.
- “disabled” points to the field, which as an integer set to 1 will signify that the record is hidden. Zero means the record is not hidden.
- “starttime” points to the field, which will hold the “Start” time for the record display (always UNIX time integer).
- “endtime”, like starttime, but of course signifies the date where the record will not be displayed anymore.
- “fe_group” points to the field, which holds a reference to the fe_groups id which is exclusively allowed access to view the record. This field is normally called “Access”.
Notice: There are other options which are documented in “Inside Typo3”.
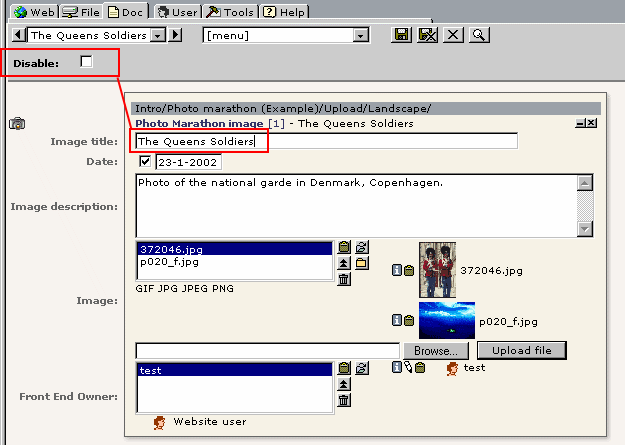
In the record list from before we see the impact of the “label” configuration pointing to the “title” field of user_photomarathon; The title is “The Queens Soldiers”. Furthermore the state of the enablecolumns/disable - the “hidden” field - is also shown by the record icon being dimmed and having a red cross on it:

The latter is quickly un-hidden by a click in the Control Panel:

... and immediately the record is not hidden anymore.
Mandatory fields: uid and pid
Looking at the previous SQL-dump of the table we see that blue lines (below) has been utilized for system purposes through configuration in the “ctrl” section in $TCA.
The remaining red lines are not. They are mandatory and should largely be configured exactly like you see here including the indices set in the bottom of the listing:
CREATE TABLE user_photomarathon (
   uid int(11) unsigned DEFAULT '0' NOT NULL auto_increment,
   pid int(11) unsigned DEFAULT '0' NOT NULL,
   tstamp int(11) unsigned DEFAULT '0' NOT NULL,
   crdate int(11) unsigned DEFAULT '0' NOT NULL,
   deleted tinyint(3) unsigned DEFAULT '0' NOT NULL,
   title tinytext NOT NULL,
   hidden tinyint(4) unsigned DEFAULT '0' NOT NULL,
   photodate int(11) DEFAULT '0' NOT NULL,
   description text NOT NULL,
   images tinyblob NOT NULL,
   fe_cruser_id int(11) unsigned DEFAULT '0' NOT NULL,
   PRIMARY KEY (uid),
   KEY parent (pid)
);
There are two simple rules:
“uid” is a unique, automatically incremented integer. It's the unique and authoritative reference to any editable record in Typo3. Sometimes it's called the “id” in loose terms.
“pid” is an integer. It is a relation pointing to the record (“Page”) from the backbone table “pages” to which it belongs. If you picture the page tree as folders and files in a filesystem, the “pid” value basically indicates in which folder (here: page) the file (here: user_photomarathon record) is found.
The principle is shown here:
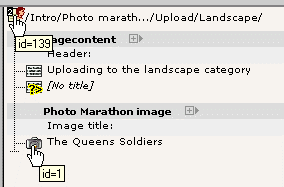
The user_photomarathon record has become the uid “1” and it is found on the page with uid “139” (sometimes page id's are refered to as the “pid” in the context of the a record belonging to a page).
In the phpMyAdmin view it looks like:

This should suffice to demonstrate this simple but vital concept. The power of this principle lies in the fact that records are thus naturally categorized by the page they belong to. How you choose to take advantage of this is up to you to a certain extend.
The root page
While a pid value of 0 (zero) or less can never point to a record, exactly the zero value is valid. If the pid value of a record is zero it means the record belongs to the root of the page tree. However records are divided sharply into two categories; records which are allowed in the root (and in turn editable by the admin-users only!) and recods which must belong to a proper page record (the only exception is “pages” records which form the very page tree).
$TCA: The [columns] section
This section configures how Typo3 handles each field; which kind of form element it should be rendered as and which further properties are assigned. This configuration should definitely be consistent with the actual database field receiving the value. Of course, you cannot expect an ordinary input field accepting textual content to cleanly submit it into an integer database field! However it does not generate a warning - just the wrong value.
The INPUT type:
    // Title is set up as an ordinary input-field, one line.
"title" => Array (
    "label" => "Image title:|Billedtitel:|Bildtitel:",
    "config" => Array (
        "type" => "input",
        "size" => "40",
        "max" => "80",
        "eval" => "trim"
    )
),
This renders a traditional INPUT element. In this case with the relative size of “40”. The real value is compensated depending on browser so the fields appear equally wide in various operating systems and browsers.
The eval value “trim” signifies that the value is stripped from whitespace in both ends before it's submitted. This is required with varchar database fields as MySQL strips whitespace anyway.
You can configure some more options, in particular you can configure the field to evaluate a date and/or time input. This is the case with the photodate field which is configured like this:
    // Photo date
"photodate" => Array (
    "label" => "Date:|Dato:|Datum:",
    "config" => Array (
        "type" => "input",
        "size" => "7",
        "max" => "20",
        "eval" => "date",
        "checkbox" => "0",
        "default" => "0"
    )
),
The TEXT type:
"description" => Array (
    "label" => "Image description:|Billedbeskrivelse:|Bildbeschreibung:",
    "config" => Array (
        "type" => "text",
        "cols" => "48",
        "rows" => "5"
    )
),
This renders a textarea field. The columns are once again a relative messure conpensated based on browser and client OS.
You can also configure the field to turn wrapping OFF or use the Rich Text Editor!
The CHECK type:
"hidden" => Array (
    "label" => $LANG_GENERAL_LABELS["disable"],
    "config" => Array (
        "type" => "check"
    )
),
This renders a checkbox. Notice how the labels from the field is cleverly taken from the LANG_GENERAL_LABELS array which holds a lot of generally used label-names translated into all the system languages.
You can also configure checkboxes to present a whole array of checkboxes (up to 10) where each represents a bit in the integerfield which must receive the value. Here's an example from tables.php (tt_content.text_properties):
"text_properties" => Array (
    "exclude" => 1,
    "label" => "Properties:",
    "config" => Array (
        "type" => "check",
        "items" => Array (
            Array("Bold", ""),
            Array("Italics", ""),
            Array("Underline", ""),
            Array("Uppercase", "")
        ),
        "cols" => 4
    )
),
This is rendered like this in the forms:

The GROUP type / file:
"images" => Array (
    "label" => $LANG_GENERAL_LABELS["image"],
    "config" => Array (
        "type" => "group",
        "internal_type" => "file",
        "allowed" => "gif,jpg,jpeg,png",        // Allowed extensions
        "max_size" => "1000",            // Max 1000 kb pr. image
        "uploadfolder" => "uploads/photomarathon",
        "show_thumbs" => "1",        // Yes, show thumbnails in backend
        "size" => "3",                // The image list box is 3 items high
        "maxitems" => "6",            // Max 6 images pr. record!
        "minitems" => "0"            // Min 0 images.
    )
),
This configures the field to receive images. As you can probably spot, you can configure 1) which file types, 2) their maximun kb-size, 3) where they should be put and 4) the maximum and/or minimum number of files required.
The TCE (Typo Core Engine, t3lib_tcemain class) takes care of all the file handling (although you must follow certain guidelines when you're submitting files.)
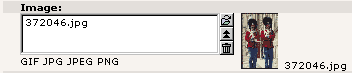
In the backend interface it looks like this:
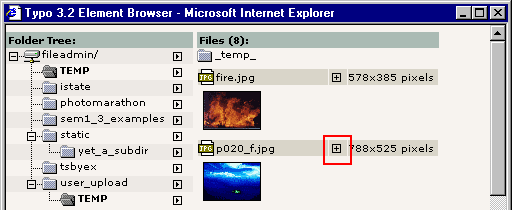
... and adding images is so easy using the Element Browser:
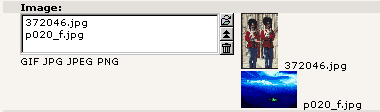
The filenames are (by default) stored as a comma separated list of filenames, typically in a BLOB field.
The content of the “user_photomarathon.image” field is
372046.jpg,p020_f.jpg
The GROUP type / db:
"fe_cruser_id" => Array (
    "label" => "Front End Owner:|Website-bruger ejer:|Frontend Besitzer:",
    "config" => Array (
        "type" => "group",
        "internal_type" => "db",
        "allowed" => "fe_users",
        "size" => "1",
        "maxitems" => "1",
        "minitems" => "0",
        "show_thumbs" => "1"
    )
)
This element is a sister to the GROUP/file type from above. But instead of containing references to filenames, it contains references to records. You can even configure the field to mix records from various tables if you wish.
In the Photo Marathon example this configuration holds the reference to the user, who created the record:

... and likewise you can browse for records with the Element Browser:
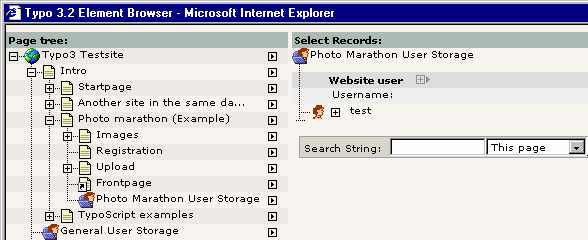
Looking at the actual content of the field, this is what we see:
2
A number, pointing to the fe_user record. In this case the field can contain only this one record, because the database field is an integer.
Looking at another example, the tt_content.records field from tables.php is configured like this:
"records" => Array (
    "label" => "Items:",
    "config" => Array (
        "type" => "group",
        "internal_type" => "db",
         "allowed" =>
              “tt_content,tt_address,tt_links,tt_board,tt_guest,tt_calender,tt_products,tt_news",
        "size" => "5",
        "maxitems" => "200",
        "minitems" => "0",
        "show_thumbs" => "1"
    )
),
... and on the page “/Intro/Another site.../More lists a.../Records/” the element “Various records inserted” looks like this:
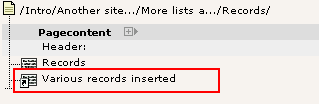
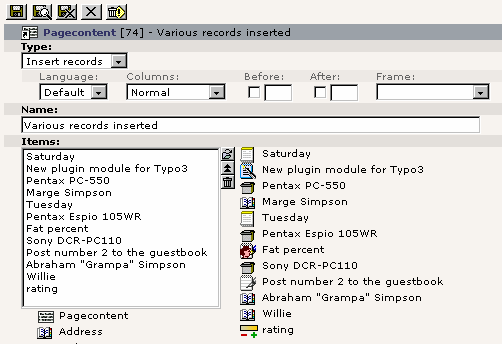
The content of the tt_content.record field in this case looks like:
tt_calender_7,tt_news_1,tt_products_3,tt_address_5,tt_calende r_3,tt_products_2,tt_board_1,tt_products_5,tt_guest_2,tt_add ress_1,tt_address_2,tt_rating_1
This is uid-numbers prepended with the tablenames.
Making real MM relations
The above examples shows how to make MM (many-to-many) relations in a straight forward manner - a list of comma separated values - but also a database designwise discouraged way; You should use an intermedia table instead if you want to do it “right”.
About relations, 1-M (one-to-many) and M-1 (many-to-one) signifies a relation where one record is related to many other records. For instance the pid - pages.uid relation ship is a such; A record can belong to one and only one page. The Photo Marathon fe_cruser_id field is also such a relation; It's an integer field point to one and only one owner user - however this user may have other user_photomarathon records pointing to him (which makes it a “many” relation).
M-M relations are like with the content element type “Insert records” where we wish any number of content elements to be able to link to any - maybe even the same element twice! - record from other tables regardless of existing relations.
The newly added sys_dmail_group table actually represents such a relationship in the field sys_dmail_group.static_list. This field is actually just a dummy placeholder - the real relations to tt_address and fe_users elements are done through an intermediate table, sys_dmail_group_mm. This is the field configuration (taken from tables.php):
"static_list" => Array (
    "label" => "Recipients:",
    "config" => Array (
        "type" => "group",
        "internal_type" => "db",
            "allowed" => "tt_address,fe_users",
            "MM" => "sys_dmail_group_mm",
        "size" => "20",
        "maxitems" => "100000",
        "minitems" => "0",
        "show_thumbs" => "1"
    )
),
The table “sys_dmail_group_mm” looks like this:
CREATE TABLE sys_dmail_group_mm (
   uid_local int(11) unsigned DEFAULT '0' NOT NULL,
   uid_foreign int(11) unsigned DEFAULT '0' NOT NULL,
   tablenames varchar(30) NOT NULL,
   sorting int(11) unsigned DEFAULT '0' NOT NULL,
   KEY uid_local (uid_local),
   KEY uid_foreign (uid_foreign)
);
- uid_local holds the uid number of the sys_dmail_group record
- uid_foreign holds the uid number of either the tt_address or fe_users record, which is determined by...
- ... the tablenames field which is either set to “tt_address” or “fe_users”
- Finally sorting is used to denote the order of the records.
Whether you use real relations (for a more correct data structure than the lists) or the comma-list principle, the proces of adding and removing records is totally the same in the backend interface! It's all managed inside the t3lib_tcemain class! In fact the submission of the order of records is always done as a list.
The table, tt_news, also features such a relationship, but with only one table, tt_news, involved which eliminates the user of the “tablename” field in the relation table:
CREATE TABLE tt_news_related_mm (
   uid_local int(11) unsigned DEFAULT '0' NOT NULL,
   uid_foreign int(11) unsigned DEFAULT '0' NOT NULL,
   sorting int(11) unsigned DEFAULT '0' NOT NULL,
   KEY uid_local (uid_local),
   KEY uid_foreign (uid_foreign)
);
The TCA config looks like this for tt_news.related:
"related" => Array (
    "exclude" => 1,
    "label" => "Related news:",
    "config" => Array (
        "type" => "group",
        "internal_type" => "db",
            "allowed" => "tt_news",
            "MM" => "tt_news_related_mm",
        "size" => "5",
        "maxitems" => "200",
        "minitems" => "0",
        "show_thumbs" => "1"
    )
),
Finally you can also use an intermediate table with files, so each file is registered with a record where the uid_foreign is a varchar with the filename rather than an integer pointing to the foreign record. This is the example structure found in t3lib/install/example_MM_relationTables.sql:
CREATE TABLE tt_content_media_mm (
  uid_local int(11) unsigned NOT NULL default '0',
  uid_foreign varchar(60) NOT NULL default '',
  sorting int(11) unsigned NOT NULL default '0',
  KEY uid_local (uid_local),
  KEY uid_foreign (uid_foreign)
);
The “exclude” fields
Did you notice in tables.php that certain fields has a flag set, “exclude=1”? For instance the tt_news.related field as shown above:
"related" => Array (
    "exclude" => 1,
    "label" => "Related news:",
     ....
When this option is set, the field is not available for non-admin users by default. Rather it must be specifically enabled by selecting the field in the list of “Allowed excludefields” in the setup of backend usergroups:
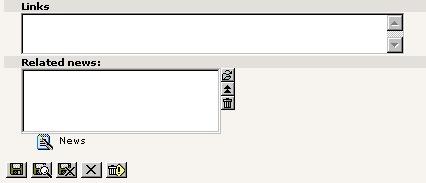
The default view; The “Links” field is the last in the form:

Then adding the “News: Related news” to the list of “Allowed excludefields”...
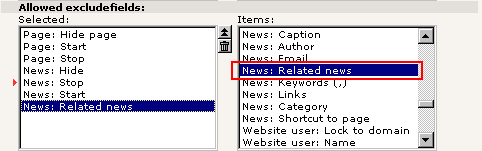
... and then the user (being a member of that group) has instant access to the field:
Notice: It's better to define a field “exclude” if you're in doubt! If you specify that option later, you'll have to edit alll your usergroups which should keep access. Setting the value by default will on the other hand allow you to just remove the flag if you suddenly realize that there is generally no need to restrict certain users from accessing this field!
$TCA: The [types] and [palettes] section
While the ctrl and columns section deal with general handling and specific handling of the table and it's fields, the “types” and “palettes” section is basically concerned with the presentation on- screen.
In essense the “types” section lists the fieldnames in the order they should be shown in the form. The field list is separated by comma. Each entry in the list is furthermore exploded by a semi-colon. The first part is the field name , the second part an alternative label for the field (if any), the third part is a reference to a palette to invoke with the field and the forth part is used for special configuration (primarily used with the TEXT field type, eg. to invoke the Rich Text Editor or turning of wrapping in the textarea field).
Consider this configuration:
.....
    "types" => Array (
        "0" => Array("showitem" => "title;;1,photodate,description,images,fe_cruser_id")
    ),
    "palettes" => Array (
        "1" => Array("showitem" => "hidden")
    )
);

?>
... and compare it with the display in the backend below.
When you're looking at these screenshots notice how the configuration of the title-field invokes the display of the palette number 1, which will in turn display the list of fields configured there - in this case only one field, the “hidden” field.
In the Alternative Backend (and wherever the class t3lib_tceforms.php is used to render editing fields) the palette fields needs to be shown together with the masterfield. However in the Classic backend, Doc- module, the whole palette principle is related to form fields found on layers in a specific frame. This concept was invented to save space and make forms less confusing - which it does very well. However it tends to hide the options from people, because you have to place the cursor in the formfield in order to invoke the palette. And finally this concept relies heavily on JavaScript and layers which makes it quite vulnerable to browser behaviours and bugs - in addition to the requirement of the whole database structure being loaded into JavaScript memory when the interface is first started - which quickly amounts to several hundreds kilobytes of JavaScript - which again pushes the client computer on it's resources.
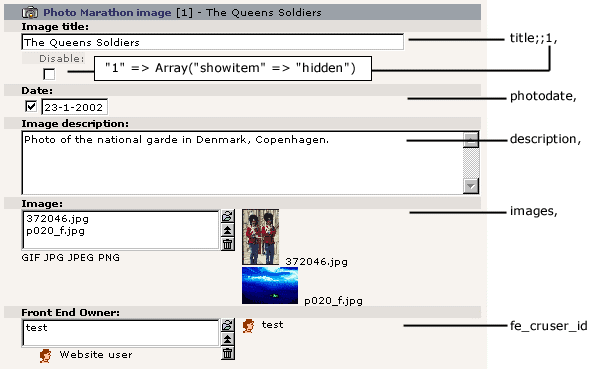
Notice the order from top and down is the same as set by the field name list defined in the “types” section!
Looking at the traditional forms in the Classic backend, Doc-module it looks very similar:
Multiple “types” entries
So far I haven't commented the “types” configuration for more than a single, default entry. However the concept of using the “types” section to order the way fields are displayed also allows us to choose various displays depending on the value of a certain field!
Consider this code listing, taken from the sys_action table in Typo3:
<?php
// ******************************************************************
// sys_action
// ******************************************************************
$TCA["sys_action"] = Array (
"ctrl" => Array (
"label" => "title",
"tstamp" => "tstamp",
"default_sortby" => "ORDER BY title",
"title" => "Action",
"crdate" => "crdate",
"cruser_id" => "cruser_id",
"adminOnly" => 1,
"rootLevel" => 1,
"enablecolumns" => Array (
"disabled" => "hidden"
),
"type" => "type"
),
"interface" => Array (
"showRecordFieldList" => "hidden,title,type,description,assign_to_groups"
),
"columns" => Array (
// ..... (more field are configured)
"type" => Array (
"label" => $LANG_GENERAL_LABELS["type"],
"config" => Array (
"type" => "select",
"items" => Array (
Array("", "0"),
Array("Create Backend User", "1"),
Array("SQL-query", "2")
)
)
),
// ..... (more field are configured)
),
"types" => Array (
"0" => Array("showitem" => "hidden,title,type"),
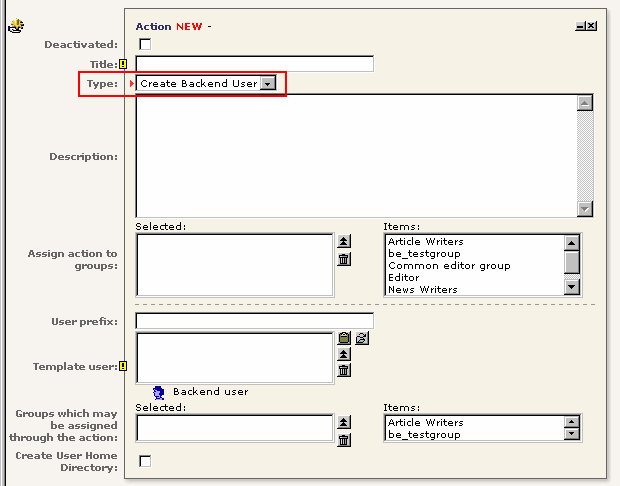
"1" => Array("showitem" => "hidden,title,type,description,assign_to_groups,--div--, ..."),
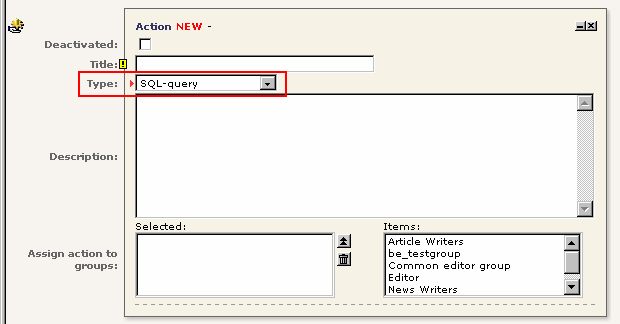
"2" => Array("showitem" => "hidden,title,type,description,assign_to_groups,--div--,")
)
);
?>
In the “ctrl” section we define the “type” key to the value “type” which in turn points to the fieldname “type” as being the fieldname determining the “type” of display (oh boy, al those types...). It works like this:
If the value of the field sys_action.type is “0” (zero), then the “hidden,title,type” fields are displayed:

Changing the “Type” selector to “Create Backend User” the form is rendered differently:
... and finally the “SQL-query” option will show us this form:
This is basically the options.
Configuring the Rich Text Editor (RTE)
You can attach the Rich Text Editor component in Typo3 to any field of the TEXT type. The configuration is best shown by looking at how the sys_staticfile_edit table is configured:
    "types" => Array (
        "0" => Array("showitem" => "
            edit_file;;1,
            edit_content;;;nowrap:richtext[*]:rte_transform[flag=rte_enabled|mode=ts_images],
            rte_enabled,
            update_status"
        )
    ),
    "palettes" => Array (
        "1" => Array("showitem" => "edit_subpart_marker,always_reload")
    )
);
In particular the existence of “richtext[*]” is important and the main parameter in charge of invoking the editor. In addition the RTE can be configured to process the output in various ways including configuration of the toolbar. This is a topic covered in “Inside Typo3” and the Administrators Guide.
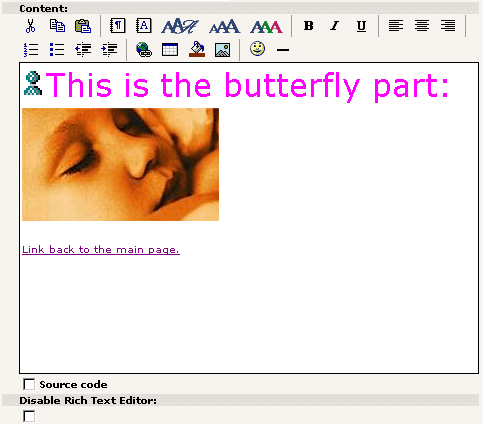
The result of this configuration looks like this:
Browsing the configuration in Tools > Configuration
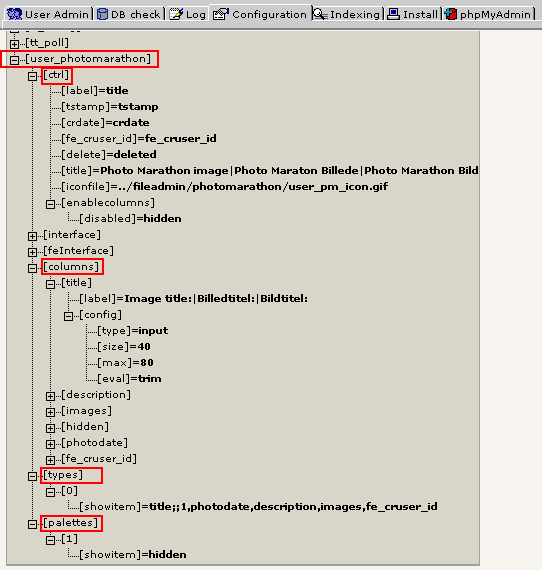
If you are curious how your configuration of tables should happen to be currently, you can take a peek in the Tools > Configuration module, selecting $TCA as the array to browse:
Creating records on pages
The pages table has a field, doktype, which is hardcoded in a relationship with the $PAGES_TYPES global var. The content of $PAGES_TYPES looks like this (in tables.php):
$PAGES_TYPES = Array(
    "3" => Array(
        "icon" => "pages_link.gif"
    ),
    "4" => Array(
        "icon" => "pages_shortcut.gif"
    ),
    "5" => Array(
        "icon" => "pages_notinmenu.gif"
    ),
    "6" => Array(
        "type" => "web",
        "icon" => "be_users_section.gif",
        "allowedTables" => "*"
    ),
      // TypoScript: Limit is 200.
      // When the doktype is 200 or above, the page WILL NOT be regarded as a "page" by TypoScript.
      // Rather is it a system-type page
    "199" => Array(
        "type" => "sys",
        "icon" => "spacer_icon.gif",
    ),
    "254" => Array(
        "type" => "sys",
        "icon" => "sysf.gif",
        "allowedTables" => "*"
    ),
    "255" => Array(
        "type" => "sys",
        "icon" => "recycler.gif",
        "allowedTables" => "*"
    ),
    "default" => Array(
        "type" => "web",
        "icon" => "pages.gif",
        "allowedTables" => "pages,pages_language_overlay,tt_content,tt_links,tt_board,....  ",
        "onlyAllowedTables" => "0"
    )
);
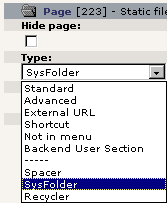
Each number in this array relates to the pages.doktype field value. This is the configuration of doktype:
"doktype" => Array (
    "exclude" => 1,
    "label" => $LANG_GENERAL_LABELS["type"],
    "config" => Array (
        "type" => "select",
        "items" => Array (
            Array("Standard", "1"),
            Array("Advanced", "2"),
            Array("External URL", "3"),
            Array("Shortcut", "4"),
            Array("Not in menu", "5"),
            Array("Backend User Section", "6"),
            Array("-----", "--div--"),
            Array("Spacer", "199"),
            Array("SysFolder", "254"),
            Array("Recycler", "255")
        ),
        "default" => "1"
    )
),
... and it looks like this is the backend forms:
The $PAGES_TYPES array not only indicates which icons the page records should be assigned depending on their “doktype”. It also determines which tables are allowed be represented on the page! This is configured with the “allowedTables” list. This value may be a asterisk, *, in which case all records are allowed.
All records may apparently be created in sysFolders. This looks like this in the backend:
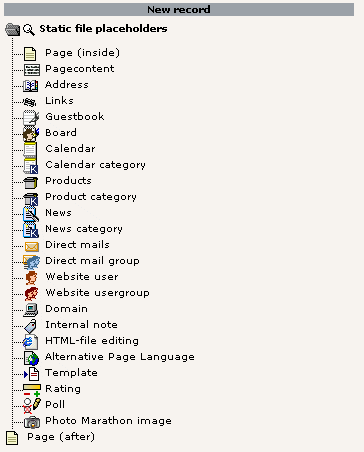
As you can see the Photo Marathon image records are allowed in sysFolders.
When we try to create records on a regular page, the list looks like this:
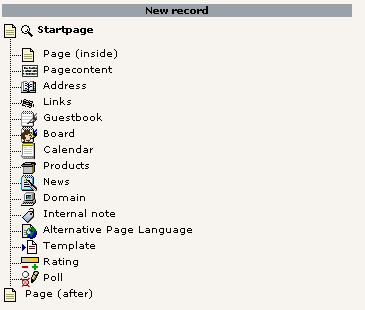
No Photo Marathon record in the list! Do'h!
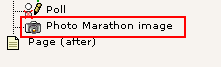
However if we intend our newly configured table to be included in the list of records allowed on regular pages, we simply add it to the default list in the $PAGES_TYPES. This is done by adding this line to our extTables.php script:
$PAGES_TYPES["default"]["allowedTables"].=",user_photomarathon";
And in return we get to create the records:
Adding context sensitive help to custom table fields
All the default tables in Typo3 has context sensitive help for their fields. This is done through the centrally distributed tables sys_tabledescr*. However modifying these tables are not clever for custom purposes because the tables are meant to be updated by new Typo3 releases. Therefore a file-based concept has been introduced in parallel to the sys_tabledescr concept.
This is also demonstrated by the user_photomarathon example. All you have to do is to place a file named 'extTables_descr.php' in the typo3conf/ folder of your Typo3 site. The content of this file should be modelled after this principle:
<?php

$TCA_DESCR["user_photomarathon"] = Array (
    "columns" => Array (
        "title" => Array(
            "description"=> "Enter the title of the image.",
            "details" => "This is displayed in the headers on the webpages.",
            "image" => "../typo3conf/web/uPhotomarathon/someImage.gif",
            "image_descr" => "Here you see the title",
            "seeAlso" =>"user_photomarathon:description,user_photomarathon:images"
        ),
        "description" => Array(
            "description"=>"Users may enter a description. This is shown with the image."
        ),
        "images" => Array(
            "description"=>"The image. Users may upload up to 2 images."
        ),
        "photodate" => Array(
            "description"=>"The date of the photo"
        ),
        "fe_cruser_id" => Array(
            "description"=>"
                This field contains a reference to the fe_user (website user) who owns it.
                You should not change this.
                If you remove the user, the image will no longer belong to him and he cannot ...
                In addition if you simply insert another user, the image will belong to this ...
            "
        )
    )
);

?>
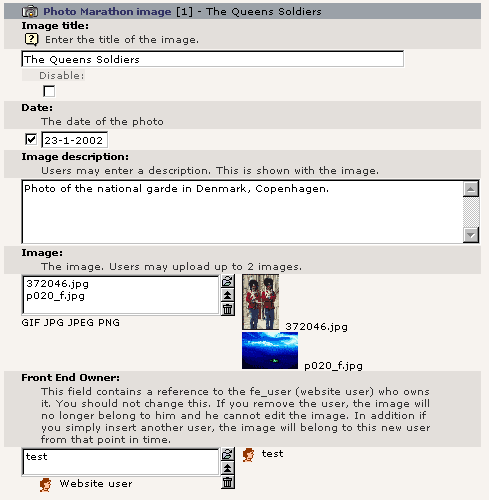
Provided that the user has enabled field help texts (see below) this will look like this in the backend forms:

... and clicking the icon will bring up this pop-up window:

Changing the display type, the field help may also appear like this:
Adding a translation to the custom table descriptions
That's very easy. You just need to know the available language keys (must be one of them). Those are found in the t3lib/config_default.php script. In this case we select danish (which is “dk”). You simply make a copy of the 'extTables_descr.php' file and rename it 'extTables_descr _dk .php':
<?php
$TCA_DESCR_DK["user_photomarathon"] = Array (
    "columns" => Array (
        "description" => Array(
            "description"=>"Beskrivelse af billedet"
        ),
        "images" => Array(
            "description"=>"Brugerne kan uploade op til 2 billeder."
        ),
        "photodate" => Array(
            "description"=>"Datoen for fotografiet."
        ),
        "fe_cruser_id" => Array(
            "description"=>"Reference til brugeren, som ejer billedet."
        )
    )
);

?>
Looking at the help text now - provided we shift our system language to danish - we'll see the descriptions translated into danish - except the “title” description which is missing. This description will then default to english. Notice how the additional information like “seeAlso” references and links does not need to be respecified.
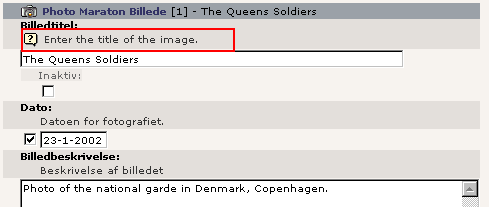
In this example it is danish descriptions with the exception of the “title” which was left out in the translation.
Custom Backend Module
Introduction
Backend modules are subdivided into “main modules” and “submodules”. Generally speaking “modules” covers them all. Refering to a module is done by it's name and 'path'. For instance the submodule “List” in the “Web”-module would be refered to as “Web>List” module.
The location of default and custom modules
The modules are technically represented by a folder each in typo3/mod/, the first level being the main module and subfolders to this being the submodules. This structure is reflected in the backend interfaces - the Classic Backend (CB) and Alternative Backend (AB) view.
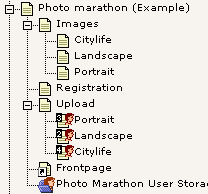
This illustration shows the relationship between them:

Notice how the Classic Backend presents access to the modules through the panes, while the Alternative Backend renders a vertical menubar. It's the same modules invoked - just different shells to manage them.
Looking at the illustration you'll see that the userdefined Photo Marathon module (from the testsite) appears within the Web module. However it's not a part of the directory structure found at typo3/mod/web/ but rather a parallel structure found in typo3conf/ where it is located in web/uPhotomarathon.
Placing custom modules - and customized material in general! - in the typo3conf/ folder is clever because the typo3/ folders content is not touched and can thus be upgraded easily by simply overriding the files when a new version is released. And so far we've seen the extTables.php files including table-description files being placed in the typo3conf/ folder in addition to the wellknown localconf.php file and now also the custom modules!
Basic requirements to (custom) modules
First of all, determine if you wish to make a main module or submodule. Submodules should be placed in folders in typo3conf/ named similar to the main module found in typo3/mod/. Custom main modules should of course be located in typo3conf/ directly.
Always prepend your user defined modules with a “u” like in “uPhotomarathon”. This will ensure that the module name will not be taken by a default module some day.
This is how the custom Photo Marathon module (from typo3conf/web/uPhotomarathon) is located in the Classic backend:

1) Files in the module folder
Regardless of a module being a main- or submodule, a file named “conf.php” must be found in the module folder:
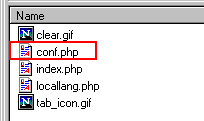
- The clear.gif file found is not required, but quite practical to have around.
- index.php is not required either. It's commonly used as the main script invoking the module, but it's always configured in conf.php.
- locallang.php contains labels for the interface, typically translated into the system languages.
- tab_icon.gif is configured in conf.php to be the icon of the module. Max 12 pixels high.
- conf.php is however the only required file. This is how it looks inside in the Photo Marathon case:
<?

    // Relative path to the module from the typo3/ folder
define("TYPO3_MOD_PATH","../typo3conf/web/uPhotomarathon/");
    // Relative path to the typo3/ folder
$BACK_PATH="../../../typo3/";

    // Module name as shown in the backend:
$MLANG["default"]["tabs"]["tab"] = "Photo Marathon";
    // Icon-file used with the module. Max 12 pixels high.
$MLANG["default"]["tabs_images"]["tab"] = "tab_icon.gif";
    // Short description for the tab image label:
$MLANG["default"]["labels"]["tablabel"] = "Photo Marathon (EXAMPLE!)";
    // Longer description, used in the "Help>About modules" module
$MLANG["default"]["labels"]["tabdescr"] = "This is an example module related to ....";


    // Danish translation of labels:
$MLANG["dk"]["tabs"]["tab"] = "Fotomaraton";
$MLANG["dk"]["labels"]["tablabel"] = "Fotomaraton (Eksempelmodul)";

    // Main script invoked:
$MCONF["script"]="index.php";
    // Access level.
    // You can specify access for both backend users and groups to this module.
$MCONF["access"]="user,group";

    // Syntax: [module]_[subModule]  or just [module] if no submodule!!
    // Remember, never use underscore "_" in module names!
$MCONF["name"]="web_uPhotomarathon";

?>
As you can see both the index.php and tab_icon.gif files are configured herein. In turn the locallang.php file is included from index.php.
    // Relative path to the module from the typo3/ folder
define("TYPO3_MOD_PATH","../typo3conf/web/uPhotomarathon/");
    // Relative path to the typo3/ folder
$BACK_PATH="../../../typo3/";
Defining these paths correctly is vital. These vars tells the script where it is in relation to the typo3/ folder. $BACK_PATH is generally used as a script prefix to call scripts in the typo3/ folder and keeping this value correct will ensure success when linking to scripts and images. You can see how it's used in the default modules. Plenty of examples.
The TYPO3_MOD_PATH constant is used in the init.php file which must be included immediately after the conf.php file in the index.php main script (or whatever you configure it to be) of the module.
    // Access level.
    // You can specify access for both backend users and groups to this module.
$MCONF["access"]="user,group";
The access settings determines how the system handles access to your module. If you set the value to blank, then the module appears for ALL users. Like with the “exclude” option of fields in $TCA you should be very certain that you want this. Better configure the module to be specifically assigned to users/groups than having to modify a whole bunch of groups later due to a change here.
Setting it to “admin” will allow only 'Admin'-backend users to access it.
Then you can finally enter “user”, “group” or both in a list. Each code determines where the module will appear in the backend user and group settings. For instance the settings used here will result in the module list to look like this:
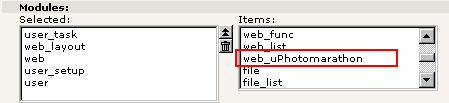
    // Syntax: [module]_[subModule]  or just [module] if no submodule!!
    // Remember, never use underscore "_" in module names!
$MCONF["name"]="web_uPhotomarathon";
The module name is used many places to refer to the module. Not only in the access lists, but also in TSconfig where applicable.
    // Danish translation of labels:
$MLANG["dk"]["tabs"]["tab"] = "Fotomaraton";
$MLANG["dk"]["labels"]["tablabel"] = "Fotomaraton (Eksempelmodul)";
The labels are used for the module title in the backend. You can specify the label in many languages, in this case, danish.
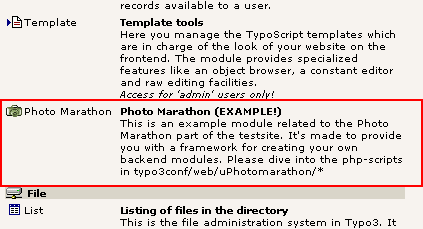
    // Longer description, used in the "Help>About modules" module
$MLANG["default"]["labels"]["tabdescr"] = "This is an example module related to ....";
In addition you can write a longer description of the module. This will be shown in the “Help>About modules” module and likewise the “tab” and “tablabel” above you can provide a localized version in another language.
2) Adding to the global $TBE_MODULES array
When your module is configured you must also enable it in the global $TBE_MODULES array. The default values (and syntax derived from this) of this array is seen in the bottom of the default tables.php file:
$TBE_MODULES = Array (
    "web" => "layout,modules,info,perm,func,list,ts",
    "file" => "list,images",
    "doc" => "",    // This should always be empty!
    "spacer1"=>"",
    "user" => "task,setup",
    "tools" => "beuser,dbint,log,config,isearch,install,phpadmin",
    "help" => "welcome,aboutmodules,quick,about"
);
( Notice: The “doc” key is hardcoded to be ignored in the Alternative Backend (AB). In addition “spacers” and not used either in the AB)
Looking into the typo3conf/extTables.php file, we see in the very bottom how the web/uPhotomarathon module is added to the main module “Web”:
$TBE_MODULES["web"].=",uPhotomarathon";
That's basically it! You can of course also remove default modules this way by modifying the array. Or even switch them around, altering the order etc.
Parameters passed to the module script
Generally the scripts of the modules are called without any special parameters. At least this is the case with the Classic Backend. Using the Alternative Backend the AB=1 parameter is passed as well. How and if the module is using this for anything significant is up to the module. But the point is that this parameter is a notice to the module that the module is operating within the framework of the Alternative Backend and not the Classic Backend. For instance the Web>List module uses this to disable the click-menus when the Classic Backend is not present.
This is an example of a call to the “User>Task center” from the Alternative Backend:
typo3/mod/user/task/index.php?AB=1
The Web and File main modules
There are two very special main modules. This is the Web and File modules. They are always used within the context of the page tree and directory tree respectively. This is not the case with any of the other main/submodule which are basically providing a way to group modules together logically.
The Web and File modules are special because the submodules are called with the “id=” parameter. In the Web-module the id points to the page clicked in the page tree, in the File-module the id value is equal to the absolute filepath on the server which the submodule is going to work on or relate to.
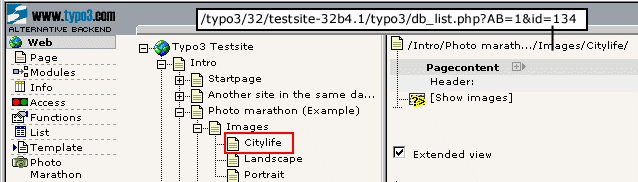
Notice how the id 134 is passed to the script because the title of the page “Citylife” was clicked in the page tree.
The main script
Mandatory initialization
Looking inside the main script of the Photo Marathon module we see first of all a few lines of traditional includes and evaluations:
// **********************************************
// Basic initialization, don't tamper with this!
// **********************************************
unset($MCONF);
include ("conf.php");
include ($BACK_PATH."init.php");
include ($BACK_PATH."template.php");
include ("locallang.php");
$BE_USER->modAccess($MCONF,1);
- As you see the conf.php file is included before anything else. This is necessary in order to set the TYPO3_MOD_PATH constant.
- init.php is then included. This will include some libraries from t3lib/, include the typo3conf/localconf configuration, connect to the database, authenticate the backend user login, include the $TCA etc. This file should always be included by any Typo3 Backend script.
- Then the template.php file is included. This contains some function for printing out a page header and footer, including the default Typo3 colorscheme. In addition the language handling functions are found in there.
- Then the locallang.php file is included. This sets the global variable $LOCAL_LANG as we see here for the Photo Marathon example:
<?
$LOCAL_LANG = Array (
    "default" => Array (    // Default english labels:
        "title" => "Photo Marathon (EXAMPLE)",
        "menu" => "Select a function",
        "menu_overview" => "Overview of Photo Marathon records",
        "menu_list" => "List Photo Marathon records on the page"
    ),
    "dk" => Array (        // Danish labels:
        "title" => "Foto Maraton (EKSEMPEL)",
        "menu" => "Vælg en funktion",
        "menu_overview" => "Overblik over foto maraton emner",
        "menu_list" => "Liste over foto maraton emner på siden"
    )
)
?>
And finally $BE_USER->modAccess() is called. This will determine if the user has access to this module and if not issue an error message and exit.
(For the authoritative list of the global variables available in the Backend scope, please refer to “Inside Typo3” document)
Now the module access is granted and you can do whatever you like. Following is a description of various repeatedly used concepts, which may come in handy for you.
Typo3 Project Guidelines and “GPvars”
First of all I would like to draw attension to “Inside Typo3” document where a list of project guidelines are specified. You're strongly encouraged to read them through and follow them. This will ensure that your code will be consistent with the style in which Typo3 is programmed.
One of these guidelines - or specifications - is that your code must comply with the php.ini-optimized settings of PHP. Although most PHP- installs does not use these settings in order to be backwards compatible, Typo3 must be able to work perfectly in both environments.
The consequence of the php.ini-optimized settings is that global variables are not registered as vigorously as originally. In particular the incoming variables from HTTP_POST_VARS and HTTP_GET_VARS are not registered in the global space.
There are two solutions to this:
In order to register the GET or POST vars (with precedence to POST), eg. “bart” and “homer” to the globals $bart and $homer, simply make this function call:t3lib_div::setGPvars("bart,homer");Slashes are automatically stripped on strings, but not recursively on arrays (unless you set the second parameter to “1”).
You can also retrieve single variables directly like this:$bart = t3lib_div::GPvar(“bart”);
Page access
You should make sure that the user has read-access to the page according to his permissions. You can get an appropriate WHERE-clause for this from the $BE_USER object. The value you should pass is “1” which will check for read access (2,4,8 and 16 is for the other permissions. Look inside the header of class t3lib_tcemain to see the full list and meaning).
With this query string you can try to select the page and if you get a page record back the user has read access. In short it looks like this:
<?

  // WHERE-clause part which you should use for selecting records so you can be sure,
  // the BE_USER (backend user) has read access.
$perms_clause = $BE_USER->getPagePermsClause(1);

  // integer id value
$id = intval($id);

  // The page record of the current page (set by $id).
  // $perms_clause ensures that the BE user has read access to this module.
$pageinfo = t3lib_BEfunc::readPageAccess($id,$perms_clause);

  // Has access??
if ($id && is_array($pageinfo)) {

    // Do your main things here

} else {
    die("Sorry, you did not have read access to this page!");
}

?>
Header and footer
The template.php script contains some classes for the framework of the page, eg. correct charset based on system language.
You can either choose to just output a header and footer on the page, or like this is case call the API which will provide Typo3 style “sections” in your modules, including headers etc:
<?

    // Make instance of class mediumDoc:
$doc = new mediumDoc;
$doc->backPath = $BACK_PATH;
$doc->JScode = '
    <SCRIPT>
        function jumpToUrl(URL)    {
            document.location = URL;
        }
    </SCRIPT>
';

    // Draw the header.
$content.=$doc->startPage($LANG->getLL("title"));
$content.=$doc->header($LANG->getLL("title"));
$content.=$doc->spacer(5);
$content.='<form action="index.php" method="POST">
        <input type="hidden" name="id" value="'.$id.'">
        <input type="hidden" name="AB" value="'.$AB.'">';


    // Add you main things to $content here! Eg:
$content.=$doc->section('Hello World!',"What a great module!");
$content.=$doc->divider(5);

    // Ending the page
$content.=$doc->endPage();
$content.='</form>';

echo $content;

?>
Notice how a default form is initialized, pointing to the current script and preserving the AB variable.

Taking a look into the class “template” which $doc is an instance of also reveals the internal variables at your disposal:
<?

class template {
    var $bgColor = "#F7F3EF";        // Light background color
    var $bgColor2 = "#9BA1A8";        // Steel-blue
    var $bgColor3 = "#F6F2E6";        // dok.color
    var $bgColor4 = "#D9D5C9";        // light tablerow background, brownish
    var $bgColor5 = "#ABBBB4";        // light tablerow background, greenish
    var $bgColor6 = "#E7DBA8";        // light tablerow background, yellowish, for section headers.
    var $hoverColor = "#254D7B";
(typo3/template.php)
These can be reached through $doc, eg:
$doc->bgColor2
Language specific labels ($LANG object)
In the above code listing you also see how to retrieve the language labels from the $LOCAL_LANG array configured in locallang.php:
    // Draw the header.
$content.=$doc->startPage($LANG->getLL("title"));
$content.=$doc->header($LANG->getLL("title"));
This is a clear example, how to get the value of the label, named “title”:
<?
$LOCAL_LANG = Array (
    "default" => Array (    // Default english labels:
        "title" => "Photo Marathon (EXAMPLE)",
        "menu" => "Select a function",
        "menu_overview" => "Overview of Photo Marathon records",
        "menu_list" => "List Photo Marathon records on the page"
    ),
    "dk" => Array (        // Danish labels:
        "title" => "Foto Maraton (EKSEMPEL)",
        "menu" => "Vælg en funktion",
        "menu_overview" => "Overblik over foto maraton emner",
        "menu_list" => "Liste over foto maraton emner på siden"
    )
)
?>
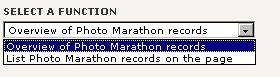
A selector box menu
Making a selector menu like the one found in the Photo Marathon module is done easily through an API call. The menu will reload the page “onChange”. In addition there is a straight forward way to configure page TSconfig to enable/disable items in the menu as you like.
// **************************
// Menu initializing
// **************************
    // MENU-ITEMS:
    // If array, then it's a selector box menu
    // If empty string it's just a variable, that'll be saved.
$MOD_MENU = array(
    "mode" => array(    // variable
        "overview" => $LANG->getLL("menu_overview"),        // Menu value/item
        "list" => $LANG->getLL("menu_list")                    // Menu value/item
    )
);

    // page/be_user TSconfig settings:
$modTSconfig = t3lib_BEfunc::getModTSconfig($id,"mod.".$GLOBALS["MCONF"]["name"]);

    // ... and blinding of menu-items:
$MOD_MENU["mode"] =
    t3lib_BEfunc::unsetMenuItems($modTSconfig["properties"],$MOD_MENU["mode"],"menu.mode");

    // Settings cleansed:
$MOD_SETTINGS = t3lib_BEfunc::getModuleData($MOD_MENU, $SET, $GLOBALS["MCONF"]["name"]);
In this list the menu items is configured:
- The $MOD_MENU[“mode”] array is filled with element pairs, “ key ” => “ label ”. Notice how the labels are fetched by $LANG->getLL() from the $LOCAL_LANG array!
- $modTSconfig is loaded with the TSconfiguration combined of page TSconfig and user TSconfig (see the Administrators Guide for details here). We'll get back to that.
- Then the $MOD_MENU[“mode”] is passed to a function which removed unavailable menu items, if any. I'll get back to that as well.
- Finally the $MOD_SETTINGS is set and if there has been any change in states, the value of $MOD_SETTINGS is saved to the session data for the backend user. This ensures that the state of the menu is always remembered from each visit to the module.
Now you just need to insert the selectorbox menu somewhere in your module. Following our style from before this is easily done like this:
    // Render the main menu (&mode)
    // Good thing about this menu is that it saves the state automatically for the backend user.
$menuHTML = t3lib_BEfunc::getFuncMenu($id,"SET[mode]",$MOD_SETTINGS["mode"],$MOD_MENU["mode"]);
$content.=$doc->section($LANG->getLL("menu"),$menuHTML);
Using “module TS config”
One final thing for you to know is that there is a concept established called TSconfig. This has threads into all kinds of things in Typo3. Basically it's the wellknown TypoScript configuration style used to configure values other than those bringing a website to life through the TypoScript template records.
TSconfig fields are available in page records and in Backend users and groups. Both may play a role in configuring your module if you like.
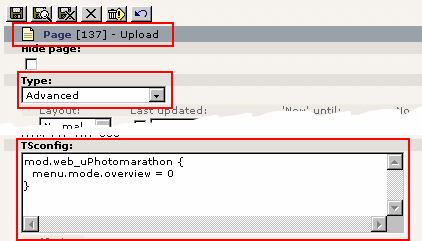
Now, change the type of the page “Images” from “Standard” to “Advanced” and enter this configuration script:
In your module, try to output the content of $modTSconfig by this line:
// page/be_user TSconfig settings:
$modTSconfig = t3lib_BEfunc::getModTSconfig($id,"mod.".$GLOBALS["MCONF"]["name"]);
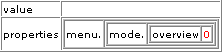
debug($modTSconfig);
This is what you get:
When this is used in the lines below, it happens to disable the “Overview...” menu item in the menu, which now looks like:

This is a common principle used in most modules with a main menu. Basically you can determine all by yourself how you wish your module to handle the TypoScript configuration available in $modTSconfig. The common thing is to use the “menu”-node to blind menu items. But you could add any number of customly defined nodes and let then determine further settings.
For inspiration look inside the Administrators Guide for examples.
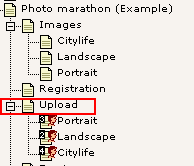
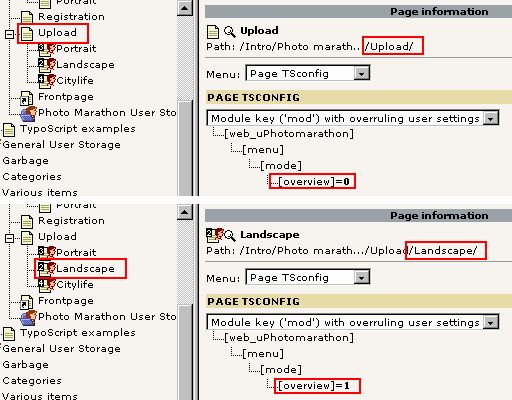
A final demonstration of the power of “page TSconfig” is now shown. The TSconfig from above was inserted on the page “Upload” and so covers the three subsequent pages Portrait, Landscape and Citylife. Imagine you wish to enable the overview item on the page “Landscape” only while letting it remain blank on the other pages. This is easily done by modifying the page “Landscape like we just did with the page “Upload”:

In effect both menu items are available on the “Landscape” page, but not on the Portrait and Citylife pages!
If you wish you can also examine this configuration by the Web>Info module:
 Backend Programming - 36