DEPRECATION WARNING
This documentation is not using the current rendering mechanism and is probably outdated. The extension maintainer should switch to the new system. Details on how to use the rendering mechanism can be found here.
Upgrade Typo3 3.8.0 to 4.2.0 (and PHP 4 to PHP 5)
| Author: | Kasper Skårhøj |
|---|---|
| Created: | 2002-11-01T00:32:00 |
| Changed: | 2008-05-14T13:59:07 |
| Classification: | Typo3 Tutorial |
| Description: | Upgrade Typo3 3.8.0 to 4.2.0 (and PHP 4 to PHP 5) |
| Author: | Marco Voegeli |
| Contact: | |
| Copyright: |
|
| Web: |
Upgrade Typo3 3.8.0 to 4.2.0
(And PHP 4 to PHP 5)
Extension Key: doc_tut_upgrade_380_to_420
Copyright 2008, Marco Voegeli, Switzerland / Europe
Web: http://www.voegeli.li / Contact: http://contact.voegeli.li
This document has been published under the Open Content License:
This document is not an official document from the Typo3 Association (see Disclaimer).
The content of this Tutorial is related to the Open Source Content Management System called „TYPO3“
Inhaltsverzeichnis
Upgrade Typo3 3.8.0 to 4.2.0 1
Disclaimer 2
Introduction 2
What is this document for? 2
What is the target group? 2
Why upgrade to PHP5? 2
Does these steps here fit to all installations? 2
Any Hints or Suggestions? 2
Requirements 2
Step 1: Backup Your Entire Website 3
Step 2: Check and Save the Backup 3
Step 3: Download Entire Typo3 Root Folder 3
Step 4: Local Replacement of Old Files with New Files 3
Step 5: Upload New Files to the Webserver 4
Step 6: Switch New Directory to PHP 5.x.x. 4
Step 7: Copy Current MySQL Database to the New Database 5
Step 8: Execute Typo3 Install Tool and Database Analyser 6
Upgrade Typo3 Database and Extension Tables 6
Clear Typo3 Cache 9
Step 9: Check Changelog and Check/Adjust Settings 9
Step 10: Correct Errors and Adjust Programming 9
Step 11: Various Stuff I Had to Do... 10
Switch On Debugging 10
Change of Charset to UTF-8 10
Own Classes and Database Connections 10
RTEHtmlArea Now a System Extension 10
Replace Paths to New Directory 11
Update Date2Cal Extension 12
Languages Configuration and Flags 12
TT_News locallang.xml 12
Check and Correct Indexed Search Engine 12
Reindex Alll Pages 12
Scrollbars Missing in the Template Frameset 13
Update Dh_LinkLayout 13
Performance Enhancements 13
Own Page Content Type from USER to USER_INT (if Cache is used) 13
Configure System Parameters 13
Typo3 Load Control (Upcoming Extension mv_typo3_load_control) 13
Disclaimer
- This document is NOT an official document from the TYPO3 association.
- The execution of the system upgrade, as mentionned in this document, is on your own risk. The author and the Typo3 association cannot be responsible for anything that results out of this upgrade.
- Please also check the official publications on typo3.org, the relevant change logs and forums.
- If you feel insecure or you do not have the specific knowledge to perform this upgrade, please contact a Typo3 consulting partner.
- **There is no free consulting given by the author for this tutorial or your upgrade!**
Introduction
What is this document for?
This tutorial contains a well structured 10-step-guide (or even more :-) to upgrade Typo3 version 3.8.0 (PHP 4.x.x) to Typo3 version 4.2.x (PHP 5.x.x), which means upgrading both Typo3 and PHP. It will consider data security as well as ease of execution of the following logical steps. While TYPO3 3.8.0 can be run with PHP 4.x.x, TYPO3 > 4.2.0 requires PHP 5. That is the reason both has to be upgraded (PHP & TYPO3).
What is the target group?
This document is addressed to Typo3 administrators and developers.
Why upgrade to PHP5?
Never Typo3 versions > 4.2.0 can only be used with PHP 5.x.x.
Does these steps here fit to all installations?
No! This tutorial is just a documentation of what I had to do during the upgrade. It may give you hints what steps have to be performed and what you should think about. But you should also keep in mind, that each installation is different and there are always specific tasks for each upgrade.
Any Hints or Suggestions?
If you have any hints or suggestions (not basic questions), you may send them to me (see contact data in the document header).
Requirements
Before you start with your upgrade, be sure that your installation meets the following requirements:
- Webserver with PHP 4.x.x and MySQL database installed
- Typo3 3.8.0 (might work with other versions as well) installed & running
- PHP 5.x.x installed on your system (beside PHP 4.x.x) / Ask your administrator or hosting provider to get that information.
Step 1: Backup Your Entire Website
Backup your entire site! It is important to perform this step anytime you change or replace Typo3 core files. Especially if you upgrade more than a subversion of Typo3. Your backup should include the following:
All Files & the directory structure
Entire MySQL database dump
Sometimes hosting provider give you access to a backup tool, with which you can backup your entire site and dump the database at once.
Step 2: Check and Save the Backup
Be sure your backup is not corrupted (especially if the files are compressed in an archive file like zip, rar etc.). Be sure that all files are in it and the directory structure is stored in the archive as well. Don’t forget to check if the MySQL database dump is created! And this correctly.
It is advisable to save the backup on more than just one storage device. Just to be on the safe side.
Step 3: Download Entire Typo3 Root Folder
Download the root folder of your TYPO3 installation to your local harddrive. The root folder is, where the TYPO3 “index.php” file is. Copy every file in the root folder and all sub-folders as well.
Step 4: Local Replacement of Old Files with New Files
Download the latest TYPO3 version from www.typo3.org ! In this case it is version TYPO3 4.2 RC (Release Candidate) 1. Unpack these files to a new directory on your local harddrive.
Copy this unpacked files and folders to the clipboard and go the the local directory where you have downloaded your current installation TYPO3 root folder (see previous step). Paste the copied files and folders from your clipboard and replace the old files.
Be sure the following files and folders are being replaced for sure:
- Folder Media/
- Folder T3lib/
- Folder Tslib/
- Folder Typo3/
- File Index.php
- File Showpic.php
Replace the existing files and folders with the new version.
Step 5: Upload New Files to the Webserver
Create a new directory on your webserver and upload the files. The reason for the new directory is, that we will later switch this directory to be parsed by PHP 5.x.x instead of PHP 4.x.x! And you can perform all adjustments and corrections beside your running Typo3 installation – no down time! You may need to adjust the rights of the files (CHMOD) via FTP.
Step 6: Switch New Directory to PHP 5.x.x.
In order to run Typo3 > .2.0, you need PHP 5. Therefore you need to have PHP 5.x.x installed. Most web hosting provider have PHP 4 as default and optionally PHP 5 installed. Sometimes the file ending “.php5” will be parsed by PHP 5.x.x. On my server it is:
.php Parsed by PHP 4, every folder
.php5 Parsed by PHP 5, every folder
If your webserver is Apache and allows you to create “.htaccess” files, then one of the following entries can help you to define, that “.php” files in a single folder (and all subfolders) will be parsed by PHP 5.x.x, instead of default PHP 4.x.x. What we want to reach is:
.php Parsed by PHP 5, one folder with subfolders
Create a new “.htaccess” file in the TYPO3 root folder, or extend the existing one, by the following lines.
For PHP 5.2.x:
Action php /cgi-php52/php
AddHandler php52 .php
For PHP 5.1.x:
Action php /cgi-php51/php
AddHandler php51 .php
For PHP 5.0.x:
Action php /cgi-php5/php
AddHandler php5 .php
The above examples work if your PHP is implemented as CGI. If that should not work, try one of the following entries.
For PHP 5.2.x:
AddType application/x-httpd-php52 .php
Eventually additional: AddHandler x-httpd-php52 .php
For PHP 5.1.x:
AddType application/x-httpd-php51 .php
Eventually additional: AddHandler x-httpd-php5 .php
For PHP 5.0.x:
AddType application/x-httpd-php5 .php
Eventually additional: AddHandler x-httpd-php50 .php
After this step all “.php”-files should be parsed and executed by PHP 5.x.x. You can easily check this with a new PHP file with <?php phpinfo(); ?>.
Step 7: Copy Current MySQL Database to the New Database
Create a copy of your database! A good tool to perform this step is PHPmyAdmin ( www.phpmyadmin.net ). Copy both – structure and data.
If you have a really big database to copy and problems to import it in your new database in phpmyadmin, then the following tool might help (it did so to me!).
BigDump: Staggered MySQL Dump Importer
Step 8: Execute Typo3 Install Tool and Database Analyser
Go to your Typo3 folder in your webbrowser and call the install tool (has to be enabled before).
Upgrade Typo3 Database and Extension Tables
Go to your Backend. Under “Tools”, click the link “Install”.
Under “Database Analyser”, click the link “COMPARE”.
Database Analyser reads the “.sql”-files from TYPO3 core and extensions. Then it reads the meta data from the MySQL database. These two definitions will be compared. As a result of this automatic procedure, you will get a list which is divided in different parts:
Add fields
- Change fields
- Delete unused fields
- Add Tables
- Delete Tables
Each entry has a checkbox, which defines if the action will be performed after a click on the button “Write to database”.
**ATTENTION:** Check each entry carefully! Escpecially if you have added own fields to TYPO3 or extension tables!!! Don’t delete fields you still need.
Upgrade Static and Description Tables
The tables beginning with “static_” are delivered with TYPO3 and should not be changed. These tables have to be updated as well.
ATTENTION: Be sure you did not change any table beginning with “static_”.
Go to “Database Analyser” again, then press “IMPORT” under Dump static data.
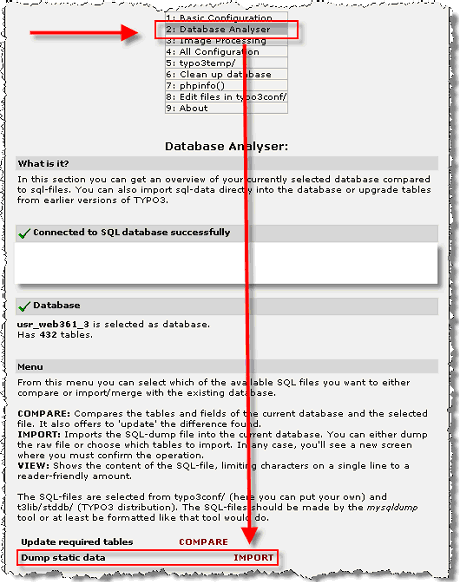
Activate checkbox “Import the whole file …” and press the button “Write to database”.
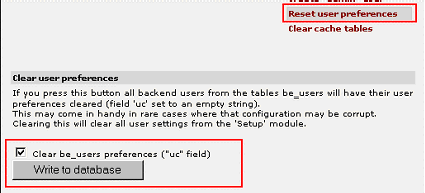
In the next step you can initialize cache tables. Mark the following entries and press “Write to database” again.

The next step clears the backend user preferences. Press “Write to database” again.
Clear Typo3 Cache
Clear both – FE cache and cache in typo3conf/:
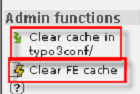
**ATTENTION:** Please check via FTP, that all “temp_CACHED…” files in the folder typo3conf/ are deleted.
Step 9: Check Changelog and Check/Adjust Settings
Please the check the TYPO3 changelogs. Check the log in your new TYPO3 distribution, as well as all logs of versions in between. You can find the changelogs under the following link:
Check the major context attributes of the TYPO3 installation under “Configuration” and adjust settings where needed. You might also check the main extensions, such as news etc. in the template.

Please check also for path strings, as it might not be correct anymore (if you copied the new Typo3 installation to another folder).
Especially if you did some own PHP development under PHP 4 in your “old” installation, it might be necessary to change some notation for PHP 5. You should check the following things:
Step 10: Correct Errors and Adjust Programming
Especially if you did some own PHP development under PHP 4 in your “old” installation, it might be necessary to change some notation for PHP 5. You should check the following things:
- Check for path strings, as they might not be correct now (if you copied the new TYPO3 files to another directory).
- PHP 5 has a new object model. This could have influence to all classes. The most changed from PHP 4 to PHP 5 are done here. Read more about this here: http://devzone.zend.com/article/1714-Whats-New-in- PHP-5
- XML support has been consolidated from different classes to 1 library. Read more about this here: http://devzone.zend.com/article/1714 -Whats-New-in-PHP-5
Please see the following sites to get to know what I had to correct and adjust.
Step 11: Various Stuff I Had to Do...
Switch On Debugging
In order to check errors it is good to switch debugging on while you are testing your upgraded Typo3 installation.
Go to the part „configuration“ in your Typo3 backend:

Under the tree item „SYS“ you can configure the debugging:
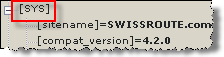
Set the following parameters in you localconf.php:
$TYPO3_CONF_VARS['FE']['debug'] = '1';
$TYPO3_CONF_VARS['SYS']['sqlDebug'] = '1';
$TYPO3_CONF_VARS['SYS']['Debug'] = '1';
$TYPO3_CONF_VARS['SYS']['displayErrors'] = '1';
$TYPO3_CONF_VARS['SYS']['devIPmask'] = '*';
Change of Charset to UTF-8
Since version 4.2.0 the charset is set to UTF-8. This means you might need to change special characters. The best is to use HTML signs for special chars! A good resource for this is http://www.asciitable.com/
Own Classes and Database Connections
If you have own classes and database connections (even in external files and included over content type PHP), you need to change them as well! Check that the right database is being selected and all paths are correct! I had global Typo3 errors, because of errors raised in external PHP files.
RTEHtmlArea Now a System Extension
If you use the wysiwyg editor RTEHtmlArea then there is a surprise: This extension is now a system extension and already being delivered with the Typo3 installation. Be sure to deinstall and maybe delete your local version. Then clear all cache and install the delivered system extension. If the editor is not being displayed, the error might be that your local installation is not properly undone.
 If the editor is still not being displayed (I had this
problem), then be sure you have set the following parameter in
localconf.php:
If the editor is still not being displayed (I had this
problem), then be sure you have set the following parameter in
localconf.php:
$TYPO3_CONF_VARS['BE']['RTEenabled'] = 1;
Once correctly installed you may wish to use all options the RTEHtmlArea. Therefore select the following options preset:
 This will show everything. Works fine for me, even if it says
„Not for production environments.“.
This will show everything. Works fine for me, even if it says
„Not for production environments.“.
Replace Paths to New Directory
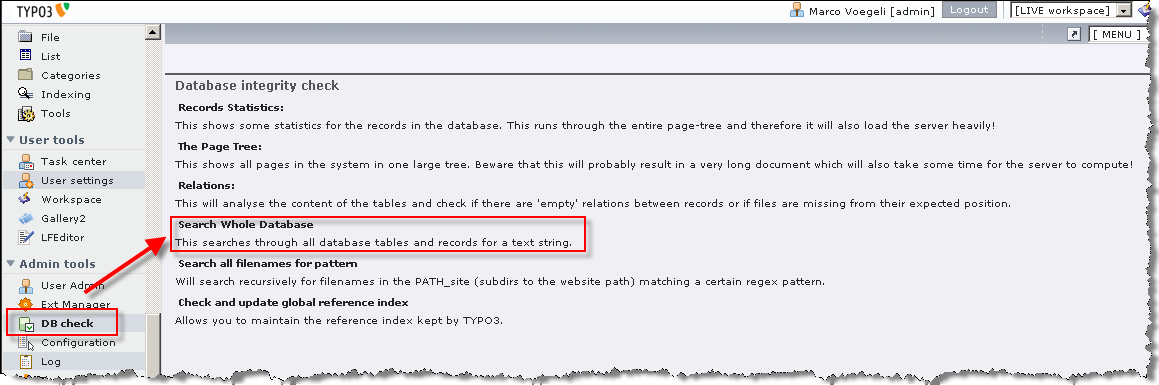
Be sure that you have replaced all paths from the old installation directory to the new one. A good way to do this for content in your new Typo3 installation is using „DB check“. For this log on to your Typo3 backend an choose „DB check“. Then select „Search whole database“:
Select „Raw Search in all fields“ as search method and search for the old path:
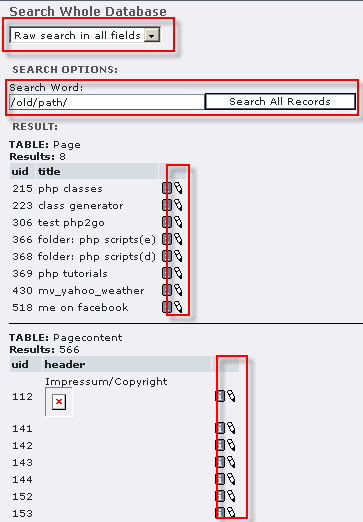
 You can update this directly by using the symbol:
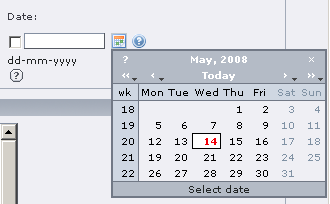
Update Date2Cal Extension
I had installed the date2cal extenion, which makes date fields in the backend selectable by a calendar:
I needed to update this extension to a new version. Then it worked again.
Languages Configuration and Flags
I needed to change my secondary website language, because new flags were delivered:

TT_News locallang.xml
My tt_News did not work anymore. Error message was something like „invalid locallang.xml“. I have downloaded the single file „locallang.xml“ from the Typo3.org repository. Then it worked for me. Be sure to download locallang.xml for the right version of your tt_news installation.
Check and Correct Indexed Search Engine
The indexed search did not work anymore. Here you may use a new configuration for it. I have decided to use the old version as it was easy to implement again.
Reindex Alll Pages
Clear all cache and index tables in your database (index_*, cache_*). Then you have to reindex the entire site. A good way to reindex an entire website is an offline browser like HTTRACK http://www.httrack.com/ . With the call of each site, the called sites will be indexed.
Scrollbars Missing in the Template Frameset
In the backend while editing a template in the object browser: The left scrollbar was missing. So I had to change the file typo3/alt_mod_frameset.php by changing „frame list_frame option scrolling=" **yes"** “.
Update Dh_LinkLayout
I had installed the extension dh_linklayout, which enables you to configure an own rendering for your links. After the upgrade it did not work anymore. I needed to reinstall it and configure it new.
Performance Enhancements
It is, especially when you let host your site by en external hosting provider, advisable to check the Typo3 performance. I had several problems after the upgrade. Things you can do are:
**Set Memory Limit**
ini_set("memory_limit", "45M"); in index.php
$TYPO3_CONF_VARS['SYS']['setMemoryLimit'] = 45; in localconf.php
(Set the memory limit to as small as possible.Around 45 seemed fine for me.)
**Index on MySQL tables**
Check especially that large and often used database tables are inddexed correctly.
**Load Control**
It may be necessary, especially if you have a low performance server of a public hosting company, that you limit number of users and reloads of your website. Therefore I am currently developping a new extension. See point „Typo3 Load Control“ later in this document.
Own Page Content Type from USER to USER_INT (if Cache is used)
If you use Typo3 cache system and you use a custom rendering part in your template of type „USER“ you may change it to „USER_INT“. This way the content will be dynamic (important for counters etc.).

Configure System Parameters
You may need to do the following things:
- Remove debugging parameters (see point switch on debugging)
- Deactivate install tool
- Set the following parameters, if necessary in the localconf.php
$TYPO3_CONF_VARS['FE']['maxSessionDataSize'] = x;
$TYPO3_CONF_VARS['FE']['lifetime'] = x;
$TYPO3_CONF_VARS['FE']['maxSessionDataSize'] = x;
(x = number)
Typo3 Load Control (Upcoming Extension mv_typo3_load_control)
It may be necessary, especially if you have a low performance server of a public hosting company, that you limit number of users and reloads of your website. Therefore I am currently developping a new extension called „mv_typo3_load_control“.
That was it :-)
 Upgrade Typo3 3.8.0 to 4.2.0 - 13