DEPRECATION WARNING
This documentation is not using the current rendering mechanism and is probably outdated. The extension maintainer should switch to the new system. Details on how to use the rendering mechanism can be found here.
Add custom events
An event is related to something happening in the application; it may be accessible so that notifications can be dispatched whenever this specific event occurs.
Three phases need to be done in order to register custom events:
1. Dispatch the event
The most common way to send an event is to use the TYPO3 signal API. This signal can afterwards be used to dispatch notifications.
Note
Hooks may also be used, but signals should be preferred.
namespace Acme\MyExtension\Controller;

use Acme\MyExtension\Form\ContactForm;
use TYPO3\CMS\Extbase\Mvc\Controller\ActionController;

class ContactController extends ActionController
{
    public function sendMessageAction(ContactForm $contactForm)
    {
        $this->signalSlotDispatcher->dispatch(
            __CLASS__,
            'sendMessage',
            [$contactForm]
        );

        $this->redirect('show');
    }
}
2. Associate the event
Now that the event is sent, it needs to be associated to a specific PHP class
that should extend \CuyZ\Notiz\Core\Event\AbstractEvent.
In addition to the required methods, the event must implement the run
method. This method takes the signal/hook arguments as parameters.
Hint
If one needs a more specific implementation for an event, the interface
\CuyZ\Notiz\Core\Event\Event can be implemented instead.
Here is an event bound to our previously sent signal:
namespace Acme\MyExtension\Domain\Event;

use CuyZ\Notiz\Core\Event\AbstractEvent;
use Acme\MyExtension\Form\ContactForm;

class ContactFormSentEvent extends AbstractEvent
{
    /**
     * @label The message sent by the user
     * @marker
     *
     * @var string
     */
    private $message;

    /**
     * @label LLL:EXT:my_extension/Resources/Private/Language/locallang.xlf:name
     * @marker
     *
     * @var string
     */
    private $name;

    /**
     * @label The email of the user
     * @email
     *
     * @var string
     */
    private $email;

    /**
     * @param ContactForm $contactForm
     */
    public function run(ContactForm $contactForm)
    {
        $this->message = $contactForm->getMessage();
        $this->name = $contactForm->getName();
        $this->email = $contactForm->getEmail();
    }
}
Hint
Variables annotated with @marker will be available to be replaced in
some notifications fields, for instance:
- In an email, they will be available in the subject and body;
- In a log, they will be available in the message.
- …and so on.
For instance, the property $name from the example above can be used as
{name} in an email body.
Hint
Variables annotated with @email will be available in the recipients
list of email notifications.
For instance, the property $email from the example above will create an
entry that can be selected in the recipients list of an email.
Note
Learn more about properties in the chapter “Advanced properties usage”.
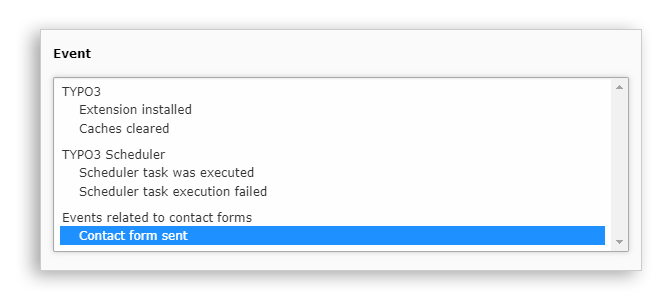
3. Register the event
Now that the signal is sent and the event is associated, they both need to be registered in the definition:
notiz {
    eventGroups {
        contactEvents {
            label = Events related to contact forms

            events {
                messageSent {
                    label = Contact form sent

                    className = Acme\MyExtension\Domain\Event\ContactFormSentEvent

                    connection {
                        type = signal

                        className = Acme\MyExtension\Controller\ContactController
                        name = sendMessage
                    }
                }
            }
        }
    }
}
After completing these three steps, the event becomes accessible for notifications: