DEPRECATION WARNING
This documentation is not using the current rendering mechanism and is probably outdated. The extension maintainer should switch to the new system. Details on how to use the rendering mechanism can be found here.
EXT: PMK SlimBox
| Author: | Kasper Skårhøj |
|---|---|
| Created: | 2002-11-01T00:32:00 |
| Changed: | 2009-04-23T19:31:28 |
| Author: | Peter Klein |
| Email: | peter@umloud.dk |
| Info 3: | |
| Info 4: |
EXT: PMK SlimBox
Extension Key: pmkslimbox
Copyright 2007-2009, Peter Klein, <peter@umloud.dk>
mootools.js v1.2.1 © Valerio Proietti, < http://mootools.net/ >
slimboxMagnify.js v1.2 © by Peter Klein.
Slimbox.js v1.69 © by Christophe Beyls, < http://www.digitalia.be/software/slimbox/>
SlimboxPlus.js v1.0 © by OrangeBread, < http://www.lifewithpixel.com/ >
mediaboxAdvanced v0.9.9f © by John Einselen, < http://iaian7.com/ >
This document is published under the Open Content License
available from http://www.opencontent.org/opl.shtml
The content of this document is related to TYPO3
- a GNU/GPL CMS/Framework available from www.typo3.com
Table of Contents
EXT: PMK SlimBox 1
Introduction 1
What does it do? 1
Screenshots 2
Users manual 2
Adminstration 2
Configuration 3
Reference 4
How does it work? 6
Using PMKSlimbox with the T3mootools extension 7
Tutorial 7
How to change the images? 7
How to open another page inside the LightBox? 8
How to get tt_news to show the singleView page inside the Lightbox? 9
How to get PMK Slimbox to work in tt_products? 9
Known problems 9
To-Do list 10
Changelog 10
Introduction
What does it do?
- Changes TYPO3s standard click-enlarge functionality to use SlimBox instead of popup windows. - Doesn't XCLASS any functions, as all is done using pure Typoscript.This extension was created because I needed the lightbox effect on a site where the output had to be XHTML compliant, and didn't XCLASS any files. (Which the other lightbox extensions do.)
- Slimbox is a 4kb visual clone of the popular Lightbox JS v2.0 by Lokesh Dhakar, written using the ultra compact mootools 1.2 framework. It was designed to be small, efficient, more convenient and 100% compatible with the original Lightbox v2.
- This SlimboxPlus version has additional features as follows.
- Support to show external content by iframe. You can assign url not only for image but also for general html document.
- Support to set content size. You can add width/height parameter in rev attribute of the anchor url.e.g.) rev="width=500, height=300" (For image content, you can also use percent value.)
Screenshots
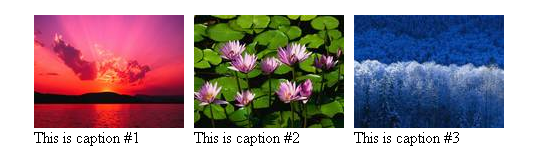 The above picture shows 3 pictures inserted with the
standard TYPO3 “Image” element.
The above picture shows 3 pictures inserted with the
standard TYPO3 “Image” element.
 The above picture is a screenshot of how the SlimBox looks
when you click on one of the images.
The above picture is a screenshot of how the SlimBox looks
when you click on one of the images.
Users manual
Nothing new is available to the user, as the extension just changes the way the click-enlarge function works.
Adminstration
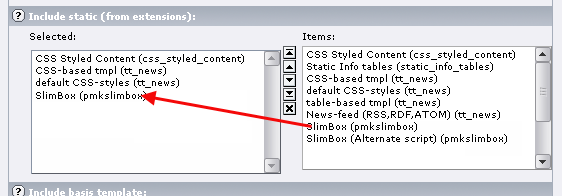
Once the extension is installed, you need to include the static typoscript of the extension, in order for the SlimBox script to be activated.
Add the “SlimBox (pmkslimbox)” script AFTER “CSS Styled Cobtent (css_styled_content)”
You can also choose the alternate slimbox script, by adding “SlimBoxPlus (pmkslimbox)” INSTEAD of “SlimBox (pmkslimbox)”. This script supports opening HTML pages inside the Slimbox frame.
As of version 2.3.0 there's a companion script you can enable, called “SlimboxMagnify”. This script adds a small “magnify” icon to the SlimBox-enabled images (the “thumbnails”). So when you hover over a SlimBox-enabled image, the small magnify icon will appear in the lower right corner.
NOTE: This script must be added AFTER the main slimbox script, and can't be used alone.
Configuration
All configuration of the extension is done using Typoscript Constants. Use the “Constants Editor” of TYPO3 to change these options. You can change things like the transition, sizes, enable print and save buttons etc.
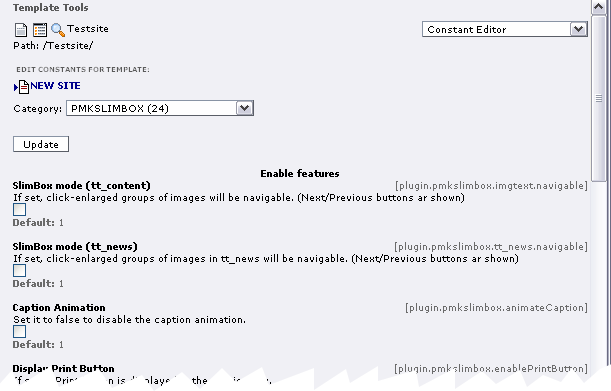
There's currently 3 config option available. The first allows you to switch between “Navigable” mode and “Single” mode. Default is “Navigable” mode.
To switch to ”Single” mode, you just set the CONSTANT “plugin.pmkslimbox.imgtext.navigable” to zero, like this:
plugin.pmkslimbox.imgtext.navigable = 0
And to switch on the ”Navigable” mode , you set the CONSTANT to one, like this:
styles.content.imgtext.slimbox.navigable = 1
The second and third config options defines the maximum width and height for the images shown in the Lightbox. To change these, you can set the two CONSTANTS, like this:
plugin.pmkslimbox.imgtext.maxW = 800
plugin.pmkslimbox.imgtext.maxH = 600
If you install the optional static template for tt_news “SlimBox tt_news (pmkslimbox)”, there will be a couple extra CONSTANTS available:
plugin.pmkslimbox.tt_news.navigable = 1
Which allows you to switch between “Navigable” mode and “Single” mode. (Default is “Navigable” mode.)
And then there's three CONSTANTS to control in which section of tt_news you want the Lightbox effect enabled.
plugin.pmkslimbox.tt_news.displaySingle.slimBoxEnable = 1
plugin.pmkslimbox.tt_news.displayList.slimBoxEnable = 0
plugin.pmkslimbox.tt_news.displayLatest.slimBoxEnable = 0
Default is only to enable it in singleView.
(NOTE: All the CONTSTANTS can be set using the standard TYPO3 “Constant Editor”.
Reference
plugin.pmkslimbox.animateCaption
Constant
plugin.pmkslimbox.animateCaption
Data type
boolean
Description
Caption Animation: Set it to false to disable the caption animation.
Default
1
plugin.pmkslimbox.enablePrintButton
Constant
plugin.pmkslimbox.enablePrintButton
Data type
boolean
Description
Display Print Button: If set, a Print button is displayed in the caption box.
Default
0
plugin.pmkslimbox.enableSaveButton
Constant
plugin.pmkslimbox.enableSaveButton
Data type
boolean
Description
Display Save Button: If set, a Save button is displayed in the caption box.
Default
0
plugin.pmkslimbox.tt_news.enableSplit
Constant
plugin.pmkslimbox.tt_news.enableSplit
Data type
boolean
Description
Enable Splitting: If true, then a small userfunction is included for tt_news. This enables splitting of the caption value by setting the register value "IMAGE_NUM_CURRENT" to the current item number.
Default
1
plugin.pmkslimbox.loop
Constant
plugin.pmkslimbox.loop
Data type
boolean
Description
Enable loop : if true, allows to navigate between the first and last images of a Slimbox gallery, when there is more than one image to display.
Default
1
plugin.pmkslimbox.showCounter
Constant
plugin.pmkslimbox.showCounter
Data type
boolean
Description
Show Numbers: Set it to false to disable "Page 1 of 3" text.
Default
1
plugin.pmkslimbox.tt_news.displaySingle.slimBoxEnable
Constant
plugin.pmkslimbox.tt_news.displaySingle.slimBoxEnable
Data type
boolean
Description
Enable SlimBox in displaySingle : If set, LightBox effect will be available in tt_news SingleView when you click on an image.
Default
1
plugin.pmkslimbox.tt_news.displayLatest.slimBoxEnable
Constant
plugin.pmkslimbox.tt_news.displayLatest.slimBoxEnable
Data type
boolean
Description
Enable SlimBox in displayLatest : If set, LightBox effect will be available in tt_news LatestView when you click on an image.
Default
0
plugin.pmkslimbox.tt_news.displayList.slimBoxEnable
Constant
plugin.pmkslimbox.tt_news.displayList.slimBoxEnable
Data type
boolean
Description
Enable SlimBox in displayList : If set, LightBox effect will be available in tt_news ListView when you click on an image.
Default
0
plugin.pmkslimbox.tt_news.displayList.slimBoxSingleView
Constant
plugin.pmkslimbox.tt_news.displayList.slimBoxSingleView
Data type
boolean
Description
Enable singleView in SlimBox : If set, tt_news SingleView will be shown inside a LightBox.
(Only available if you use the SlimboxPlus script)
Default
0
plugin.pmkslimbox.initialWidth
Constant
plugin.pmkslimbox.initialWidth
Data type
Int+
Description
Starting Width: The initial width of the box, in pixels.
Default
250
plugin.pmkslimbox.initialHeight
Constant
plugin.pmkslimbox.initialHeight
Data type
Int+
Description
Starting Height: The initial height of the box, in pixels.
Default
250
plugin.pmkslimbox.slimBoxMaxW
Constant
plugin.pmkslimbox.slimBoxMaxW
Data type
Int+
Description
SlimBox Max Image Width: Defines the maxwidth of the image shown in the Lightbox.
Default
800
plugin.pmkslimbox.slimBoxMaxH
Constant
plugin.pmkslimbox.slimBoxMaxH
Data type
Int+
Description
SlimBox Max Image Height: Defines the maxheight of the image shown in the Lightbox.
Default
600
plugin.pmkslimbox.defaultIframeWidth
Constant
plugin.pmkslimbox.defaultIframeWidth
Data type
Int+
Description
Iframe Default Width: The default width of the iframe, in pixels.
(Only available if you use the SlimboxPlus script)
Default
500
plugin.pmkslimbox.defaultIframeHeight
Constant
plugin.pmkslimbox.defaultIframeHeight
Data type
Int+
Description
I frame Default Height: The default height of the iframe, in pixels.
(Only available if you use the SlimboxPlus script)
Default
300
plugin.pmkslimbox.tt_news.displayList.slimBoxWidth
Constant
plugin.pmkslimbox.tt_news.displayList.slimBoxWidth
Data type
Int+
Description
SlimBox tt_news Iframe width : Used to set the width of the LightBox if displaying tt_news SingleView in SlimBox is enabled.
(Only available if you use the SlimboxPlus script)
Default
600
plugin.pmkslimbox.tt_news.displayList.slimBoxHeight
Constant
plugin.pmkslimbox.tt_news.displayList.slimBoxHeight
Data type
Int+
Description
SlimBox tt_news Iframe height : Used to set the height of the LightBox if displaying tt_news SingleView in SlimBox is enabled.
(Only available if you use the SlimboxPlus script)
Default
500
plugin.pmkslimbox.slimboxCSS
Constant
plugin.pmkslimbox.slimboxCSS
Data type
file
Description
CSS File: CSS file for Slimbox. See EXT:pmkslimbox/res/styles/slimboxplus.css for an example.
Default
EXT:pmkslimbox/res/styles/slimboxplus.css
plugin.pmkslimbox.mootoolsJS
Constant
plugin.pmkslimbox.mootoolsJS
Data type
file
Description
Mootools Javascript Library: You only need to change this if you are using Mootools, and need some functions not in the included in the one used as default. (A full version of Mootools v1.2.1 is lotated at EXT:pmkslimbox/res/scripts/mootools-1.2.1_uncompressed.js)
Default
EXT:pmkslimbox/res/scripts/mootools-1.2.1.js
plugin.pmkslimbox.slimboxJS
Constant
plugin.pmkslimbox.slimboxJS
Data type
file
Description
Slimbox Javascript Library: You will only need to change this, if you want to use a different version of the slimbox script.
Default
EXT:pmkslimbox/res/scripts/slimboxplus.js
plugin.pmkslimbox.resizeDuration
Constant
plugin.pmkslimbox.resizeDuration
Data type
Int+
Description
Resizing duration: The duration of the resize animation for width and height, in milliseconds.
Default
400
plugin.pmkslimbox.resizeTransition
Constant
plugin.pmkslimbox.resizeTransition
Data type
string
Description
SlimBox Transition: The transition you want to use for the resize animation. You can choose amongst lots of cool transitions that are part of the optional "Transitions" module of mootools, like "Fx.Transitions.elasticOut". Many transitions require a longer execution time to look good, so you should adjust the resizeDuration option above as well.
Available values:[linear,Quad.easeIn,Quad.easeOut,Quad.easeInOut,Cubic .easeIn,Cubic.easeOut,Cubic.easeInOut,Quart.easeIn,Quart.easeOut,Quart .easeInOut,Quint.easeIn,Quint.easeOut,Quint.easeInOut,Sine.easeIn,Sine .easeOut,Sine.easeInOut,Expo.easeIn,Expo.easeOut,Expo.easeInOut,Circ.e aseIn,Circ.easeOut,Circ.easeInOut,Elastic.easeIn,Elastic.easeOut,Elast ic.easeInOut,Back.easeIn,Back.easeOut,Back.easeInOut,Bounce.easeIn,Bou nce.easeOut,Bounce.easeInOut]
Default
Sine.easeInOut
plugin.pmkslimbox.opacity
Constant
plugin.pmkslimbox.opacity
Data type
string
Description
Background opacity level
Default
0.8
plugin.pmkslimbox.iframeScrolling
Constant
plugin.pmkslimbox.iframeScrolling
Data type
string
Description
Iframe scrolling parameter:Used when HTML page is displayed inside Lightbox frame. Available values: [auto,yes,no]
(Only available if you use the SlimboxPlus script)
Default
auto
plugin.pmkslimbox.imgtext.captionField
Constant
plugin.pmkslimbox.imgtext.captionField
Data type
string
Description
tt_content Caption Field: tt_content field to use as caption inside the Lightbox.
Available values: [titleText, altText, imagecaption]
Default
titleText
plugin.pmkslimbox.tt_news.captionField
Constant
plugin.pmkslimbox.tt_news.captionField
Data type
string
Description
tt_news Caption Field: tt_news field to use as caption inside the Lightbox.
Available values: [imagetitletext, imagealttext, imagecaption]
Default
imagetitletext
[tsref:(cObject).plugin.pmkslimbox]
For more information on how the Slimbox javascript is working, I suggest you visit the official homepage(s).
SlimBox: http://www.digitalia.be/software/slimbox
SlimBoxPlus: http://www.lifewithpixel.com/
mediaboxAdvanced: http://iaian7.com/
plugin.pmkslimboxmagnify.magnifyImg
Constant
plugin.pmkslimboxmagnify.magnifyImg
Data type
file
Description
Magnify image.
Default
EXT:pmkslimbox/res/images/magnify.png
plugin.pmkslimboxmagnify.magnifyJS
Constant
plugin.pmkslimboxmagnify.magnifyJS
Data type
file
Description
Caption Animation: Set it to false to disable the caption animation.Slimbox Magnify Javascript Library: You will only need to change this, if you want to use a different version of the slimbox magnify script.
Default
EXT:pmkslimbox/res/scripts/slimboxMagnify.js
plugin.pmkslimboxmagnify.magnifyDuration
Constant
plugin.pmkslimboxmagnify.magnifyDuration
Data type
int+
Description
The duration for the magnify image to become visible, in milliseconds.
Default
400
plugin.pmkslimboxmagnify.magnifyTransition
Constant
plugin.pmkslimboxmagnify.magnifyTransition
Data type
string
Description
Magnify Opacity Transition: The transition you want to use for the fadein/fadeout animation.
Available values:[linear,Quad.easeIn,Quad.easeOut,Quad.easeInOut,Cubic .easeIn,Cubic.easeOut,Cubic.easeInOut,Quart.easeIn,Quart.easeOut,Quart .easeInOut,Quint.easeIn,Quint.easeOut,Quint.easeInOut,Sine.easeIn,Sine .easeOut,Sine.easeInOut,Expo.easeIn,Expo.easeOut,Expo.easeInOut,Circ.e aseIn,Circ.easeOut,Circ.easeInOut,Elastic.easeIn,Elastic.easeOut,Elast ic.easeInOut,Back.easeIn,Back.easeOut,Back.easeInOut,Bounce.easeIn,Bou nce.easeOut,Bounce.easeInOut]
Default
Sine.easeInOut
plugin.pmkslimboxmagnify.magnifyImgMarginB
Constant
plugin.pmkslimboxmagnify.magnifyImgMarginB
Data type
int
Description
Magnify image bottom margin, in pixels.
Default
8
plugin.pmkslimboxmagnify.magnifyImgMarginR
Constant
plugin.pmkslimboxmagnify.magnifyImgMarginR
Data type
int
Description
Magnify image right margin, in pixels.
Default
8
[tsref:(cObject).plugin.pmkslimboxmagnify]
How does it work?
This extension is done using only Typoscript, except for the javascript that makes the lightbox effect ;)
Update: Due to the order of how TYPO3 adds code to the header, I had to “invent” a userfunction called “addJS” in order to get the javascripts added to the header in the correct order.
First we have to include the Slimbox files, and set the config options and language values. This is done in the static templates like this:
page.1230 = COA
page.1230 {
        10 = USER
        10.userFunc = user_slimbox->addJS
        10.jsfile.dataWrap = {$plugin.pmkslimbox.mootoolsJS}

        20 = USER
        20.userFunc = user_slimbox->addJS
        20.jsfile.dataWrap = {$plugin.pmkslimbox.slimboxJS}

        30 = USER
        30.userFunc = user_slimbox->addJS
        30.jsdata.cObject = COA
        30.jsdata.cObject {
                1 = TEXT
                1.value = Slimbox.scanPage = function() {var links = $$("a").filter(function(el) {return el.rel && el.rel.test(/^lightbox/i);});
                2 = TEXT
                2.value = $$(links).slimbox({resizeDuration: {$plugin.pmkslimbox.resizeDuration}, resizeTransition: Fx.Transitions.{$plugin.pmkslimbox.resizeTransition}, opacity: {$plugin.pmkslimbox.opacity}, opacityDuration: {$plugin.pmkslimbox.opacityDuration}, loop: {$plugin.pmkslimbox.loop}, initialWidth: {$plugin.pmkslimbox.initialWidth}, initialHeight: {$plugin.pmkslimbox.initialHeight}, animateCaption: {$plugin.pmkslimbox.animateCaption}, showCounter: {$plugin.pmkslimbox.showCounter}, defaultIframeWidth: {$plugin.pmkslimbox.defaultIframeWidth}, defaultIframeHeight: {$plugin.pmkslimbox.defaultIframeHeight}, iframeScrolling: '{$plugin.pmkslimbox.iframeScrolling}', enablePrintButton: {$plugin.pmkslimbox.enablePrintButton}, enableSaveButton: {$plugin.pmkslimbox.enableSaveButton},
                3 = TEXT
                3.value = counterText: '{LLL:EXT:pmkslimbox/locallang.xml:counterText}', psScriptPath: '{TSFE:baseUrl}{path:EXT:pmkslimbox/savefile.php}'
                3.insertData = 1
                4 = TEXT
                4.value = }, null, function(el) {return (this == el) || ((this.rel.length > 8) && (this.rel == el.rel));});};window.addEvent("domready", Slimbox.scanPage);
        }
}
page.headerData.1230 = TEXT
page.headerData.1230.dataWrap (
        <link rel="stylesheet" href="{path:{$plugin.pmkslimbox.slimboxCSS}}" type="text/css" media="screen" />
)
Next we need to get the A tag to link to the original image. To make this possible we access an undocumented feature of TYPO3, which returns the path + filename of the original image.
parameter.data = TSFE:lastImageInfo|origFile
Other examples of using these features, can be found at: `http://www.typo3wizard.com/en/snippets/cool-stuff-typoscript/fun- with-tsfe-part-1-getting-additional-image-imformation.html <http://www.typo3wizard.com/en/snippets/cool-stuff-typoscript/fun- with-tsfe-part-1-getting-additional-image-imformation.html>`_
That take care of getting the link to point to the correct file, so now we just need to activate the lightbox script.
This is done by simply adding an extra parameter (rel=”lightbox”) to the A tag, and in Typoscript done like this:
ATagParams = rel="lightbox"
That's all you need to enable the lightbox feature on your own links!
((generated))
Example
Here an example (taken from the static template “SlimBox (pmkslimbox)” ), which shows how the “ImageLinkWrap” is changed for tt_news records.:
temp.imageLinkWrap = 1
temp.imageLinkWrap {
        enable = 1

        # Add new typolink wrapping code
        typolink {
                # Set the title of the A tag, which is used as caption inside the Lightbox
                title.field = {$plugin.pmkslimbox.tt_news.captionField}
                title.split.token.char = 10
                title.split.returnKey.data = register : IMAGE_NUM_CURRENT

                # This returns a link, pointing to the path + name of the original image.
                # or to the path + name of the resized lightbox image (if maxH or maxW is reached.)
                parameter.cObject = IMG_RESOURCE
                parameter.cObject.file.import.data = TSFE:lastImageInfo|origFile
                parameter.cObject.file.maxW = {$plugin.pmkslimbox.slimBoxMaxW}
                parameter.cObject.file.maxH = {$plugin.pmkslimbox.slimBoxMaxH}

                # Add the "rel" attribute needed to activate the lightbox effect.
                ATagParams = rel="lightbox"
                ATagParams.override = rel="lightbox[sb{field:uid}]"
                ATagParams.override.if.isTrue = {$plugin.pmkslimbox.tt_news.navigable}
                ATagParams.insertData = 1
        }
}
Using PMKSlimbox with the T3mootools extension
If the “t3mootools” extension is installed, a different set of static include files is used. This setup uses the mootools library created from the t3mootools extension.
To create a mootools library that works with PMK Slimbox, you can use the 3 rd option of t3mootools to analyze the PMK Silmbox javascripts for dependencies, and create the library with the mootools parts you need.
Coming as soon as I get some free time to update the t3mootools extensions to Mootools v1.2.1.
Tutorial
How to change the images?
Changing the images can easily be done with a little bit of CSS and typoscript.
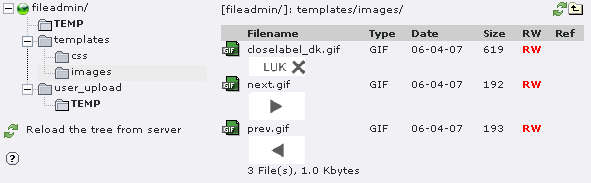
In this example i have created 2 folders in my fileadmin/templates/ folder, called “css” and “images” (See screenshot), placed my alternate images in the “images” folder and created a file named “alt_button_styles.css” in the “css” folder.
In the “alt_button_styles.css” file I have just added some code to override the original stylesheet IDs with my own. It looks like this:
#lbPrevLink:hover {
    background: transparent url(../images/prev.gif) no-repeat 0% 15%;
}
#lbNextLink:hover {
    background: transparent url(../images/next.gif) no-repeat 100% 15%;
}
#lbCloseLink {
    width: 66px;
    height: 22px;
    background: transparent url(../images/closelabel_dk.gif) no-repeat center;
}
And as the original SlimBox CSS code is included as “page.headerData.1230”, we just need to include the alternate CSS file in our Typoscript template AFTER that, like this:
page.headerData.1240 = TEXT
page.headerData.1240.value (
        <link rel="stylesheet" href="fileadmin/templates/css/alt_button_styles.css" type="text/css" media="screen" />
)
The above Typoscript could then be placed inside CONDITION brackets to in order to change the buttons based on the language selected.
How to open another page inside the LightBox?
If you are using the SlimboxPlus script (This option is not available in the standard Slimbox script), it's quite simple, all you have to do is add a REL and a REV attribut to the A tag (The MediaboxAdv script uses a different method, described later). This can be done like this in Typoscript:
lib.myLink = TEXT
lib.myLink.value = This link opens in a Lightbox
lib.myLink.typolink.parameter = 1
lib.myLink.typolink.ATagParams = rel="lightbox" rev="width=600, height=400"
I is also possible to “fool” the HTMLArea RTE into opening links inside the Lightbox, by adding the rel=”lightbox” attribute to the Title parameter in the linkpopup window.
To do this you must add the the title like this:
title" rel="lightbox
Note: When you edit the link again, the Title field will be “cleaned” of the extra parameter, and only show the title.
The MediaboxAdvanced script requires the width/height placed inside the “rel” attribute, as 2 nd and 3 rd parameter.
Example:
lib.myLink = TEXT
lib.myLink.value = This link opens in a Lightbox
lib.myLink.typolink.parameter = 1
lib.myLink.typolink.ATagParams = rel="lightbox[external 600 400]"
How to get tt_news to show the singleView page inside the Lightbox?
Since tt_news doesn't have any Typoscript “typolink” properties available for the link to singleView, we will have to find an alternate way to add the REL attribute to the A tag.
From looking at the tt_news manual, theres only one property that can add anything to the A tag links, and that's the “linkTitleField” property, which is used for adding custom TITLE attributes.
So with a little clever way of wrapping, we can use that to add our REL attribute, like this:
plugin.tt_news.displayList.linkTitleField = title
plugin.tt_news.displayList.linkTitleField.wrap = |" rel="lightbox" rev="width=600, height=400
What the above wrapping result in is this: (The code generated by TYPO3 is shown in bold .)
<a href=”link_to_singleView_page” title=”title_attributes ” rel=”lightbox” rev=”width=600, height=400 ”>
Note: This can be enabled/disabled using the Constant “plugin.pmkslimbox.tt_news.displayList.slimBoxSingleView”.
How to get PMK Slimbox to work in tt_products?
tt_products uses the standard TYPO3 method for displaying images with click-enlarge, so it's very easy to get it to work with PMK Slimbox. Here's some typoscript for tt_products.
plugin.tt_products {
  image {
    imageLinkWrap {
      typolink {
        parameter.cObject = IMG_RESOURCE
        parameter.cObject.file.import.data = TSFE:lastImageInfo|origFile
        parameter.cObject.file.maxW = {$plugin.pmkslimbox.slimBoxMaxW}
        parameter.cObject.file.maxH = {$plugin.pmkslimbox.slimBoxMaxH}
        ATagParams = rel="lightbox"
        ATagParams.override = rel="lightbox[sb{field:uid}]"
        ATagParams.override.if.isTrue = {$plugin.pmkslimbox.imgtext.navigable}
        ATagParams.insertData = 1
      }
    }
  }
  listImage {
    imageLinkWrap {
      typolink {
        parameter.cObject = IMG_RESOURCE
        parameter.cObject.file.import.data = TSFE:lastImageInfo|origFile
        parameter.cObject.file.maxW = {$plugin.pmkslimbox.slimBoxMaxW}
        parameter.cObject.file.maxH = {$plugin.pmkslimbox.slimBoxMaxH}
        ATagParams = rel="lightbox"
        ATagParams.override = rel="lightbox[sb{field:uid}]"
        ATagParams.override.if.isTrue = {$plugin.pmkslimbox.imgtext.navigable}
        ATagParams.insertData = 1
      }
    }
  }
  basketImage {
    imageLinkWrap {
      typolink {
        parameter.cObject = IMG_RESOURCE
        parameter.cObject.file.import.data = TSFE:lastImageInfo|origFile
        parameter.cObject.file.maxW = {$plugin.pmkslimbox.slimBoxMaxW}
        parameter.cObject.file.maxH = {$plugin.pmkslimbox.slimBoxMaxH}
        ATagParams = rel="lightbox"
        ATagParams.override = rel="lightbox[sb{field:uid}]"
        ATagParams.override.if.isTrue = {$plugin.pmkslimbox.imgtext.navigable}
        ATagParams.insertData = 1
      }
    }
  }
}
Known problems
- The Javascript and CSS gets loaded into the typoscript object/property “page.headerData.1230”, so if you are using that for something else, you'l have to include the Javascript and CSS manually. The same applies if you don't use the “page” object.
- If you have an EMBED tag on your page, IE7 won't display the page when the SlimBox is installed. Simply remove the EMBED tag from your page, and it will work in IE7. (The EMBED tag is deprecated, and you should use the OBJECT tag instead.)
- The foldout animation doesn't work correctly in IE7 with the default TYPO3 doctype. (HTML 4.0) Change it to HTML 4.01, and it will work:config.doctype (
<!DOCTYPE HTML PUBLIC "-//W3C//DTD HTML 4.01 Transitional//EN"
    "http://www.w3.org/TR/html4/loose.dtd">
)
- If you have Flash elements on your page, and have problems with getting SlimBox to work (Like the page doesn't load in IE). Then the problem can usually be solved by changing the Flash Javascript loader to the newest version of SWFObject, which can be found here: http://code.google.com/p/swfobject/
- PMK Slimbox conflicts with the following TYPO3 extensions:
- kj_imagelightbox2 => The 1 st TYPO3 Lightbox extension. Uses XCLASS to achieve Lightbox effect.
- perfectlightbox => Based on code from PMK Slimbox.
- wsclicklightbox => Based on code from PMK Slimbox.
- ju_multibox => Based on code from PMK Slimbox.
To-Do list
Please contact me if you have any suggestion about this extension.
Changelog
- 1.0.0 First public release.
- 1.0.1 Added two new constants to define the maximum width/height of the image shown in the Lightbox.Added z-index: 1000 to stylesheet in order for SlimBox to stay on top.Thanks to Bartosz Aninowski for informing me of the problem with displaying very large images in the Lightbox.Added some new constants to the tt_news setup, so now it's possible to choose which parts of tt_news(SingleView, ListView or LatestView) that should have LightBox effect enabled.
- 1.1.0 Switched javascript from Slimbox.js to Slimbox_ex.js which has some additional features, like opening HTMLpages inside the Lightbox (using an IFRAME)Changed the installation of Javascripts and CSS. So now you can install the plugin Local, Global and even as a SysExt.Added locallang.xml for the text in the SlimBox (the words “Page” and “of”)Updated the manual to reflect the new changes.
- 2.0.0 Added new Mootools v1.1 framework library.Added support for changing the Slimbox options from Typoscript. Now it's possible to choose which transition touse, and the duration, Change the opacity level of the background, Control the crolling parameter of the Iframe, andmore.Added Print and Save functionality, which can be enabled/disabled using Typoscript contstants.Added German, Swedish an Norwegian languages.Added support for using an alternate version of the Slimbox script which is able to display the previous/next buttonspermanently in the bottom. NOTE: The alternate Slimbox scrip does NOT support opening HTML pages inside theLightbox window.Added a small tt_news userfunction to set the register value IMAGE_NUM_CURRENT, which is needed forsplitting the tt_news titletext/caption field correctly. Also added an option to choose which field (alt, title or caption)should be uses as caption inside the Lightbox window.Added support for changing the CSS file used, and the version of Mootools Library.
- 2.1.0 Added security fix by Stefan Aebischer.Added “showNumbers” option to turn on/off the “Page x of x” text.Improved the Save/Print functionality by using the baseURL.
- 2.2.0 Added an new constant called “slimboxJS” which holds the path/name of the slimbox scriptAdded support for using the “t3mootools” extension.
- 2.3.0 Added a new script called “slimboxmagnify”. This script adds a small “magnify” icon to the SlimBox-enabled images(the “thumbnails”). So when you hover over a SlimBox-enabled image, the small magnify icon will appear in thelower right corner.Fixed problem with the “Save Image “ function, where files with uppercase letters couldn't be downloaded.Fixed caching problem with the small AddJS function, which would return a TYPO3 error wheneverext_localconf.php was reloaded (like when you entered the EM).Updated the manual with Typoscript code for enabling PMK Slimbox in tt_products.
- 2.3.1 Several updates done to the SlimboxMagnify script:Eliminated the need for setting magnifyImgWidth and magnifyImgHeight manually, by usingTSFE:lastImgResourceInfo|0 and TSFE:lastImgResourceInfo|1 instead.Updated the manual with Typoscript reference for the SlimboxMagnify script.The bottom and right margins can now be set seperatly using TS constants.Sometimes the positioning of the magnify image was wrong, due to elements with relative or absolute positioning.Now a SPAN tag is inserted inside the A tag, with position set to “relative”. The magnify position is then calculactedfrom within the SPAN tag.Thanks to Daniel Wegener for reporting this problem.
- 2.3.2 Extended the AddJS userfunction to allow wrapping of inline Javascript with CDATA tag, as this is required inXHTML strict. (A similar update has been done in the t3mootools extension.).Rewrote most of the SlimboxMagnify script in order for it to comply to XHTML strict specifications. Due to this Ihad to remove the persistant feature, as it now only uses one magnify icon for all lightbox enabled images onthe page.Thanks to András Szepesházi for reporting the XHTML strict problems.
- 3.0.0 Updated Mootools to version 1.2.1.removed the 2 old slimbox scripts and replaced them with the original Slimbox script, SlimboxPlus which now hasthe same features as the old Slimbox Extendes script) and mediaboxAdvanced. The last 2 are both based on theoriginal Slimbox script, and uses similar setups.Added extra functionality to the SlimboxPlus script, so that it can be used directly as a replacement for the oldSlimbox Extended script.Added Print/Save functionality to the Slimbox and SlimboxPlus scripts.Rewrote the SlimboxMagnify script to Mootools 1.2 format.Updated manual (screenshots still shows the old version)
- 3.0.1 Added setup info for MediaboxAdvanced to the manual.Removed unused images.
- 3.1.0 Re-enabled t3mootools support.Updated Slimbox script to v1.69.Updated MediaBoxAdv script to v0.99fFixed problems with the save/print functionality. (Thanks to Stefan Froemken for reporting this.)
 EXT: PMK SlimBox - 11