DEPRECATION WARNING
This documentation is not using the current rendering mechanism and is probably outdated. The extension maintainer should switch to the new system. Details on how to use the rendering mechanism can be found here.
EXT: My Extension
| Author: | Kasper Skårhøj |
|---|---|
| Created: | 2002-11-01T00:32:00 |
| Changed: | 2007-09-12T17:00:30 |
| Author: | Author Name |
| Email: | your@email.com |
| Info 3: | |
| Info 4: |
EXT: My Extension
Extension Key: ts_lastupdate
Copyright 2000-2002, Author Name, <your@email.com>
This document is published under the Open Content License
available from http://www.opencontent.org/opl.shtml
The content of this document is related to TYPO3
- a GNU/GPL CMS/Framework available from www.typo3.com
Table of Contents
EXT: My Extension 1
Introduction 1
What does it do? 1
Screenshots 1
Users manual 1
FAQ 1
Adminstration 1
FAQ 2
Configuration 2
FAQ 2
Reference 2
Tutorial 2
Known problems 2
To-Do list 2
Changelog 2
Introduction
What does it do?
This extension shows the date of the last change on the website. Not specially the last change on the page it is included, but the last change somewhere on the whole site. This means that a visitor can see if something has changed somewhere on the website no matter on which page he drops in, especially on the main-page which normally changes not that often.
Screenshots
Users manual
Just put the frontend plugin on the page you want to show it. If you want to show the plugin on every page, you can do that using TypoScript.
Adminstration
Nothing special, I think. Please drop me a line if you do not agree with me
Configuration
The whole configuration is done, using TypoScript. I think most of you will use the plugin on every page, so this would be the best way to do it. At least you have to tell the plugin how to show the timestamp. This is done via strftime. A description of the parameters can be found at
http://php.net/manual/en/function.strftime.php (english) http://php.net/manual/de/function.strftime.php (german)
So, for example your TypoScript could look like this:
temp.lastUpdate = COA
temp.lastUpdate.10 < plugin.tx_tslastupdate_pi1
temp.lastUpdate.10.strftime = %A, %d.%m.%Y
The output would look like this (german view):
Letzte Änderung: Sonntag, 02.09.2007
Reference
all.wrap
Property
all.wrap
Data type
wrap
Description
Wraps the whole item
Default
text.wrap
Property
text.wrap
Data type
wrap
Description
Wraps the text in front of the date
Default
value.wrap
Property
value.wrap
Data type
wrap
Description
Wraps the date itself
Default
strftime
Property
strftime
Data type
string
Description
Defines the appearance of the date in the frontend
Default
[tsref:(cObject).TEST]
((generated))
Example
Here you would show an example of the stuff from the reference or so:
page = PAGE
page.typeNum = 0
page.lastUpdate = COA
page.lastUpdate.10 < plugin.tx_tslastupdate_pi1
page.lastUpdate.10.strftime = - %d.%m.%Y -
page.lastUpdate.10.text.wrap = | <br>
Shows the following on the page:
Letzte Änderung:- 02.09.2007 -
Tutorial
see configuration. There is no need for a tutorial.
Known problems
none at this point
To-Do list
I would try to consider tt_news entries in one of the next releases.
You have ideas? Just tell me :-)
Important guidelines
Issues with Open Office documentation for TYPO3
There are a few important points to make about writing documentation for TYPO3 in Open Office. Please makes sure to follow these.
Inserting images
When you insert images you can either:
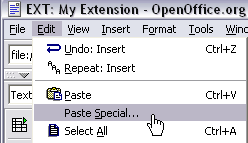
Make a copy/paste from eg. Photoshop, but it's REALLY IMPORTANT that you insert the image into Open Office by the menu “Edit > Paste Special” and then select “Bitmap” . If you don't do it in this way the image cannot be shown (since it will not be stored as a PNG internally in the SXW file)
Alternatively you can use the traditional way “Insert > Graphics > From file” and insert an image from your harddrive. In particular use this if the image is photographic (JPG) since the internal storage as PNG is not good for photographs.
Generally please use copy/paste only for screendumps with large areas of similar color (good png-compression) and JPG-files for photographic images. Go for small images, 72 dpi, medium quality.
Paragraph styles
- Use the paragraph style “Text body” for bodytext
- Use “Heading 1” to “Heading 5” for headers. “Heading 1-3” will be recognized as “sections” on typo3.org. “Heading 4-5” is subheaders, where “Heading 5” is preferrably for “Examples”.
- For code listings, use the style “Preformatted Text” (found under “HTML Styles”). For codelistings in tables there is a custom style called “Table Contents/PRE”.
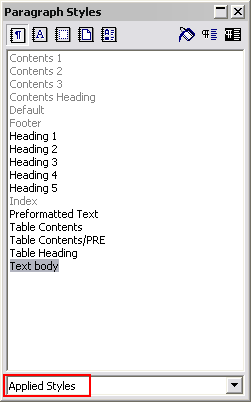
This screenshot shows the only paragraph styles allowed in the documents. The ones grayed out are paragraph styles that are used by default for such as the index table or the footer. The others are the ones you are allowed to use.
Linking
You can make hyperlinks in the documents as absolute URLs. Use menu “Insert > Hyperlink”
Meta data and updates
There are three fields of meta-data you have to fill in. First of all go to “File > Properties...”.
In the “Description” screen you enter the title of the document. Extension manuals are prefixed “EXT: [extension title]”
In the “User defined” screen you enter your email address as the first field (named “Email” / ”Info 1”)
In the “User defined” screen you enter your full name as the second field (named “Author” / ”Info 2”)
Finally you should also insert the correct extension key in the text below the document title, but this is not a meta-data field, just regular text.
For more information you can go to typo3.org .
 EXT: My Extension - 5