DEPRECATION WARNING
This documentation is not using the current rendering mechanism and is probably outdated. The extension maintainer should switch to the new system. Details on how to use the rendering mechanism can be found here.
EXT: DB Integration
| Author: | Kasper Skårhøj |
|---|---|
| Created: | 2002-11-01T00:32:00 |
| Changed: | 2017-09-27T08:56:21.407812086 |
| Author: | Mauro Lorenzutti - Webformat srl |
| Email: | mauro.lorenzutti@webformat.com |
| Info 3: | |
| Info 4: |
EXT: DB Integration
Extension Key: wfqbe
Copyright 2006-2017, Webformat srl, <support@webformat.com>
This document is published under the Open Content License
available from http://www.opencontent.org/opl.shtml
The content of this document is related to TYPO3
a GNU/GPL CMS/Framework available from www.typo3.com
Table of Contents
EXT: DB Integration 1
Introduction 1
What does it do? 1
Screenshots 1
Developers 4
Support 4
Sponsors 4
User manual 4
Characters list 4
Search forms 5
Details view 6
New record insert form 8
Edit and delete functionalities 9
Email features 10
Typoscript markers 10
Headers rewrite 11
Multi-language labels 11
Administration 12
Configuration 14
Important security topics 18
Available hooks 19
How to remove empty markers in search queries 20
How to integrate wfqbe in your extension 21
DB Structure Module 21
WFQBE Extensions 21
Graph generation with wfqbe and sav_jpgraph 22
Case histories 22
Extending seminar extension (by Nico Deblauwe) 22
wfqbe as a frontend-form to insert tt_news articles 23
TYPO3, OXID CE and an XML interface to Adobe Flash (by Jan Sass) 26
How to join tables and showing sub-results 27
Known problems 28
To-Do list 29
Changelog 29
Thanks to 32
Introduction
What does it do?
This extension allows you to connect to a generic DBMS (not necessary resident in the localhost) and to insert, search or retrieve data. The extension provides you three different wizards to:
- create a query for retrieving data
- create a search form for searching in an existing query
- create a module to insert, edit and delete data into a specific table
All the FE outputs are template based, this means that it's possible to create a custom template to show your query results. With marker management it's also possible to create links, to configure images, to create links to detailed pages and so on.
In the BE the extension provides a module to manage the DB structure (add new fields or delete existing ones).
Support
First of all try to get support from English, Developers or Italian (if you speak Italian, of course :-)) mailing lists.
Then, you can get support for this extension at https://forge.typo3.org/projects/extension-wfqbe
Sponsors
The development of the multi-language support was sponsored by Punk.de .
The development of the calendar field type for insert/edit forms was sponsored by Team-X .
User manual
In this chapter of the manual we are going to see how to setup a database management tool in the FrontEnd. This is only a simple example of what you can obtain with this extension.
First let's describe what we are going to do. We want to provide to the website users the possibility to see the list of the characters of our preferred telefilm, to search for the preferred character, to see a detailed page for each character, to insert a new character, edit an existing character and to delete an existing character from the database.
First of all we have to configure the plugin (see “Administration” chapter) and then the first step is to create the page tree:
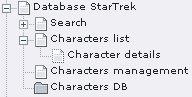
As you can see we have to create 5 pages. The last one is a system folder where we can store our credentials for the DB connections and where we have to store the characters records (fe_user records).
In this case we don't need to create a DB credentials record due to the fact that we are going to use the fe_users table to store our characters (and this table is located in the TYPO3 db which is available by default). In the same way, after creating any DB credentials you need, you can use a different table in a different DB in a different DBMS, the only limit is that ADODB has to support the DBMS you want to use.
In the “Characters DB” page we are going to store the characters. Every character is stored in the fe_users table and has a relation with the fe_groups table where the groups are stored (in our example every group represents a race and each race can have a number of characters).
The “Characters list” page is the page where the visitors of our website can see the list of the characters.
The “Character details” page is the page where it's possible to see the details of the individual characters (you can take a look to the screenshots in the previous pages of this manual). If you pay attention to the icon of the “Character details” page, you'll notice that this page is a “not in menu” page, this is due to the fact that if you don't provide a character id, this page doesn't show anything, like the single page for the tt_news extension.
The “Search” page contains a search form to search inside the characters db, just to restrict the list query we are going to construct for the list page.
Finally, the “Characters management” page provides the form to insert, edit and delete characters in the db. In the following pages we'll see that it's possible to create these functionalities with a good knowledge of SQL and TypoScript and a small knowledge of HTML, no PHP knowledge is needed (but it can be necessary to customize some options).
Characters list
Let's start with the list page. The first step is tocreate a new “Query table” record. We have to complete the fields of this record:
- Type: we choose “select” to create a query to display results from the db.
- Title: it's the name of this record, it's useful for us to remember for what it is used for. Let's call it “list query”.
- Description: it can be used to provide a description about the records in the FrontEnd.
- User credentials: we have to choose the credentials for the connection to the db (if we don't want to use the local TYPO3 db, we need to create them before this step).
- Database name: we have to provide the db name (only if we don't use the local TYPO3 db). DEPRECATED: this field has been moved in the credentials record. Take a look to the Administration section of this manual.
- Query: let's ignore this field for now.
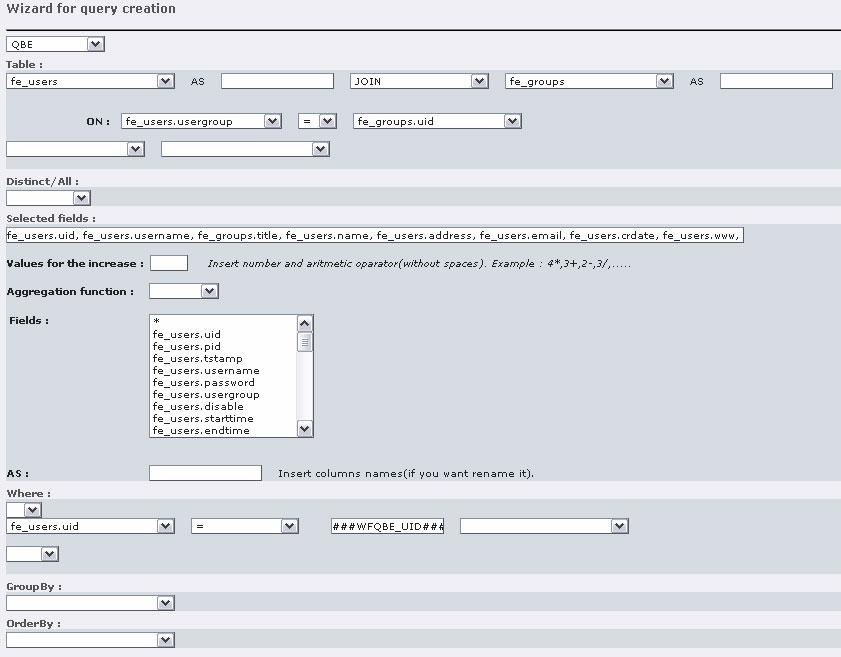
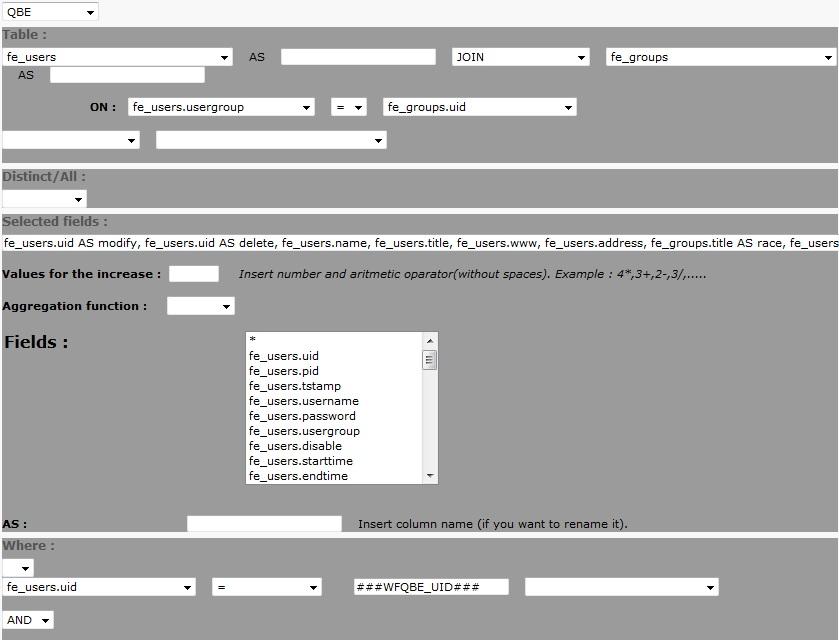
Now we can save our changes paying attention not to exit the form: after saving, the extension will now compare a wizard button near the query field. This button can be used to enter in the Query-by-Example (QBE) wizard. The first choice available is from a guided query construction (QBE) and a simple textarea where you can, if you wish, write manually the query (RAW QUERY). To make life easier we are going to use the nice QBE wizard!
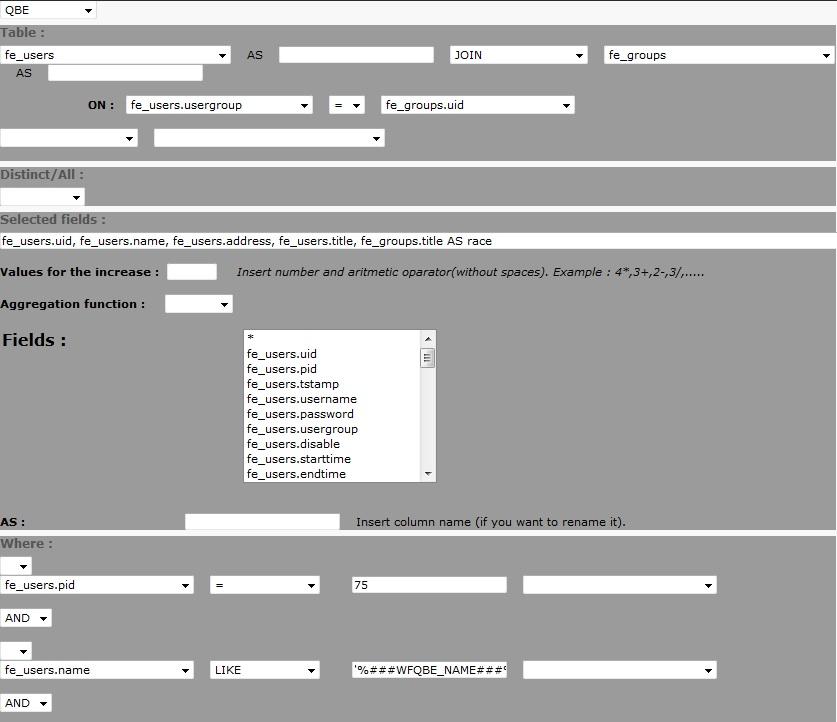
At this point we have to construct a query to retrieve the list of the fe_users which are not deleted and, for every character, the group name which the character belongs to. Try to use the wizard to obtain the following SQL:
SELECT fe_users.uid, fe_users.name, fe_users.address, fe_users.title, fe_groups.title AS race FROM ( fe_users LEFT OUTER JOIN fe_groups ON fe_users.usergroup = fe_groups.uid ) WHERE fe_users.deleted = 0 ORDER BY fe_users.name ASC
When we have finished constructing our query we can save and exit from the wizard (and from the record, of course).
Now we have to insert the “DB Integration” plugin in the page as a content element. In the “General” tab we have to specify an id for the div containing the output of the plugin (this is very important if you are using xajax), a query record (in this case the one we have just created), a template and a template type (we'll speak about this options in the following paragraphs) and finally we can activate the debug output to see the executed query.
Going to the “Results” tab, we can specify how many results per page we want, a text in case of no results, a summary and a caption to describe the results. Finally we can decide if we want to provide to the site users a link to download the results in a CSV format. The other tabs will be described in the following paragraphs, now save and close the content element.
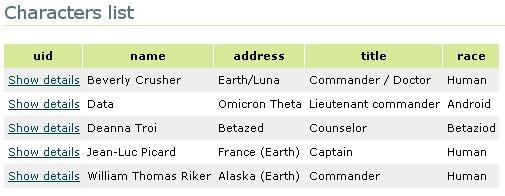
If we open the “Characters list” page in the FrontEnd we'll see the list of fe_users records stored in our table (remember to insert at least one fe_users record if you want to see something :-)) Very easy!!!
If you take a look at the query field of the “query table” record, you'll see that it's not filled with the SQL of the constructed query but with a serialized object. This is because if you re-open the wizard it's necessary to provide you the same form that you saved before and, to do this, it's necessary to parse the output of the wizard. As you can imagine, it's easier to restore a serialized object containing the SQL structure than parsing an SQL query. For this reason I decided to save the data-structure used to manage the wizard instead of the SQL result. As you'll see in the next phases of this example, this is a solution that I adopted in a lot of cases. Before version 0.9.3, I used an XML document to describe the SQL structure.
PAY ATTENTION TO DO NOT MODIFY THE QUERY FIELD MANUALLY!!!
Search forms
Now let's create the search form. We have to go inside the “Search” page and follow the same process as before. But in this case we have to choose the “search” option in the type selector. After this selection, some fields will be hidden and some others will be displayed. We have to complete these new fields:
- Results query: we have to link to a “select” query record. This is due to the fact that the search form that we are constructing is able to search only inside the results of a previously constructed query (or better, it's used to restrict the rows retrieved by an existing query). In our case we select the previously made “list query”.
- Search module: as before, we ignore this field because after saving the changes we we'll be able to use the wizard.
After saving, we can open the wizard for the search module creation. Surprisingly, we receive an error message: “No marker has been used in the query”. What's wrong? What did we miss? As I said before, a search module is used to refine an existing query, so we have to modify our “select” query to allow this search form to interact with it. Let's close this wizard and return to our previously created “list query” record.
We want to permit our users to search for the characters whose name contains a particular string. For example, if a user searches for “he”, the query has to retrieve two characters: the doctor Beverlie Crusher and the Commander William Richer (Number 1 for the Captain ;-)). To do this we have to modify the query. Use again the wizard to modify the query and to obtain the following SQL:
SELECT fe_users.uid, fe_users.name, fe_users.address, fe_users.title, fe_groups.title AS race FROM ( fe_users LEFT OUTER JOIN fe_groups ON fe_users.usergroup = fe_groups.uid ) WHERE fe_users.name LIKE '%###WFQBE_NAME###%' AND fe_users.deleted = 0 ORDER BY fe_users.name ASC
As you can see, we have a new condition in the WHERE part of the query: we want to test if the name contains the code ###WFQBE_NAME###. This is a marker that is substituted with an empty string by default but, if we provide a particular parameter, it will be substituted with the value of this parameter. And this is what is going to do our search form.
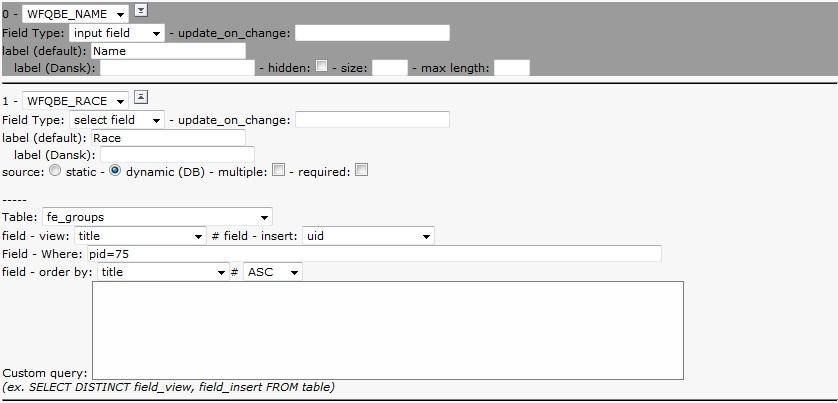
So, let's return to the search query and re-open the wizard. At this point we can find a selector box with the list of the available markers (only one in this example). We can select the marker and then we can select the type of input we need. For our example we select the “input” type and we simply provide the label string.
Now we have to insert the “DB Integration” plugin in the search page (as we have done in the list page) and we have to complete the id and the query record fields. In the “Search” tab we can specify the results page (the page containing the “list query” results). If the results page is the same as the search page, it's not necessary to fill in any field but, if you use xajax, you can specify the id containing the results list (in this way, the results are loaded through an AJAX call).
After saving, we can open the “Search” page in the FrontEnd and we'll find the search form. If everything is correct, if we search for a string, we'll be redirected to the “List” page and we'll see all the characters whose name contains the string we searched for. As before, this is only a very simple example: you can construct more complex queries and more complex search forms.
Since version 1.0.1, there's a new marker: CUSTOM. This marker is not associated to any marker in the results query and can be used to introduce custom search fields that have to be managed manually with a hook (e.g. I used a CUSTOM field to provide a selection between AND and OR operators inside the query).
Details view
The next step is the configuration of the “Character details” page with the detailed view of a character. First of all we have to create a “Query table” record to retrieve the data from a single fe_user record (so we have to choose the “select” type). Open the query wizard and construct the following SQL query:
SELECT fe_users.uid, fe_users.name, fe_users.address, fe_users.title, fe_users.image, fe_groups.title AS race, fe_users.www, fe_users.crdate FROM ( fe_users LEFT OUTER JOIN fe_groups ON fe_users.usergroup = fe_groups.uid ) WHERE fe_users.uid = ###WFQBE_UID###
Pay attention to the where condition. We want to retrieve the details of a precise record, the details of a character that has been selected in the list view. We haven't spoken about the link yet, but you can imagine that in the list view we have to provide a link for every character that passes the uid of the character to the details view. With this uid we can correctly retrieve the details of the selected character and this can be done with the conditionWHERE fe_users.uid = '###WFQBE_UID###'. If you open this page in the FrontEnd you'll see an error because no uid has been passed.
The solution is to modify the list page to insert a link that allows the user to select a character and to see his details. To do this, we have to create an extension template in the “Characters list” page and to configure the “uid” field to become a link (with the text “Show details”) and to pass the character uid to the “Character details” page. Take a look to the following TypoScript code that we have to insert in this new extension template:
plugin.tx_wfqbe_pi1.customProcess.1 {
0 = TEXT
0.value = Show details
0.typolink = 1
0.typolink.parameter = 7
0.typolink.additionalParams = &tx_wfqbe_pi1[uid]=###WFQBE_FIELD_0###
}
Pay attention to the customProcess number. You can see that we have set the customProcess.1 option, this “.1” is referred to the uid of the query record we have created. This is due to the fact that in the same page you can have more query records than one and for this reason the only way to refer to the correct one is with its uid.
In the previous TS code, you can see that we have defined a text object. You have to pay attention to two facts. The first one, very important, is that the “0.” (the key of the COA) is the number of the retrieved field and means that the field number 0 has to be shown based on this TS configuration. If you take a look to the list query, you'll find that we want the following fields:
fe_users.uid, fe_users.name, fe_users.address, fe_users.title, fe_groups.title as race
The query returns an array like this one:
0 => uid
1 => name
2 => address
3 => title
4 => race
Now I hope it's clear that the “uid” field is the number 0 and for this reason we created a TEXT object with key 0. The second fact to pay attention to is the ###WFQBE_FIELD_0### used in the “typolink” option. This marker will be substituted before evaluating the TS object with the value of the field 0 retrieved from the db (the uid).
The only thing to notice at this point is that the parameter has to be an array named “tx_wfqbe_pi1” and the name of the key (“uid”) has to be the same as the last part of the marker in the query (“###WFQBE_UID###”).
Now, we are able to reload the list, to see the generated links, to click on the “Show details” link of one character and to see his details in the “Character details” page. Perhaps, in this page you'll see a bad table, with some non-understandable values (e.g. the creation date is a timestamp, while we need a human-readable date). We have to create an extension template and to configure the crdate, www and image fields inside the setup field of this extension template:
plugin.tx_wfqbe_pi1.customProcess.3 {
7 = TEXT
7.value = ###WFQBE_FIELD_7###
7.date = d/m/Y
6 = HTML
6.value = <a href="###WFQBE_FIELD_6###">###WFQBE_FIELD_6###</a>
4 = IMAGE
4 {
file.maxW = 150
file = uploads/pics/###WFQBE_FIELD_4###
imageLinkWrap = 1
imageLinkWrap {
enable = 1
bodyTag = <BODY bgColor=black>
wrap = <A href="javascript:close();"> | </A>
width = 400
JSwindow = 1
JSwindow.newWindow = 1
JSwindow.expand = 17,20
}
}
}
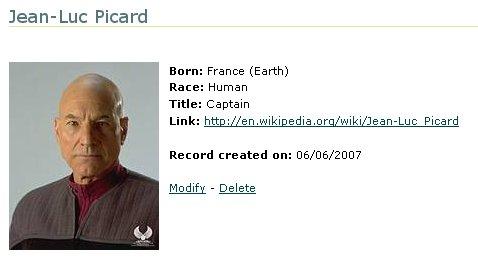
With the previous comments, I hope you are able to understand this code. Now every field is displayed correctly but this is not enough: to obtain a detailed view like the one shown in the screenshots part of this manual, we need to customize the layout. We have to create an HTML code with the proper markers and then to associate it to the plugin. The HTML used in our example is the following one (you'll find an example in res/custom_template.html):
<!--###RESULT_TEMPLATE###-->
<divid="###CONF_DIVID###">
<!--###DATA_TEMPLATE###-->
<divclass="###WFQBE_CLASS###">
<h2class="first">###FIELD_name###</h2><br />
###FIELD_image###
<strong>Born:</strong>###FIELD_address###<br />
<strong>Race:</strong>###FIELD_race###<br />
<strong>Title:</strong>###FIELD_title###<br />
<strong>Link:</strong>###FIELD_www###<br />
<br />
<strong>Record created on:</strong>###FIELD_crdate###<br />
###FIELD_uid###
</div>
<!--###DATA_TEMPLATE###-->
</div>
<!--###RESULT_TEMPLATE###-->
<!--###EMPTY_RESULT_TEMPLATE###-->
<divid="###CONF_DIVID###">
###CONF_EMPTYTEXT###
</div>
<!--###EMPTY_RESULT_TEMPLATE###-->
In this template you can see that every field is marked as ###FIELD_x### where x is the name of the retrieved field. If you compare this HTML code with the SQL query of the detailed view, you'll be able to associate the correct field with the correct marker. This is what the extension does while presenting the results in the FrontEnd.
We have to save this HTML in an HTML file, to re-open the “DB Integration” content element, to associate this HTML file as “Template” and to select a “Custom” template type in the “General” tab (alternatively, you can configure it via TS).
If we have done everything correctly, in the detailed view we'll find a nice character presentation but without the configuration done via TS. This is because we used markers like “###FIELD_fieldname###” instead of “###FIELD_fieldnumber###”. We can continue to use the field number but if we construct a custom template it is much easier to use the field name. To make the TS template compliant to our new custom HTML template, we have to modify the TS in this way:
plugin.tx_wfqbe_pi1.customProcess.3 {
crdate = TEXT
crdate.value = ###WFQBE_FIELD_crdate###
crdate.date = d/m/Y
www = HTML
www.value = <a href="###WFQBE_FIELD_www###">###WFQBE_FIELD_www###</a>
image = IMAGE
image {
file.maxW = 150
file = uploads/pics/###WFQBE_FIELD_image###
imageLinkWrap = 1
imageLinkWrap {
enable = 1
bodyTag = <BODY bgColor=black>
wrap = <A href="javascript:close();"> | </A>
width = 400
JSwindow = 1
JSwindow.newWindow = 1
JSwindow.expand = 17,20
}
}
}
We simply substituted the field number with the field name. This is a great improvement (I think...) because if you change your query you don't need to remap the fields with their position. At this moment, this is not possible with custom templates.
New record insert form
The last step is to provide a way to manage the character records. First of all we need an insert form for our users to permit them to insert a new character in our db.
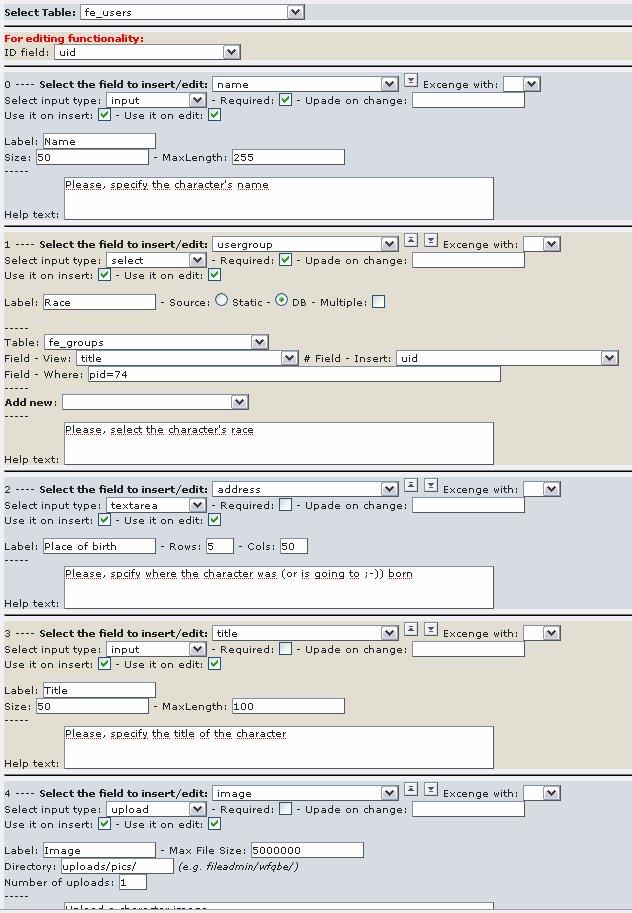
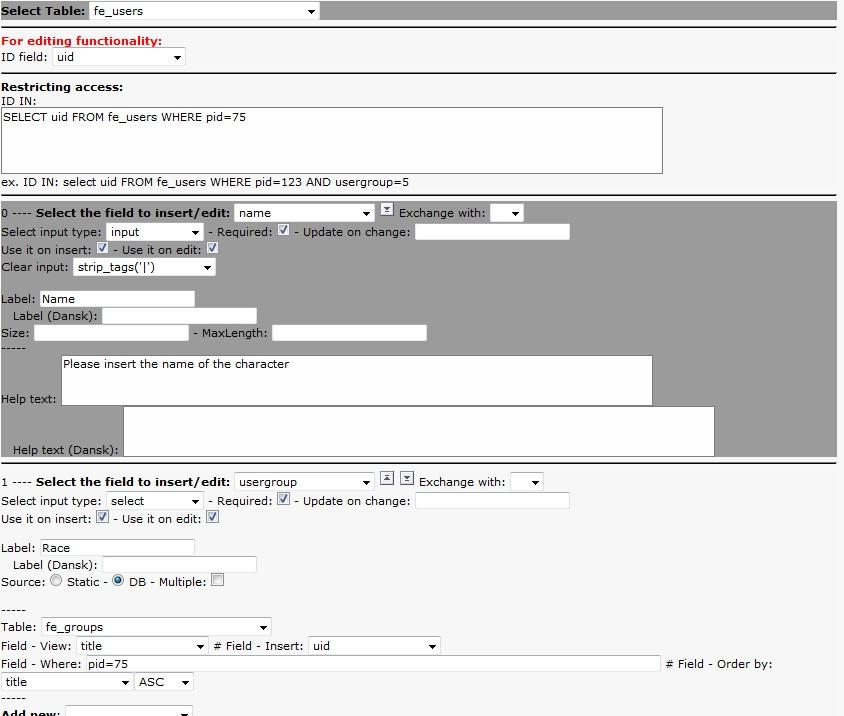
Like before, we have to create a new “query record”. This time we have to select “insert / edit” type and we can use the wizard to create the form. In the wizard the first thing to do is to select the table of the database where we want to insert the new records. After this selection, the wizard presents us the list of fields available in the table (for now we can ignore the “ID field” selection).
For every field we can decide which type of input to provide to our users or to do not provide an input possibility (simply ignoring the field). For every field remember to set that you want it in the insert form with a flag in the “Use it on insert” option. We are using the fe_users table and we want to provide the possibility to insert the name, the race (a fe_group record), the title, the place of birth, the image and the site of the character. It's not enough: we want to save the characters in a specific page (pid) and to save the creation date (crdate) but we don't want the users to modify this values (to obtain this behavior you can use the hidden type or the PHP function type). In the screenshots paragraph of the manual you can see a part of the insert form wizard.
After the “query table” record, we have to insert the “DB Integration” plugin as before. Now we can select the “Insert” tab and specify if we want to provide a confirmation request before inserting the data, a destination page after insertion (otherwise we'll see a report page about the insert operation) and some redirect parameters (if we set a destination page).
Usually it's a good idea to send the user to the detailed page of the inserted record. To do this, we have to select the “Character details” page in the “Record details page” field and we have to set the following string in the “Redirect parameters”:
tx_wfqbe_pi1[uid]=###ID###
where the ###ID### marker is ALWAYS substituted with the new id (it doesn't depend on the name of the id field, it's a fixed marker). If you need to specify a different field you can use this syntax:
tx_wfqbe_pi1[uid]=###WFQBE_FIELD_fieldname###
where fieldname is the name of an existing field.
In the next image you can see the resulting form in the insert page:
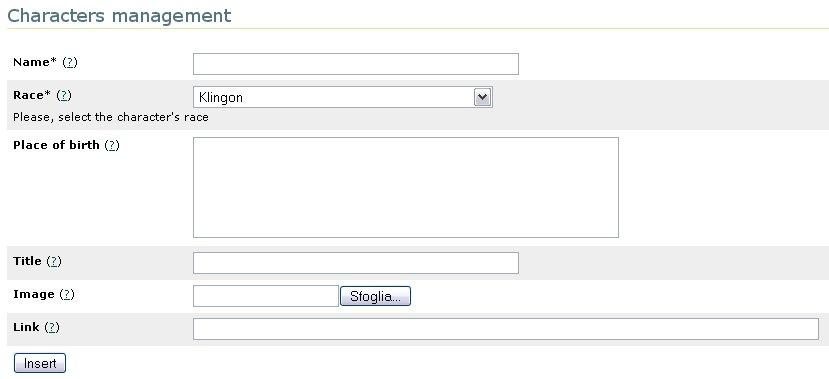
We reached the end of this very simple example. I think that this tool can be used in a lot of cases to include data inside our sites from every db we need (and we have access, of course).
In this example, for the race field we provided a drop-down menu. This is a common way to provide selection from multiple options but there are some other cases where this is not the best way to do this. For example, imagine that one field is not enough to decide the correct option to choose. In this case (and in a lot of other cases), it's useful the type “relation”. For this input type it's necessary to select a “Select wizard”. In this selector box, you'll see all the “select” query records you made. The procedure is this: first of all you have to construct a query to list all the fields you need (remember to include the id field of the related table), before entering the insert form wizard, then you can set this new query record in the “Select wizard” option. If you re-open the FE you'll see that the selector-box has been substituted by an icon. If you click this icon you'll see the list of record that you can associate to the fe_user record. You can associate a single fe_group (through a radio input) or more than one fe_group (through a checkbox list), it depends on your multiple selection. At this moment it's not possible to use a custom template for the selector wizard and it's not available the pagination.
Another option for the “relation” type is the “Add new wizard”. The concept is the same as the “select wizard” but, in this case, this is used to provide the user the possibility of adding a new record in the related table (in our example we can give the user the possibility to add a new fe_group record). Before selecting it, you need to create a “query record” of type “insert / edit” for the fe_group table and then you'll find it in this list.
If you use this extension to provide FE forms to insert records in TYPO3, you may need to clear the cache of some pages automatically. In this case you can use the field “Clear cache pages” in the “insert” tab of the flexform plugin configuration. You have to insert a comma separated list of page uids and the cache of that pages will be cleared after every insert / delete / update operation.
Edit and delete functionalities
Since version 1.0.0, the “DB Integration” extension also supports editing and deleting functionalities. Let's explain how to add these capabilities to our example.
The first step is to create a new form for editing (this form will be used for deleting too). We have two possibilities:
we can follow the “New record insert form” paragraph of this manual and provide a new page with a new form for editing (pay attention to check the “Use it on edit” option for every field)
we can use the same form used for the insertion of records. In this case we have to check the “Use it on edit” option for the fields we want to provide in the editing form (but don't un-flag the “Use it on insert” selections)
The second way is the one I prefer: it gives me the possibility to use the same configuration for the biggest part of fields without the need to redo the same work twice. If you choose the second way you can have different fields for inserting and editing forms. For example you may need to set the crdate field (which contains the creation date of the record) only on insert, not on edit. It's very easy to achieve this: you simply need to flag the “Use it on insert” option and not the “Use it on edit” option.
For both the possibilities, you have to select the “ID field” in the top of the wizard. This field must contain the unique identifier (id) of the table. In our example it's the “uid” field. This is necessary to provide to the extension a secure way to identify a record.
Now, what we need is a link in the detailed page to allow the users to edit the character details. If you go back in this manual, you'll find that in the query for the detailed view we retrieved the uid (which seemed to be not useful) and in the detailed template we added the ###FIELD_uid### marker (which seemed to be an error!). Now we are going to use these two objects to provide a link to edit and to delete the selected record.
In the “Character details” page, we have to modify the extension template and we need to add the following TS code:
plugin.tx_wfqbe_pi1.customProcess.75 {
uid = COBJ_ARRAY
uid.10 = HTML
uid.10.value = <br />
# This object is used to provide a link to edit the record
uid.20 = TEXT
uid.20.value = Modify
uid.20.typolink = 1
uid.20.typolink.parameter = 69
uid.20.typolink.additionalParams = &tx_wfqbe_pi1[uid]=###WFQBE_FIEL D_uid###&tx_wfqbe_pi1[wfqbe_editing_mode]=1
uid.30 = TEXT
uid.30.value = -
# This object is used to provide a link to delete the record
uid.40 = TEXT
uid.40.value = Delete
uid.40.typolink = 1
uid.40.typolink.parameter = 69
uid.40.typolink.additionalParams = &tx_wfqbe_pi1[uid]=###WFQBE_FIEL D_uid###&tx_wfqbe_pi1[wfqbe_deleting_mode]=1
}
With these changes, the ###FIELD_uid### marker will be substituted with the following text:
Modify – Delete
and the links to modify and delete the record, of course.
If you study the code, you'll find that both the edit and delete links are to the page with uid 69, which is the page that contains the insert form (the “Characters management” page in my example). Then you need to pay attention to the additional parameters of the link:
&tx_wfqbe_pi1[uid]=###WFQBE_FIELD_uid###&tx_wfqbe_pi1[wfqbe_del eting_mode]=1
The first one is used to provide the id of the record (remember that the parameter must be the same as the id field selected in the step before). As you can see we are providing the uid parameter that will be used to identify the correct character to edit or to delete.
The second parameter is (obviously) the parameter that defines if we want to edit or to delete the record.
The final option to set is in the FlexForm configuration of the “DB Integration” plugin in the “Characters management” page. Here we can specify a different page to be redirected in case of deleting operations (the detailed page set up for the inserting and editing operations is not useful in deleting operations because you deleted the record...). In our example a good selection can be the “Characters list” page.
Email features
Since version 1.3 it's possible to send emails after records creation, deletion and update. You can simply specify the admin email and a subject in the FlexForm of the Plugin Content. Remember to set the “Send email” option. After that an email will be sent every time a user inserts, updates and deletes a record.
It's also possible to send an email to the user who created the record. For this purpose, it's necessary to provide an email field in the insert form. Then you have to specify that field in the FlexForm (pay attention to specify the field number and not the field name). Thanks to this feature, it's now possible to use wfqbe to create subscription forms with confirmation emails.
Typoscript markers
In the previous paragraphs we didn't speak about Typoscript Markers in our queries. Suppose for example that you need to retrieve all the fields of the logged-in user. You have to construct a query like this:
SELECT * FROM fe_users WHERE uid=###TS_WFQBE_FEUSER###
Then you have to provide a way to manage the TS_WFQBE_FEUSER marker to the extension. You can do this via Typoscript, by adding the following TS code in your template:
plugin.tx_wfqbe_pi1.customQuery.10 {
TS_WFQBE_FEUSER = TEXT
TS_WFQBE_FEUSER.data = TSFE:fe_user|user|uid
TS_WFQBE_FEUSER.overrideAlways = 1
}
where 10 is the uid of our query record. In this example we want to prevent the site users to hack our query (by providing a different FEUSER parameter than the logged in user) so we set the overrideAlways option to 1. This means that the substitution of the TS_WFQBE_FEUSER marker has to be substituted in any case. The other possibility is the overrideIfEmpty option that can be used to set a default value in case of empty parameters.
Pay attention to the markers: all the WFQBE_XXX markers are used to pass parameters (like in previous examples) and so they are reserved for that. In any case, you can provide via TS a default value for these parameters too. Imagine that you use the WFQBE_USERNAME marker in your query and you provide a search form where you can search for a specific username. If you enter in the result page without searching for a username, the marker will be substituted with an empty value (''). Via Typoscript you can provide a default value for the marker that will be used if no value is passed in GET or in POST (in this case you need to set the overrideIfEmpty option to 1).
Another example. Imagine that you want to retrieve all the pages that have an end date in the future. You can construct a query like the following one:
SELECT * FROM pages WHERE endtime > ###TS_WFQBE_TIMESTAMP### OR endtime=0 OR endtime=''
Then you have to insert the following TS code in your template:
includeLibs.functions = fileadmin/user_functions.php
plugin.tx_wfqbe_pi1.customQuery.10 {
TS_WFQBE_TIMESTAMP = USER
TS_WFQBE_TIMESTAMP.userFunc = user_functions->getTimestamp
TS_WFQBE_TIMESTAMP.overrideAlways = 1
}
Finally, you have to insert the following PHP code in a file named 'user_functions.php' in fileadmin:
class user_functions {
function getTimestamp($content, $conf) {return time();}
}
Headers rewrite
Since version 1.1.0, in the default template it was not possible to rename the table headers. The only way it was the use of “AS” operator in the select query. For example take a look to the following query:
SELECT fe_users.uid, fe_users.name, fe_users.address, fe_users.title, fe_users.image, fe_groups.title AS race, fe_users.www, fe_users.crdate FROM ( fe_users LEFT OUTER JOIN fe_groups ON fe_users.usergroup = fe_groups.uid ) WHERE fe_users.uid = ###WFQBE_UID###
This will create a table with the following headers: uid, name, address, title, image, race, www and crdate. It's clear that some of these headers are not so friendly... This was the reason why a lot of developers decided to use custom templates even if they only needed a table like the one provided by the default template.
In version 1.1.0 a new feature has been introduced: while using customHeader TS option, it's now possible to override the default header. It's possible to use customHeader exactly in the same way that you use customProcess:
plugin.tx_wfqbe_pi1.customHeader.4 {
0 = HTML
0.value =
7 = TEXT
7.value = Creation date
}
In this example, let's assume that 4 is the uid of the previously created query. The table headers will be overrided with this configuration. So, uid will be substituted with an empty label and crdate will be substituted with the label “Creation date”. The other headers will remain the same.
Multi-language labels
In version 1.1.0, a multi-language support has been introduced. If you want to provide localized labels in your search and insert forms, first of all you have to create “Website language” records, than search form wizards and insert form wizards will present you as many label inputs as many languages you configured. So, for each field, you can provide a localized language. The multi-language support has been added to help text labels too.
Remember to translate your pages and to set the config.sys_language_uid parameter in your TS template...
Administration
Before using this plugin you have to include the static template in your site template:
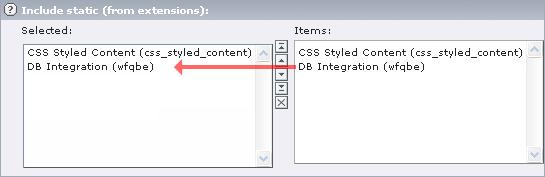
Now you have included the necessary TypoScript to show your extension in the FrontEnd:
plugin.tx_wfqbe_pi1 {
template = EXT:wfqbe/pi1/wfqbe_template.html
style = EXT:wfqbe/pi1/stile.css
defLayout = 0
debugQuery = 0
insert {
pageConfirmation = 1
requiredSymbol = *
add_new {
icon = EXT:wfqbe/res/add.gif
}
select_wizard {
icon = EXT:wfqbe/res/open.gif
}
}
classes {
even = wfqbe_even
odd = wfqbe_odd
}
}
## This enables the csv file export
csv_wfqbe >
csv_wfqbe = PAGE
csv_wfqbe {
typeNum = 181
10 < plugin.tx_wfqbe_pi1
10.template = EXT:wfqbe/pi1/wfqbe_csv_template.html
10.defLayout = 0
config {
disableAllHeaderCode = 1
additionalHeaders = Content-type:application/csv|Content-Disposition: attachment; filename=results.csv|Content-Transfer-Encoding:binary
xhtml_cleaning = 0
admPanel = 0
}
}
Thecsv_wfqbeobject is used to create a new page object (with a default typeNum=181) that is used if you want to create a CSV file with your results.
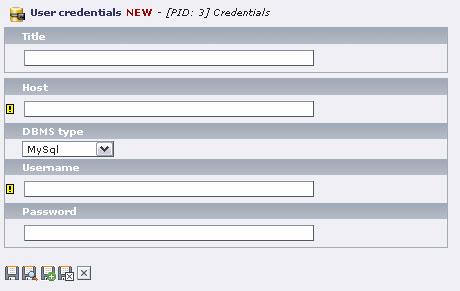
The next step is to create a new system folder where to store the credentials of the DBMS. Inside this new system folder, follow the “Create a new record” link and select “User credentials”. In this form you must insert the following data:
- Title: this is the name of your connection.
- Host: in this field you have to insert the host where is located your DBMS
- DBMS type: select the correct DBMS
- Username: insert the username which you use to connect to DBMS
- Password: insert the password which you use to connect to DBMS
- Dbname: insert the name of the db you want to connect to
- Connection type: you can choose the connection type you need:
- Connect: this is used to create a non-persistent connection (this is the default value ).
- PConnect: this is used to create a persistent connection.
- NConnect: this is used to always force a new connection ( use this if you are trying to connect to a database that is stored in the same DBMS of the TYPO3's local DB!!! ).
- Connect SQL configuration: you can fill in this field with SQL statements (separated by ';') that are sent to DB right after connecting. This is useful, e.g., for charset configuration (SET NAMES utf8).
By default a connection to the local TYPO3 DB is available that you can use without the need to create the credentials for it.
If you have to integrate more than one DBMS, you can create a lot of credential records. This is a screenshot of the User Credentials form:
If you need more flexibility while configuring the db connection, you can choose the “Alternative URI” connection mode:
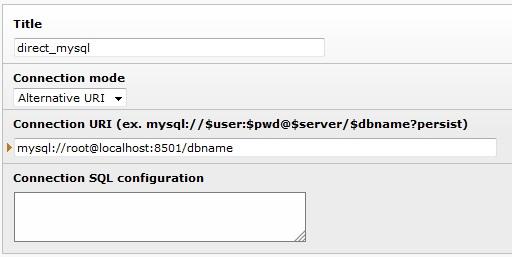
E.g. for connecting to Oracle using the utf-8 charset, you can set the following connection uri:
oci8://USERNAME:PASSWORD@TNS?charSet=utf8
Another possibility is to specify connection data in the typo3conf/localconf.php file by creating an array like the following one:
$TYPO3_CONF_VARS['EXTCONF']['wfqbe']['__CONNECTIONS']['local_zf2' ] = array(
'name' => 'Local Zend Framework 2 Tutorial',
'type' => 'standard', // Possible values "standard", "uri"
'dbms' => 'mysqli', // All the possible dbms supported by adodb (e.g. "mysql", "mysqli", ...)
'host' => 'localhost',
'username' => 'root',
'passw' => '',
'dbname' => 'zf2-tutorial',
'conn_type' => 'NConnect', // Possible values "Connect", "PConnect", "NConnect"
'connection_uri' => '', // Used is "type" equals to "uri"
);
$TYPO3_CONF_VARS['EXTCONF']['wfqbe']['__CONNECTIONS']['local_mage nto_17'] = array(
'name' => 'Local Magento 1.7',
'type' => 'standard', // Possible values "standard", "uri"
'dbms' => 'mysql', // All the possible dbms supported by adodb (e.g. "mysql", "mysqli", ...)
'host' => 'localhost',
'username' => 'root',
'passw' => '',
'dbname' => 'magento_17',
'conn_type' => 'NConnect', // Possible values "Connect", "PConnect", "NConnect"
'connection_uri' => '', // Used is "type" equals to "uri"
);
Where “local_zf2” and “local_magento_17” should be unique keys and should be not modified after the “User credentials” record associated to the credentials defined under the key has been created. The keys are free: you can choose any key you like (but it should be shorter than 255 chars).
After that you can create a new “User credentials” record for each of the array items paying attention to select the “Connection specified in localconf.php” type option:
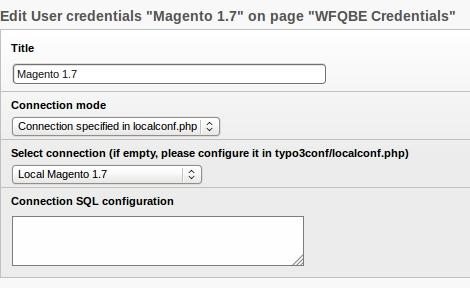
The type “Configuration specified in localconf.php” is the best one since it's not necessary to save the connection credentials in the TYPO3 DB.
Now you are ready to use the extension!
Configuration
template
Property
template
Data type
Resource
Description
The template-file.
See examples in 'EXT:wfqbe/pi1/'
This option can be overrided in the FlexForm of the plugin.
Default
style
Property
style
Data type
Resource
Description
A css-file to include inline
Default
wrapInBaseClass
Property
wrapInBaseClass
Data type
Boolean
Description
This option defines if the plugin output has to be wrapped with the standard div (<div class=”tx-wfqbe-pi1”>|</div>) or not.
Default
1
defLayout
Property
defLayout
Data type
Boolean
Description
This must be set to define which type of layout you want to use. There are two types available at the moment:
- table-based (0)
- custom (1)
The table-based layout has the particularity that the table is automatically constructed and you don't need to modify the template.
The custom option is necessary if you want to provide a complex layout. In this case you have to provide a template file with all the markers for all the fields in the place you want to show them.
This option can be overrided in the FlexForm of the plugin.
You can find a custom template example in EXT:wfqbe/res/custom_template.html
Default
0
enableXAJAX
Property
enableXAJAX
Data type
Boolean
Description
Set this to 1 to enable XAJAX features in FE (not fully supported yet)
Default
0
recordsForPage
Property
recordsForPage
Data type
int
Description
Number of records to be shown in list mode
Default
10
pageLimit
Property
pageLimit
Data type
int
Description
Number of page links to be shown in page browser.-1 means all pages:<< 1 2 3 4 5 6 7 8 >>
e.g. if pageLimit=3 and selected page is 4 than the page browser will be:
<< 3 4 5 >>
Default
-1
results.enableOrderByHeaders
Property
results.enableOrderByHeaders
Data type
Boolean
Description
Set this to 1 to enable orderby links on table headers
Default
1
customProcess
Property
customProcess
Data type
COA
Description
A TS object to customize the fields retrieved
Example:
plugin.tx_wfqbe_pi1.customProcess.4 {
1 = TEXT
1.value = ###WFQBE_FIELD_1###
1.case = upper
}
where:
- 4 is the uid of the query record
- 1 is the key of the retrieved field
If you use a custom template you can substituted the key of the retrieved field with the field name, like in this example:
plugin.tx_wfqbe_pi1.customProcess.4 {
username = TEXT
username.value = ###WFQBE_FIELD_username###
username.case = upper
}
where:
- 4 is the uid of the query record
- “username” is the name of the retrieved field
Default
globalCustomProcess
Property
globalCustomProcess
Data type
COA
Description
It is the same of the customProcess option but it doesn't need a uid number since it works as global.
Example:
plugin.tx_wfqbe_pi1.customGlobalProcess {
1 = TEXT
1.value = ###WFQBE_FIELD_1###
1.case = upper
}
If you use a custom template you can substituted the key of the retrieved field with the field name, like in this example:
plugin.tx_wfqbe_pi1.customGlobalProcess {
username = TEXT
username.value = ###WFQBE_FIELD_username###
username.case = upper
}
This option can be used to globally set a marker that you use in more than one query and you don't want to manually set for each query. It is overrided by the customProcess.XX option for specific query markers.
Default
customProcess.XXX.template
Property
customProcess.XXX.template
Data type
String
Description
This option can be used to customize the template file for a specific query.
Example:
plugin.tx_wfqbe_pi1.customProcess.123.template = fileadmin/wfqbe_custom.html
It has priority than flexform template option.
Default
customProcess.XXX.defLayout
Property
customProcess.XXX.defLayout
Data type
Boolean
Description
This option can be used to enable custom template mode for a specific query.
Example:
plugin.tx_wfqbe_pi1.customProcess.123.template = fileadmin/wfqbe_custom.html
plugin.tx_wfqbe_pi1.customProcess.123.defLayout = 1
It has priority than flexform option.
Default
customProcess.XXX.excludeColumns
Property
customProcess.XXX.excludeColumns
Data type
String
Description
This option can be used to exclude some columns in the results when using the default layout.
Example:
plugin.tx_wfqbe_pi1.customProcess.4.excludeColumns = 5,6
where:
- 4 is the uid of the query record
- 5,6 are the positions of the retrieved columns from the database (pay attention that 0 is the first value)
Default
customProcess.XXX.excludeDuplicatedValuesInColumns
Property
customProcess.XXX.excludeDuplicatedValuesInColumns
globalCustomProcess.excludeDuplicatedValuesInColumns
Data type
String
Description
This option can be used to define some columns that should show only one times each value to obtain lists like this one:
a
Author
b
Books
a
Stephen King
b
It
a
b
The Green Mile
a
b
Misery
a
Tom Clancy
b
The Hunt of Red October
a
b
Debt of Honor
a
b
Rainbow Six
a
b
Dead or Alive
Example:
plugin.tx_wfqbe_pi1.customProcess.4.excludeDuplicatedValuesInColumns = 0
where:
- 4 is the uid of the wfqbe query
- 0 is the key of the Author column
Default
costomProcess.XXX.wfqbeFirst
Property
costomProcess.XXX.wfqbeFirst
globalCustomProcess.wfqbeFirst
Data type
COA
Description
This option can be used to define a particular typoscript configuration for the first row.
Example:
plugin.tx_wfqbe_pi1.customProcess.4 {
myfield = TEXT
myfield.value = ###WFQBE_FIELD_myfield###
myfield.wrap = <li>|<li>
myfield.wfqbeFirst = TEXT
myfield.wfqbeFirst.value = ###WFQBE_FIELD_myfield###
myfield.wfqbeFirst.wrap = <ul><il>|</li>
}
This takes precedence to the wfqbeEven option.
Default
costomProcess.XXX.wfqbeLast
Property
costomProcess.XXX.wfqbeLast
globalCustomProcess.wfqbeLast
Data type
COA
Description
This option can be used to define a particular typoscript configuration for the last row.
Example:
plugin.tx_wfqbe_pi1.customProcess.4 {
myfield = TEXT
myfield.value = ###WFQBE_FIELD_myfield###
myfield.wrap = <li>|<li>
myfield.wfqbeFirst = TEXT
myfield.wfqbeFirst.value = ###WFQBE_FIELD_myfield###
myfield.wfqbeFirst.wrap = <ul><il>|</li>
myfield.wfqbeLast = TEXT
myfield.wfqbeLast.value = ###WFQBE_FIELD_myfield###
myfield.wfqbeLast.wrap = <il>|</li></ul>
}
This takes precedence to the wfqbeEven option.
Default
costomProcess.XXX.wfqbeEven
Property
costomProcess.XXX.wfqbeEven
globalCustomProcess.wfqbeEven
Data type
COA
Description
Same as wfqbeFirst but used for even rows
Default
costomProcess.XXX.wfqbeOdd
Property
costomProcess.XXX.wfqbeOdd
globalCustomProcess.wfqbeOdd
Data type
COA
Description
Same as wfqbeFirst but used for odd rows
Default
customProcess.XXX.CSVquery
Property
customProcess.XXX.CSVquery
globalCustomProcess.CSVquery
Data type
int
Description
This option can be used to define a different query to be executed to export results in csv / xls format. Useful if you want to provide different data when the user asks for csv / xls results download.
Default
customSearch.XXX.excludeFields
Property
customSearch.XXX.excludeFields
Data type
String
Description
This option can be used to exclude some fields in the search form.
Example:
[loginUser = *]
plugin.tx_wfqbe_pi1.customSearch.4.excludeFields = USER,KEYWORD
[end]
This typoscript example hides the fields named “WFQBE_USER” and “WFQBE_KEYWORD” in a search form when the user is logged in.
Default
CustomHeader
Property
CustomHeader
Data type
COA
Description
A TS object to customize the field names retrieved in the default template
Example:
plugin.tx_wfqbe_pi1.customHeader.4 {
1 = HTML
1.value = web site
3 = TEXT
3.value =
}
where:
- 4 is the uid of the query record
- 1 is the key of a retrieved field (the header of the column will became “web site”
- 3 is the key of a retrieved field (the header of the column will became empty)
- the other column names of the other retrieved fields will be the database field name
It's also possible to override the results.enableOrderByHeaders option if you want to disable link on a specific field. For example:
plugin.tx_wfqbe_pi1.customHeader.4 {
1 = HTML
1.value = web site
- enableOrderByHeaders = 0
3 = TEXT
3.value = title
}
in this example the header of the field 1 is not linked. The link on the header of the field 3 depends on the default configuration results.enableOrderByHeaders
Default
globalCustomHeader
Property
globalCustomHeader
Data type
COA
Description
It is the same of the customHeader option but it doesn't need a uid number since it works as global.
Example:
plugin.tx_wfqbe_pi1.globalCustomHeader {
1 = HTML
1.value = web site
3 = TEXT
3.value =
}
This option can be used to globally set a marker that you use in more than one query and you don't want to manually set for each query. It is overrided by the customHeader.XX option for specific query markers.
Default
customQuery
Property
customQuery
Data type
COA
Description
A TS object to manage the markers in the queries
Example:
plugin.tx_wfqbe_pi1.customQuery.4 {
TS_WFQBE_FEUSER = TEXT
TS_WFQBE_FEUSER.data = TSFE:fe_user|user|uid
}
where:
- 4 is the uid of the query record
- TS_WFQBE_FEUSER is a marker inserted in a where clause in your query (these type of markers have to be in the form ###TS_WFQBE_(A-Z, 0-9)###
You need to specify when the marker has to be substituted (see overrideIfEmpty and overrideAlways options).
Default
globalCustomQuery
Property
globalCustomQuery
Data type
COA
Description
A TS object to manage the markers in the queries at global level
Example:
plugin.tx_wfqbe_pi1.customGlobalQuery {
TS_WFQBE_FEUSER = TEXT
TS_WFQBE_FEUSER.data = TSFE:fe_user|user|uid
}
where:
- TS_WFQBE_FEUSER is a marker inserted in a where clause in your query (these type of markers have to be in the form ###TS_WFQBE_(A-Z, 0-9)###
You need to specify when the marker has to be substituted (see overrideIfEmpty and overrideAlways options).
This option can be used to globally set a marker that you use in more than one query and you don't want to manually set for each query. It is overrided by the customQuery.XX option for specific query markers.
Default
customQuery.XXX.wfqbe.intval
Property
customQuery.XXX.wfqbe.intval
Data type
Boolean
Description
This option should be used each time you get an integer value via GET or POST. Using this option you can prevent SQL Injections
Default
0
customQuery.XXX.wfqbe.intval
Property
customQuery.XXX.wfqbe.intval
Data type
Boolean
Description
This option should be used each time you get a float value via GET or POST. Using this option you can prevent SQL Injections
Default
0
customQuery.XXX.allowedOrderByFields
Property
customQuery.XXX.allowedOrderByFields
Data type
String
Description
This option should be used to enable fields for order by purpose. Otherwise no orderby condition is added to your query.
Example:
plugin.tx_wfqbe_pi1.customQuery.4.allowedOrderByFields = title,name
where 4 is the uid of the query record and title and name are field names that can be used to order results in recordset.
Default
overrideIfEmpty
Property
overrideIfEmpty
Data type
Boolean
Description
This option is used with the customQuery option and specify that the marker has to be substituted only if it's empty. This is useful because you can provide search options via GET and POST parameters, so you can avoid overriding them.
Example:
plugin.tx_wfqbe_pi1.customQuery.4 {
WFQBE_FEUSER = TEXT
WFQBE_FEUSER.data = TSFE:fe_user|user|uid
WFQBE_FEUSER.overrideIfEmpty = 1
}
In this example the FEUSER marker is substituted with the logged in user only if there are no GET and POST parameters specifying a different user (like in this case: &tx_wfqbe_pi1[FEUSER]=5))
Default
0
overrideAlways
Property
overrideAlways
Data type
Boolean
Description
This option is used with the customQuery option and specify that the marker has to be substituted in any case. This is useful because you can override any search options provided via GET and POST.
Example:
plugin.tx_wfqbe_pi1.customQuery.4 {
WFQBE_FEUSER = TEXT
WFQBE_FEUSER.data = TSFE:fe_user|user|uid
WFQBE_FEUSER.overrideAlways = 1
}
In this example the FEUSER marker is always substituted with the logged in user even if there are GET or POST parameters specifying a different user (like in this case: &tx_wfqbe_pi1[FEUSER]=5))
Default
0
debugQuery
Property
debugQuery
Data type
Boolean
Description
Set this to 1 to show the query executed
Default
0
insert.pageConfirmation
Property
insert.pageConfirmation
Data type
Boolean
Description
Set this to 0 to do not ask confirmation after data insertion
Default
1
insert.requiredSymbol
Property
insert.requiredSymbol
Data type
String
Description
The text shown to specify required fields
Default
*
insert.help_link
Property
insert.help_link
Data type
String
Description
The text of the help link
Default
?
insert.help_link.wrap
Property
insert.help_link.wrap
Data type
String
Description
Wrapper for the help link
Default
(|)
backend.disableCreateNewRecord
Property
backend.disableCreateNewRecord
Data type
Boolean
Description
If set to true, it hides the “Create new record” link into backend module
Default
0
Important security topics
Since this extension allows to execute queries in your databases and allows to customize these queries through GET and POST parameters, it's very important to take care about possible SQL Injection vulnerabilities.
Every GET and POST parameter used in the extension is cleaned via the addSlashes function, to avoid bad SQL parameters. This is enough when you create queries like this:
SELECT * FROM mytable WHERE myfield LIKE '%###WFQBE_PARAM###%'
In this case the parameter tx_wfqbe_pi1[PARAM] is automatically cleaned and you can safely use it. If someone tries to use “tx_wfqbe_pi1[PARAM]=test' OR 1=1 OR myfield LIKE'”, this string will be converted in “tx_wfqbe_pi1[PARAM]=test' OR 1=1 OR myfield LIKE'”. The query fails but it doesn't return unwanted records.
Unfortunately this is not true when you create queries like this:
SELECT * FROM mytable WHERE myfield = ###WFQBE_PARAM###
Please notice that no “ ' ” are used to wrap the parameter. In this case a parameter similar to the previous one “tx_wfqbe_pi1[PARAM]=1 OR 1=1” can be used to bypass your controls and get more information than you want to provide. In this case (and in every case you use a “=” control in your queries) you have to filter your parameters before executing the query. It's highly recommended that you add the following code in your TS setup to check the parameter:
plugin.tx_wfqbe_pi1.customQuery.10 {
WFQBE_PARAM=TEXT
WFQBE_PARAM.data=GPvar : tx_wfqbe_pi1 | PARAM
WFQBE_PARAM.overrideAlways = 1
WFQBE_PARAM.intval=1
}
or
plugin.tx_wfqbe_pi1.customQuery.10 {
WFQBE_PARAM.wfqbe.intval=1
}
where 10 is the uid of the results query. In this case the tx_wfqbe_pi1[PARAM] will be converted from “1 OR 1=1” to “1”. If you use float value, you can check them using the ' floatval ' option.
You should add this kind of controls for every parameter you use in your queries.
You can also use other extensions to sanitize your parameters. E.g. the following extensions could be useful for you:
- http://typo3.org/extensions/repository/view/wt_doorman/current/
- http://typo3.org/extensions/repository/view/px_phpids/current/
About use credentials, the best way is to specify the credentials into typo3conf/localconf.php file and create “User credentials” records of type “Connection specified in localconf.php).
About ordeby links, since version 2.0.1 it's necessary to define which fields can be used to order results:
plugin.tx_wfqbe_pi1.customQuery.123.allowedOrderByFields = name,address,city
Available hooks
I just started the development of an example extension (search for: wfqbehooks) that you can download to study how these hooks can be used.
Since version 1.0.0, the following hooks have been added:
preProcessQueryStructure: this can be used to manipulate the query structure before executing it. For example, this is useful to remove where clauses if a parameter is empty.
processCheckInsertValues: this can be used to validate a user input. For example, this is useful to check if the user inserted a correct date.
ProcessSubstituteSearchParametersClass: this can be used to manipulate search parameters from a search form before executing the results query. For example, this is useful to convert a date parameter from a “dd-mm-yyyy” format to a timestamp before executing a query.
checkPermissions: this can be used to check if a user is allowed to do a certain operation in insert, edit and delete forms. For example, this can be used to check if a user belongs to a fe_group which is allowed to delete records or not.
afterExecuteQuery: this can be used to do custom operations after an insert, edit or delete operation in the database. For example, this can be used to send an email, to save a log or to delete related records of the deleted record.
ClearFunctions: this can be used to add more clear functions for the input field in the “insert” wizard. At the moment only two functions are available (htmlspecialchars and strip_tags) but you can use this hook to add new and more complex controls.
ProcessProcessInsertValues: this can be used to pre-process values before inserting/updating them in the DB. For example, this can be used to convert a date field from human format to DB format.
PreProcessFormValues: this hook can be used to pre-process values in edit forms before showing them in the form field. For example, this can be used to convert a DB format date field in a human format. It's the opposite of the 'ProcessProcessInsertValues' hook...
customFieldTypesWizard: this hook can be used to add new custom field types to the insert / edit wizard. It consists of three functions:
addCustomFieldTypes: this is used to add the custom fields to the dropdown
manageCustomFieldType: this is used to provide the needed options in the form creation wizard
showCustomFieldType: this is used in the FE to provide the custom insert field in the insert form
preProcessRawQuery: this hook can be used to manipulate raw queries before executing them. For example, this can be used to dinamically add new sql statements in the query.
showBrowser: this hook can be used to manipulate the standard pagination for query results. It's available inclass.tx_wfqbe_results.php
How to remove empty markers in search queries
Imagine that you created a search form using the ###WFQBE_XXX### markers. This search form uses the following query:
SELECT * FROM users WHERE name='###WFQBE_NAME###' AND surname='###WFQBE_SURNAME###'
What does it happen if you fill in the name field with 'Jean-Luc' and leave empty the surname field? The results query will be the following one:
SELECT * FROM users WHERE name='Jean-Luc' AND surname=''
This query retrieves all the users with name 'Jean-Luc' and an empty surname. This is not correct: you want to retrieve all the users who's name is 'Mauro' without any surname constraints.
You will find that it's quite difficult to construct a correct query without any error in case of empty markers. You have to create a very complex query that works even if the user doesn't select one or more options in your search form.
Another possibility is to remove the unused constraints in the where clause of your query on biding-time... It's possible to manipulate the query during the association of the search values and the correct markers. In this way, you can construct a query like this:
SELECT * FROM users WHERE name='Jean-Luc'
or like this one:
SELECT * FROM users WHERE surname='Picard'
or like this one:
SELECT * FROM users WHERE name='Jean-Luc' AND surname='Picard'
without any problem. The magic can be done through the preProcessQueryStructure hook. But how can we use it?
First of all you have to create an extension and to put the following line in the ext_localconf.php file:
$GLOBALS['TYPO3_CONF_VARS']['EXTCONF']['wfqbe']['preProcessQueryStru cture'][] ='EXT:your_ext_key/res/class.tx_wfqbe_preprocessquery.ph p:tx_wfqbe_preprocessquery';
Then you have to create the class.tx_wfqbe_preprocessquery.php class and the tx_wfqbe_preprocessquery function as follows:
class tx_wfqbe_preprocessquery {
function tx_wfqbe_preprocessquery(){}
function process_query_structure($wfqbe, $piVars, $query_uid, &$callingObj) {
$remove = array();
if ($query_uid==65) {
$markers = array("NAME", "SURNAME");
foreach ($markers as $marcatore) {
if ($piVars[$marcatore]=='' || (is_array($piVars[$marcatore]) && $piVars[$marcatore][0]=='')) {
foreach ($wfqbe[0]['insert'] as $key => $value) {
if (strpos($value, 'WFQBE_'.$marcatore)>0) {
$remove[] = $key;
unset($wfqbe[0]['insert'][$key]);
}
}
}
}
}
return $remove;
}
}
This function checks if the two markers are empty, in this case it removes all the conditions in the where clause of the query with uid 65 that are related to this markers.
For your queries, I think you simply need to change the uid of the query and the markers names (and of course to repeat this for all the queries that you want to preprocess) of the above code.
For a better explanation of how to use an hook, please read the online docs.
How to integrate wfqbe in your extension
Since version 1.4.0, it's available an API for the integration of wfqbe in other extensions. Think, e.g., that you have to perform a query on an external database into your extension. First of all, you have to connect to the external database, then you have to learn PHP functions for interacting with that database. It's not always simple to work with different databases!
Now you can use wfqbe as a layer for executing queries on every DBMS supported by ADODB into your extension. You simply have to create a credentials record and a query record with wfqbe as explained in previous chapters and to call the API with the uid of the query that you want to execute. The result is an array of rows.
Let's do an example.
require_once(t3lib_extMgm::extPath('wfqbe')."lib/class.tx_wfqbe_ap i_query.php");
$WFQBE= t3lib_div::makeInstance("tx_wfqbe_api_query");
$WFQBE->init($query_uid);
$rows=$WFQBE->execQuery();
With these 4 lines of code, you can call the wfqbe API and get an array of rows as a result of the execution of the query. You simply have to provide the uid of the query record ($query_uid) and the “DB Integration” extension will connect to the external DBMS and perform the query.
Please take care about TypoScript configuration! Since it's possible to perform customizations of the results and preprocessings of the search parameters via TypoScript, it's mandatory to include the TS code into the page that contains the query record. This is needed because the API gets the TypoScript code based on the “pid” field of the query record.
In TER you can find the wfqbe_savjpgraph extension: this is the first extension that uses this API. You can try it and learn how to integrate wfqbe in your extension.
DB Management Module
Now suppose that you want to provide a tool to manage records of your database into the BE. For this purpose it's available a module that allows to use the same frontend query records into the backend to manage the contents of the databases.
Let's create an example! Imagine that you want to provide a tool to manage, e.g., the fe_users TYPO3 table (but it works with any table in any database supported by adodb).
First of all you have to create the list query (you can use the same created in the “User Manual” chapter of this tutorial or you can create a new one):
Then you may want to create a search form to allow your BE users to filter results (please follow instructions in previous chapters on how to create a search form query record starting from an existing select query record):
Then you may want to provide edit and insert functionalities to your BE users. In this case you have to create ad insert/edit query record:
Oh, I forgot: maybe you want to show the details of records and not a list only! So you have to create another select query record for the details:
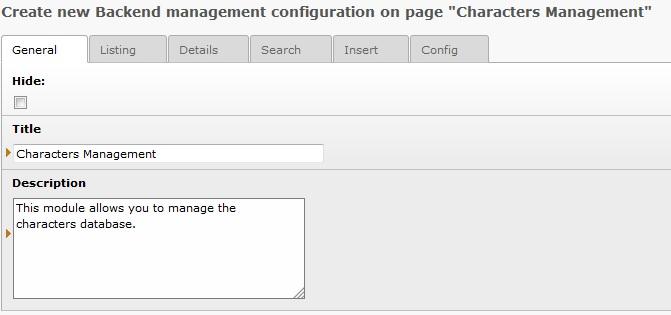
Ok, now we are ready to create a new special type of record to provide these functionalities in the backend. So, in the page where you want to provide the management of these records, you have to create a new “Backend management configuration” record:

Then you have to compile the title and the description (they will be shown in the DB Management module) and to fill in the fields “List query”, “Details query”, “Search query” and “Insert query” with the previously created query records. Optionally you can set the number of records you want to show per page in the Listing tab.
Ok, now you can switch to the DB Management module and choose the page where you created the last record. You should see the records list, the search form and a “Create new record” link:
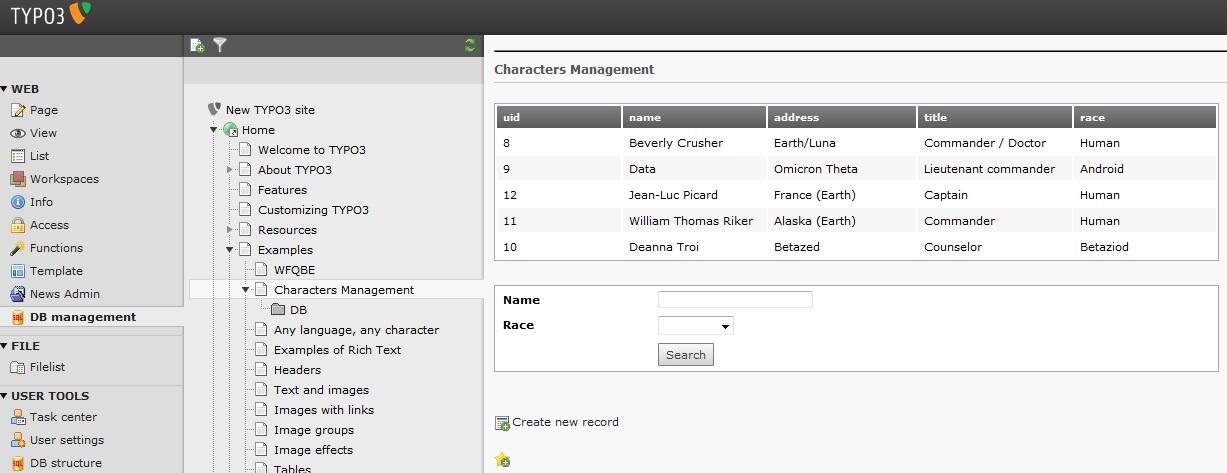
(if you don't see anything, please make sure that you included the static typoscript template of the extension!)
If you already produced the typoscript to customize the output in the frontend, it will be applied in the BE too (if found in the selected page). Otherwise you may want to create an extension template and to add the following typoscript code to produce the link to the details (where 5 is the uid of the list query record):
plugin.tx_wfqbe_pi1.customProcess.5 {0 = TEXT0.value = Show details0.typolink = 10.typolink.parameter = 740.typolink.additionalParams = &tx_wfqbe_pi1[UID]=###WFQBE_FIELD_0###}
Now you can reach the record details.
This is the default template, let's customize the output by applying a custom template! First of all you have to create the custom template:
<!-- ###RESULT_TEMPLATE### -->
<divid= "###CONF_DIVID###" >
<!-- ###DATA_TEMPLATE### -->
<divclass= "###WFQBE_CLASS###" >
<h2class= "first" >###FIELD_name###</h2><br/>
###FIELD_image###
<strong>Born:</strong>###FIELD_address###<br/>
<strong>Race:</strong>###FIELD_race###<br/>
<strong>Title:</strong>###FIELD_title###<br/>
<strong>Link:</strong>###FIELD_www###<br/>
<br/>
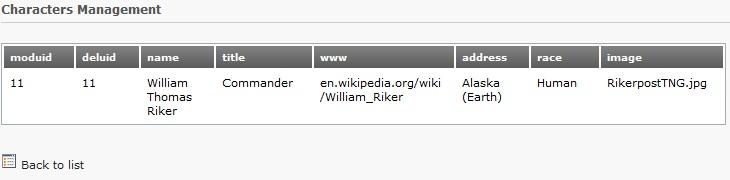
<strong>Record created on:</strong>###FIELD_crdate###<br/>
###FIELD_moduid### - ###FIELD_deluid###
</div>
<!-- ###DATA_TEMPLATE### -->
</div>
<!-- ###RESULT_TEMPLATE### -->
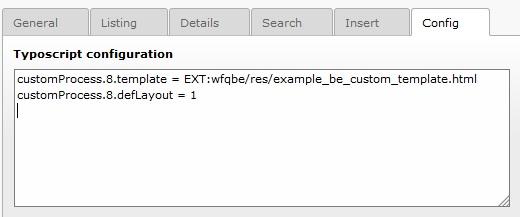
Then you have to associate it to the query output. In the frontend it could be done by selecting the template file into the flexform in the content element. In the backend you have to configure it via typoscript in the “Typoscript” field of the “Backend management configuration” record you just created:
customProcess.8.template = EXT:wfqbe/res/example_be_custom_template.html
customProcess.8.defLayout = 1
Alternatively, you can define a specific typoscript configuration for backend only by adding the following typoscript code in the setup field of the TS template of the page:
plugin.tx_wfqbe_pi1.customProcess.8.template = EXT:wfqbe/res/example_be_custom_template.html
plugin.tx_wfqbe_pi1.customProcess.8.defLayout = 1
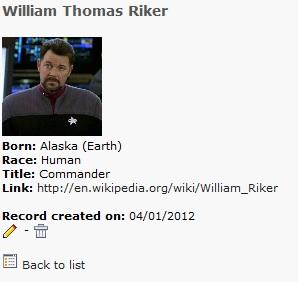
Now you can see the details of the record. As you can see, image, link, crdate and uid fields need some conversion. You can add the following typoscript code to the setup field of your TS template (where 8 is the uid of you details query record and 74 the uid of the page containing the Backend Management Configuration record):
plugin.tx_wfqbe_pi1.customProcess.8 {image = TEXTimage.value = <img src="http://localhost:8502/mysite/uploads/pics/###WFQBE_FIELD_image# ##" width="100px" /><br />www = TEXTwww.value = <a href="###WFQBE_FIELD_www###" target="_blank">###WFQBE_FIELD_www###</a>crdate = TEXTcrdate.value = ###WFQBE_FIELD_crdate###crdate.date = d/m/Ymoduid = TEXTmoduid.value = <span class="t3-icon t3-icon-actions t3-icon- actions-document t3-icon-document-open"> </span>moduid.typolink= 1moduid.typolink.parameter = 74moduid.typolink.additionalParams = &tx_wfqbe_pi1[uid]=###WFQBE_FIELD_moduid###&tx_wfqbe_pi1[wfqbe_edit ing_mode]=1deluid = TEXTdeluid.value = <span class="t3-icon t3-icon- actions t3-icon-actions-edit t3-icon-edit- delete"> </span>deluid.typolink = 1deluid.typolink.parameter = 74deluid.typolink.additionalParams = &tx_wfqbe_pi1[uid]=###WFQBE_FI ELD_deluid###&tx_wfqbe_pi1[wfqbe_deleting_mode]=1}
Ok, the details page now should be ok:
Now you can also try the edit, delete and create new record feature:
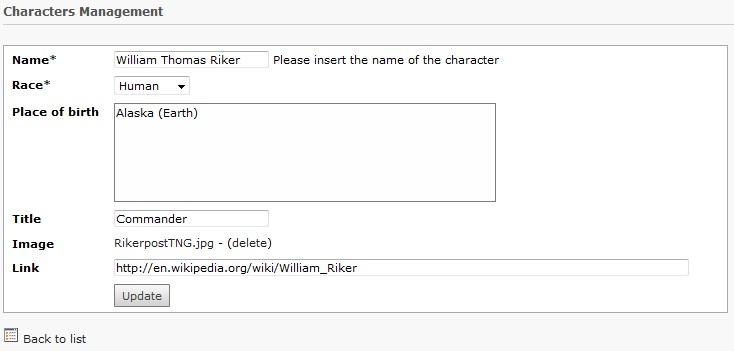
That's all, now you can manage your characters from the backend!
DB Structure Module
In the BE it's available a module that allows to manage the structure of the databases. Even if this is a simple tool, it's very dangerous to give access to this module to BE users. I suggest you to protect it and to prevent access through usergroup permissions.
For those who are allowed to access this module, they'll find the possibility to operate on all the DB connected and on all the tables of those DBs. They will be able to create new fields and to delete existing fields. In a future release it will be possible to rename columns, to create, to rename and to delete tables.
If you want to provide this module to your BE users, you can limit their access through UserTS configuration. In this way you can limit the DBs and the tables they can work on. E.g.:
module.user_txwfqbeM1 {
allowedCredentials = 0,1
allowedTables.0 = pages,tt_content,fe_users
allowedTables.1 = table1,table2,table3
}
In this example this user can access DBs 0 (Local TYPO3 DB) and 1 (the DB connected through the credential record with uid 1). In the local TYPO3 DB the user can work on pages, tt_content and fe_users tables only. In the other DB the user can modify table1, table2 and table3 only. They are not allowed to modify other DBs and other tables.
WFQBE Extensions
In this section I will collect the extensions that are related or use the DB Integration extension. If you develop an extension that integrates this one, please send me an email and I'll add your extension.
Graph generation with wfqbe and sav_jpgraph
WFQBE – SAV JpGraph connector is an extension that allows you to create nice graphs with your data retrieved with wfqbe. This is a connector between DB Integration and SAV JpGraph extensions. Please take a look on the manual of wfqbe_savjpgraph and sav_jpgraph extensions for more details.
This extension has been developed by Mauro Lorenzutti and Yolf (Laurent Foulloy).
Case histories
In this chapter I'm including the case histories on how TYPO3 developers used this extension to integrate an external db, to add functionalities to existing extensions and everything else related to this extension. If you used wfqbe and you think you used it in a particular way, it would be very interesting to add a case history in this manual to explain to other developers the ways that they can use this extension.
Extending seminar extension (by Nico Deblauwe)
This extension is extremely useful to add front-end functionality to extensions that haven't done this so far. Or to test different possibilities for the front-end output, before you will incorporate it in your own extension. What follows is an example of how the seminars extension was extended.
Problem statement
KVIV-Jongeren is the association that unites the Flemish young engineers. The members of the board organize throughout the year about 25 activities that are accessible for all the members of the network (about 2500). Each of the organizers needs to be able to check who applied for his activity and for management reasons, we like to keep the overview as well available for every member of the board.
Seminars is an extension that allows you to create and manage a list of seminars, workshops, lectures, theater performances and other events as an overview or as detailed descriptions. In addition, it allows front end users to register for these events. This was exactly what we needed for the website of our volunteer-run association.
The daily management for the seminars extension, however, is (at the moment) completely done through the back-end. This was one step too far for our active members, who just needed be able to get the overview (how many persons did apply, contact information).
Solution
By using the wfqbeextension, it was possible to add the needed functionality easily to the pages that are only accessible to the board members. The latter comment is something really important: since wfqbedirectly executes predefined SQL commands in your TYPO3 database, you need to make sure that the access rights to the pages where you use the plug-in are set correctly... Otherwise you could of course have privacy issues...
The main screens (for queries and images, see below) are:
- Overview of the activities (query 1)
- Limited overview of the activities (add constraint “ND a.begin_date > UNIX_TIMESTAMP()” to query 1), so that the user is not annoyed with too many activities that already passed by. Other improvements are possible as well,e.g. only show the five first upcoming activities, etc...
- Overview per activity (query 2) : with names, email addresses (needed to contact them), number of received seats and comments (where the names of the extra participants can be given)


Front-end view, left the list of activities, right the detailed view.
It is clear that the functionality could be improved even more from a usability point of view. For example, it is actually not needed to show the event id nor the date (in this cryptic format). And adding an extra column with the number of applications (sql count) so far would also be a big improvement.
Query 1: for the activities overview SELECT a.uid, a.begin_date, a.titleFROM tx_seminars_seminars AS aWHERE a.pid = 16 AND a.hidden = 0ORDER BY a.begin_date ASC
Query 2: for the detailed view of an activity
SELECT a.name, a.email, c.seats, c.notes
FROM fe_users AS a,tx_seminars_seminars AS b,tx_seminars_attendances AS c
WHERE c.seminar = b.uid AND c.user = a.uid AND b.uid = '###WFQBE_UID###' AND c.deleted = 0
ORDER BY a.name ASC
wfqbe as a frontend-form to insert tt_news articles
Although some specific extensions exist, that make you able to insert tt_news articles from the FE, wfqbe can be used for that task too. The configuration is slightly more complex, but if you are already using wfqbe for other purposes, using it for that task too might be convenient in some circumstances.
The example described here is just a simple setup for inserting articles, however you could use wfqbe to build up a more complete interface, through which you are able to modify and/or delete existing tt_news articles.
Creating a page for the tt_news FE
First, create a page which will include the wfqbe plugin. In the example described here, the page is supposed to be accessible only by logged-in FE users.
The page will include two elements:
a wfqbe query record, defining the form you will use to supply the tt_news article fields from the FE;
a plugin content element including the wfqbe plugin, which will make the query record available in the page.
Building the query record
Create a new “Query table” record and edit it appropriately:
- Type: “Insert/edit”.
- User credentials: “Local Typo3 DB”, because tt_news articles are stored in the Typo3 DB itself.
You can use the wizard to build up the Insert form. Select “tt_news” as the table to be handled through the form, and “pid” as the ID field for editing functionality. Remember to enable “Use it on insert” checkbox for every field you want to be included in the form.
Defining the form may vary from simple to very complex task, it depends on the number and types of fields you want to be able to insert from the FE. For a simple interface, we chose to include only the following fields in the form:
Title:
Field to insert/edit: title; input type: input.
Body text:
Field to insert/edit: bodytext; input type: textarea.
Category: you might like to display a dropdown select menu including the available tt_news categories, extracting them from the tt_news_cat table. We assume that no more than one category can be assigned to an article at the same time, for simplicity.
Field to insert/edit: category; input type: select; source: DB; table: tt_news_cat; field – view: title; field – insert: uid.
Links:
Field to insert/edit: links; input type: textarea.
Related files: here the “upload” field type helps, to make you able to upload the related files from your computer. You must define the directory where uploaded files must be saved as the path where tt_news expects to find them.
Field to insert/edit: news_files; input type: upload; directory: “uploads/media/”.
Some additional tt_news fields must be automatically created, because they are important for tt_news to handle the data correctly. You can configure them to return an appropriate value through a PHP function, directly embedded in the query record, by using the “PHP function” input type:
author: this field will be filled in with the username of the FE-user:
Input type: PHP function; PHP code:
return "'".$GLOBALS['TSFE']->fe_user->user['name']."'";
tstamp, crdate, datetime: these three fields must contain the current timestamp, so their setting is identical:
Input type: PHP function; PHP code:
return time();
pid: the uid of the folder where the tt_news articles are saved in your page tree:
Input type: PHP function; PHP code:
return 100;
Setting up the wfqbe plugin
Create a content element of type “Insert plugin”. The plugin to select is “DB Integration”, of course. The usual settings for pages containing wfqbe apply.
The plugin can be configured as follows:
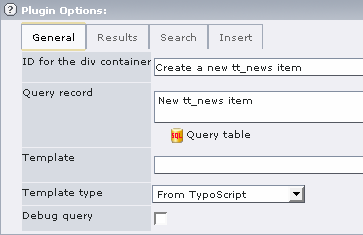
In the Query record field, just refer to the query record you defined above.
Optionally you might want to configure the Insert tab too. For instance, you might redirect users to a page displaying the details of the new added article. If you redirect to the default tt_news details page, you must also define the “Redirect parameters” field in order to attach the new tt_news article id just written into the database to the end of the URL, and the id of a page to which you want the user to be returned back from the details page (see the tt_news documentation for details):
&tx_ttnews[tt_news]=###ID###&tx_ttnews[backPid]= PageID-for-Back- option
Using a hook to write the category
All done? Not yet.
Unfortunately enough, tt_news do not write the category to which each article belongs to in the tt_news table. This is done in order to allow articles to belong to more than one categories at the same time. For this reason, the relations between articles and categories are stored in a separate table, called tt_news_cat_mm. Although in our example we assume that each article can be assigned to one category only, we must define the relation inside tt_news_cat_mm anyway, otherwise the relation will not be taken into consideration.
wfqbe is not able to write fields to more than one table from a single query record: in the query object we defined above, the tt_news has been selected as the target table for the data supplied through the form, then there is no way to write data to tt_news_cat_mm directly from the query record.
This tricky problem can be solved using a wfqbe hook called afterExecuteQuery, which allows the execution of a PHP function after the data supplied through the form have been written in the database. A function must be written, which will be associated to the afterExecuteQuery hook, in order to write a record into the tt_news_cat_mm through a MySQL directive.
The function must be embedded as a brand new extension; let's call it wfqbe_tt_news_afterExecuteQuery. You must create this files structure under typo3conf/ext:
typo3conf/ext/wfqbe_tt_news_afterExecuteQuery/ext_emconf.php
typo3conf/ext/wfqbe_tt_news_afterExecuteQuery/ext_localconf.php ty po3conf/ext/wfqbe_tt_news_afterExecuteQuery/res/tx_wfqbe_add_tt_news_cat_mm.php
ext_emconf.php is just the configuration for the extension we are building up:
<?php
# Extension Manager/Repository config file for ext: "wfqbe_tt_news_afterExecuteQuery"
#
# Auto generated 16-05-2007 10:03
#
# Manual updates:
# Only the data in the array - anything else is removed by next write.
# "version" and "dependencies" must not be touched!
$EM_CONF[$_EXTKEY] = array(
'title' => 'Extended WFQBE for tt_news',
'description' => 'An extension of wfqbe to handle tt_news',
'category' => 'misc',
'author' => 'Your Name',
'author_email' => 'Your.Name@example.com',
'shy' => '',
'dependencies' => 'wfqbe',
'conflicts' => '',
'priority' => '',
'module' => '',
'state' => 'beta',
'internal' => '',
'uploadfolder' => 0,
'createDirs' => '',
'modify_tables' => '',
'clearCacheOnLoad' => 0,
'lockType' => '',
'author_company' => '',
'version' => '0.0.0',
'constraints' => array(
'depends' => array(
'wfqbe' => '',
),
'conflicts' => array(
),
'suggests' => array(
), ),
);
?>
ext_localconf.php associates the extension to the wfqbe afterExecuteQuery hook:
<?php
if (!defined ('TYPO3_MODE')) die ('Access denied.');
$GLOBALS['TYPO3_CONF_VARS']['EXTCONF']['wfqbe']['afterExecuteQuery'] [] = 'EXT:wfqbe_tt_news_afterExecuteQuery/res/tx_wfqbe_add_tt_n ews_cat_mm.php:tx_wfqbe_add_tt_news_cat_mm';
?>
Finally, res/tx_wfqbe_add_tt_news_cat_mm.php is the function that does the job:
<?php
class tx_wfqbe_add_tt_news_cat_mm {
function tx_wfqbe_add_tt_news_cat_mm() {
}
function postQueryProcess(&$wfqbe, $piVars, $query_uid, &$callingObj) {
$dbquery_cat = "INSERT INTO tt_news_cat_mm (uid_local,uid_foreign) VALUES ('".$wfqbe['id']."','".$wfqbe['insert_data']['category']."');";
if($GLOBALS['TYPO3_DB']->sql(TYPO3_db, $dbquery_cat)) {
}else{
$wfqbe['content'].="<p>An error happened while assigning the news article to its category.</p>";
}
return $wfqbe;
}
}
?>
Just install the extension “wfqbe_tt_news_afterExecuteQuery” from your BE: you should find it in the list of extensions available for installation in your Ext Manager.
TYPO3, OXID CE and an XML interface to Adobe Flash (by Jan Sass)
We are connecting a Typo3 4.x installation to the shop frontend of OXID CE using an XML interface that uses Flash. We are using the DB Integration TER extension from Mauro Lorenzutti (wfqbe) to do it.
Our thanks go out to Mauro for his support with the 2 nd generation of an xml template, which is available to be downloaded at the end of this case study.
1st Step: Installation of DB Integration ( wfqbe ) We are proceeding on the assumption that you are familiar with the installation of Typo3 4.3 as well as the DB Integration extension..If not, we recommend the reading material of the easy to read the first part of this document . If you follow the simple guide word-by-word, you will get a simple search box as well as a table with the results of your query to any local or remote SQL database.The result is a table in classical HTML terms with TRs and TDs - good for HTML, bad for Flash.
2nd Step: Rerouting the output of wfqbe to XML This task is broken down into two sub-steps.First of all, the template in the wfqbe plug-in is changed for this so that TRs and TDs are not output, rather the table cells are separated by tildes (~) as well as the table lines by <data> tags.The result of this is an ugly, but functional XML construct:<data>ArtID~Name~PictureName~and so on...</data>.At our request, Mauro sent us a new xml template in addition to the csv and xls templates that are installed by default.You will find both templates for downloading at the end of this page.
In the second step, we must make sure in the TS setup that an XML header is sent instead of the one for HTML.You will also find these TS setup lines in the attachment for this case study.You can see the results of these two sub-steps in Fig. 3 of the xml output that is generated using a GET call like this one: www.servername.de/?type=666&tx_wfqbe_pi1[OXARTNUM]=12345.
In this example, 666 is the typeNum that was selected in the TS setup, and "12345" is text that is being searched for in OXARTNUM.A very beneficial feature is that with one URL, not only a search result is generated in the database of any server, but Typo3 is also directly given the correct formatting for this based on the TypeNum.
3rd Step: Creating the article in OXID CE In order for it to be possible for the article to be found by wfqbe, some information must be created and compiled.First of all, at least one article must be created in OXID CE, of course.Secondly, at the latest since the installation of OXID, we also know thedatabase names, server name and access password.This is important, because the OXID database is never in the same SQL DB as Typo3.The above TER article provides great documentation of how wfqbe addresses remote databases.And thirdly, you must find out where OXID stores the data inside its SQL database.To do this, we recommend taking a look in Php MyAdmin on the server.In this example, we are looking for the article numbers which are stored in OXARTNUM, among other things.
4th Step: Development of Flash programming Now that both the database query works with GET and this result is output in an XML structure, only a small amount of programming in Flash is necessary for the query and display of the OXID CE article data.In this example, there is an environment picture of a bathroom in which a good dozen buttons have been drawn.These buttons outline the shape of the displayed articles so that the mouse can be used in the picture to specifically select the toilet paper holder, for example.
Each button in Flash only tells you the article number. Flash uses this article number to query the interface built in steps 1 to 3 and receives a small amount of the article data in return.For this example, the article picture as well as a details link are requested and displayed as well as the name, price, and unit of quantity.
5th Step: Results at a glance DB Integration (wfqbe) can output any database in a freely definable format with the right template.XML is obvious, because with it an interactive system like Flash can directly access the live data of a shop like OXID CD.With it, the Flash GUI, the shop itself and the detailed view of the article are driven from only one database. It doesn't get much more practical than that.
Download material and German translation:
How to join tables and showing sub-results
Imagine that you have two tables and you want to show the result of a join between these two tables. With wfqbe this is not a problem, of course, but what about if you don't want to repeat a lot of times the same value? Let's do an example:
Table 1: Countries
Uid
a
Uid
b
Country
1
a
1
b
Italy
2
a
2
b
Germany
Uid
a
Uid
b
Country
c
City
1
a
1
b
1
c
Milan
2
a
2
b
1
c
Rome
3
a
3
b
1
c
Venice
4
a
4
b
2
c
Berlin
5
a
5
b
2
c
Hamburg
6
a
6
b
3
c
New York
7
a
7
b
3
c
San Francisco
Now let's create the following query with wfqbe:
SELECT countries.country, cities.city FROM countries JOIN cities ON countries.uid = cities.country
The default output will be the following one:
Country
a
Country
b
City
Italy
a
Italy
b
Milan
Italy
a
Italy
b
Rome
Italy
a
Italy
b
Venice
Germany
a
Germany
b
Berlin
Germany
a
Germany
b
Hamburg
Usa
a
Usa
b
New York
Usa
a
Usa
b
San Francisco
This could be fine but sometimes you don't want to repeat the country name. In that case you can use the following TS option (let's suppose this query has uid 123):
plugin.tx_wfqbe_pi1.customProcess.123.excludeDuplicatedValuesInColum ns = country
The output will be the following one:
Country
a
Country
b
City
Italy
a
Italy
b
Milan
((Unknown Property))
a
b
Rome
((Unknown Property))
a
b
Venice
Germany
a
Germany
b
Berlin
((Unknown Property))
a
b
Hamburg
Usa
a
Usa
b
New York
((Unknown Property))
a
b
San Francisco
We can do even better. Let's create a custom template:
<!--###RESULT_TEMPLATE###-->
<divid="###CONF_DIVID###">
<ul>
<!--###DATA_TEMPLATE###-->
###FIELD_country###
<li>###FIELD_city###</li>
<!--###DATA_TEMPLATE###→
</ul></li>
</ul>
</div>
<!--###RESULT_TEMPLATE###-->
Now you have to use the new “wfqbeFirst” options to customize the output of the first row:
plugin.tx_wfqbe_pi1.customProcess.8 {
excludeDuplicatedValuesInColumns = country
country = TEXT
country.value = ###WFQBE_FIELD_country###
country.wrap = </ul><li class="country"><strong>|</strong><ul>
country.wfqbeFirst = TEXT
country.wfqbeFirst.value = ###WFQBE_FIELD_country###
country.wfqbeFirst.wrap = <li class="country"><strong>|</strong><ul>
}
The final output will be the following one:
- Italy
- Milan
- Rome
- Venice
- Germany
- Berlin
- Hamburg
- Usa
- New York
- San Francisco
Very nice, isn't it? :-)
Known problems
If you find any problem, please contact me. Feel free to correct any existing bug and to send me the patches ;-)
1. At the moment some features are not supported via AJAX. These are the file upload, the “select wizard” and the “Add new” features, if you use one of these functionalities you can't use xajax.
2. About Schema support for PostgreSQL, ADODB doesn't support it yet. If you need to see Schemas, you can apply a patch to the following file:
adodb/drivers/adodb-postgres64.inc.php
The patch is contained in wfqbe/res/postgres64_patch.txt
3. There is a known problem about ordering records in case of field rename:
If you make a query and select “xyz.tstamp as something” then the column title in the standard template will be “something” and not “tstamp” (which is good), but if you now click on the title in the FE records list to let it sort for this field, there will be an error telling there’s a missing parameter and the query will fail. This is due to a missing management of field rename in order by clause.
To-Do list
In the following versions, I'm going to introduce these new functionalities (which are listed in a rigorous disordered mode):
- Improve the “DB Structure” BE module
- Full FE Ajax support
- Support for MM tables in editing, inserting and deleting
- BE module to do the same things of the FE
- support for imageMagick
- support for CSV download
- log of insert / edit / delete operations
- a better permissions management
- RTE support
- nested queries
- cache support
- better access support
- improve the documentation
I've also started to think about a complete RealUrl integration (by now, if you use an external db it's not possible to use the lookUp option to convert ids with names).
If you want to collaborate, to sponsor some functionalities or just to give me some ideas, please contact me: mauro.lorenzutti@webformat.com.
Changelog
0.1.0
Initial release
0.1.1
Some bug fixing
0.2.0
Search capabilities
0.9.0
- TypoScript configuration
- Insert form
- A lot of small fixes and improvements
0.9.1
- Added a default credential to the local TYPO3 DB
- Small bug fixing
0.9.2
- Conversion from XML output to serialized object
- Improved XAJAX support
- Small bug fixing
0.9.3
- Added TS management for markers in queries
- Added XAJAX support in search forms
- Added feedback for empty result set
- Added XAJAX support in insert forms
- Modified the “Insert form” wizard (WARNING: all the insert records created before this version are incorrect, you have to redo them)
0.9.4
Small bug fixing
0.9.5
- Added the confirmation page after data insertion
- Corrected the name of the uploaded files to prevent the over-writing
- Improved the upload files feature
- Ajax improvements
- Fixed some bugs
1.0.0
- Moved the visualization options from “Query table” records to FF options of the plugin
- Added password and relation field types in insert forms
- Added TS management for markers in search forms (inside where fields)
- Added the “Add new” functionality: this provides you the possibility to add a new record in an external table while adding a record in the main table
- Added the “Select wizard” functionality
- Added some useful hooks
- Fixed some bugs
1.0.1
- Improvements in search capabilities
- Added the TypoScript option to disable the wrapInBaseClass
- Added the connection type option in the credentials record
- Some bug fixing
1.0.2
- Improvements in PostgreSQL support (thanks to Didier Moens)
- Some bug fixing
1.1.0
- Added the multi-language support for search and insert labels
- Added the possibility to change the default column headers while using the default table template (with the customHeader option). With this new feature, e.g., it will be possible to remove or to rename the uid column header in the default template
- Fixed a bug in page browser: now if you have two page browsers for two different queries in the same page, the work separately
- Some improvements against sql injection
- Manual updated
- Some minor bug fixing
1.1.1
- HTMLArea support in FE (it's a textarea option)
- Added a new field for insert/edit module: “display only”. This can be used to show values that user has not the rights to modify
- $TYPO3_CONF_VARS['SYS']['setDBinit'] integration if using default TYPO3 DB
- XAJAX support has to be enabled via TS
- Help link is now shown only if a help text is available
- Help link is customizable via TS
- checkPermissions hook is now available in deleting mode too
- Added German translations
- Added Italian translations
- Some minor bug fixing
1.1.2
- Fixed a bug that prevented wizards to work with DBAL
- Fixed a bug that prevented Oracle connection
- Changed the template field in flexform to link template files instead of copying them (PAY ATTENTION DURING UPDATES: templates referred in old flexform fields could require to be re-inserted)
- Added some controls in the input field to check input data (it's available a hook to add more controls)
- Checked if HTMLArea is installed before initializing it
- Added a new case history in the manual
1.2
- Added the field 'setdbinit' in credentials record to send SQL statements to db right after connecting
- Added the “check field” option in search forms
- Added a new hook to preprocess values in editing forms
- Added the possibility to order select, radio and checkbox items in insert forms
- Added Greek labels
- Fixed a bug in thepreProcessQueryStructure hook management
- Documentation updated
1.2.1
Added the possibility to clear the cache of some pages after record insert / update / delete
1.3.0
- Added a dbname in the credentials record. Now the dbname of the query record is deprecated
- Added a BE module to manage the DB structure
- Added some useful hooks
- Added the datetype field in insert form (thanks to Fabian Moser)
- Added the email feature
- Fixed a connection bug with setDBinit option (thanks toMathias Brodala)
- Fixed an XSS vulnerability (thanks to Panagiotis Kontaxis)
- Added a chapter for security controls
1.3.2
- Added the possibility to order the options in a select based on a field value
- Added some more debug info when connection and queries fail
- Added the possibility to specify custom queries in a select field in search forms
- Added the hidden field type in search forms
- Added the excludeColumns option to prevent some columns to be printed in the default layout
- Fixed an XSS vulnerability (thanks toFelix Buenemann)
1.4.0
- Added an API for interaction with other extensions (see “How to integrate wfqbe in your extension” chapter)
- Improvements on BE wizards with AJAX interaction
- Added the calendar option in the search form (based on date2cal extension)
- Added some new options in search form wizard
- Added some new TypoScript options
- Added a security check (see “Important security topics” chapter)
- Code refactoring: renamed some classes and added XCLASS inclusions
- Fixed a bug in CSV download link
- Changed the CSV download, now the extension produces an xls file
1.4.1
Added support for customGlobal* (thanks to Aimo Künkel)
1.4.5
- Added some german labels (thanks to Aimo Künkel)
- Replaced deprecated ereg_replace functions withpreg_replacefunctions (thanks to Frank Mueller)
- Fixed some minor bugs
1.5.0
- Added the calendar field type in the insert/edit form (based on date2cal extension)
- Added an XML default template that can be used to export data in XML format
- Added a customSearch option to hide search fields via TypoScript in search forms
- Fixed some minor bugs in hooks management
- Fixed a JS bug in the calendar field type of the search forms
- Added a case history about integrating wfqbe with Adobe Flash by Jan Sass
1.6.0
- Added a new hook to pre-process raw queries (preProcessRawQuery)
- Added a new TypoScript option for hiding duplicated values when joining tables (excludeDuplicatedValuesInColumns)
- Added a new Typoscript configuration to catch first, last, even and odd rows while customProcessing a field
- Added ###WFQBE_NUMROWS### marker to print the total number of rows retrieved by the query (without LIMIT)
- Added two TS options to define a different query for csv / xls results export
- Added a new connection type for raw uri connections
- Added an option to define the number of records to export in csv/xml format
- Added a new option to check permissions in editing records
- Printed queries execution time in debug mode
- Set HTML format in notify emails
- Added the possibility to send notify emails to more than one administration email address
- Added a new date format in calendar field type in insert wizard
- Fixed a bug in customInsert TypoScript option
- Fixed a bug in the connection opening
- Fixed a bug in the orderby option when creating UNION queries
- Fixed a missing check in checkPermissions hook
- Updated paragraph about security with some references to useful extensions
- Added a new case history about how to customize join query results
2.0.0
- Added the BE module “DB Management” to manage database contents from the BE
- now orderby links contain query uid to avoid conflict in case of multiple DB Integration instances in the same page
- new “window” mode in page browser
- added raw mode support in insert/edit form wizard. This allows to create insert/edit forms even if the db user doesn't have permissions to access tables and fields definitions
- new skin for backend wizards
- Fixed globalCustomProcess and globalCustomHeaders
- Some minor fixes
2.0.1
- Security fix
- added option to filter order by conditions, please refere to “Important security topics” chapter
- Latest version that supports TYPO3 4.x
6.0.0
- Added compatibility with TYPO3 6.x
- Added support for multiple file uploads
- Added option to exclude duplicated values
- Added some minor new functionalities
- Some minor fixes
6.2.0
- Use of fields with type RTE has been deprecated and it will be removed after wfqbe 6.x(pi1/tx_wfqbe_insert.php)
- Added some minor new functionalities
- Some minor fixes
- Reformatted files
7.6.0
- Added compatibility with TYPO3 7.6.x
- Added new template for query results based on fluid. Now you can select a “Fluid template” and a template file based on fluid. The frontend plugin is able to render query results using a fluid render engine (StandaloneView). Thanks Ronald Wopereisfor the suggestion !
- RTE support for query fields has been removed(pi1/tx_wfqbe_insert.php)
- Some minor fixes
7.6.1
- Fix reported in https://forge.typo3.org/issues/81713
- Fix to date picker field for insert and search forms
- Extended hook “showBrowser” available in class.tx_wfqbe_results.php
- Some minor fixes
7.6.2
- Fix reported in https://forge.typo3.org/issues/8 2192
- Fix reported in https://forge.typo3.org/issues/81227
- Some minor fixes
7.6.3
- New version due to TER security incident. See https://typo3.org/teams/security/security- bulletins/psa/typo3-psa-2017-001/
7.6.4 (current release)
- Fixing about some problems with extbase calendar in backend modules
- Fixing about a problem related to the insert and edit query
Thanks to
Claudio Strizzolo and Ronald Wopereis for their precious support and effort to keep wfqbe compliant with TYPO3 7.6. Their contributions and support motivated us to work on a new release!
Cristian Buja for his patch in customGlobalProcess
Dirk Steffens for his patch in the orderby position in case of UNION queries
Nicola Cerchiari for his patch in adodb connection mode
Claudio Masia for his patch in customInsert option
Jan Sass for his case history
Aimo Künkel for his work on the development of globalCustomQuery support and new German labels
Yolf (Laurent Foulloy) for his work on the development of the wfqbe_savjpgraph extension
Frank Mueller for his preg_replace patch
Mathias Brodala for his connection patch
Fabian Moser for the datetype input field
Claudio Strizzolo for his patches, improvements and suggestions and for his case history
Alexander Grimm for his patch for the preProcessQueryStructure hook
Panagiotis Kontaxis for the Greek labels and security alerts.
Michael Greiner for the “check field” option in search forms and the multilanguage labels in search wizard.
Michael Riedel for the German labels.
Didier Moens for his help in PostgreSQL support and his patch for adodb.
Gianluca Rettore for his help in bug fixing.
Nico Deblauwe for his case history.
Rory Hodgson for his suggestions and corrections in the development of this manual.
Davide Menegon for his initial work. He started this extension and he created the QBE (Query-by-Example) wizard for his computer science thesis.
 EXT : DB Integration - 43