DEPRECATION WARNING
This documentation is not using the current rendering mechanism and is probably outdated. The extension maintainer should switch to the new system. Details on how to use the rendering mechanism can be found here.
How to create your own Themes as a third-party extension
Although you can create your themes with TypoScript and some Fluid templates, we will show here how to create a theme as a third party extension. We use Extbase’s Kickstarter to create a basic extension and then show how to bring up all the rest.
1. Creating a basic extension using FLUID kickstarter
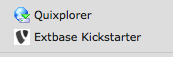
Start Extbase kickstarter:
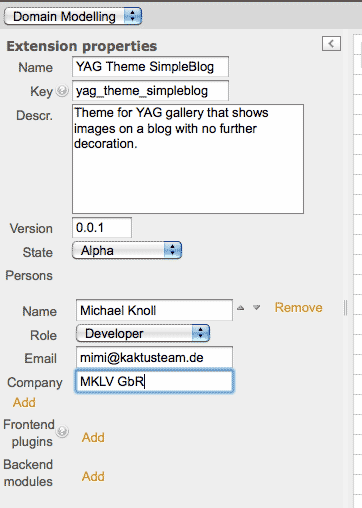
Open the properties pane and give your theme a descriptive name and some more information:
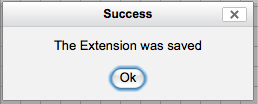
Save your extension. If everything worked fine, you should get the following message:
2. Open you extension in some Editor / Create a new project
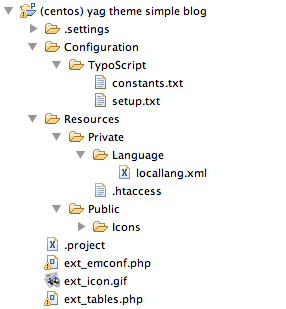
Open your extension in any editor you like – e.g. ZendStudio and create a new project. First of all, you can delete some files and folders, as we won’t need them:
- /ext_localconf.php (we won’t have any plugins configured and won’t have any tables or TCA)
- /ext_tables.sql (as we won’t have any tables, we don’t need this file)
- /kickstarter.json (there is no need in keeping this file)
- /Resources/Private/Language/locallang_db.xml (we won’t have any DB changes or fields)
- /Configuration/TCA (we don’t need no TCA changes)
So after that, your folder structure looks something like that:
3. Modify ext_tables.php
We will later include a static template holding the configuration for our theme. This has to be included via ext_tables.php:
<?php
if(!defined(‘TYPO3_MODE’))die(‘Access denied.’);
// Include static template for SimpleBlog Theme
t3lib_extMgm::addStaticFile($_EXTKEY,’Configuration/TypoScript’,’[ya g] Theme SimpleBlog’);
?>
Save your ext_tables.php and you’re done with it.
4. Set up basic TypoScript Template
We need at least one TS-Template for registering our theme and copying all the basic settings from the default theme. Copying the settings from default prevents you from writing all configuration again. So first you copy everything and then you overwrite the settings you would like to change. Here is our first draft of the /Configuration/TypoScript/setup.txt:
####################################################
# YAG theme SimpleBlog
#
# @author Daniel Lienert <typo3@lienert.cc>
# @author Michael Knoll <knoll@punkt.de>
####################################################

# Copy default settings from default theme
plugin.tx_yag.settings.themes.simpleBlog < plugin.tx_yag.settings.themes.default
As long as we do not want to change any settings, that’s all we have to do. We will come back to this file later.
5. Hands on FLUID Templates
Most of the look and feel of our themes is set via FLUID html templates. So let’s create some. The only template we need for our theme is a simple image list, that shows the images from a single album.
So here’s, what you have to do step-by-step:
- Create a new folder in /Resources/Private and call it ‘Templates’
- Create a new folder in /Resources/Private/Templates and call it ‘ItemList’
- Create a new html file ‘List.html’ inside this folder (/Resources/Private/Templates/ItemList/List.html)
- Remove all content from this html file your editor probably auto- generated
- Open up your setup.txt again and add the following lines to overwrite the template used for the ItemListController and list action:plugin.tx_yag.settings.themes.simpleBlog {controller {ItemList {list.template = EXT:yag_theme_simpleblog/Resources/Private/Template s/ItemList/List.html}}}
- Write some template code inside ‘/Resources/Private/Templates/ItemList/List.html’:{namespace yag=Tx_Yag_ViewHelpers}<divclass=”tx-yag-theme-simpleblog-imageconta iner”><f:foreach=”{listData}”key=”rowIndex”as=”listRow”><f:renderparti al=”{config.itemListConfig.imageThumbPartial}”arguments=”{config: config, image: listRow.image.value,rowIndex: listRow.specialValues.absoluteRowIndex,pager: pager, pagerCollection:pagerCollection}”/></f:for></div>The first line gives us access to some YAG viewhelpers we probably need later on. The rest is quite straight-forward: We open up a div container for all images. The we iterate through the rows we get from pt_extlist as listData object. Each row stands for a single image in our album . Do not confuse row here with the visualized rows containing some images in a row. A row here is a record in a database table containing one record, which is an image here!We then use a partial to render the thumbnail for an image. This partial will be created in the next step.One line that show get your attention is ‘{config.itemListConfig.imageThumbPartial}’. ‘config’ holds a so called ConfigurationBuilder which gives you access to almost all the configuration of YAG within your templates and partials. We will come back to this later.
- You are done with your template. Save it!
6. Hands on FLUID Partials
Although it is not really needed here to use partial, we will use them for practice. Again step-by-step what you have to do:
- Create a new folder in ‘/Resources/Private’ and call it ‘Partials’
- Create a new file in your new folder and call it ‘ImageThumb.html’
- Open this file and remove any content eventually created
- Open your setup.txt again and add the following lines to make the partial known to yag:plugin.tx_yag.settings.themes.simpleBlog {controller {ItemList {list.template = EXT:yag_theme_simpleblog/Reso urces/Private/Templates/ItemList/List.html}}itemList {imageThumbPartial = EXT:yag_theme_simpleblog/Resources/Private/Part ials/ImageThumb.html}}
- Write some code to make the partial work (for your own themes, you can copy and paste the content of the partial in YAG’s default theme for a start):{namespace yag=Tx_Yag_ViewHelpers}
<f:ifcondition=”{image.width} > {image.height}”>
<divclass=”tx-yag-theme-simpleblog-thumb tx-yag-theme-simpleblog- thumb-landscape”>
</f:if>
<f:ifcondition=”{image.width}<{image.height}”>
<divclass=”tx-yag-theme-simpleblog-thumb tx-yag-theme-simpleblog- thumb-portrait”>
</f:if>
<f:ifcondition=”{image.width} == {image.height}”>
<divclass=”tx-yag-theme-simpleblog-thumb tx-yag-theme-simpleblog- thumb-square”>
</f:if>
<ahref=”{yag:resource.image(item: image, resolutionName: ‘lightbox’)}” rel=”shadowbox[images_{image.album.uid}]”title=”{image.title}”>
<yag:imageitem=”{image}”resolutionName=”thumb”alt=”{image.title}”/>
</a>
<ul>
<liclass=”tx-yag-theme-simpleblog-thumb-title”>{image.title}</li>
</ul>
</div>So this one’s a little trickier. The outer div’s class changes, depending on whether the image is a landscape image or a portrait image. Therefore we use an inline if-viewhelper.For a single click, we use a link to a down-sized image whose URL we get using imageLink viewhelper. We later have to set up a resolution configuration with the name ‘lightbox’.
- Add the required resolutions to setup.txt:plugin.tx_yag.settings.themes.simpleBlog {resolutionConfigs {thumb {width = 150height =quality =}lightbox {width = 1200height = 800}}controller {ItemList {list.template = EXT:yag_theme_simpleblog/ Resources/Private/Templates/ItemList/List.html}}itemList {imageThumbPartial = EXT:yag_theme_simpleblog/Resources/Private/Part ials/ImageThumb.html}}
- Save your partial.
7. Add some CSS
The last step in creating your theme is CSS styling. We therefore create a new folder ‘/Resources/Public/CSS’ and in there a new file ‘styles.css’.
Here is our CSS:
@CHARSET”UTF-8”;
div.tx-yag-theme-simpleblog-imagecontainer:after{
content:”.”;
display:block;
height:0;
clear:both;
visibility:hidden;
}
div.tx-yag-theme-simpleblog-thumb{
float:left;
height:200px;
width:200px;
border:1px solid;
border-color:#AAA #444 #444 #AAA;
margin:10px 10px;
padding:24px;
-moz-border-radius:3px 3px 3px 3px;
-moz-box-shadow:3px 3px 4px #aaa;
-webkit-box-shadow:3px 3px 4px #aaa;
box-shadow:3px 3px 4px #aaa;
/* For IE 8 */
-ms-filter:”progid:DXImageTransform.Microsoft.Shadow(Strength=4, Direction=135, Color=’#aaaaaa’)”;
/* For IE 5.5 - 7 */
filter:progid:DXImageTransform.Microsoft.Shadow(Strength=4, Direction=135, Color=’#aaaaaa’);
}
div.tx-yag-theme-simpleblog-thumb ul{
display:none;
}
div.tx-yag-theme-simpleblog-thumb img{
border:1px solid;
border-color:#444 #AAA #AAA #444;
}
div.tx-yag-theme-simpleblog-thumb-landscape img{
height:133px;
width:200px;
margin:33px 0;
}
div.tx-yag-theme-simpleblog-thumb-portrait img{
height:200px;
width:133px;
margin:0 33px;
}
There is one thing left to do: Include CSS file via TypoScript so for a last time, open up setup.txt and bring it to its final version:
# Include CSS for this theme
page.includeCSS.yag_theme_simpleBlog = EXT:yag_theme_simpleblog/Resources/Public/CSS/styles.css

# Copy default settings from default theme
plugin.tx_yag.settings.themes.simpleBlog < plugin.tx_yag.settings.themes.default

# Some theme-specific settings
plugin.tx_yag.settings.themes.simpleBlog {

   resolutionConfigs {

      thumb {
         maxH = 200
         maxW = 200
      }

      lightbox {
         maxH = 1200
         maxW = 800
      }

   }

   controller {

      ItemList {
         list.template = EXT:yag_theme_simpleblog/Resources/Private/Templates/ItemList/List.html
      }

   }

   itemList {
      imageThumbPartial = EXT:yag_theme_simpleblog/Resources/Private/Partials/ImageThumb.html
   }

}
8. Installing your theme
You can now install your theme using the Extension Manager. Chose ‘Install Extensions’ from the dropdownlist and click on the gray brick to install your new theme.
After installing the extension, you can include the static template on the page you want to use the new theme. If you haven’t yet done so, create a new extension template and add the static template you just created.

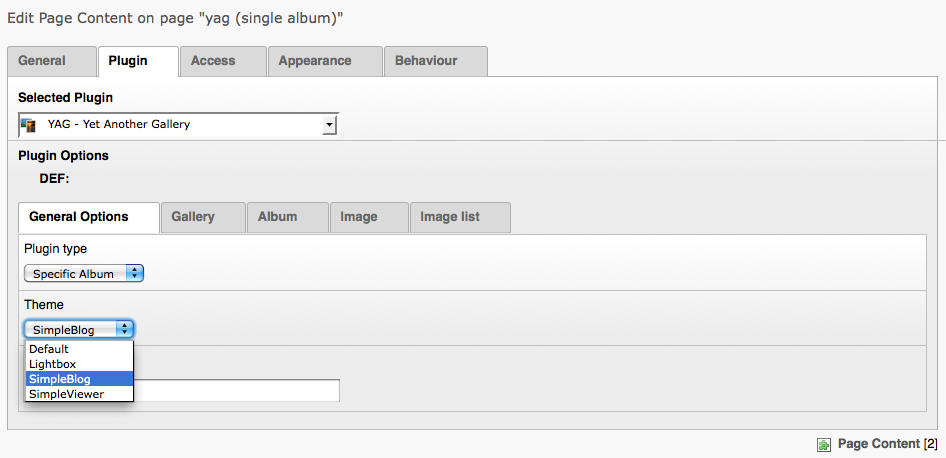
Now you can chose the theme from within your plugin’s FlexForm on the page you want to include the album:
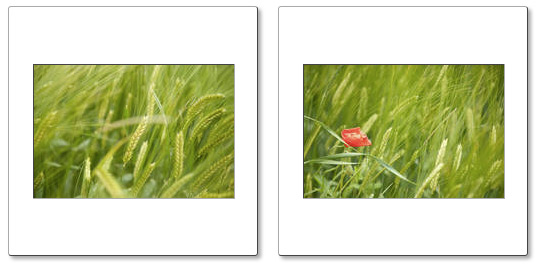
And basically that’s it :-) You have just created your new theme. Depending on your settings, it could look something like this: