The Scheduler is a system extension that provides a simple interface to automate
the running of tasks in TYPO3. It provides an easier alternative to having to set
up command-line scripts in cron jobs.
Task management
A task is created by extending the Scheduler base class and then registering it so
that it appears in the Scheduler backend module.
Screenshots
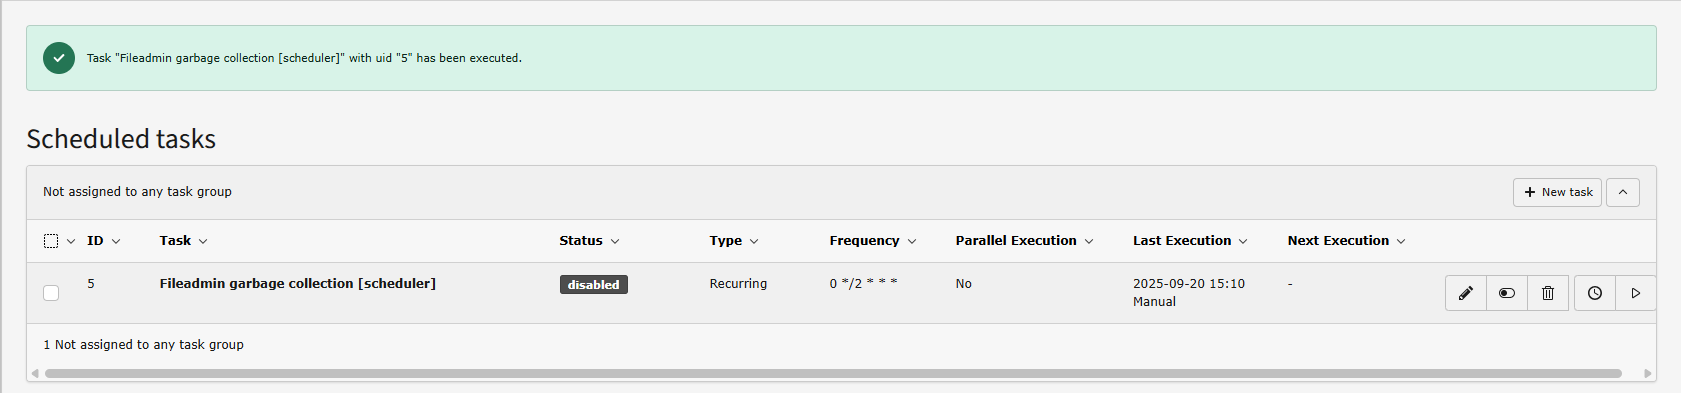
Below is the Scheduler backend module, showing a task that has been registered.
The module shows details about the tasks, i.e. status, type and whether it failed during the
last execution, and individual tasks can be rerun manually by clicking on the
'play' button.
Main screen of the Scheduler BE module
Task execution
The Scheduler includes a command-line script that needs to be registered once
in the server's crontab to set it up. It is run by the TYPO3 command-line
dispatcher. Every time the Scheduler is launched by the cron daemon it looks for
tasks that are due (or overdue) and executes them.
When a task is executed it is marked as being
executed in the Scheduler database record (in the
serialized_executions field). When the task has finished running, the
execution status is removed from the database record. This makes it
clear whether a task is currently running and also
prevents multiple executions. If a task requires
more time to run than the frequency it is set up for, a
new run will start (which is not always desirable). It is possible
to prevent such parallel (or multiple) executions.
Follow-up
Log messages are written out to the TYPO3 system Administration > Log
when a task starts and ends and when parallel execution has been blocked. This
provides a trace of events of the tasks.
A task that fails may also raise an exception reporting the reasons for failure.
The exception message will be logged in the Scheduler database table and
displayed in the backend module.
Tasks have no command-line output as they are designed to run in the background.
Symfony Console commands can also be run as tasks (see
Console commands (CLI)).
These tasks can specify all commandline arguments that are available to Symfony
Console commands.
Glossary
Task
Specifically, a piece of code that does a precise task and can be registered
with the Scheduler in order to execute that piece of code at a precise time,
either once or recurrently.
Task class
A type of task, for example, the "IP Anonymization" task is one
particular task class. Its function is to anonymize IP addresses to enforce
the privacy of persisted data. The "Optimize MySQL database tables"
task executes "OPTIMIZE TABLE" statements on selected database tables.
Registered task
An instance of a task class that has been
registered with the Scheduler. A given task class may be registered
several times, for example if it needs to be executed with different
parameters.
Credits
The Scheduler is a derivation of the Gabriel extension originally developed by
Christian Jul Jensen and further developed by Markus Friedrich.
Check whether you are already using the extension with:
composer show | grep scheduler
Copied!
This should either give you no result or something similar to:
typo3/cms-scheduler v12.4.11
Copied!
If it is not installed yet, use the composer require command to install
the extension:
composer require typo3/cms-scheduler
Copied!
The given version depends on the version of the TYPO3 Core you are using.
Classic installation without Composer
In an installation without Composer, the extension is already shipped but might
not be activated yet. Activate it as follows:
In the backend, navigate to the System > Extensions
module.
Click the Activate icon for the Scheduler extension.
Extension manager showing Scheduler extension
Next steps
Once the extension is installed, the following setting is available:
Maximum lifetime : it may happen that a task crashes while
executing. In this case it will stay in a state marked as "running".
That may prevent it from being executed again, if parallel executions
are denied (see "Tasks execution" above). The maximum lifetime
parameter ensures that old executions are removed after a while. The
lifetime is expressed in minutes . The default is 15 minutes.
Configuring the extension settings
Checking the setup of the scheduler extension
The scheduler check provides useful information for setting up cronjobs.
Click on the button Setup check to open the popup
The first message shows when the scheduler was last run. If it was never run
there will be a warning displayed.
The second messages tells you which command (with absolute paths) must be
executed by the cron job.
The third message shows information about the current server time.
Setting up the cron job to run the scheduler tasks
Tasks registered with the Scheduler can be run manually from the backend
module. However this is of limited use. To really benefit from the
Scheduler, it must be set up on the server to run regularly. The
following chapters describe how to set this up on Unix or Unix-like
system (including Mac OS X) and on Windows.
Choosing a frequency
Whatever system the Scheduler will run on, the first step is to define
the frequency at which it should run. The Scheduler script should set
up to run pretty often, but not unnecessarily often either. The
frequency should be that of the most often running task or some
frequency that fits all tasks.
For example, if you have some tasks running every quarter of an hour
and some others running every hour, it is useless to have the
Scheduler run every 5 minutes. On the other hand, if you have tasks
scheduled to run every 10 minutes and others every 15 minutes, you
will want to run the Scheduler every 5 minutes. Indeed, if you run it
only at 10-minute intervals, it will run – assuming it is 8 o'clock –
at 08:10, 08:20, 08:30, etc. So the tasks that should run at 08:15
will actually run 5 minutes late.
On Unix and Mac OS X
On such systems the Scheduler must be set up as a cron job. There are
several ways to achieve this, although the simplest is probably to add
it to some user's crontab. Edit that user's crontab using:
If you are editing system crontabs (for example /etc/crontab
and /etc/cron.d/* ), there will be one additional parameter
to enter, i.e. the user with which the job should run. Example:
If you are not familiar with cron syntax, refer to some Unix
administration book or start with the Wikipedia page about it
(https://en.wikipedia.org/wiki/Cron).
On Windows
On Windows, cron jobs are called "Scheduled tasks" and run with the
schtasks utility. SchTasks.exe performs operations
similar to those provided by Scheduled Tasks in the Control Panel. You
can use either tool to create, delete, configure, or simply display
scheduled tasks.
Assuming you want to run the TYPO3 Scheduler every 15 minutes, use the
following command line to create a new task:
At task creation you will be prompted to give a password or you can
use the /u and /p switches to provide user and
password information. Note that the user must be a member of the
Administrators group on the computer where the command will run.
The Scheduler comes by default with several tasks:
Caching framework garbage collection : some cache backends do not
have an automatic garbage collection process. For these it is useful
to run this Scheduler task to regularly free some space.
Fileadmin garbage collection : empties _recycler_ folders in
the fileadmin.
Table garbage collection : cleans up old records from any table in
the database. See related section below for more information on
configuration.
Most TYPO3 console command can also be executed via scheduler.
The following tasks provide configuration options that need dedicated chapters:
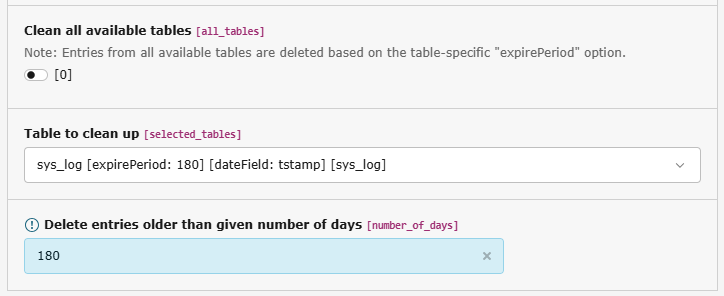
The task can be registered to clean up a particular table, in which
case you simply choose the table and the minimum age of the records to
delete from the task configuration screen.
Configuring the table garbage collection task
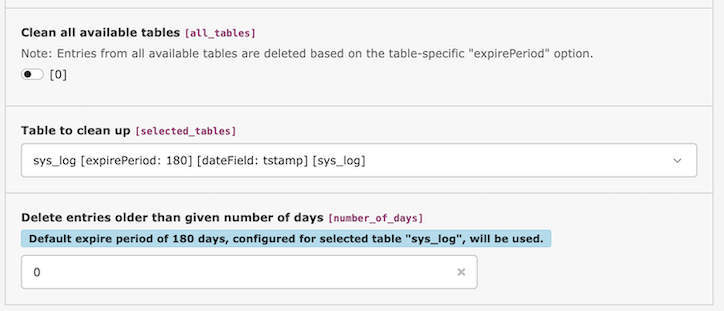
In case no minimum age is choosen, the configured
expirePeriod
is used.
Configuring the table garbage collection task with default expire period
It is also possible to clean up all configured table by
checking the "Clean all available tables" box.
The configuration for
the tables to clean up is stored in the TCA of table tx_scheduler_task, in
field tables.
This configuration is an array with the table names as fields and the following
entries:
option
expireField
can be used to point to a table field
containing an expiry timestamp. This timestamp will then be used to
decide whether a record has expired or not. If its timestamp is in the
past, the record will be deleted.
if a table has no expiry field, one can use a combination of a date
field and an expiry period to decide which records should be deleted.
The corresponding options are
dateField
and
expirePeriod
.
The expiry period is expressed in days.
Example: Configure additional tables for the "Garbage Collection" task
Deprecated since version 14.0
The previous configuration method using
$GLOBALS['TYPO3_CONF_VARS']['SC_OPTIONS']['scheduler']['tasks'][\TYPO3\CMS\Scheduler\Task\TableGarbageCollectionTask::class]['options']['tables']
has been deprecated and will be removed in TYPO3 v15.
If your extension overrides the TCA of the scheduler extension, it must
be loaded after
typo3/cms-scheduler
, otherwise the
configuration might take no effect.
The first part of the configuration indicates that records older than
180 days should be removed from table tx_myextension_my_table ,
based on the timestamp field called "tstamp". The second part
indicates that old records should be removed from table
tx_myextension_my_other_table directly based on the field expire
which contains expiration dates for each record.
Migration: Supporting custom tables for garbage collection for both TYPO3 13 and 14
If your extension supports both TYPO3 13 (or below) and 14 keep the registration
of additional tables in the extensions ext_localconf.php until support
for TYPO3 13 is removed:
packages/my_extension/ext_localconf.php
<?phpuseTYPO3\CMS\Core\Information\Typo3Version;
useTYPO3\CMS\Scheduler\Task\TableGarbageCollectionTask;
if ((new Typo3Version())->getMajorVersion() < 14) {
// TODO: Remove once TYPO3 13 support is dropped// TYPO3 14 configuration can be found in Configuration/TCA/Overrides/tx_scheduler_garbage_collection.php
$GLOBALS['TYPO3_CONF_VARS']['SC_OPTIONS']['scheduler']['tasks'][TableGarbageCollectionTask::class]['options']['tables']['tx_myextension_errorlog'] = [
'dateField' => 'tstamp',
'expirePeriod' => '180',
];
$GLOBALS['TYPO3_CONF_VARS']['SC_OPTIONS']['scheduler']['tasks'][TableGarbageCollectionTask::class]['options']['tables']['tx_myextension_uniqalias'] = [
'expireField' => 'expire',
];
}
Copied!
IP anonymization task
The IP Anonymization task can take a more elaborate
configuration which is detailed below.
The task anonymizes the IP addresses to enforce the privacy of the persisted data.
Example: Configure additional tables for the "IP Anonymization" task
Deprecated since version 14.0
The previous configuration method using
$GLOBALS['TYPO3_CONF_VARS']['SC_OPTIONS']['scheduler']['tasks'][\TYPO3\CMS\Scheduler\Task\IpAnonymizationTask::class]['options']['tables']
has been deprecated and will be removed in TYPO3 v15.
If your extension overrides the TCA of the scheduler extension, it must
be loaded after
typo3/cms-scheduler
, otherwise the
configuration might take no effect.
This entry configures that the field private_ip of table
tx_myextension_my_table can be anonymized after a chosen number of days.
The field tstamp will be taken into account to determine when the database
record was last changed.
Migration: Supporting custom tables for "IP Anonymization" tasks for both TYPO3 13 and 14
If your extension supports both TYPO3 13 (or below) and 14 keep the registration
of additional tables in the extensions ext_localconf.php until support
for TYPO3 13 is removed:
packages/my_extension/ext_localconf.php
<?phpuseTYPO3\CMS\Core\Information\Typo3Version;
useTYPO3\CMS\Scheduler\Task\IpAnonymizationTask;
if ((new Typo3Version())->getMajorVersion() < 14) {
// TODO: Remove once TYPO3 13 support is dropped// TYPO3 14 configuration can be found in Configuration/TCA/Overrides/tx_scheduler_ip_anonymization.php
$garbageCollectionTables =& $GLOBALS['TYPO3_CONF_VARS']['SC_OPTIONS']['scheduler']['tasks'][IpAnonymizationTask::class]['options']['tables'];
$garbageCollectionTables = array_replace($garbageCollectionTables ?? [], [
'tx_myextension_my_table' => [
'dateField' => 'tstamp',
'ipField' => 'private_ip',
],
]);
}
Copied!
Backend administration in the "Scheduler" module
The Scheduler provides a BE module to manage tasks. It provides three
screens: a setup check, an information screen and the main (default)
one for actually managing the tasks.
This screen has already been mentioned in the Installation chapter.
It is mostly useful when setting up the Scheduler, as it indicates
whether the CLI script is executable or not. When everything is
running fine, it contains mostly one useful piece of information: when
the last run took place, when it ended and whether it was started
manually (i.e. from the BE module) or automatically (i.e. from the
command line).
The scheduled tasks screen
This is the main screen when administering tasks. At first it will be
empty and just offer a link to add a new task. When such registered
tasks exists, this screen will show a list with various pieces of
information.
Main screen of the Scheduler BE module
Disabled tasks have a gray label sign near the task name. A disabled task is a
task that will not be run automatically by the command-line script,
but may still be executed from the BE module.
A late task will appear with an orange label sign near the task name:
A late task in the main screen of the Scheduler BE module
The task list can be sorted by clicking the column label. With every click it
switches between ascending and descending order of the items of the associated column.
The table at the center of the above screenshot shows the
following:
The first column contains checkboxes. Clicking on a checkbox will
select that particular scheduled task for immediate execution.
Clicking on the icon at the top of the column will toggle all
checkboxes. To execute the selected tasks, click on the "Execute
selected tasks" button. Read more in "Manually executing a task"
below.
The second column simply displays the id of the task.
The third column contains the name of the task, the extension it is
coming from and any additional information specific to the task. It also shows
a summary of the task's status with an icon.
The fourth column shows whether the task is recurring or will run only
a single time.
The fifth column shows the frequency.
The sixth columns indicates whether parallel executions are allowed
or not.
The seventh column shows the last execution time and indicates whether
the task was launched manually or was run via the command-line script
(cron).
The eighth column shows the planned execution time. If the task is
overdue, the time will show up in bold, red numbers. A task may have
no future execution date if it has reached its end date, if it was
meant to run a single time and that execution is done, or if the task
is disabled. The next execution time is also hidden for running tasks,
as this information makes no sense at that point in time.
The last column contains possible actions, mainly editing, disable or
deleting a task. There are also buttons for running the task on the
next cron job or run it directly.
The actions will be unavailable for a task that is currently running,
as it is unwise to edit or delete it a task in such a case. Instead a
running task will display a "stop" button (see "Stopping a task" below).
Note that all dates and times are displayed in the server's time zone.
The server time appears at the bottom of the screen.
At the top of the screen is a link to add a new task.
If there are a lot of tasks that appear late,
consider changing the frequency at which the cron job is running (see
"Choosing a frequency" above).
Occasionally the following display may appear:
A scheduled task missing its corresponding class
This will typically happen when a task provided by some
extension was registered, then the extension was uninstalled, but the
task was not deleted beforehand. In such a case, this task stays but
the Scheduler doesn't know how to handle it anymore. The solution is
either to install the related extension again or delete the registered
task.
Adding or editing a task
Administrators can add or edit scheduler tasks in the backend module
Administration > Scheduler.
When adding a new scheduler task a wizard will allow you to select a task
type from several categories.
When adding or editing a task, the following form will show up:
Adding a new scheduled task
Some fields require additional explanations (inline help is
available by moving the mouse over the field labels):
A disabled task will be skipped by the command-line script. It may
still be launched manually, as described above.
New in version 13.3
Similar to editing regular content elements, it is now possible to save
scheduler tasks being edited via keyboard shortcuts as well.
It is possible to invoke the Ctrl/Cmd + s hotkey to save a
scheduler task, altogether with the hotkey Ctrl/Cmd + Shift + S
to save and close a scheduler task.
Scheduler task settings
Some tasks allow additional settings to be made in the area Settings.
These fields differ from task to task
Task executions timing details
Choosing a frequency for a recurring task
A task must have a start date. It defaults to the time of creation.
The server's time appears at the bottom of the form.
Task can be run a single time or recurring.
The frequency needs be entered only for recurring tasks.
It can be either an integer number of seconds or a cron-like schedule expression.
Scheduler supports ranges, steps and keywords like @weekly.
See en.wikipedia.org for more information.
See
\TYPO3\CMS\Scheduler\CronCommand\CronCommand
and
\TYPO3\CMS\Scheduler\CronCommand\NormalizeCommand
class references in the TYPO3 CMS source code for definitive rules.
Parallel executions are denied for recurring tasks. They can be allowed by
checking "Allow Parallel Execution"
If an error occurs when validating a cron definition, the
Scheduler's built-in cron parser tries to provide an explanation about
what's wrong.
Deleting a task
When choosing to delete a task, a pop-up window will appear requesting
confirmation.
Deleted tasks can be recovered in the module Content > Recycler if
installed or by unsetting the deleted flag in the database.
Restoring a deleted scheduler task
Changed in version 14.0
Previously removed tasks can be restored via recycler.
If the system extension
typo3/cms-recycler
is installed, go to
module Content > Recycler.
Choose the page root (page 0) in the page tree, all scheduler tasks are stored
here.
You can use the field "Type" to filter for "Scheduler task" only.
A task can be restored or permanently deleted in the recycler module
Grouping tasks together in the Scheduler backend module
In case of a high number of different tasks, it may be useful to visually
group similar tasks together:
Use button New group (1) to create a group, click on the title (2) to edit the group
You can sort and disable groups (3).
Unused groups are displayed at the bottom of the page. Only unused groups can
be deleted (4).
When editing a group you can change its title and color.
Color options can be customized by manipulating the
$GLOBAS['TCA']['tx_scheduler_task_group']['columns']['color']['config']['valuePicker']['items']
array in your TCA overrides file.
Scheduler task groups can be created, edited and deleted from the module
Administration > Scheduler.
Technically they are records stored on the root page (pid=0). They can also be
created, edited and sorted with module Content > Records.
It is also possible to create a new task group from within the edit task form by
clicking on the + icon next to the task group select box.
Disabling task groups
You can use button Disable group to disable all tasks in a group
at once.
Use button Enable group to enable all tasks that had not been manually disabled.
Tasks in a disabled group, just like disabled tasks in general are not executed
when the scheduler is called by the cron job. They can, however, be executed
manually by clicking the Run task button.
Stopping a task in the Scheduler backend module
A task is marked as "running" while it runs. If the process crashes or
is killed, the task may remain marked as "running". This is usually
cleaned up automatically based on the maximum lifetime parameter,
but manual cleanup may sometimes be needed.
Stopping a running task from the main screen
Use the stop button to clear the execution mark for a task.
This allows the task to run again.
Note: This does not terminate an actual running or hanging process.
Stopping a task via console command
You can also use a command to stop the task:
# Note the id of the task
vendor/bin/typo3 scheduler:list

vendor/bin/typo3 scheduler:run --task=<taskUid> --stop
Copied!
# Find the id of the task
typo3/sysext/core/bin/typo3 scheduler:list

typo3/sysext/core/bin/typo3 scheduler:run --task=<taskUid> --stop
Copied!
How to handle a truly "hung" task
If a task hangs or is stuck (for example due to an infinite loop or external I/O),
then stopping it via TYPO3 (either UI or CLI) will only clear TYPO3’s internal flag.
The actual PHP process running the task will continue on the system
until it finishes or the OS/PHP process manager kills it.
If a task keeps running indefinitely:
#. Identify the process PID You can find the hanging PHP process using
tools like top, ps aux | grep scheduler, or via systemctl status if you run TYPO3 via a
systemd service.
#. Manually terminate the PHP process (for example, kill <pid>).
#. Clear the TYPO3 execution flag by running:
vendor/bin/typo3 scheduler:run --task=<taskUid> --stop
Warning
Manually terminating a scheduler process using sudo kill <pid> should only
be used as a last resort.
Killing a running PHP process may interrupt database or file operations and
leave the system in an inconsistent state.
Always analyze why the task is hanging before killing it.
ps aux | grep scheduler

# you might find something like this:
www-data  12345  99.0  5.2  php vendor/bin/typo3 scheduler:run

# To force-stop that OS-level process:
sudo kill 12345

# Then clear the mark again via:
vendor/bin/typo3 scheduler:run --task=13 --stop
Copied!
Manually executing a task from the Scheduler backend module
You can manually execute tasks from the BE module. After execution, each
task shows success or failure.
If a task was overdue, a new execution date is calculated.
If it was not overdue, the existing next execution date remains.
Running tasks:
To run a single task, press the button in its row.
To run multiple tasks, select their checkboxes and press the button below the list.
There are two options:
Run the task immediately. (Button 2 in the screenshot)
Schedule the task. (Button 1 in the screenshot) The selected tasks will
then run on the next cron job.
Button 2 runs the task immediately, while button 1 schedules it fot the next cronjob run
Manually executing a task from the console
# Note the id of the task
vendor/bin/typo3 scheduler:list

vendor/bin/typo3 scheduler:execute --task=<taskUid>
Copied!
# Find the id of the task
typo3/sysext/core/bin/typo3 scheduler:list

typo3/sysext/core/bin/typo3 scheduler:execute --task=<taskUid>
Copied!
Console tools to manage scheduler tasks
Console commands to manage scheduler tasks include typo3 scheduler:list,
typo3 scheduler:execute and typo3 scheduler:run.
You can display detailed help on these commands, by using the --help parameter to
display the help:
The command typo3 scheduler:execute is a "manual fire" runner. You pick
tasks (IDs or whole groups) and it executes them on demand, regardless of
whether they are due. It can also prompt you interactively to choose.
# Note the id of the task
vendor/bin/typo3 scheduler:list

vendor/bin/typo3 scheduler:execute --task=<taskUid>
Copied!
# Find the id of the task
typo3/sysext/core/bin/typo3 scheduler:list

typo3/sysext/core/bin/typo3 scheduler:execute --task=<taskUid>
Copied!
Listing all scheduler tasks
Command typo3 scheduler:list can be used to list all available tasks.
This command basically displays the same information as the backend module
Administration > Scheduler.
vendor/bin/typo3 scheduler:list
Copied!
typo3/sysext/core/bin/typo3 scheduler:list
Copied!
Running the scheduler: typo3 scheduler:run
The scheduler provides a PHP shell script designed to be run using
TYPO3's command-line dispatcher. To try and run that script a first
time, type the following command.
The shell scripts accepts a number of options which can be provided in any
order.
--task (-i)
To run a specific scheduler task you need to provide the uid of the task:
# Run task with uid 42
vendor/bin/typo3 scheduler:run --task=42

# Run tasks with uid 3 and 14
vendor/bin/typo3 scheduler:run --task=3 --task=14
Copied!
# Run task with uid 42
typo3/sysext/core/bin/typo3 scheduler:run --task=42

# Run tasks with uid 3 and 14
typo3/sysext/core/bin/typo3 scheduler:run --task=3 --task=14
Copied!
The tasks will be executed in the order in which the parameters are provided.
--force (-f)
To run a task even if it is disabled (or not scheduled to be run yet),
you need to provide the force option:
# Run task with uid 42, even if disabled
vendor/bin/typo3 scheduler:run --task=42 --force
Copied!
# Run task with uid 42, even if disabled
typo3/sysext/core/bin/typo3 scheduler:run --task=42 --force
Copied!
This will also run the task with uid 42 if it is disabled.
--verbose (-v)
A single -v flag will output errors only. Two -vv flags will also output
additional information:
# Run task with uid 42, with detailed stack traces
vendor/bin/typo3 scheduler:run --task=42 -vv
Copied!
# Run task with uid 42, with detailed stack traces
typo3/sysext/core/bin/typo3 scheduler:run --task=42 -vv
Copied!
Scheduler task development
The Scheduler makes it very easy to create a new task class.
Furthermore the tasks packaged with this extension provide
a good basis to learn by example.
All scheduler task implementations must extend
\TYPO3\CMS\Scheduler\Task\AbstractTask
.
packages/my_extension/Classes/MyTask.php
<?phpdeclare(strict_types=1);
namespaceMyVendor\MyExtension\Task;
useMyVendor\MyExtension\BusinessLogic;
useTYPO3\CMS\Core\Utility\GeneralUtility;
useTYPO3\CMS\Scheduler\Task\AbstractTask;
finalclassMyTaskextendsAbstractTask{
/**
* MUST be implemented by all tasks
*/publicfunctionexecute(): bool{
# Dependency injection cannot be used in scheduler tasks
$businessLogic = GeneralUtility::makeInstance(BusinessLogic::class);
return $businessLogic->run('arg1', 'arg2', '…');
}
publicfunctiongetAdditionalInformation(){
$this->getLanguageService()->sL('LLL:EXT:my_extension/Resources/Private/Language/locallang.xlf:myTaskInformation');
}
}
Copied!
A custom task implementation must override the method execute(): bool.
It is the main method that is called when a task is executed.
This method Should return true on successful execution, false on error.
Note
There is no error handling by default, errors and failures are expected
to be handled and logged by the client implementation.
Method getAdditionalInformation()should be implemented to provide
additional information in the schedulers backend module.
Scheduler task implementations that provide additional fieldsshould implement additional methods, expecially getTaskParameters().
Scheduler task registration and configuration
Deprecated since version 14.0
Registering tasks and additional field providers via
$GLOBALS['TYPO3_CONF_VARS']['SC_OPTIONS']['scheduler']['tasks']
has
been deprecated.
Custom scheduler tasks can be registered via TCA overrides, for example in
EXT:my_extension/Configuration/TCA/Overrides/tx_scheduler_my_task.php
Using the
iconOverlay
option on task type registration, an icon
overlay can be added, which is then displayed in the wizard. This can
be useful for similar task types that use the same "base" icon, but
still have to be differentiated.
Warning
If your extension overrides the TCA of the scheduler extension, it must
be loaded after
typo3/cms-scheduler
, otherwise the
configuration might take no effect.
Additional fields for scheduler tasks are handled via FormEngine and can be
configured via TCA.
If the task should provide additional fields for configuration options in
the backend module, you need to implement a second class, extending
AbstractAdditionalFieldProvider
.
And implemented the following methods in your scheduler task if needed:
packages/my_extension/Classes/MyTask.php
<?phpdeclare(strict_types=1);
namespaceMyVendor\MyExtension\Task;
useMyVendor\MyExtension\BusinessLogic;
useTYPO3\CMS\Core\Messaging\FlashMessage;
useTYPO3\CMS\Core\Messaging\FlashMessageService;
useTYPO3\CMS\Core\Type\ContextualFeedbackSeverity;
useTYPO3\CMS\Core\Utility\GeneralUtility;
useTYPO3\CMS\Scheduler\Task\AbstractTask;
finalclassMyTaskextendsAbstractTask{
protected string $myField = '';
protected string $emailList = '';
publicfunctionexecute(): bool{
# Dependency injection cannot be used in scheduler tasks
$businessLogic = GeneralUtility::makeInstance(BusinessLogic::class);
return $businessLogic->run($this->myField, $this->emailList, '…');
}
/**
* Set field values from associative array.
*
* @param array $parameters Values from TCA fields
*/publicfunctionsetTaskParameters(array $parameters): void{
$this->myField = $parameters['my_extension_field'] ?? '';
$this->emailList = $parameters['my_extension_email_list'] ?? '';
}
/**
* Validate task parameters.
* Only implement this method for validation that cannot be handled by FormEngine.
* Basic validation like 'required' should be done via TCA 'eval' configuration.
*/publicfunctionvalidateTaskParameters(array $parameters): bool{
$isValid = true;
// Example: Custom email validation (beyond basic 'required' check)
$emailList = $parameters['my_extension_email_list'] ?? '';
if (!empty($emailList)) {
$emails = GeneralUtility::trimExplode(',', $emailList, true);
foreach ($emails as $email) {
if (!GeneralUtility::validEmail($email)) {
GeneralUtility::makeInstance(FlashMessageService::class)
->getMessageQueueByIdentifier()
->addMessage(
GeneralUtility::makeInstance(
FlashMessage::class,
'Invalid email address: ' . $email,
'',
ContextualFeedbackSeverity::ERROR
)
);
$isValid = false;
}
}
}
return $isValid;
}
publicfunctiongetAdditionalInformation(): string{
return sprintf(
'Field: %s, Emails: %s',
$this->myField,
$this->emailList
);
}
}
Copied!
Note
Method getTaskParameters() should be implemented when
migrating tasks
For native TCA tasks, this method is typically no longer needed in custom
tasks after the migration has been done, since field values are then stored
directly in database columns.
Migrating tasks with AdditionalFieldProviders to TCA registration
Scheduler tasks should now be registered as native task types using TCA.
This provides a more integrated and maintainable approach to task configuration.
Migration steps:
Remove the registration from ext_localconf.php
Create a TCA override file in Configuration/TCA/Overrides/scheduler_my_task_type.php
Update your task class to implement the new parameter methods
Remove the
AdditionalFieldProvider
class if it exists
Note
The new TCA-based approach automatically migrates existing task data.
When upgrading, existing task configurations are preserved through the
getTaskParameters()
and
setTaskParameters()
methods.
Example migration: Scheduler task with additional fields suppporting TYPO3 13 and 14
Remove the registration from ext_localconf.php once TYPO3 13 support is
dropped:
packages/my_extension/ext_localconf.php
<?phpdeclare(strict_types=1);
useMyVendor\MyExtension\Task\MyTask;
if ((new \TYPO3\CMS\Core\Information\Typo3Version())->getMajorVersion() < 14) {
// Todo: Remove when TYPO3 13 support is dropped
$GLOBALS['TYPO3_CONF_VARS']['SC_OPTIONS']['scheduler']['tasks'][MyTask::class] = [
'extension' => 'my_extension',
'title' => 'LLL:EXT:my_extension/Resources/Private/Language/locallang.xlf:myTask.title',
'description' => 'LLL:EXT:my_extension/Resources/Private/Language/locallang.xlf:myTask.description',
'additionalFields' => \MyVendor\MyExtension\Task\MyTaskAdditionalFieldProvider::class,
];
}
Copied!
And also remove the
MyTaskAdditionalFieldProvider
class once
TYPO3 13 support is dropped.
Create a TCA override file in Configuration/TCA/Overrides/scheduler_my_task_type.php:
Update your (existing) task class to implement the new methods:
packages/my_extension/Classes/MyTask.php
<?phpdeclare(strict_types=1);
namespaceMyVendor\MyExtension\Task;
useMyVendor\MyExtension\BusinessLogic;
useTYPO3\CMS\Core\Messaging\FlashMessage;
useTYPO3\CMS\Core\Messaging\FlashMessageService;
useTYPO3\CMS\Core\Type\ContextualFeedbackSeverity;
useTYPO3\CMS\Core\Utility\GeneralUtility;
useTYPO3\CMS\Scheduler\Task\AbstractTask;
finalclassMyTaskextendsAbstractTask{
protected string $myField = '';
protected string $emailList = '';
publicfunctionexecute(): bool{
# Dependency injection cannot be used in scheduler tasks
$businessLogic = GeneralUtility::makeInstance(BusinessLogic::class);
return $businessLogic->run($this->myField, $this->emailList, '…');
}
/**
* Return current field values as associative array.
* This method is called during migration from old serialized tasks
* and when displaying task information.
*/publicfunctiongetTaskParameters(): array{
return [
'my_extension_field' => $this->myField,
'my_extension_email_list' => $this->emailList,
];
}
/**
* Set field values from associative array.
* This method handles both old and new parameter formats for migration.
*
* @param array $parameters Values from either old AdditionalFieldProvider or new TCA fields
*/publicfunctionsetTaskParameters(array $parameters): void{
// Handle migration: check old parameter names first, then new TCA field names$this->myField = $parameters['myField'] ?? $parameters['my_extension_field'] ?? '';
$this->emailList = $parameters['emailList'] ?? $parameters['my_extension_email_list'] ?? '';
}
/**
* Validate task parameters.
* Only implement this method for validation that cannot be handled by FormEngine.
* Basic validation like 'required' should be done via TCA 'eval' configuration.
*/publicfunctionvalidateTaskParameters(array $parameters): bool{
$isValid = true;
// Example: Custom email validation (beyond basic 'required' check)
$emailList = $parameters['my_extension_email_list'] ?? '';
if (!empty($emailList)) {
$emails = GeneralUtility::trimExplode(',', $emailList, true);
foreach ($emails as $email) {
if (!GeneralUtility::validEmail($email)) {
GeneralUtility::makeInstance(FlashMessageService::class)
->getMessageQueueByIdentifier()
->addMessage(
GeneralUtility::makeInstance(
FlashMessage::class,
'Invalid email address: ' . $email,
'',
ContextualFeedbackSeverity::ERROR
)
);
$isValid = false;
}
}
}
return $isValid;
}
publicfunctiongetAdditionalInformation(): string{
$info = [];
if ($this->myField !== '') {
$info[] = 'Field: ' . $this->myField;
}
if ($this->emailList !== '') {
$info[] = 'Emails: ' . $this->emailList;
}
return implode(', ', $info);
}
/**
* is called by additional field provider
* Todo: Remove setters once TYPO3 13 support is dropped
* @deprecated
*/publicfunctionsetMyField(string $myField): void{
$this->myField = $myField;
}
/**
* is called by additional field provider
* Todo: Remove setters once TYPO3 13 support is dropped
* @deprecated
*/publicfunctionsetEmailList(string $emailList): void{
$this->emailList = $emailList;
}
}
Copied!
The new TCA-based approach uses three key methods for parameter handling:
getTaskParameters(): array
This method is already implemented in AbstractTask to handle task class
properties automatically, but can be overridden in task classes for custom
behavior.
The method is primarily used:
For migration from old serialized task format to new TCA structure
For non-native (deprecated) task types to store their values in the legacy parameters field
For native TCA tasks, this method is typically no longer needed in custom
tasks after the migration has been done, since field values are then stored
directly in database columns.
setTaskParameters(array $parameters): void
Sets field values from an associative array. This method handles:
Migration from old AdditionalFieldProvider field names to new TCA field names
Loading saved task configurations when editing or executing tasks
Parameter mapping during task creation and updates
The method should always be implemented, especially for native tasks
The migration pattern is:
$this->myField = $parameters['oldName'] ?? $parameters['new_tca_field_name'] ?? '';
validateTaskParameters(array $parameters): bool
Optional method. Only implement this for validation that cannot be handled by FormEngine.
Basic validation (required, trim, etc.) should be done via TCA configuration (required property and eval options)
Use this method for complex business logic validation (e.g., email format validation, external API checks)
Return false and add FlashMessage for validation errors
FormEngine automatically handles standard TCA validation rules
For a complete working example, see
\TYPO3\CMS\Reports\Task\SystemStatusUpdateTask
and its corresponding TCA configuration in
EXT:reports/Configuration/TCA/Overrides/scheduler_system_status_update_task.php.
The PSR-14 event
\TYPO3\CMS\Scheduler\Event\AfterTaskExecutionEvent
is dispatched after a scheduled task (including command tasks) has been executed.
It provides the following information:
getTask(): AbstractTask
— the executed task object
isSuccess(): bool
— whether the task completed without exception
getException(): ?\Throwable
— the thrown exception on failure, or
null
on success
Example listener:
use TYPO3\CMS\Scheduler\Event\AfterTaskExecutionEvent;

final class SchedulerTaskResultListener
{
    public function __invoke(AfterTaskExecutionEvent $event): void
    {
        $task = $event->getTask();
        $status = $event->isSuccess() ? 'success' : 'failure';
        // e.g. send a notification, write to a custom log, etc.
    }
}
Copied!
Scheduler API
It is possible to refer to the Scheduler from other extensions. Once a
\TYPO3\CMS\Scheduler\Scheduler
object has been instantiated all of its
public methods can be used. The PHPdoc of the methods should be enough to
understand what each is to be used for.
The extension ships with a
\TYPO3\CMS\Scheduler\Domain\Repository\SchedulerTaskRepository
class,
which provides some helpful methods, for example:
findByUid(int $uid)
: this method is used to fetch a registered task
from the database given an ID.
findNextExecutableTask()
: this method returns the next due task. The
return value is the unserialized task object.
findRecordByUid(int $uid)
: is also used to retrieve a registered task
from the database, but it returns the record corresponding to the task
registration and not the task object itself.
These are the main methods that will be used from outside the
Scheduler as they can retrieve registered tasks from the database.
When a task has been fetched, all public methods from the
\TYPO3\CMS\Scheduler\Task\AbstractTask
class can be used.
Scheduler task storage
Changed in version 14.0
With TYPO3 v14.0 the storage of scheduler tasks switched from the
PHP-serialized storage format in the database to a JSON-based format.
The scheduler tasks displayed in backend module Administration > Scheduler
are stored in the database table
tx_scheduler_task
. Task groups are
stored in table
tx_scheduler_task_group
.
The database table
tx_scheduler_task
contains the following fields:
tasktype
Typically contains the fully qualified class name of the task, for example
\TYPO3\CMS\Scheduler\Task\CachingFrameworkGarbageCollectionTask
or
the command name, for example language:update if the task is implemented as
Symfony console command.
parameters
The options configuring the task as JSON-encoded value.
execution_details
Contains all details on execution like the type (Recurring / Single),
start and end dates and the frequency in which recurring tasks should be
executed.
Additionally it stores some information on the last and next execution of the
task, and fields for a description and the group.
A manual migration is necessary. You can also delete the task and
create it newly.
Known problems
The main problem currently is that a running task cannot be killed,
because no relation exists to the (cron) process that is running the
Scheduler. The process pid could be retrieved, but that may not work
on all platforms. And can the process be killed afterwards? Anyway it
may not be safe to do that.