TYPO3 v12 has reached end-of-life as of April 30th 2026 and
is no longer being maintained. Use the version switcher on the top
left of this page to select documentation for a supported version of TYPO3.
Need more time before upgrading?
You can purchase Extended Long Term Support (ELTS) for TYPO3 v12 here:
TYPO3 ELTS.
TYPO3 Editors Guide
Once you have installed TYPO3 using the TYPO3 - Getting Started Tutorial;
the next step is to log in to the backend of the CMS and start adding pages and create
some content. In the TYPO3 world we often call users who carry out these tasks "Editors".
This guide contains detailed information about all of the common tasks an Editor
is likely to perform including granting other users access to the backend,
creating pages, adding content to pages in the form of content elements and
uploading and managing various file types including images and PDFs.
This guide assumes that you are already familiar with TYPO3. If this is not the case,
visit the concepts of TYPO3 to get started.
All of the examples used in this guide are taken from a TYPO3 installation running
the Official Introduction Package.
TYPO3 v12 has reached end-of-life as of April 30th 2026 and
is no longer being maintained. Use the version switcher on the top
left of this page to select documentation for a supported version of TYPO3.
Need more time before upgrading?
You can purchase Extended Long Term Support (ELTS) for TYPO3 v12 here:
TYPO3 ELTS.
Logging in to TYPO3
With TYPO3, an editor's work is done via the backend and having
an active backend account is required.
Enter your domain name into the address bar of your browser and
append /typo3 to the end of it to access the backend login page.
For example: http://www.example.org/typo3.
Check that JavaScript and cookies are enabled in your browser as they are
required by TYPO3's backend.
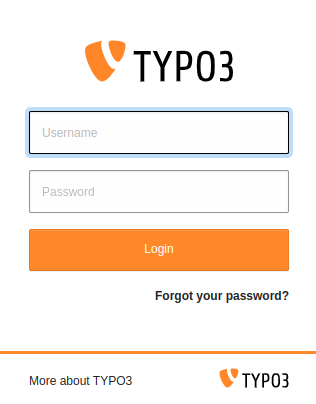
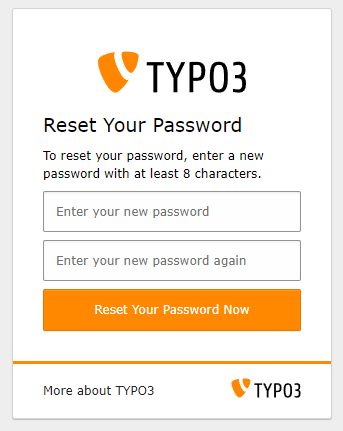
The TYPO3 backend login screen
New in version 12.3
The password can be displayed in clear text by clicking the "eye" symbol
once something has been typed in the password field.
Warning
Revealing login credentials is always a security risk. Please use this
feature with caution when nobody can watch your input, either remotely or by
looking over your shoulders!
Troubleshooting: Forgot password for backend login
The following example only works if your site administrator has
enabled the password reset feature
and if your backend account has a valid email address set.
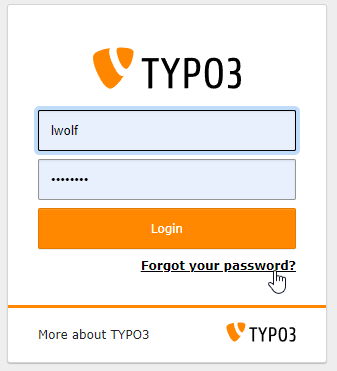
Click on Forgot your password?
Go to the backend login page and select Forgot your password?.
Click on Forgot your password?
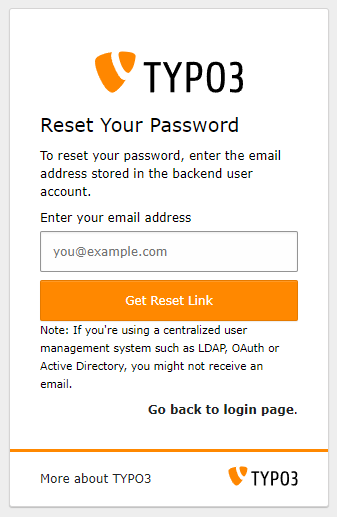
Enter your email address
Use the same email address that you provided during registration.
Click on Forgot your password?
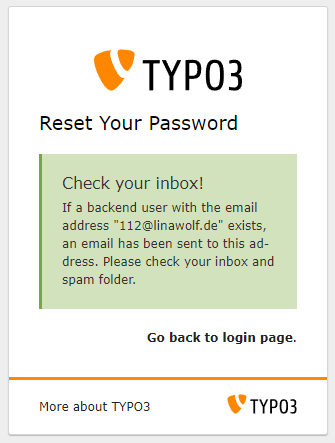
Open the email
Note that you will get the following page even if the email
you entered was not found. This is due to the fact that the system will not
disclose information about any registered email addresses.
If you do not receive the email, check your spam folder and
double-check that the email address is correct.
Click on Forgot your password?
Enter the new password
After you clicked on the password recovery link in the email you received
you can enter a new password. Always use a
secure password.
You will need to enter your new (secure) password twice
Attention
TYPO3 v12 has reached end-of-life as of April 30th 2026 and
is no longer being maintained. Use the version switcher on the top
left of this page to select documentation for a supported version of TYPO3.
Need more time before upgrading?
You can purchase Extended Long Term Support (ELTS) for TYPO3 v12 here:
TYPO3 ELTS.
Creating pages is one of the first things you will do with your
new TYPO3 installation. This chapter contains information on how to
create pages and arrange them in the page tree.
TYPO3 has a built-in feature that allows multiple pages to be created at once, making it easier to get started
with larger projects. This chapter contains information on how to use this tool.
There are a number of different types of pages that can be created in the page tree,
including restricted pages and shortcuts to other pages. This chapter contains information
about the different types of pages that are available and how they can be used.
Every page in the page tree has a set of properties that can be changed. This includes what
template a page uses, SEO information and its visibility in the frontend. This chapter contains
detailed information on each of the property tabs and how they can be configured.
Attention
TYPO3 v12 has reached end-of-life as of April 30th 2026 and
is no longer being maintained. Use the version switcher on the top
left of this page to select documentation for a supported version of TYPO3.
Need more time before upgrading?
You can purchase Extended Long Term Support (ELTS) for TYPO3 v12 here:
TYPO3 ELTS.
Creating Pages
There are two ways to add a new page to your site. It can be done either by dragging the new page
icon to the desired location in the page tree or by right-clicking on
an existing page and using the contextual menu.
To start adding pages:
Select the Web > Page module in the backend.
Expand the page tree so that all of its subpages are visible (optional).
Adding pages within the page tree
You can create a new page by dragging and dropping a page from the top of
the page tree.
Creating a page using drag and drop
Select the type of page you want to add by choosing from one of the icons. In this example
we are creating a standard page.
Drop the icon either between two existing pages to create a sibling
or on top of an existing page to create a child.
Give the new page a title.
Inserting a page title
New pages are disabled by default. To enable a newly created page, right-click on the page
and select Enable. You can also enable a page from the Access tab in page properties.
Adding pages with the context menu
Right-click any existing page and choose More options > 'Create
New' Wizard from the context menu.
Creating pages with the context menu
The New record screen will appear.
Decide where you want your new page to appear in the page tree by selecting one of the black arrows.
Selecting a position for the new page using the wizard
The Create new Page screen will appear.
Provide a title for the page. You can also go to the Access tab
and enable the page to make it visible in the frontend.
Making the new page publicly visible
Visit the page types chapter for more information on the different types of pages that can be created.
Attention
TYPO3 v12 has reached end-of-life as of April 30th 2026 and
is no longer being maintained. Use the version switcher on the top
left of this page to select documentation for a supported version of TYPO3.
Need more time before upgrading?
You can purchase Extended Long Term Support (ELTS) for TYPO3 v12 here:
TYPO3 ELTS.
Creating Multiple Pages
In the page tree, position your cursor on the page that you want to be the
parent of the new pages you are about to create.
Right-click the page and select More options > Create
multiple pages from the context menu.
The Create Multiple Pages screen will appear, with five new empty pages.
Give each new page a title and select its type.
Click the Add more lines button to add five more new pages if you need to create even more pages.
Configure the new pages using the options at the bottom of the screen:
The Place new pages after the existing subpages option adds
new pages below the existing subpages. Otherwise they will be
placed above the current pages.
The Hide new pages and Hide new pages in menus
options let you manage the visibility of your new pages.
A hidden page cannot be accessed by anyone via the web site. A page which
is hidden in menus does not appear in the site navigation but can be
accessed by someone having the direct URL of that page.
Click the Create pages button to create the pages.
Attention
TYPO3 v12 has reached end-of-life as of April 30th 2026 and
is no longer being maintained. Use the version switcher on the top
left of this page to select documentation for a supported version of TYPO3.
Need more time before upgrading?
You can purchase Extended Long Term Support (ELTS) for TYPO3 v12 here:
TYPO3 ELTS.
Working with pages
You can manage pages directly in the page tree.
Move pages
Choose the page you want to move, then drag it anywhere in the page
tree.
A horizontal line displays to indicate the new
position of the page.
Drag a page to move it on the page tree
A gray outlined background on existing pages indicates that your page will
become a child of that page.
Drop a page on another page to make it a child page
Release your mouse. A confirmation message will appear displaying the option to copy or
move the page.
Select Move this item.
Copy pages
Choose the page you want to copy, then drag it to its new position on the
page tree.
Release your mouse, then select Copy in the confirmation
message.
Delete pages
Choose the page you want to delete. Drag it directly to the right to display
the Delete option.
Drag a page to the right to delete it
Context menu
A variety of functions are also available from the right-click context
menu.
Filter the page tree
At the top of the page tree is a filtering tool.
Type a word or numbers to filter the page tree based on matching page titles
or page ID.
Filtering pages in the page tree
Attention
TYPO3 v12 has reached end-of-life as of April 30th 2026 and
is no longer being maintained. Use the version switcher on the top
left of this page to select documentation for a supported version of TYPO3.
Need more time before upgrading?
You can purchase Extended Long Term Support (ELTS) for TYPO3 v12 here:
TYPO3 ELTS.
Page types
Default page types
By default, TYPO3 includes the following page types.
Page
Standard
This is the default page type, and the most common. It covers all basic
needs.
Backend User Section
This page type only displays in the frontend for a specific group of backend
users. You have to be logged in to the backend to see this type of page.
Link
Shortcut
This page type is a shortcut to another page in the page tree. When users
navigate to this page in the frontend, they will be taken seamlessly to the
shortcut's destination.
Mount point
A mount point lets you select any other page in the page tree. All
child pages of the chosen page will display as child pages of the mount
point. This lets you duplicate parts of your page tree in terms of
navigation, without actually duplicating pages and content.
See the Mounts section in "TYPO3
Explained" for more information about mount points.
Link to External URL
This page type is similar to the Shortcut type but leads the
user to a page on another web site.
Special
Folder
A folder page type is a container. It is generally used to store records
other than pages or content elements. It will not display in the frontend.
Recycler
This is similar to the Folder type, but indicates that the
content is meant for removal. There is no clean-up function, it is just a
visual indicator.
Menu separator
This page type creates a visual separation in the page tree. You can use
TypoScript to also display these separators in the frontend navigation.
Custom page types
Depending on the project, custom page types may also be available.
Attention
TYPO3 v12 has reached end-of-life as of April 30th 2026 and
is no longer being maintained. Use the version switcher on the top
left of this page to select documentation for a supported version of TYPO3.
Need more time before upgrading?
You can purchase Extended Long Term Support (ELTS) for TYPO3 v12 here:
TYPO3 ELTS.
Page properties
To access the page properties, click on the Edit page properties
icon in the Docheader.
Edit Page Properties icon
The page properties that are available depend on the page type, your user
permissions, and the configuration of the TYPO3 installation. The default
properties available in the Introduction Package for the Standard page type
include:
General
SEO
Social media
Metadata
Appearance
Behaviour
Resources
Language
Access
Categories
Notes
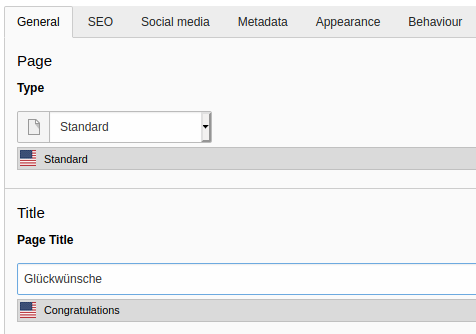
General
This tab contains general information about the page. You
can change the Page Type, and edit titles for the page and the URL.
The Page Title is used to generate speaking URLs (user
friendly URL format). It is also used in menus and in the <title> tag.
When you specify an Alternative Navigation Title all other
instances of Page Title are left unchanged.
The General tab of the page properties
SEO
This tab is used for search engine optimization. It uses the cs_seo system
extension. See the SEO Core extension manual for
more information.
Social media
The fields on this tab are used to enrich social media snippets for the URL of
the page. It uses the typo3/cms-seo system extension. See the
SEO Core extension manual for more information.
Metadata
The fields available on this tab depend on how your site is configured. How the
data is used by the frontend depends on TypoScript which depends on your site
configuration.
Typically, you might see the Abstract field, and editorial
details like Author Name and Last Update.
Appearance
This tab contains properties that influence how the page is rendered.
The Appearance tab of the page properties
Backend layouts can be applied to pages in the backend (the
Web > Page module) to provide alternatives to the standard backend
layout. In this way the backend page can mirror the structure of the frontend
page. Content areas are then in roughly the same place as in the frontend,
making editing easier.
Backend layouts can also be used to influence the rendering of the frontend.
The Show Content from Page field tells the page to display the
content from another page. This is an easier method for repeating the content of
a single page than using mount points.
Behaviour
Fields on this tab set a variety of different aspects of the page.
The Behaviour tab of the page properties
Here are some of the common fields:
Link Target
Set the default Link Target for menu items linking to the page. You can
also specify for the page to open in a new window.
Cache Lifetime
Define a specific cache duration as well as assign cache tags to the page.
Some TYPO3 extensions can flush pages from the cache based on their cache
tag.
Use as Root Page
Indicates that this page is the start of a new web site. The page icon
in the page tree is replaced by a world icon (as displayed for the
"Congratulations" page of the Introduction Package).
Include in Search
By default, every page is included in the TYPO3 CMS built-in
search engine ext_indexed_search/Index. Use this flag to
exclude the current page.
Hide child pages in page tree
Use this option to exclude the child page of the current page from
rendering in page tree of the backend. This can be useful if you have a
lot of subpages.
Contains Plugin
Lets you define the page as a container for a frontend plugin.
Resources
This tab lets you link media files to the current page.
How those files are handled depends on your frontend rendering
configuration.
The Resources tab of the page properties
The rest of the properties on this tab are related to Page TSconfig.
Language
This tab lets you control the visibility of the page based on localization.
TYPO3 CMS provides a system-wide categorisation tool. By default
categories can be applied to pages, content elements, and files.
The Categories tab of the page properties
Categories should be created in a folder and then be assigned to
pages. The content element type "Special Menus",
for example, can display a list of pages from a selected category.
Notes
Use this tab for your own editorial notes and internal comments, such as
reminders or to-do lists.
Notes display in the backend above the Page Properties tabs. They are not
displayed in the frontend.
Attention
TYPO3 v12 has reached end-of-life as of April 30th 2026 and
is no longer being maintained. Use the version switcher on the top
left of this page to select documentation for a supported version of TYPO3.
Need more time before upgrading?
You can purchase Extended Long Term Support (ELTS) for TYPO3 v12 here:
TYPO3 ELTS.
Want to change a content element's type? This chapter contains information on
how you can change a content element's type while preserving its content.
This chapter contains information on how you can move, copy and cut content. It also has information
on the different ways you can view content in the backend.
Find out how to create a contact form using the step-by-step guide.
Attention
TYPO3 v12 has reached end-of-life as of April 30th 2026 and
is no longer being maintained. Use the version switcher on the top
left of this page to select documentation for a supported version of TYPO3.
Need more time before upgrading?
You can purchase Extended Long Term Support (ELTS) for TYPO3 v12 here:
TYPO3 ELTS.
Creating content
In the Web > Page module, on any page, click the +
Content icon in the place where you want to insert content.
Create a new Content Element by clicking the button
The Create new content element window will then be displayed. The
content elements that are available depend on the setup of your TYPO3
installation and the extensions that are installed.
Types of content elements
Note
If you are working with the Introduction Package, you will see more
content elements than described here. That's because the Bootstrap Package
(which is a dependency of the Introduction Package) comes with several content elements of its own.
This page describes the TYPO3 Core content elements.
Typical page content
Insert regular text and image content types to build standard web pages.
The Typical page content tab of the new content element window
Form elements
Create a login form or a simple contact form.
The Form elements tab of the new content element window
Menu elements
Present a menu or list of page links in different ways.
The Menu tab of the new content element window
Plugins
Plugins are provided by extensions. Plugins that are available on this tab will
depend on the individual plugin architecture or on the backend configuration.
In some cases a plugin is made available by adding the "General Plugin" content
element and then selecting the plugin itself on the Plugin tab.
The Plugins tab of the new content element window
Special elements
Insert plain HTML, or a horizontal divider on the page. The "Insert records"
element lets you reference other content elements, i.e. reuse a content
element from another page without duplicating it.
The Plugins tab of the new content element window
Add new content to a page
On a page, click the + Content icon in the place where you want
to insert content.
On the Typical Page Content tab, choose the "Text & Media" element.
This is the most commonly used content type. The
Create new Page Content screen appears.
Empty input form for a Text & Media content element
In the Header field, type My new content element.
In the Text area, type in some text. This field uses a
Rich Text Editor (RTE).
Save and close the content element.
You can see the newly added element on the page:
The new content element appears in the Page module
Attention
TYPO3 v12 has reached end-of-life as of April 30th 2026 and
is no longer being maintained. Use the version switcher on the top
left of this page to select documentation for a supported version of TYPO3.
Need more time before upgrading?
You can purchase Extended Long Term Support (ELTS) for TYPO3 v12 here:
TYPO3 ELTS.
Editing content
On a page, click the pencil icon for the content element you want to edit,
then edit the text and make other changes as required.
You can also change the content element type by selecting a new element from
the Type list.
Editing a content element to change its type
When you change a content element's type, the TYPO3 CMS reloads the screen to
display different input fields.
Editing a content element to change its type
This action does not delete content. It is saved in the background and will be
restored if you select the applicable content element type again.
Attention
TYPO3 v12 has reached end-of-life as of April 30th 2026 and
is no longer being maintained. Use the version switcher on the top
left of this page to select documentation for a supported version of TYPO3.
Need more time before upgrading?
You can purchase Extended Long Term Support (ELTS) for TYPO3 v12 here:
TYPO3 ELTS.
Working with content
In TYPO3, working with content happens mostly in the Web > Page
module.
This module has two different modes: "Columns" and "Languages". See
Working with languages for more information about the
"Languages" mode.
For now we want to be in "Columns" mode. Use the menu in the docheader to
switch modes.
The screenshot below shows how the home page of the Introduction
Package looks in the TYPO3 backend. Content is distributed
across various content areas on the page - these are called columns. For
example, "Border", "Middle: Left", "Middle: Center", etc.
Many icons are greyed out to make the interface look less cluttered.
Some icons don't display at all until your hover over specific areas.
Common page icons explained:
Use this icon to edit all the content elements of a column.
Add a new content element to the column at this specific position.
Content element icon. This can provide a visual clue to the type of content
element. Click to access the context menu for the element (to perform
actions like copy).
This group of icons is enabled when hovering over the whole element.
Use the pencil icon to edit the element.
Enable/disable the element to show or hide it in the frontend
Delete the element.
Moving content elements
You can move content elements using drag and drop.
Click in the grey bar at the top of a content element to start dragging it.
Highlighted areas will then show you where you can drop it.
You can move a content element from one page to another in the Web
> List module using cut and paste. Refer to the clipboard chapter for information about using the clipboard in the List module.
Attention
TYPO3 v12 has reached end-of-life as of April 30th 2026 and
is no longer being maintained. Use the version switcher on the top
left of this page to select documentation for a supported version of TYPO3.
Need more time before upgrading?
You can purchase Extended Long Term Support (ELTS) for TYPO3 v12 here:
TYPO3 ELTS.
The rich text editor
The TYPO3 text editing interface is not much different from a word processor.
The options available in the toolbars vary depending on how your TYPO3
installation is configured.
A typical rich text editor
You can format text, set the alignment, insert tables and symbols and add
internal and external links to text.
Creating a link
Select the text you want to link.
Click the Link icon in the toolbar.
The Link Browser window displays.
This window lets you link to an internal page, file, folder, external
URL, email address or phone number.
Internal links
You can link to an internal file, folder, page or content element on a page.
On the Page tab, select the page in the page tree that you want to link to.
Alternatively, you can link to a specific point (anchor) on the page. Browse
to the page you want to link to, then click the arrow icon next to the page
name. The content elements on that page are displayed and you can select the
content element you want to link to.
The Link Browser window closes and the link is added to your text.
External links
In the Link Browser window, go to the *External URL tab.
Type your link in the URL field.
In the Target drop-down list, select New window to open the
link in a new browser window.
Click the Set Link button to close the Link Browser
window.
Removing a link
To remove a link from text, put your cursor anywhere in the linked text then
click the Unlink icon on the toolbar.
Attention
TYPO3 v12 has reached end-of-life as of April 30th 2026 and
is no longer being maintained. Use the version switcher on the top
left of this page to select documentation for a supported version of TYPO3.
Need more time before upgrading?
You can purchase Extended Long Term Support (ELTS) for TYPO3 v12 here:
TYPO3 ELTS.
Working with images
For content elements that support images (for example Text & Images, Text &
Media, Images Only), you will see an Images tab when you create or edit
the content element.
The Images tab for a content element
It's best practice to add new images using the File > Filelist
module, which is covered in the chapter about the file module. This method means files are stored centrally
and any information or metadata you add to the image is used wherever that
image is used on the site.
When you use the Select & upload files button, the image file is
attached to the page and gets uploaded to the user_uploads folder in the Filelist.
Tip
By only using Select & upload files, your files pile up in the user_uploads folder pretty quickly.
Therefore you should rather upload and organize the files via the Add Image button or upload it with the File > Filelist
module directly, as described above.
Add an image to a page
On the Images tab, click the Add image button. The
File selector window displays to let you browse for an image.
Browse the file tree, then select a folder.
Tick the Display thumbnails box to show a preview of each image
in the folder.
Click the name of an image to select it. Alternatively, click the
+ icon to select multiple images before closing the window.
Configure the image
The Images tab lets you perform a number of actions to configure an image.
Working with an image attached to the content element
Image metadata
Use the small arrow next to the thumbnail to collapse and expand this section.
Here you can set general metadata including description and alt text, and
insert a link to the image.
If the file was added using the File > Filelist
module (which is best practice), the information displayed here is drawn from
the Filelist. If required, you can override this metadata to set specific
values for the image for the current content element.
You can experiment with the image manipulation editor to crop or resize the
image. Making changes here won't impact the original image file in Filelist.
Media adjustments
Manually specify the width and height of the image in pixels, and apply a
border.
Gallery settings
Choose where to position the image in relation to the text.
Images are automatically arranged in columns, two by two. You can change this
behaviour with the Number of Columns field.
Behavior
Use the Enlarge on Click setting to enable a lightbox display for the image.
Attention
TYPO3 v12 has reached end-of-life as of April 30th 2026 and
is no longer being maintained. Use the version switcher on the top
left of this page to select documentation for a supported version of TYPO3.
Need more time before upgrading?
You can purchase Extended Long Term Support (ELTS) for TYPO3 v12 here:
TYPO3 ELTS.
Embedding video and audio
Like images, it's best practice to add new video and audio files using the
File > Filelist module, which is covered in the chapter about the file module. This method
means files are stored centrally and any information or metadata you add to
the file is used wherever that media file is used on the site.
When you use the Select & upload files button, the media file is
attached to the page and gets uploaded to the user_uploads folder in the Filelist.
Tip
By only using Select & upload files, your files pile up in the user_uploads folder pretty quickly.
Therefore you should rather upload and organize the files via the Add Media button or upload it with the File > Filelist
module directly, as described above.
Add a video to a page
On the Media tab, click the Add media file button, then follow
the same process as you would to Add an image to a page.
The Media tab for a content element
Alternatively, you can click the Add media by URL button to paste
a link to a video or audio file from the web.
Configure the video
Use the Autoplay setting to specify whether the video should
start playing as soon as the page loads.
You can configure various settings for media files (for example, adding a
border, setting page position and behavior) just as you would to
configure an image.
Attention
TYPO3 v12 has reached end-of-life as of April 30th 2026 and
is no longer being maintained. Use the version switcher on the top
left of this page to select documentation for a supported version of TYPO3.
Need more time before upgrading?
You can purchase Extended Long Term Support (ELTS) for TYPO3 v12 here:
TYPO3 ELTS.
Creating a contact form
You can create a form from the Web > Forms module. This is a
system extension which needs to be activated by your administrator. It is
written in TypoScript and is fully documented in the Form Framework system extension manual.
This module provides a guided interface for editors to create any kind of form
such as a contact form, newsletter subscription or even a survey. TYPO3 comes
with one pre-defined form already built, which you can use to get started.
In the Web > Forms module, click the + Create new
form button. The Create new form wizard displays.
Launching the Create new form wizard
Choose whether you want to create a blank form or use a predefined form.
In this case, choose Predefined Form.
Choose Predefined form
Choose the predefined Simple contact form and enter a name.
Check the settings and click Next once more.
In the Start template list, select 'Simple contact form', and
then type a name for the form.
Click Next and then click Finish. Your new form displays.
New form based on template
The predefined 'Simple contact form' comes with some settings already
configured, but you can edit these settings and add more fields. For
example, you might want to delete the Summary page, and change
the labels on the buttons.
Add your form to a page the same way you would add any
content element. On the Form elements tab, choose 'Form'.
In the form content element, go to the Plugin tab and in the
Form definition list, choose your form.
Choose your form on the Plugin tab
On the General tab, type a header for your form, then save and close
the record.
Preview the page and it should look something like this:
The contact form in the frontend
Create a form from scratch
In the Web > Forms module, click the + Create new
form button.
In the Create new form wizard, choose to create a blank form.
Give your form a name, then click Next and Finish.
A blank form displays.
Create a new form from scratch
Click the Create new element button. The New element
window displays.
Create new element in form
TYPO3 comes with over twenty form fields by default, including:
Basic elements like text or password fields
Special elements requiring specific format validation, like phone
numbers or dates
Select elements like checkboxes or multiple choice
Advanced elements that have special rules, like user uploads or
calendar date pickers
Container elements to visually organize surveys
Once you’ve selected a form element, you can customize the settings for how the field is displayed.
Choose the Text element and the field is added to your form. You can
configure settings for the field (such as placeholder text and field
validation) on the right-hand side of the screen .
Create a new form from scratch
Click the Preview mode icon to see an indication of how your
form will display on the frontend. Use the Edit mode icon to
return to editing your form.
Create a new form from scratch
Working with forms
When you have added multiple fields to your form, you can drag and drop them
to rearrange their order.
Click the Settings button at the top of the form to add
Finishers like a confirmation message or redirection to another page.
You can integrate extensions with existing forms. For example, if you're
running a sales operation, you can integrate with Mautic and any changes to a
TYPO3 form will update Mautic to give you seamless lead tracking.
Tip
There are many more properties that can be defined. They are
described in the "Form Framework" system extension
manual.
Attention
TYPO3 v12 has reached end-of-life as of April 30th 2026 and
is no longer being maintained. Use the version switcher on the top
left of this page to select documentation for a supported version of TYPO3.
Need more time before upgrading?
You can purchase Extended Long Term Support (ELTS) for TYPO3 v12 here:
TYPO3 ELTS.
The List module makes it possible to display the content of several
fields at once and gives you the ability edit several records with one action.
Attention
TYPO3 v12 has reached end-of-life as of April 30th 2026 and
is no longer being maintained. Use the version switcher on the top
left of this page to select documentation for a supported version of TYPO3.
Need more time before upgrading?
You can purchase Extended Long Term Support (ELTS) for TYPO3 v12 here:
TYPO3 ELTS.
Using the list module
The Web > List module allows you to browse through pages and folders
in your site and view the records that
are stored there. You can also create and edit records.
Records stored on pages include sub pages, content elements and news articles.
Select the Web > List module and browse to the
"Congratulations" page. You should see the following:
A typical view of the List module
The list view displays a list of records stored on the
current page, grouped by type. The name which appears on a record
depends on which field is used for the label. For "pages", the field is
"Pagetitle".
The list view has action icons in the Docheader including:
Create a new record (a wizard appears to let you choose which type)
View the current page (in the frontend)
Edit the current page
Search the current page
Clear the cache of the current page
Refresh the List view
Bookmark this view
Copy URL of this view
Access contextual help (removed with version 12.0)
Action icons are also available in the Content Area:
The "List" module content area with action icons
Create a new page record
Action icons for the record. Which icons appear here depends on the record
type selected. If the record is viewable in the frontend (as "pages" are), a "View"
icon is displayed. All records have the three icons
"Edit", "Hide/unhide" (i.e. visible in the frontend or not) and "Delete".
The ellipsis icon (three consecutive dots) expands the icon list to show
additional action icons (typically used for accessing information, moving around, etc.)
There are also cut and paste icons.
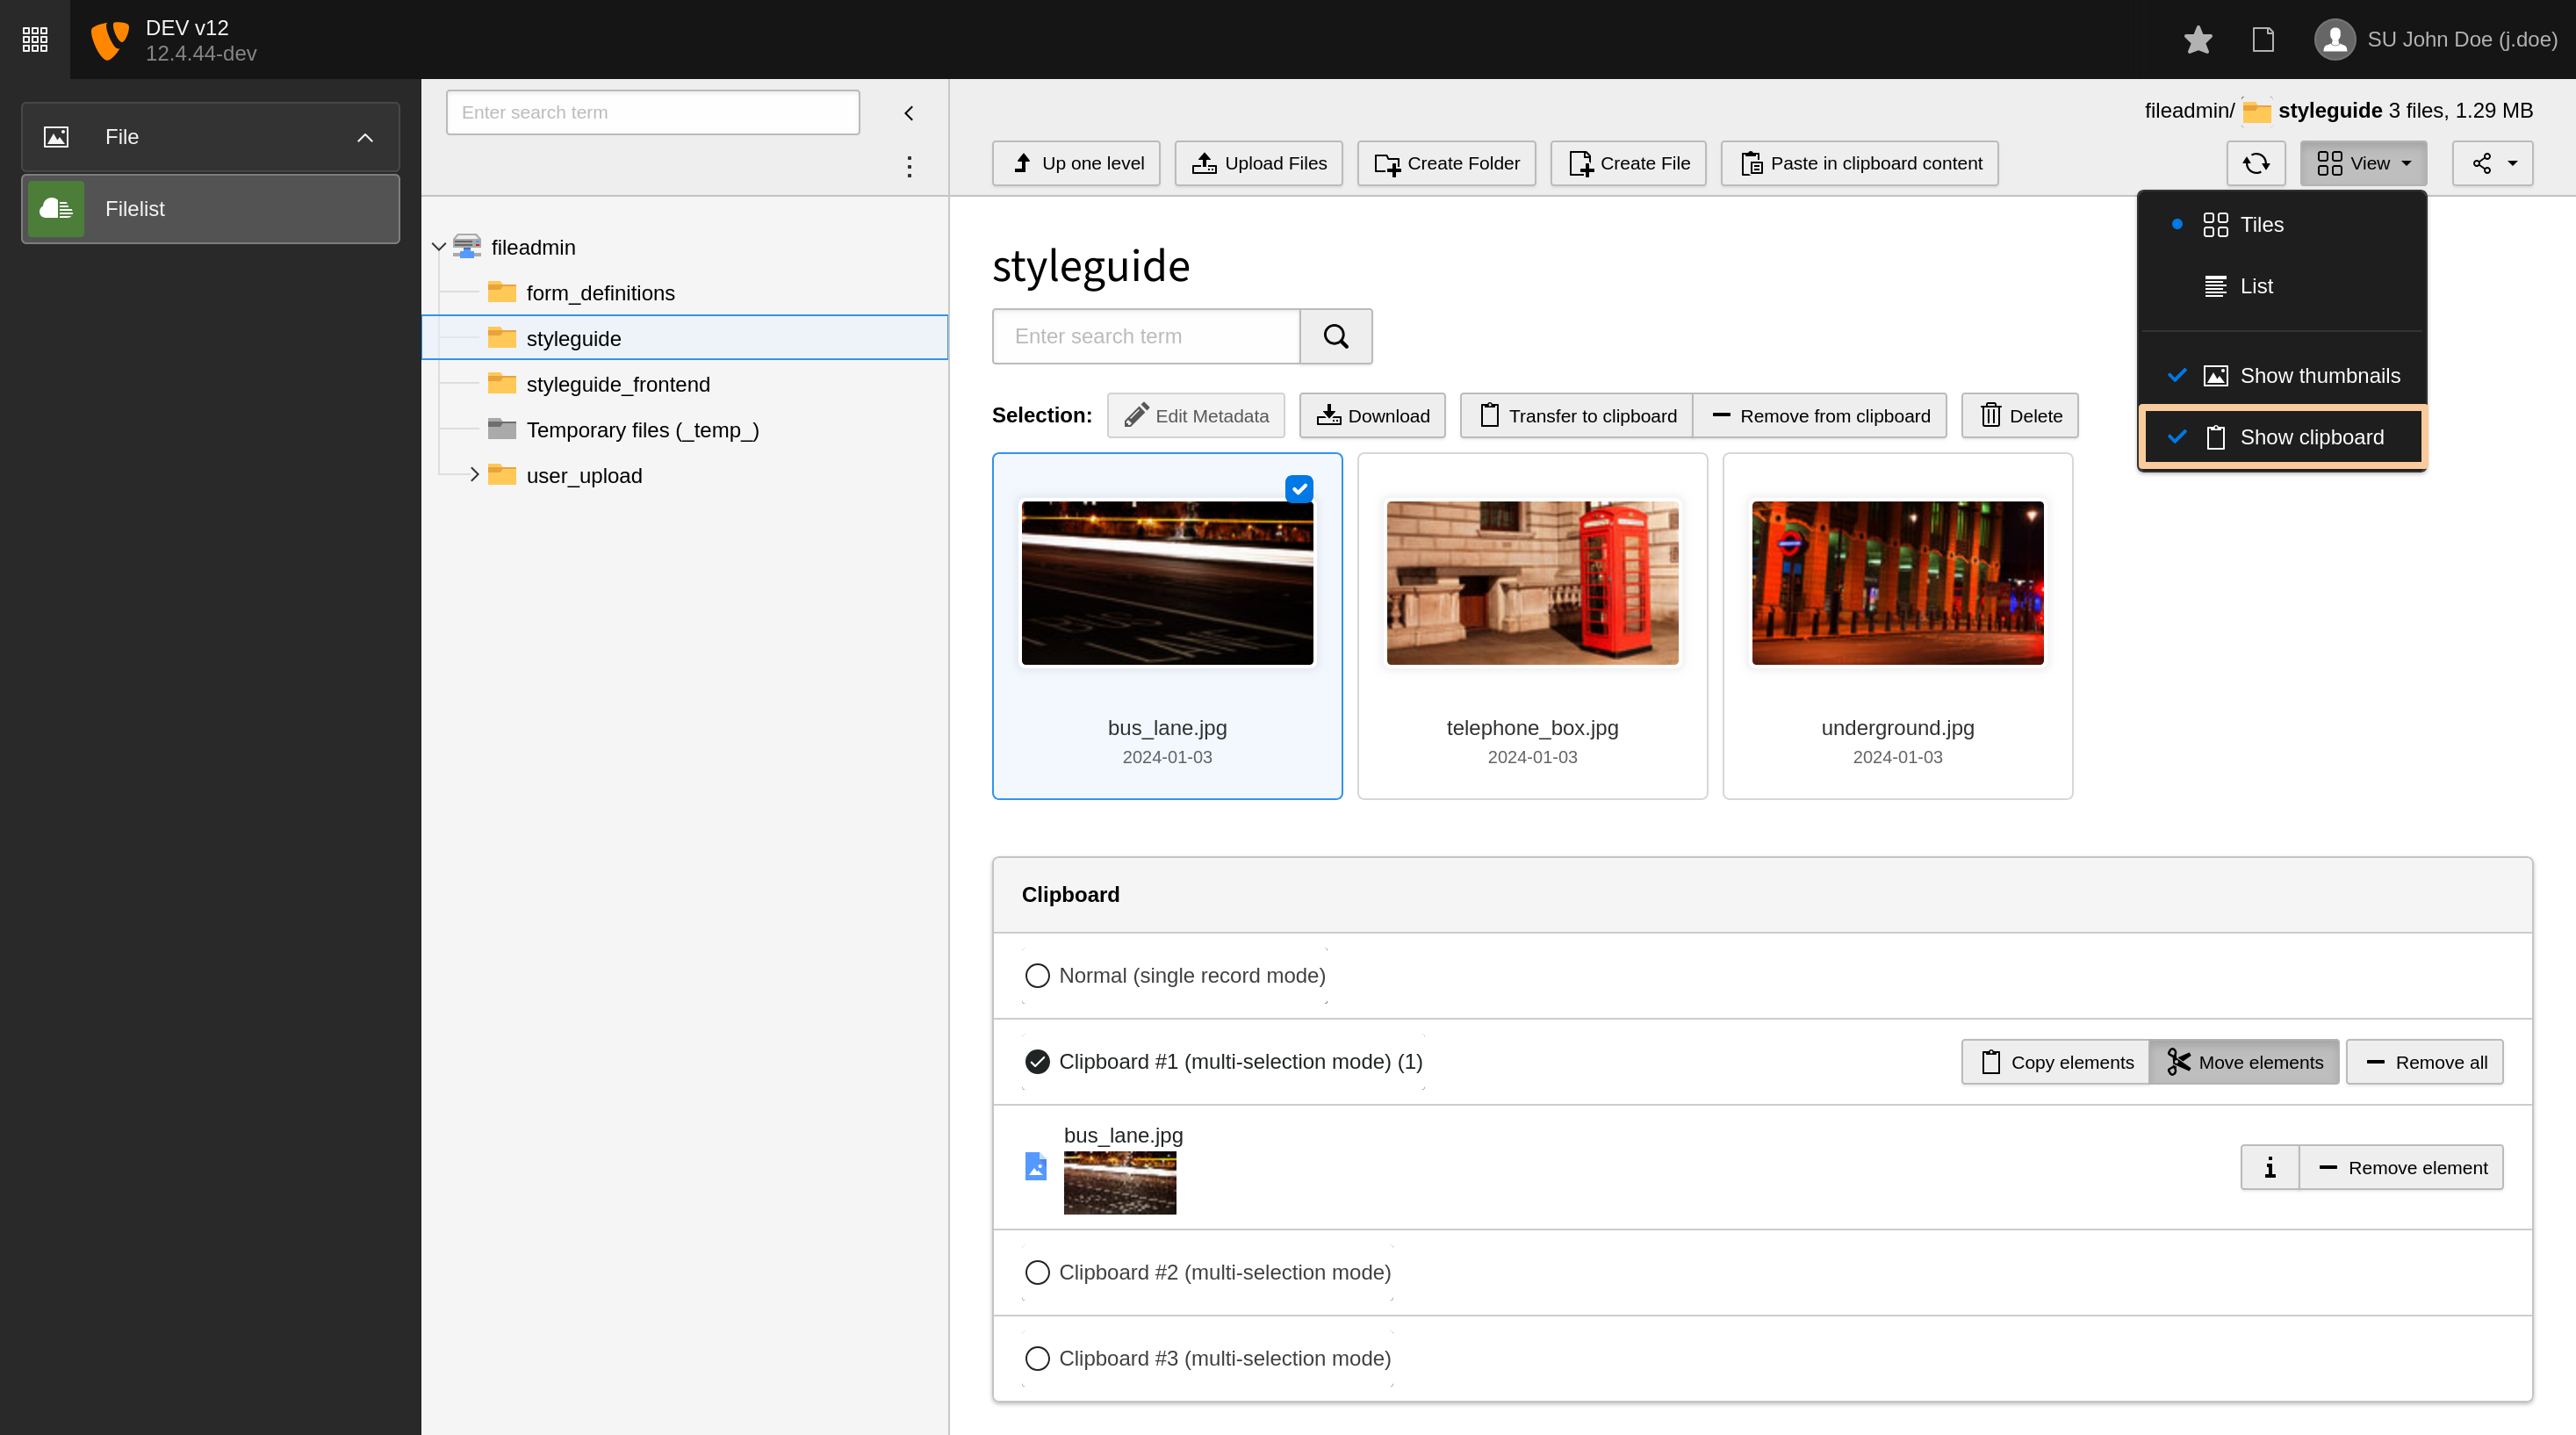
Now, make sure that the Show clipboard box is checked, as we
will explore this next.
Attention
TYPO3 v12 has reached end-of-life as of April 30th 2026 and
is no longer being maintained. Use the version switcher on the top
left of this page to select documentation for a supported version of TYPO3.
Need more time before upgrading?
You can purchase Extended Long Term Support (ELTS) for TYPO3 v12 here:
TYPO3 ELTS.
The clipboard
Every time a record is copied in the TYPO3 CMS backend,
it appears in the clipboard found at the bottom of the list module
screen.
Click on the copy icon of the "Features" page:
Now scroll down and look at the clipboard:
Note how the clipboard registers the fact that we have chosen
the "Copy" action. The "Cut" action is the same, but the clipboard
will reflect that with different texts.
As you can see, the clipboard indicates that it is in
"single record mode". If you cut or copy another record it will
replace the current content of the clipboard. In the next chapter
we will look at the other clipboards.
Attention
TYPO3 v12 has reached end-of-life as of April 30th 2026 and
is no longer being maintained. Use the version switcher on the top
left of this page to select documentation for a supported version of TYPO3.
Need more time before upgrading?
You can purchase Extended Long Term Support (ELTS) for TYPO3 v12 here:
TYPO3 ELTS.
Advanced clipboard usage
Select a page, in the List view. If not activated, click on
Show Clipboard (1). Select
"Clipboard #1 (multi-selection mode)" in the clipboard panel on the
bottom of the page. You can now check all records (3) or check just the ones
you want to work on. Each record now has a checkbox.
As soon as one or more records are checked, new buttons will appear at the top of the list:
Edit all selected items at once
Transfer to Clipboard all selected items at once
Remove from Clipboard all selected items at once
Delete all selected items at once
Now check several boxes and click the Transfer to Clipboard button.
Your clipboard should look like this:
Multiple items stored in the clipboard
The button Move Elementsis selected by default. Select the button
Copy Elements instead. The selected elements will now be copied
and the current page will remain unchanged.
Move to another page and click the "Paste into" icon:
The "Paste into" icon at the top of the list
A warning appears to confirm the operation:
The dialog box for confirming the paste action
After confirmation, you can see that the two elements have been moved
to the top of the list and that the clipboard pane is empty:
Moved records and empty clipboard
Attention
TYPO3 v12 has reached end-of-life as of April 30th 2026 and
is no longer being maintained. Use the version switcher on the top
left of this page to select documentation for a supported version of TYPO3.
Need more time before upgrading?
You can purchase Extended Long Term Support (ELTS) for TYPO3 v12 here:
TYPO3 ELTS.
Mass editing
The List module makes it possible to display the content of several
fields at once and gives you the ability edit several records with
one action.
Choose the columns to be displayed by clicking the Show Columns
button.
The Show Columns button
Then chose the field or fields from the modal. Select the Type
field for now and click on the Update button.
Choose the fields to be displayed and click "Update"
This makes the Type field appear in a new column to the right
of the record list:
Click on the title to enable mass edit mode
To enable mass editing you have to switch into the record list single view by
clicking the tables title:
Click one of these buttons to mass-edit the according columns
Edit all headers
To edit the headers of all records in one go,
select the pencil icon next to the "Header" label:
Click the button next to the Header column to mass edit the fields
You will then see this:
Changes will be applied to all fields
Upon saving this change will be applied to all records.
Edit all selected fields
All fields that are currently viewable can be edited at the same
time by selecting a different icon:
Click the button next to the Header column to mass edit the fields
The result is almost the same form, but with the additional field "Type":
Changes will be applied to all fields
Edit selected fields of selected records
When the advanced clipboard with multi-selection
mode is activated, it is possible to select only those records that should be
edited.
Selecting records for editing
The result is a form for editing just the chosen field for the
selected records.
Attention
TYPO3 v12 has reached end-of-life as of April 30th 2026 and
is no longer being maintained. Use the version switcher on the top
left of this page to select documentation for a supported version of TYPO3.
Need more time before upgrading?
You can purchase Extended Long Term Support (ELTS) for TYPO3 v12 here:
TYPO3 ELTS.
Files
The File > Filelist module is where you can manage
all the media associated with your TYPO3 web site.
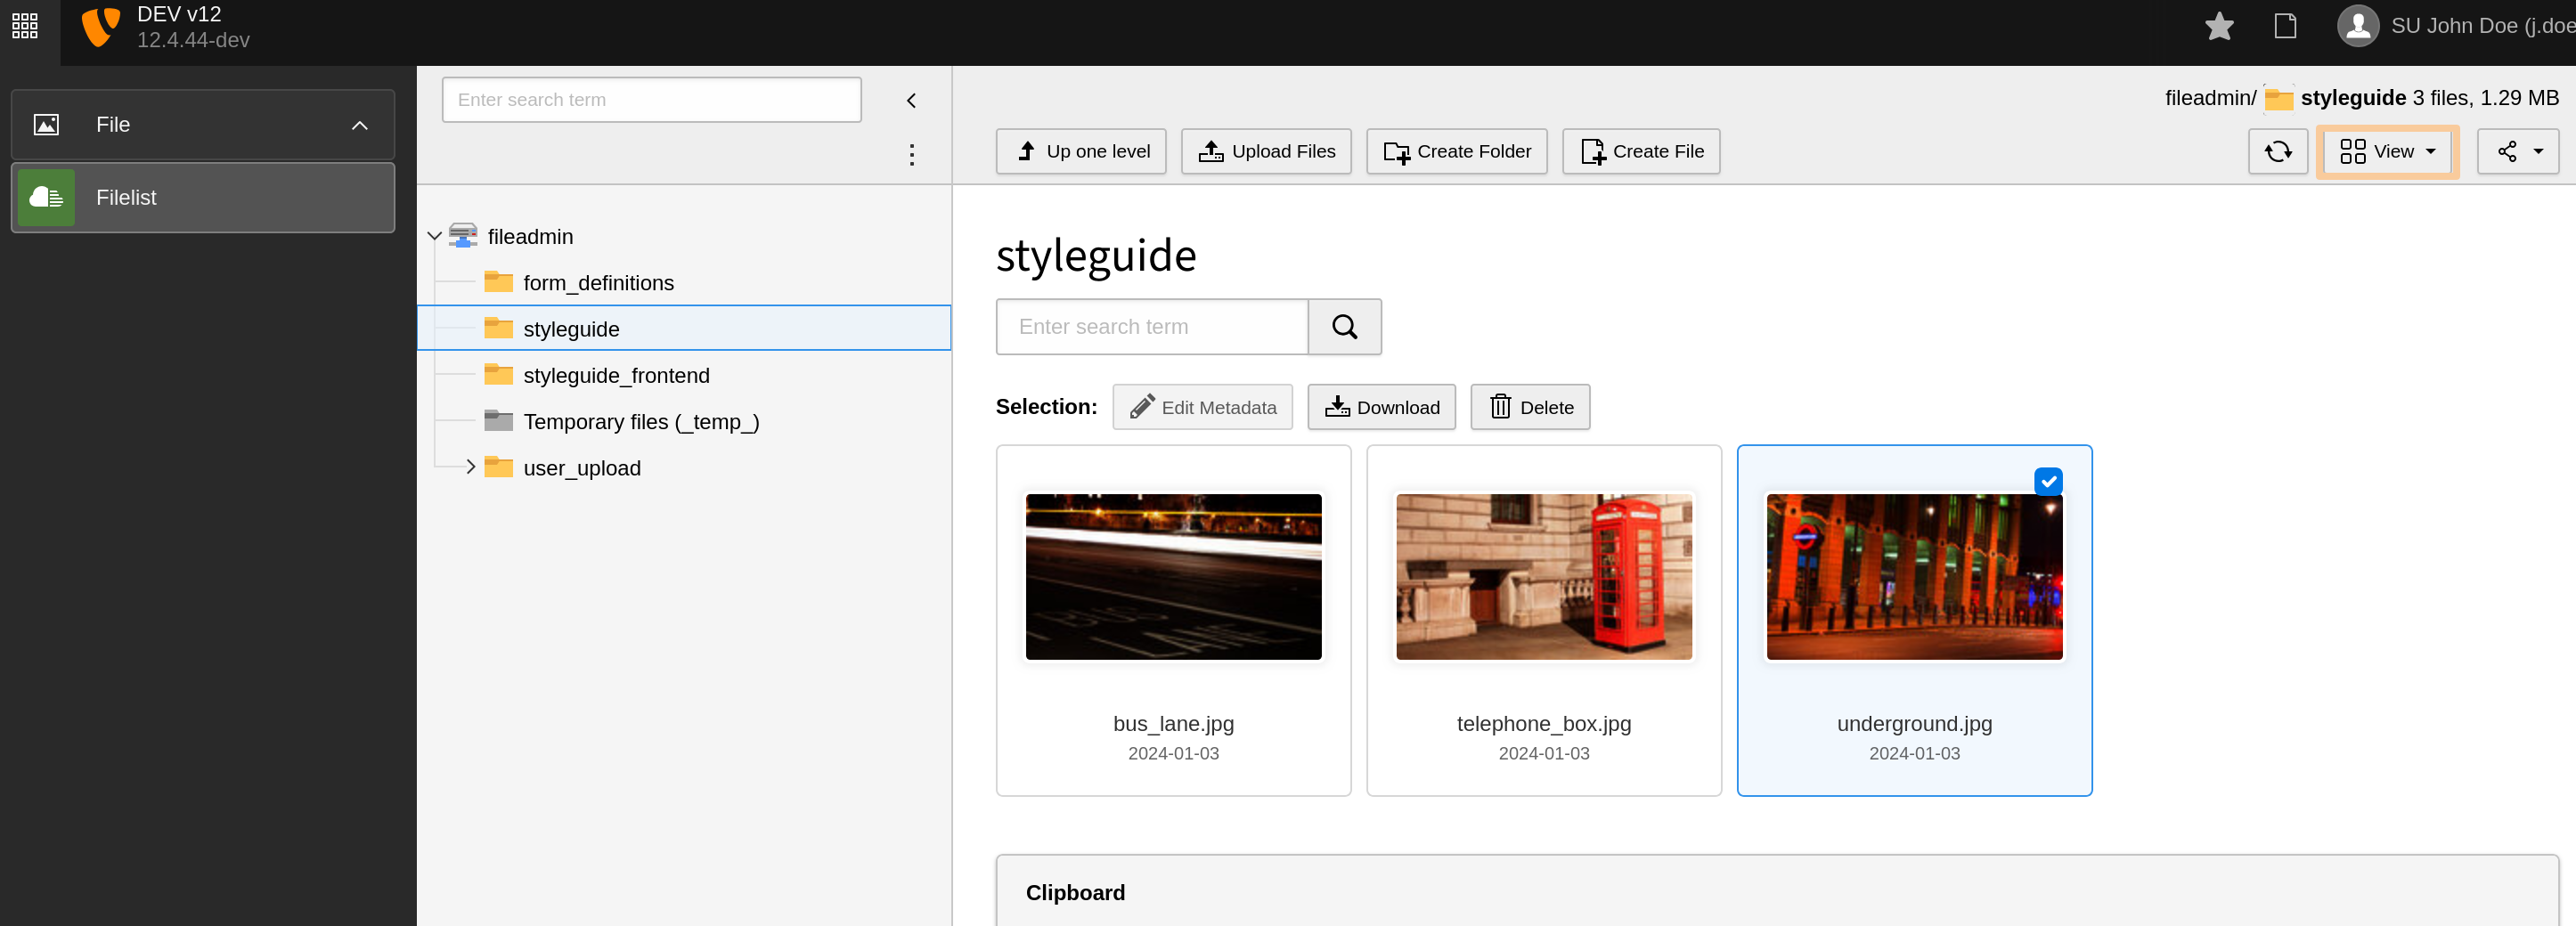
Managing files in the TYPO3 CMS
Files including documents and images are managed in the
Filelist module. Similar to the Web > List module,
it displays a navigation tree, which corresponds to the file
structure on the server, and a list of all files for the
selected directory.
View from the The Media module displaying default view option tiles.
List view from the The Media module with View Selector open displaying options.
For admin users, the folder displayed by default is called
"fileadmin/ (auto-generated)" and corresponds to the
fileadmin/ folder located under the document root
folder on your web server.
Using these files inside content elements to display them
or link to them in your web site is covered in the
images chapter.
Note
There are extensions which make it possible to connect to remote
storage pools (like a WebDAV server or an Amazon S3 account) and work
with the files as if they were on the TYPO3 CMS server.
File metadata
You can provide metadata for the file by clicking on the button that looka like
a pencil with the title text Edit Metadata of this file.
The metadata you provide can include (depending on the setup of the system
and the format of the file):
Text to be displayed to all users in some contexts (Title,
Description)
Text for Accessibility such as the alternative text
for an image or a download name
Data required due to copyright issues
Metadata attached to the uploaded file such as information about the
camera used or the location
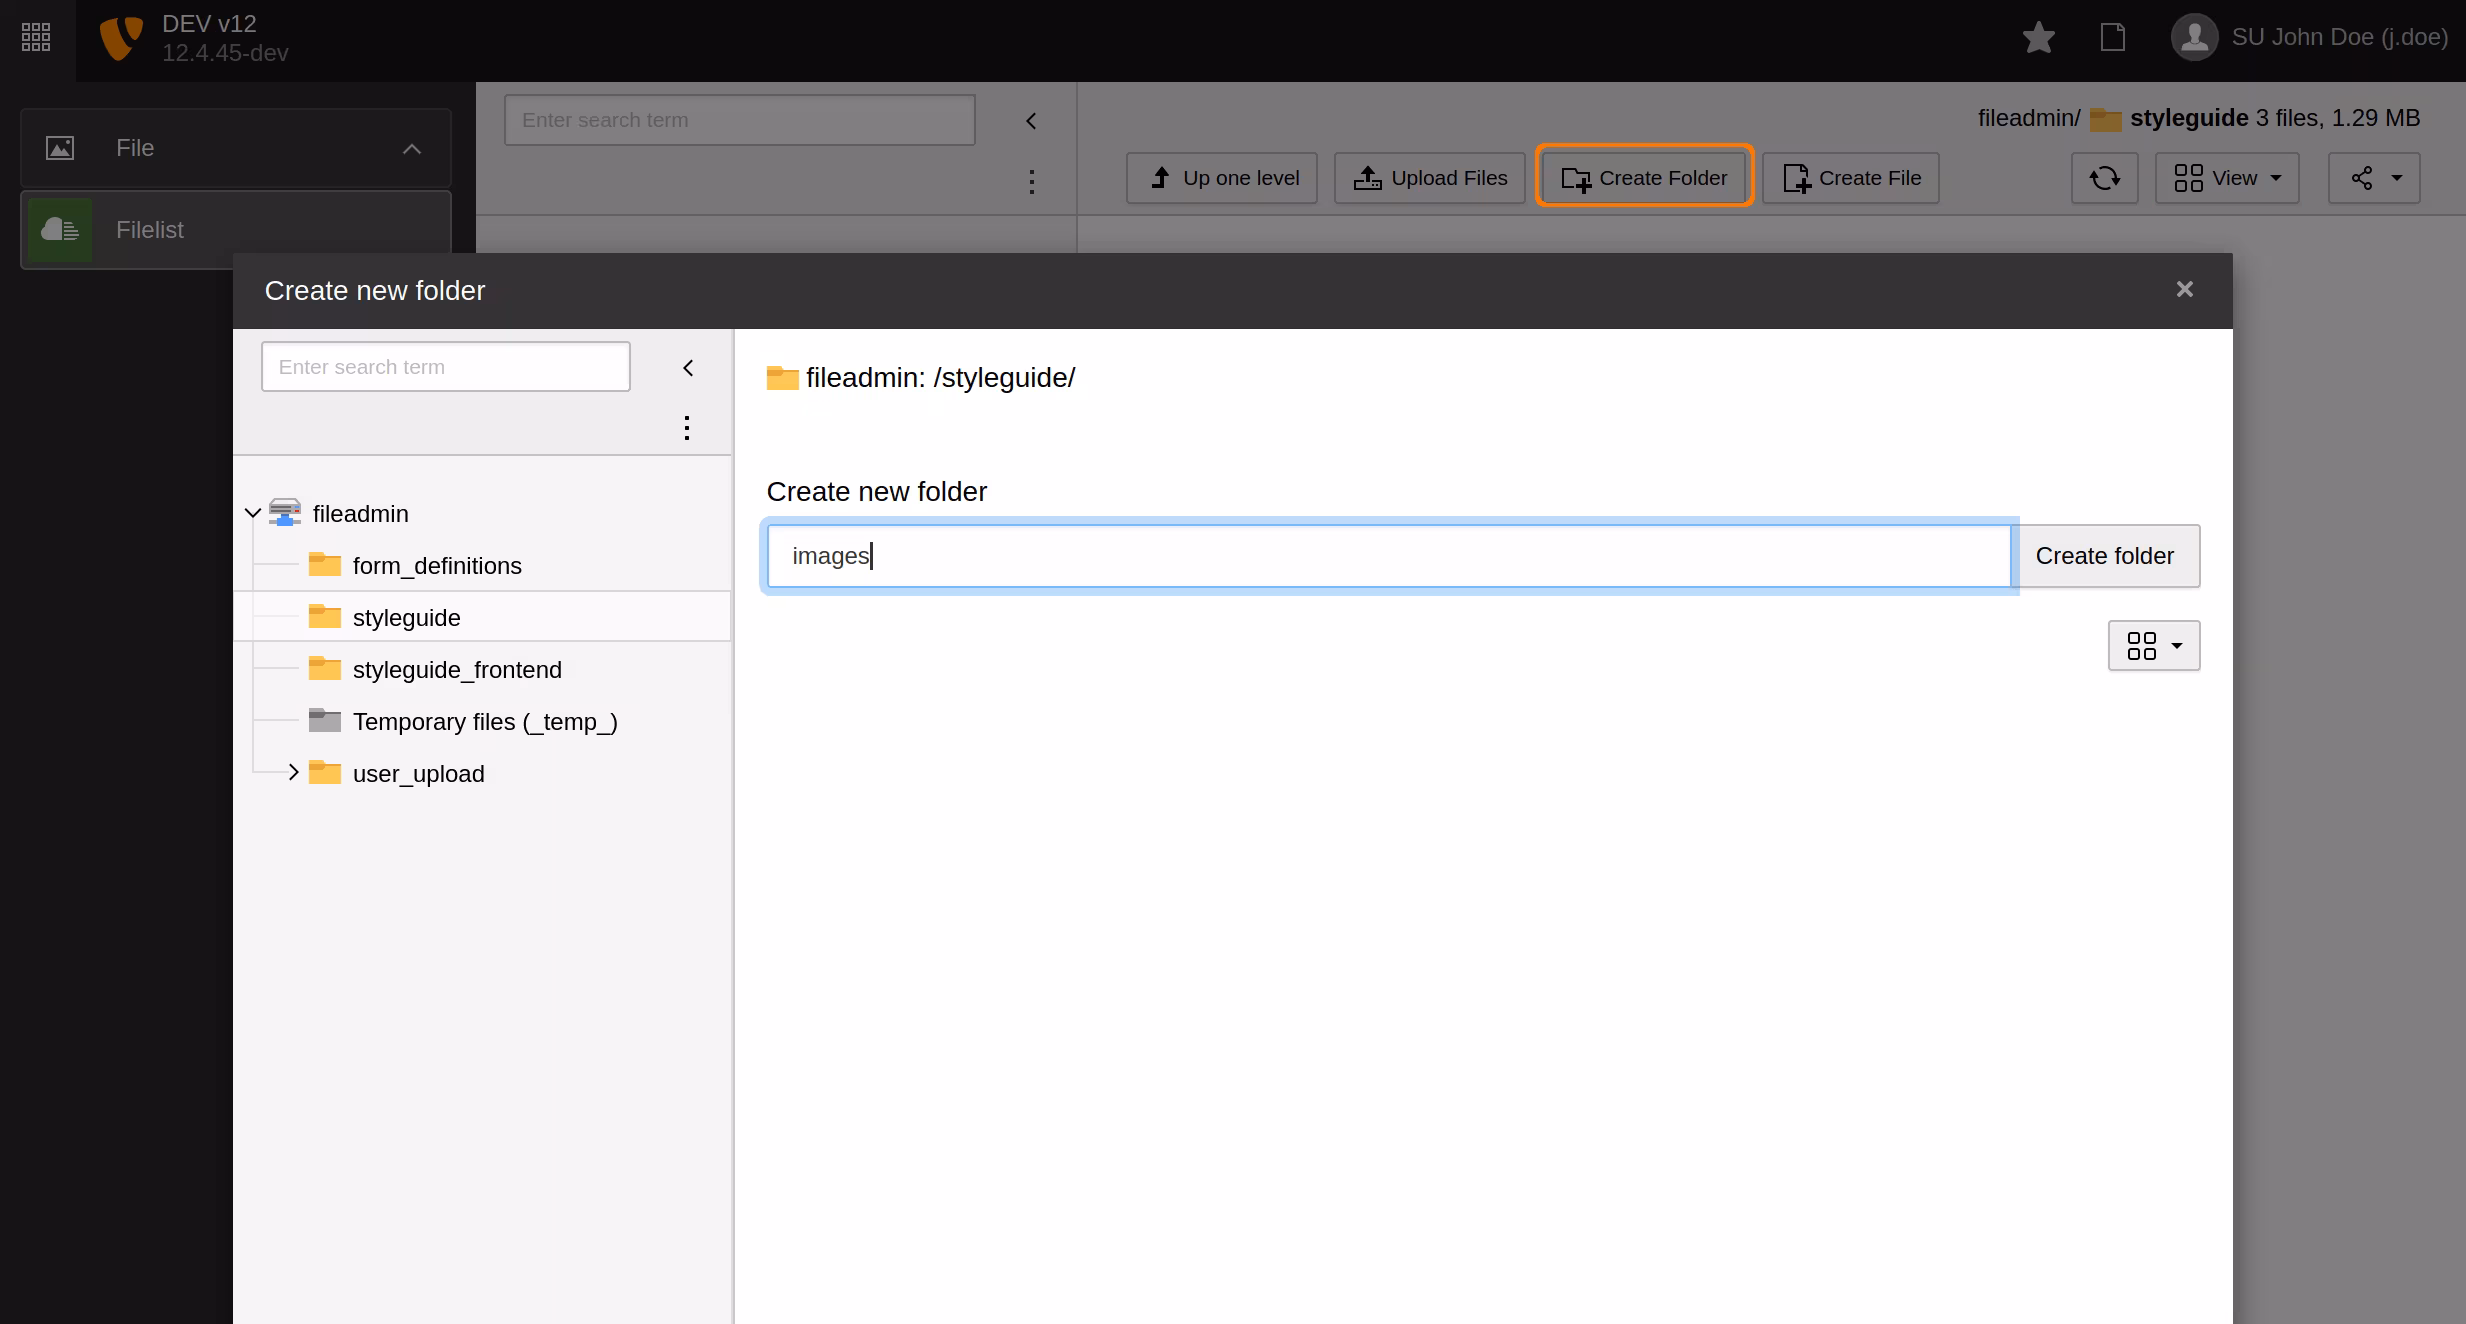
To create folders within the file storage, the button Create Folder opens a module dialog
with the familiar separation of tree and working frame. Left hand all available storages and folders
are displayed in tree structure. The folder selected here will act as the parent for the folders
to be created.
Folders are to be created one by one, the modal will remain open after operation to ease multiple
additions. Each new entry appears immediately in the folder tree and can be used as parent.
Modal dialog for folder creation
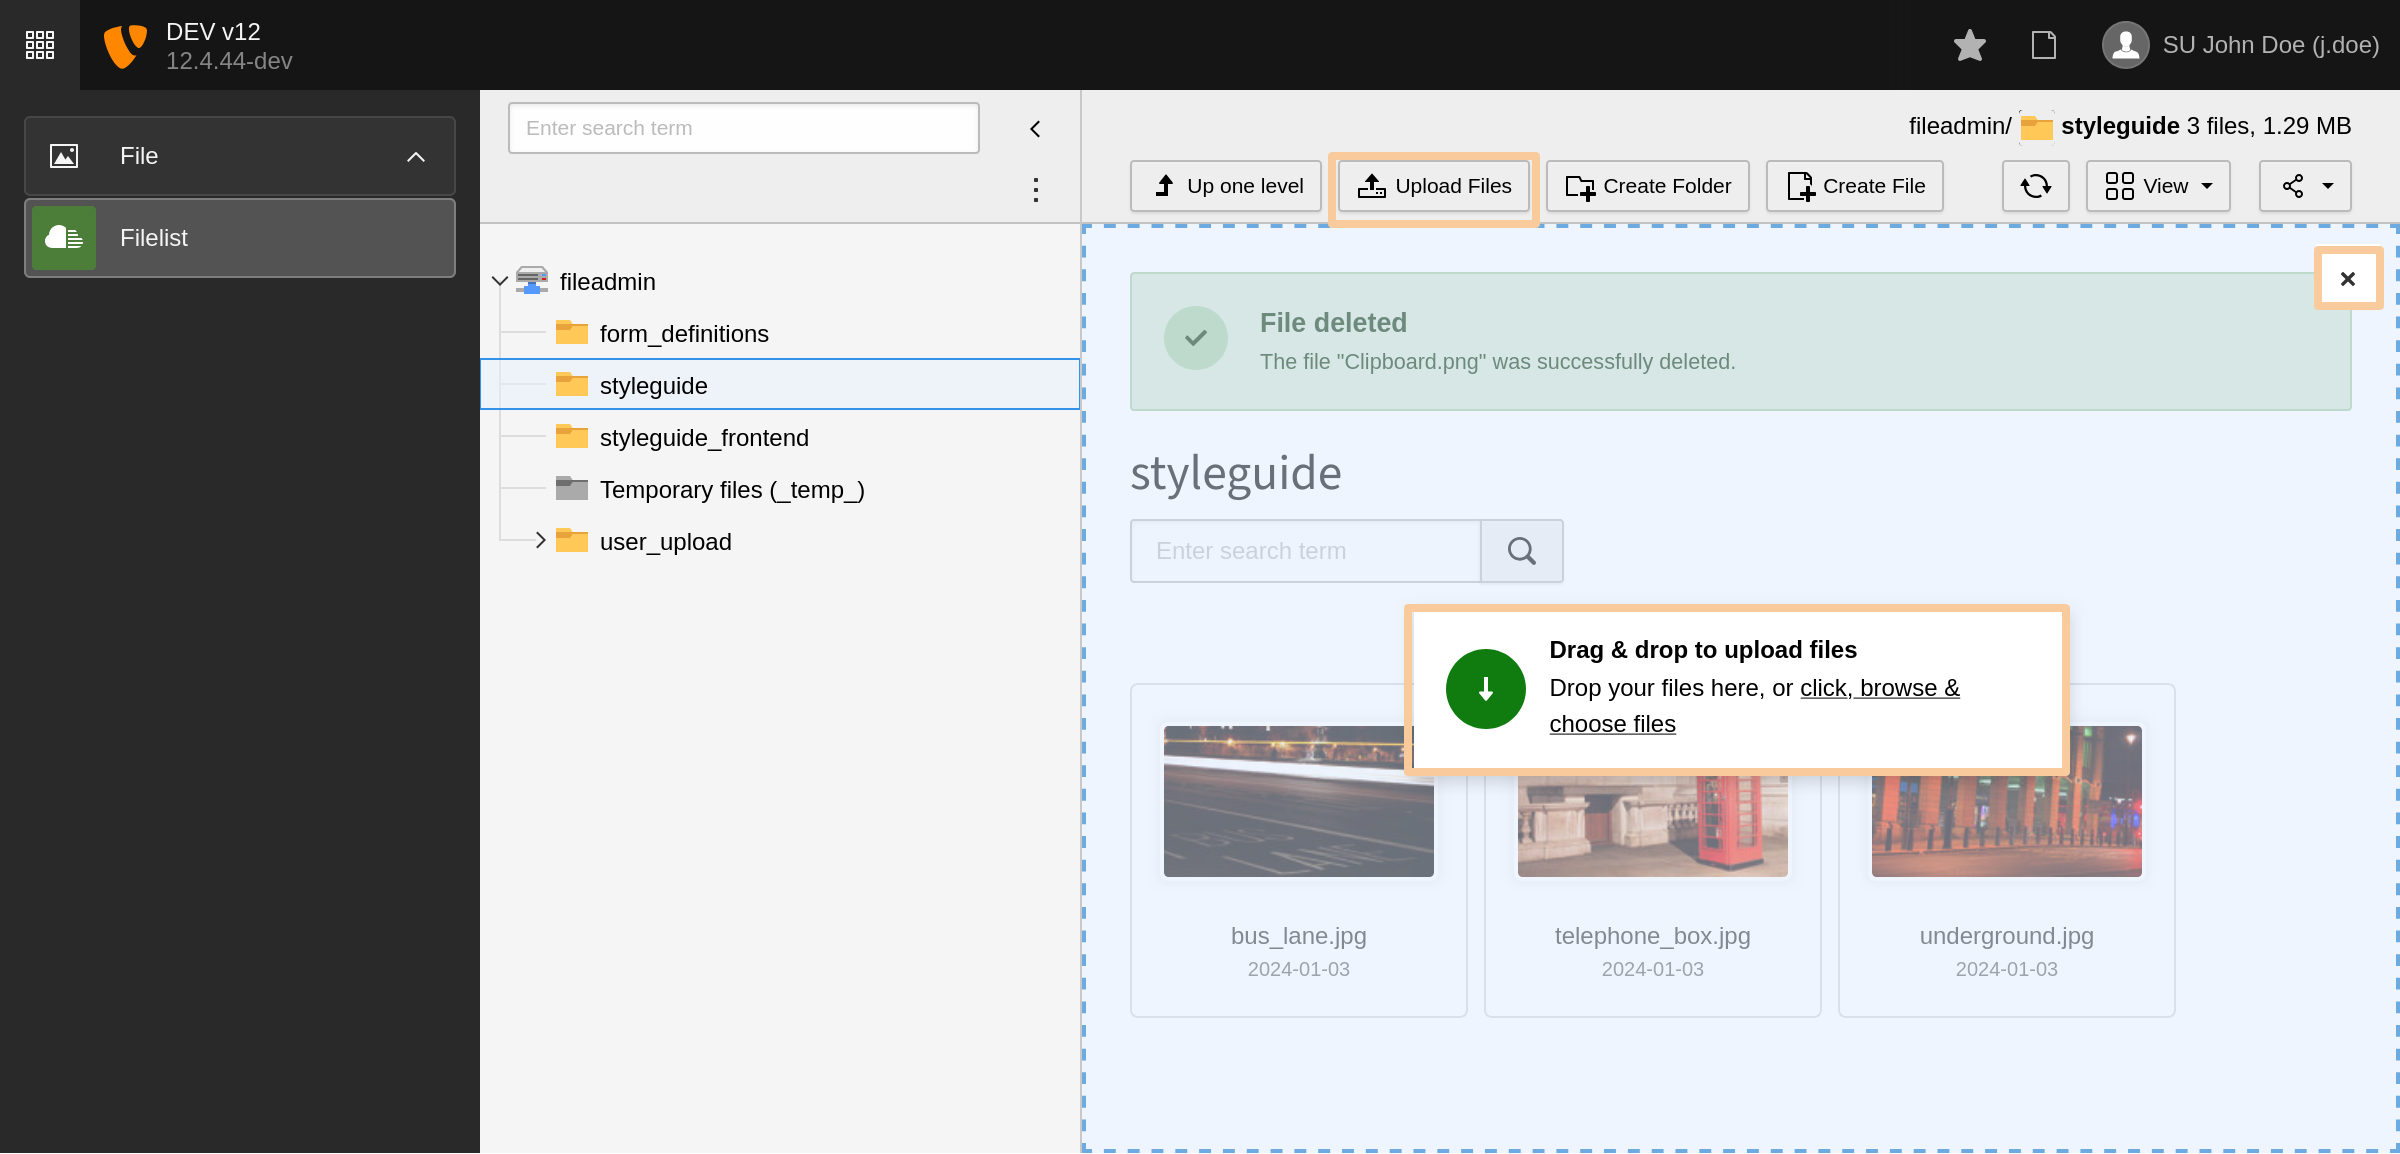
Uploading new files
You can upload files to a given folder by using the context menu
or to the current directory by using the action icon in the docheader. Also, drag & drop
will initiate the upload. Just drag any file into the main view to upload it to the
current folder, or select the click, browse and choose files option.
TYPO3 v12 has reached end-of-life as of April 30th 2026 and
is no longer being maintained. Use the version switcher on the top
left of this page to select documentation for a supported version of TYPO3.
Need more time before upgrading?
You can purchase Extended Long Term Support (ELTS) for TYPO3 v12 here:
TYPO3 ELTS.
Working with languages
TYPO3 CMS comes with the built-in ability to handle web sites
in multiple languages.
Adding a new language is done in the Site Management > Sites
module, which is restricted to admin users. Detailed information on how to
configure your site to add more languages can be found in the Site
Handling documentation.
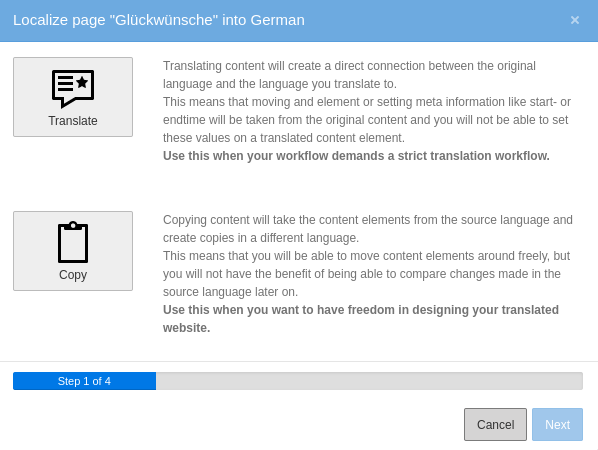
When you choose to translate content, TYPO3 offers two methods:
Translate - Use this option when you have a strict translation workflow
or content structure.
TYPO3 will create a direct connection between the
original language and the translation. When the original language content
is changed, the translations are marked as out-of-date and you can see the
changes in the original language when editing a translation.
This mode means that TYPO3 can help you maintain consistency when you have
separate teams localizing content. This mode also allows TYPO3 to
automatically mark translated content for review, and notify translators
when the original text changes.
Copy - Use this option when you would like the content structure to be
free and independent between languages.
TYPO3 creates a copy of the content in the target language. No connection
is maintained between the original and the translation, which means
subsequent versions of the translations can easily diverge from the
original.
Working with translations
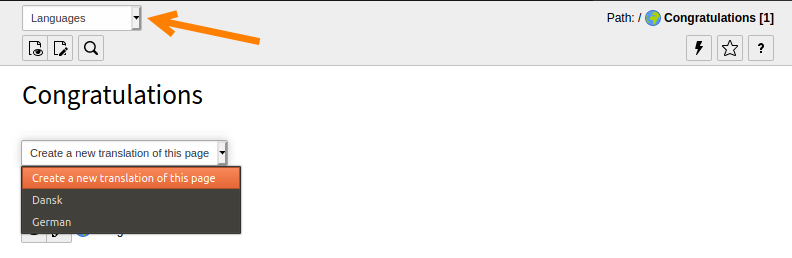
Working with the Introduction Package, in the Web > Pages module, go to the "Congratulations" home page.
Using the menu in the docheader, switch to the "Languages" view.
In the drop-down menu "Create a new translation of this page", choose a
language, let's say German in this case. The page properties displays for
the German version of the page.
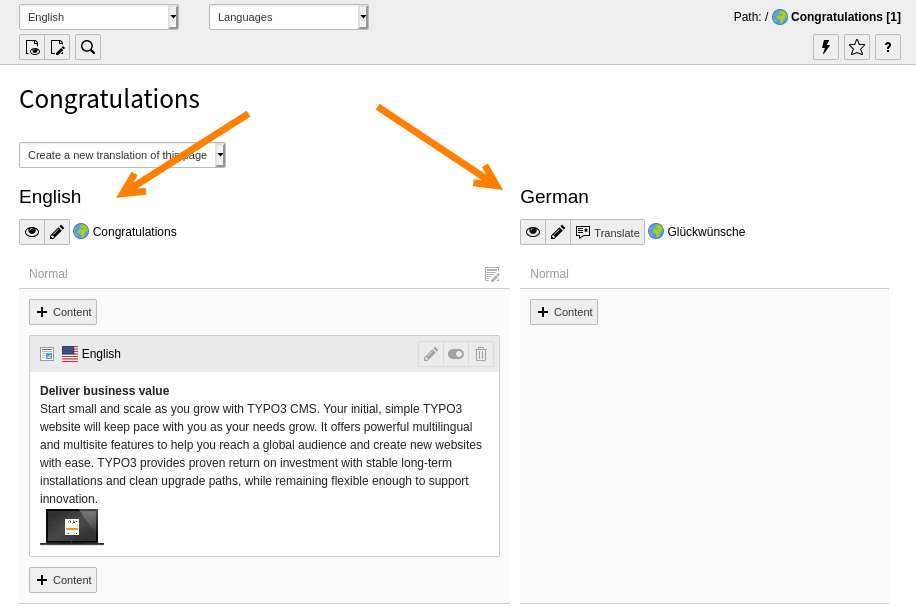
Type the German translation in the Page Title field.
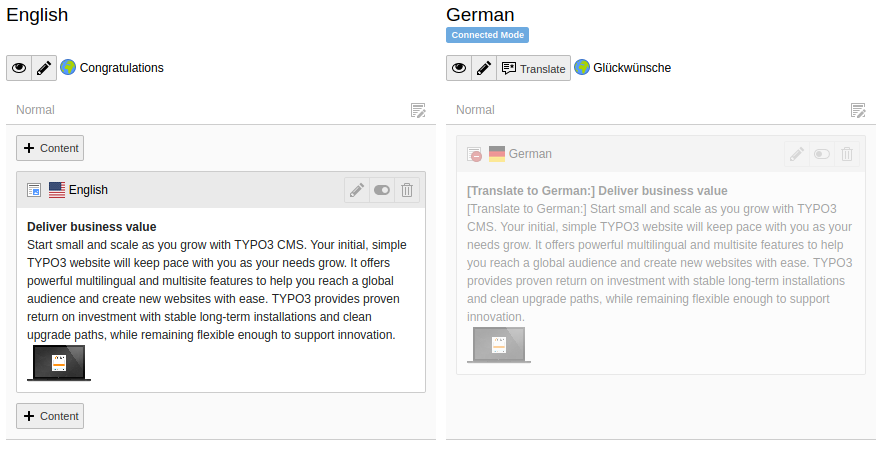
Save and close the page. The screen now displays two versions of the content
elements showing the default language and the German version side by side.
In the German column, click the Translate button for a content
element. The Localize wizard displays.
For this example, click the Translate button then click
Next.
Step 2 of the wizard will pass by automatically since we are translating in
a single language.
Step 3 provides a summary of the elements that will be translated.
Click Next to complete the wizard.
The German version of the content element is now prepended with [Translate
to German:]. The element is hidden by default, so that incomplete
translations aren't displayed on the frontend until you are ready.
A newly created content element translation
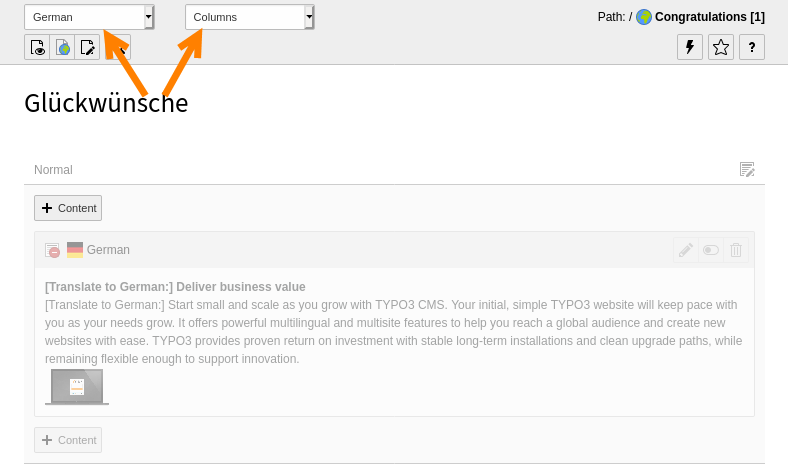
Adjusting the view
The Page module may now seem cluttered, with one column for each
translation. You can view a single language at a time by switching back to the
"Columns" mode and choosing a specific language in the docheader.
The "Columns" mode displaying a translation
Next steps
The Frontend Localization Guide
contains detailed information about setting up a multilingual web site and how to
actually do the translation and localization.
The Site Handling documentation contains
information about how to configure your site to add more languages.
Attention
TYPO3 v12 has reached end-of-life as of April 30th 2026 and
is no longer being maintained. Use the version switcher on the top
left of this page to select documentation for a supported version of TYPO3.
Need more time before upgrading?
You can purchase Extended Long Term Support (ELTS) for TYPO3 v12 here:
TYPO3 ELTS.
Access Control
There are many ways to restrict access to pages, content elements
and other information in your TYPO3 CMS installation. Options can range from
hiding pages in menus, to limiting visibility of content for a set time
period, all the way through to requiring visitors to log in to view content.
When an element is hidden, be it a page, a content element or a news item,
it will not display in the frontend. You can, however, preview it in the backend.
Find out how to configure content and pages to only be visible
to frontend users who have logged in to a restricted area.
Attention
TYPO3 v12 has reached end-of-life as of April 30th 2026 and
is no longer being maintained. Use the version switcher on the top
left of this page to select documentation for a supported version of TYPO3.
Need more time before upgrading?
You can purchase Extended Long Term Support (ELTS) for TYPO3 v12 here:
TYPO3 ELTS.
Elements visibility
When an element is hidden, be it a page, a content element or a news item, it
will not display in the frontend. You can, however, preview it in the backend.
In the Core, and in extensions that follow best practice, all options related
to visibility are controlled in the Access tab of the page
properties.
Publication dates
You can specify a period of time for content to be visible. This might be
useful for seasonal announcements or festive periods.
Any page or content element with a defined Publish Date
will not be visible before that date. If it has an Expiration
Date, it will be hidden from that point onward.
When you set a publication date in the future then try to navigate to that
page, you are redirected to the home page.
When you enable the Extend to Subpages setting, the
publication date (and other access restrictions) also apply
to all child pages of the current page. This makes it possible
to apply restrictions to a whole branch of the page tree.
Attention
TYPO3 v12 has reached end-of-life as of April 30th 2026 and
is no longer being maintained. Use the version switcher on the top
left of this page to select documentation for a supported version of TYPO3.
Need more time before upgrading?
You can purchase Extended Long Term Support (ELTS) for TYPO3 v12 here:
TYPO3 ELTS.
Frontend login
You can configure content or pages to only be visible to frontend users who
have logged in.
Frontend users
The concept of the TYPO3 backend and frontend is explained in the Getting Started Tutorial.
You can use the concept of frontend users (website visitors) to create member-only content and restrict access to pages and content elements by requiring a
log in.
Frontend users are always part of frontend groups. Access is granted to
groups, never directly to users. Users and groups are defined like any other
record, and stored in a suitable page in the backend.
Create a user group and user
Create a new folder in the page tree, and name it "Frontend users".
Navigate to the Web > List module, and select your new folder.
Click the +Create new record icon at the top left of the
Docheader. The "New record" wizard displays.
Click Website Usergroup to create a new frontend group.
Name it "Private Area".
Save and close the record.
Use the "New record" wizard again, but this time create a Website User.
Type a username, a password and click the "Private Area" group to select it.
You can add further information on the Personal Data tab if required.
Save and close the record.
Assign access rights
Now that we have at least one group, and a user assigned to that group, we can
assign access restrictions. This is done on the Access tab of
the page properties or content element properties.
Note
Two default groups appear in the list of groups. They are always available
and cannot be edited or removed.
The "Hide at login" group means that the element is only visible
when the user is not authenticated.
The "Show at any login" group is used for elements that require
authentication to access, but are okay for all groups to see.
Navigate to the Web > Page module, and create a new page called
"Members only".
Add a text content element to the Members Only page, with text similar to
"You need to authenticate to access the members area".
On the Access tab, select the "Hide at login" group for it.
Save and close the record.
Add another text content element to the page, with text similar to
"Welcome to the members area".
On the Access tab, select the "Private area" group for it.
Save and close the record.
You should have something like this:
Try setting the access for an entire page to "Private area". When you save the
page, notice how the icon in the page tree changes. This is a visual reminder
that the page is not public. If you try to access a restricted page in the
frontend, the TYPO3 error message "Page Not Found" will display.
Add a login form
The next step is to place a login box somewhere on the site so that visitors
can log in to view the restricted content.
On the "Members only" page, click the + Content button between
the two existing content elements.
In the new content element wizard, go to the Form elements tab and
select "Login Form".
Give it a header (for example, Log in).
Go to the Plugin tab. There are several options for the Login Form, but
the only one which is absolutely necessary is the "User Storage Page".
Use the Browse for records icon to browse the page tree and
select the "Web site users" folder.
Save and close the record.
View the page. You should have something like this:
Enter the user name and the password you defined earlier for the
frontend user, and you should see the following:
This is just a quick overview of the login form provided by TYPO3 CMS. It has a
rich set of features that are described in the Frontend Login manual.
Attention
TYPO3 v12 has reached end-of-life as of April 30th 2026 and
is no longer being maintained. Use the version switcher on the top
left of this page to select documentation for a supported version of TYPO3.
Need more time before upgrading?
You can purchase Extended Long Term Support (ELTS) for TYPO3 v12 here:
TYPO3 ELTS.
Deep Linking
Deep linking allows users to share links to specific pages, content elements and modules
from within TYPO3's backend.
For example, a user could be writing content for a new page that is about
to be published. Using deep links, they can share a link to the page
they are working on or even share a link to the actual content element that contains
their work and send it to another member of the team for review.
Sharing links
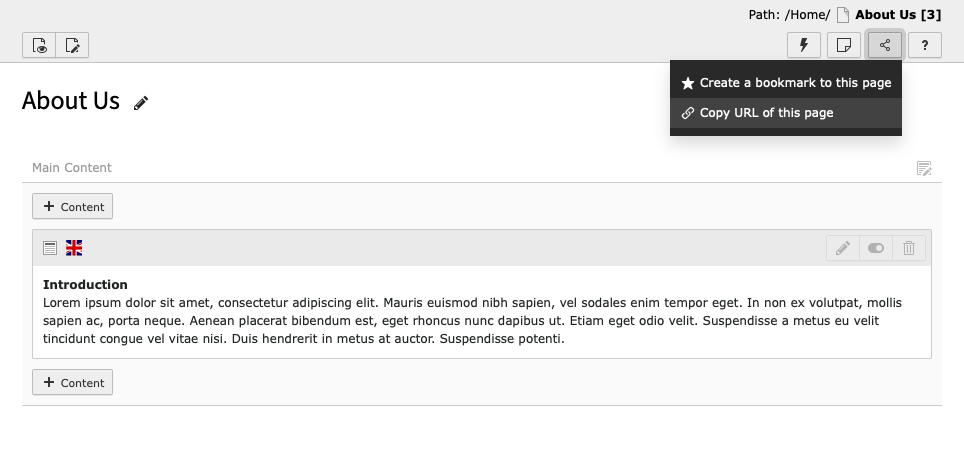
To share a link, look for the Share icon located at the top right hand side of any
page in the backend.
Linking to a page
The example below would create a deep link to the About Us page:
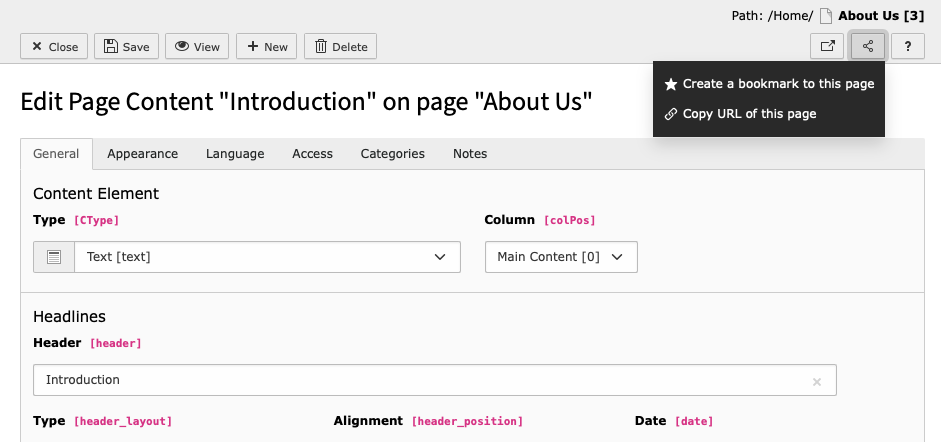
Linking to a content element
This example would a create a deep link to the Introduction content element, found
on the About Us page:
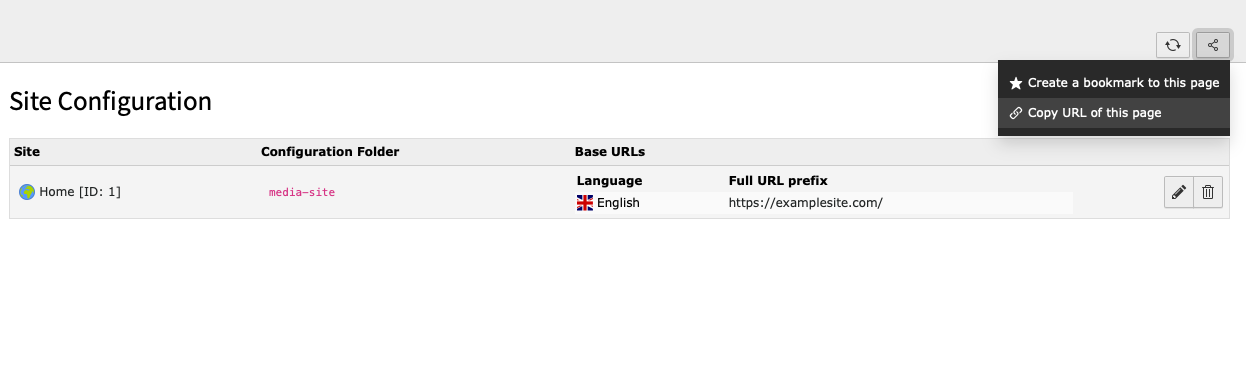
Linking to backend modules
It is possible to create links to places within backend modules. This example would create a link
to the Site Configuration module.
URLs and deep links
When creating links to anything in the backend, it is recommended that the
Share button is used to generate the link. Copying the URL from the browser
is not recommended.
Attention
TYPO3 v12 has reached end-of-life as of April 30th 2026 and
is no longer being maintained. Use the version switcher on the top
left of this page to select documentation for a supported version of TYPO3.
Need more time before upgrading?
You can purchase Extended Long Term Support (ELTS) for TYPO3 v12 here:
TYPO3 ELTS.
Help within TYPO3
There are several features built-in to the user interface of the backend to
help guide you when using the TYPO3.
Changed in version 12.0
The context sensitive help, also called "CSH" has been removed as it was
outdated and not maintained. Refer to the
TYPO3 online documentation instead.
TYPO3 v12 has reached end-of-life as of April 30th 2026 and
is no longer being maintained. Use the version switcher on the top
left of this page to select documentation for a supported version of TYPO3.
Need more time before upgrading?
You can purchase Extended Long Term Support (ELTS) for TYPO3 v12 here:
TYPO3 ELTS.
Backend search
The backend search tool accepts text and searches against
various types of records in the backend.
The search can be opened by selecting the magnifying glass in the top right
corner of the toolbar or by pressing the Cmd + K
keystroke on macOS or the Ctrl + K keystroke on Windows and Linux
systems.
The backend search modal with some search results
Attention
TYPO3 v12 has reached end-of-life as of April 30th 2026 and
is no longer being maintained. Use the version switcher on the top
left of this page to select documentation for a supported version of TYPO3.
Need more time before upgrading?
You can purchase Extended Long Term Support (ELTS) for TYPO3 v12 here:
TYPO3 ELTS.
It is possible to navigate the page tree using only a keyboard and it adheres to
the guidelines set out in WAI-ARIA Authoring Practices 1.1.
Home moves the focus to the first item in the page tree.
End moves the focus to the last item in the page tree.
Enter either expands the item or selects it.
Up and Down arrow keys will move the focus up and down the page tree.
Right arrow key will expand the focus if possible.
Left arrow key will close the focus if possible.
Editing text in the Rich Text Editor (RTE)
Below is a list of common keyboard commands that can be used when editing
text in TYPO3's RTE.
ctrl + a = Select all text
ctrl + c = Copy
ctrl + v = Paste
ctrl + x = Cut
ctrl + z = Undo
ctrl + i = Italic
ctrl + b = Bold
cmd (⌘) + a = Select all text
cmd (⌘) + c = Copy
cmd (⌘) + v = Paste
cmd (⌘) + x = Cut
cmd (⌘) + z = Undo
cmd (⌘) + i = Italic
cmd (⌘) + b = Bold
Reloading pages and clearing browser cache
F5 = Reload
ctrl + F5 = Reload page and clear browser cache
cmd (⌘) + r = Reload page
cmd (⌘) + option (⌥) + r = Reload page and clear browser cache
Opening the backend search modal
New in version 12.0
ctrl + k
cmd (⌘) + k
Multiselect in content elements
New in version 12.3
The keyboard commands can be used on a select element:
A multiselect element
Or a folder element:
A folder element
Or a group element:
A group element
Selecting and deselecting options with the keyboard:
enter = Add options, either from right to left or left to right
delete or backspace = Remove an option for Windows and Mac users
alt + arrow up = Move the option one up
alt + arrow down = Move the option one down
alt + shift + arrow up = Move the option to the top
alt + shift + arrow down = Move the option to the bottom
More combinations:
shift + arrow up = Include the upper option
shift + arrow down = Include the lower option
home = Move the cursor to the top
end = Move the cursor to the bottom
Attention
TYPO3 v12 has reached end-of-life as of April 30th 2026 and
is no longer being maintained. Use the version switcher on the top
left of this page to select documentation for a supported version of TYPO3.
Need more time before upgrading?
You can purchase Extended Long Term Support (ELTS) for TYPO3 v12 here:
TYPO3 ELTS.
You can conveniently open this documentation from your TYPO3 backend:
In the top bar, click the question mark icon to access the
Help section, then select the TYPO3 Online Documentation module.
The TYPO3 Online Documentation in the Help menu
Attention
TYPO3 v12 has reached end-of-life as of April 30th 2026 and
is no longer being maintained. Use the version switcher on the top
left of this page to select documentation for a supported version of TYPO3.
Need more time before upgrading?
You can purchase Extended Long Term Support (ELTS) for TYPO3 v12 here:
TYPO3 ELTS.
Tooltips
Hover your mouse pointer over buttons and icons to display a short description
of the function.
See the Tooltip help for the Forms module
Attention
TYPO3 v12 has reached end-of-life as of April 30th 2026 and
is no longer being maintained. Use the version switcher on the top
left of this page to select documentation for a supported version of TYPO3.
Need more time before upgrading?
You can purchase Extended Long Term Support (ELTS) for TYPO3 v12 here:
TYPO3 ELTS.
Cache
Computing a page to be displayed in the frontend requires time and resources.
TYPO3 (and many other CMS) use caching to help reduce the amount of time and resources it takes to generate a page.
When you display a page in the frontend, TYPO3 first checks if that page
can be found in the cache and has already been calculated. If the page
is found in the cache, the previously calculated result is delivered right away.
If the page is not found in the cache, it is generated by collecting data from
different sources and performing some calculations. The result is then delivered
to the visitor and stored for future use.
Browser cache
The browser on the client machine (Chrome, Edge, Firefox, etc) also caches pages.
Sometimes you cannot see changes you have made to a page because your browser
has cached the old content.
It depends on the browser and the operating system, how you can clear your
browsers cache.
On Windows in most browsers you can press Ctrl + F5 to clear the
browser cache.
Automatic cache clearing
With TYPO3, the cache of a page is cleared automatically in the following cases:
You changed something about the page itself like its title
You changed a content of the page like a text or image on that page
In certain time intervals, usually once a day
If content with a starttime or endtime set becomes visible or invisible
In some other cases that your integrator or developer might have defined
Scenario: Changes are not visible in the frontend
If the cache did not get automatically cleared, the changes you made might not
be visible right away in the frontend.
Some scenarios in which manual cache clearing might be necessary:
You changed the title of a page. You view the affected page and everything
looks fine. Now you go to the start page and cannot see your change in the
menu. The following happened: Changing a pages title deletes the cache of the
affected page. It does, however, not delete the cache of other pages like the
start page.
You added a news record. It does not appear in the news list. Creating a
record does not automatically delete the cache of any page unless the
integrator made some configurations.
You changed content on one page that should also be displayed on other pages.
This is often done with static parts of the page that should be editable
such as the footer, a carousel in the header, etc.
Manual cache clearing
Clearing the cache of a single page can be done without ill effect in most
installations.
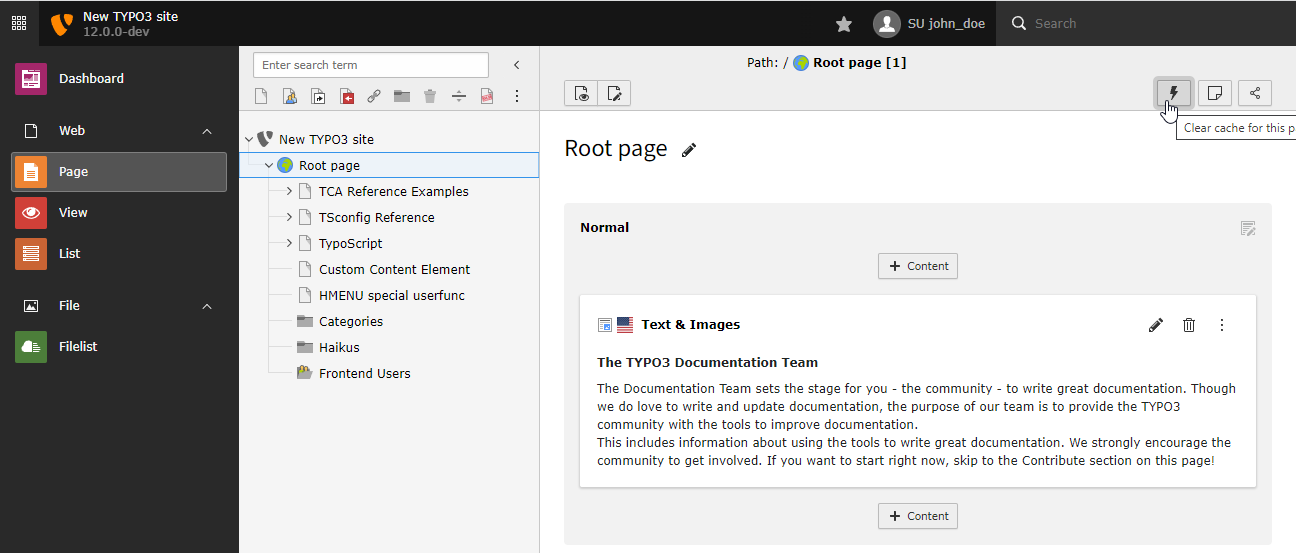
To clear the cache of that page, go to the module Web > Page
and click the button representing a lightning bolt with the tooltip
Clear cache for this page.
Clear cache for this page
When you reload the affected page, the changes should be visible right away.
If the changes are not visible, clear the Browser cache. Or use an
incognito tab in your browser.
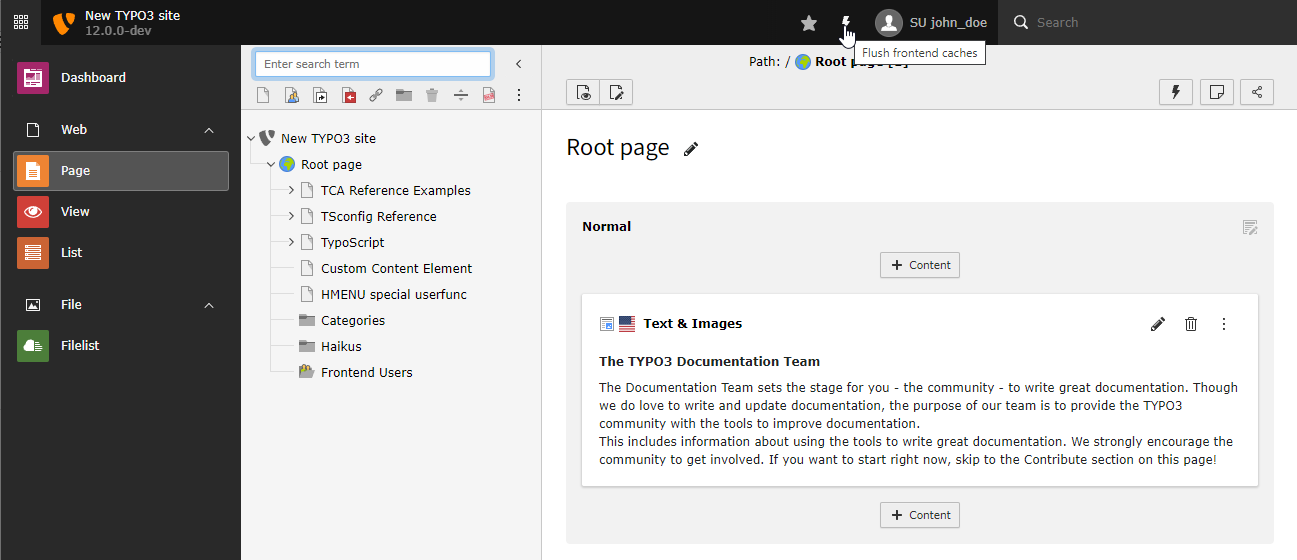
Only editors who have the relevant user rights can flush the cache of
all pages. If you cannot see the lightning bolt button beside the help menu
button in the toolbar you might not have the rights to carry out this action:
Flush cache of all pages
Warning
After flushing the cache each page has to be generated a new
on the first request for that page. This requires resources on the server
such as processor and hard disc usage. If too many pages have to be
generated at the same time, generating them might take longer (maybe minutes
instead of seconds) or fail all together. Therefore some TYPO3 installations
do not allow manual cache flushing. Talk to you administrator about the
preferred strategy here.
Previewing a page without clearing the cache
If you need to preview a page and cannot clear its cache you can use the
parameter no_cache=1 to preview the page as it will look once the
cache is cleared. This option might have been disabled by the administrator
however.
For example, visit
https://example.org/community/events?no_cache=1.
Attention
TYPO3 v12 has reached end-of-life as of April 30th 2026 and
is no longer being maintained. Use the version switcher on the top
left of this page to select documentation for a supported version of TYPO3.
Need more time before upgrading?
You can purchase Extended Long Term Support (ELTS) for TYPO3 v12 here:
TYPO3 ELTS.
File abstraction layer (FAL)
TYPO3 has a file abstraction layer (FAL) integrated which abstracts technical
details (where the file is stored) and allows to work with different storage
forms.
FAL also allows the editors to manage meta data that can be displayed wherever
an asset is displayed. The metadata can also be used for
copyright notices.
Working with multi media: Digital asset management
Multi media assets (images, videos, audio, etc) are usually stored as
files on the server. Especially videos are frequently displayed from
third-party sources such as Youtube or Vimeo.
In TYPO3 you can manage all assets in the backend module
File > Filelist if you have sufficient permissions. See chapter
Managing files in the TYPO3 CMS.
Attention
TYPO3 v12 has reached end-of-life as of April 30th 2026 and
is no longer being maintained. Use the version switcher on the top
left of this page to select documentation for a supported version of TYPO3.
Need more time before upgrading?
You can purchase Extended Long Term Support (ELTS) for TYPO3 v12 here:
TYPO3 ELTS.
Accessibility
Accessibility is the design of products, services, [...]
or environments so as to be usable by people with disabilities.
The concept of accessible design and practice of accessible development
ensures both "direct access" (i.e. unassisted) and "indirect access"
meaning compatibility with a person's assistive technology
(computer screen readers, keyboard only access).
The title of a page can - in most cases - be influenced in the
page properties. Part of the page title - such as the
name of the organization - might be added automatically. Ask your developer
about this.
Use headings to convey meaning and structure
Almost all content elements have the ability to provide a heading.
Depending on your user rights you may also be able to influence the level of
the heading (Headlines > Type). The choice of the level of the
heading should be made in accordance to the semantics of the text and not according to
design choices.
The rich text editor (RTE) also offers the ability to create
headlines of different levels.
Make link text meaningful
When creating links in the RTE write the meaningful link
text, highlight it and then click the link button.
If you are linking an image the image should have a meaningful alternative text.
It is also possible to link headlines of content elements. In this case the
text of the headline itself becomes the link text.
In TYPO3 when you are uploading or managing an image file in the module
File > Filelist you can provide an alternative text in the
metadata of this file.
When you are displaying an image as Image content element you
can override the alternative text to fit the
context or use the default.
Note
An alternative image text is usually not visible. However, the description
of an image is usually displayed below the image. Therefore the alternative
text needs to supply the information supplied by the image to most users. The
description text should supply additional information to all users.
Attention
TYPO3 v12 has reached end-of-life as of April 30th 2026 and
is no longer being maintained. Use the version switcher on the top
left of this page to select documentation for a supported version of TYPO3.
Need more time before upgrading?
You can purchase Extended Long Term Support (ELTS) for TYPO3 v12 here:
TYPO3 ELTS.
Copyright and data privacy
Copyright
Whenever you use files not created by yourself, for example images or videos,
the copyright must be considered.
Using a file or even a text without proper copyright lead to high fines.
If in doubt, do not use a content without consulting legal advice first.
Even images that you created yourself might infringe someones copyright. For
example you may not take pictures of certain artwork or draw a picture of
your favorite cartoon character and publish it.
In different countries there are different laws about data privacy. In general,
you may not publish pictures of or data from any person alive or dead unless
the person consented. There are some exceptions for persons of public interest
such as politicians, scientists or movie stars.
Personal data does not only include a persons name but each information that
might help to identify the person in question such as phone number, email
address, IP address, nick names, pictures, car license plates etc.
Wikipedia has a good article on Personal Data
which explains the situation in different countries.
Publishing personal information without consent might lead to high fines in
some countries. If in doubt, do not use any personal information without consulting legal advice first.
Attention
TYPO3 v12 has reached end-of-life as of April 30th 2026 and
is no longer being maintained. Use the version switcher on the top
left of this page to select documentation for a supported version of TYPO3.
Need more time before upgrading?
You can purchase Extended Long Term Support (ELTS) for TYPO3 v12 here:
TYPO3 ELTS.
About this guide
Credits
This guide is based on material originally written by Marlies Cohen and Eikaa.
It has since been updated by Susanne Moog, François Suter and Felicity Brand.
Maintaining high quality documentation requires time and effort and the TYPO3 Documentation Team always appreciates support. If you want to support us, please contact us as described in the next section.
Contact the Documentation Team
For general questions about the documentation get in touch with the Documentation Team.
Attention
TYPO3 v12 has reached end-of-life as of April 30th 2026 and
is no longer being maintained. Use the version switcher on the top
left of this page to select documentation for a supported version of TYPO3.
Need more time before upgrading?
You can purchase Extended Long Term Support (ELTS) for TYPO3 v12 here:
TYPO3 ELTS.
Next steps
If your activities are not limited to editorial work, you may want to further
learn about TYPO3 CMS by following the Sitepackage Tutorial. This tutorial teaches you to create individual
templates using Fluid and some TypoScript. There are also some sitepackage
generators you can use.
Attention
TYPO3 v12 has reached end-of-life as of April 30th 2026 and
is no longer being maintained. Use the version switcher on the top
left of this page to select documentation for a supported version of TYPO3.
Need more time before upgrading?
You can purchase Extended Long Term Support (ELTS) for TYPO3 v12 here:
TYPO3 ELTS.
Sitemap
Reference to the headline
Copy and freely share the link
This link target has no permanent anchor assigned.The link below can be used, but is prone to change if the page gets moved.


Social media
The fields on this tab are used to enrich social media snippets for the URL of the page. It uses the
typo3/cms-seo system extension. See the SEO Core extension manual for more information.