A TYPO3 extension that provides a generic content display system for listing and viewing records from any configured repository with advanced filtering capabilities.
Overview
The ll_anthology extension creates a flexible plugin system that can display content from any TYPO3 repository in both list and single view modes. It dynamically loads repositories based on configuration and provides pagination, advanced filtering, template customisation, and routing capabilities.
Features
Dual Display Modes: List view with pagination and single record view
Dynamic Repository Loading: Configurable to work with any TYPO3 repository
Advanced Filtering System: Search, category, and date filtering with multiple display modes
Flexible Template System: Custom template paths and template name overrides
Pagination Support: Configurable items per page and pagination links
SEO-Friendly: Automatic page title generation from record data
Route Enhancement: Built-in route enhancers for clean URLs
Requirements
TYPO3 CMS ^13.4 || ^14.3
PHP 8.2+
Composer
Installation
Anthology relies upon PSR-4 autoloading, so the recommended installation method is via Composer. This ensures that all dependencies are correctly installed and that the extension is properly registered with TYPO3.
composer req liquidlight/typo3-anthology
Copied!
Or with ddev:
ddev composer req liquidlight/typo3-anthology
Copied!
Quick Start
This guide provides a comprehensive overview for getting the Anthology extension running, assuming you have an existing TYPO3 model you wish to display.
Installation
Install the extension via Composer:
composer require liquidlight/typo3-anthology
Copied!
Add Anthology to your site set as a dependency by either selecting it in the Sites module or adding the following to your site config YAML:
dependencies:-liquidlight/anthology
Copied!
If you're not using site sets, you can include the TypoScript in your setup.typoscript file:
Replace [site_package_path] with the path to either your site package, or the extension you are modifying.
Once the command has completed, it is recommended you manually review the generated configuration for accuracy before proceeding.
Add the Generated Configuration
If it is not already configured, you must include the generated sitemap.typoscript and [model_name].typoscript files in your site package or extension's TypoScript file:
@import './TypoScript/modules'
Copied!
And also add the generated YAML configuration to your site configuration YAML:
AsAnthologyRepository's tableName argument must be the name of your database table and TCA.
Add and Configure the Plugin
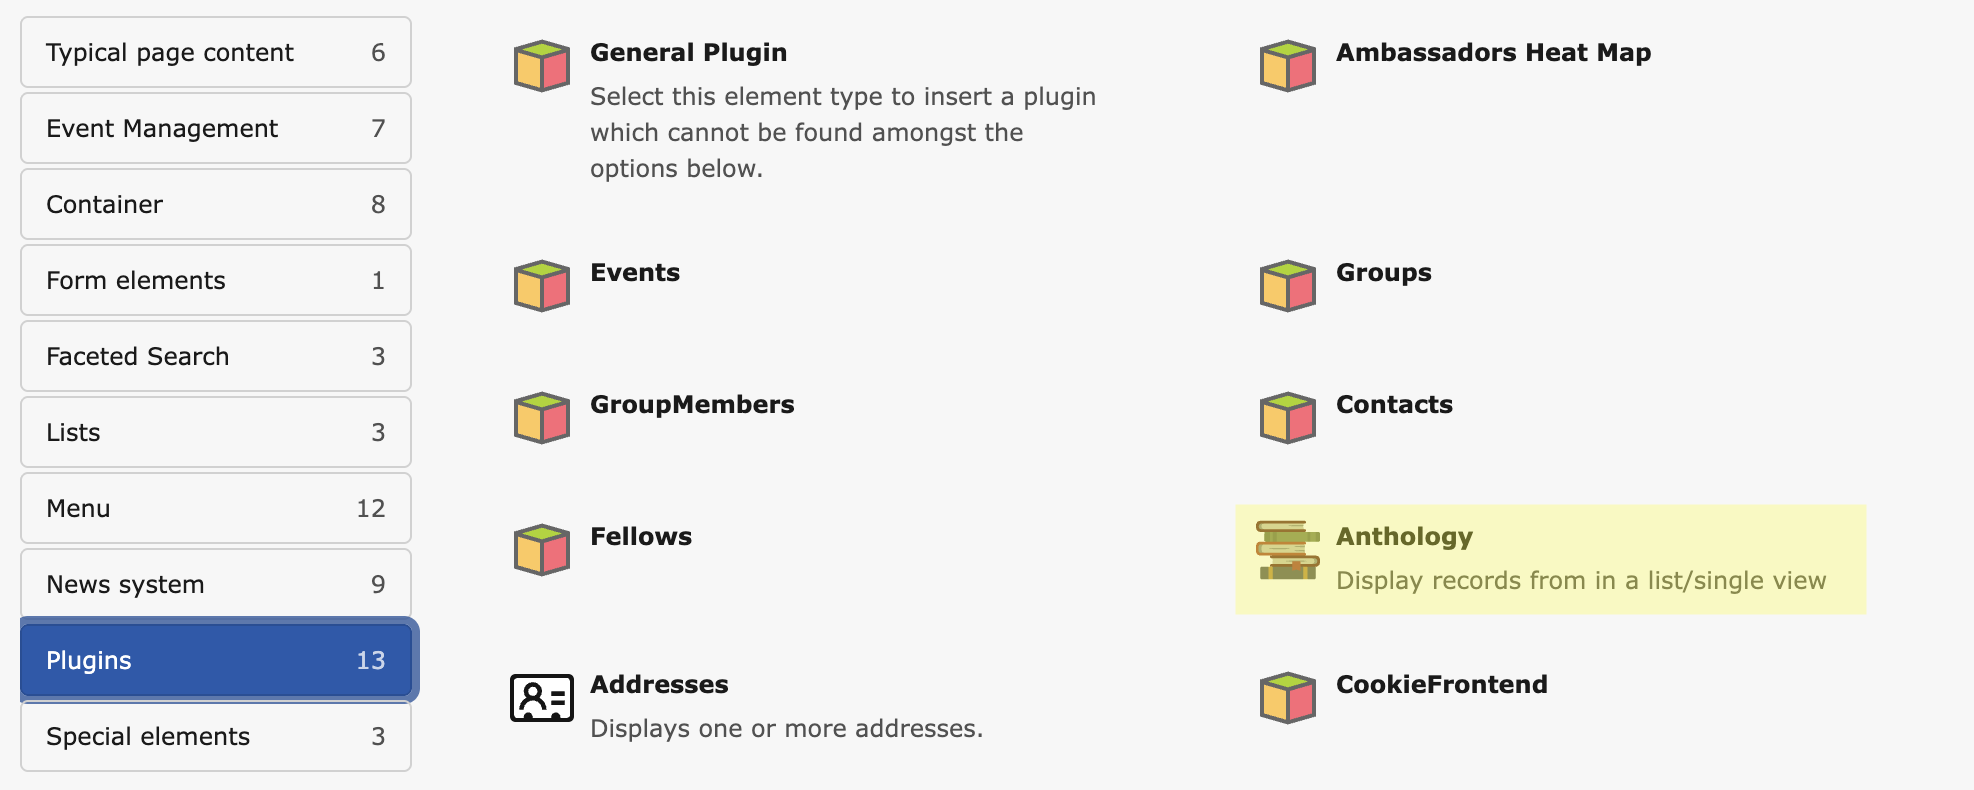
Navigate to the Page module and add the Anthology content element from the Plugins tab.
Configure the plugin settings:
General Tab
Mode: Choose List for the main view or Single for a detail page.
Model name: Select your model (e.g., "My Extension Items"). This list is populated based on repositories with the AsAnthologyRepository attribute, and their corresponding TCA's title.
Single View Page: For a List plugin, link to the page where the Single view is located.
Display Tab
Items Per Page: Set the number of items for pagination (e.g., 10).
Enable Pagination: Activate or deactivate the pagination.
Filters Tab
Assign pre-configured filter records to the plugin.
Routing (for Detail Pages)
To create user-friendly URLs for your detail pages, add a route enhancer to your site's config.yaml:
routeEnhancers:# Single view with slug-based URLsItemSingle:type:ExtbaselimitToPages:-123# Your single view page UIDextension:LlAnthologyplugin:AnthologyViewroutes:# Single record by slug-routePath:'/{record}'_controller:'Anthology::single'defaultController:'Anthology::view'aspects:record:type:PersistedAliasMappertableName:tx_myextension_domain_model_itemrouteFieldName:slug
Copied!
This requires a slug field in your model's table.
For further information, and to add pagination route enhancers to the list view, refer to the Routing documentation.
Sitemap
To include your detail pages in the XML sitemap, add a sitemap provider to your TypoScript:
The extension will automatically use templates from your model's extension directory. To override a template, copy it from ll_anthology/Resources/Private/ to the corresponding path in your own extension (e.g., my_extension/Resources/Private/Partials/List/Record.html) and modify it.
See also
For more detailed information on template customization, see the Templates guide.
Integrators
This section contains comprehensive guides for integrating the Anthology extension into your project.
Add the Anthology plugin to the page where you want the list view to appear via the New Page Content Wizard.
Adding the Anthology plugin to a page
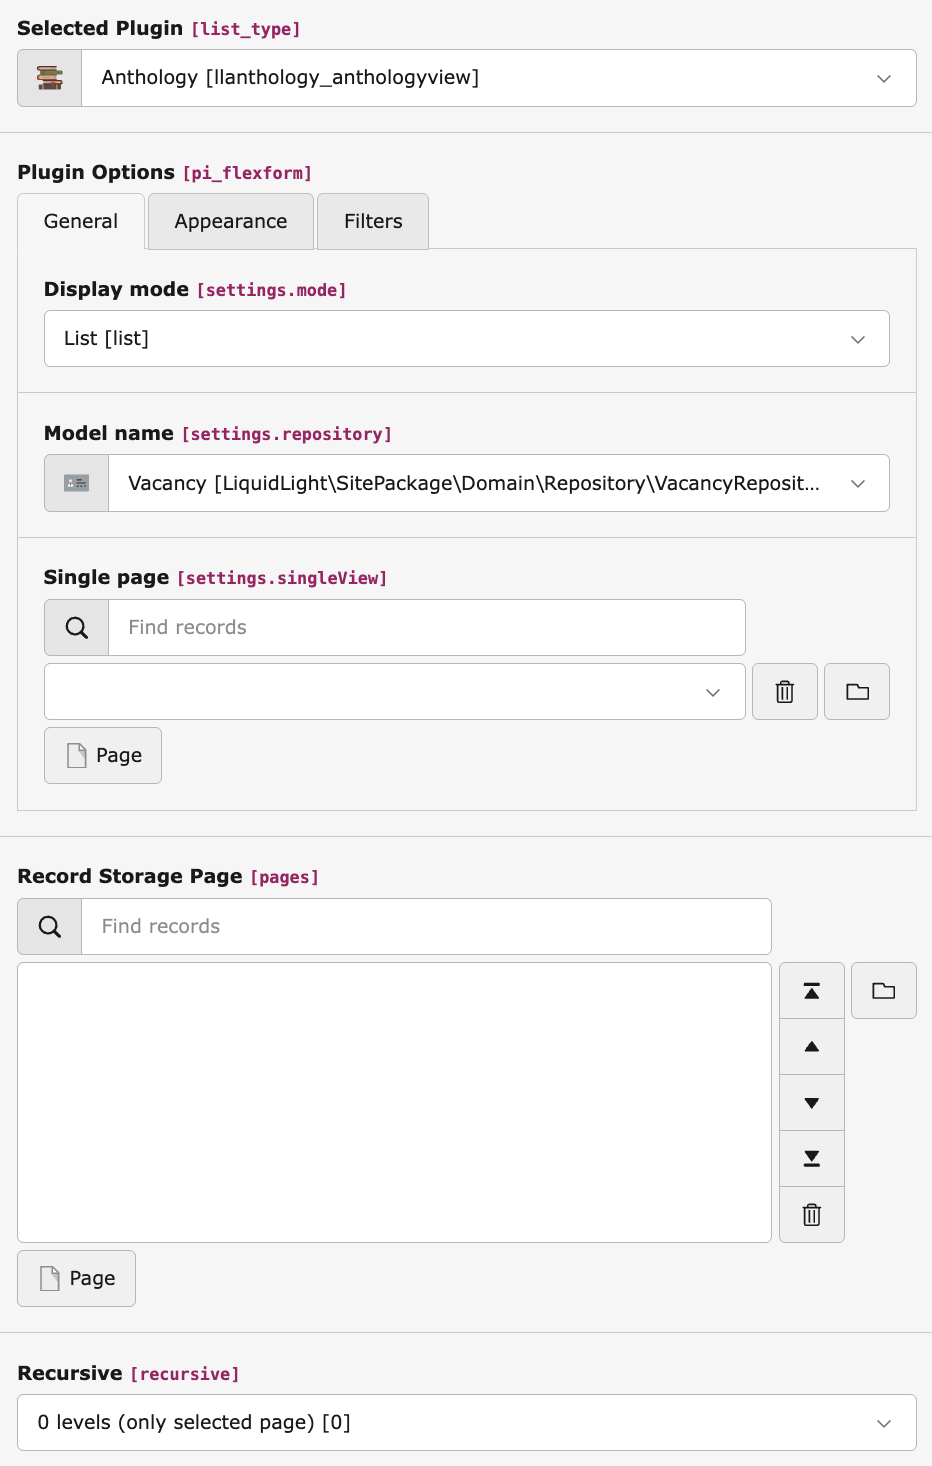
Configure the plugin, ensure the following minimum settings are applied:
Configuring the Anthology plugin in list mode
Display mode: List
Model name: Select your model. If your model is not listed, ensure it has been configured correctly, see Quick Start for instructions
Single page: Select the page where the single view plugin is located (if required)
Record Storage Page: Select where your records are stored
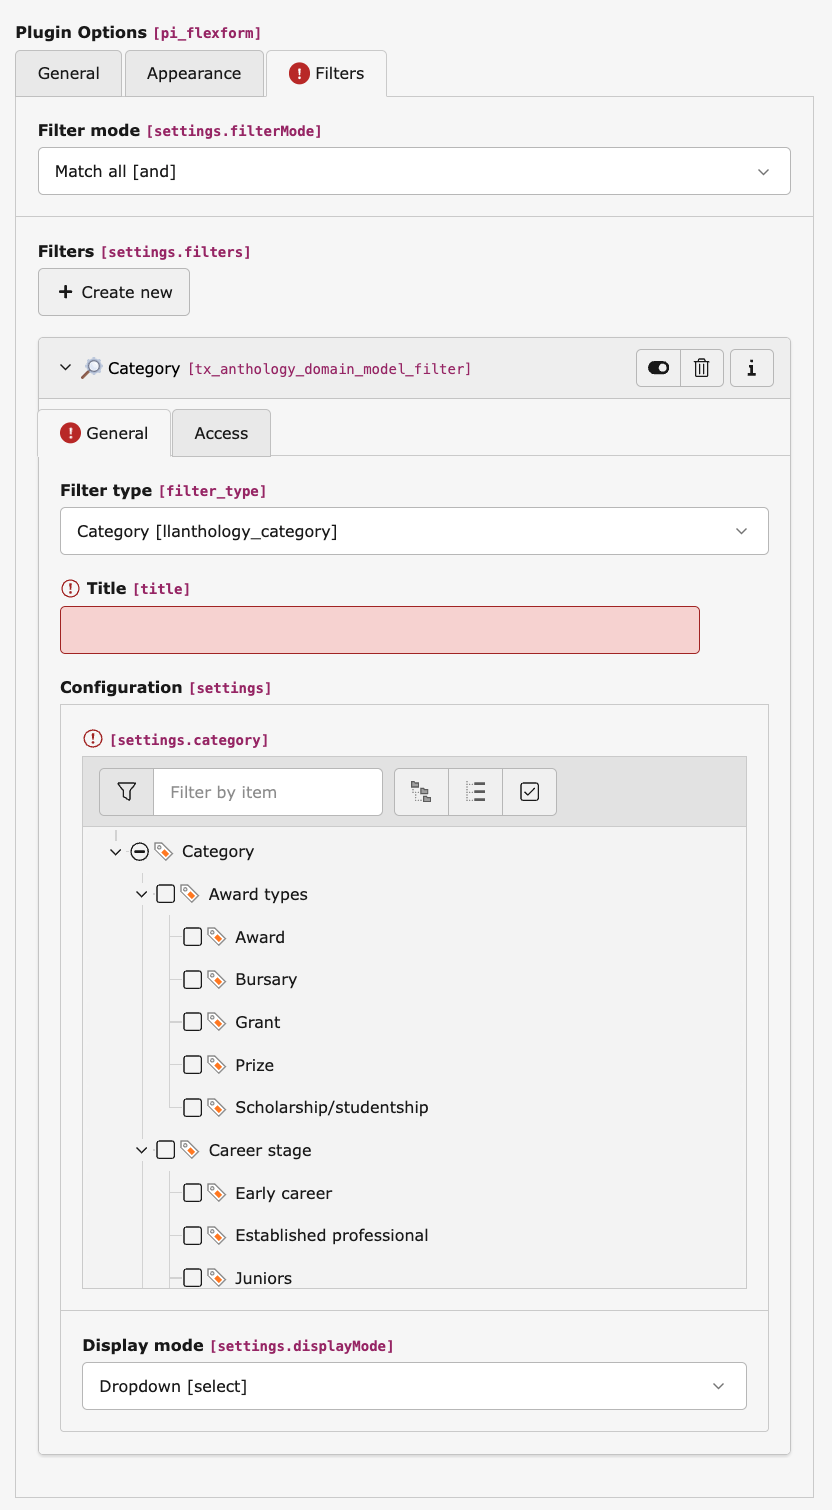
Configure filters (if required)
Configuring filters for the Anthology plugin
Navigate to the Filters tab, and add any required filters. Anthology comes with a set of commonly used filter types already available, see Filters for more information
Single View
Add the Anthology plugin to the page where you want the single view to appear via the New Page Content Wizard.
Adding the Anthology plugin to a page
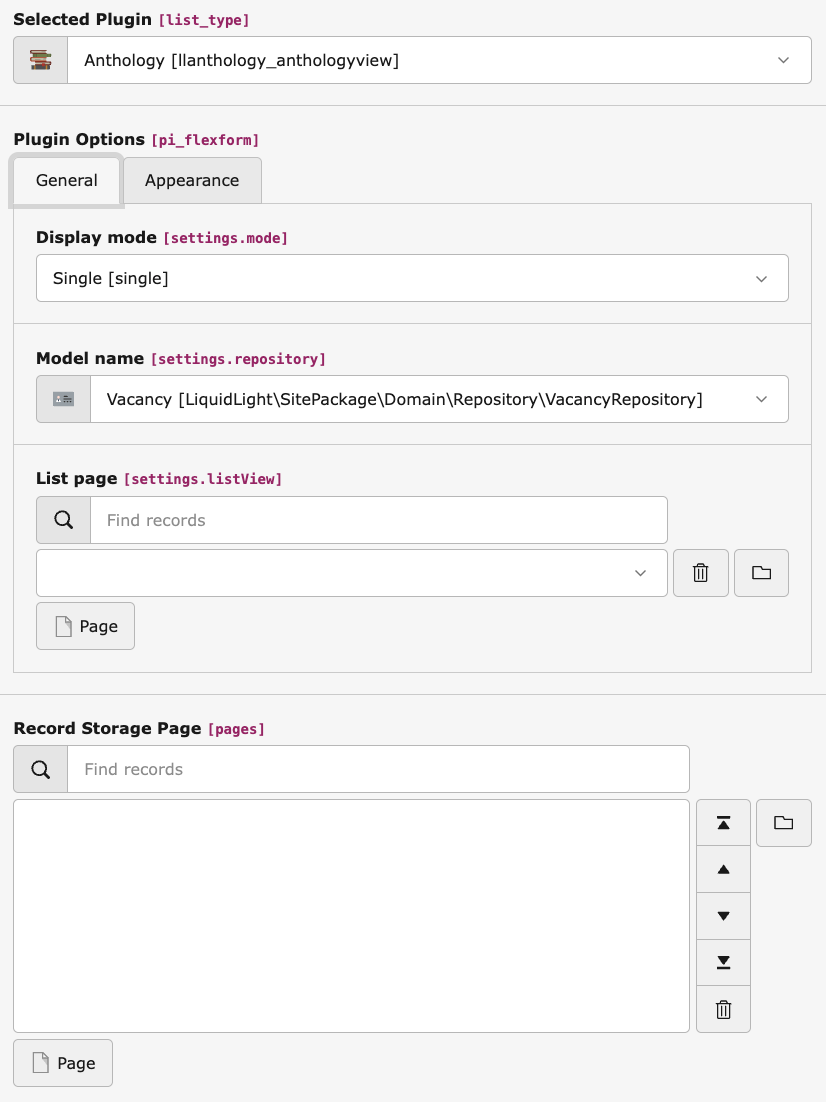
Configure the plugin, ensure the following minimum settings are applied:
Configuring the Anthology plugin in single view mode
Display mode: Single
Model name: Select your model. If your model is not listed, ensure it has been configured correctly: Quick Start
List page: Select the page where the list view plugin is located
Record Storage Page: Select where your records are stored
Filters
Filtering options
Filter mode
Configuring Anthology's filter mode
The filter mode determines how filters are combined, if only one filter is available, this option is irrelevant.
Match all
A record must match all the supplied filters in order to be returned, this will return fewer results, but the results returned will match the users' intent more closely. This would be useful for job vacancies for example, where a user will want to match specific criteria and exclude matches which aren't exact.
Match any
A record will be returned if it matches any of the filters. This will return more results, but their correlation to what the user requires may be lower. This would be useful for news articles where a user may want to see any records which match a keyword, or are in a given category
Display modes
Most filters have multiple options for display modes (with the obvious exception of Keyword search):
Dropdown
Renders a select box
Checkbox
Actually a radio button, but "checkbox" makes it clearer for integrators
Link
Renders a link, this will retain previously selected filters, but it will not retain values which have been entered since the page loaded
Pre-filters
Pre-filters permanently restrict a list view to matching records, independently of any filters the user selects, they are configured on the plugin's "Source" tab in the same way as regular filters. Pre-filters always apply, regardless of the plugin's filter mode.
Note
Only Keyword search and Category filters can currently be used as pre-filters; Date filters aren't yet supported for pre-filtering.
Note
A filter's pre-filter value is only shown while editing it from within the plugin's "Source" tab. If the same filter record is opened directly (for example from the page's record list), that value won't be shown or saved. Always edit pre-filters from within the plugin they're configured on.
Available filters
See also
For more detailed information on custom filters, see the Custom Filters guide.
Keyword search
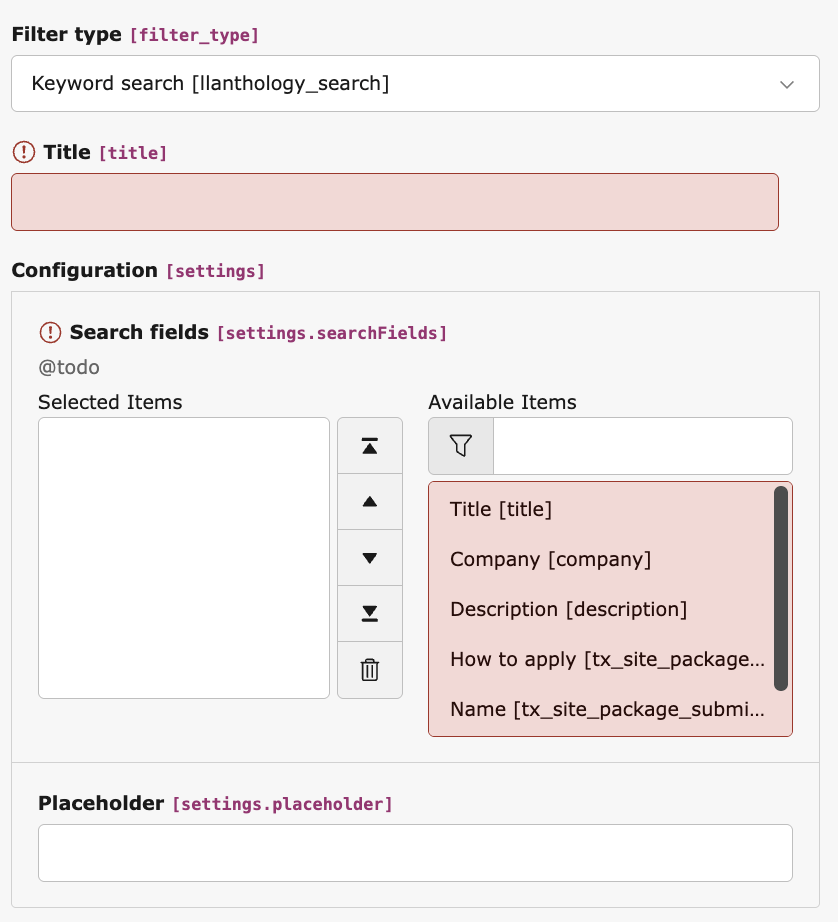
Keyword search allows users to search across multiple fields using a single search input. The available fields are configured through the filter, and any text based field configured in the record's TCA is available
Configuring Anthology's keyword filter
It is possible to include multiple fields in the keyword search, and results will be returned if they entered keyword is found in any of them
Category
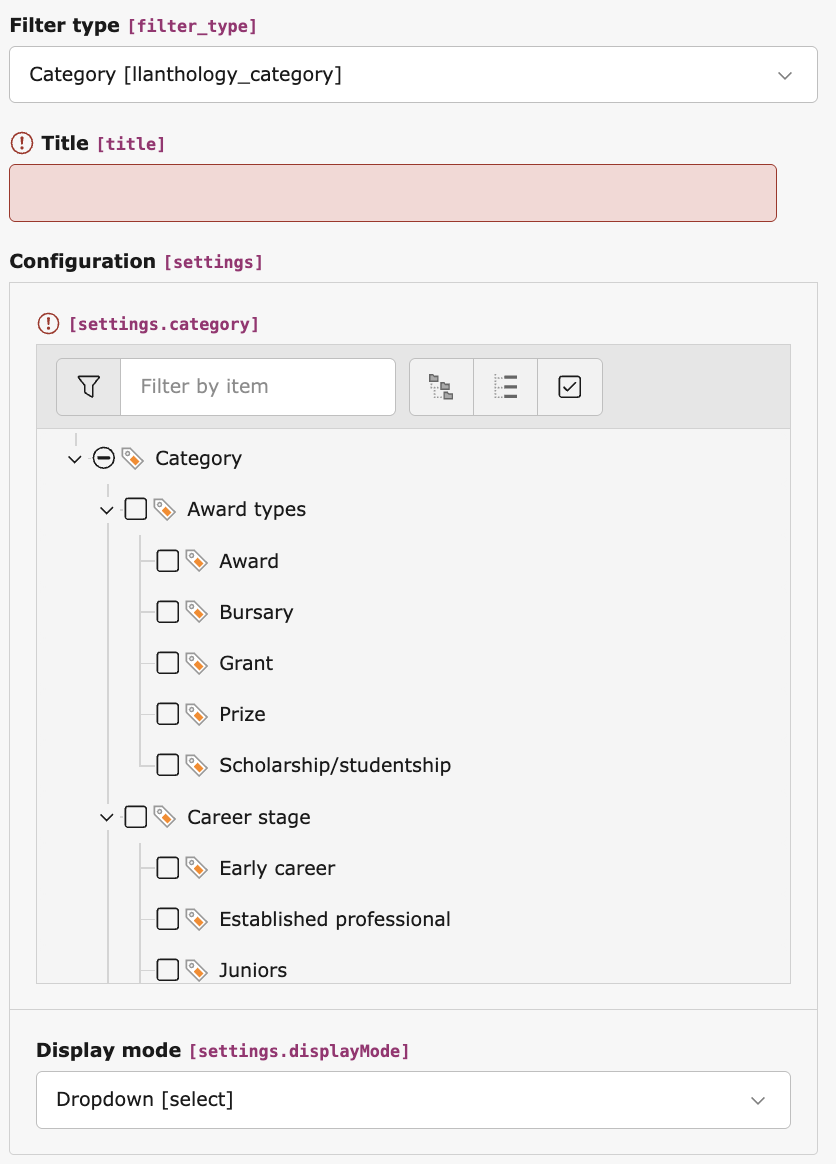
Category filters allow users to filter records based upon the records' selected TYPO3 categories . Only one parent category should be selected per filter, if filtering across more than one category is required, another category filter should be added. Select the parent category for the filter categories, and all child categories will be included.
Configuring Anthology's category filter
Date
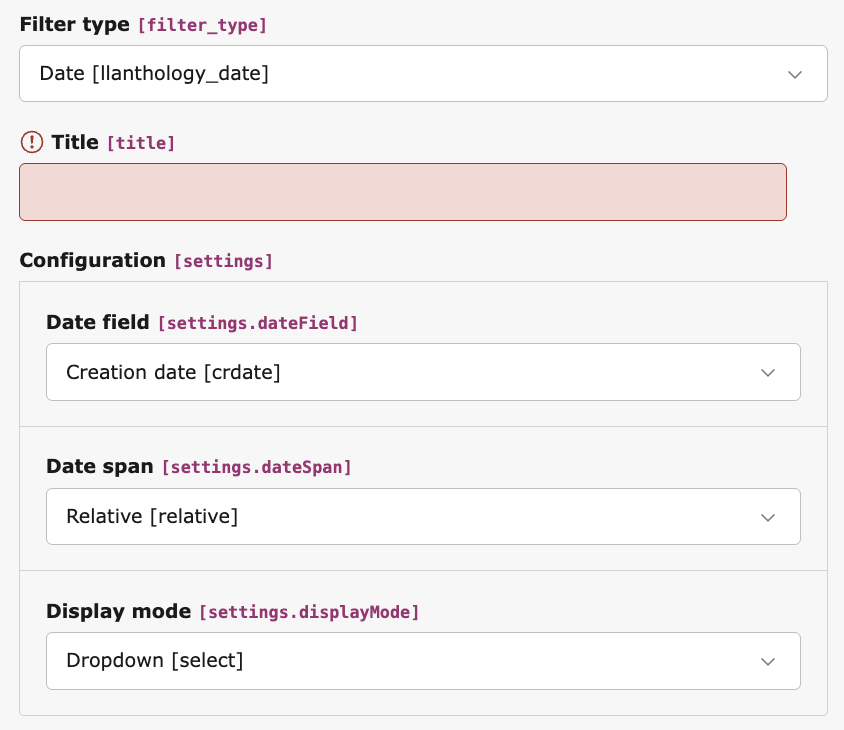
Date filters allow filtering based upon datetime values, as well as selecting the field to filter by, it is also possible to configure what date options are available
Relative
Will display dates relative to the current date.
The following options are available:
24 hours
7 days
1 month
3 months
6 months
1 year
This is useful for time sensitive records, for example displaying recently added job vacancies or frequently updated news.
Months
Displays options based upon available months in the records. This will be constrained to the first and last date in the range of the selected field.
This is useful for records which have a medium range time archive, for example, sporadically updated news or events
Years
Displays options based upon available years in the records. This will be constrained to the first and last date in the range of the selected field.
This is useful for records which have a large time archive, for example, infrequently updated news or events
Configuring Anthology's date filter
Note
Date ranges are currently only available for past dates, future date ranges will be available in a future release.
Note
Many models do not include datetime fields generated internally, for example, crdate or tstamp. In order to enable these fields for filtering, they must be added to the model's TCA configuration and if the model is an external model, added to the model (see: External Repositories)
Developers
This section contains comprehensive guides for using the Anthology extension, covering advanced topics and detailed configuration.
The Anthology extension is designed to be a generic tool for displaying records from any database table. To achieve this, you must explicitly tell the extension which model you want it to work with. The Quick Start guide provides a brief overview, whilst this guide explains the concepts in more detail.
Making a model available involves three key parts: the TCA, the Extbase Repository, and the Extbase Model.
The TCA File
At a minimum, you need a ctrl section in your TCA file with a title. This title is what will appear in the plugin's "Model name" selection box.
Here is a minimal example for a hypothetical table named tx_myextension_domain_model_item:
To fetch the data from your table, the Anthology extension needs a corresponding Extbase repository. This repository must have the LiquidLight\Anthology\Attribute\AsAnthologyRepository attribute with the corresponding TCA/table name argument.
After completing the steps above and clearing the cache, your new model will be available for selection in the Anthology plugin.
Edit the Anthology content element on your page.
Navigate to the General tab.
Click on the Model name dropdown menu.
You should now see "My Extension Items" (the title from your TCA file) as an option.
Once you select it and save the content element, the plugin will start to query and display the records from your tx_myextension_domain_model_item table.
Routing
To create user-friendly, human-readable URLs for the detail view of your records, you need to configure routing for the Anthology plugin.
This guide explains how to set up a route enhancer for the Anthology extension's single record view and list view pagination.
YAML Configuration
Routing is configured in the main config.yaml file for your TYPO3 site.
Here is an example of a route enhancer for an Anthology detail page:
routeEnhancers:# Single view with slug-based URLs[UniqueIdentifier]:type:ExtbaselimitToPages:-123extension:LlAnthologyplugin:AnthologyViewroutes:# Single record by slug-routePath:'/{record}'_controller:'Anthology::single'defaultController:'Anthology::view'aspects:record:type:PersistedAliasMappertableName:tx_myextension_domain_model_itemrouteFieldName:slug
Copied!
[uniqueIdentifier] must be replaced by a unique value; this can be anything so long as it is unique.
And a more general configuration for list view pagination:
routeEnhancers:# Anthology list view - handles paginationAnthologyList:type:ExtbaselimitToPages:-123-456extension:LlAnthologyplugin:AnthologyViewroutes:# List view-routePath:'/'_controller:'Anthology::list'# List view with pagination-routePath:'/page-{page}'_controller:'Anthology::list'_arguments:page:'currentPage'defaultController:'Anthology::list'defaults:page:'1'aspects:page:type:StaticRangeMapperstart:'2'end:'1000'
Copied!
The list view configuration can be reused across all instances of the Anthology list view as it is not dependent upon a model. Add the list view page UIDs to the limitToPages array.
Each single view requires a route configuration per-model as it requires the tableName configuration. Single view page UIDs can be added to the limitToPages array.
Important Considerations
Slugs
For the PersistedAliasMapper to work, your table must have a dedicated field to store the URL slug. You are responsible for generating and saving the unique slugs for your records.
Site Configuration
The YAML above needs to be placed under the routeEnhancers key within your site's configuration.
Clearing Caches
After adding or changing routing configuration, you must clear the caches in the TYPO3 backend for the changes to take effect.
Sitemap
To ensure that search engines can discover and index all the detail pages of your anthology records, it is important to include them in your website's XML sitemap.
This guide will show you how to configure a sitemap provider for the records displayed by the Anthology extension.
The Sitemap Provider
A sitemap provider is responsible for collecting a list of URLs for a specific type of content and adding them to the XML sitemap. TYPO3 provides a generic RecordsXmlSitemapDataProvider that can be configured to work with any database table.
The [model_identifier] must be replaced with a unique value; this can be anything so long as it is unique. The table, pid and pageId values must be replaced with the relevant values.
Configuration Breakdown
[model_identifier]
A unique key for your sitemap provider. This can be any descriptive name (e.g., my_items, news_articles, products).
provider
Uses the standard RecordsXmlSitemapDataProvider from the TYPO3 core SEO extension.
config
Contains the specific settings for the provider:
table: The name of the table your anthology is displaying (must match your repository configuration).
sortField: How the records should be sorted in the sitemap. crdate (creation date) is a sensible default.
lastModifiedField: Field used to determine when the record was last modified. Usually tstamp.
pid: The UID of the storage page where your records are stored. The provider will only select records from this page.
url: Defines how to construct the URL for each record:
pageId: The UID of the page that will handle the single view (your detail page).
fieldToParameterMap: Maps database fields to URL parameters. Here, the uid field is mapped to the tx_llanthology_anthologyview[record] parameter.
additionalGetParameters: Additional parameters required for the Anthology plugin to work correctly.
Final Steps
Add the TypoScript configuration above to your site's setup.typoscript file.
Adjust the following values to match your specific setup:
- [model_identifier]: Choose a unique name for your sitemap
- table: Your model's database table name
- pid: The UID of the page where your records are stored
- pageId: The UID of your single view page
Clear all caches in the TYPO3 backend.
If you're using route enhancers (recommended), ensure your routing configuration is set up correctly as described in the Routing guide.
Note
If you're using route enhancers for clean URLs, you may need to adjust the fieldToParameterMap and additionalGetParameters to match your routing configuration. The example above works with the default Anthology plugin parameters.
After these steps, TYPO3 will automatically include the URLs for all your published anthology records in the XML sitemap. You can verify this by accessing your sitemap at https://www.your-site.com/sitemap.xml.
Templates
The Anthology extension uses the Fluid templating engine to render its output. This allows for full control over the HTML markup. You can customise every aspect of the plugin's appearance by overriding the default templates.
Default Template Structure
The extension's templates are located in its Resources/Private/ directory:
Templates/
Contains the main template files for each action (e.g., List.html, View.html).
Partials/
Contains reusable snippets of code that are used in the main templates. This is where the most common customisations are made.
List/Record.html: Renders a single record in the list view.
List/Pagination.html: Renders the pagination widget.
List/Filters.html: Renders the container for the filters.
Filter/...: Contains the templates for the different filter types (e.g., Date.html, Search.html).
Layouts/
Defines the overall HTML structure of the templates.
Overriding Templates
There are two main ways to override the default templates.
Automatic Overrides (Recommended)
A powerful feature of the Anthology extension is its ability to automatically detect and use templates from the extension that provides the data.
As described in the "Models" guide, you configure the Anthology plugin to use a repository from one of your own extensions. When you do this, the Anthology plugin will automatically add your extension's Resources/Private/ directories to its template paths.
This means you can simply copy a template file from the Anthology extension to your own extension, modify it, and it will be used automatically.
For example, to customise the display of a single record in the list view:
Copy the file from ll_anthology/Resources/Private/Partials/List/Record.html.
Paste it into the corresponding directory in your own extension: my_extension/Resources/Private/Partials/List/Record.html.
Clear the cache.
Modify the copied file to your liking.
This is the recommended approach as it keeps the templates for your model logically grouped with the model itself.
Manual TypoScript Overrides
You can also explicitly tell the Anthology plugin where to find your templates using TypoScript:
Inside the templates, you have access to several variables:
paginator
A paginator object that contains the records for the current page (paginator.paginatedItems).
pagination
The pagination object for building the page links.
filters
A list of the configured filter objects.
record
In the singleAction view and the List/Record.html partial, this variable holds the current record being displayed.
settings
The settings array from the plugin's FlexForm.
Custom Filters
The Anthology extension includes a powerful and extensible filtering system. Whilst it comes with several common filter types out of the box (Search, Category, and Date), you can create your own custom filter types to meet the specific needs of your project.
This guide will walk you through the process of creating, registering, and using a new custom filter.
The Components of a Filter
A filter consists of three main parts:
A Filter Class: The PHP class that contains the filtering logic.
A FlexForm File: An XML file that defines the configuration options for the filter (optional).
A Fluid Template: An HTML file that renders the filter's frontend interface.
We will create a simple "Tag" filter as an example.
The Filter Class
The filter class is responsible for applying the actual query constraint. It must implement the FilterInterface (or extend the provided AbstractFilter), and must have the AsAnthologyFilter attribute.
If your filter should also be selectable as a pre-filter (see Filters), add the AsAnthologyPreFilter attribute as well. See Supporting Pre-filters below.
Although not required, it is recommended to prefix the name of your filter with the extension in order to avoid clashes with other filters.
Classes/Domain/Filter/TagFilter.php
<?phpdeclare(strict_types=1);
namespaceVendor\MyExtension\Domain\Filter;
useLiquidLight\Anthology\Attribute\AsAnthologyFilter;
useLiquidLight\Anthology\Domain\Filter\AbstractFilter;
useLiquidLight\Anthology\Domain\Filter\FilterInterface;
useLiquidLight\Anthology\Domain\Model\Filter;
useTYPO3\CMS\Extbase\Persistence\Generic\Qom\ComparisonInterface;
useTYPO3\CMS\Extbase\Persistence\QueryInterface;
#[AsAnthologyFilter('myextension_tag')]classTagFilterextendsAbstractFilterimplementsFilterInterface{
protectedconst LABEL = 'My Custom Tag Filter';
publicstaticfunctiongetConstraint(
Filter $filter,
QueryInterface $query
): ?ComparisonInterface{
// If no tag is selected in the frontend, don't apply any constraintif (empty($filter->getParameter())) {
returnnull;
}
// 'tags' is the property on our model that we want to filter by.// This comes from the FlexForm setting for this filter.
$property = $filter->getParsedSettings()['property'];
return $query->like($property, '%' . $filter->getParameter() . '%');
}
}
Copied!
LABEL: This constant defines the human-readable name of your filter, which will be shown in the backend. Whilst not required, this should refer to an XLIFF file.
getConstraint(): This is the core method. It receives the Filter model (which contains its settings and the current value from the frontend) and the Extbase Query object. It should return a ConstraintInterface object that will be added to the database query.
The FlexForm Configuration
The FlexForm defines the settings that are available for your filter in the backend. This is an XML file.
Configuration/FlexForms/Filter/Tag.xml
<?xml version="1.0" encoding="utf-8" standalone="yes" ?><T3DataStructure><sheets><sDEF><ROOT><sheetTitle>Settings</sheetTitle><type>array</type><el><settings.property><label>Property to filter on</label><config><type>input</type><eval>trim,required</eval></config></settings.property></el></ROOT></sDEF></sheets></T3DataStructure>
Copied!
This simple FlexForm adds a single text input field where the editor can specify which property of the model (e.g., tags) this filter should apply to.
The Fluid Template
This template renders the filter on the website. It's a standard Fluid template.
Resources/Private/Partials/Filter/Tag.html
<htmlxmlns:f="http://typo3.org/ns/TYPO3/CMS/Fluid/ViewHelpers"><f:form.textfieldname="filter[{filter.uid}]"value="{filter.parameter}"class="form-control"placeholder="Enter a tag..."
/></html>
Copied!
filter: A filter object is available in the template, containing all its properties and settings.
name="filter[{filter.uid}]": It is crucial that the name attribute follows this format. This allows the Anthology extension to correctly identify the value for each filter.
value="{filter.parameter}": This ensures that when the form is submitted, the selected value is pre-filled.
Supporting Pre-filters
Pre-filters (see Filters) let an integrator permanently restrict a list view to matching records, with a value they configure directly on the pre-filter itself rather than one submitted by a site visitor. To make your filter selectable as a pre-filter, add the AsAnthologyPreFilter attribute alongside AsAnthologyFilter:
No change is required to getConstraint() — pre-filter values still arrive via $filter->getParameter(), exactly as they would for a filter driven by frontend input.
Since a pre-filter's value is configured by the integrator rather than read from the request, add a dedicated settings.preFilterValue field to your FlexForm, shown only in the pre-filter context, and hide your normal input field(s) in that same context:
<settings.property><label>Property to filter on</label><config><type>input</type><eval>trim,required</eval><hideWhenInlineParentField>settings.preFilters</hideWhenInlineParentField></config></settings.property><settings.preFilterValue><label>Value</label><config><type>input</type><eval>trim</eval><showWhenInlineParentField>settings.preFilters</showWhenInlineParentField></config></settings.preFilterValue>
Copied!
See Configuration/FlexForms/Filter/Category.xml or Configuration/FlexForms/Filter/Search.xml for complete reference examples.
Configuring the Filter
Register the FlexForm
To provide customisable options for your filter, you need to create a FlexForm. This is done in the TCA for the filter record. If no further configuration options are required, this is not necessary.
<?php// Add this to your extension's TCA override file
$GLOBALS['TCA']['tx_anthology_domain_model_filter']['columns']['settings']['config']['ds']['tag'] =
'FILE:EXT:my_extension/Configuration/FlexForms/Filter/Tag.xml';
Copied!
Register the Template
Finally, ensure the template is found by placing it in your extension's Resources/Private/Partials/Filter/ directory. As explained in the Templates guide, the Anthology extension will automatically find templates in the extension that provides the model.
Using the Custom Filter
After clearing the cache, you can now use your new filter:
In the TYPO3 backend, create a new "Anthology Filter" record.
In the Filter Type dropdown, you should now see "My Custom Tag Filter".
Select it. The FlexForm you created will appear, asking for the "Property to filter on". Enter the name of the field on your model (e.g., tags).
Give the filter a Title (e.g., "Filter by Tag").
Save the filter record.
Edit your Anthology plugin on the content page, go to the Filters tab, and add your newly created filter.
Now, your custom tag filter will appear on the frontend, allowing users to filter your records.
Link Handler
Link handlers in TYPO3 allow editors to create links to specific records directly from the link browser in the backend. This is particularly useful when you want to link to individual records that are displayed through the Anthology extension.
Overview
When you configure a link handler for your model, editors can:
Select records directly from the link browser
Create links that automatically route to the single view of a record
Maintain links even if the record moves or changes
The link handler consists of two parts:
Backend Configuration (page.tsconfig) - Enables the link browser tab
Frontend Configuration (setup.typoscript) - Defines how links are rendered
Backend Configuration
Add this configuration to your page.tsconfig to enable the link browser for your model:
If you wish to display records from a repository which is not part of your project, or is in a dependency which does not natively support Anthology, you can do so by creating a custom model and repository which extend the original.
The following examples assume you wish to display records created by
friendsoftypo3/tt-address
, but the same principles apply to any repository.
Model
Create a new model which extends the original. Unless required, you don't need to add any additional properties or methods to this model.
After completing the steps above and clearing the cache, your new model will be available for selection in the Anthology plugin.
PSR-14 Events
Several events are dispatched in order to allow for modifications to the behaviour of the Anthology extension, records, filters, returned data, and views. These can be listened for by creating a Typo3 Event Listener class.
Available Events
All events are in the namespace LiquidLight\Anthology\Events:
This event is the first to be dispatched by the list view, and is the most powerful of those provided. It is dispatched before any queries are made to the database, and can be used to override almost all of the subsequent behaviours of the extension, including modifying the query itself.
BeforeAnthologyListViewRenderEvent
Arguments
ViewInterface $view
RequestInterface $request
Called immediately before the HTML response is returned from AnthologyController when in list view.
BeforeAnthologySingleViewRenderEvent
Arguments
AbstractEntity $record
ViewInterface $view
RequestInterface $request
Called immediately before the HTML response is returned from AnthologyController when in single view, and contains the record which will be displayed.
BeforeAnthologyViewRenderEventInterface
Both BeforeAnthologyListViewRenderEvent and BeforeAnthologySingleViewRenderEvent implement the BeforeAnthologyViewRenderEventInterface, which can also be listened for as an event in itself. This will ensure that a listener will be triggered before the rendering of both list and single views.
Reference to the headline
Copy and freely share the link
This link target has no permanent anchor assigned.The link below can be used, but is prone to change if the page gets moved.