The Focal Point Editor extension adds an interactive focal point editor to TYPO3's
file references (sys_file_reference). It allows editors to define focus points for
different crop variants, ensuring that the most important part of an image remains
visible regardless of how the image is cropped or displayed.
The Focal Point Editor extension enhances TYPO3's native image handling by allowing
editors to define focal points for images. A focal point marks the most important area
of an image – the part that should always remain visible, regardless of how the image
is cropped or scaled.
This is particularly useful for:
Responsive images: Ensure the subject of a photo remains visible across all
device sizes and aspect ratios
Portrait photography: Keep faces visible when images are cropped
Product images: Ensure the product remains centered in all crop variants
Hero images: Maintain focus on key visual elements across different layouts
Features
Interactive Editor: Click directly on the image to set the focal point
Per-Variant Focal Points: Define different focal points for each crop variant
(e.g., landscape, portrait, square)
Visual Feedback: See focal points displayed on crop previews in the backend
Fluid ViewHelpers: Easy integration with global nnfp namespace
Drop-in f:image Replacement: <nnfp:image> adds focal point styling automatically
Background Image Support: <nnfp:backgroundStyle> for hero sections
Non-Destructive: Focal points are stored separately from the image and crop data
How it works
The extension adds a new field to sys_file_reference that stores focal point
coordinates as JSON. Each crop variant can have its own focal point, stored as
percentage-based coordinates (0-1 range):
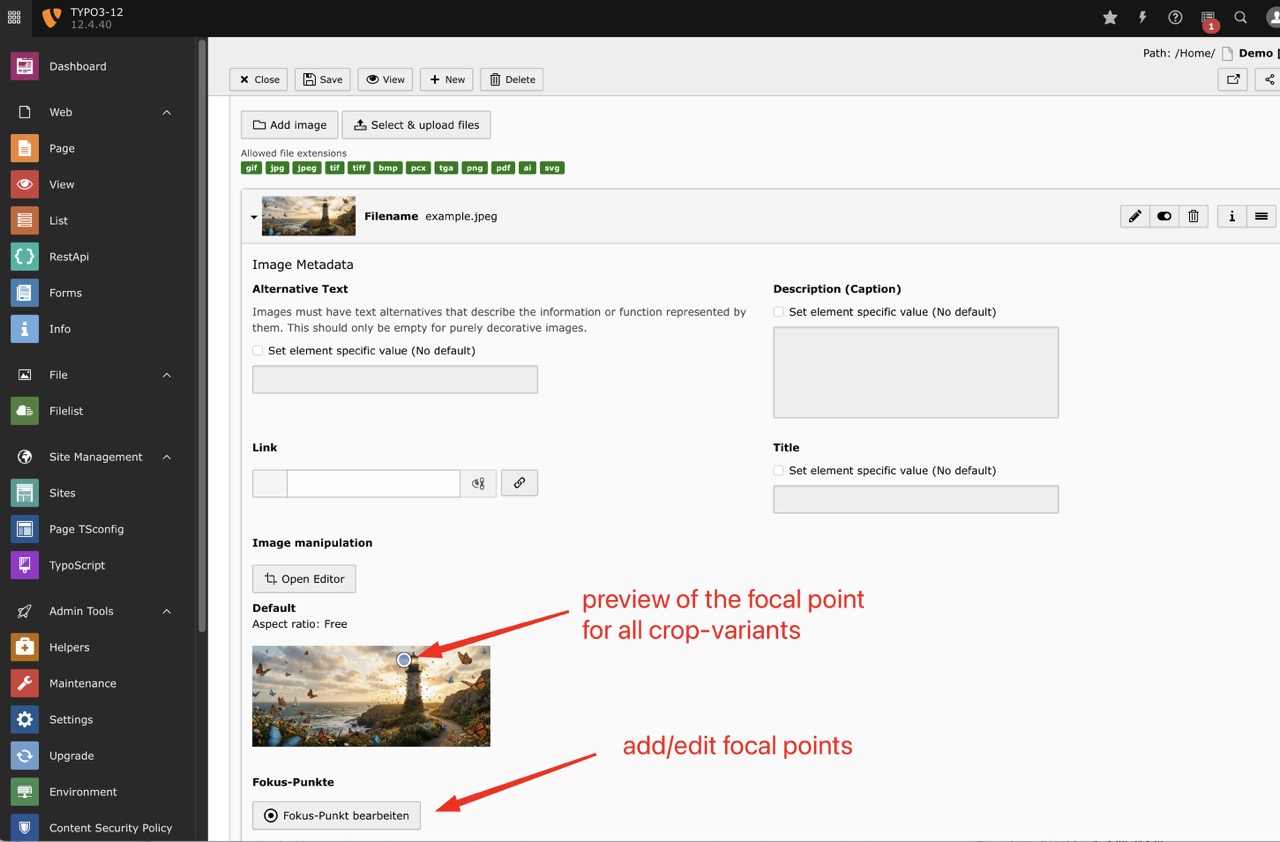
The focal point editor appears below the crop options in the file reference editing
form. Click the "Fokus-Punkt bearbeiten" button to open the modal editor. The focal
point is displayed as a visual indicator on each crop variant preview.
The "Fokus-Punkt bearbeiten" button appears below the crop variants, showing a
preview of the focal point position on each crop.
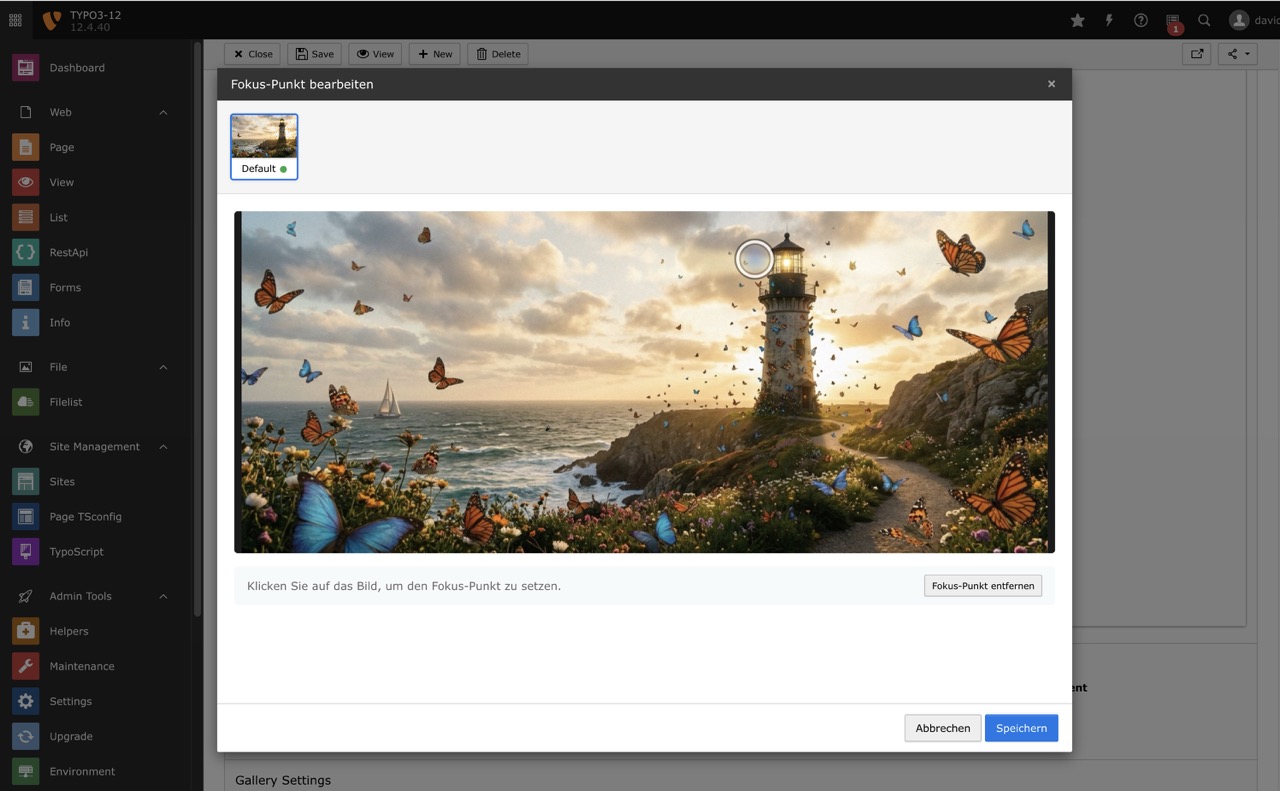
Modal Editor
The modal shows all available crop variants as thumbnails. Select a variant and click
on the image to set the focal point. A green indicator on the thumbnail shows which
variants have focal points defined.
The modal editor allows setting individual focal points for each crop variant.
Click anywhere on the image to position the focal point.
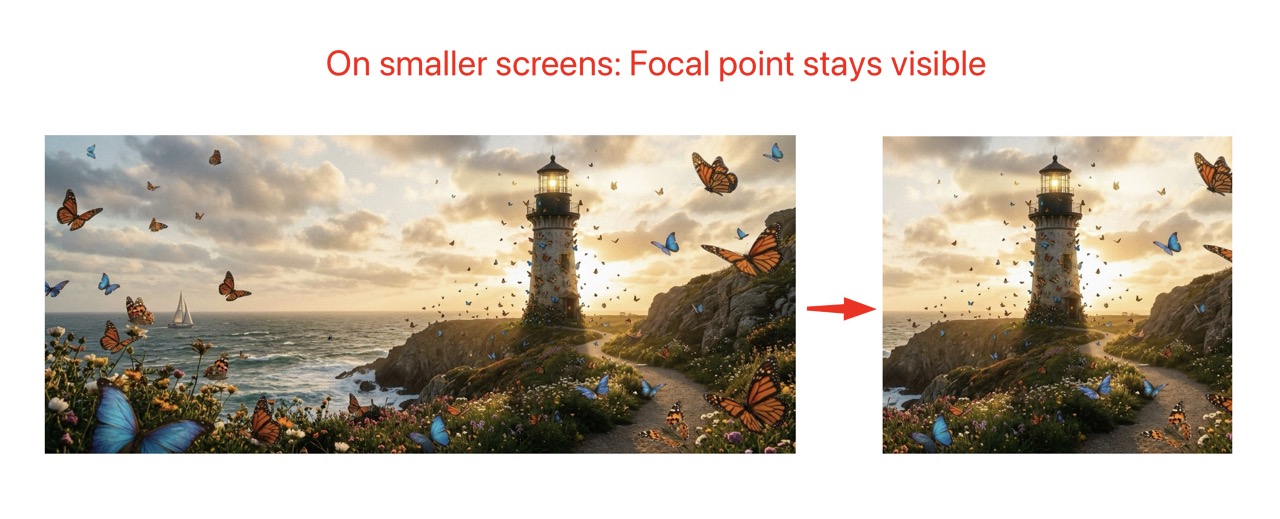
Frontend Result
Using the ViewHelpers, the focal point is applied via CSS object-position. This
ensures the important part of the image remains visible regardless of container size.
The focal point keeps the subject visible when the container is scaled or the
image is displayed in different aspect ratios.
Use Cases
Responsive Hero Images
A hero image might be displayed as a wide banner on desktop but as a square on mobile.
By setting appropriate focal points for each variant, you ensure the subject remains
visible in both cases.
Portrait Galleries
When displaying portraits in different aspect ratios (e.g., 3:4 for cards, 1:1 for
avatars), focal points ensure faces are always visible and properly positioned.
E-Commerce Product Images
Product images often need to be displayed in various formats. Focal points help
maintain product visibility across different layouts and crop variants.
Installation
Requirements
TYPO3 12.4 LTS or TYPO3 13.x
PHP 8.2 or higher
Installation via Composer (recommended)
For Composer-based TYPO3 installations, run:
composer require nng/nnfocalpoint
Copied!
Classic Installation
Download the extension from the TYPO3 Extension Repository (TER) or GitHub
Extract the archive to typo3conf/ext/nnfocalpoint
Activate the extension in the Extension Manager
Database Update
After installation, you need to update the database schema:
Go to Admin Tools → Maintenance → Analyze Database Structure
Apply the suggested changes to add the tx_nnfocalpoint_points field to
sys_file_reference
After installation, verify the extension is working correctly:
Go to any content element with an image (e.g., Text & Media)
Edit the image reference
You should see a "Fokus-Punkt bearbeiten" button below the crop options
Upgrading
From earlier versions
When upgrading from an earlier version:
Update the extension files
Clear all caches
Run the Database Analyzer to apply any schema changes
Note
Existing focal point data is preserved during upgrades. The JSON format is
backward compatible.
Configuration
The Focal Point Editor extension works out of the box with minimal configuration.
This chapter covers the technical configuration and customization options.
TCA Configuration
The extension automatically adds the focal point field to sys_file_reference
through TCA overrides.
Default Configuration
The field is added to the imageoverlayPalette after the crop field:
To customize the appearance of the focal point editor, you can override the CSS
classes in your own backend stylesheet:
.nnfocalpoint-container - Main container
.nnfocalpoint-trigger - The button to open the editor
.nnfocalpoint-modal - Modal container
.nnfocalpoint-thumbnails - Thumbnail row
.nnfocalpoint-thumbnail - Individual thumbnail
.nnfocalpoint-editor - Editor area
.nnfocalpoint-image-container - Image container
.nnfocalpoint-point - Focal point marker
Editor's Guide
This chapter explains how to use the Focal Point Editor in the TYPO3 backend.
Accessing the Focal Point Editor
The focal point editor is available for any image that is added to a content element
or other record through a file reference.
Edit a content element that contains an image (e.g., Text & Media)
Click on the image to expand its settings
Look for the "Fokus-Punkt bearbeiten" button below the crop options
Click the button to open the focal point editor modal
The focal point button appears below the crop variant previews. Existing focal
points are shown as indicators on each crop preview.
The Focal Point Modal
The modal window consists of two main areas:
Thumbnail Row
At the top of the modal, you see thumbnails for each available crop variant. These
correspond to the crop variants defined in your TYPO3 configuration (e.g., "Default",
"Mobile", "Portrait").
Click a thumbnail to select that crop variant
Green dot indicator shows which variants have a focal point set
Blue border indicates the currently selected variant
Editor Area
The main area shows the full image with a semi-transparent overlay indicating the
current crop area.
Click anywhere on the image to set the focal point
The focal point is shown as a pulsing circle
The overlay helps you see which part of the image will be visible in the crop
The modal editor with crop variant thumbnails at the top and the main editing
area below. Click on the image to set the focal point.
Setting a Focal Point
Open the focal point editor modal
Select the crop variant you want to edit (click its thumbnail)
Click on the image where you want the focal point to be
The focal point marker appears at your click position
Repeat for other crop variants if needed
Click "Speichern" (Save) to save your changes
Tip
You can set different focal points for each crop variant. This is useful when
the subject should be positioned differently depending on the aspect ratio.
Removing a Focal Point
To remove a focal point from a crop variant:
Select the crop variant
Click the "Fokus-Punkt entfernen" button at the bottom of the editor
The focal point marker disappears
Save your changes
Visual Feedback
After saving, the focal point is displayed on the crop preview thumbnails in the
file reference form. This gives you immediate visual feedback about where the focal
point is positioned relative to each crop.
Best Practices
Choosing the Right Focal Point
Portraits: Set the focal point on the subject's face, typically between the eyes
Products: Center the focal point on the main product
Landscapes: Choose the most important element (e.g., a building, person, or
natural feature)
Text overlays: Consider where text will be placed and avoid setting focal
points in those areas
Working with Multiple Variants
Start with the most restrictive crop (usually the smallest or most square)
Ensure the focal point works well for that crop
Then adjust other variants as needed
Preview your changes in the frontend to verify the result
Troubleshooting
Button not visible
If the "Fokus-Punkt bearbeiten" button is not visible:
Ensure the extension is properly installed and activated
Check that the database field tx_nnfocalpoint_points exists in
sys_file_reference
Clear all TYPO3 caches
Modal doesn't open
If clicking the button doesn't open the modal:
Check the browser console for JavaScript errors
Ensure the AJAX routes are properly registered
Verify that the JavaScript module is loaded
Focal point not saved
If focal points are not being saved:
Ensure you click "Speichern" in the modal
Save the parent record (content element) after closing the modal
Check for any form validation errors
Developer's Guide
This chapter covers the technical aspects of integrating the Focal Point Editor
in your TYPO3 templates and custom extensions.
The nnfp-image CSS class is automatically added to all images rendered
with this ViewHelper. This class provides basic styling (width/height 100%,
display block) that works well with container-based layouts.
FocalCropViewHelper (Server-side focal crop)
Crops images to exact dimensions while keeping the focal point centered.
Unlike nnfp:image which uses CSS positioning, this ViewHelper performs
actual server-side cropping - the generated image file has the exact target dimensions.
Crop variant for focal point lookup (default: default)
absolute
bool
No
Force absolute URL (default: false)
Usage:
<!-- Crop to 400x200, focal point centered horizontally --><nnfp:focalCropimage="{image}"width="400c"height="200" /><!-- Square crop --><nnfp:focalCropimage="{image}"width="200c"height="200c" /><!-- With specific crop variant --><nnfp:focalCropimage="{image}"width="800c"height="600"cropVariant="mobile" />
Copied!
How it works:
The "c" suffix indicates that dimension should be cropped. The ViewHelper:
Calculates the target aspect ratio (e.g., 400:200 = 2:1)
Crops the original image to match that aspect ratio, centered on the focal point
Scales the cropped result to the final dimensions
Example: For a 1200x800 image with focal point at (0.7, 0.3):
width="400c" height="200" creates a 2:1 crop (800x400 from original)
The crop window is positioned to keep the focal point (at x=840, y=240) as centered as possible
The nnfp:focalCrop ViewHelper can largely replace the need for multiple crop variants.
Traditional TYPO3 crop variants require editors to manually define crop areas for each
aspect ratio (desktop, tablet, mobile, square, etc.). This is time-consuming and error-prone.
With focal points, you can simplify this workflow:
Use only the default crop variant in your TCA configuration
Let editors set a single focal point on the important part of the image
Use nnfp:focalCrop with different dimensions - the focal point stays centered automatically
Before (traditional approach):
<!-- Editor must define 4 different crop areas --><f:imageimage="{image}"cropVariant="desktop"width="1920c"height="600c" /><f:imageimage="{image}"cropVariant="tablet"width="1024c"height="768c" /><f:imageimage="{image}"cropVariant="mobile"width="768c"height="768c" /><f:imageimage="{image}"cropVariant="square"width="400c"height="400c" />
Copied!
After (with focal point):
<!-- Editor sets ONE focal point, all crops are calculated automatically --><nnfp:focalCropimage="{image}"width="1920c"height="600" /><!-- wide banner --><nnfp:focalCropimage="{image}"width="1024c"height="768" /><!-- 4:3 --><nnfp:focalCropimage="{image}"width="768c"height="768" /><!-- square --><nnfp:focalCropimage="{image}"width="400c"height="600" /><!-- portrait -->
Copied!
Benefits:
Less editor work: One focal point instead of multiple crop definitions
Consistent results: The important subject stays visible in all aspect ratios
Flexible frontend: Developers can use any aspect ratio without backend changes
Simpler TCA: No need to configure multiple crop variants
Tip
This approach works best for images where there's a clear subject (person, product,
logo) that should remain visible. For images requiring precise artistic framing
per aspect ratio, traditional crop variants may still be preferred.
Uri\FocalCropViewHelper (URI only)
Returns only the URI of a focal-point-cropped image. Use this when you need
the image URL for custom markup, srcset, or JavaScript.
The following examples show how to use the focal point data in your templates.
The result ensures that the important part of the image remains visible when
the container is scaled or cropped.
Using object-position with the focal point coordinates keeps the subject
visible regardless of container dimensions.
Required CSS
For focal points to work correctly, you need CSS that allows the image to be
positioned within its container. Here are the essential styles:
/* Basic focal point container */.focal-container {
position: relative;
overflow: hidden;
}
/* Image with focal point - fills container and respects focal point */.focal-containerimg {
width: 100%;
height: 100%;
object-fit: cover;
/* object-position is set inline via ViewHelper */
}
/* Fixed aspect ratio containers */.focal-container--16-9 {
aspect-ratio: 16 / 9;
}
.focal-container--4-3 {
aspect-ratio: 4 / 3;
}
.focal-container--1-1 {
aspect-ratio: 1 / 1;
}
/* Background image with focal point */.focal-bg {
background-size: cover;
background-repeat: no-repeat;
/* background-position is set inline via ViewHelper */
}
Copied!
Example 1: Simple IMG Tag
The most basic usage with a standard <img> tag:
<!-- Basic usage --><divclass="focal-container"style="width: 300px; height: 200px;"><imgsrc="{image.publicUrl}"alt="{image.alternative}"style="object-fit: cover; object-position: {nnfp:objectPosition(image: image)}" /></div><!-- With aspect ratio class --><divclass="focal-container focal-container--16-9"style="width: 100%; max-width: 800px;"><imgsrc="{image.publicUrl}"alt="{image.alternative}"style="object-fit: cover; object-position: {nnfp:objectPosition(image: image, cropVariant: 'default')}" /></div>
Copied!
Example 2: Using f:image ViewHelper
Combine TYPO3's f:image ViewHelper with focal point positioning:
<!-- f:image with focal point --><divclass="focal-container"style="width: 400px; height: 300px;"><f:imageimage="{image}"alt="{image.alternative}"width="800"style="object-fit: cover; object-position: {nnfp:objectPosition(image: image)}" /></div><!-- f:image with crop variant --><divclass="focal-container focal-container--4-3"><f:imageimage="{image}"cropVariant="mobile"width="600c"height="450c"style="object-fit: cover; object-position: {nnfp:objectPosition(image: image, cropVariant: 'mobile')}" /></div>
Copied!
Note
When using f:image with cropping (width="600c"), the focal point provides
additional fine-tuning for how the already-cropped image is positioned in its container.
Example 4: Custom Logic with FocalPoint ViewHelper
For advanced use cases, access the raw focal point data:
<nnfp:focalPointimage="{image}"cropVariant="default"as="fp"><f:ifcondition="{fp}"><f:then><!-- Display focal point coordinates --><pclass="debug">Focal point: X={fp.x}, Y={fp.y}</p><!-- Use in calculations --><divclass="image-with-hotspot"style="position: relative;"><imgsrc="{image.publicUrl}"alt="" /><!-- Hotspot marker at focal point --><spanclass="hotspot"style="left: {fp.x * 100}%; top: {fp.y * 100}%;"></span></div><!-- Conditional positioning based on focal point location --><f:ifcondition="{fp.x} < 0.5"><f:then><divclass="text-overlay text-overlay--right">
Text on right (focal point is on left)
</div></f:then><f:else><divclass="text-overlay text-overlay--left">
Text on left (focal point is on right)
</div></f:else></f:if></f:then><f:else><!-- Fallback when no focal point is set --><imgsrc="{image.publicUrl}"alt=""style="object-position: center center;" /></f:else></f:if></nnfp:focalPoint>
Returns URI of focal-point-cropped processed image
Known Problems
This chapter documents known issues and limitations of the Focal Point Editor
extension.
Limitations
Image Processing
The focal point data is stored separately from TYPO3's image processing. When using
f:image or f:uri.image ViewHelpers with cropping, the focal point is not
automatically applied to the crop calculation.
Workaround: Use the focal point data with CSS object-position to position
the image within its container, rather than relying on server-side cropping.
No Automatic Cropping
The extension does not modify how TYPO3 crops images. It provides focal point data
that you can use in your templates to position images correctly using CSS.
The focal point modal opens in the main backend frame, while the form is rendered
in an iframe. This is by design to ensure proper modal functionality, but it means
the CSS must be loaded globally in the backend.
Crop Preview Updates
After saving focal points, the crop preview indicators may not update immediately
in all cases. Refreshing the form or saving the record will update the display.
Reporting Issues
If you encounter a bug or have a feature request, please report it on the project's
issue tracker: