Microsoft Exchange 365 Mailer 

Extension key

ok_exchange365_mailer

Package name

oliverkroener/ok-exchange365-mailer

Version

main

Language

en

Author

Oliver Kroener <ok@oliver-kroener.de>

License

This document is published under the Open Publication License.

Rendered

Wed, 18 Mar 2026 09:18:23 +0000


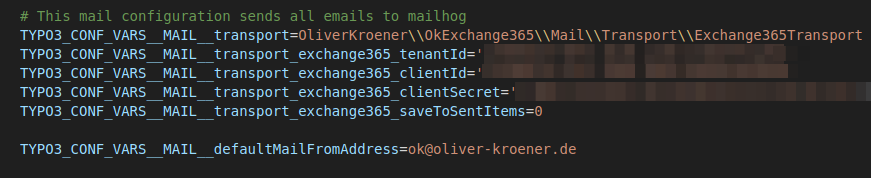
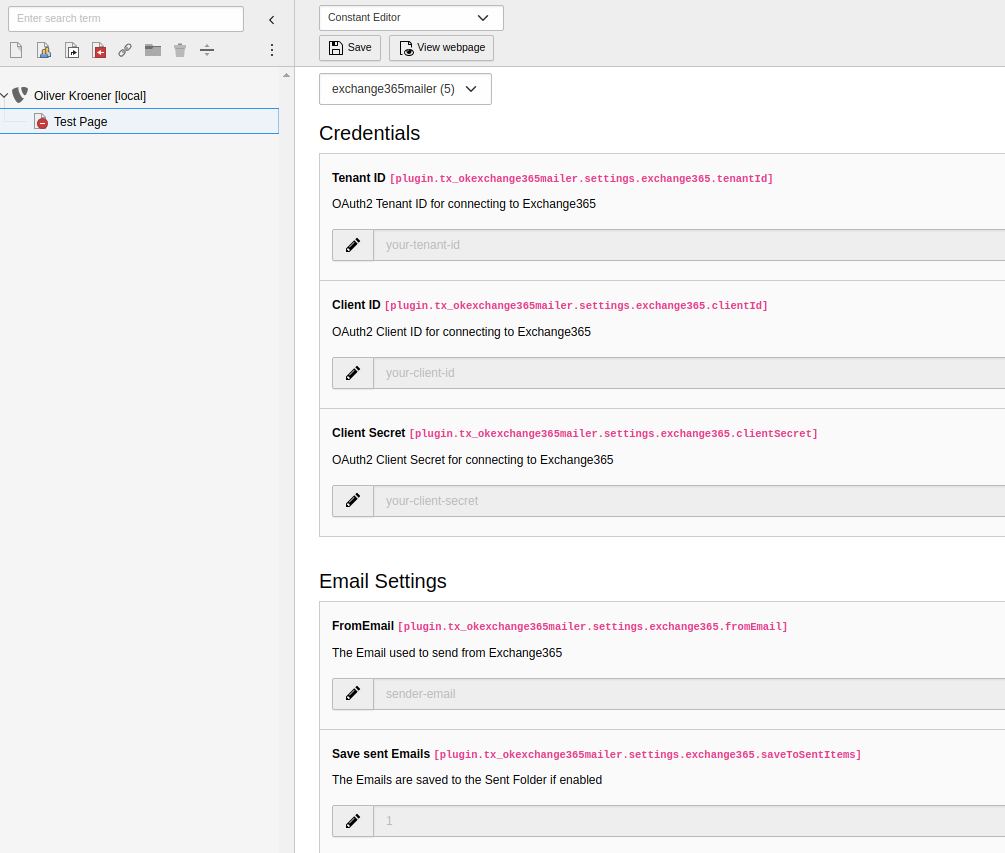
A TYPO3 extension for sending emails via Microsoft Exchange 365 using the MS Graph API instead of SMTP. Uses OAuth 2.0 client credentials flow for secure, token-based authentication.

Introduction 

Learn what this extension does, its features, and system requirements.

Installation 

Install the extension via Composer and activate it in your TYPO3 project.

Microsoft Entra ID Setup 

Register an app in Microsoft Entra ID (formerly Azure AD) and configure API permissions for Graph API mail sending.

Exchange Online Setup 

Configure Application Access Policies to restrict app permissions to specific mailboxes using PowerShell.

Configuration 

Set up the extension via environment variables, TYPO3 settings, or TypoScript for frontend form integration.

FAQ 

Answers to frequently asked questions about installation, configuration, and usage.

Contact 

Get in touch with the author for support, questions, or contributions.

Introduction 

What does it do? 

The Microsoft Exchange 365 Mailer extension replaces TYPO3's default SMTP mail transport with a custom transport that sends emails via the Microsoft Graph API.

Instead of configuring an SMTP server, you register an application in Microsoft Entra ID (formerly Azure AD) and authenticate using the OAuth 2.0 client credentials flow — no user interaction or stored passwords required.

Features 

  • Send emails through Microsoft Graph API — no SMTP required
  • OAuth 2.0 client credentials flow for server-to-server authentication
  • Supports both backend (environment variables / TYPO3 settings) and frontend (TypoScript) configuration
  • Compatible with Powermail, TYPO3 Form Framework, and other form extensions
  • Optional saving of sent emails to the sender's "Sent Items" folder
  • Automatic credential blinding in TYPO3's configuration module
  • Works with shared mailboxes and Application Access Policies

Requirements 

  • TYPO3: 12.4 LTS, 13.4 LTS, or 14.x
  • PHP: 8.3+
  • Dependencies:

    • microsoft/microsoft-graph ^2 — Microsoft Graph SDK
    • oliverkroener/ok-typo3-helper — provides MSGraphMailApiService for message conversion

Installation 

Install with Composer 

Install the extension via Composer:

composer req oliverkroener/ok-exchange365-mailer
Copied!

See also Installing extensions, TYPO3 Getting started.

Install in Classic Mode 

Or download the extension from https://extensions.typo3.org/extension/ok_exchange365_mailer and install it in the Extension Manager.

Configuration of Microsoft Entra ID (formerly Azure AD) 

Please follow the steps below to configure Microsoft Entra ID (formerly Azure AD) for the TYPO3 extension ok_exchange365_mailer. This configuration is necessary to enable secure email sending through Microsoft Exchange 365 using the Graph API. .. note:: This guide assumes you have administrative access to Microsoft Entra ID and the necessary permissions to register applications.

  1. Register an application in Microsoft Entra ID (formerly Azure AD).

    Please go to https://portal.azure.com

    Azure portal home page with app registrations navigation
  2. Register the application in Microsoft Entra ID.

    Register application form with name and supported account types
  3. Register an application.

    Application registration form with redirect URI section
  4. Collect tenant ID and client ID.

    • Tenant ID: This is the unique identifier for your Microsoft Entra ID tenant.
    • Client ID: This is the unique identifier for your registered application.
    Application overview page showing Tenant ID and Client ID values
  5. Create a client secret. - Navigate to the "Certificates & secrets" section of your application. - Click on "New client secret".

    Certificates & secrets page with New client secret button
  6. Add client secret.

    Add client secret dialog with description and expiration settings
    Client secret creation confirmation with expiration date
  7. Copy secret value.

    • Secret Value: This is the value you will use in your TYPO3 configuration to authenticate with Microsoft Entra ID.
    • Secret ID: This is not required for the configuration, only the Secret Value is needed. This will be later on the clientSecret in the TYPO3 configuration.
    Client secret value display with copy button (value visible only once)
  8. Assign API permissions.

    • Navigate to the "API permissions" section of your application.
    • Click on "Add a permission".
    API permissions page with Add a permission button
  9. Select Microsoft Graph.

    Choose "Microsoft Graph" as the API you want to access.

    Request API permissions dialog with Microsoft Graph selection
  10. Select application permissions.

    Choose Application permissions since this application will run without user interaction.

    Permission type selection showing Application permissions option
  11. Add Mail.Send permission.

    • This permission allows the application to send emails on behalf of users in your organization.
    • Choose Mail.Send (Send mail as any user) and "Add permissions".
    Microsoft Graph permissions list with Mail.Send permission highlighted
  12. Add User.ReadBasic.All permission.

    • This permission allows the application to read basic user information, which is often necessary for sending emails on behalf of users.
    • Click on "Add permissions" after selecting the permission.
    Microsoft Graph permissions list with User.ReadBasic.All permission highlighted
  13. Grant admin consent.

    • After adding the permissions, you need to grant admin consent for the permissions to take effect.
    • Click on "Grant admin consent for [Your Organization Name]".
    API permissions page with Grant admin consent button
    Admin consent confirmation dialog for granted permissions

Exchange Online Setup 

To restrict app access to specific mailboxes, you need the Exchange Online PowerShell module.

Prerequisites 

PowerShell 7.x (latest recommended) is required for best compatibility. Windows PowerShell 5.1 works but may have limitations with newer module versions.

Check your version:

$PSVersionTable.PSVersion
Copied!

Install or update to PowerShell 7:

winget install Microsoft.PowerShell
Copied!

Install the ExchangeOnlineManagement module. Run PowerShell as Administrator:

Install-Module -Name ExchangeOnlineManagement -Force -AllowClobber
Copied!

Import and connect 

Import-Module ExchangeOnlineManagement
Connect-ExchangeOnline -UserPrincipalName your-admin@yourdomain.com
Copied!

This opens a browser window for authentication. Use an account with Exchange Admin rights.

Create the Application Access Policy 

The New-ApplicationAccessPolicy cmdlet restricts your application to only access specific mailboxes instead of all mailboxes in the tenant.

Parameters:

  • -AppId: The Application (client) ID from your Microsoft Entra ID app registration
  • -PolicyScopeGroupId: The email address of the mailbox or mail-enabled security group the app is allowed to access
  • -AccessRight RestrictAccess: Limits the app to only the specified mailbox(es)
  • -Description: A human-readable description for the policy
New-ApplicationAccessPolicy -AppId "<your-app-id>" -PolicyScopeGroupId "shared@yourdomain.com" -AccessRight RestrictAccess -Description "Restrict to shared mailbox"
Copied!

To verify the policy was created:

Get-ApplicationAccessPolicy | Format-List
Copied!

To test if the policy works correctly:

Test-ApplicationAccessPolicy -Identity "shared@yourdomain.com" -AppId "<your-app-id>"
Copied!

Troubleshooting 

# Check if connected
Get-ConnectionInformation

# Verify cmdlet exists
Get-Command New-ApplicationAccessPolicy

# Check PowerShell version (needs 5.1+)
$PSVersionTable.PSVersion

# List all existing policies
Get-ApplicationAccessPolicy | Format-List

# Remove a policy if needed
Remove-ApplicationAccessPolicy -Identity "<policy-id>"
Copied!

Using Shared Mailboxes 

If you see an error like this when creating the policy:

The policy scope "shared@yourdomain.com" is not a valid mail-enabled security group.
Copied!

You need to create a mail-enabled security group and add the shared mailbox to it.

Create a mail-enabled security group 

1. Create the security group via PowerShell:

New-DistributionGroup -Name "Graph API Shared Mailboxes" -Type Security -PrimarySmtpAddress "graph-mailboxes@yourdomain.com"
Copied!

2. Add your shared mailbox to the group:

Add-DistributionGroupMember -Identity "Graph API Shared Mailboxes" -Member "shared@yourdomain.com"
Copied!

3. Verify the group was created correctly:

Get-DistributionGroup -Identity "Graph API Shared Mailboxes" | Format-List
Get-DistributionGroupMember -Identity "Graph API Shared Mailboxes"
Copied!

4. Now create the Application Access Policy using the group:

New-ApplicationAccessPolicy -AppId "<your-app-id>" -PolicyScopeGroupId "graph-mailboxes@yourdomain.com" -AccessRight RestrictAccess -Description "Allow app to send from shared mailboxes"
Copied!

5. Test the policy:

Test-ApplicationAccessPolicy -Identity "shared@yourdomain.com" -AppId "<your-app-id>"
Copied!

You should see AccessCheckResult: Granted.

Adding multiple mailboxes 

Simply add additional mailboxes to the same security group you already created:

Add-DistributionGroupMember -Identity "Graph API Shared Mailboxes" -Member "another-shared@yourdomain.com"
Copied!

The Application Access Policy applies to all members of the group – no need to create a new policy.

Verify it worked:

# List all members of the group
Get-DistributionGroupMember -Identity "Graph API Shared Mailboxes"

# Test the new mailbox
Test-ApplicationAccessPolicy -Identity "another-shared@yourdomain.com" -AppId "<your-app-id>"
Copied!

Alternative via Microsoft 365 Admin Center 

  1. Go to Admin Center → Teams & Groups → Active teams & groups
  2. Click Add a group and select Mail-enabled security
  3. Name the group (e.g., "Graph API Shared Mailboxes")
  4. Add the shared mailbox as a member
  5. Then run the New-ApplicationAccessPolicy command with that group's email address

Configuring the Sender Display Name 

When sending emails through the Graph API, the recipient sees the display name configured on the mailbox in Exchange Online. To ensure the correct sender name appears, you need to configure the mailbox properties in the Microsoft 365 Admin Center.

Configure via Microsoft 365 Admin Center 

  1. Open the Microsoft 365 Admin Center.

    Go to https://admin.microsoft.com and sign in with an admin account.

  2. Navigate to the mailbox.

    • For shared mailboxes: Go to Teams & Groups → Shared mailboxes (or Active teams & groups if the mailbox is a group).
    • For regular user mailboxes: Go to Users → Active users.

    Select the mailbox you configured as the fromEmail in your TYPO3 setup.

  3. Edit the display name.

    Click on the mailbox name to open its properties. Under General, update the Display name to the name you want recipients to see as the sender (e.g., "Oliver Kroener" or "Contact - Oliver Kroener").

    Click Save changes.

  4. Verify the sender display name.

    Send a test email through TYPO3 and verify that the recipient sees the correct sender name in their inbox.

Configure via Exchange Admin Center 

Alternatively, you can use the Exchange Admin Center for more granular mailbox settings:

  1. Open the Exchange Admin Center.

    Go to https://admin.exchange.microsoft.com and sign in with an admin account.

  2. Navigate to the mailbox.

    Go to Recipients → Mailboxes (for user mailboxes) or Recipients → Groups → Shared mailboxes (for shared mailboxes).

    Select the mailbox used as fromEmail.

  3. Edit mailbox properties.

    Click on the mailbox to open its settings. Under General, you can configure:

    • Display name: The name shown to email recipients (e.g., "Oliver Kroener Website")
    • Email addresses: Add or modify email aliases if needed

    Click Save to apply the changes.

Configure via PowerShell 

You can also update the display name via PowerShell:

# For a shared mailbox
Set-Mailbox -Identity "shared@yourdomain.com" -DisplayName "Your Desired Sender Name"

# Verify the change
Get-Mailbox -Identity "shared@yourdomain.com" | Format-List DisplayName, PrimarySmtpAddress
Copied!

Configuration 

This section covers all aspects of configuring the Microsoft Exchange 365 Mailer extension for TYPO3.

After completing the Azure Configuration, you need to configure the TYPO3 extension with the values obtained from Microsoft Entra ID.

Quick Configuration Overview 

The extension requires the following key configuration variables:

  1. Mail Transport: Set to use Exchange365Transport
  2. Tenant ID: Your Microsoft Entra ID tenant identifier
  3. Client ID: Your Azure application identifier
  4. Client Secret: Your Azure application secret
  5. From Email: The sender email address
  6. Save to Sent Items: Whether to save emails to sent folder

For detailed step-by-step instructions, see:

Configuration Methods 

You can configure this extension using:

Essential Configuration (Recommended)
  • Environment variables (.env file)
  • TYPO3 LocalConfiguration.php
  • TYPO3 Admin Panel (if available)
Frontend Configuration (For Forms)
  • TypoScript configuration
  • Required for Powermail, Form Framework, and other frontend forms

Choose the method that best fits your deployment workflow and security requirements.

Essential Configuration 

After completing the Azure Configuration, you need to configure the TYPO3 extension with the values obtained from Microsoft Entra ID.

Quick Navigation 

This page covers the complete configuration setup for the Exchange 365 TYPO3 extension:

Configuration Variables 

The extension requires several configuration variables to be set in TYPO3. These can be configured through environment variables or directly in the TYPO3 configuration.

The following steps show the configuration with .env variables, but you can also set them in the LocalConfiguration.php file or through the TYPO3 Admin Panel if available. .. note:: The configuration variables are prefixed with TYPO3_CONF_VARS__MAIL__transport_exchange365_ to avoid conflicts with other mail transports.

  1. Set the mail transport to Exchange365Transport.

    Configure TYPO3 to use the Exchange 365 transport instead of the default SMTP transport.

    TYPO3_CONF_VARS__MAIL__transport=OliverKroener\\OkExchange365\\Mail\\Transport\\Exchange365Transport
    Copied!
  2. Configure the Tenant ID.

    Set the Tenant ID obtained from step 4 of the Azure Configuration.

    TYPO3_CONF_VARS__MAIL__transport_exchange365_tenantId='your-tenant-id-here'
    Copied!
  3. Configure the Client ID.

    Set the Client ID (Application ID) obtained from step 4 of the Azure Configuration.

    TYPO3_CONF_VARS__MAIL__transport_exchange365_clientId='your-client-id-here'
    Copied!
  4. Configure the Client Secret.

    Set the Client Secret value obtained from step 7 of the Azure Configuration.

    TYPO3_CONF_VARS__MAIL__transport_exchange365_clientSecret='your-client-secret-here'
    Copied!
  5. Configure the sender email address.

    Set the email address that will be used as the sender for all emails sent through this transport.

    TYPO3_CONF_VARS__MAIL__transport_exchange365_fromEmail='service@your-domain.com'
    Copied!
  6. Configure save to sent items (optional).

    Determine whether sent emails should be saved to the sender's "Sent Items" folder.

    TYPO3_CONF_VARS__MAIL__transport_exchange365_saveToSentItems=1
    Copied!

Configuration Example 

Here's a complete example of all required configuration variables:

TYPO3 configuration showing Exchange365 transport variables setup

Environment Variables (.env file) 

You can configure these settings using a .env file in your TYPO3 root directory:

# Exchange 365 Mail Transport Configuration
TYPO3_CONF_VARS__MAIL__transport=OliverKroener\\OkExchange365\\Mail\\Transport\\Exchange365Transport
TYPO3_CONF_VARS__MAIL__transport_exchange365_tenantId='your-tenant-id-here'
TYPO3_CONF_VARS__MAIL__transport_exchange365_clientId='your-client-id-here'
TYPO3_CONF_VARS__MAIL__transport_exchange365_clientSecret='your-client-secret-here'
TYPO3_CONF_VARS__MAIL__transport_exchange365_fromEmail='service@your-domain.com'
TYPO3_CONF_VARS__MAIL__transport_exchange365_saveToSentItems=1
Copied!

Alternative Configuration Methods 

In Typo3 config files 

Alternatively, you can add these settings directly to your TYPO3 configuration files, such as config/system/settings.php or config/system/additional.php or typo3conf/LocalConfiguration.php.

<?php
return [
    // ...existing configuration...
    
    'MAIL' => [
        'transport' => 'OliverKroener\\OkExchange365\\Mail\\Transport\\Exchange365Transport',
        'transport_exchange365_tenantId' => 'your-tenant-id-here',
        'transport_exchange365_clientId' => 'your-client-id-here',
        'transport_exchange365_clientSecret' => 'your-client-secret-here',
        'transport_exchange365_fromEmail' => 'service@your-domain.com',
        'transport_exchange365_saveToSentItems' => 1,
    ],
    
    // ...existing configuration...
];
Copied!

Or using the $GLOBALS syntax:

<?php
// In typo3conf/LocalConfiguration.php or ext_localconf.php
$GLOBALS['TYPO3_CONF_VARS']['MAIL']['transport'] = 'OliverKroener\\OkExchange365\\Mail\\Transport\\Exchange365Transport';
$GLOBALS['TYPO3_CONF_VARS']['MAIL']['transport_exchange365_tenantId'] = 'your-tenant-id-here';
$GLOBALS['TYPO3_CONF_VARS']['MAIL']['transport_exchange365_clientId'] = 'your-client-id-here';
$GLOBALS['TYPO3_CONF_VARS']['MAIL']['transport_exchange365_clientSecret'] = 'your-client-secret-here';
$GLOBALS['TYPO3_CONF_VARS']['MAIL']['transport_exchange365_fromEmail'] = 'service@your-domain.com';
$GLOBALS['TYPO3_CONF_VARS']['MAIL']['transport_exchange365_saveToSentItems'] = 1;
Copied!

Testing the Configuration 

After configuring all variables, you can test the email functionality by:

  1. Sending a test email through TYPO3's mail functionality
  2. Checking the TYPO3 logs for any error messages
  3. Verifying that emails are received at the intended recipients
  4. Checking the sender's "Sent Items" folder if saveToSentItems is enabled

Security Considerations 

Configuration Validation 

To verify your configuration is correct:

  1. Check in backend:

    • Navigate to the TYPO3 Admin Panel
    • Check the mail configuration under Settings > Environment > Test Mail Setup
    • Ensure the transport is set to Exchange365Transport and all required fields are filled
    TYPO3 Admin Panel showing mail transport configuration
  2. Check TYPO3 configuration:

    // In TYPO3 backend or debug context
    \TYPO3\CMS\Core\Utility\DebugUtility::debug($GLOBALS['TYPO3_CONF_VARS']['MAIL']);
    Copied!
  3. Test email sending:

    // Test email functionality
    $mail = \TYPO3\CMS\Core\Utility\GeneralUtility::makeInstance(\TYPO3\CMS\Core\Mail\MailMessage::class);
    $mail->to('test@example.com')
        ->subject('Test Email')
        ->text('This is a test email from TYPO3.')
        ->send();
    Copied!
  4. Check logs: Monitor TYPO3 logs for authentication or sending errors

Frontend Configuration 

The Exchange 365 Mailer extension supports frontend email sending through popular TYPO3 extensions like Powermail, Form Framework, and other form extensions. This requires additional TypoScript configuration to work properly.

Frontend Configuration Overview 

Frontend email sending requires the same 5 core parameters as the backend configuration, but they must be configured via TypoScript instead of environment variables or LocalConfiguration.php.

TYPO3 TypoScript configuration showing Exchange365 frontend parameters

Required TypoScript Parameters 

The following 5 parameters must be configured in your TypoScript setup for frontend email functionality:

  1. Transport Class Configuration

    Set the mail transport to use the Exchange365Transport class for frontend operations.

    config.mail.transport = OliverKroener\OkExchange365\Mail\Transport\Exchange365Transport
    Copied!
  2. Tenant ID

    Configure your Microsoft Entra ID tenant identifier.

    plugin.tx_okexchange365mailer.settings.exchange365.tenantId = your-tenant-id-here
    Copied!
  3. Client ID

    Set your Azure application's client identifier.

    plugin.tx_okexchange365mailer.settings.exchange365.clientId = your-client-id-here
    Copied!
  4. Client Secret

    Configure the Azure application's client secret.

    plugin.tx_okexchange365mailer.settings.exchange365.clientSecret = your-client-secret-here
    Copied!
  5. From Email Address

    Set the sender email address for frontend-generated emails.

    plugin.tx_okexchange365mailer.settings.exchange365.fromEmail = service@your-domain.com
    Copied!
  6. Save to Sent Items (Optional)

    Determine whether frontend emails should be saved to the sender's "Sent Items" folder.

    plugin.tx_okexchange365mailer.settings.exchange365.saveToSentItems = 1
    Copied!

Complete TypoScript Configuration Example 

Here's a complete TypoScript setup example for frontend email functionality:

# Exchange 365 Frontend Mail Configuration
config {
    mail {
        # Set transport to Exchange 365
        transport = OliverKroener\OkExchange365\Mail\Transport\Exchange365Transport
        
        # Optional: Default mail settings
        defaultMailFromAddress = service@your-domain.com
        defaultMailFromName = Your Organization Name
    }
}

# Exchange 365 specific configuration
plugin.tx_okexchange365mailer {
    settings {
        exchange365 {
            # Azure/Microsoft Entra ID Configuration
            tenantId = your-tenant-id-here
            clientId = your-client-id-here
            clientSecret = your-client-secret-here
            
            # Email Configuration
            fromEmail = service@your-domain.com
            saveToSentItems = 1
        }
    }
}
Copied!

Integration with Form Extensions 

Powermail Integration 

When using Powermail, the extension will automatically use the configured Exchange 365 transport for sending emails:

plugin.tx_powermail {
    settings {
        setup {
            # Powermail will use the global mail configuration
            # No additional configuration needed
        }
    }
}
Copied!

TYPO3 Form Framework Integration 

For the TYPO3 Form Framework, ensure your form configuration references the global mail settings:

# In your form configuration (YAML)
finishers:
  -
    identifier: EmailToReceiver
    options:
      # Uses global mail configuration automatically
      recipientAddress: 'recipient@example.com'
      recipientName: 'Recipient Name'
Copied!

Configuration File Locations 

Place your TypoScript configuration in one of these locations:

Template Records
Add the configuration to your main TypoScript template record in the TYPO3 backend.
Static Files

Create or modify files in your site package:

  • Configuration/TypoScript/setup.typoscript
  • Configuration/TypoScript/constants.typoscript (for constants)
Page TSconfig (Not recommended for mail settings)
Only use for page-specific overrides, not for global mail configuration.

Security Considerations for Frontend 

Best Practices 

  1. Environment-Specific Configuration

    Use different Azure applications for different environments:

    [applicationContext == "Development"]
        plugin.tx_okexchange365mailer.settings.exchange365.clientId = dev-client-id
        plugin.tx_okexchange365mailer.settings.exchange365.tenantId = dev-tenant-id
    [END]
    
    [applicationContext == "Production"]
        plugin.tx_okexchange365mailer.settings.exchange365.clientId = prod-client-id
        plugin.tx_okexchange365mailer.settings.exchange365.tenantId = prod-tenant-id
    [END]
    Copied!
  2. Conditional Loading

    Only load Exchange 365 configuration when needed:

    [siteIdentifier == "main-site"]
        <INCLUDE_TYPOSCRIPT: source="FILE:EXT:site_package/Configuration/TypoScript/exchange365.typoscript">
    [END]
    Copied!
  3. Fallback Configuration

    Always provide fallback settings:

    config.mail {
        defaultMailFromAddress = fallback@your-domain.com
        defaultMailFromName = Fallback Sender
    }
    Copied!

Testing Frontend Configuration 

To test your frontend configuration:

  1. Create a test form using Powermail or Form Framework
  2. Submit the form and verify email delivery
  3. Check TYPO3 logs for any authentication or sending errors
  4. Verify in Exchange 365 that emails appear in the sender's mailbox (if saveToSentItems is enabled)

Troubleshooting Frontend Issues 

Common issues and solutions:

Emails not sending
  • Verify all 5 parameters are correctly configured in TypoScript
  • Check that the Azure application has proper permissions
  • Ensure the sender email exists in Exchange 365
Authentication errors
  • Verify Tenant ID and Client ID are correct
  • Check that the Client Secret is valid and not expired
  • Confirm Azure admin consent has been granted
Permission errors
  • Ensure the Azure application has Mail.Send permission
  • Verify the sender email address exists in your Exchange 365 environment
  • Check that the application can send on behalf of the specified user

Contact 

Author — Oliver Kroener 

Automated. Scaled. Done. 

Web3 · Cloud · Automation

Technology is only valuable when it solves a real problem. For over 30 years I've been translating between business and tech — so your investment in digitalisation doesn't stall at proof-of-concept but delivers measurable results.

Support 

If you encounter issues or have questions about this extension:

Contributing 

Contributions are welcome. Please open a pull request or issue on GitHub.

License 

This extension is licensed under the GPL-2.0-or-later.

Sitemap