Configuration
Backend Configuration Module
The primary way to configure this extension is through the dedicated backend module located at Site > Rek.ai. It is accessible to administrators only.
Configuration is per TYPO3 site. When the TYPO3 installation contains more than one site, a
site selector dropdown appears at the top of the module. Select the site you want to configure
before making changes — each site stores its own independent set of values in
config/ under the one_forge_rekai key.
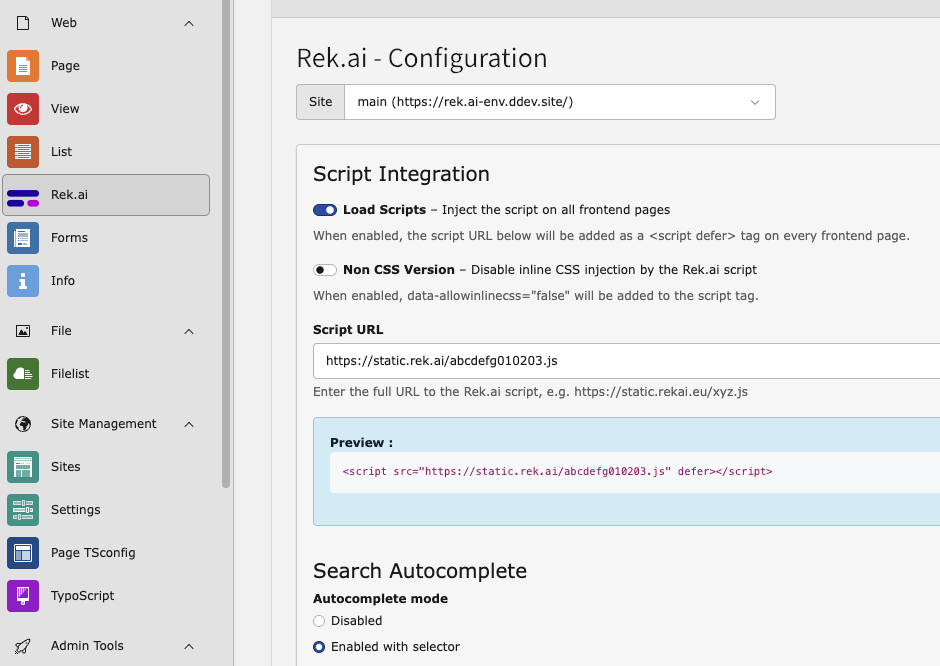
The Rek.ai configuration module.
The module is divided into two sections: Script Integration and Autocomplete.
Script Integration
Load Scripts
- Type
- Boolean (toggle)
- Default
- Disabled
When enabled, the Rek.ai JavaScript is injected as a <script defer> tag into the <head>
of every rendered frontend page. The tag is only added when both this toggle is on and a
valid Script URL is configured.
Non CSS Version
- Type
- Boolean (toggle)
- Default
- Disabled
When enabled, the data-allowinlinecss="false" attribute is added to the Rek.ai <script>
tag. This instructs the Rek.ai script to skip its built-in inline CSS, which is useful when the
site provides its own styling for Rek.ai widgets.
Script URL
- Type
- URL string
- Default
- (empty)
- Example
https://static.rekai.se/xyz.js
The full URL to the Rek.ai JavaScript file. This URL is provided by Rek.ai when you create or configure a site in the Rek.ai dashboard. The module validates that the value is a well-formed URL before saving; "Load Scripts" cannot be enabled without a valid URL.
After saving, the module shows a preview of the tag that will be injected:
<script src="https://static.rekai.se/xyz.js" defer></script>With Non CSS Version enabled:
<script src="https://static.rekai.se/xyz.js" data-allowinlinecss="false" defer></script>Autocomplete
The extension can load and initialise the Rek.ai autocomplete library automatically. All autocomplete settings are managed in the same backend module.
Autocomplete Mode
- Type
- Select (integer)
- Options
0– Disabled (default)1– Enabled with selector2– Enabled with custom script
Controls whether the autocomplete feature is active and how it is initialised.
- Disabled — no autocomplete library is loaded.
- Enabled with selector — the autocomplete library (
rekai_autocomplete.min.js) is loaded and the extension generates an initialisation script automatically based on the settings below. A preview of the generated script is shown in the module. - Enabled with custom script — the autocomplete library is loaded and the content of
Custom autocomplete script is injected verbatim as an inline
<script>block.
Autocomplete Selector
- Type
- String (CSS selector)
- Default
#searchform-input- Applies to
- Mode 1 only
The CSS selector for the search input field that autocomplete should attach to.
Open on Click
- Type
- Boolean (toggle)
- Default
- Enabled
- Applies to
- Mode 1 only
When enabled, selecting an autocomplete suggestion navigates to that result's URL immediately.
Use Current Language
- Type
- Boolean (toggle)
- Default
- Enabled
- Applies to
- Mode 1 only
When enabled, the autocomplete request is restricted to content in the current page language (using the ISO language code resolved from the active TYPO3 site language).
Number of Results
- Type
- Integer
- Default
5- Applies to
- Mode 1 only
The maximum number of autocomplete suggestions to display.
Custom Autocomplete Script
- Type
- Text (JavaScript)
- Applies to
- Mode 2 only
A full custom JavaScript block that is injected as-is into every frontend page when autocomplete mode 2 is active. Use this when you need full control over the autocomplete initialisation that the generated script (mode 1) does not provide.
Warning
The custom script is output without sanitisation. Only enter trusted JavaScript here.
Site Settings Storage
All values configured in the backend module are stored per site in
config/ under the one_forge_rekai key. The file is
created automatically on first save if it does not already exist.
Example config/:
one_forge_rekai:
  loadScripts: true
  scriptUrl: 'https://static.rekai.se/xyz.js'
  nonCssVersion: false
  autocompleteMode: 1
  autocompleteSelector: '#searchform-input'
  autocompleteOpenOnClick: true
  autocompleteUseCurrentLanguage: true
  autocompleteNumberOfResults: 5
autocompleteCustomScript: ''Each site in a multi-site TYPO3 installation maintains its own independent configuration file.
Values are read and written by One via
TYPO3CMSCore and TYPO3CMSCore.
TypoScript Reference
The extension auto-imports the following TypoScript setup, which registers both content element rendering chains:
tt_content.rekai_recommendations = FLUIDTEMPLATE
tt_content.rekai_recommendations {
    templateName = RekaiRecommendations

    templateRootPaths {
        10 = EXT:one_forge_rekai/Resources/Private/Templates/Content/
    }

    dataProcessing {
        10 = OneForge\RekAi\DataProcessing\RekaiSettingsProcessor
    }
}

tt_content.rekai_qna = FLUIDTEMPLATE
tt_content.rekai_qna {
    templateName = RekaiQna

    templateRootPaths {
        10 = EXT:one_forge_rekai/Resources/Private/Templates/Content/
    }

    dataProcessing {
        10 = OneForge\RekAi\DataProcessing\RekaiSettingsProcessor
    }
}data (Rekai) passes the extension configuration
array as the Fluid variable {rekaiSettings} to both templates. It also resolves any selected
page UIDs to their URL slugs so they can be passed as data-subtree attributes.
Rendered HTML output
Recommendations element — attributes vary by field values:
<div class="rek-prediction"
     data-headertext="Discover more"
     data-nrofhits="5"
     data-renderstyle="pills">
</div>With a specific page subtree selected:
<div class="rek-prediction"
     data-nrofhits="5"
     data-renderstyle="list"
     data-listcols="2"
     data-subtree="/news/,/blog/">
</div>Q&A element:
<div class="rek-prediction"
     data-entitytype="rekai-qna"
     data-nrofhits="10"
     data-userootpath="true">
</div>The Rek.ai JavaScript (loaded via the <script> in <head>) finds all elements with the
class rek-prediction and populates them with the appropriate content.