The SAV Library Plus is a library developped since TYPO3 6.x. Used with the SAV Library Kickstarter, it
makes it possible to directly build extensions without any PHP coding,
thanks to simple configuration parameters using the SAV Library Kickstarter as an extension editor.
Multiple views of the data including forms can be generated.
The extension sav_filters
provides filters to work with the extensions generated for the SAV Library Plus or
the SAV Library Mvc.
Screenshots
The following screenshots come from the SAV Library Examples.
The example #X is related with the exentension sav_library_exampleX
and is described in the tutorial #X section of this manual.
Example 1 – Creating Text and Image
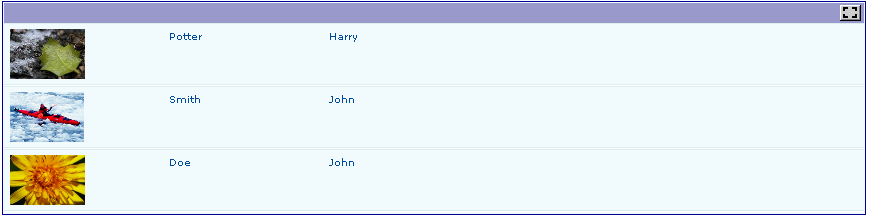
List View
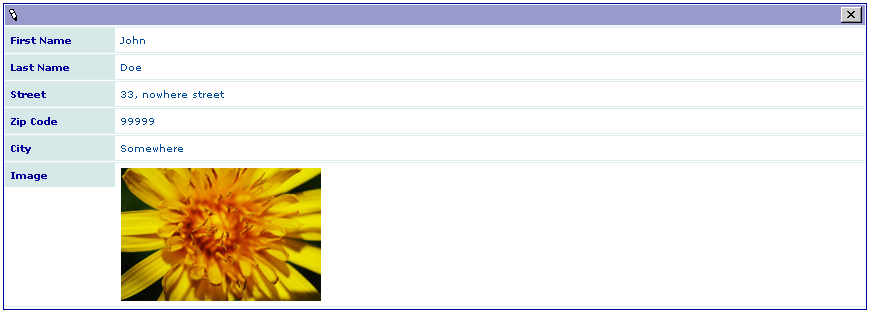
Single View
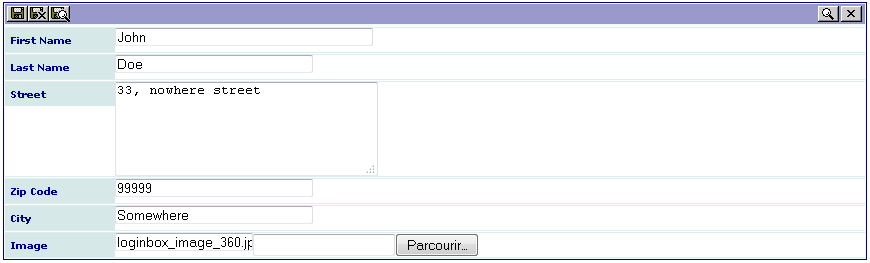
Edit View
Example 2 – Creating Link, Text Area, Selector
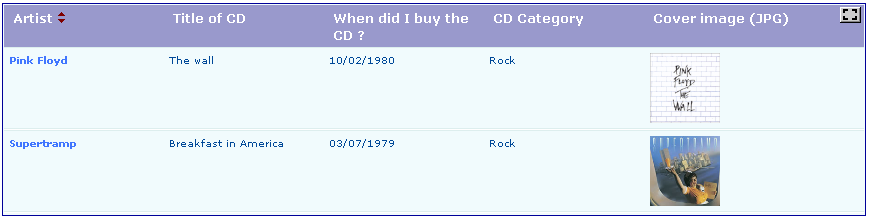
List View
Single View
Edit View
Example 3 – Creating Folders, MM Table in a Subform
Single View
Edit View
Example 4 – Double-Window Selector, Table in a Subform Which is not in Relation With Items
Single View
Edit View
Example 6 – Email and RTF
Edit View
Example 7 – Guest Book (Multiple Forms)
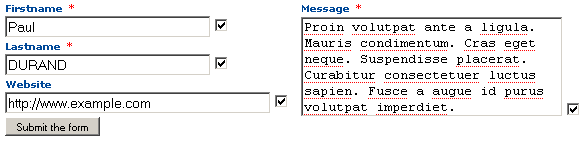
Guest Form (Edit View)
Guest Inputs Validation (List and Edit Views)
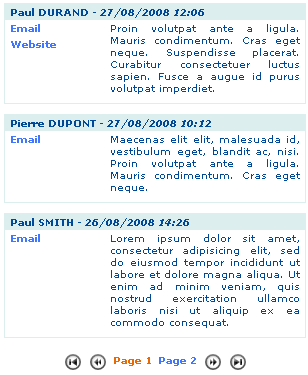
List View
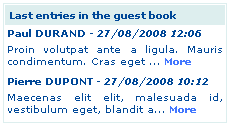
Teaser View
Example 8 – Fe Users Admin and Export
List View of the ADMIN Form With Export Icon
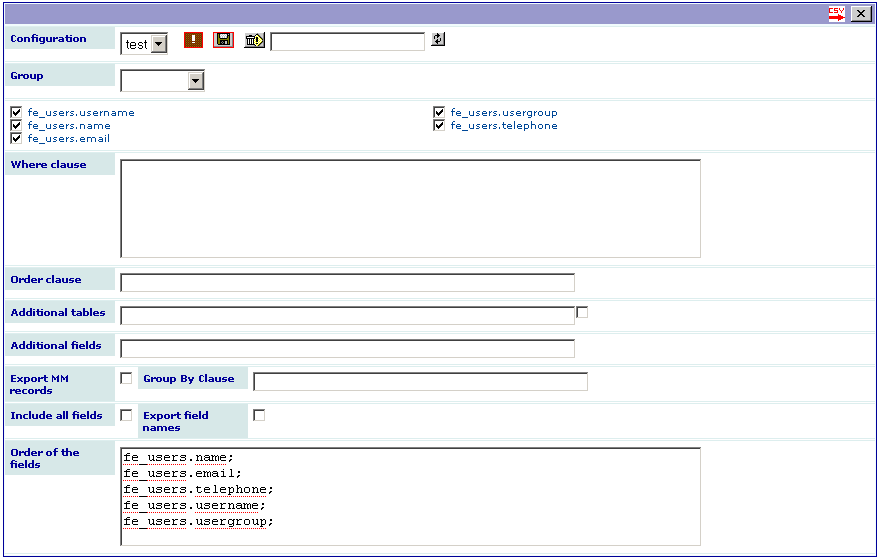
Export View Using a Previously Saved Configuration
Read the SAV Library Kickstarter tutorial section
to create a new extension or download one of the SAV Library Examples
(sav_library_exampleX, where X is a number) available in the TER.
Important
The SAV Library Kickstarter now generates CType plugins instead of list_type plugins.
If you regenerate existing extensions, flush TYPO3 cache after regeneration.
vendor/bin/typo3 cache:flush
Copied!
Then use the Upgrade Admin Tool and run Upgrade Wizard to migrate the plugins to CType.
Configuration
This section describes the different available configurations of
the plugin generated by the SAV Library Kickstarter. Read the tutorial section first.
The configuration of each generated extension is done by means of
a flexform. The flexform has four folders:
General
Input controls
Advanced
Help pages
General Folder
Help: click on the word Help to access to this section
of the documentation.
Select form: use this selector to select the form name. Let use
recall that the sav_library_plus makes it possible
to build several forms associated with the same extension, thus providing
different views of your tables.
Show all if no filter: if set, all items are displayed if no
filter is applied, for example by means of the sav_filters
extension.
If no information available: use the selector to choose what to
display when no information are available.
Max number of items : maximum number of items that will be
displayed in a page. If set to 0, all items are displayed.
Input Controls Folder
=====================
Help: click on the word Help to access to this section
of the documentation.
Allow authenticated FE users to input data: if set, frontend
inputs are allowed by authenticated users (set by default).
Allowed groups: if you select user groups, user must belong to
one of these groups to be allowed to input data in the frontend.
Input Admin field: put here a field under the form
tableName.fieldName (if you use only fieldName, the main table is
taken as tableName). This will restrict the input to users that have
Admin right for this field in their TSConfig. For example, if one
user has extKey_Admin=value1,value2 in his TSConfig, he/she will
be allowed to edit or delete items for which fieldName is equal to
value1 or value2 for the extension extKey. The fields or the
folders which have the attribute editAdminPlus= 1; can be modified
if the user has the Admin+ rights. For example, if the TSConfig is
extKey_Admin=value1+,value2 , the user is an Admin+ for the
records where fieldName is equal to value1 and just Admin for
the records where fieldName is equal to value2. Users become
Super Admin if their TSConfig is extKey_Admin=\*.
Note
Two special entries are also allowed:
fe_users.uid: it may be used if the main table is fe_users.
In this case, access is granted if the authenticated frontend
user uid is the same as the main table uid
(see Tutorial 8 for an example).
cruser_id or your_main_table.cruserd_id: in this case, the access
is granted if the authenticated frontend user has created the current
record, i.e. its uid is equal to the cruser_id field in the
current record.
No “new” button: no new button is added to the form. It means
that you can modify existing records but you cannot create new record.
No “edit” button: an edit button will not be added in front of
the records in List views.
No “delete” button: a delete button will not be added in front of
the records in List views.
Add a “delete” button only for records created by the user : add a
delete button only for records created by the user.
Input start date: if set, inputs in the frontend will not be
possible before this date.
Input end date: if set, inputs in the frontend will not be
possible after this date.
Apply date limit: use the selector to set either Nobody, All,
Admin plus users, All excluding Super Admin. The date limit is
applied according to this selector.
Advanced Folder
Help: click on the word Help to access to this section
of the documentation.
Permanent filter: you can use this field to add a WHERE clause
part to the WHERE clause of the form query.
Add a fragment (# content id) to links: the content id is added
as a fragment to the links.
SELECT query to allow data to be displayed (if void display is
always allowed): the SELECT query entered in this field is used
to check if data can be displayed. It the query result is not empty
the access is granted. It may be used in very specific cases to protect
access to the data. Because it is very specific, for security reasons,
only admin users can fill this field when needed.
Allow the use of the “query” property: the query property makes
it possible to execute queries in Edit or Update views. Because
any query may be executed, for security reasons, only admin users can
check this field when this property is needed.
Allow the use of the exec function in export: The use of the php
exec function is allowed in export which makes the execution of text
processors possible, for example.
Help Pages Folder
Help: click on the word Help to access to this section of
the documentation.
Help page for the List view: use this selector to choose a page
of your site which will be use as a help page for the List view. In
this case, an icon is displayed in the title bar of your extension.
Help page for the Single view: use this selector to choose a page
of your site which will be use as a help page for the single view. In
this case, an icon is displayed in the title bar of your extension.
Help page for the Edit view: use this selector to choose a page
of your site which will be use as a help page for the edit view. In
this case, an icon is displayed in the title bar of your extension.
The SAV Library Kickstarter generated the file
Configuration/Routes/Default.yaml which can be imported into your site route configuration.
The following configuration illustrates the configuration for the
sav_library_example0 extension.
The extension sav_library_plus
comes with default icons and images
which are respectively in the directory Resources/Public/Icons and
Resources/Public/Images. There are several ways of changing icons
and images. When changing an icon, you may also change the file
extension. Allowed extensions are .gif, .png, .jpg or .jpeg.
For example, you may replace the icon file calendar.gif by
calendar.png. If icons with the same name but different extensions
are in the icon directory, the priority is .gif first, then .png
then .jpg and finally .jpeg.
At the Library Level
Changes are made in TypoScript and will be applied to all extensions
using the SAV Library Plus. The syntax is the following:
There are two different ways of changing the icon or images root
paths.
Create a Resources/Public/Icons (resp. Resources/Public/Images)
directory in the generated extension in which you put your icon files
with the same names as in the default directory
Resources/Public/Icons (resp. Resources/Public/Images) in the
extension sav_library_plus.
Create a directory where you want in the fileadmin directory, in which
you put your icon files with the same names as in the default
directory. Then, in the Setup of your template, write:
where yourExtensionNameWithoutUnderscores is the key of the
extension you have created with the SAV Library Kickstarter, but
without underscores if any, and yourIconRootPath (resp.
yourImageRootPath)is the relative path of the directory where you
have put your icons (resp. images).
You may also want to apply the changes only for one form in one
specific extension. The syntax becomes:
The extension sav_library_plus
comes with default templates for
the views. Templates, layouts, partials are respectively in the
directory Resources/Private/Templates/Default,
Resources/Private/Layouts and Resources/Private/Partials. There
are several ways of changing them.
At the Library Level
Changes are made in TypoScript and will be applied to all extensions
using the SAV Library Plus. The syntax is the following for the
template, layout and partial root paths:
The default partials directory Resources/Private/Partials contains
the defaut title bars and footers respectively in TitleBars and
Footers sub-directories. If you use your own partials, your
destination directory must have the same organization and must contain
the same files as in the default partials directories. It may happen
that you want to change only the title bar or the footer for one type
of view, for example the EditView as in Tutorial 8.
The syntax is the following where viewType is either listView,
singleView or editView:
You also may want to modify the default styles only for one specific
extension. In that case, you just have to put a CSS file in the
Resources/Public/Css directory of your extension under the name
under the name yourExtensionName.css, where yourExtensionName is
the key of the extension you have created with the generator. This CSS
will be automatically added in the HTML <head> section (see
Tutorial 7 for such a case). You can also change it
using the following TypoScript configuration:
This feature was introduced in version 0.0.3. By default the date
and dateTime format are respectively %d/%m/%Y and *%d/%m/%Y %H:%M.
Each date and dateTime field can have a separate configuration using
the format attribute for that field in the SAV Library Kickstarter or
using the page TSConfig as explained above.
Global changes can also be performed at the extension or library
levels in TypoScript. The priority for the default are extension level
if any, else library level if any, else the default format. For
example, the two following TypoScript instructions respectively modify
the default date format only for the extension sav_library_example0
and the default dateTime format for all extensions using SAV Library
Plus.
There are several style sheets provided with the date picker. The
default CSS is calendar-win2k-2.css. You can change the default CSS
at the extension level or library level by using the following
TypoScript configuration:
The date format of the tooltip (footer bar of the date picker) or the
title bar can be changed at the extension or library level by the
following TypoScript configuration:
Default values for the title bar is %B, %Y and depends on the
language for the tool tip (see the variable
Calendar._TT[“TT_DATE_FORMAT”] in files in the directory
Classes/DatePicker/lang).
Adding Parameters to Links
It may occur that additional parameters are required with an extension
generated by the SAV Library Kickstarter. There are several ways of
adding parameters.
At the Library Level
Parameters are added in TypoScript and will be applied to all
extensions using the SAV Library Plus. The syntax is the following:
The SAV Library Extension Generator includes flags to deal with
maintenance operation.
A global maintenance flag is available at the SAV Library Plus level
using the Extension Manager. If you check the flag, a maintenance
message will be displayed by all extensions built with the SAV Library
Plus and filters will not be displayed.
If you provide a list of users'id, separated by a comma, then these
users will still see the extensions and the filters.
Global maintenance is useful for developers when global changes are
performed on the SAV Library Plus.
Tutorial 0: Test Extension
This tutorial is described in the SAV Library Kickstarter
manual. It
shows the basic steps for creating and installing an extension.
You can download this example from the TER (sav_library_example0).
Install it and enjoy many features and the power of the SAV Library
Plus.
Tutorial 1: Contact List
This example creates a contact list with the first name, last name, street, zip
code, city and an image of the contact.
You can download this example from the TER
(sav_library_example1).
Install it and enjoy. The following sections explain several features
of the extension.
A List view which displays all the items associated
with the query,
A Single view which displays only information
associated with one item,
An Edit view which makes it possible to edit an item in
the frontend.
Let us note that most extensions deal with one form with three views:
one view to list the items, one view to display an item
and one view to edit an item. However, an extension may only
have one List view. It can also contain several forms with different
views as it is explained in Tutorial 7.
Click on the List view to open it.
The item template defines how each item will be displayed. In general,
it is an <ul> list with <li> elements which contain the fields to
display. Fields must be written as markers ###fieldname###.
Click on the help icon to get more information.
Then, click on the Single and Edit views where no specific
configurations are required.
Queries
Each form has an associated query to select the items that will be
displayed in the List view. Use the Context Sensitive Help icon to
get the description associated with each field.
Forms
The Form section is the place where the forms are specified, i.e.
the views and the query are selected. Use the Context Sensitive Help
icon to get the description associated with each field.
Field Configuration
A specific configuration can be provided for each field in each view.
Configuration are available in the database table. Click on the data
base table. Three tabs associated with your three views have been
generated. By clicking on a tab, then on a field you will see the
configuration parameters of all the field for the selected view. The
Context Sensitive Help icon provides on line information about the
allowed attribute for the field type (see also the SAV Library
Kickstarter Reference
for the description of the attributes).
Using the Extension
Create a page and insert a plugin content element and select `Contact
list` in the plugin selector.
The configuration of the plugin is performed by means of a flexform
which comes with default values. Just select your form name, that is
Contact in the Select form selector, change the default values,
save your content element and clear the cache .
Go to your page in the frontend and you should see the following
caption.
Authenticate yourself to be allowed to input data in the frontend.
Now, a new icon should be displayed.
Click on the right icon to enter in the edit mode. A new icon appears
at the left hand side of the form. Click on it to input a new item.
The generated edit view is shown. As it can be seen on the following
caption, the size of the field firstname is longer than the other
fields of the same type. This is due to the configuration parameter
size = 40; added for this field. The other fields take the default
configuration of the SAV Library Kickstarter, i.e. a default size of
30.
Fill the form with information. Use the browser to select the image
and save.
When your have completed your input quit the input form. Note that you
can also use the save and close icon. Now, your extension will display
one item in your List view.
Click on the Enter in edit mode button to add another item, edit the
previous one or suppress it.
Thanks to the attribute func = makeItemLink; in the field image of
the List view, clicking on the image will open the Single view.
Let us note that if you click on the icon on the pencil icon, you will
access to the Edit view and be able to edit the content.
How to?
How to Specify the Size of the Image?
The image is displayed in the List and Single views. The following
configuration parameters define a 50x50 image, for example in the
List view:
width = 50;
height = 50;
Copied!
How to Change the Number of Items Displayed by Page in the List View?
By default, the Max number of items in the flexform is set to 10,
just change this number. Setting this number to 0 will display all
items. Using the default configuration, you will get:
Now, if you set Max number of item to 2, you will obtain:
How to Introduce an Alphabetic Selector?
It is often useful to select records based on, for example, the first
letter of the name. The extension sav_filters was specially
built to deal with this problem.
Download sav_filters
from the TER, read the documentation and install it.
Configure the flexform by filling the table name and the field name. A
Context Sensitive Help is available.
Save your configuration and go in the frontend.
Only the letters corresponding to the first letter of existing records
can be selected. Click on a letter to select the records.
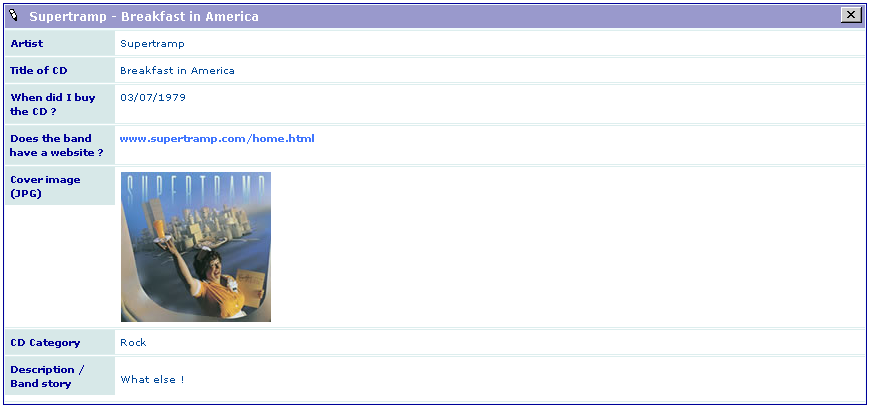
Tutorial 2: CD Album
This example is taken from Kasper's video Episode III. It creates a list
of CD albums. It includes artist name, title of the album, date of
purchase, cover image, artist web link, category fields.
Download this example from the TER (sav_library_example2). Install
it, add your CD categories in the Back End and enjoy.
Create a page and insert a plugin content element and select `CD
Collection` in the plugin selector.
The configuration of the plugin is performed by means of a flexform
which comes with default values. Just select your form name, that is
CD Album in the Select form selector, save your content element
and clear the cache .
Add your CD categories in the Back End (in list mode, create one or
several CD Category records: Rock, Jazz, Pop...).
Finally, go to your page in the frontend and add items to your
collection.
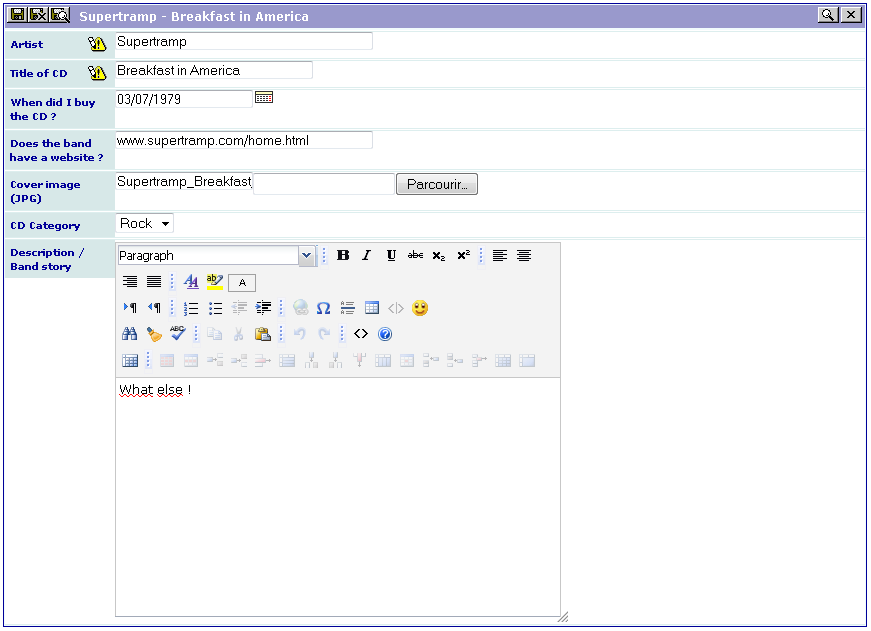
As it can be seen, a new icon is associated with the fields artist
and album_title. It indicates that these fields are required (if
you have selected Required as shown in the video, of course!). You
will not be able to save your record if you do not fill these fields
and an error message will be displayed.
Let us note that you can also mark any field as required using the
configuration parameter:
required = 1;
Copied!
You can use a date picker by clicking on the button associated with a
date.
The icons displayed for the RTE depend on the frontend configuration
of the RTE.
How to?
How to Display a Title in the Upper Icon Bar of the View?
A title can be associated with each view. It is defined in the `Title
bar` section of the views. Text, language markers or field markers can
be used.
For example, if you use $$$formTitle$$$ in the Title bar field,
this language marker will be replaced by its definition in the
locallang.xlf file. In this example, formTitle is defined as `CD
Collection`` for the default language and ``Liste de CD` for the French
language. Therefore, the output becomes:
Now, if you use ###artist### - ###album_title### in the Title bar
section of the Single and Edit views, the markers ###artist###
and ###album_title### will be replaced by the respective values of
the field artist and album_title for the current record. If these
markers are used in the Title bar section of the List view, they
will be replaced by the label associated with the fields. Thus, the
output is the following for the Single view:
How to Display the Labels Associated With Each Field in the Title Bar?
As explain above, field markers used in List view are replaced by
the label associated with the fields. Therefore, if the Title bar
section is the following:
How to Change the Order of the Item List by Clicking on the Label in the Title Bar?
For example, assume that we want to change the displayed order by
clicking on Artist (or Artiste if you use the french language).
Add the following configuration parameter in the artist field of the
List view.
orderLinkInTitle = 1;
Copied!
Add the following configuration in the WHERE Tags section of your
query. Click on the plus icon to add an entry.
In this configuration, use filedname+ or fieldname- and associate
the order clause you want. In general + can be used for the
ascending order and - for the descending order.
By default, the displayed link will behave as a toogle between the
ascending and the descending sort. However you can control the display
using the property
orderLinkInTitleSetup
which introduces links
associated with icons. For example, using `orderLinkInTitleSetup =
:value:ascdesc;`` or ``orderLinkInTitleSetup = asc:value:desc;` will
respectively provide the following outputs:
Of course, you may keep the toggle link by writing
respectively orderLinkInTitleSetup = :link:ascdesc; or
orderLinkInTitleSetup = asc:link:desc;.
The icon color will change depending on the sort order as shown below.
In the following caption, the descending order is displayed.
How to Reorganize the Fields with Folders?
Folders may be introduced in the Single and Edit views to provide
a better organization of the information. Click on the plus icon to
add a folder.
In this example, two folders are defined. If the labels General and
Comments are defined in the locallang.xlf file, they will be
replaced by their definition in the selected language, otherwise they
are used as it. Then, set a folder to each selected field of the `CD
Collection`` table for the ``Single` view as shown below, save and
generate the extension:
If you set all the fields to the folder General except the field
description which is set to Comments, the following views are
obtained in the frontend where the folder General and Comments
have a French translation in locallang.xlf.
Tutorial 3: CD Album (Advanced)
This example illustrates other features of the extension generator (MM
table, email link, fields on the same line).
Download this example from the TER (sav_library_example3). Install
it, add your CD categories in the backend and enjoy. The
following sections explain several important features.
Now, let us assume that you want to lend your CD to your friends.
Well, even with friends it is useful to keep trace of your CD! One
solution is to build a new table which will be in a MM-relation with
your main table. One CD can have been borrowed by several friends.
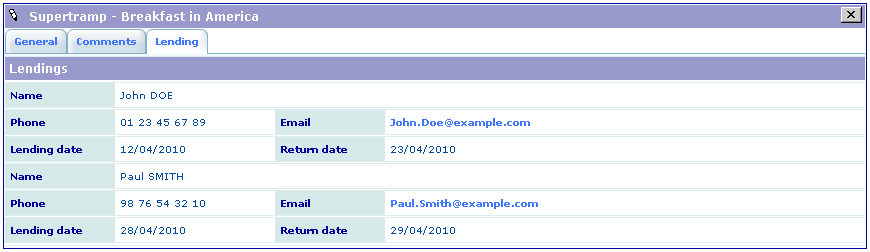
In this table tx_savlibraryexample3_lending, the name of each
friend is kept as well as its phone number, its email, the lending
date and the return date. All the lending operation will be displayed
in a folder Lendings (Prêts in French).
A field rel_lending was created by means of the SAV Library
Kickstarter in the tx_savlibraryexample3_cds as a relation n:n
with the table tx_savlibraryexample3_lending.
cutLabel = 1; means that the label of this field will not be
displayed (it is just a personal choice !)
maxSubItems = 5; overrides the Max number of relations value (it
is also a personal choice !)
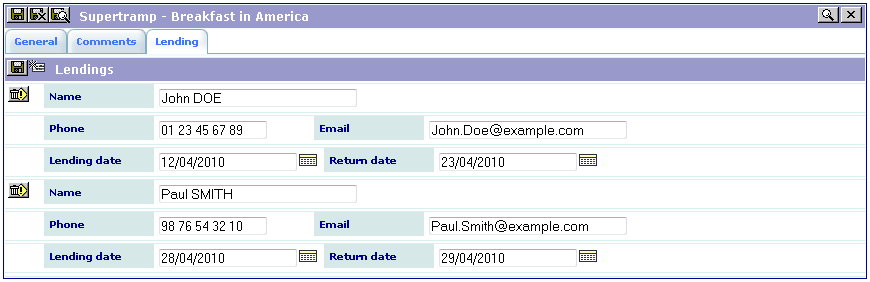
In the Edit view, almost the same configuration is used. The
attribute addDelete will add a delete icon in front of each item in
the sub-form so that you can delete them.
Let us recall that the Context Sensitive Help provides information on
the attributes that can be used. In following captions, three
different attributes are used:
noDefault = 1; is an attribute for Date type fields.
It means that no default value, i.e. the current date, will be displayed when a new
item is created.
fusion = begin; and fusion = end; are General attributes which
can be used almost with every fields. fusion = begin; starts the
process of writing fields consequently on the same line, while `fusion
= end;` stops the process.
func = makeEmailLink; belongs to Functions
attributes, they can
also be used almost with every fields for which it makes sense to
apply thy function. It will generate an email link the current value
of the field.
Queries
A GROUP BY clause is needed in the Query to display only one item per
CD in the List view. If this clause is not added, we get as many
repeated outputs for same item as the number of sub-items associated
with it (the reason is that SAV Library Plus extension generates
left join relations between the tables).
Using the Extension
Proceed as in Tutorial 2 and go in The frontend to enjoy editing and
displaying you Lending.
Click on the Icon to edit a new item. Fill it and save.
Click on the link to open your mail tool.
Use the Context Sensitive Help and feel free to test the attributes in
the SAV Library Kickstarter.
Tutorial 4: CD Album (Improved)
This example makes it possible to add your friends and to lend them
your CDs. It illustrates other features of the extension generator (MM
relation in a double window selector, input table which is not in
relation with an item).
Download this example from the TER (sav_library_example4). Install
it, add your CD categories in the backend and enjoy.
A new table tx_savlibraryexample4_friends was created with four
fields: friend_name, friend_phone, friend_email as string
inputs and friend_preferred_music as a database relation. In this
example, it is clear that your friends are not associated with one CD.
They should be in the table but with no relation with the CD item. We
need a new input in the table tx_savlibraryexample4_cds, such
that you will be able to add your friends in an element browser as
shown in Example 3, `but without creating a relation field in the
table` .
This is done by selecting `Just create the Element Browser (no
relation)` as shown in the caption below.
As we want to select only our friends, a where clause is added to the
field which will select the records. They must have the correct
cruser_id in the tx_savlibraryexample4_friends table.
Let us assume that we want to select our friend's preferred music
styles from a double-window selector. Since our friends may have
several preferred styles, we have to build a MM relation. In this
example, we have chosen to use a non-true MM relation, that is no MM
table is built and, instead, TYPO3 uses a comma-separated list. If you
prefer to use a true MM relation just select the checkbox.
Using the Extension
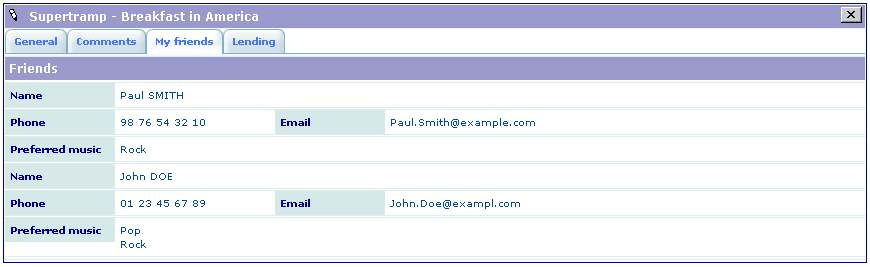
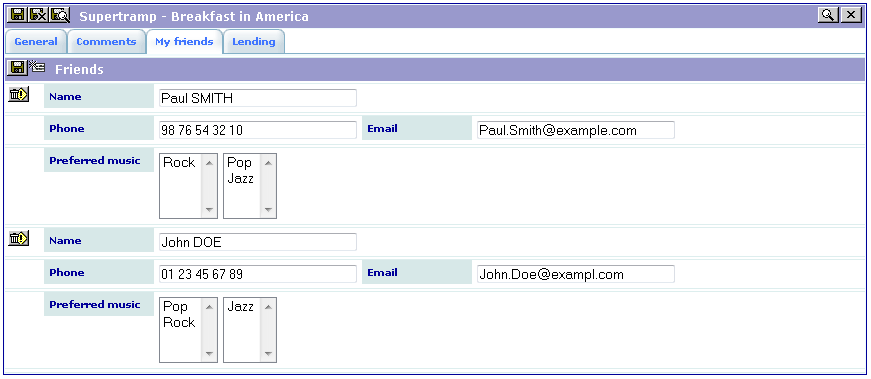
Add your friends. In the double-window selector, double-click on the
items to make them go from one window to the other. The left hand side
defines what is saved in the table.
Finally, input the lendings of your CDs.
Tutorial 5: Hooks
The configuration options that can be used in the SAV Library Kickstarter makes
it possible to generate the rendering in most of the cases. However, when more
complex renderings are required, hooks can be used either in the extension
itself or in another extension extension.
The extension defines three fields: a field named title and two working fields
respectively named field1 and field2. The aim of this example is to render
field1 and field2 in the Single view, by means of a FLUID template,
such that their content are ordered in the ascending order.
Note
Hooks are useful when the processing associated with the rendering is more complex
than simply displaying fields. Indeed, since FLUIDTEMPLATE is a TypoScript content
object, it can be used with the tsObject
and tsProperties attributes
(see Tutorial 10 for an example).
Edit the extension sav_library_example5
in the SAV Library Kickstarter to get an overview. It contains
one form with three conventional List, Single and Edit views.
There is nothing special in the List and Edit views.
Attributes in the Single View
The Single view contains the call to the hook in the field
hook_content defined as Only shown in SAV form.
The attributes must define the hook name and the hook parameters.
The hook name is defined by means of the hookName property.
hookName = SavLibraryExample5;
Copied!
The hook parameters are defined by the hookParameters property
as a JSON array.
Configuration of the Hook in the File ext_localconf.php
=======================================================
The class to be called is set in the variable
$GLOBALS['TYPO3_CONF_VARS']['EXTCONF']['sav_library_plus']['hooks']['YourHookName']
in the file ext_localconf.php file.
// Adds a hook for SAV Library Plus
$GLOBALS['TYPO3_CONF_VARS']['EXTCONF']['sav_library_plus']['hooks']['SavLibraryExample5'] = \YolfTypo3\SavLibraryExample5\Hooks\SavLibraryPlus::class;
Copied!
In this example, the class \YolfTypo3\SavLibraryExample5\Hooks\SavLibraryPlus
is in the file typo3conf/sav_library_example5/Classes/Hooks/SavLibraryPlus.php.
Rendering the Hook
The class \YolfTypo3\SavLibraryExample5\Hooks\SavLibraryPlus extends the
class \YolfTypo3\SavLibraryPlus\Hooks\AbstractHook. The method renderHook($parameters)
is called to render the hook.
In this example, this method creates a template view, whose name is provided by the hook parameter
template and fetches the current record associayed with the Single view.
/**
* Renders the hook
*
* @param array $parameters
*
* @return string
*/publicfunctionrenderHook($parameters){
// Gets the parameters
$template = $parameters['template'];
$uid = $parameters['uid'];
// Creates a view for more fluid processings of the template/** @var StandaloneView $view */
$view = GeneralUtility::makeInstance(StandaloneView::class);
$view->setTemplatePathAndFilename('EXT:sav_library_example5/Resources/Private/Templates/' . $template);
// Selects the record
$queryBuilder = GeneralUtility::makeInstance(ConnectionPool::class)->getQueryBuilderForTable('tx_savlibraryexample5');
$rows = $queryBuilder->select('*')
->from('tx_savlibraryexample5')
->where($queryBuilder->expr()
->eq('uid', $queryBuilder->createNamedParameter($uid, \PDO::PARAM_INT)))
->executeQuery()
->fetchAllAssociative();
// Assigns the row variable
$view->assign('row', $rows[0]);
// Renders the content
$content = $view->render();
return $content;
}
Copied!
The FLUID template is in the folder Resources/Private/Templates of the extension.
It compares the values of the field and displays them in the ascending order.
Copy the file invoice.rtf, which is in the extension directory, in
the fileadmin directory,
Add the following line in the field TSconfig of the page where you
have installed the extension. It will overload the email sender defined
in the extension as it will be described in the configuration section.
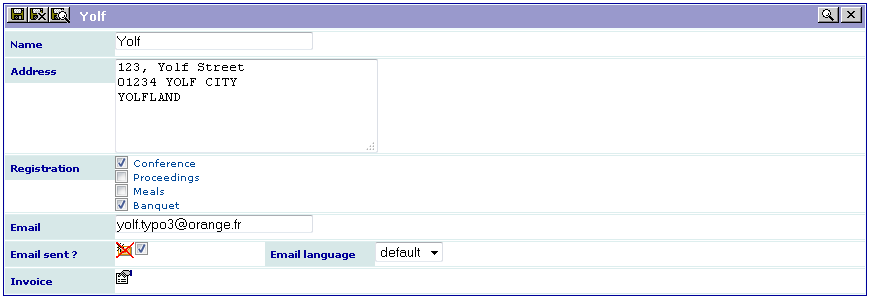
Use the input form to enter a conference participant as in the
following caption.
Then select the email language (default or French) and click on the
email icon. If the email is correct, the form will slightly change as
shown below. You cannot click on the email icon anymore (if you need
to re-send the email, cancel the checkbox at the right hand side of
the email icon and save the form).
You should have received an email as the one below:
Dear Yolf,
Thank you for your registration to the conference.
Your registration includes:
√ Conference
- Proceedings
- Meals
√ Banquet
Your invoice will be available at the registration desk.
Looking forwards to seeing you.
Best regards,
The conference organization committee.
Copied!
To generate the RTF file, click on the icon associated with the
invoice, then open the generated file by clicking on the link and
print it (the fields are automatically updated).
Configuration
Open the extension in the SAV Library Kickstarter and select `SAV
Example6 – Email and RTF`` in the ``New Database Tables`, then select
the Input folder. As it can be seen, only the fields email_flag,
email_language and invoice have special configurations.
Field email_flag
The field email_flag is associated with the email generation. Let
us analyze its configuration shown below. Do not forget to use the
Context Sensitive Help to get information about the field type
attributes and to click on the sav_library_plus / general
attributes.
fusion = begin;. This attribute is used with fusion = end; in the
field email_language to have both fields aligned.
mail = 1;. It tells that an email is associated with the field.
fieldForCheckMail = email;. The email will be sent only if the field
email is not null.
mailSender = conference.organization@example.com;. This attribute defines the email
sender. You can change it with your email and remove the line you have
added in the TSconfig of the page.
mailSubject = $$$mailSubject$$$;. It defines the mail subject. Since
$$$tag$$$ is used, it means that localization is used. Therefore, the
mail subject is defined in the file locallang.xlf in the extension
directory Resources/Private/Language. Open this file in your
favorite editor and check the xml tag
<trans-unit id="mailSubject" xml:space="preserve">.
mailMessage = $$$mailMessage$$$;. This attribute is the same as the
previous one for the message to be sent. As you can check in the file
locallang.xlf, the xml tag <trans-unit id="mailMessage" xml:space="preserve">
contains ###fieldName### markers that were replaced by their values in the
received message.
mailMessageLanguageFromField = email_language;. This attribute
indicates that the language for the mail is provided by the value of
the field email_language.
This is one of the possibilities for sending emails. See the Context
Sensitive Help to see how to send emails each time you save the form
(mailAlways) or when data have changed (mailAuto).
Field email_language
Nothing special about this field. It contains only:
fusion = end;. It closes the fusion, thus the next field will be on
the next line.
Field invoice
This field is used to generate the RTF file. Its configuration is:
generateRTF = 1;. It tells that RTF should be generated.
templateRTF = fileadmin/invoice.rtf;. It defines the template file
for the generation. To use this configuration, you must copy the file invoice.rtf
located in Resources/Private/Templates; into fileadmin.
This file contains markers ###tableName.fieldName### that will be replaced
by their value for the current row. You may also change the configuration into
templateRTF = EXT:sav_library_example6/Resources/Private/Templates/invoice.rtf;
to use directly the template file.
saveFileRTF = fileadmin/###tx_savlibraryexample6.name###.rtf;. This
attribute defines the name under which the RTF file will be saved.
Since a marker is used in this attribute, it will be replaced by its
value for the current row. In this example, the value of the field
name is Yolf, therefore, the file name will be Yolf.rtf.
Tutorial 7: Guest Book
The aim of this extension is to deal with multiple forms of the same
table and to explain how update views can be used. It creates a guest
book which is inspired from the extensions available in the TER.
Download this example from the TER (sav_library_example7).
This extension uses a table with the following fields:
the guest firstname,
the guest lastname,
the guest email,
the guest website,
the guest message,
a comment field.
We want to have three forms associated with this table:
one form for the guest input (FORM),
one form for the list of guest inputs (LIST),
one form for a teaser of the most recent entries (TEASER).
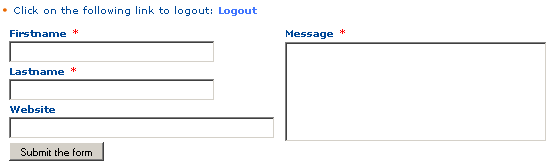
For the guest input, we want to avoid spams and to control the
content. Therefore, we want the following behavior:
The guest will answer to a captcha, then his/her email will be
required.
If he/she has given a valid email, he/she will receive a personal link
by email.
Using this link, the guest will be able to input data. His/her
firstname, lastname and message should be required fields.
The guest input will only appear on your website if you validate the
data.
To perform this task, we will use new concepts: the update view and
a filter for the page access thanks to the extension
sav_filters already used in
tutorial 1.
Edit the extension sav_library_example7
in the SAV Library Kickstarter to get an overview. It contains:
Three forms (FORM, LIST, TEASER),
Four views (FORM_Update, FORM_All, LIST_All, TEASER_All),
Three queries (FORM_Query, LIST_Query, TEASER_Query).
The Guest Input Form (FORM)
Click on FORM in the Forms section. As you can see, the form has a
List view, a special view and a query.
The special view, named FORM_Update is used to generate the guest
input form. The List view is used to validate the data in the
administration mode. Now, let us analyze each view.
The View FORM_Update
Click on FORM_Update in the Form views section.
The view is of type Special and of sub-type Form view. The `Item
template` field defines the template. In our case, two <div> are used
for having two columns in the form. The SAV Library provides some help
to easily implement the view. $$$label[fiedname]$$$ will be replaced
by the field title, depending on the localization, while
###field[fieldname]### will be replaced by the input item associated
with the type of the field. The CSS classes field and label are
defined in the default CSS of the SAV Library Plus extension. You may
overload their properties in your CSS file. Finally,
###button[submit]### creates the submit button.
Now, we will analyse the configuration. Click on `SAV Example7 – Guest
book`` in the section ``New tables``, select the ``FORM_Update` folder
tab and click on message, for example.
As it can be seen, the configuration is simple since only three
attributes are used:
addEdit = 1; means that the field can be edited by the guest, that
is it will be displayed in the edit mode for the defined type. For the
above example, a textarea is displayed.
required = 1; means that the guest will have to fill the field.
checkedInUpdateformAdmin = 1; means that the field will be pre-
checked for the validation in the Admin form as explained in the next
section.
For example, with the above configuration and the provided CSS file,
once installed, you should have the following result. Required fields
appear with the \* character.
And, thanks to the localization markers $$$label[fieldname]$$$, if you
change to the French language, you will get:
The View FORM_All
When a Form view is used, information provided by the guest are not
directly saved in the table fields. A temporary field, named
_submitted_data_ is automatically added to the table. It used to
keep the guest inputs until you have validated them. For that, the
Form view includes an Admin mode in which you have to enter by
means of an associated List view which will display the new inputs.
Since we will use a filter which requests the email of the guest
input, it will be used in the view to switch to the Admin mode.
Localization marker $$$adminTitle$$$ is used to the view title bar.
Let us recall that the marker is defined in the file locallang.xlf in
the Resources/Private/Language directory of the extension. The
template is very simple and contains only the email field which is
selected in the configuration.
Two attributes are associated with the field email:
func = makeItemlink;, already seen in the previous examples, which
creates the link associated to the field value.
updateForm = 1; specifies that the updateform should be opened.
Once correctly installed, if a guest, e.g.
paul.durand@example.com has left
a new message, you should have the following output:
Now, by clicking on the link, you will enter in the Admin mode. As
can be seen, the fields have a checkbox already checked. It is due to
the property checkedInUpdateformAdmin = 1; set in the Update view.
Only fields that are checked will be transferred to their respective
place in the table when submitting the form.
The Query FORM_Query
In order to get only the guest inputs that have not been checked and
processed, a special WHERE clause has to be used.
As explained before, the guest entry is not directly saved in the
table fields. Information are serialized and temporary saved in the
field _submitted_data_. Therefore, to check that new entries are
present, the WHERE clause checks a substring in the
_submitted_data_ field. The substring is: extensionName_formName
in lower case . When data are processed, the field _validated_
is automatically set. Thus, the WHERE clause will return new entries
that have not been processed.
In our example, the extensionName is sav_library_example7 and the
formName is FORM, thus the substring to fetch is:
sav_library_example7_form.
The Guest Input List (LIST)
Nothing very special here. The form LIST includes a conventional List
view (LIST_all). Analyze the view, the query and the field configurations
(use the Context Sensitive Help if necessary). Below are two useful
comments.
These two properties make is possible to display the label for the
field only if the field is not null (addLeftIfNotNull will add the
right hand side string to the left of the content if it is not null).
The field content is cut if it is null (cutIfNull).
Field date
This field has a special type Only shown in SAV form. It means that
it will not be present in the table but you may use it as marker
###date### in forms. It has one attribute:
alias = crdate; means that this field is an alias for the field
crdate that already exists in the table (it is created by the
Kickstarter).
Below is the screen shot obtained for the LIST form when the extension
is correctly installed.
The teaser (TEASER)
The form TEASER includes a conventional List view (TEASER_All). Analyze the
view, the query and the field configurations (use the Context
Sensitive Help if necessary). The only specific configuration concerns
the field message. We want to have it cropped to 60 characters and
have a more link right to the text to go to the page where the LIST
form is.
stdWrapValue =crop = 60\|...; defines a conventional TypoScript stdWrap
property. You can add here full TypoScript syntax. Do not forget that the
configuration field is ended by a semi-column, therefore if you need a
semi-column in your TS, write it \\;.
addRightIfNotNull = $$$more$$$; adds the label to the right hand
site of the content if it is not null. The localization marker
$$$more$$$ is used and will be replaced by its value in
Resources/Private/Language/locallang.xlf.
funcRight = makeLink; applies the internal function
makeLink,
which creates an internal link, to the right hand side part, that is
to the more link.
setUidRight = 123; defines the page uid associated with the link.
The value 123 is just for example, you can either replace it by your
page uid or overload it using the TypoScrit pageConfig as explained in the
configuration section Changing the Field Configuration.
If the extension is correctly installed, you should get:
Download the extension sav_filters from the TER and
install it.
Download the extension sr_freecap
from the TER and install it.
Guest Input
Create a page for the guest input.
In this page, insert a plugin content. Select `SAV Example7 – Guest
book``, select ``FORM`` in the ``General`` folder, then in the ``Input
Controls`` folder, uncheck ``Allow authenticated FE users to input data`.
In the same page, before the previous plugin , add a
new plugin content. Select SAV Filters. Fill the fields as shown
below. Replace your_email@example.com by a valid email. The value in
Uid for the field cruser_id will be the default value for the
cruser_id field of each record in the table
tx_savlibrary_example7_guests. For example, put your frontend user uid.
Provide a key which will be used to crypt the link. Finally provide a
redirection page for errors ( this field is required ). When using
captcha, you can set this field with the current page.
Save and go to the page in the frontend. Answer to the captcha and
submit.
Fill the field with your email and submit.
An information message is displayed and you should received an email
with a personal link.
Click on the following link to access to the service
Guest input
This link is valid only for one request.
Copied!
The link is Your_page_title (Guest input is the page title used
for the tutorial). Click on the link to access to the input form, fill
the form and submit it.
Guest Input Validation
Create a frontend group, for example savlibrary_test. It will be use to
protect the page and define the Admin group. Apply this group to
you, that is to your frontend user record.
Create a page for the guest input validation. Protect the page with
the frontend group.
Insert a plugin content. Select SAV Example7 – Guest book, select
FORM in the General folder. In the Input Controls folder,
uncheck input on form and add the frontend Group to the Allowed groups
field.
Save and go to the page in the frontend and click on the email
associated with your last input.
List View
Insert a plugin content. Select SAV Example7 – Guest book, select
LIST in the General folder. Set the field Max number of items to
the number of items you want in the list (10 is the default). Uncheck
Allow authenticated FE users to input data in the
Input Controls folder. Save and go to the
page in the frontend.
Teaser View
Insert a plugin content. Select SAV Example7 – Guest book, select
TEASER in the General folder. Set the field Max number of items
to the number of items you want in the teaser. Uncheck `Allow authenticated
FE users to input data`` in the ``Input Controls` folder.
If you have not changed the value of setUidRight, edit the page property.
In the page TSConfig add:
You have certainly remarked that the forms and the styles used in the
guest book were not the same as in the other SAV Library examples.
The reason is very simple. The extension sav_library_example7 comes
with its own CSS file. By convention:
If a file extensionKey.css is in the Resources/Public/Css
directory of an extension, this file is loaded in the <head> section
of the HTML. It is used to overload several default styles.
Tutorial 8: Fe Users Admin and Export
The aim of this tutorial is to show how an extension can be easily
built from an existing table. It will also be explained how to export
data in CSV from the extension.
The example deals with the fe_users table from which we want to build
two forms:
The first one (USER) is for the authenticated user who wants to manage
his/her personal data.
The second one (ADMIN) is for a frontend Admin user who may manage all users
and export them.
Edit the extension sav_library_example8
in the SAV Library Kickstarter to get an overview. It contains:
Two forms (USER, ADMIN),
Five views (USER_List, USER_Edit, ADMIN_List, ADMIN_Single,
ADMIN_Edit),
Two queries (USER_Query, ADMIN_Query).
The organization of the forms is quite similar to the previous
examples. Just click on them to analyze it. Let us focus on the
configurations associated with the existing table fe_users by
clicking on the link fe_users. As it can be seen, all fields have
type Only shown in SAV Form.
When the extension was created, by clicking on the link `Import
fields from table as “Only shown in SAV form”` , all fields from
the table fe_users were imported, then unwanted fields were
removed.
The User Form (USER)
In this example, it was chosen to design a very simple form consisting
in the display of the user image field. The image is associated with a
link to open the user form in the edit mode.
The Query USER_Query
The query is used to filter the fe_users table with the
authenticated user. This is easily done by using the marker ###user###
in the WHERE clause of the query.
The Views USER_List and USER_Edit
The template associated with these views is quite simple since the
only field to display is image.
And to make it possible to generate the link to open the input view,
only a few configuration attributes are required.
func = makeItemLink; generates the link for the current item.
edit = 1; opens the edit view instead of the default view (Single
view).
width = 50; and height = 50; define the size of the image.
Because there is no Single view associated with the user form, the
default Edit view title bar must be changed, in particular the `save
and show`` and the ``show button` must be removed. The example comes a
directory Resources/Private/Partials which contains two directories
TitleBars and Footers. They respectively contain a folder
EditView which contain themselves a new default.html Fluid file.
We will see later how to call these new Partials.
Finally, to override the default css, the example comes with a css
file sav_library_example8.css in the Resources/Public/Css
directory which contains the following instructions :
Concerning the view USER_edit, each field with the tyep Only shown in SAV Form (ShowOnly fields)
has the property updateShowOnlyField set to 1.
By default in ShowOnly fields are not created
nor can be updated. Setting this property to 1 overrides the default behavior.
The Administration Form (ADMIN)
The administration form is used in the frontend to manage, give
rights, export frontend users. It is based on a conventional query, List,
Single and Edit views for which no specific configuration is
needed. Just click on the different views and tabs to see how fields
are grouped.
Installation and Configuration
Installation
The following installation is just an example for testing the
extension.
In the folder, create a frontend group for regular users and a frontend group for
admin users.
In the folder, create a regular user and an admin user for the test.
Create a test page for the USER form and another for the ADMIN form.
In the USER page, insert the plugin and select the USER form.
Click on the folder Input controls. Select `Allow
authenticated FE users to input data`.
Enter fe_users.uid in the Input Admin Field.
Select No "new" button, No "edit" button, "No delete button
and save.
Edit the Page Properties and add the following configuration
in the field Page TSconfig in the folder Resources. It will change the
Partials root path to the Partials directory provided with this
extension.
Authenticate the user and go to the USER page. You should see either
the user's image or a question mark image if no input was provided (default image).
Click on the image link to open the edit view. As it can been seen,
the new title bar has been taken into account and only Save and
Close buttons are displayed.
In the ADMIN page, insert the plugin, select the ADMIN form and
include the user folder in the Record Storage Page field.
Click on the folder Input controls. Select `Allow authenticated
FE users to input data to allow
the input. Add your administration group (here ``admin``) in Allowed
group``. Select ``No new button` if you do not want to allow the
creation of new users.
Authenticate the administration user and go to the ADMIN page. The
view displays the users'name, their email, their phone number and
their groups. The behavior of the form is the same as in the previous
examples. Click on the name to see the user's configuration. Use the
edit icon to modify the fields.
Exporting Data to CSV Format
Exporting data is possible for any form built with the SAV Library
Generator. To allow this feature you simply have to add the following
line in the field SAV Library Plus Configuration in the user
configuration:
sav_library_example8_Export = *
Copied!
In general, it is done in the Back End. However, our extension makes
it possible to do it in the frontend for the user as shown below.
Now, close the view and verify that you obtain a new CSV icon in the
ADMIN List view and click on it to obtain the export view.
The configuration can be used to save, load, delete an export
configuration. Use the toogle button to display only selected fields
or to display all fields.
XML and XSLT files can be used to export data to other formats (see
next section).
Checkboxes are used to select the fields to be exported. If the first
checkbox is selected, the raw data are displayed, that is the content
of the field in the data base. If the second one is selected, a
rendering is done. The field is displayed as it would have been in a
Single view.
The Where clause field is used to filter the data to be exported.
Let us note that if you double-click on a field name, it will be added
in the Where clause field. It is useful to avoid mistakes.
The Order clause field is used to order the data to export.
Additional tables can be used for more complex export where you need
to link data used by the extension to data in other tables. In that
case do not forget to add a condition in the Where clause to join
correctly the tables.
Export MM records can be set when your extension use MM tables and
you want to export all data. In that case you may also need to add a
Group by clause.
Include all fields can be used when you want to export fields like
uid, pid, crdate, ... which are hidden by default. Click on the red
CSV icon to include all the fields. Use the toogle button if you have
previously restricted the display to selected fields.
Export field names can be selected when you want to have the field
names as the first line in the CSV file.
Order of the fields can be used to change the order in which the
fields are extracted. By default, it is the order in which the appear
in the checkbox list from left to right. In the above example, without
information in this field, fe_users.username comes first, then
fe_users.usergroup is extracted, then fe_users.name and so on.
Provide a list of fields separated by a semi-column (one field per
line makes it simple to read) in the text area to change this order.
Let us also note that you can put the same field several time, which
is sometimes useful when you process directly the CSV file.
Fields configuration can be used to add a configuration for the
field rendering. The syntax is the same as in the SAV Library
Kickstarter but each configuration must start by the full field name.
See after for an example.
Click on the red CSV icon to export your data. Below is the result
obtained when the CSV file is imported in LibreOffice Calc.
As it can be seen, the user groups are displayed as a comma-separated
list because the fields were exported in the raw mode. By selected,
the second checkbox, it is displayed with the same rendering as in a
single view.
Depending on the field type, HTML tags can be exported, which is the
case with the usergroup field of the fe_users table. If you want to
process these tags, use a stdWrapItem attribute for the field . For
example, to remove them, add the following configuration in `Fields
configuration` as shown below (see Changing the field configuration ).
Exporting Data to Other Formats
The exporting form contains two fields XML file and XSLT file
which enable the export to other formats.
The XML file field must be a XML file which will be used as a
template. It may contain:
field markers under the conventional format in the SAV Library
Extension Generator, that is ###field_name###,
localization markers under the conventional format in the SAV Library
Extension Generator, that is $$$tag$$$ for a marker in the
locallang.xlf file, $$$label[field_name]$$$ to obtain the label
associated with a field,
constant markers under the form $$$constant[tag]$$$.
The XML tag may contain special attributes:
sav_type can be set to:
replaceAlways: the XML tag and its children will be processed for
all exported rows,
replaceDistinct: the XML tag and its children will be processed each
time the associated sav_id attribute changes in the rows,
cutIfEmpty: the XML tag and its children will be cut if the
associated sav_id attribute is empty in the row,
cutIfNotEmpty: the XML tag and its children will be cut if the
associated sav_id attribute is not empty in the row,
cutIfEqual, cutIfNotEqual, cutIfgreater, cutIfLower,
cutIfgreaterEqual, cutIfLessEqual: the XML tag and its children
will be cut if the associated sav_id attribute in the row is
respectively equal to, not equal to, greater than, less than, greater
than or equal to, lower than or equal to, a given value provided by
the sav_value attribute.
Assume that we want to produce the FE user list under the form of a
table with four columns: the user image, his/her name, email and
groups. It can be solved used the XML file to_docbook.xml,
available in the Resources/Private/Files directory of this
extension. As it can be seen, this file uses several markers and
attributes.
<?xml version="1.0" encoding="UTF-8"?><!DOCTYPE articlePUBLIC"-//OASIS//DTD DocBook XML V4.5//EN""https://www.oasis-open.org/docbook/xml/4.5/docbookx.dtd"><articlelang="en"><title>List of FE users</title><informaltable><tgroupcols="4"align="left"colsep="1"rowsep="1"><thead><row><entryalign="center"></entry><entryalign="center">$$$label[fe_users.name]$$$</entry><entryalign="center">$$$label[fe_users.email]$$$</entry><entryalign="center">$$$label[fe_users.usergroup]$$$</entry></row></thead><tbody><rowsav_type="replaceAlways"><entryalign="center"><mediaobjectsav_type="cutIfEmpty"sav_id="fe_users.image"><imageobject><imagedatafileref="fileadmin###sys_file.identifier###"width="2cm"scalefit="1" /></imageobject></mediaobject></entry><entry>###fe_users.name###</entry><entry>###fe_users.email###</entry><entry><itemizedlistspacing="compact">###fe_users.usergroup###</itemizedlist></entry></row></tbody></tgroup></informaltable></article>
Copied!
In order to produce the XML file, the process is the same as for the
CSV export. Each field marker have to be selected to be replaced and
the template file has to be provided in the XML file field as shown
in the following caption. The configuration was saved in `FE users
(docbook)`.
Note
Because DocBook needs the path to the user's image, the Additional tables
and the Additional fields fiels are filed to retrieve the path from the FAL.
In this example, the document is processed automatically, by calling
for example the FOP docbook processor (https://xmlgraphics.apache.org/fop/), in the extension. In order
to do so, an admin user must allow the use of the php exec function in
the Advanced folder of the configuration of the extension as shown
in the following caption.
A XSLT file (http://xmlfr.org/w3c/TR/xslt/) is used to process the resulting
XML. Output can be transformed to virtually any file format. In this
example, it transforms docbook XML file before the FOP processing.
The Exec field is filled with the following input in order to call
FOP.
The tag ###FILE### will be replaced by the resulting file name. The
xsl path for the file name docbook.xsl depends on your installation of
the FOP processor.
The tag ###SITEPATH### will be replaced by your site path. Here, the
generated file will be test.pdf in the fileadmin directory of the
site. It leads to the following caption.
Using a Query for Exporting Data
A query may be used instead of using the export view fields to select the
data to be exported. In order to do so, the user TypoScript Config field or
the group TypoScript Config must contain the following line :
sav_library_example8_ExportWithQuery = *
Copied!
A new icon should be displayed in the export view.
Clicking on this icon toggle the export view to the query mode where a query
can be entered. As it can be seen below, no field are displayed.
Save and click on the load icon to display the fields associated with the query.
Finally, select the fields, fill the configuration if any and click again on
export icon to get the CSV file.
Tutorial 9: Using XML Graph
The aim of this tutorial is to show how graphs, produced by the
extension (sav_charts), can be
introduced in an extension generated by the SAV Library Kickstarter.
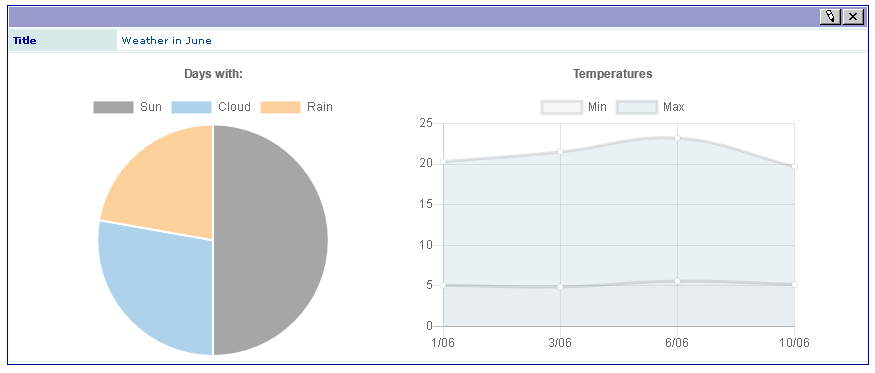
In this example, two graphs about the weather are displayed:
One graph shows the number of sunny, cloudy and rainy days in a pie chart.
One graph shows the evolution of the minimal and maximal temperatures in
a line chart.
Edit the extension sav_library_example9
in the SAV Library Kickstarter to get an overview. It contains
one form with three conventional List, Single and Edit views.
There is nothing special in the List view.
Edit View
Two subforms are used to input the graph data. Even if another choice was possible
for the field graph1, the use of a subform makes it possible to use similar queries
for the graph.
The subform graph1 is configured to allow the input of one item. It is used to
input the number of sunny, cloudy and rainy day in the month.
the subform graph2 is used to enter the minimal and maximal temperature for a given day.
Note the field attributes used to add a delete button and up and down buttons in front of
each item.
addDelete = 1;
addUpDown = 1;
Copied!
Single View
The type of the field graph is Graph.
Its configuration includes the following properties.
Analyze the graph template Charts.xml provided in the folder
Resources/Private/Templates of the extension.
The markers marker#uidQueryGraph1 and marker#uidQueryGraph2 are used in the
definition of the query manager. You could have to modify the value 1 and 2 as explained
in the next section. The marker marker#uidMainTable takes the value of the current
uid of the main table, i.e. tx_savlibraryexample9. This value is always available
by means of the marker ###uidMainTable###.
Add two Sav Charts queries in backend list mode. The following caption shows the
result with queries inserted in the Data folder.
Fill the query Query Graph 1 as shown below.
The subforms used for the field graph1 and graph2 generates relations n:n.
Therefoe, the FROM clause joins the tables tx_savlibraryexample9,
tx_savlibraryexample9_graph1_mm and tx_savlibraryexample9_graph1.
tx_savlibraryexample9
INNER JOIN tx_savlibraryexample9_graph1_mm
    ON tx_savlibraryexample9.uid = tx_savlibraryexample9_graph1_mm.uid_local
INNER JOIN tx_savlibraryexample9_graph1
    ON tx_savlibraryexample9_graph1_mm.uid_foreign = tx_savlibraryexample9_graph1.uid
Copied!
The WHERE clause retricts the records to the one used by the Single view. The marker
###uidMainTable### does the job.
tx_savlibraryexample9.uid = ###uidMainTable###
Copied!
Fill the query Query Graph 2 by replacing respectively
tx_savlibraryexample9_graph1 and tx_savlibraryexample9_graph1_mm by
tx_savlibraryexample9_graph2 and tx_savlibraryexample9_graph2_mm.
Important
The uid of the Sav Charts queries should be 1 and 2. However, if you do have already enter
other Sav Charts queries their uid will be different. You can modify the values in the
tags property of the field graph in the Singe view and regenerate the extension.
You may also change the configuration using the field
configuration, for example at the
extension level. The following TypoScript sets the values of the
markers marker#uidQueryGraph1 and marker#uidQueryGraph2
respectively to 3 and 4.
Tutorial 10: Using TypoScript (Gallery With a Map)
The aim of this tutorial is to show how to use TypoScript into an
extension. In this example, we want to display a gallery of pictures.
Important
Do not forget to fill the plugin Record storage Page with the pages containing the points of interest.
We will use three views in only one form for the sake of the simplicity (see
previous examples to create an admin form):
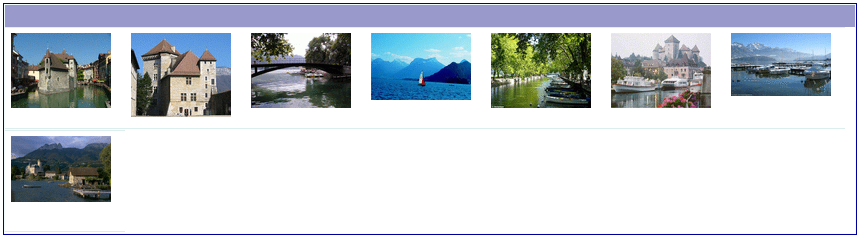
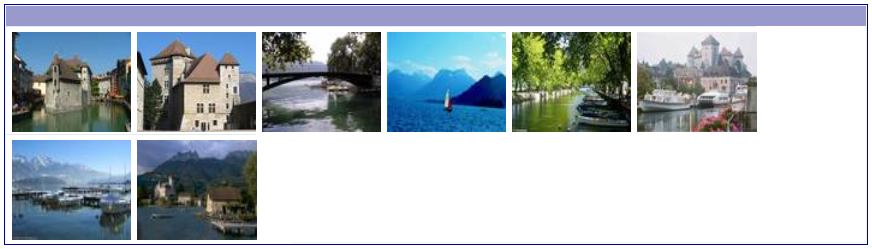
The List view to display small images.
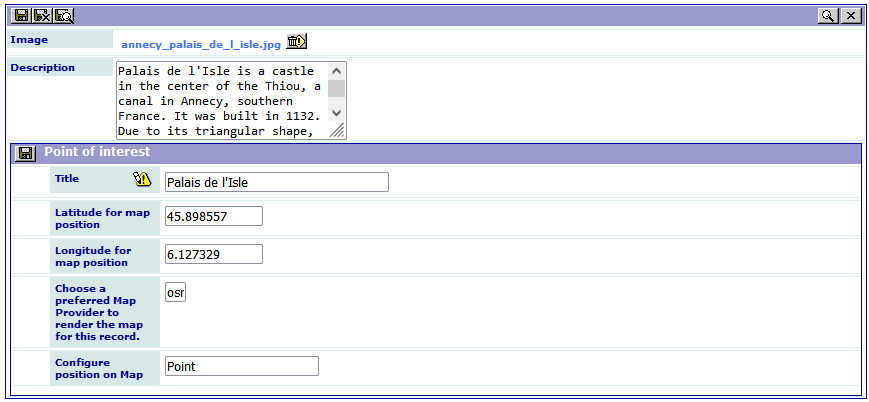
The Edit view to enter the picture, its title, a description and the
address corresponding to the picture.
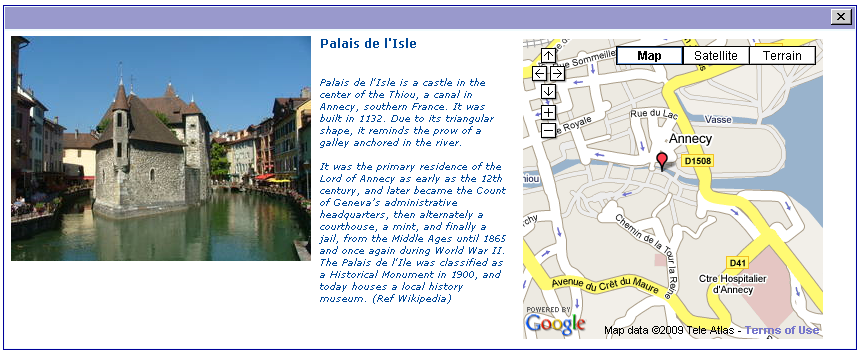
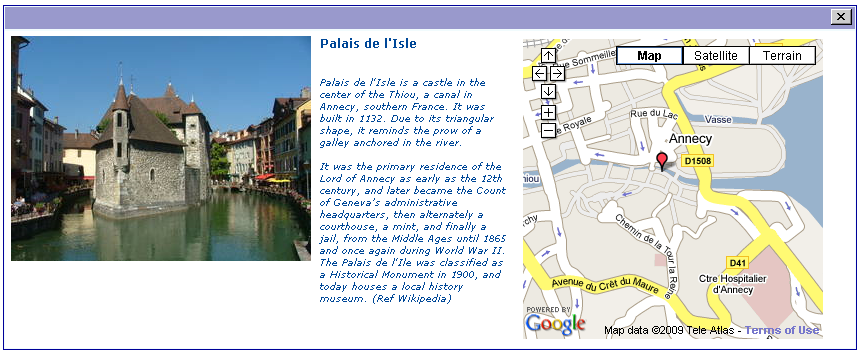
The Single view with a special organization. The picture is on the
left, then the title and the description is displayed at the right of
the picture and, finally, the map, where the marker is defined
by the address, goes to the right of the description. By clicking on
the image, it should be displayed in its original size.
Several authenticated users may use the plugin. Each user can modify
or delete the records he/she has created.
Download also the extension maps2 from the TER, read the
documentation and install it. By default the configuration it set
to provide maps from OpenStreetMap.
The template of this view is very simple since the only field to
display is the image. However, we want to take advantage of the TYPO3
image processing instead of using the conventional modification of the
size of the image through the properties
width and
height.
When the field is an image and you use the property
tsProperties, an
IMAGE cObject is generated with the provided TypoScript properties. You can
use markers to refer to the fields. In the example, the configuration
is the following:
func = makeItemLink;
Copied!
tsProperties =
  file.width= 100
;
Copied!
The first property is already known. It makes it possible to open the
Single view by clicking on the image.
The second one is just TypoScript syntax for an IMAGE cObject. It
defines the file using the ###image### marker. The width is set to 100px.
You may insert any other TypoScript property as, for example, GIFBUILDER.
Important
The syntax is exactly the same as in TypoScript. Do not forget to
end the property by a semicolon. If you need a semicolon in a
TypoScript property, please use \\;.
The last problem to solve in the List view is to have several images
on the same line instead of having them one per line. It can be simply
done by changing the default style (See the file
sav_library_example10.css in the Resources/Public/Css
directory) as follows:
This view includes a subform which defines a relation n-n with the table
tx_maps2_domain_model_poicollection of the extension
maps2.
This table is defined as an existing table. The fields are, by default,
set to the type Show Only by the Kickstarter.
Because we want to enter points of interest from the frontend of the extension,
the property updateShowOnlyField
is set to 1.
The positioning of the fields is very simple in the List view
because you can define the template. For the Single and Edit
views, the positioning can be obtained using the
wrapItem property.
This property has the same syntax and the same behaviour as the wrap
property in TypoScript.
To perform the requested positioning, we will use <div> tags organized
as follows:
The wrapping is done field by field. For example, the first field is
image. It defines the beginning of the container <div> and the image
<div> when the following property is used:
Analyze the wrapItem
for all the fields, then open the file
sav_library_example10.css in the
Resources/Public/Css directory to analyze the configuration. As
it can be seen, the labels associated with the field are not displayed
thanks to the {display:none;} CSS configuration. Let us note that the
same result could have been obtained using the
cutLabel property in
the Kickstarter (see for example the image and map fields).
Executing the Plugin
Executing a plugin in the extension can simply be done by means of the
tsObject and
tsProperties properties.
The tsObject is a content
object in TypoScript, that is TEXT, FILE, CONTENT, ... Below is the configuration
of the field map.
tsObject = EXTBASEPLUGIN;
Copied!
The EXTBASEPLUGIN is used to execute the default action of the plugin Maps2.
The extension settings are iported and modified. Let us note the use of
the marker ###poi_uid### which provides the uid of the point of interest for
the map.
The showIf property checks
if the marker ###poi_uid### is positive. If true the map is displayed,
otherwise it is cut as shown below.
Let us now explain how the marker ###poi_uid### is set. Let us
have a look to the configuration of the field poi_uid whose type
is Show Only.
The first configuration is to always cut the field, i.e. it will not
be displayed because it is is just a working field.
cutIf = true;
Copied!
The second configuration gets the uid by means of a CONTENT object.
The marker ###uidMainTable### is always available. It is replaced by the
uid of the current field in the main table.
The third configuration sets the field value in the marker poi_uid, i.e.
the marker ###poi_uid### is now available.
renderFieldInMarker = poi_uid;
Copied!
Configuration of the Plugin
The last step is the configuration of the plugin so that the
authenticated users can only modified their images.
This can be simply done by using the cruser_id field in the `Input
Admin Field` of the flexform as shown below.
Other examples
If you have reached this part of this manual, you are familiar with
form and field configurations.
This section describes simple or more complex examples that were
designed to answer to specific problems. Most often, they are used
as tools for an intranet. They are shared with the TYPO3 community to
illustrate the simplicity and the power of the SAV Library Kickstarter.
They are provided as it and will probably have no updated version.
Download extensions from GitHub, open them in the SAV Library Kickstarter,
analyze the configurations and adapt them to your problem.
In the following, each extension will be shortly described and
illustrated by several screenshots. Useful information are provided
when needed.
Downloading documents (sav_download)
What Does it Do?
The extension sav_download
is a very simple extension which makes it possible to download documents. A
new icon indicates the new documents during 15 days and icons are
associated with the file type (see the field configurations). Sorting
is available by clicking on Date or Category in the title bar.
Screenshots
Minutes of Meetings (sav_meetings)
What Does It Do?
The extension sav_meetings
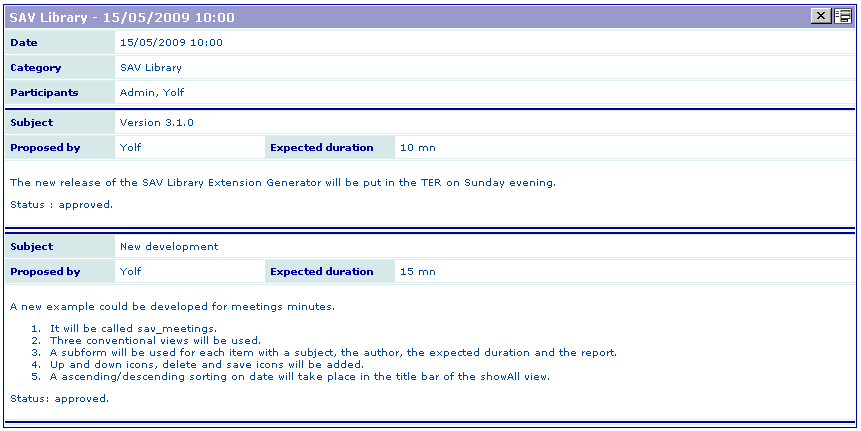
was designed to enter and display the minutes of a
meeting for a group of frontend users, for example a management team or a
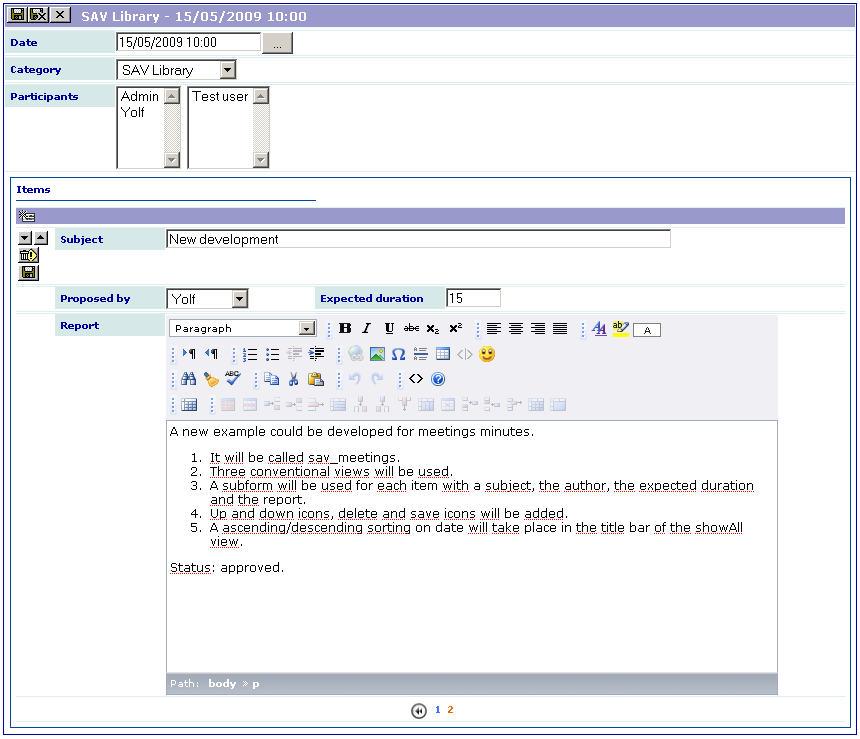
development team. Each member of the group may enter items that will
be discussed during the meeting. A meeting has a date and belongs to a
category (for example a project for a development team). An item is
proposed by a member of the group. It has a name and an expected
duration. A report is associated with it. Up and down icons are
displayed to reorganize the items. A delete icon makes it possible to
delete one item. A save button with an anchor is displayed to make the
saving more comfortable when the minutes are taken during the meeting.
Useful Information
By default the group of frontend users is sav_meetings. The selectors for
the participants and the proposed_by fields filter the fe_users
table with this group. See the configuration of these fields for the
Edit view. It includes the following property:
whereSelect=###group_list=sav_meetings###;
Copied!
If you do not want to use this group name nor modify the extension,
you can overload this property using the facility provided by the SAV
Library Extension Generator (see: Changing the field configuration ).
Edit the page properties and add the following lines in the TSConfig
field (see the folder tab Options in the flexform of the page
properties). The group that will be used is now testgroup.
Routing mapper added for human readable URLs
to Single Views.
10.4.0
Compatibility changed to TYPO3 10.4.x.
10.3.0
Compatibility changed to TYPO3 10.3.x.
Compatibility with TYPO3 8.7 removed.
9.5.0
Compatibility with TYPO3 7.6 removed.
Compatibility changed to TYPO3 9.5.x
Files processed in the FAL.
New features (requiredIf, valueIf, processing of "and", "or" in conditions...).
1.2.0
Compatibility with TYPO3 6.2 removed
1.1.0
Processing for RichTextEditor modified.
Compatibility changed to TYPO3 8.9.
composer.json added
Vendor name changed
1.0.1
Compatibility changed to TYPO3 8.1.
New attribute rteStyleSheet added for the rich text editor item viewer.
1.0.0
Several bugs corrected (see the forge).
Compatibility with TYPO3 8.0.1 added.
css, javaScript and icon files transfered to the directory Resources/Public.
Compatiblility with TYPO3 versions lower than 6.x removed.
0.3.0
Documentation converted to the reStructuredText format.
New feature in export view: query can be used to export data
(see Tutorial 8).
The queriers have been simplified to provide faster queries.
Localized records are now handled.
Compatibility with TYPO3 7.x.x added.
0.2.1
Several warnings generated when using arrays corrected.
js file for the calendar in Deutch corrected (Thanks to Erwin Winkel).
New type "currency" added (Feature #52986).
Small bugs corrected.
Code slighly modified in accordance to the TYPO3 coding guidelines.
0.2.0
Compatibility with TYPO3 6.1 and 6.2 added.
Code for exporting data slightly modified.
Small modification in the graphItemViewer to allow the use of queries
in sav_jpgraph.
New configuration feature added. Additional parameters can be added to
links from TypoScript at the library, extension or page levels.
Additional parameters can also be added from TypoScript to filters.
Subforms can be included into subforms.
New DIV savFilter added to filters in order to allow global
configuration in CSS.
New special marker ###link[...]### and ###linkDefault[...]### added
for title bars.(see the note in the orderLinkInTitle attribute in the
SAV Library Kickstarter Reference section).
Default CSS simplified.
0.1.0
New attribute addLinkInEditMode added for files.
Small bug corrected in the subform title.
Suggestion #41038 added. Icons in item viewers can changed by adding
them in the iconRoot directory defined by iconRootPath. Icon file
extensions can be either .gif or .png or .jpg or .jpeg.
documentation and csh files updated.
Compatibility with TYPO3 6.0 added.
0.0.4
Feature #39265 added. The former "iconsDir" and "imagesDir" are now
replaced respectively by "iconRootPath", "imageRootPath". The values
and the templates, layouts, partials rooth paths can be changed at the
library, extension or page levels. Field configurations can now also
be changed at the extension or page level. The default cascading style
sheet is now Resources/Private/Styles. It can be changed by
TypoScript.
Documentation updated to the new documentation template (doc_template
1.6.2).
Language files in the XML Localisation Interchange File Format (.xlf)
added in Resources/Private/Language for the translation.
Suggestions #39436 and #39437 added. Configuration of the style sheet,
the date format fo the title bar and the tool tip are now possible by
TypoScript at the extension and library level.
Suggestion #39505 added. Icon of the sav_filter_abc extension can be
changed by typoScript.
Major feature #39829 added. Values filled by the user in edit view are
reloaded in case of errors.
Feature #40074 (from the SAV Library Kickstarter forge project) added.
Table sorting configuration from the SAV Library Kickstarter is now
working correctly.
Context Sensitive Help localization files have been totally
reorganized to facilitate the translation process.