DEPRECATION WARNING
This documentation is not using the current rendering mechanism and is probably outdated. The extension maintainer should switch to the new system. Details on how to use the rendering mechanism can be found here.
EXT: Apples "Hello World" of lib/div
| Author: | Kasper Skårhøj |
|---|---|
| Created: | 2002-11-01T00:32:00 |
| Changed: | 2007-08-04T17:19:25 |
| Author: | Elmar Hinz |
| Email: | elmar.hinz@team-red.net |
| Info 3: | |
| Info 4: |
EXT: Apples "Hello World" of lib/div
Extension Key: apples
Copyright 2007-2007, Elmar Hinz, <elmar.hinz@team-red.net>
This document is published under the Open Content License
available from http://www.opencontent.org/opl.shtml
The content of this document is related to TYPO3
- a GNU/GPL CMS/Framework available from www.typo3.com
Table of Contents
EXT: Apples "Hello World" of lib/div 1
Entering the garden of real object orientated extension development 1
Installation 2
Install the extension 2
Include the static template 2
Use the plugin 2
Building your own 3
As a step by step tutorial 3
Playing with the code 3
Start your own extension 3
The structure of the file system 3
General considerations 3
The base directory 3
The directory configurations 4
The directory controllers 4
The directory models 4
The directory templates 4
The directory views 4
Including files 4
Including files magically 5
Calling the controller 5
Configurations 6
Controller 6
Model 7
View 7
Template 7
Entering the garden of real object orientated extension development
The extension Apples (apples) is the Hello World example of lib/div development. Take your first walk into the garden of real object orientated extension development. After a few steps you will harvest your first apples by the use of a model, a view and a controller class. You will get a basic feeling for the MVC architecture and you will long for more.
But be warned. Don't directly run into the garden on your own. You may get lost. The Apple walk doesn't show you enough, that you could already build a useful extension. The garden is a good deal bigger than you would expect. Take the Bananas tour next, to learn fundamental features, that are required by typical extensions. The extension key is bananas . By starting with the Apples walk you will be able to keep track of the wide land of the Bananas plantation.
Installation
Install the extension
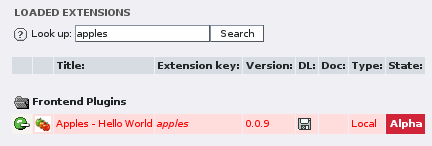
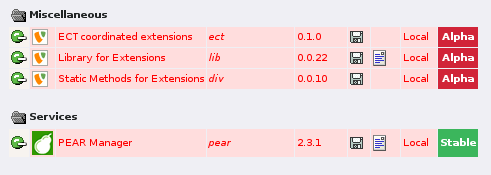
Go to the module Tools/Ext Manager and install the extension Apples (apples) in the typical way. You will discover that, it depends on the extension lib wich again dependes on div .
Include the static template
Go to the module Web/Template and open the template, where you want to configure the extension, in the Info/Modify view. In the select box Include static (from extensions) you select the template Apples (apples) . Save it.

Use the plugin
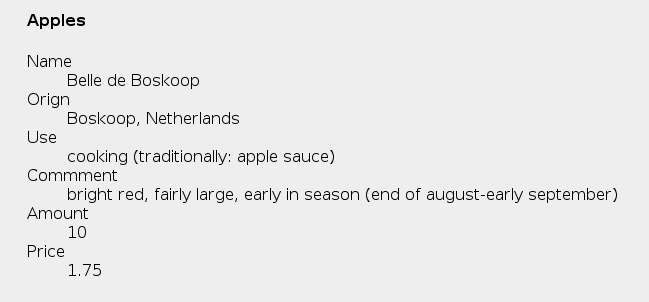
Go to the module Web/Page and open a page. Insert in the Apples plugin. Save it. In the frontend you should now find a description of the apple Belle de Boskoop .
Building your own
This isn't a step by step tutorial. It's up to you how you want to use the given material.
As a step by step tutorial
You can use this extension just like a step by step tutorial. Although there are several files, it's only few code. You copy each file (maybe with a different key) to see how it works. In this case you start with the files in the base directory and with the configuration (setup) and the controller directories. When you have managed to call the controller as a plugin, you add model and view.
Playing with the code
You can also take this extension and play with it. You could extend the model, trying other rendering engines or implementing a second plugin into the same extension.
Start your own extension
If you don't want to use extension kickstarter__mvc , you could use this extension to get started, with a new project. You replace all occurrences of the string apples against your own extension key in the files and in the filenames. Please choose an extension key without underscores.
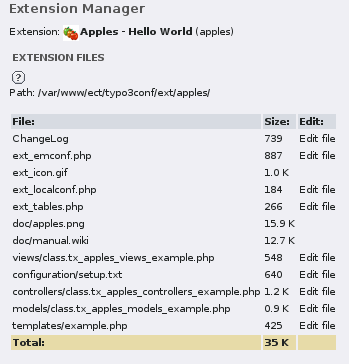
The structure of the file system
The interesting files of the plugin:
ext_emconf.php
ext_icon.gif
ext_localconf.php
ext_tables.php
configuration/setup.txt
controllers/class.tx_apples_controllers_example.php
models/class.tx_apples_models_example.php
templates/example.php
views/class.tx_apples_views_example.php
General considerations
There is only one plugin in this example. If you work with multiple plugins, there are 2 different styles to organize the files. The first is to place all files of a plugin into a common folder. The second is to group the files by functionality (configuration, controllers, models, ...). That's what we do in this example. Feel free to develop your own style.
The base directory
While you are free in general to structure the whole extension as you like, a few files are required to exist in the base directory, namely the files ext_emconf.php and ext_icon.gif . Other files of the base directory are optional. Some files of a given name have a special function when available. In our example this are the files ext_localconf.php and ext_tables.php . All this files are used in their typical way for TYPO3 extensions.
The directory configurations
The directory configuration contains the file setup.txt . In bigger extensions it would contain other configurations, maybe subdirectories. At the same time this directory is the static template that is registered in the file ext_tables.php with the line:
t3lib_extMgm::addStaticFile('apples', './configuration', 'Apples'); // ($extKey, $path, $title)
If you like to work with multiple static templates in a big extension, you could register subdirectories of the configuration directory.
The directory controllers
As the name tells, controllers are the classes, that control the cooperation of models and views. Typically each plugin has one controller class, so we find one class in this directory.
The directory models
The name models tells you that this classes contains the data, that are displayed by the view. In the case of apples this data are simply contained within the only class of the model. In more useful extensions, you will place the functional logic including database queries into the model. In enterprise environments, you would use the model to delegate the business part to other servers.
The directory templates
This directory contains the templates of the view. This is the interface between the programmers and the web designers. You can configure the path to this directory in the setup, so that the web designers could place the templates into other locations like the fileadmin/ folder.
Depending on the rendering engine you choose, you can use different kind of templates. Apples uses the PHP-rendering engine. You could choose templates in traditional TYPO3 style or Smarty templates, if you add the matching template engine.
The directory views
In this directory the classes are stored that handle the templates. They implement a type of a rendering engine.
Including files
There are different ways to require class files, some inclusions are done magically, when you instance a class. Before you can use the the magic functions of tx_div you have to include it. This is done the traditional T3 way in the class ext_localconf.php :
require_once(t3lib_extMgm::extPath('div') . 'class.tx_div.php');
In the same file you find the line:
if(TYPO3_MODE == 'FE') tx_div::autoLoadAll($_EXTKEY);
This includes all classes of the given extension and works for apples. But it has some drawbacks. Please read the documentation of tx_div::autoLoadAll() before using it in your extension. To mention the typical way of lib/div file inclusion:
tx_div::load('tx_apples_controllers_example');
There is no example in apples for this, because it's covered by the autoLoadAll() method. Finally you could include files in the setup, which would look like this:
includeLibs.tx_div = EXT:div/class.tx_div.php
includeLibs.tx_apples_controllers_example = EXT:apples/controllers/class.tx_apples_controllers_example.php
Including files magically
In the file controllers/class.tx_apples_controllers_example.php you find the following lines:
$modelClassName = tx_div::makeInstanceClassName('tx_apples_models_example');
$viewClassName = tx_div::makeInstanceClassName('tx_apples_views_example');
The use of the function tx_div::makeInstanceClassName() is doe to the TYPO3 coding guidelines. The effect is to check if an XCLASS is defined for the given classname. In this case it is used. Additionally the call to tx_div::makeInstanceClassName() magically requires class files with classnames following the lib/div syntax.
In your private extensions you may drop the use of makeInstanceClassName if you are sure that you don't want to use the XCLASS feature. Then you have to take other measures to assure the the files are included.
Similar considerations apply to the the function tx_div::makeInstance(), that is not used in apples .
Calling the controller
The most difficult part to get started is the inclusion of the controller as a plugin.
When a page is called, that contains the plugin the controller of that plugin has to be called. The controller then runs the job, coordinates model and view and returns a chunk of XHTML to display in the page.
This call of a controller by a plugin is configured in the file configurations/setup.txt .
plugin.tx_apples.exampleController = USER_INT
plugin.tx_apples.exampleController.userFunc = tx_apples_controllers_example->main
[... adding configurations ...]
tt_content.list.20.tx_apples_example =< plugin.tx_apples.exampleController
During installation you have to manually include this static template from the list of static templates. To list it, you have to register the static template in the file ext_tables.php .
t3lib_extMgm::addStaticFile('apples', './configuration', 'Apples'); // ($extKey, $path, $title)
Also in ext_tables the plugin has to be registered for the BE forms.
t3lib_extMgm::addPlugin(array('Apples', 'tx_apples_example')); // array($title, $pluginKey)
The plugin key is necessary to match the input of the BE forms with the output by typoscript. The plugin key should start with the extension key (best with tx_ -prefix) to avoid conflicts. You could consider to always use the classname of the controller unlike from this example.
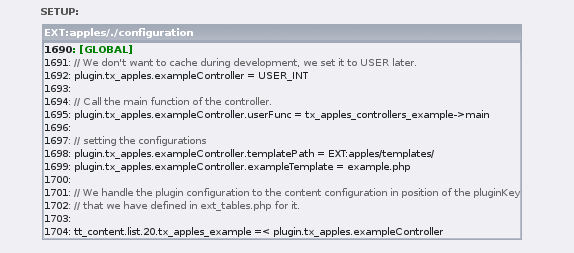
Configurations
Apart from the inclusion of the controller, also the configurations are done in the file configurations/setup.txt .
[...]
// Setting configurations
plugin.tx_apples.exampleController.templatePath = EXT:apples/templates/
plugin.tx_apples.exampleController.exampleTemplate = example.php
[...]
tt_content.list.20.tx_apples_example =< plugin.tx_apples.exampleController
In this example we assign the path to the templates to the key templatePath . The assignment of the templatePath is required!!''' You can use the EXT: syntax. Additionally we assign a template file to the key exampleTemplate .
For productive extensions you often set dozens of key value pairs, that can be configured as constants in turn. All configurations that are defined this way, are automatically filled into the configurations object $this->controller->configurations of the plugin.
Controller
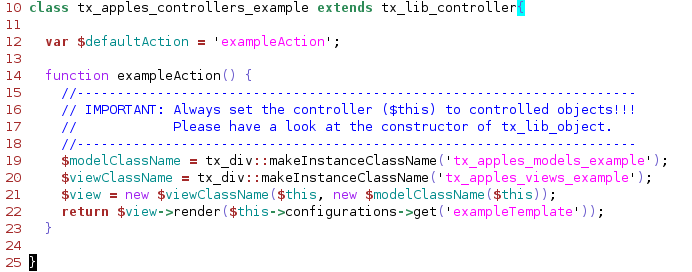
The controller extends the class tx_lib_controller .
class tx_apples_controllers_example extends tx_lib_controller{
The example works with one action only, so it is defined as the default action.
var $defaultAction = 'exampleAction';
This is the default action:
function exampleAction() {
  $modelClassName = tx_div::makeInstanceClassName('tx_apples_models_example');
  $viewClassName = tx_div::makeInstanceClassName('tx_apples_views_example');
  $view = new $viewClassName($this, new $modelClassName($this));
  return $view->render($this->configurations->get('exampleTemplate'));
}
Fist the model is instanced. Upon instance it is already initialized with the data. It can directly be given to the views constructor.
$view = new $viewClassName($this, new $modelClassName($this));
The view is rendered and the final result is returned to the calling framework. When the view is rendered, it expects the name of the template a parameter, which we take from the configurations object.
return $view->render($this->configurations->get('exampleTemplate'));
The configuration object is created automatically when the main function of the controller is called by the outer T3 framework. By default the view uses the configuration value of templatePath to determine the template path.
Model
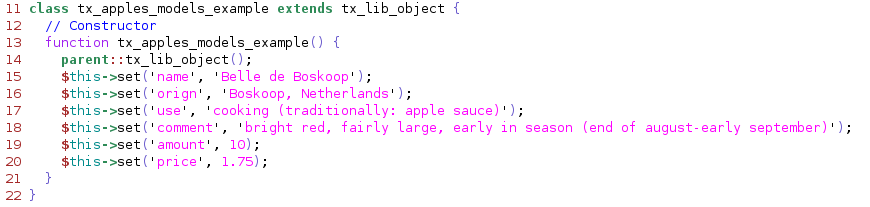
The model extends the class tx_lib_object .
class tx_apples_models_example extends tx_lib_object {
  function tx_apples_models_example() {
    parent::tx_lib_object();
    $this->set('name', 'Belle de Boskoop');
    $this->set('orign', 'Boskoop, Netherlands');
    $this->set('use', 'cooking (traditionally: apple sauce)');
    $this->set('comment', 'bright red, fairly large, early in season (end of august-early september)');
    $this->set('amount', 10);
    $this->set('price', 1.75);
  }
}
Already the constructor fills up this object with the data.
View
The view extends the class tx_lib_phpTemplateEngine .
class tx_apples_views_example extends tx_lib_phpTemplateEngine {
}
All functions that are needed within apples are inherited.
Template
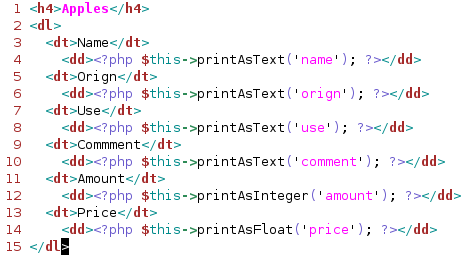
The template is very simple to understand. Chunks of PHP code are embedded. $this always is to the object of the view class, which is executing the template. The formatting functions like printAsText($key) are inherited form tx_lib_phpTemplateEngine(). They give some power of choice to the template designer.
<?php $this->printAsText('name'); ?>
[...]
<?php $this->printAsInteger('amount'); ?>
[...]
<?php $this->printAsFloat('price'); ?>
Not everybody likes to handle that much power and complexity to the template designers. In this case you could prepare the necessary rendering of each date within the view class, so that the designer only needs to know one function call. You are also encouraged to use different types of rendering engines and templates for the view.
 EXT: Apples "Hello World" of lib/div - 7