DEPRECATION WARNING
This documentation is not using the current rendering mechanism and is probably outdated. The extension maintainer should switch to the new system. Details on how to use the rendering mechanism can be found here.
Display Tables: CSV / Excel or Database / SQL¶
| Created: | 2010-02-18T17:33:18 |
|---|---|
| Changed: | 2012-12-29T12:23:11 |
| Classification: | cag_tables |
| Description: | Flexible Tool to Display any kind of Data as a Table. Features: - Datasources can be: CSV / Excel (1st plugin) or the result of an SQL-Statement (2nd plugin) - Configurable autofilter dropdownboxes (as in Excel) - Sort data by clicking on column head - Easy to configure via flexforms - Runs out of the box after installation - No knowlege of SQL necessary. - cag_tables is the further development of cag_longlists |
| Keywords: | Excel CSV SQL Database Results Table |
| Author: | Jens-Wolfram Eipel - Connecta AG |
| Email: | j.eipel@connecta.ag |
| Info 4: | |
| Language: | en |

 Display Tables: CSV / Excel or Database / SQL -
cag_tables
Display Tables: CSV / Excel or Database / SQL -
cag_tables
Display Tables: CSV / Excel or Database / SQL¶
Extension Key: cag_tables
Language: en
Keywords: Excel CSV SQL Database Results Table
Copyright 2000-2013, Jens-Wolfram Eipel - Connecta AG, www.connecta.ag , <j.eipel@connecta.ag>, www.jwebservice.de
This document is published under the Open Content License
available from http://www.opencontent.org/opl.shtml
The content of this document is related to TYPO3
- a GNU/GPL CMS/Framework available from www.typo3.org
Table of Contents¶
Display Tables: CSV / Excel or Database / SQL 1
`Introduction 3 <#__RefHeading__4327_1349857861>`_
`Users manual 9 <#__RefHeading__4337_1349857861>`_
`Configuration 13 <#__RefHeading__4381_1349857861>`_
`Known problems 18 <#__RefHeading__4389_1349857861>`_
`To-Do list 19 <#__RefHeading__4391_1349857861>`_
`ChangeLog 20 <#__RefHeading__4393_1349857861>`_
Introduction¶
What does it do?¶
- Display a CSV- / Excel- file as a well formatted table in the frontend.
- or
- Display any table within your database or any result of an SQL-query as a well formatted table in the frontend.
- Fulltext search function to filter data
- Works out of the box. No immediate need to adapt the HTML-Template.
- Configure what you want to see via flexforms
- Flexible formatting functions. Format every column of your table (Number format / Date Format etc.)
- Datasources can be: CSV / Excel (1st plugin) or the result of an SQL- Statement (2nd plugin)
- Configurable autofilter dropdownboxes (as in Excel)
- Sort data by clicking on column head
- Pagination
- No knowlege of SQL necessary
- Optional detail view for every row of data of your displayed table. Click on a data row and get a detail view.
- New since 4.0: Optional dynamic javascript driven tables (Ajax search, Ajax sort etc.)
- New since 4.1: Dynamic SQL Statements (evaluate expressions); Option to display specific record in detail view without prior calling list view; Option for passing definable primary key and record ID when calling and displaying detail view.
**IMPORTANT CHANGE SINCE VERSION 3.0.2:**
The plugin “Database Table” is only configurable for admin users for security reasons.
This extension was developed by `Connecta AG <http://www.connecta- ag.com/>`_ and `jWebservice Darmstadt <http://www.jwebservice.de/>`_ . Click `here <http://www.typo3-projects.de/typo3-extensions/cag- tables.html>`_ for more Info.
Example installation of cag_tables (CSV table) see: http://www.jwebservice.de/showroom/cag-tables-csv.html
Example installation of cag_tables (Database table) see: http://www.jwebservice.de/showroom/cag-tables-db.html
Screenshots¶
General Example:
 (Courtesy `
http://www.altron.de/nc/produkte/produktuebersicht.html
<http://www.altron.de/nc/produkte/produktuebersicht.html>`_ )
(Courtesy `
http://www.altron.de/nc/produkte/produktuebersicht.html
<http://www.altron.de/nc/produkte/produktuebersicht.html>`_ )
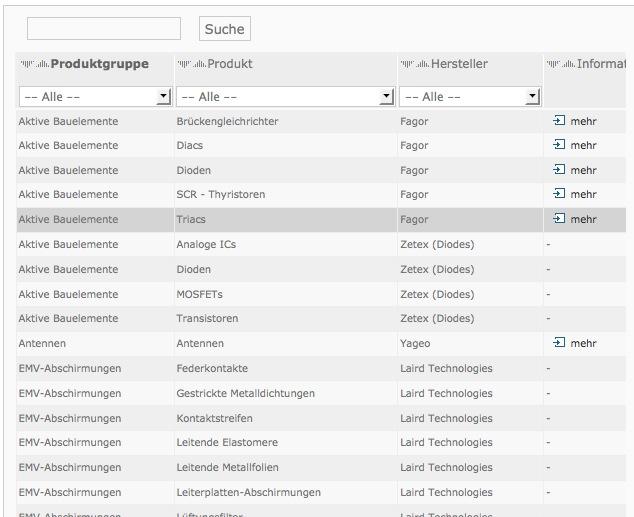
Example 1a: CSV- / Excel file as a table. Each column can be defined as sortable and can have auto filters. (frontend display)
 Example 1b:
Optional: Table with an additional detail view (since version 2.0)Detail view can configured for getting a detail view when clicking on each row of the table.

 Detail view (can display more detailed Info and different data
columns than the main table view). You can adapt the styling to your
cause.
Detail view (can display more detailed Info and different data
columns than the main table view). You can adapt the styling to your
cause.
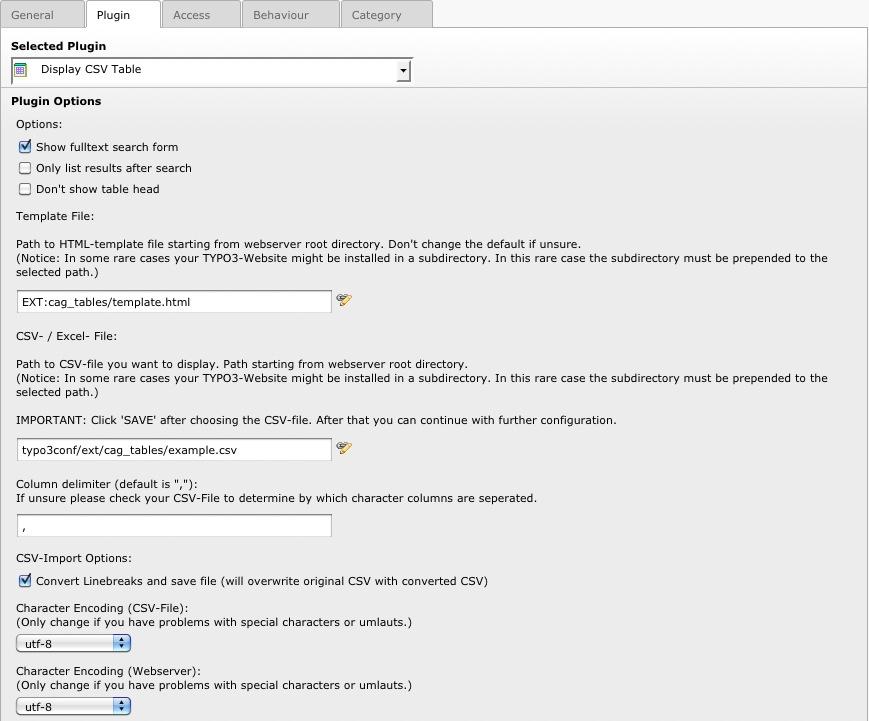 Example 1b: Backend plugin configuration for displaying
CSV- / Excel File…
Example 1b: Backend plugin configuration for displaying
CSV- / Excel File…

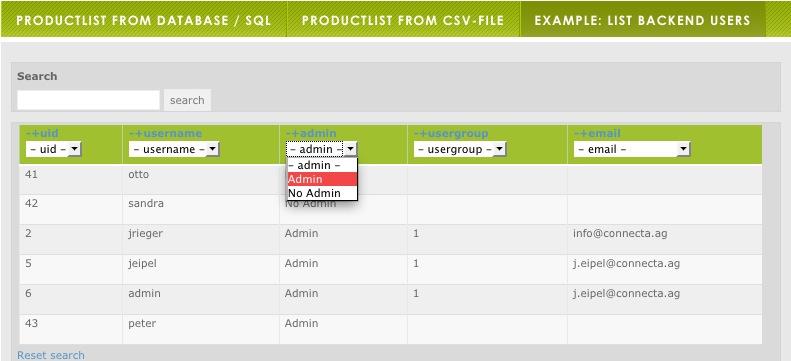
Example 2a: Display a database query result. Get all TYPO3 backend users and display as table with full text search, autofilter and sortable columns.
 It is also possible to cofigure a detail view for every table
row. (as shown in example 1.b)
It is also possible to cofigure a detail view for every table
row. (as shown in example 1.b)
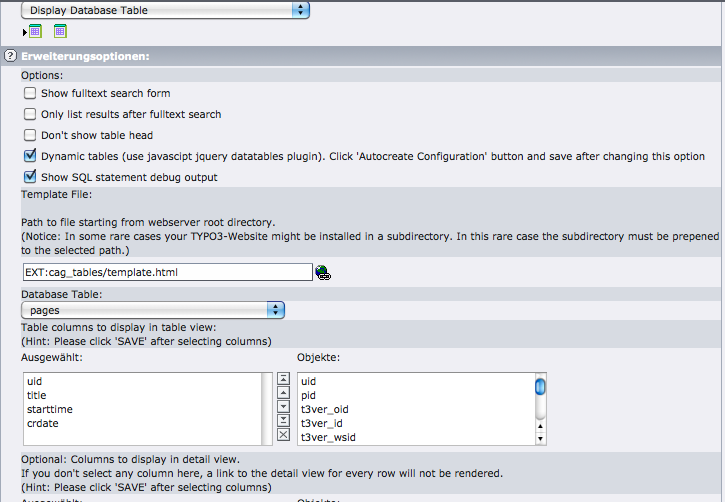
Example 2b: Backend plugin configuration for displaying any database query result
...
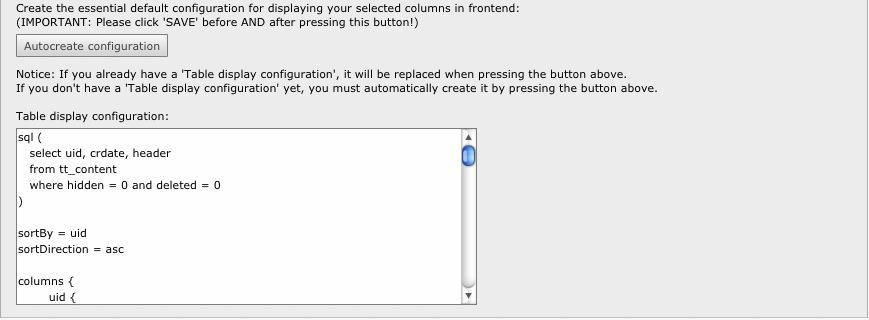
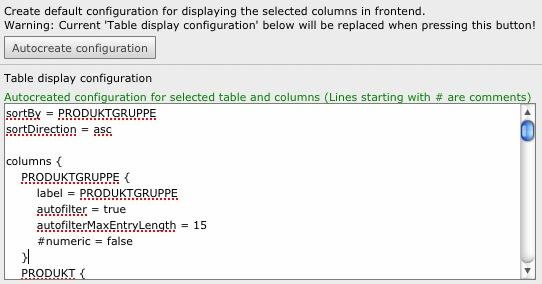
Note: The SQL and configuration you see in the “Table display configuration” is generated automatically for you. You can modify it or leave it as is (depending on your state of expertise).
Users manual¶
This Extension includes two plugins.
 1.) Plugin 1 for displaying columns of a Database Table
or the result of an SQL-Query in general.
1.) Plugin 1 for displaying columns of a Database Table
or the result of an SQL-Query in general.
2.) Plugin 2 for displaying CSV / Excel files as a table in the Frontend.
Once we have chosen our datasource and know which columns to display, we can configure and format each column very easily and flexibly. The configuration applies to both plugins in the same manner.
There is no immediate need to adapt the template, as the template that comes with this extension contains everything you need to get started. The included standard template applies to both plugins.
Quickstart in two Minutes – Step by Step Installation and Configuration¶
Display a database table or a general SQL-Query result¶
In this first Quickstart Guide we will choose a Database table and display a few columns of the selected table in the frontend.
Install cag_tables using the TYPO3 Extension Manager and Create a new page
Insert plugin (there are two plugins – one for displaying a CSV / Excel – table and one for displaying a SQL – Query result). In this Quickstart Guide we will query the Database – so we will choose the first plugin “Display Database Table”
Click on the Tab Plugin and have a look at the options:
Choose the table be_users from the dropdown box “Database Table”. The dropdown box lists all tables in your TYPO3 database.
Once you have done that the form will reload . Please click on the tab “ **Plugin** ” again to return to the form we are just configuring.
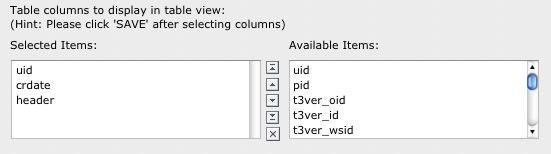
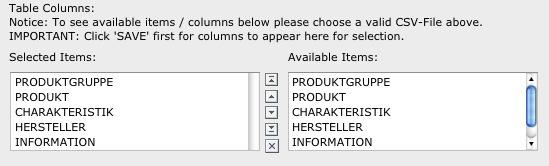 Choose the table columns you want to display by clicking
on them in the list of “Items”.
Choose the table columns you want to display by clicking
on them in the list of “Items”.
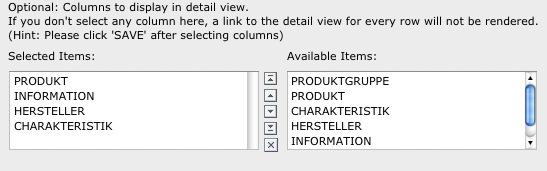
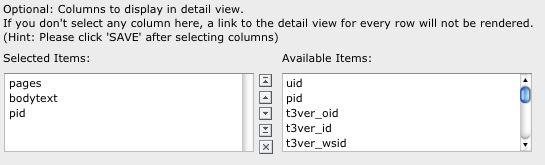
Optional: You can choose table columns you wish to see in your detail view (detail view is shown when user clicks on a table row). Detail view is optional. If you don't select any column, the link to detail view will not be displayed.
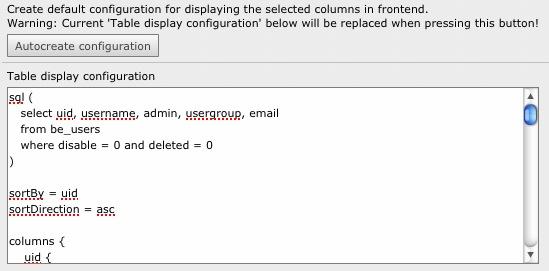
Click the button “Autocreate configuration”. The Extension will now write an SQL-Statement according to your selection and it will create a standard configuration for you on a basis of your selected columns. You can adapt the autocreated configuration as you like. It is listed in the textfield below called “Table display configuration”.
 Press “Save” and look at the result in the Frontend.
That's it – you are up and running. Adapt the “Table display
configuration” to your cause. The configuration includes a list of all
commands and options and examples at the bottom as comments. As you
see comments in the configuration start with a “#”.
Press “Save” and look at the result in the Frontend.
That's it – you are up and running. Adapt the “Table display
configuration” to your cause. The configuration includes a list of all
commands and options and examples at the bottom as comments. As you
see comments in the configuration start with a “#”.
Display a CSV / Excel – File as a table¶
In this second Quickstart Guide we will choose a CSV-File and display a few columns of the selected file in the frontend.
Install cag_tables using the TYPO3 Extension Manager and Create a new page
Insert plugin (there are two plugins – one for displaying a CSV / Excel – table and one for displaying a SQL – Query result). In this Quickstart Guide we will display a CSV-File – so we will choose the first plugin “Display CSV Table”
Click on the Tab Plugin and have a look at the options:

We will be using the included example CSV file. So for now don't change the “CSV- / Excel- File”
Just press the “Save” button on top of the page.
 The form will reload. If you have chosen the right data
delimiter according to your CSV-File you will now see all column names
in the csv files. The column names must be in the first line of the
CSV-File.The delimiter in the included example CSV-File is “;”.
The form will reload. If you have chosen the right data
delimiter according to your CSV-File you will now see all column names
in the csv files. The column names must be in the first line of the
CSV-File.The delimiter in the included example CSV-File is “;”.
Choose the columns you want to display by clicking on them in the list of “Items”:
Optional: You can choose table columns you wish to see in your detail view (detail view is shown when user clicks on a table row). Detail view is optional. If you don't select any column, the link to detail view will not be displayed:
Click the button “Autocreate configuration”. The Extension will create a standard configuration for you on a basis of your selected columns. You can adapt the auto created configuration as you like. It is listed in the textfield below called “Table display configuration”.
 Press “Save” and look at the result in the Frontend.
That's it – you are up and running. Adapt the “Table display
configuration” to your cause. The configuration includes a list of all
commands and options and examples at the bottom as comments. As you
see comments in the configuration start with a “#”.
Press “Save” and look at the result in the Frontend.
That's it – you are up and running. Adapt the “Table display
configuration” to your cause. The configuration includes a list of all
commands and options and examples at the bottom as comments. As you
see comments in the configuration start with a “#”.
Configuration¶
This chapter describes and explains all options in the “Table display configuration”. All configuration parameters apply to both Plugins (“Display Database Table” and “Display CSV Table”).
Basic options (configured in Extension configuration form – flexform):¶

1.) Show fulltext form: Displays a searchform above the table. Keywords are applied to all columns of the table (fulltext serverside search)
2.) Only list results after search: Table is only displayed after fulltext has been submitted
3.) Don't show table head: Table head is not displayed
4.) Dynamic tables: Renders the table using the “Datatables” Java Script library. The result is a much fancier and more responsive front end rendering. Options for the configuration of datatables are set in the corresponding config file which is by default located here: typo3conf/ext/cag_tables/res/js/dataTablesConfig.js.More details on configurations options can be found at http://www .d :title:``atatables.net <http://www.datatables.net/>`_ Datatables needs the jquery library to be included into the website. The paths for including- jquery.min.js- jquery.dataTables.js- dataTablesConfig.jscan be configured in the config field “Table display configuration” (see Reference below). The following default config is included here if you check this option “Dynamic tables”, save, press “Autocrate configuration”, save again.`
DynamicTables {jQueryPath = /typo3conf/ext/cag_tables/js/jquery.min.jsdataTablesPath = /typo3conf/ext/cag_tables/js/jquery.dataTables.jsdataTablesConfigPath = /typo3conf/ext/cag_tables/js/dataTablesConfig.js}Be sure not to include jquery twice in case anther extension or your site already use jquery. In that case delete the jQueryPath above.
5.) Show SQL Statement (only for Plugin “Display Database Table”): Displays SQL debug output.
Reference¶
Configuration options and Commands in the “Table display configuration”:¶
Notice: In addition to this manual, all commands are listed as comments at the bottom of any auto generated configuration in the “Table display configuration”. You thereby have a reference inside the plugin.
There is **no TypoScript configuration** necessary. Configuration is done in the Flexform in the field **“Table display configuration”** inside the plugin. All options are listed in the Reference below:
General options:¶
Property
General options:
Description
Example
PaginationSize = 10
sortBy = name
sortDirection = asc
paginationSize¶
Property
paginationSize
Description
Number of results to be displayed per page. If there are more results than the configured paginationSize, results are splitted on multiple pages and a page browser is displayed at the bottom.
Example
paginationSize = 10
sortBy¶
Property
sortBy
Description
Standard column to sort / order by
Example
sortBy = name
sortDirection¶
Property
sortDirection
Description
Standard sorting directionasc = ascendig
desc = descending
Example
sortDirection = asc
SortByAutofilterColumn¶
Property
SortByAutofilterColumn
(advanced feature)
Description
If the user changes the selection in the dropdownbox of a column that has an autofilter dropdown, the subsequent sorting is changed to that column.
Example
sortByAutofilterColumn = true
((Unknown Property))¶
Property
Description
Example
Column specific options:¶
Property
Column specific options:
Description
Column specific options apply to the configuration of a column. They must be used in the context as shown in the example on the left.
For example if you want to set the label of the column “lastname” you must do that in the section “columns” and within in the section “lastname”.
Column configuration for :underline:`table view` (Example)
columns {
lastname {
label = Last Name
…
}
firstname {
label = Vorname
…
}
}
Column configuration for :underline:`detail view` (Example)
columnsDetailView {
lastname {
label = Last name
#numeric = false
}
address {
label = Adresse
}
...
}
Example
columns {
lastname {
label = Last Name
autofilter = true
autofilterMaxEntryLength = 15
}
age {
label = Person's age
autofilter = true
autofilterMaxEntryLength = 2
numeric = true
}
}
label¶
Property
label
Description
Label of the column to be displayed in table head. If not set the label will be the same as the column name in database table or CSV- table.
Example
label = fistname
autofilter¶
Property
autofilter
Description
Display an autofilter dropdownbox in the head of the table.
An autofilter contains all unique values of the column.
Example
autofilter = true
autofilterFirstEntry¶
Property
autofilterFirstEntry
Description
Specifies the first entry in the Autofilter dropdownbox. This is usualy the “reset” option for that column
Example
autofilterFirstEntry = -- all --
autofilterMaxEntryLength¶
Property
autofilterMaxEntryLength
(advanced option)
Description
Maximum number of charcters of an entry in the autofilter dropdown box.
Example
autofilterMaxEntryLength = 15
numeric¶
Property
numeric
Description
Specify whether the data in the column is numeric. This is important so the system can sort the values numericallyin case they are numeric. Otherwise it will sort alphanummerically.
Example
numeric = true
notSortable¶
Property
notSortable
Description
If “notSortable = true” there will be control elements in the head of the column – so sorting for that column is nit available.
Example
notSortable = true
notSearchable¶
Property
notSearchable
Description
If “notSortable = true” the data in that column will not be included in the fulltext search (if you have a searchbox configured – this can be done using the flexform configuration by checking “Show Searchform”)
Example
notSearchable= true
link¶
Property
link
Description
If the data in the column is a link (for example www.connecta.ag/typo3) the system will create a link with the text assigned to the link.
Example:
link = more …
will create
<a href=” www.connecta.ag/typo3 ”>more ...</link>
Example
link = Click here for more …
imgConf.file.maxW¶
Property
imgConf.file.maxW
Description
If the data in that column contains the path to an image on your server (for example a product image) you can adapt the size or other image properties via typoscript. In this example the image will be processed and have a width of 50px so all images in that columns all have the same width.
Example
imgConf.file.maxW = 50
eval¶
Property
eval
Description
Applies any php function to the data of that column. The value / data to be processed is represented by “|”.
It's actually very easy:
Example – Multiply all values in the column by 2:
eval = | * 2
You can also concatinate Strings – Example :
eval = “Our value is” . |
Example
eval = “It is : “ . int(| * 2)
format¶
Property
format
Description
Format data in the column. You can either do “ numberFormat ” or “ dateFormat ”.
Example for numberFormat (four digits after “.” and seperator for thousands digits):
format = numberFormat|4|.|,
Example for dateFormat (formats from unix timestam to the desired format – in this example to day.month.year):
format = dateFormat|d.m.Y
Available options are:
d = day
m = month
y = year
H = hour
I = minute
s = second
for more options see php manual
Example
format = numberFormat|4|.|,
or
format = dateFormat|d.m.Y
((Unknown Property))¶
Property
Description
Example
Database Plugin options¶
Property
Database Plugin options
Description
Only applies to Database Plugin not CSV!
Example
sql¶
Property
sql
Description
SQL Statement executed for displaying table. Please note the round brackets in the example after “sql”
**New advanced features since Version 4.1:**
Placing expressions or variables inside Statements.
It is possible to use variables inside the defined SQL-Statement. Variablenames are defned in curly brackets. Example {_detail}
- Possible list of variables:
{_detail} = URL-Variable detail as may be passed from table view to detail view
{_usergroup} = usergroup(s) of current user if logged in
{_userid} = userid of current user if logged in
{_timestamp} = current unix timestamp
{_lang} ) = current page language
{_pid} = current oage id
(&SOME_URLPARAMETERN} = get the value of any URL-/Requestparameter
{§SOME_SESSIONPARAMETER} = get the value of any Sessionparameter.
- Evaluating an expression:
Expressions must also be defined inside curly brackets.
Example:
sql (
select uid, title, starttime, crdate
from pages
where deleted = 0 and hidden = 0
{empty($usergroup) ? "" : " and fe_group in ($usergroup)"}
)
Side Note: The example displays all pages a user has access to.Inside expressions you can refer to usergroup, userid and the id of the detail record with the variables $usergroup, $userid, $detail
Example
sql (
select uid, crdate, header
from tt_content
where hidden=0 and deleted=0
)
sqlDetailView¶
Property
sqlDetailView
Description
SQL Statement executed for displaying table. Please note the round brackets in the example after “sql” Please note: if you wish to adapt the fields selected in the sqlDetailView-Query you will also have to add the selected field above in the select field selector:
Example
sqlDetailView (
select name, age
from persons
where hidden=0 and deleted=0
)
Note: To configure the output of the detail view you will also have to define the fields to be displayed (see also “column specific options above).
Example:
columnsDetailView {
name {
label = Last name
}
address {
label = Adresse
}
...
}
pkDetailView¶
Property
pkDetailView
Description
Optional: Primary key selected in query which is then passed from list view to detail view.
This way you can use the unique ID of a row in list view in the sql query for the detail view. The passed “detailId” then can be used as a variable in the detail view. {_detail}
pkDetailView is optional – for passing a variable from the list view to detail view – to be used in detail statement.
Example
Example:
# List View Statement
sql (
select uid, title, starttime, crdate
from pages
where deleted = 0
and hidden = 0
)
# Primary key passed to detail view
pkDetailView = uid
# List of
sqlDetailView (
select title, uid, pid
from pages
where deleted = 0 and hidden = 0 and uid = {_detail}
)
forceDetailView¶
Property
forceDetailView
Description
Optional: Forces to immediately display the detail View of a record without displaying the Table / Listview first.
For example ...
forceDetailView = true
… displays the first record of a resultset as defined by the sql query in “sqlDetailView”.
Alternatively for example …
forceDetailView = 3
… displays the fourth record of the resultset (counting begins with 0).
Example
sql (
select uid, title, starttime, crdate
from pages
where deleted = 0 and hidden = 0
)
sqlDetailView (
select title, uid, pid
from pages
where deleted = 0 and hidden = 0
)
# Displays the first record of the result set in detail view
forceDetailView = 0
forceTableView¶
Property
forceTableView
Description
Optional: Forces the display of the table view as opposed to the detail view.This can be useful if you want to call a new table using the detail ID of the selected record in the query of the new table.
Hint: When calling a new table you may want to configure this new table on another page and place cag_tables on this new page.
To jump to the new page when clicking on a table row - use the parameter pidDetailView = x.
Example
forceTableView = true
pidDetailView¶
Property
pidDetailView
Description
Optional: Set the Page Id (pid) of the detail view.
If not set, the detail view is on the same page as the table / list view (default setting).
Make sure you have configured cag_tables on the target page (in case you don't use the default setting).
Example
# Opens the page with page ID 66 when clicking on a record in table
PidDetailView = 66
Datatables Javascript Plugin options¶
Property
Datatables Javascript Plugin options
Description
Only applies when the option “Dynamic tables” are checked in options.
Example
dynamicTables¶
Property
dynamicTables
Description
# Path to jQuery Javascript Library (also comes with this extension).# Be sure only to include jQuery once into your site.
jQueryPath=/typo3conf/ext/cag_tables/js/jquery.min.js
# Path to dataTables Javascript library (comes with this extension):
dataTablesPath=/typo3conf/ext/cag_tables/js/jquery.dataTables.js
# Path to dataTables configuration. An example is located at this path.
# Please copy it somewhere into the fileadmin folder and adapt to your needs.
dataTablesConfigPath=/typo3conf/ext/cag_tables/js/dataTablesConfig.js
Example
HTML Template¶
The Extension is 100% html template driven. The template is located in the extension folder (usually typo3conf/ext/cag_tables/template.html).
If you want to modify the standard Template you can do so. Please note that building the table it is a highly automated process – so you have to leave the general structure of the template (with its subparts and markers) in tact.
There are two sections in the template. A section for “table view” and “detail view”.
Table / Searchresult view:¶
All HTML-Code for the table / searchresult view is located in between “<!-- ###SEARCHRESULT### begin -->” and <!-- ###SEARCHRESULT### end -->
- Please note that building the table it is a highly automated process. Only change HTML if you know what you are doing.
- You may change or remove the default inline CSS styles and adapt it to your design
Detail View (optional):¶
The detail view of a record is shown when clicking on a table row. You must explicitly configure the detail view. The detail view uses the following HTML-Subpart from “<!-- ###DETAIL_VIEW### begin -->” to “<!-- ###DETAIL_VIEW### end -->”.
Please note that the generation of the detail view automated process. Only change HTML if you know what you are doing.
You may change or remove the default inline CSS styles and adapt it to your design
The detail view HTML-snipplet is shwon below. There are two ways of displaying the selected data.
- Generically display all selected data (default)
2. Explicitly display fields by setting markers in the template. The
marker names must be exactly the same as the selected fields in the
SQL-statement. Example if you “select title from pages” you can use
the marker ###TITLE### in the detail view. Furthermore you can use a
subpart called “###IFEXISTS_{MYFIELDNAME}###”.
Data:underline:inside the subpart is only displayed if the data is
not empty. This can be useful if you don't want to display parts of
the HTML if the selected data / field is empty. See example below.
<!-- ###DETAIL_VIEW### begin -->
<style type="text/css">
div.cagtables_details {
border: 1px dotted;
}
div.even0 {
/** background: #e0e0e0; **/
border-top: 1px dotted;
}
div.even1 {
/** background: #ffffff; **/
border-top: 1px dotted;
}
div.highlight {
background: #ffffa0;
border-top: 1px dotted;
}
</style>
<!-- Example for displaying some fields explicitly
###IFEXISTS_TITLE###<h1>Titel: ###TITLE###</h1>###IFEXISTS_TITLE###
###IFEXISTS_UID###<h1>UID: ###UID###</h1>###IFEXISTS_UID###
###IFEXISTS_SUBTITLE###<h1>SUbtitle: ###SUBTITLE###</h1>###IFEXISTS_SUBTITLE###
-->
<!-- Display all fields generically (remove if you are displaying fields explicitly as in example above) -->
<div class="cagtables_details">
###ROWS###
<div class="cagtables_detail_row even###ROW_EVEN###" onMouseOver="this.className='cagtables_detail_row highlight'" onMouseOut="this.className='cagtables_detail_row even###ROW_EVEN###'">
<h3>###LABEL###</h3>
<p>###COLUMN_CONTENT###</p>
</div>
###ROWS###
</div>
<div class="cagtables_details_backlink">
<p><br /><a href="javascript:history.back()"><< Back</a></p>
</div>
<!-- ###DETAIL_VIEW### end -->
Known problems¶
None so far
To-Do list¶
I will think of more features!
ChangeLog¶
0.9.0¶
Version
0.9.0
Changes
Initial realease by Jens Eipel, ( Connecta AG, TYPO3 Agentur Wiesbaden http://www.connecta.ag )
1.0.0¶
Version
1.0.0
Changes
Minor Bugfixes
1.0.1¶
Version
1.0.1
Changes
Bugfix: Eliminanted warnings when empty result occurs
1.0.2¶
Version
1.0.2
Changes
Minor Bugfixes
1.0.3¶
Version
1.0.3
Changes
Eliminated problem whith trailing spaces when choosing template for CSV-Display
Handle the case when chosen CSV-File in backend is not readable
1.0.5¶
Version
1.0.5
Changes
Bugfix for Safari Browser (autocreate config now works)
1.0.7¶
Version
1.0.7
Changes
Performance Optimization
1.1.0¶
Version
1.1.0
Changes
Security Fix, changes to Flexform, added classnames to th-tags
1.2.1¶
Version
1.2.1
Changes
Performance optimization
1.2.2¶
Version
1.2.2
Changes
Performance optimization
1.2.3¶
Version
1.2.3
Changes
Bugfixes and Features: Fixed alternating classes for table rows, Fixed Option “Only list results after search”, Example Inline CSS for alternating row colors, Changes in Flexforms
1.2.6¶
Version
1.2.6
Changes
Security Fix, Fixed Problems where markers where not replaced in some cases, introduces colgroups in table head, column width can now be configured as an attribute for each column
1.2.7¶
Version
1.2.7
Changes
Updated Manual
2.0.0¶
Version
2.0.0
Changes
Revision
3.0.0¶
Version
3.0.0
Changes
Detail View implemented
Some performance improvements. Optional detail view for every data row.
3.0.1¶
Version
3.0.1
Changes
Security fix and changes in autoconfiguration function
3.0.2¶
Version
3.0.2
Changes
Bugfix addressing issue with some php versions extension fails to run. Addresses security issues in pi1 (Database Plugin). Plugin 1 (display database tables) only accessible for admin users.
3.0.3¶
Version
3.0.3
Changes
Adresses a security issue within plugin 1 with datasource database. Fixes an issue in detail view mode of plugin 2 with datasource CSV
4.0.0¶
Version
4.0.0
Changes
- Optional javascript driven dynamic tables now available (datatables javascript plugin: See www.datatables.net)
- Detail template for view of a column can now contain dedicated markers to be replaced by SQL-query result
- Fixed an error when switching Extension between CSV and Database Mode in backend
4.1.0¶
Version
4.1.0
Changes
- Dynamic SQL Statements (evaluate expressions or parse variables like userid, usergroup etc.)
- Option to display specific record in detail view without prior calling list view
- Option for passing definable primary key and record ID when calling and displaying detail view.
- Bugfix in CSV view (fgetcsv now with line length indefinite (0)).
20