DEPRECATION WARNING
This documentation is not using the current rendering mechanism and is probably outdated. The extension maintainer should switch to the new system. Details on how to use the rendering mechanism can be found here.
EXT: TwinHelix Designs FreeStyle Menus for TYPO3
| Author: | Kasper Skårhøj |
|---|---|
| Created: | 2002-11-01T00:32:00 |
| Changed: | 2008-11-13T14:51:27 |
| Author: | Christian Lerrahn |
| Email: | christian.lerrahn@cerebrum.com.au |
| Info 3: | |
| Info 4: |
EXT: TwinHelix Designs FreeStyle Menus for TYPO3
Extension Key: cerebrum_fsmenu
Copyright 2000-2002, Christian Lerrahn, <christian.lerrahn@cerebrum.com.au>
This document is published under the Open Content License
available from http://www.opencontent.org/opl.shtml
The content of this document is related to TYPO3
- a GNU/GPL CMS/Framework available from www.typo3.com
Table of Contents
EXT: My Extension 1
Introduction 1
Licence note 1
What does it do? 1
Screenshots 1
Users manual 1
Administration 1
Configuration 2
Reference 2
Tutorial 2
Known problems 2
Changelog 3
Important guidelines 4
Issues with Open Office documentation for TYPO3 4
Inserting images 4
Paragraph styles 4
Linking 5
Meta data and updates 5
Introduction
Licence note
This extension makes use of FreeStyle Menu by TwinHelix Designs. The menu's developer requires you to either link back to his site or make a donation. For more details, visit http://www.twinhelix.com/dhtml/fsmenu/ .
What does it do?
This extension facilitates the use of a CSS layer menu as set up by FreeStyle Menu . It integrates the CSS styles that FreeStyle Menu uses as well as the JavaScript and makes the main features configurable via TS. You can also modify the templates and add your own markers which you then fill trough TS.
Screenshots
Still to come.
Users manual
The extension comes with a plug-in which can be included as a content element. As it it mainly developed with direct inclusion in the TYPO3 template, it is mainly configured via TypoScript and only allows for the 'class' and 'id' on the menu's root tag to be set via FlexForms.
Installation
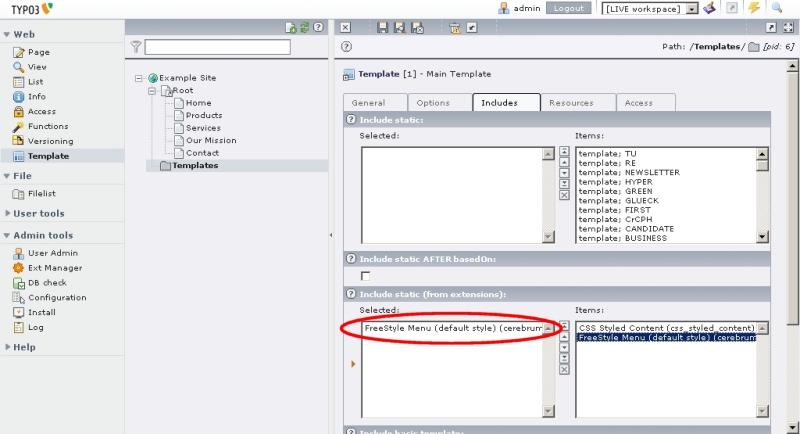
Install the extension via “Ext. Manager” in the TYPO3 backend.
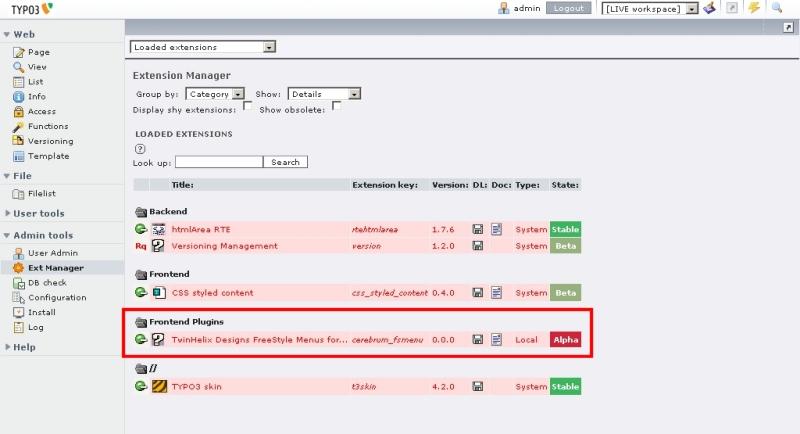
Include static template: "FreeStyle Menu (default style) (cerebrumfsmenu)" on the page you want to use the menu. Normally this is the root page of your web site. All subpages inherit the templates from the parent.
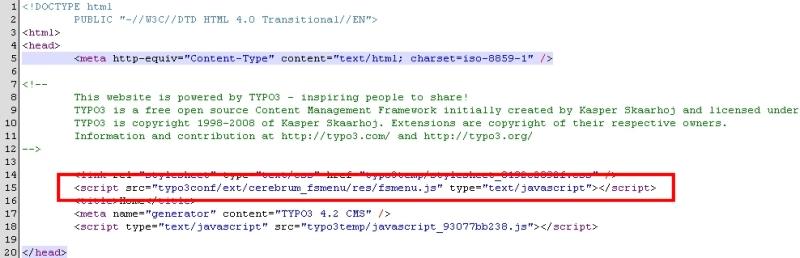
Now the JavaScript "fsmenu.js" is included in the HTML source of the page(s). You can verify this by clearing the FE cache, reload the page and take a look into the page source. The screen shot below is just an example. Your source code may differ from the code depending on your individual web site. Just note the highlighted line for JavaScript inclusion.
Administration
This extension is exclusively configured via TypoScript. It comes with the standard templates of TwinHelix Designs' FreeStyle Menu and all the TypoScript constants are set to exactly reproduce the example configuration that FreeStyle Menu comes with. As long as you don't want to use your own template files or introduce new template markers, all the configuration can be done via TypoScript constants. For alternative template files or new markers, you will have to use the 'setup' section.
Setting up
The extension will run out of the box after installing. You can style it using TypoScript. You can also modify the MENU object that the extension uses to determine what pages to include in the menu, etc.
The following TypoScript code is a full working example, using TYPO3 internal marker (named “MENU”):
page = PAGE
page.10 = TEMPLATE
page.10 {
        template = FILE
        template.file = fileadmin/templates/main.tmpl
        marks.MENU < plugin.tx_cerebrumfsmenu_pi1
}
The file “fileadmin/templates/main.tmpl” contains the marker, e.g.:
<div id=”menu”>###MENU###</div>
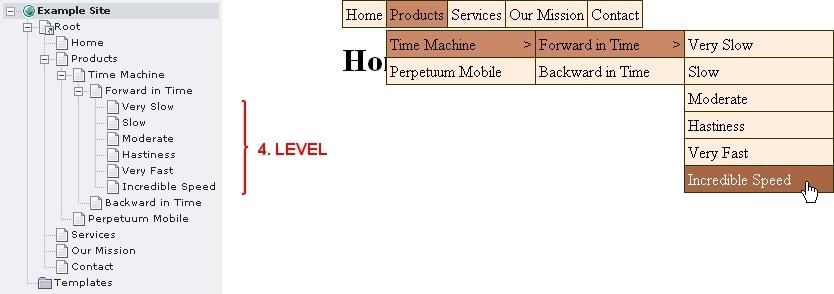
Assuming we use the following page tree:
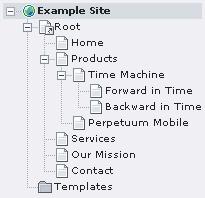
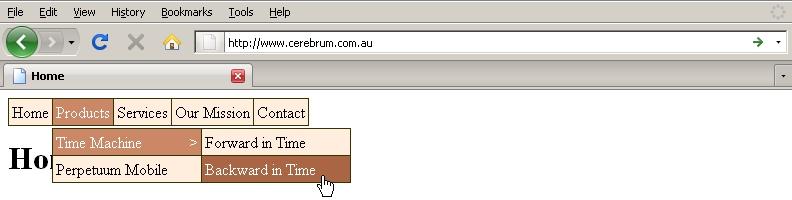
The output looks like (note the menu at the top of the page):
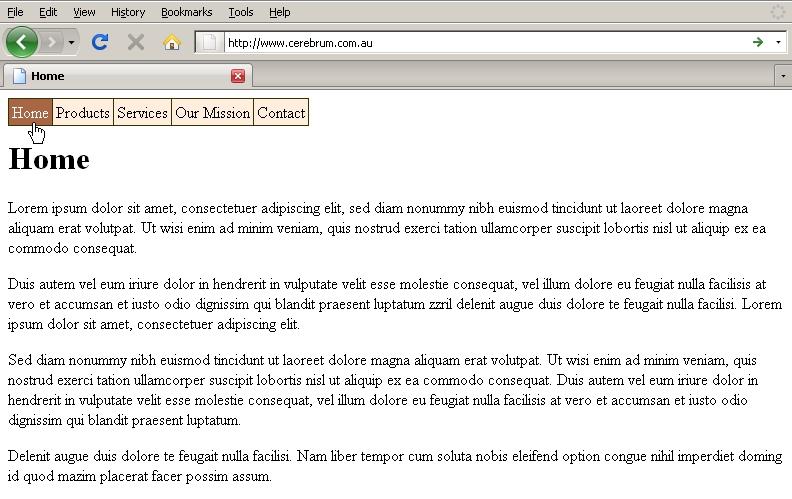
If you move the mouse pointer over the menu items, they change their states. Due to the fact that “Products” has subpages (see page tree above), the subpages are displayed in a nice smooth slide down effect when you move the mouse over the appropriate items.
Configuration
As already mentioned above, the extension will run out of the box after installing. Please see some examples below for a fine tuning.
Reference
plugin.tx_cerebrumfsmenu_pi1
cssFile
Property
cssFile
Data type
resource
Description
CSS style sheet for normal menu.
Default
EXT:cerebrum_fsmenu/res/listmenu_X.css (X is set via 'style'
cssFallbackFile
Property
cssFallbackFile
Data type
resource
Description
CSS style sheet to be used if JavaScript is disabled and the normal menu cannot be used.
Default
EXT:cerebrum_fsmenu/res/listmenu_fallback.css
JSStartFile
Property
JSStartFile
Data type
resource
Description
JavaScript code to get the menu set up in the browser.
Default
EXT:cerebrum_fsmenu/res/fsmenu.html
style
Property
style
Data type
string
Description
Menu style
Possible values are “vertical”, “horizontal” and “office”
Default
horizontal
itemWidth
Property
itemWidth
Data type
string
Description
Sets the width of the menu items from second level on. On first level width is usually determined by the width of the menu label.
Default
150px
bgColor
Property
bgColor
Data type
string
Description
RGB colour code for the background colour of the menu. With the default templates the leading '#' is included in the template. You will therefore need a value like '12abff'.
Default
FED
bgColor.RO
Property
bgColor.RO
Data type
string
Description
RGB colour code for the background colour of the menu when mouse is hovering over the menu item. With the default templates the leading '#' is included in the template. You will therefore need a value like '12abff'.
Default
A64
bgColor.ACT
Property
bgColor.ACT
Data type
string
Description
RGB colour code for the background colour of the menu when menu item is active, i.e. you are on the page that corresponds to this menu item. With the default templates the leading '#' is included in the template. You will therefore need a value like '12abff'.
Default
C86
bgColor.HIGHLIGHT
Property
bgColor.HIGHLIGHT
Data type
string
Description
RGB colour code for the background colour of the menu when menu item is highlighted, i.e. the menu item is parent item to the expanded submenu. With the default templates the leading '#' is included in the template. You will therefore need a value like '12abff'.
Default
C86
linkColor
Property
linkColor
Data type
string
Description
RGB colour code for the links in the menu. With the default templates the leading '#' is included in the template. You will therefore need a value like '12abff'.
Default
000
linkColor.RO
Property
linkColor.RO
Data type
string
Description
RGB colour code for the link colour when mouse is hovering over the link. With the default templates the leading '#' is included in the template. You will therefore need a value like '12abff'.
Default
FFF
linkColor.ACT
Property
linkColor.ACT
Data type
string
Description
RGB colour code for the link colour when menu item is active, i.e. you are on the page that corresponds to this menu item. With the default templates the leading '#' is included in the template. You will therefore need a value like '12abff'.
Default
FFF
linkColor.HIGHLIGHT
Property
linkColor.HIGHLIGHT
Data type
string
Description
RGB colour code for the link colour when menu item is highlighted, i.e. the menu item is parent item to the expanded submenu. With the default templates the leading '#' is included in the template. You will therefore need a value like '12abff'.
Default
FFF
className
Property
className
Data type
string
Description
If you want to use a FreeStyle menu directly in your TypoScript template and therefore can't easily style it via FlexForms, you can use this to set the class name applied to the menu's root UL tag. If you use the menu as a plug-in, you will probably use FlexForms to configure this.
Default
menulist
rootTagId
Property
rootTagId
Data type
Description
If you want to use a FreeStyle menu directly in your TypoScript template and therefore can't easily style it via FlexForms, you can use this to set the id applied to the menu 's root UL tag. If you use the menu as a plug-in, you will probably use FlexForms to configure this.
Default
listMenuRoot
padding
Property
padding
Data type
string
Description
padding for the individual menu items
Default
3px
border
Property
border
Data type
string
Description
border paramters for the individual menu items
Default
1px solid #330
[tsref:(script).class.tx_cerebrumfsmenu_pi1.php]
plugin.tx_cerebrumfsmenu_pi1.myMarkers
<your own marker>
Property
<your own marker>
Data type
String
Description
You create a marker and set its content. E.g. The configuration
plugin.tx_cerebrumfsmenu_pi1.myMarkers.myExtraMarker = abc
will replace every occurrence of ###MYEXTRAMARKER## in your template files to the value 'abc'.
Default
not set
[tsref:(script).class.tx_cerebrumfsmenu_pi1.php]
((generated))
The byClass object
The extension reads configuration made in the object
plugin.tx_cerebrumfsmenu_pi1.byClass.<classname>
where <className> is the className set via TS or flexforms for the plug-in that is currently processed. These configuration objects have exactly the same properties as the top level object described above and override those default settings for the plug-in identified by its class name.
Example 1
The following TypoScript code is based on the example in chapter “Setting up” and shows the default configuration:
page = PAGE
page.10 = TEMPLATE
page.10 {
        template = FILE
        template.file = fileadmin/templates/main.tmpl

        marks {
                MENU < plugin.tx_cerebrumfsmenu_pi1
                MENU {
                        itemWidth = 150px
                        subMenuOffset = -2
                        bgColor = ffeedd
                        bgColor.RO = aa6644
                        bgColor.ACT = cc8866
                        bgColor.HIGHLIGHT = cc8866
                        linkColor = 000000
                        linkColor.RO = ffffff
                        linkColor.ACT = ffffff
                        linkColor.HIGHLIGHT = ffffff
                        className = menulist
                        rootTagId = listMenuRoot
                }
        }
}
Example 2
If you want to exclude some pages, use the menuObj configuration, as shown below. This code snippet excludes the pages with uid 23, 42 and 123:
marks {
             MENU < plugin.tx_cerebrumfsmenu_pi1
             MENU {
                     itemWidth = 150px
                     [...]
                     menuObj.excludeUidList = 23,42,123
             }
     }
The “excludeUidList” is part of the TSRef, see Content Object (cObject): HMENU. As mentioned above you can change entry levels, wraps, etc.
Example 3
If you want to add more than 3 levels in your menu you have to create (or duplicate) the menuObj. The first level is the always visible menu level. If you hover the mouse pointer on an item of this level and this item has sub pages, the second level appears. If the item in the second level has sub pages, too, the third level appears.
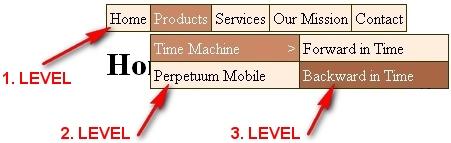
By default (and out of the box) three levels are configured. If you want to add more than these levels, simple add the following lines in your TypoScript:
marks {
             MENU < plugin.tx_cerebrumfsmenu_pi1
             MENU {
                     itemWidth = 150px
                     [...]
                     menuObj.4 < .menuObj.3
             }
     }
The line “ menuObj.4 < .menuObj.3 ” (do not forget the leading dot in “menuObj.3”) copies the 3 rd level to the new “menuObj.4” – in other words: this line activates the 4 th level. In case of further levels, duplicate the line and change the numeric values.
Let's assume our page tree has a 4 th level and we activated it in TypoScript as mentioned above. The menu should look like the following:
Example 4
As mentioned in example 2 (see above) you can use the elements from cObject HMENU. This also means you can override the MENU Object as well. The example below gives the <li> tag in the 4 th level the user defined CSS class “level4” and the currently active item the CSS id “level4active”:
marks {
             MENU < plugin.tx_cerebrumfsmenu_pi1
             MENU {
                     itemWidth = 150px
                     [...]
                     menuObj.4 = TMENU
                     menuObj.4 {
                             wrap = <ul>|</ul>
                             NO = 1
                             NO {
                                     wrapItemAndSub = <li class="level4">|</li>
                             }

                             ACT < .NO
                             ACT {
                                     wrapItemAndSub = <li id="level4active">|</li>
                             }
                     }
             }
     }
Tutorial
Maybe later. ;)
Known problems
The extension creates a new stylesheet or JavaScript file every time there was a change to the contents of the used file. As typo3temp usually does not get tidied up by the TYPO3 core, this can add up to a significant amount of junk data over time.
 EXT: TwinHelix Designs FreeStyle Menus for TYPO3 - 7