DEPRECATION WARNING
This documentation is not using the current rendering mechanism and is probably outdated. The extension maintainer should switch to the new system. Details on how to use the rendering mechanism can be found here.
EXT: Digital Asset Management
| Author: | Dan Osipov |
|---|---|
| Created: | 2011-01-22T19:19:55 |
| Changed by: | Lorenz Ulrich |
| Changed: | 2012-09-25T15:47:36.190000000 |
| Classification: | dam |
| Description: | The keywords help with categorizing and tagging of the manuals. You can combine two or more keywords and add additional keywords yourself. Please use at least one keyword from both lists. If your manual is NOT in english, see next tab "language" ---- forEditors (use this for editors / german "Redakteure") forAdmins (use this for Administrators) forDevelopers (use this for Developers) forBeginners (manuals covering TYPO3 basics) forIntermediates (manuals going into more depth) forAdvanced (covering the most advanced TYPO3 topics) see more: http://wiki.typo3.org/doc_template#tags ---- |
| Keywords: | dam, digital, assets, management, multimedia, organization, media, files, file, system, categorization |
| Author: | The DAM development team |
| Email: | typo3-project-dam@lists.netfielders.de |
| Version: | 1.2.0 |
| Language: | en |

 EXT: Digital Asset Management
Extension Key: dam
Language: en
Version: 1.3.1
Keywords: dam, digital, assets, management, multimedia, organization, media, files, file, system, categorization
Copyright 2000-2012, DAM Development team <typo3-project- dam@lists.typo3.org>
This document is published under the Open Content License
available from http://www.opencontent.org/opl.shtml
The content of this document is related to TYPO3
- a GNU/GPL CMS/Framework available from www.typo3.org
Table of Contents
`EXT: Digital Asset Management 1 <#__RefHeading__5708_1738894311>`_
`Introduction 3 <#__RefHeading__2619_1900641420>`_
`Installation 4 <#__RefHeading__2621_1900641420>`_
Installing recommended extensions 4
Installing optional extensions 4
What happened to your backend so far? 5
`Basic Configuration 6 <#__RefHeading__2633_1900641420>`_
`Setup DAM-Backend-Permissions (Backend-Users/Groups) 11 <#__RefHeading__2637_1900641420>`_
Setup File Mount & DAM Mounts 11
Giving users access the Media folder 11
Access Lists: Allow modules, tables and excludefields 11
`Changing DAM Look & Feel 13 <#__RefHeading__2645_1900641420>`_
`Working with files 14 <#__RefHeading__2649_1900641420>`_
`Working with selections 28 <#__RefHeading__2657_1900641420>`_
`Working with categories 33 <#__RefHeading__2667_1900641420>`_
`Usage information 34 <#__RefHeading__2669_1900641420>`_
`Tools 35 <#__RefHeading__2671_1900641420>`_
`Working with multiple languages 38 <#__RefHeading__2679_1900641420>`_
`Integration with extensions 40 <#__RefHeading__2710_764101692>`_
Integration with Linkvalidator 40
`TSConfig 41 <#__RefHeading__3486_1900641420>`_
Disable Upload in RTE for media links and images 41
Disabling tabs in image element browser 41
Setup styles for media links 41
Title attribute for RTE links 42
`DAM configuration (tx_dam.) 47 <#__RefHeading__3502_1900641420>`_
`Known problems 50 <#__RefHeading__2691_1900641420>`_
`I found a bug / I have a feature request 51 <#__RefHeading__2699_1900641420>`_
`ToDo 52 <#__RefHeading__2701_1900641420>`_
There is still room for improvement 52
`Sponsoring 53 <#__RefHeading__2707_1900641420>`_
`Changelog 54 <#__RefHeading__2713_1900641420>`_
Introduction
A Digital Asset Management System (DAM) system is a tool to handle digital content like images, text files and virtually any other data format. These media files can be attributed with meta information. Such information can describe the content (description, keywords, location), provide technical data (image size) or copyright information for example. All these information can be used to handle, find and categorize the media files.
Two different forces drive the necessity for advanced management of such assets:
- Large number: Even smaller sites tend to produce large numbers of assets, often stored in random folders and with incoherent naming, making the organization and overview increasingly hard over time. Digital asset management adds a meta-layer of information to every file in a semi-automatic indexing process, allowing users to search for attributes in a database associated with the files.
- Automated retrieval: Assets as building blocks for content often are used to produce automated output, like image galleries and download areas. Digital asset management serves these output functions by providing an interface for retrieving assets filtered by any combination of meta data criteria.
The Digital Asset Management for TYPO3 was developed to address the growing demand for professional asset management in TYPO3 applications and implementations. Even though the first final version is still to come, previous versions have been used in various production settings.
The DAM is similar to the File module integrated into the TYPO3 backend as a main module. It will replace the File module when finished, which means all file handling like copying, deletion and renaming of files is provided by the DAM. Nevertheless the DAM doesn't use a new storage type for files. The files are stored into the file system as before.
This manual is an introduction to the DAM extension. Additional information, as well as pending documentation can be found on Forge: http://forge.typo3.org/projects/extension-dam/wiki/Notes-for- Documentation
Installation
Requirements
DAM 1.3 requires TYPO3 4.5.0. If you're using an older version, you can install DAM 1.1
DAM also requires static_info_tables, so you need to install this extension first.
Installing DAM
To install DAM itself just import it from TER and install it. The extension key is ' dam '.
Make sure you update the reference index after installation of the dam!
Installing recommended extensions
To comfortably work with DAM in the backend and to get something out in frontend, at least the following extensions are a requirement.
- dam_index is needed for adding meta data automatically, when you upload a file or when you want to batch index multiple files.
- dam_catedit is the category editor of DAM, helpful when you categorize your assets which will probably be in 99 percent of all the cases.
- dam_ttcontent lets you use media items (and meta data) in the content elements of type Image and Text with Image.
Installing optional extensions
- dam_cron In case you want to upload files via ftp or the like you might also want to install dam_cron to be able to autoindex the new files based on a cron job (a time-based scheduling service).
- svmetaextract contains several services to extract metadata from files. For further information consult the manual of this extensions directly. It can be found in the TYPO3 extension repository.
What happened to your backend so far?
Installing DAM and it's co-extensions makes the following visible changes in your backend:
1) A new module *Media* with some submodules has been added to the module frame, while the traditional module File has been removed.
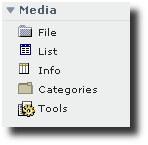 Illustration 1: A new module Media
2) A new page *Media* , the so called Media Folder, has been added to your pagetree as a direct child of your homepage. This is where all meta data of your files will be stored.
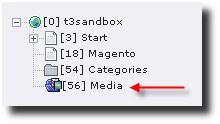 Illustration 2: A new page Media
3) The editing forms for the content elements Image and Text with Image have changed.
4) The link wizard that is used to pick files for image links, header links or media files for the Media content, has changed and has a tab „Media“ instead of „Files“ and „Folders“.
Basic Configuration
Once you have installed DAM you need to look at the configuration.
Extension Manager
After the installation you can configure the DAM in the extension manager.
Important note for upgraders: If you are upgrading from an older version of DAM you need to reconfigure both dam and rtehtmlarea:
- In the configuration options of dam , enable the media tag and the htmlArea RTE integration.
- In the configuration options of rtehtmlarea , disable the above mentioned features.
 Illustration 3: Enabling features in the extension manager
You see several options here:
Setup
TSconfig setup defining modules functions and indexing behavior.
Enable File->Filelist
When DAM is installed all file operations go through DAM. A new module appears in your main menu called Media. The File->Filelist module is hidden.
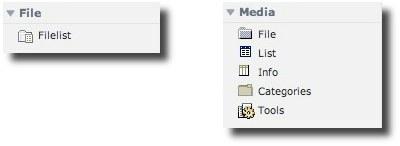 Illustration 4: The File module and the Media module
If you want to reenable the traditional File module, go to the Extension Manager, click the title Media (DAM) and check Enable File->Filelist.
Caution: DAM will not be aware of files uploaded through the traditional File module, so this might cause inconsistencies and confusion.
Hide Media folder
DAM creates a folder to store all the media records. Normally all the operations on the media records can be done through the Media menu.
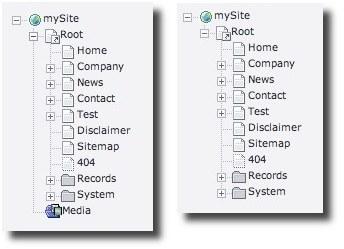 Illustration 5: Hiding the Media folder
You can hide the Media Folder by setting a default user TSConfig. Thus, no user (not even admins) will be able anymore to edit the dam tables in the List, which might be a wise move, because editing file names and the like will inevitably cause mistakes. Hiding the media folder also reduces clutter. So it is recommended to hide the media folder, but of course only after you have granted access to that page via Web>Access as described in chapter 'Setup DAM-Backend- Permissions'.
media tag
This adds the tag <media> to RTE content processing and frontend rendering. This is needed to create files links using DAM references. Additional page TSconfig may be needed to enable the media tag. This tag is similar to <link> with the difference that the given id is not a page but a media id.
Depending on the load order of installed extensions it may be needed to manually add the media tag processing to the RTE processing rules in page TSconfig:
  // Add txdam_media to RTE processing rules
RTE.default.proc.overruleMode = ts_css,txdam_media

  // Use same RTE processing rules in FE
RTE.default.FE.proc.overruleMode = ts_css,txdam_media

  // RTE processing rules for bodytext column of tt_content table
RTE.config.tt_content.bodytext.proc.overruleMode = ts_css,txdam_media
RTE.config.tt_content.bodytext.types.text.proc.overruleMode = ts_css,txdam_media
RTE.config.tt_content.bodytext.types.textpic.proc.overruleMode = ts_css,txdam_media
Why is the media tag needed?
This is because it wouldn't be possible to link assets by reference. This means whenever a link to a file is created in the RTE the file path is saved. But when the file is renamed or moved this reference is lost. The media tag use the media id instead (tx_dam.uid) and the file link will be created while FE rendering.
Activating the media tag in the EM extension options will also install a transformation handler which overrides the default ts_links mode (used also when ts_css shortcut is configured). Processing of links in db direction will be done by that handler, which searches for linked files in A tags that can be substituted with a media tag.
The media tag will be rendered in the frontend by the plugin plugin.tx_dam_tsfemediatag which is registered in the TypoScript setup of lib.parseFunc.tags and lib.parseFunc_RTE.tags.
plugin.tx_dam_tsfemediatag {
    procFields {
      file_size = 1
    }
    tag {
      current = 1
      typolink.parameter.data = parameters : allParams
      typolink.extTarget = {$styles.content.links.extTarget}
      typolink.target = {$styles.content.links.target}
      typolink.title {
        dataWrap.ifEmpty = { field : txdam_file_name } ({ field : txdam_file_size })
        htmlspecialchars = 1
      }
      parseFunc.constants =1
    }
  }

lib.parseFunc.tags.media = < plugin.tx_dam_tsfemediatag
lib.parseFunc_RTE.tags.media = < plugin.tx_dam_tsfemediatag
As you can see the fields from the tx_dam table are available in the typolink setup prefixed with txdam_. While the setup is very similar to the default link tag setup, the used typolink function is NOT the one available in stdWrap but has more or less the same properties.
htmlArea RTE integration
If set and if the htmlArea RTE extension is installed, the DAM media browser will be used by the Insert image and insert file link dialog.
 Illustration 6: HTMLArea media browser
Disable versioning
DAM has several problems with versioning of records for using workspaces. It is recommended to disable versioning for new installation, but this is off by default to prevent problems with existing installations.
Developer/Debug Functions
This activates special functions for development and debugging. This should stay deactivated for normal usage!
Setup DAM-Backend-Permissions (Backend-Users/Groups)
A mortal (non admin) user/group has to be given access to the DAM to be able to work with it.Best practice is to handle all BE-userrights via BE-usergroups and then put BE-Users into the configured group; this allows for centralized rights-management.As for specific DAM- rights you would extend your existing editors backend-usergroup with DAM-specific rights as described below.
The basics about the Rights & Permissions concepts of TYPO3 can be found in the "getting started" document: http://typo3.org/documentation/document- library/tutorials/doc_tut_quickstart/current/view/1/9/
Setup File Mount & DAM Mounts
Set up a File Mount and allow this filemount to be used by your editors backend-usergroup, see: Backend usergroup -> Mounts and Workspaces .
Note that you also have the possibility to set up a read-only filemount. This is useful if you want to create a media pool that all editors use for the FE.
Imagine you have the following folder structure:
fileadmin
public_docs (read-only filemount)
- BE-Group1 (ordinary filemount for BE_Group1)
- BE-Group2 (ordinary filemount for BE_Group2)
In order to allow the users of both or even more groups to use all media that are stored somewhere under public_docs in FE, put the following line into their User TSConfig field.
options.folderTree.altElementBrowserMountPoints = public-docs
Giving users access the Media folder
To allow your editors to read, write, edit and delete Media records you need to do two things:
Add the Media folder to the DB Mounts of a given user group.
Choose module Web>Access, select the Media folder in the pagetree and set ownership, group and permissions to read/write. This is done the same way as you would do it for normal pages.
Access Lists: Allow modules, tables and excludefields
In order to have the Media-Section being shown and to allow the editing of DAM-Records you will have to set the following withing the editors Backend-usergroup -> Access Lists:
In the ' Modules' section you can enable/disable the following items:
- Media>File (a must have)
- Media>List (a must have)
- Media>Info (optional)
- Media>Categories (needed when editors shall be allowed to edit the category tree)
- Media>Tools (optional, not really useful for ordinary editors)
Tables (listing):
In case your editors are not allowed the category tree and may only use predefined selections they need at least read access to the following tables:
- Media Category
- Selection
Tables (modify):
- Media (required to edit metadata)
- Media Category (only if your editors shall be able to edit the category tree)
- Media Types (required!)
- Selection (only if your editors shall be allowed to create own selections)
Allowed excludefields:
Select the Media:xyz and Selection:xyz fields according to your preferences.
Changing DAM Look & Feel
Enable Tabs
Tabs have been disabled in this version for better integration with the Core. You can enable tabs by setting the following parameter in User TSconfig or Page Tsconfig:
mod.txdamM1_SHARED.useTabs = 1
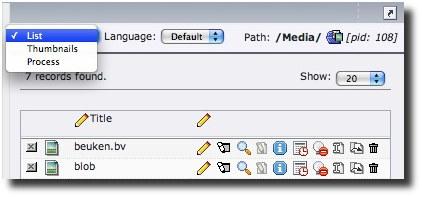 Illustration 7: TYPO3 Docheaders style
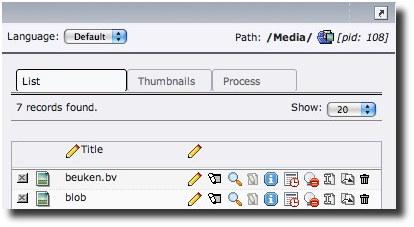 Illustration 8: DAM tabs style
Working with files
You can browse through the file tree using the module Media -> File . You will see a file browser column and a list of files in the main view.
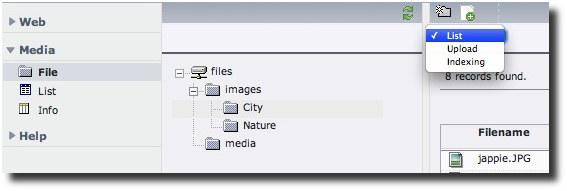 Illustration 9: The Media -> File module
The Media -> File module gives you access to three views:
- List
- Upload
- Indexing
List view
The default view (list view) shows you the filename, type, date, size and file rights.
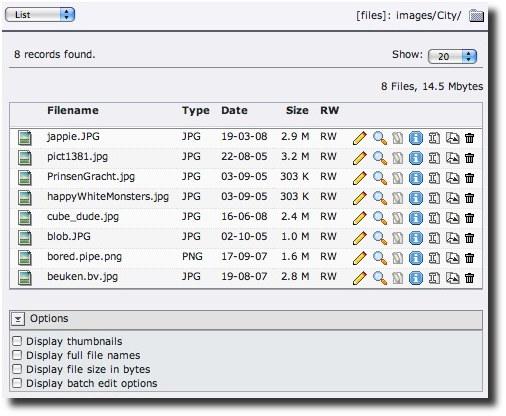 Illustration 10: File List view
You can adjust the number of files you want to see on a single page (20, 50, 100, 200) and there are several options available to change the display of the file list.
You can perform various actions on a media record by clicking one of the icons to the right. Depending on the file type and file rights, some icons may be 'grayed out'.
Edit meta data
 Editing a media record brings up a form in which you can add all the
meta data you want to a record. This form is spread over several tabs.
Editing a media record brings up a form in which you can add all the
meta data you want to a record. This form is spread over several tabs.
Overview
General information can be added here like title, description, keywords, location, category etc.
The field Title is primarily used in the backend. It will be shown in the Media->List module and in the Element browser. To get your media items displayed in a meaningful (alphabetical) order for a portrait of Albus Dumbledore we suggest a title like Dumbledore Alfred.
*A note on filenames and Title:* When you upload a file, the autoindexing feature of DAM will try to make a title out of the filename. In that process, the underscore (_) will be replaced by a blank space. So, if you want to save time here, name your file Dumbledore_Alfred.jpg.
The field Caption is intended for frontend output, for a portrait of Dumbldore this would be "Prof. Dr. Alfred Dumbledore".
The field called Source/Original location can be used to store the location of the original file. For example a photo CD name like 'Groovy Photos CD 3'.
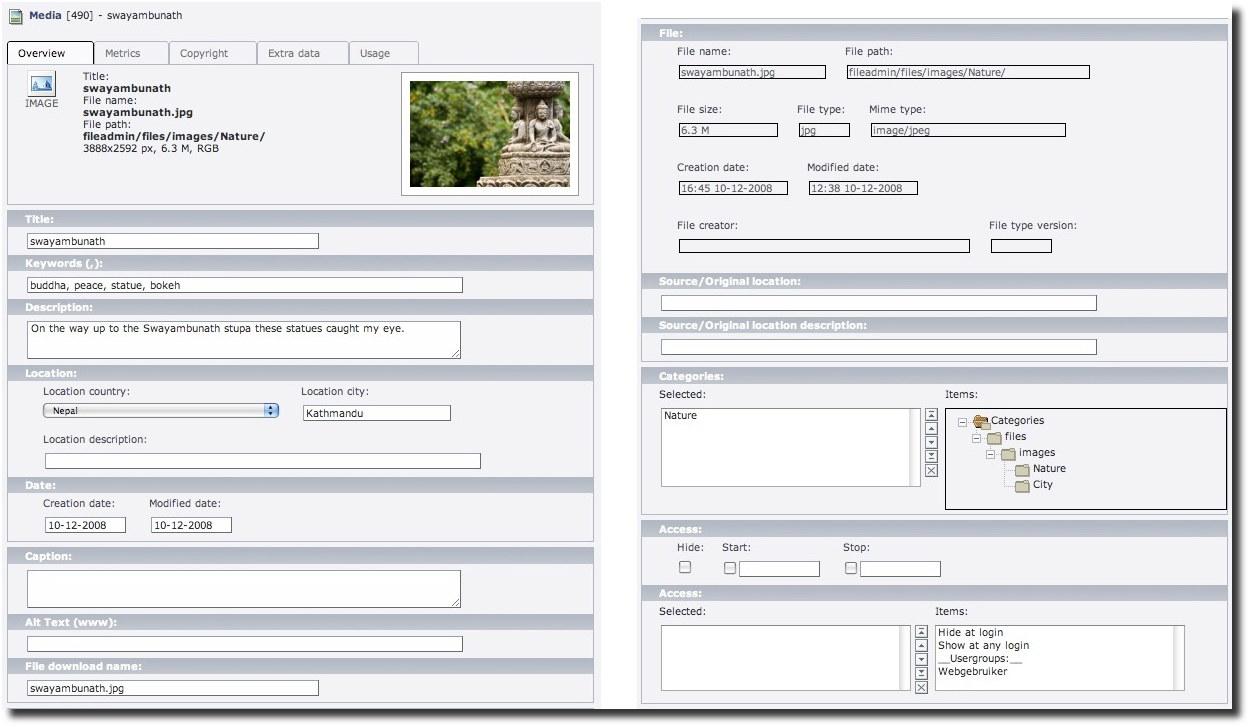 Illustration 11: Edit media: Overview tab
Metrics
 Illustration 12: Edit media: Metrics tab
Copyright
The usage of the field Ident key highly depends on what you are doing on your website. The abbreviation SKU you find here means stock keeping unit. Two possible examples:
- In case you offer eBooks on your website, the ISBN number could go here.
- In case you display images of your products, the product number would be a choice.
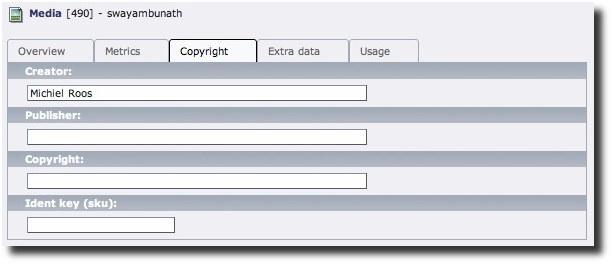 Illustration 13: Edit media: Copyright tab
Extra data
The extra data is used by the extension cc_metaexif to store EXIF information present in some image files.
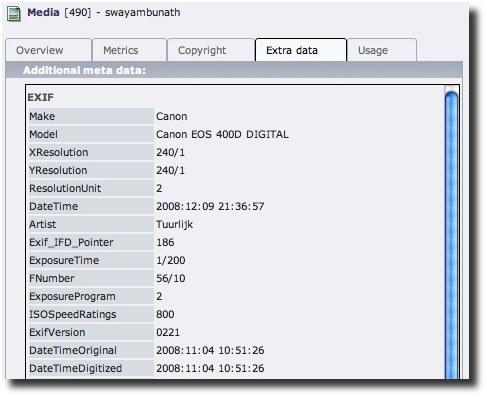 Illustration 14: Edit media: Extra data tab
Usage
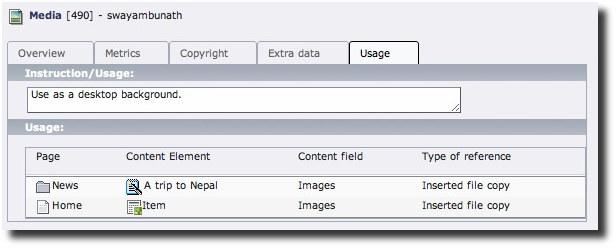 Illustration 15: Edit media: Usage tab
Show the file
 Download or view the file in a new window.
Edit the file
 Edit the file in an editor (if there is an editor available for this
filetype). If the file is in a text format, an editor will allow you
to directly edit the file.
Edit the file in an editor (if there is an editor available for this
filetype). If the file is in a text format, an editor will allow you
to directly edit the file.
Display information about record
 This view is the same as the 'edit meta data' view. The only
difference is that here you are only allowed to view the information
and not edit it.
This view is the same as the 'edit meta data' view. The only
difference is that here you are only allowed to view the information
and not edit it.
Rename the file
 You can rename your file. You can change the title of the file, the
filename and the download name.
You can rename your file. You can change the title of the file, the
filename and the download name.
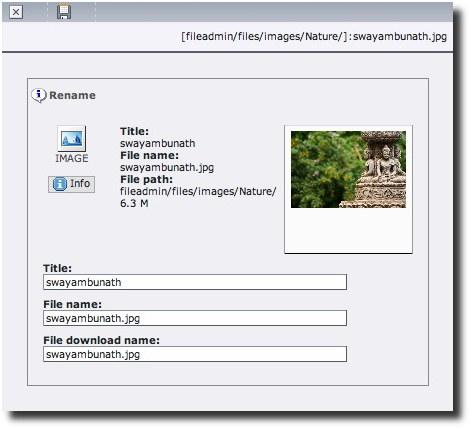 Illustration 16: Rename file
Replace file
 You can replace the file with another file. The file meta data will be
automatically updated.
You can replace the file with another file. The file meta data will be
automatically updated.
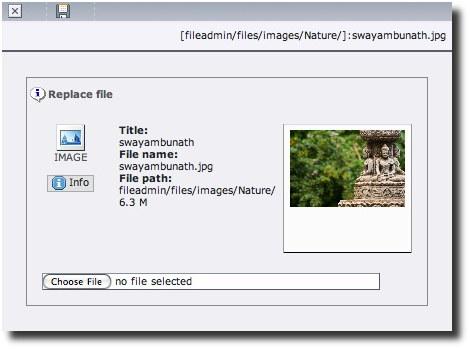 Illustration 17: Replace file
Delete the file
 When clicking the delete icon, you will be presented with a dialog
that asks for your confirmation.
When clicking the delete icon, you will be presented with a dialog
that asks for your confirmation.
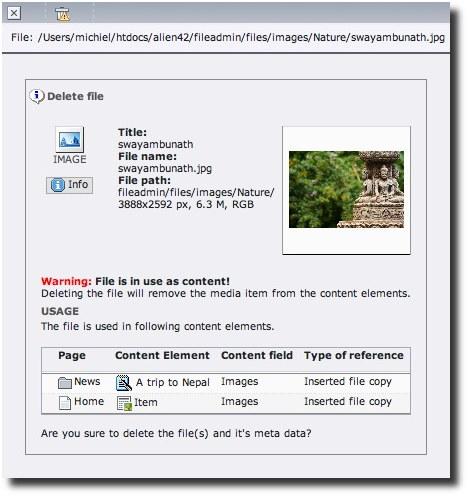 Illustration 18: File delete confirmation
This dialog will show you if and where the record is used.
Deleting a file will remove the file and all meta data associated to it. So be sure to read this dialog carefully before you delete any file.
Batch editing
You can delete, copy and move more than one file at once by enabling 'batch edit options' in the 'options' menu. When you enable batch edit options, a checkbox appears at the beginning of every media record. You can select files by checking the checkboxes or you can click the check icon at the lower right to check or uncheck all.
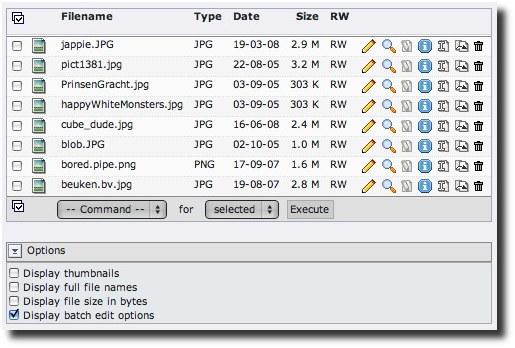 Illustration 19: Batch edit option
 By clicking the icon, you can check or uncheck all checkboxes at once.
After choosing the files you want to perform a command on you need to choose a command.
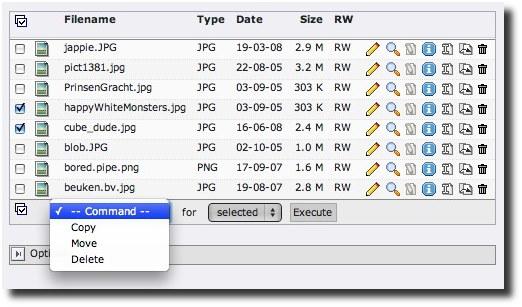 Illustration 20: Choosing a batch edit operation
You can also specify if you want the command to be executed for all the files in the list or only the files you have selected.
In case you chose the 'move' or the 'copy' command, you will need to specify a target directory.
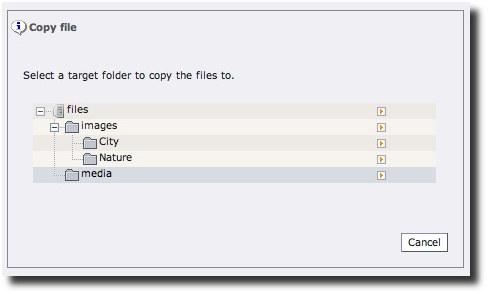 Illustration 21: Choosing a target directory
And after you have chosen a target directory, you will be asked to confirm your command.
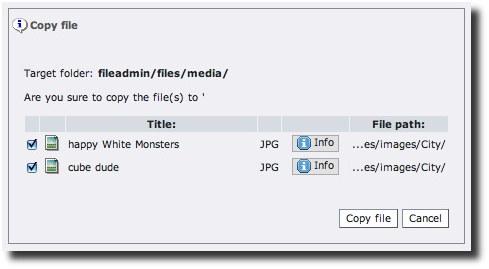 Illustration 22: Copy confirmation dialog
Be careful when batch deleting files! A warning about references to the records is not yet given. If you want to know where your media record is used, use the normal delete operation, not the batch deletion operation.
Uploading files
Uploading files is pretty straight forward. It works the same as in the old Web->File module.
 Illustration 23: Uploading files
After uploading your file, it will be automatically indexed. After upload you are given the possibility to add / change meta data by 'processing' uploaded files. This is useful if you have just batch uploaded a lot of pictures from a certain holiday trip you all want to have the same category for example.
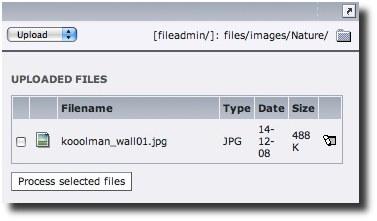 Illustration 24: Uploaded files
Indexing files
The dam media browser can only see files that have been indexed. This means you can only use 'already indexed' files in your content.
Indexing features:
- mass indexing of files and folder
- apply rules while indexing (eg. assign category from folder name)
- preset meta data before indexing
- set preset meta data not to be overwritten while indexing
- save index setup as preset
Automatic indexing
If you upload files using Media->File->Upload , those files will be indexed automatically. After upload you can add more metadata to the files by 'processing' them.
Manual indexing
There are several cases in which you need (or want) to manually index files.
Fresh DAM installation with existing files
If you already have a lot of files on your system however, you will have to manually index those files.
Files not added using upload feature
Files not added to the filesystem using DAM upload will not be auto indexed. Files may be added to the fileadmin uing FTP or certain directories in the fileadmin may be 'mounts' from filesystems on other machines. Files added without TYPO3 knowing about them will not be indexed automatically.
NOTE! Take care when using remote filesystems for storing files used in DAM. Adding files is fine, but removing files is not yet detected.
If you do add files outside of TYPO3's knowledge, you may be interested in the dam_cron extension.
A new metadata extension has been installed
After installing a new metadata extension, you may want to re-index all your files so the new extension can extract new valuable metadata from your files and add that data to the existing record.
Indexing procedure
New indexing run
- Go to Media->File->Indexing (or Media->Indexing )
- Select the folder that contains the files you want to index and click Next
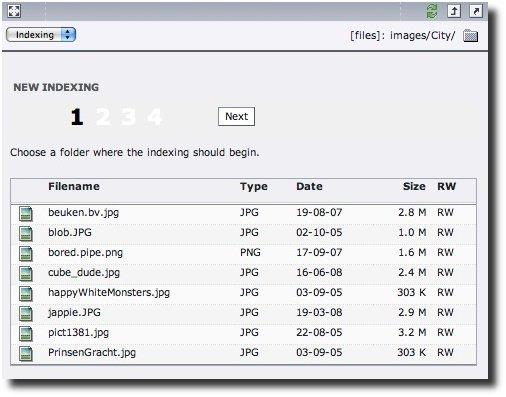 Illustration 25: New indexing run step 1
Options
In step 2 you can configure the indexing run:
- Index subfolers
- Use folder names as categories: this is useful when indexing a structured file tree into DAM
- Re-index: only missing metadata is added
- Dry run
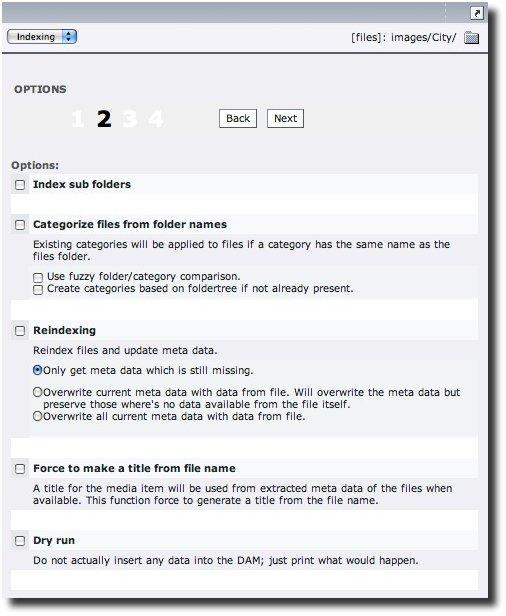 Illustration 26: Indexing step 2: Indexing options
Indexing field predefinition
If you do not want certain fields to be extracted from the media, you can predefine those values here. Check the box for the fields you want set fixed. You can add more fields to this form by adding the field names to $TCA['tx_dam']['txdamInterface']['index_fieldList'] you can do this in /typo3conf/extTables.php. If you would also like to set the user group directly when indexing, add the following line to your /typo3conf/extTables.php file:
$TCA['tx_dam']['txdamInterface']['index_fieldList'] .= ',fe_group';
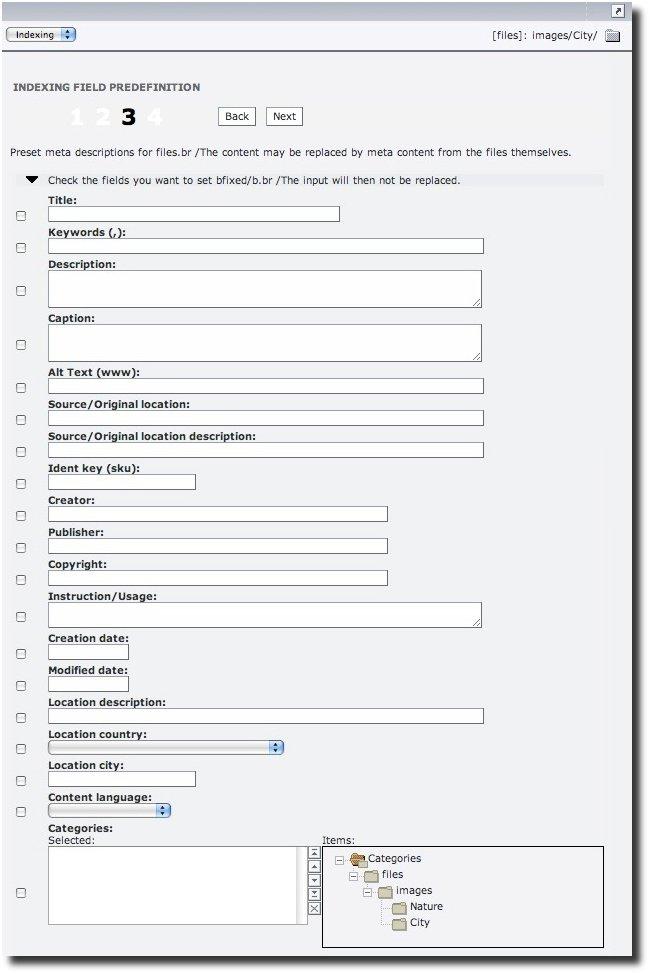 Illustration 27: Indexing field predefinition
Indexing setup summary
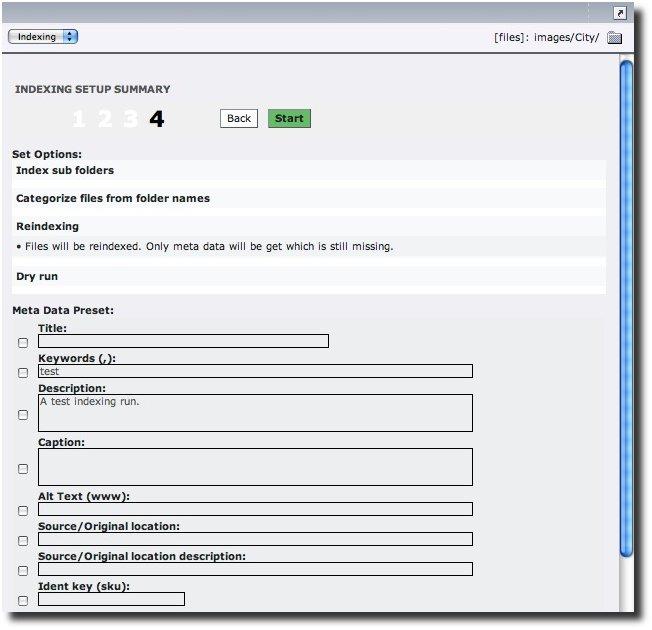 Illustration 28: Indexing summary
Actual indexing
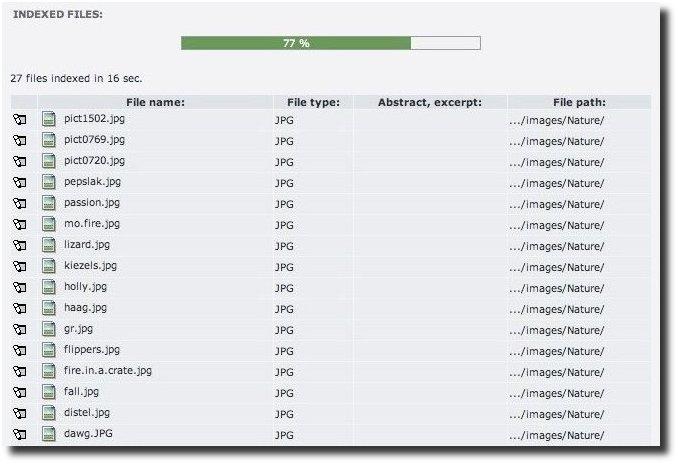 Illustration 29: What you see when the indexing task is
running
Illustration 29: What you see when the indexing task is
running
Working with selections
Selections are a powerful tool for retrieval of the stored media meta data. With selections the user can query the database with a visual tool to search for media items. When you have found your items, you can perform various actions or batch operations on them. Go to Media->List->List to create a selection.
Creating a selection
Clicking on the title of a criterium initiates a new selection. You can use the +, = and - icons to narrow down your selection. In the image below we selected any record of category 'City', that is an 'Image', but not of the filetype 'png'. You can also remove single records from the selection by clicking the X in front of a record.
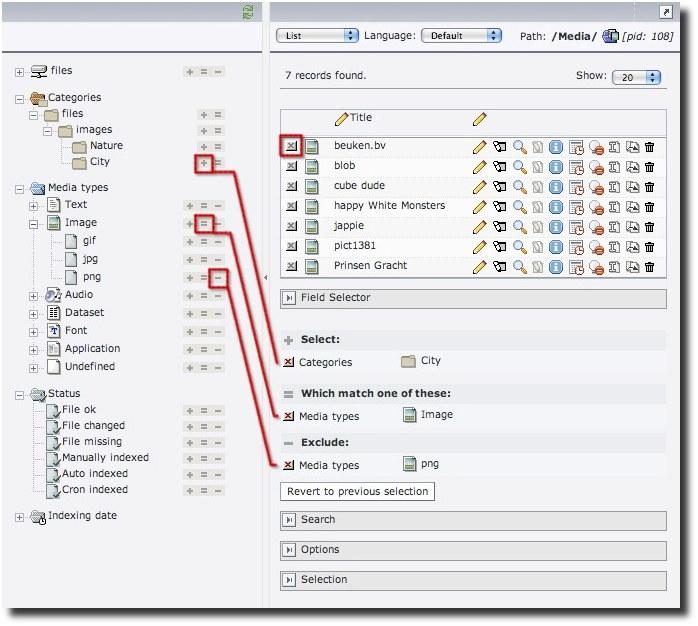 Illustration 30: Creating a selection
Saving a selection
The selection can be stored so you can use it again in a later session (or by external applications like frontend plugins).
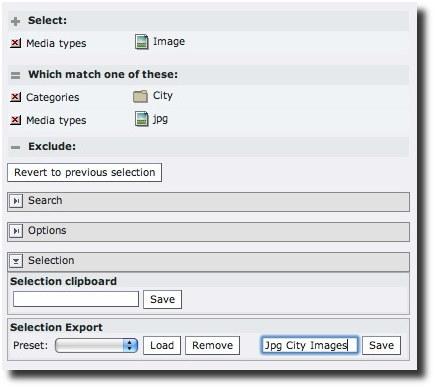 Illustration 31: Saving a selection
Any extension can extend the DAM with own selections. An example can be found in the dam_demo extension.
You can also save a selection to the clipboard. Anything you save to the clipboard will last as long as your TYPO3 session. If you want to store a selection permanently, choose the 'export' option.
Saved and exported selections can be loaded easily using 'load preset'.
You can search your selection using the 'search tool'.
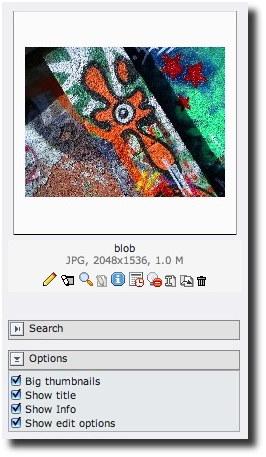
Thumbnail view
Go to Media->List->Thumbnails to view your selection as thumbnails.
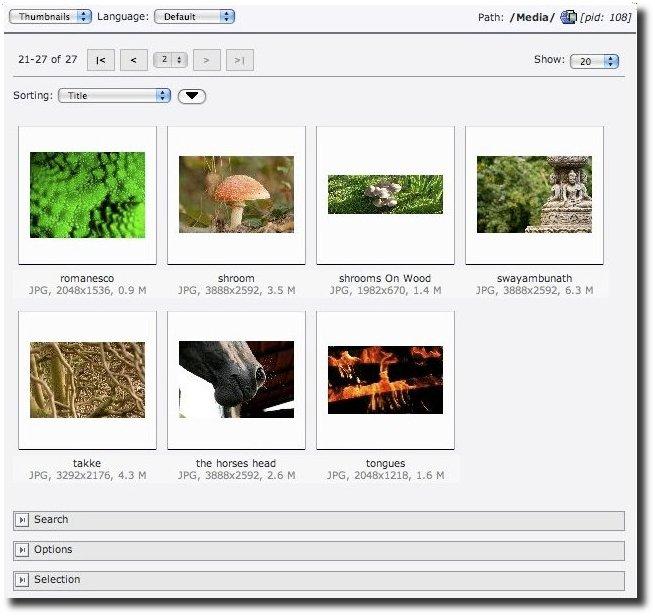 Illustration 32: Thumbnail view
Thumbnail view can be 'dressed up' using various options:
 Processing a selection
^^^^^^^^^^^^^^^^^^^^^^
Processing a selection
^^^^^^^^^^^^^^^^^^^^^^
Go to Media->List->Process to process your selection. Processing enables you to *add* metadata to all the files in your selection at once. You can also choose to 'replace' certain metadata.
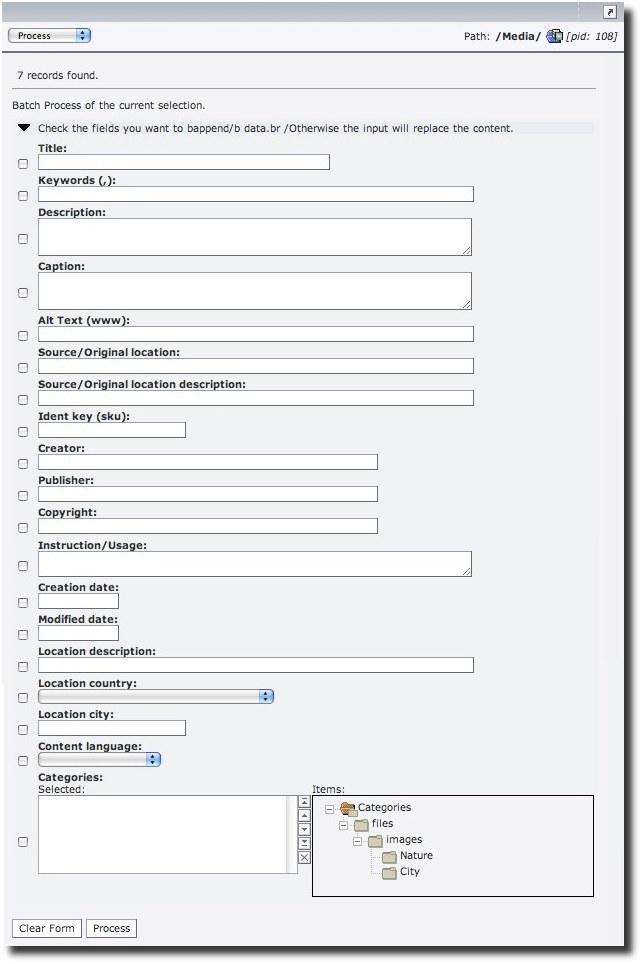 Illustration 33: Adding meta data to a selection
Working with categories
Selecting Media->Categories will bring up the category editor. Here you can create, edit and organize categories.
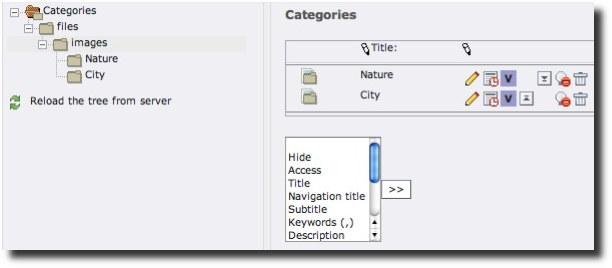 Illustration 34: Category view
You can create a new category by clicking the root node of the category tree and selecting 'new subcategory'.
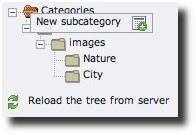 Illustration 35: Adding a category
You can nest categories by assigning a parent category.
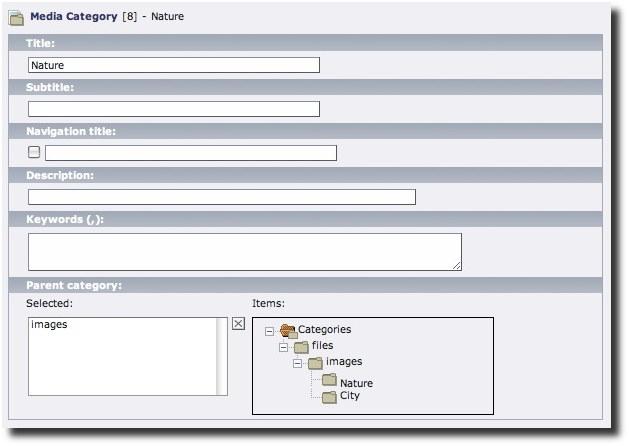 Illustration 36: Category properties
Usage information
The info module will give you insight in what media records are in use in your site. Go t o Media->Info and select Media types->Image->Jpg for example. The main view will show a list of content records where the jpg media elements are used in your site.
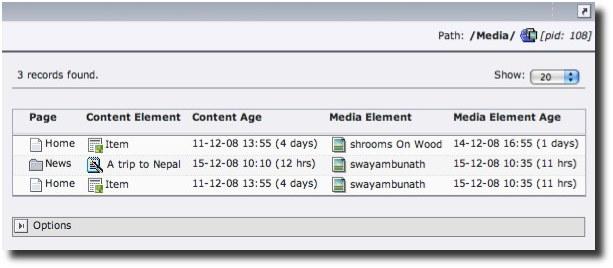 Illustration 37: Usage information
Now you can click on the title of a media record or content element to jump directly to it.
Tools
Indexing setup
With this wizard you can create an indexing configuration and store it in a folder of choice. When a file is uploaded to that folder, the file is automatically indexed using this indexing configuration.
First you need to choose a destination folder. The steps 2 through 4 are the same as for the normal indexing procedure. When you have arrived at step 4 and click Finish , you can review your settings and click Save .
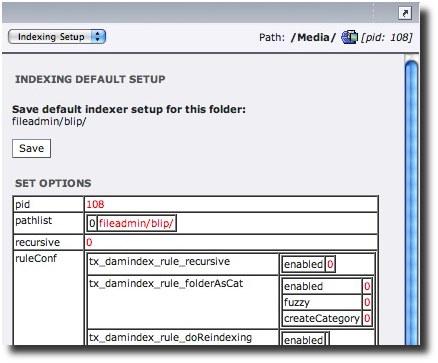 Illustration 38: Indexing setup
This will create an indexing configuration file and store it in the folder you chose in step 1. The name of the file is: .indexing.setup.xml
Every file uploaded to that folder will use the saved indexing configuration.
Checking tools
Check index
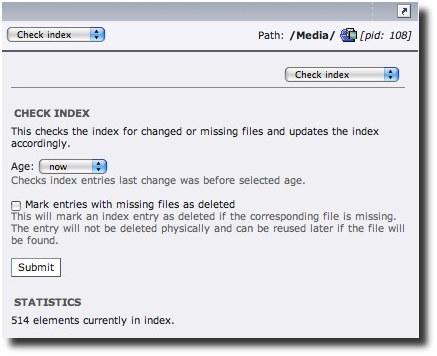 Illustration 39: Check for changed or missing files
This tool checks the index for changed or missing files and updates it accordingly.
Check uploads
This updates the index for files in uploads/ which is needed to identify the used files in content elements.
Check lost records
This function collect lost records which are not stored inside the Media folder for some reason. Lost record can be moved to the Media folder then.
Tidy metadata
This cleans the meta data from invalid content and repairs things if possible.
Statistics
This shows a statistics about indexed media items.
Configuration
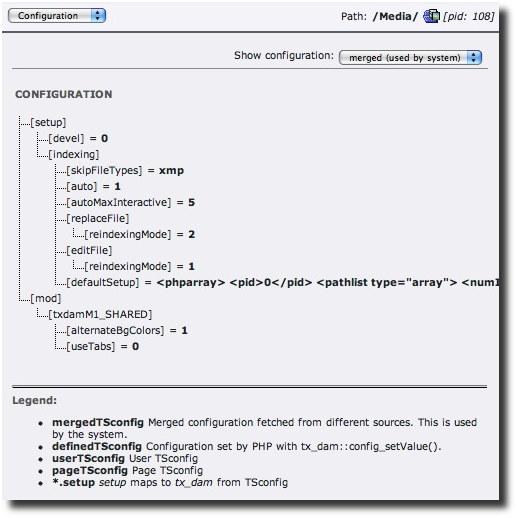 Illustration 40: DAM Configuration
Media types
Display, edit and add media types table. This table is used to determine the type of a file while indexing it.
Working with multiple languages
Introduction
DAM supports the translation of the metadata of dam-records.This feature allows you to store e.g. translated descriptions, subtitles and more for records/items and have them been shown in the frontend in the matching language. The same applies for dam-categories.
The translated metadata can then e.g. be used in the frontend of a multi language website, be it a one-tree-fits-all-languages setup or a separate-tree-for-each-language.
DAM does not yet support language-specific files with the same, but only translated content; e.g. an english and a german version of the same PDF-manual.
Website Language
As a prerequisite for using multiple languages you have to add one Website Language-Record in the root-page (globe) of your TYPO3-Installation.
Translate the Media folder
To activate the possibility to create and edit translated meta data, a translation of the Media folder has to be created. This can be done with the Web -> Page module for example. This is like creating a translation for a normal page.
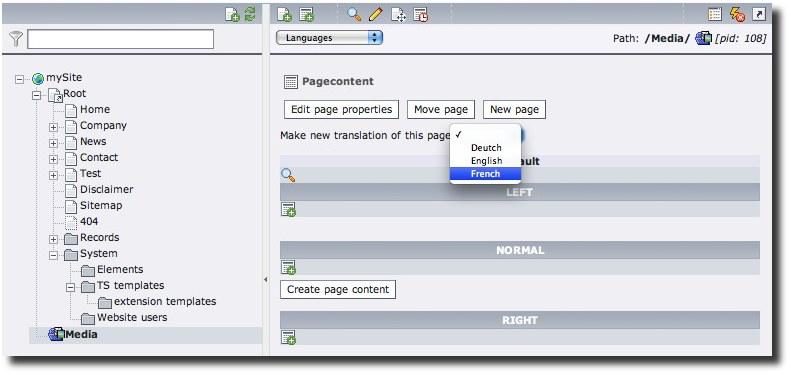 Illustration 41: Translate the media folder
Translating records
Media records and categories can be translated in the same way.
 Illustration 42: Translating a media record
Translated media records use the same category as the original language does.
Translating categories
Given the above multi language configuration, you can also translate categories to your alternative language in the Media -> Categories module with the language-dropdown on the top.The respective translated names of categories should be used by DAM extensions that show categories in the frontend.
Integration with extensions
Integration with Linkvalidator
As of DAM 1.2.1, Linkvalidator can check DAM links. There are two steps required to enable DAM support in linkvalidator:
Step 1: Add DAM to the linktypes TSConfig. Example:
Base TSConfig:
mod.linkvalidator.linktypes = db,file,external
New TSConfig :
mod.linkvalidator.linktypes = db,file,external,dam
Step 2: Add the new markers in the PAGE_SECTION mail template
Base template:

<!-- ###PAGE_SECTION### -->
     Page: ###TITLE###

     All links types: ###BROKENLINKCOUNT### (last report: ###BROKENLINKCOUNT_OLD###)

     Internal link: ###DB### (last report: ###DB_OLD###)

     External link: ###EXTERNAL### (last report: ###EXTERNAL_OLD###)


       <!-- ###PAGE_SECTION### -->

New template:

 <!-- ###PAGE_SECTION### -->
     Page: ###TITLE###

     All links types: ###BROKENLINKCOUNT### (last report: ###BROKENLINKCOUNT_OLD###)

     Internal link: ###DB### (last report: ###DB_OLD###)

     External link: ###EXTERNAL### (last report: ###EXTERNAL_OLD###)

     Dam link: ###DAM### (last report: ###DAM_OLD###)


 <!-- ###PAGE_SECTION### -->
TSConfig
Configuration
Configuration of the DAM and it's module are provided through TSconfig. For User and Page TSconfig the same properties are available for configuration. Please keep in mind Page TSconfig will be read from the DAM folder only.
Configuration is placed in
mod.txdamM1_* ... module configuration
tx_dam. ... general DAM configuration
Disable submodules
Submodules can be disabled for a user (or globally) with following TSconfig:
mod.txdamM1_list.menu.function.tx_dam_list_list = 0
mod.txdamM1_list.menu.function.tx_dam_list_thumbs = 0
mod.txdamM1_list.menu.function.tx_dam_list_editsel = 0
mod.txdamM1_list.menu.function.tx_dam_list_batch = 0
mod.txdamM1_file.menu.function.tx_dam_file_list = 0
mod.txdamM1_file.menu.function.tx_dam_file_upload = 0
mod.txdamM1_file.menu.function.tx_damindex_index = 0
mod.txdamM1_index.menu.function.tx_damindex_index = 0
mod.txdamM1_info.menu.function.tx_daminfo_reference = 0
mod.txdamM1_tools.menu.function.tx_dam_tools_indexupdate = 0
mod.txdamM1_tools.menu.function.tx_dam_tools_filerelcheck = 0
mod.txdamM1_tools.menu.function.tx_damcron_modfunc1 = 0
Set Media folder invisible
Media records in the Media folder are not meant to be edited with another module than the DAM. While the folder is visible to users, one can edit records with the Web>List module. With the following User TSconfig option the Media folder (example page id: 23) can be made invisible. Which means
options.hideRecords.pages = 23
Disable Upload in RTE for media links and images
If you want to disable the upload field in the element browser, put the following line into your page TSConfig:
// Disable Upload and Drag&Drop tabs for images
RTE.default.buttons.image.options.removeItems = upload
// Disable Upload tab for media links
RTE.default.buttons.link.options.removeItems = media_upload
Disabling tabs in image element browser
If you want to disable tabs in the RTE insert image dialogue, use the following TSconfig:
RTE.default.buttons.image.options.removeItems = media_plain,
media_magic, media_dragdrop, media_upload
//or
RTE.default.blindImageOptions = media_plain, media_magic,
media_dragdrop, media_upload
Setup styles for media links
In order to enable users to choose the style of a media link, use the following TSconfig setup for RTE:
RTE.classesAnchor {
    download {
            class = download
            type = media
            titleText = [yourTitleText]
            target = _blank
    }
}
In difference to the classic file module, you need to set type = media (instead of type = file)
Enable secure downloads
Add the following TS to your template:
plugin.tx_dam_tsfemediatag.tag.typolink.jumpurl = 1
plugin.tx_dam_tsfemediatag.tag.typolink.jumpurl.secure = 1
If you then create a text element with a link to a media element, the link will be secured (ie will not point directly to the file on the server).
Keep in mind, the file will still be accessible. Use web server configuration to lock the directory against direct access.
Title attribute for RTE links
DAM uses the value of the title field in the link selector in the title attribute of links set from the RTE. If no title attribute is set, DAM falls back to the TypoScript settings in plugin.tx_dam_tsfemediatag where DAM can be configured to use fields from the DAM records as title attributes (see here ).
There are serveral possibilites to manipulate the title attribute generation:
You can configure the RTE to make the title from metadata. Use this Page Tsconfig:
RTE.default.buttons.link.media.properties {
    title {
        readOnly = 0/1
        useDAMColumn = 0/1
        useDAMColumn {
            displayItems = _media_type:strtoupper, title, file_name
            checked = 0/1
            enforce = 0/1
        }
    }
}
If you check the checkbox „Make title from metadata“, the RTE will set the title to the current value in the database and hide the title field.
The boolean properties can be used to preset a default configuration:
- readOnly: The link title is set to readonly.
- useDAMColumn: Activate the checkbox „Make title from metadata“.
- checked: The checkbox „Make title from metadata“ is checked by default.
- enforce: The user cannot check/uncheck the checkbox.
The string displayItems is used to setup the fields being taken from the DAM record and how they are rendered:
- fieldname is the name of a column of table tx_dam or one of the special names: _media_type, _dimensions and _caption
- format is one of: date, dateage, datetime, time, timesec, year, int, float, number, md5, filesize, filesize+bytes, truncate, strtoupper, strtolower, shorten
- config is the value to be used by the formating operation, when applicable.
The frontend rendering is the last place where you can manipulate the media tag. If you e.g. want to override all link attribute values regardless of the value set in the RTE, you can override it:
plugin.tx_dam_tsfemediatag {
  tag {
    typolink.title {
      # override all title attribute values
      dataWrap.override = { field : txdam_file_name } ({ field : txdam_file_size })
    }
  }
}
Full configuration
Module configuration (mod.txdamM1_*)
DAM configuration (tx_dam.)
selections.default.modeSelIcons
Property
selections.default.modeSelIcons
Data type
Description
Selections
The selection trees can be configured as follows:
// not disable +=- icons by default
tx_dam.selections.default.modeSelIcons = 1
Default
selections.[key].modeSelIcons
Property
selections.[key].modeSelIcons
Data type
Description
// disable txdamIndexRun selection tree (hidden)
tx_dam.selections.txdamIndexRun = 0

// disable +=- icons for  txdamStatus selection tree
tx_dam.selections.txdamStatus.modeSelIcons = 0
Default
selections.txdamCat.sublevelDepth
Property
selections.txdamCat.sublevelDepth
Data type
integer
Description
limit category selection depth to 0 (non-recursive)
tx_dam.selections.txdamCat.sublevelDepth = 0
Default
indexing.auto
Property
indexing.auto
Data type
boolean
Description
Enable/Disable auto indexing
Example:
// disable auto indexing
tx_dam.indexing.auto = 0
Default
TRUE
indexing.autoMaxInteractive
Property
indexing.autoMaxInteractive
Data type
integer
Description
Defines how many files should be auto indexed at once when a user is in an interactive session like using the file module. This is to prevent a timeout when too many files needs to be indexed.
Default
5
indexing.skipFileTypes
Property
indexing.skipFileTypes
Data type
Comma list
Description
Comma list of file extensions that should be skipped while indexing.
Default
Indexing.replaceFile.keepFileName
Property
Indexing.replaceFile.keepFileName
Data type
boolean
Description
If set, the physical file name of the document is kept when replacing a file. This can be useful because are usually referenced from external sources (e.g. search engines) and will not be found if the replacing file doesn't have the same name.
This setting is ignored if the file type of the new file doesn't match with the old file.
Default
FALSE
Indexing.replaceFile.keepMetaFields
Property
Indexing.replaceFile.keepMetaFields
Data type
Comma list
Description
If you want to keep field values of metadata fields on replacing a file (ignoring the reindexingMode settings below), list the according field names. For security reasons, only fields from the index_fieldList are allowed. You can read out this configuration in the TYPO3 configuration overview:
$GLOBALS['TCA']['tx_dam']['txdamInterface']['index_fieldList']
Example:
tx_dam.indexing.replaceFile.keepMetaFields = title, caption, description
Default
indexing.replaceFile.reindexingMode
Property
indexing.replaceFile.reindexingMode
Data type
integer
Description
Make default reindexing mode when replacing the file configurable.
Available modes:
1 - Only get meta data which is still missing.
2 - Overwrite current meta data with data from file. Will overwrite the meta data but preserve those where's no data available from the file itself.
99 - Overwrite all current meta data with data from file.
Default
2
indexing.editFile.reindexingMode
Property
indexing.editFile.reindexingMode
Data type
Integer
Description
Same as above for edit file.
Default
1
indexing.defaultSetup
Property
indexing.defaultSetup
Data type
string
Description
This indexing setup will be used when no other setup will be found stored in the file path. Such a setup can be created with the module Media>Tools>Indexing Setup.
Excerpt:
<phparray>
    <pid>0</pid>
    <pathlist type="array">
        <numIndex index="0">fileadmin/</numIndex>
    </pathlist>
    <recursive>0</recursive>
    <ruleConf type="array">
        <tx_damdemo_indexRule type="array">
            <enabled>0</enabled>
            <option1>0</option1>
        </tx_damdemo_indexRule>
Default
devel
Property
devel
Data type
Description
Enables development and debug output in modules
Default
Known problems
Refer to the bugtracker for the latest list and status of known issues: http://bugs.typo3.org/ (project tx_dam)
I found a bug / I have a feature request
If you find any problems in DAM, please report over at the TYPO3 bugtracker: http://bugs.typo3.org/ (select project tx_dam)
Since DAM will be superseded by the File Abstraction Layer (FAL) in TYPO3 6.0, the DAM team won't invest time in new features but will maintain the extension until the end-of-life of TYPO3 4.5 LTS in April 2014.
In case of a bug report, please take some time and make a proper report stating at least:
- version of the extension
- reproducibility
- steps to reproduce
- observed behavior
- expected behavior
Add screenshots if they can clarify the issue. Writing a good bug report will help us to fix the bugs faster and better.
If you can, clone DAM from the TYPO3 Git server git://git.typo3.org/TYPO3v4/Extensions/dam.git, fix the bug and push a change request to Gerrit (additionally to the issue).
The DAM can output a lot of information when debugging is turned on. To enable that mode, set $TYPO3_CONF_VARS['SYS']['enable_DLOG'] = 1 (this can be done in the install tool) in your local configuration and install an extension that can handle this output (for example, extension "devlog"). This may help you track problems.
ToDo
A lot has happened since the first release of the DAM. You can see the Changelog here: http://forge.typo3.org/repositories/changes /extension-dam/dam/trunk/ChangeLog
There is still room for improvement
If you have bug hunting, coding, documentation or other skills, please contact the DAM team: http://forge.typo3.org/projects/show/extension- dam
Roadmap
http://bugs.typo3.org/roadmap_page.php (select project tx_dam)
Sponsoring
Many people and companies have contributed to the development of DAM. First and foremost we wish to thank Rene Fritz who has laid down the foundation of this great system. We are secretly hoping Rene will contribute stuff in the future.
Sponsors
 Michiel Roos and Ben van 't Ende have spent their spare time on the
project.
Michiel Roos and Ben van 't Ende have spent their spare time on the
project.
 Thanks Ben Taken for his enthusiasm and love for DAM. Contributed 1300
euro's
Thanks Ben Taken for his enthusiasm and love for DAM. Contributed 1300
euro's
 PSW group has contributed the largest one time sponsoring. This was
due to the fact that they were very grateful for being able to use
Michiel's Static File Cache extension. PSW contributed 2700 euro's
PSW group has contributed the largest one time sponsoring. This was
due to the fact that they were very grateful for being able to use
Michiel's Static File Cache extension. PSW contributed 2700 euro's
 Contributed 500 euro's
 Thank you Jeroen. Contributed 300 euro's
Recent contributors to DAM
Thanks to all contributors for version 1.3 of DAM:
- Lorenz Ulrich
- Dan Osipov
- Ingo Renner
- François Suter
- Björn Pedersen
Changelog
http://forge.typo3.org/repositories/entry/extension- dam/dam/trunk/ChangeLog
1.3.1
Version
1.3.1
Date
25 September 2012
Major changes
- Link title attribute configuration
1.3.0
Version
1.3.0
Date
20 July 2012
Major changes
- Keep original file name on replacing a file
- Force DAM to keep meta information in replacing a file
- DAM media browser now works with tt_content header and image links
- Files from subfolders can be hidden in element browser and Media list module
- Folders can be hidden by regex
- Removed documentation of removed configuration
1.2.1
Version
1.2.1
Date
5 March 2011
Major changes
Added section for secure downloads under TSConfig (see bug #14009)
1.2.1
Version
1.2.1
Date
5 March 2011
Major changes
Added section for linkvalidator support (see bug #17379)
1.2.0
Version
1.2.0
Date
26 January 2011
Major changes
Updated the document for 1.2.0 release. Added missing TSConfig documentation.
1.1.1
Version
1.1.1
Date
28 December 2008
Major changes
#10016 added file compat/class.ux_template.php
Manual uses new template
1.1.0
Version
1.1.0
Date
24 December 2008
Major changes
Bugfix release after “the big sleep”