DEPRECATION WARNING
This documentation is not using the current rendering mechanism and is probably outdated. The extension maintainer should switch to the new system. Details on how to use the rendering mechanism can be found here.
Creating videos for TYPO3
| Author: | Kasper Skårhøj |
|---|---|
| Created: | 2002-11-01T00:32:00 |
| Changed: | 2003-09-12T14:08:26 |
| Author: | Michael Perkhofer, Kasper Skårhøj |
| Email: | michael@perkhofer.at |
| Info 3: | |
| Info 4: |
Creating videos for TYPO3
Extension Key: doc_creating_video_tutorials
Copyright 2000-2002, Michael Perkhofer, Kasper Skårhøj , <michael@perkhofer.at>
This document is published under the Open Content License
available from http://www.opencontent.org/opl.shtml
The content of this document is related to TYPO3
- a GNU/GPL CMS/Framework available from www.typo3.com
Table of Contents
Creating videos for TYPO3 1
Introduction 1
What does it do? 1
Some technical terms 2
The Typo3 Video Standard for archival purposes 2
The Typo3 Video Standard for public distribution 2
Capture 2
Windows Media Encoder (free) 3
Camtasia (commercial) 5
Camstudio (free, open source) 5
CorelCAPTURE 9 (commercial) 6
Recording tips 8
Mouse clicks? 10
Notes 11
Post Processing 11
OVERLAYS 12
Virtual Dub 13
Final Encoding the public versions 13
Windows Media Encoder 13
Creating OGM Files 16
Optional Dubbing 18
Discussion 19
The Typo3 screen shot-video standard 19
Other experiences 20
Tips 20
CoolEdit processing 20
Editing strategies (OUTDATED) 21
Convert a WMV into AVI/WAV Files 22
Creating MP3s muxed into AVI Files 23
Blurry MSRLE videos? 25
Speaking techniques 26
Introduction
What does it do?
TYPO3 is not only documented by text documents. There is also a large archive of "screen shot-videos" with voice over which explains or demonstrates features in TYPO3.
This document describes the methods used to create these videos. The knowledge shared can thus be used by others to create new publicly available videos about TYPO3 so our material for training of users, administrators and developers can grow even more complete.
First I will describe the recommended work flowof creating these videos according to my experiences. Then, you can find sections which describes several other issues which you might be interested in. This includes experiences with other less effective methods and things NOT to do! The work flowto produce the videos is:
Capture the video at high quality (HQ) . This can be done using one of the capture tools, mentioned in that document. HQ means losslessvideo and almost hifi audio. For the video stream, this can be achieved, using the wmv screen capture codec, camtasia codec, camstudio codec, ms-rle. Of course there are other losslesscodec, like Huffyuv or Quicktime Animation, but these techniques produce extreme large files, and these are not very easy to handle. For audio we can use WMA @ ~48 kBit/s or mp3 192 kBit/s LAME encoding.
Do the next steps by your own, or send the fresh video to a member of the Typo3 video team (look at typo3.org or search the mailinglist typo3.projects.videos). We will help you, producing the videos and make them public, via typo3.org.
Post processing .You might want to modify video and audio of your footage. Apply a copyright info, cut some part of the film out, paste it somewhere else, etc. You might want to improve audio quality, normalize, dynamic compression, EQ. Tools like Adobe Premiere, Virtual Dub, CoolEdit, Wavelab, Sound Forge are nice to make these modifications. Most of them are commercial, only Virtual Dub (which is really a great tool) is free and open source. Post processingcan not be done using the wmv format (or at least there is this free tool from MS, called Windows Movie Maker, it is nice, but wont help us a lot here, due to its limited export possibilities – it is more for weddings movie makers.). So we will need to convert the files to avis and demux them, so we get avis and wavs separated.The result of this step shouldbe kept somewhere as an archive.The typo3.org video team can help you here!
After we have the final footage, we can compress them as a final distribution for the public . The main distribution format is WMV, using the WMA voice codec, including multi languagepossibilities. For allnon Windows Users, we have to offer an alternative format. A mp4 stream + vorbis audio stream, muxed into an ogm or mkv container seems to be an interesting solution, since these files also can be multi language.
OPTIONAL DUBBING: If other languages are dubbed over the video they are recorded as simultaneous translations and using VirtualDub the resulting audio-tracks are inserted in the video-streams instead of the "original" sound track.
Some technical terms
vFps
a
vFps
b
VariableFrames per second. The more the better, but they cost a lot of bandwidth.A PAL movie has 25 fps. Thinking of screen capturings, which is our topic here, some kind of variable fps would be a nice feature, since most of the time, nothing happens on the screen, only from time to time there is some action. Only the WMV Screen Capture Codec can offer this feature.
Bandwidth
a
Bandwidth
b
This is measured in kBit/s. Eg. A DVD has ~7000 kBit/s, which is ~875 kByte/s. So as you can see, this is really a lot of data. If we want to offer our videos for download from a website, we have to keep this small as possible.The MS-RLE codec compresses screen capturingto ~130 kBit/s, the WMV Screen CaptureCodec reaches the fantastic data rate of only 18 kBit/s. But this will be discussed later.
Container
a
Container
b
Whenever you play a movie on your PC, without even noticing it, you are always playing at least one video stream and one audio stream at the same time. As it is not very practicableto have to handle 2 different files for that, lets say an MP3 audio file and another file containing the video, you pack both into a single file by using a so- called container format file, comparable to a ZIP file. This container and the software coming with it take care of a lot of important functions, like the correct timing of the audio and video playback when the file is played ( opened ). ZIP or RAR could be a perfect container to pack one or more audio/video streams together into one single file for distribution, but WinZIP certainly wouldn'tcare about the correct timing of the these streams on playback . Known containers are the good old AVI, or the MPEG container ( .mpg , .mpeg ), Quicktime ( .mov ), Realmedia ( .rm ), MP4 ( .mp4 ). We will also discuss the OGM (.ogm) and Matroska (.mkv) containers.
Codec
a
Codec
b
The container can hold video and audio streams. The codec is the algorithm, which encodersand compresses the these streams. There are many codecs out there. They are some kind of a plugin, that you can use. Some Video codecs: mpeg-4, WMV 9 Screen Capture Codec, XVID, DIVX, Huffy. Some popular audio codecs are: mp3, PCM, vorbis, speex, WMA Audio Codec Voice
((Unknown Property))
a
b
More to come
The Typo3 Video Standard for archival purposes
Technology changes and so our solution of distributing videos will have to change. If we want to offer other codecs etc. at a later time, we need to have an archive of high qualitymaterial, so that we can produce the best of best afterward.The videos need to be stored in a format, that is lossless and that offers the fps of the original files. The audio needs to be CD quality. So this results in the remaining codecs: WMV Screen, Camstudio and Techsmith Camtasia. For audio mp3s, with min. 128 kBit/s or ogg vorbis files.
The Typo3 Video Standard for public distribution
After heavy testing, many discussions and long nights of philosophical thinking we came to the conclusion, that the best solution at the time, to develop small and high quality multi languagevideos is:
WMV 9 Screen Capture Codec + WMA 9 Audio Codec Voice
OGM container using XVID codec for video and vorbis for audio
See the discussion at the end of this document, why we have chosenthe MS WMV format.
Capture
Special software is used to capture the video either in one go or in multiple steps depending on the length. Simultaneously you record English voice over (also called "original" voice over) into a microphone with a separate sound recording software. This results in two files (or one avi/wmv), a video and an audio file, which must be merged in the next step.
Regardless, which software you use, you should always end up, with a video that utilizes these minimal features. Use these clues:
- Its VERY important to turn off hardware acceleration of your graphic card . This can be done, using the settings for your graphic card subsystem. To do this on Windows 2000/XP, go to the Control Panel, choose Display : Properties : Settings : Advanced : Troubleshooting. Set the Hardware Acceleration slider to None. For other versions of Windows, go to the Control Panel, choose System, (and under the performance tab), choose Graphics : Advanced. Set the Hardware Acceleration slider to None. The performance boost is dramatic.
- 800x600 pixel screen resolution is recommended. If not using Windows XP, switch to 256 color mode (XP does not support this mode anymore).
- The more fps we get, the better, but keep in mind, that we wont need more than ~10 fps. There is a relationship between 'CPU usage during recording' <-> 'fps' <-> 'final file size'.10 fps give a very smooth looking video and we can use the rest of the CPU for doing the presentation in a stable way, because the CPU is not only loaded with compressing the video.
- Record English "original" speak simultaneously in 44.1KHz / 16bit / Mono.
- If possible start all videos with a visual "sign" which can be heard on the audio track as well so you have something to sync video and audio with.
- Also end each video with 5 seconds silent screen - this makes it more tolerant to make audio dubbing later. Plus the video does not end so abruptly.
After experimenting it quickly turns out that the absolutely best solution is to create as good source material as possible. Better redo the recording it than editing it. And in particular make sure to record commentary while recording the video (so both parts follows each other naturally)! Get it as right as possible the first time!
To capture your Screen, you can choose between several software solutions. These are some I tested (there might be more tools available)
Windows Media Encoder (free)
www.microsoft.com/windows/windowsmedia
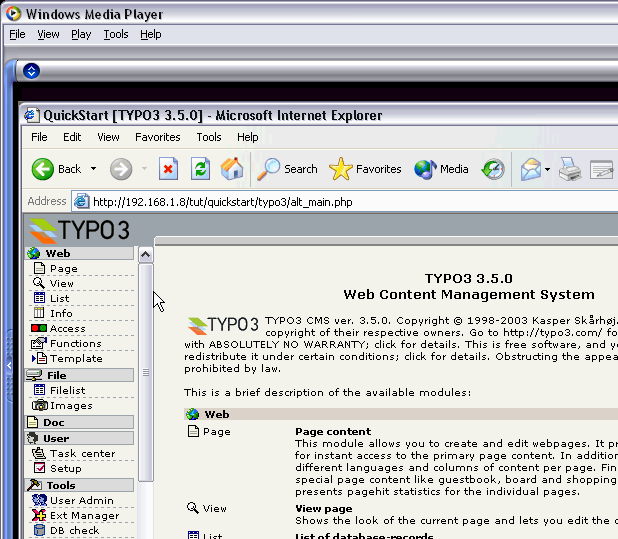
Microsofts Media Encoder is a very powerful tool, for creating any kind of videos. But the screen capture codec, delivered with this product, is the best of the best (at the time of writing this document) and it is free. Unfortunately the wmv files are only playable on Windows computers.
After launching Media Encoder, a wizard starts up. Click on cancel. We will make manual settings.
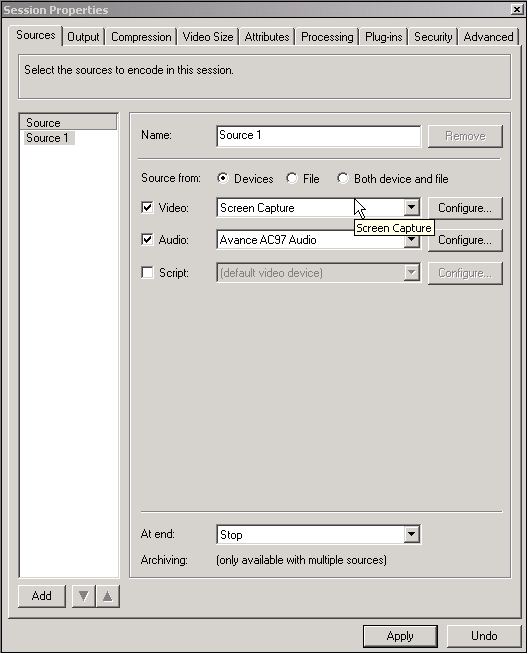
Click on 'Properties', a dialog opens. We chose 'Source from Device' and 'Screen Capture' for Video Input. Audio, should be your audio hardware. Here your microphone etc. needs to be correctly connected and configured. See Screen shots.
In the Output Pad, make modifications, to write the video into a wmv file.
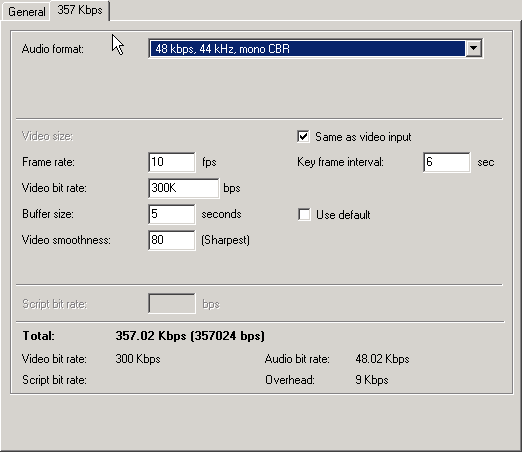
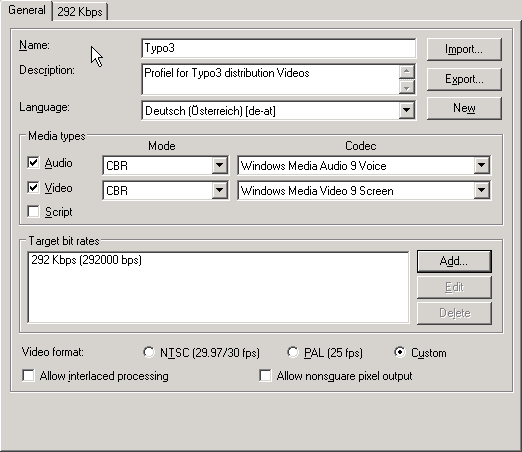
- Now go on to 'Compression', the most important part. There might already be a streaming profile in place, but we want to make a new one, so click edit. After that use the 'New' button, to create a new profile. Just look at the screen shots for good settings The kBit/s rate is only a maximum value – the encoder always runs in variable bitrate mode. Don'tforget to mention the correct language for that video.
- Add a new target bitrate of 300 kBit/s
- Audio: CBR – For first recording use CBR Windows Media Audio Series 9, 48 kBit/s 44.1 kHz, 16-Bit, mono. You might wonder, why not the voice encoder @ low bit rates.The reason is, that we might want to end up with a HQ audio file, for later post processing. Perhaps an alternative to WMV will be developed by the Open Source Scene, and in that case, it is good for us, to have an archive of high quality audio files. If we want to encode the audio streams into mp3, it is also very important to have HQ footage. I will show you later in this document, how to extract the audio data of a WMV file.
- Video: CBR – Windows Media Video 9 Screen Video Size, 'Same as Input', FPS 10, the rest of the values should be left at their default state.
- Note: The video bit ratesettings are only the maximum allowed bit rateof a variable bit rateencoding. So the encoder decides by itself the optimal bit rateto represent a good quality video. The same is valid forthe fps. Media Encoder is one of the few encoders, that support variable FPS – so if nothing happens in our videos, it automatically decreases the frame rateand saves a lot of bandwidth,

Pressing the 'Apply' button, we are ready to capture our screen session. After that, you might want to convert the wmv file into an avi (describedlater in this document), to make post processingetc.
Camtasia (commercial)
This is the crème de la crème, of all screen capture products, but its not a cheap software. You can get a test version for 30 day, so you can try it out, before you buy it. It ships with its own codec, which is also very powerful.
Camstudio (free, open source)
http://sourceforge.net/projects/camstudio , www.ehelp.com , www.rendersoftware.com
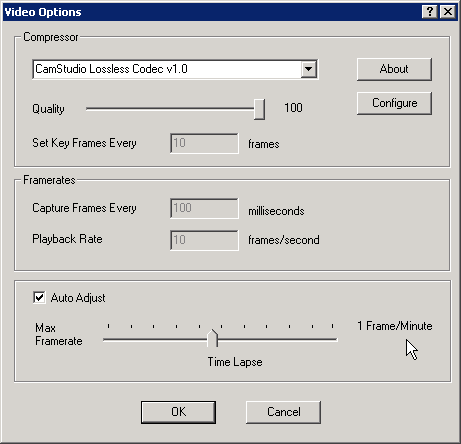
This is a free application, which is very powerful.It comes with its own lossless and powerfulvideo codec. The Video settings are a little bit tricky – you have to find the best values for your cpu. Since we don'tneed more than 10 fps, the settings, shown in the screen shotare ok. For audio choose PCM WAV, 16-Bit, mono, 44.1 kHz. So you will end up with a high quality screen capture video, that has ~10 fps and perfect sound.
There are some interesting point in the faq, which I want to mention here:
When I play back a full-screen AVI file using Windows Media Player by double clicking it, the text and graphics becomes blurred.
There are two main reasons for the movie being blurred. Oneis that you are using Windows Media Player to play back a movie that has a frame size that is as big or bigger than the screen. In this case, Windows Media Player will shrink the picture to fit it on the screen. This cause the text and graphics to be blurry. To view the movie in full quality, you will need to switch Windows Media Player to full screen playback, or switch your monitor to a higher resolution. You may also record a smaller region to avoid this problem. Otherwise you may need to use the Movie Player software that is distributed with the CamStudio package to playback the movie. Another reason for the cause of the unclear image is the use of Lossy Codec as your compressor. This means the compressor will degrade the quality of your picture to reduce the size of your AVI file. To remedy this, you may either set the Quality settings in Video Options to a higher value, or use a Lossless Codec for your compressor (e.g Microsoft RLE is a lossless codec that is available only in the display mode of 256 colors).
I record with the default settings of CamStudio and it uses up all my CPU resources. How can I free up more CPU resources for doing other stuff?
In the default setting, CamStudio uses up all your CPU resources to achieve the maximum recording rate possible on your system. You will need to set this capture rate to be lower than the maximum to free up resources for other tasks. To see how fast your computer can go, try recording with a fixed region size at the maximum frame rate (the auto-adjust slider is set to the leftmost point in Options:Video Options). Take note of the Actual Input Rate when CamStudio is recording. This is the maximum frame rate achievable on your system at this fixed size. To free up CPU resources, go back to Video Options and set the capture rate (or playback rate) -- using the auto-adjust slider -- to be less than the Actual Input Rate noted earlier. If you are recording with the same fixed region size, your CPU meter will now show some improvements.
How can I optimize the video settings to get the best results ? Can you suggest a good video setting?
In Options: Video Options set the Capture Frame Every value to 5, set the Set Key Frames Every value to be 200, set Playback Rate to 200. In general, you should adjust the Set Key Frames Every and Playback Rate to be equal 1000/Capture Frame Every. For example, if Capture Frame Every is 5, then the Playback Rate should be 1000/5 = 200. However, if you are creating a time-lapse movie, (in which your Capture Frame Every is a very large value), you may want to set the Playback Rate to be around 20 to 30 frames/second.
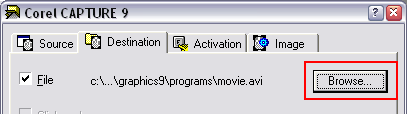
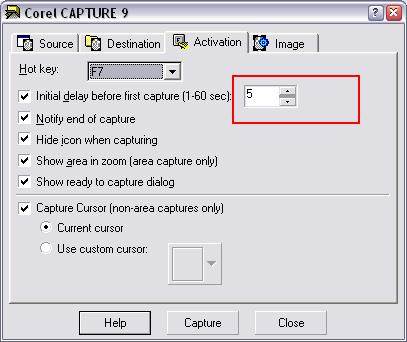
CorelCAPTURE 9 (commercial)
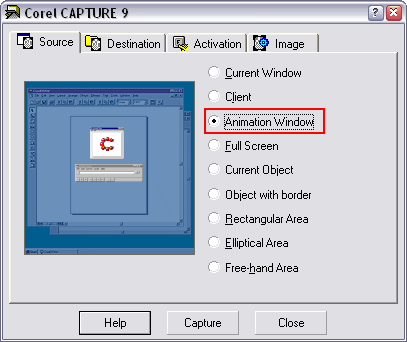
The one Kasper used to produce the videos. Seems to work quite fine. Does not come with its own codec, so you have to compress in real time to an uncompressed video or to a very fast codec (like MJPEG). This is a great disadvantage, because you can only capture at low fps and still a powerfullyCPU is necessary. This tool doesn'tseem to me of beingoptimized for the task of takingscreen capturings. This is the settings used:

Recording tips
These tips are good to keep in mind when recording the video/audio:
- Generally, use a stop watch so you can keep track of time
- Always check that the video gets captured correctly afterward: Sometimes it can stall in the end.
- If real-time audio recorded: When starting a capture session, start sound recording, start stop watch, press F7 to start Capture and when capture is running a) click a link in the browser or b) mark a text and unmark it by a loud click sound . The point is to create a sound plus visual sign so synchronization is easy later! For the end of the video you should say "Stop" and then stop sound recording. Probably you can hear on the sound signal as noise when the video capture has ended. Check synchronization in Premiere afterward: Beginning, End and Middle.
- If real-time audio recorded: Avoid talking when waiting for the system to respond - thus you can edit out waiting periods easily.
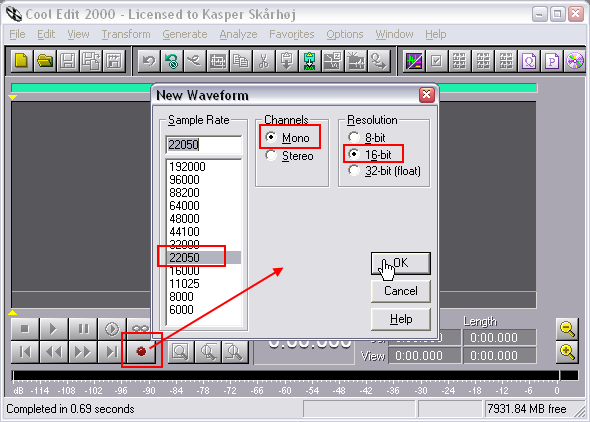
Using CoolEdit to record the sound from microphone
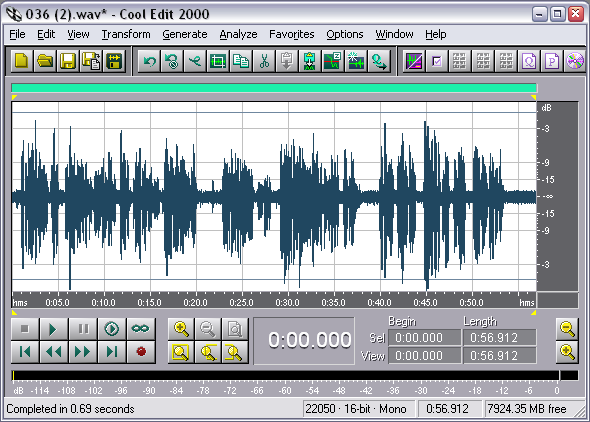
To record sound from a microphone in CoolEdit you just click the Record button when no document is open and you get these settings up. Then make sure they are set to 22KHz / 16bit / mono:
When the recording is finished, normalize it:
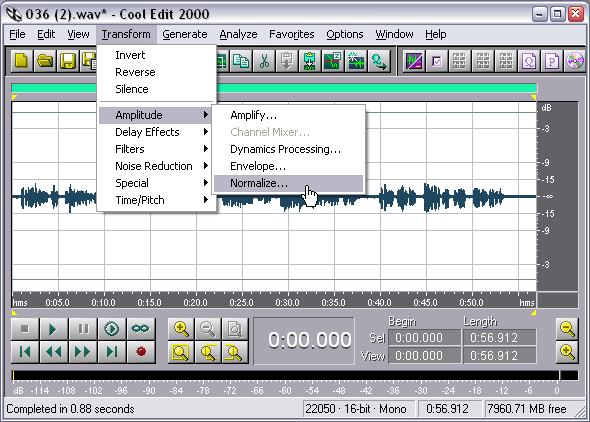
In the Normalize box all settings are fine right away. Just click OK:
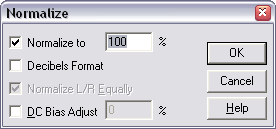
The result is something like this which you save as a Wav file:
Tips to recording audio on laptops
It turned out that I got (significant!) less noise on the recordings from my microphone connected to my laptop if I totally removed the power plug and ran on batteries while recording!
Mouse clicks?
INTRO: Recording sound with microphone in one channel and the computer lineout with mouse clicks in the other is something I have done in a few cases. But it's very unpractical and personally I find that the videos works just as well without the mouse click sounds etc. So why waste time and energy on this... In the end I skipped it.
The recording of sound can also be combined with mouse clicks and keyboard sounds if you are really fancy. See Appendix C for details. But do your self a favor and just forget about it. Takes too much time and hassle.
If you want to record sound while recording the videos I have used Creative WaveStudio or CoolEdit (or whatever, but not too processor intensive...) to record real time audio.
WARNING: With 4fps video capture I experienced that audio and video got out of sync since the video capture was delayed in the neighborhood of 5%. With 3fps - no problems!
I recorded the voice in one channel and the click sound from the computer in another channel. This was to allow audio-mixing afterwardand dubbing in other languages.
This required a mixer!
Mixer setup
- Microphone in LEFT
- ONE channel from line-out of computer into RIGHT
- Stereo line-out back into computer line-in
Computer Volume Control
The setting of audio controls (WinXP: Accessories > Entertainment > Volume Control) looked like this:
Recording Control
(Select menu: Options > Properties, then "Adjust volume for" = "Recording")

Main point is that you are recording the line-in signal.
Playback Control
(Select menu: Options > Properties, then "Adjust volume for" = "Recording")
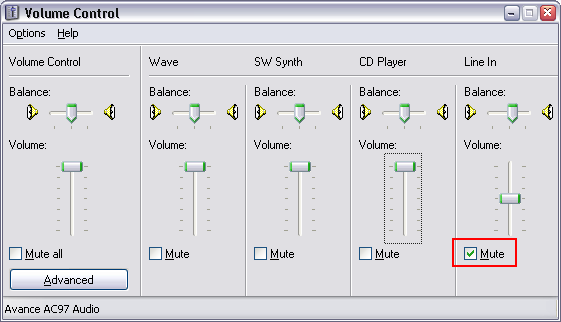
Main point is that you are muting the output of the line-in signal - otherwise that will be sent back to the mixer which is recording the system-sounds of mouse-clicks for you.
Mouse-clicks in WinXP are normally played when clicking links in Internet Explorer or links in the Windows Explorer.
Make a test. Make sure the volume does not clip the signal. Enhancements can be done afterward in CoolEdit.
Notes
- Machine was WinXP, 2.4GHz. Has successfully been done on 800 MHz Pentium with uncompressed/4fps.
- "Uncompressed" will generate very large files which will later be compressed again with MS-RLE codec (RLE because this is screen shotswhich compresses best with RunLengthEncoding schemes to keep the clarity of detail) or QuickTime/Animation mode.On my WinNT I could not successfully capture uncompressed video! Too slow?Using compression in CorelCAPTURE will make blurry videos.
- Don't create files larger than 2GB - that will make them corrupt! 480 seconds/ 3fps gives file of 1.923.786 KB at 800x570
- Capture at 800x600 screen res.Open Browser window.MSIE will automatically fill in the 800x570 area. Otherwise scale the "start- window" to have this size! The "start window" is the active application window when capturing begins. This will determine the size of the capture. Make sure the browser window in 800x570 is ALWAYS the active window at start.
- A test with 4fps (instead of 3fps) resulted in the 360 seconds video being captured over MORE time. This meant that synchronizationwith any real-time recorded sound was very hard since the video clip had to be time-stretched. 3 fps recorded the video in full realtime. Probably the lagging behind was due to bad graphics card.
- Always check the captured video afterward; does it play back well? In particular check the end of the video! Some times it has been frozen for the last 20 seconds or so. Seems the best is to capture on a computer with a fast graphics card and at a low resolution like 800x600.
Post Processing
After the video has been recorded the video and audio tracks are synchronized in a program like Adobe Premiere. Add overlays like copyright information etc.
Editing the video together afterward doesn't have to take so much time if you did the recordings well without too many mistakes and with good means to synchronize video and audio.
One significant thing to do is to get the uncompressed video compressed as QuickTime/Animation which is a lossless compression that will reduce the size to a few percent of the uncompressed version. (edit, by Michael Perkhfoer: This step is not necessary any more, if you do not use Corel Capture)
This is the steps to take in Adobe Premiere:
- Synchronize audio/video in Premiere and play the whole thing. Cut away times with silence/waiting. Trim ends of each clip.
- Divide into smaller sections if needed with 2 seconds black in the end.
- If you have mouse clicks in a separate track you might export Audio separately. Otherwise just include the "original" audio-track.
The result is now a set of edited and compressed clips and audio tracks. These are considered the "originals" for archival purposes.
OVERLAYS
Adobe Premiere
Before we export the videos to the final format for download we might want to add some overlay graphics:
- A copyright notice.
- "Admin Login" sign if you are switching between a backend with a regular user login and an admin-login backend.
- "Method #1", "Method #2" signs if you are demonstrating multiple ways to do something.
The Premiere project we have now is the original production which should be backed up for editing later if anything is needed.
Photoshop files for this can be downloaded here .
In Premiere these kinds of overlays could look like this on the time line:

Each clip must have the Transparency setting set like this:

¨

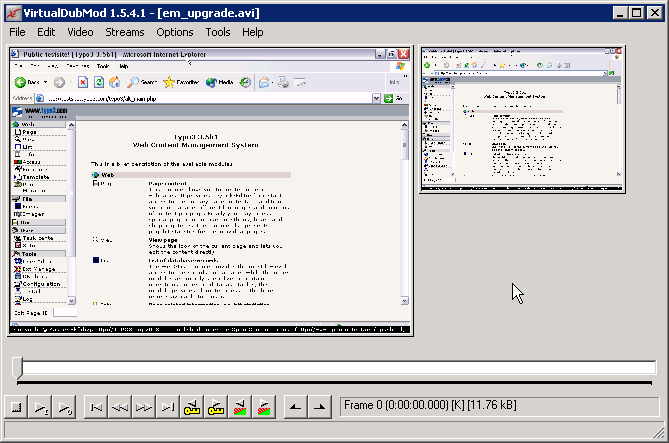
Virtual Dub
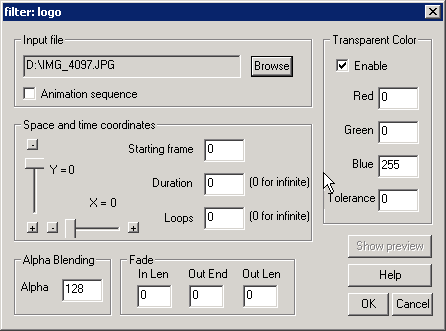
This magic tool can be downloaded here: http://www.virtualdub.org/ You will need one of Donald Graft's fantastic filters: http://www.neuron2.net/logo.html .
--to bee continued--
Final Encoding the public versions
The final video is (re)compressed. The clips now have the smallest possible size, ready for distribution as "public" versions.
Windows Media Encoder
This is our main methodfor distribution. The WMV Screen Codec supports very high compression, at lossless quality. Input can be an AVI File or a previously captured WMV file. The following settings need to be done, to produce perfect Screen Capture Vids:
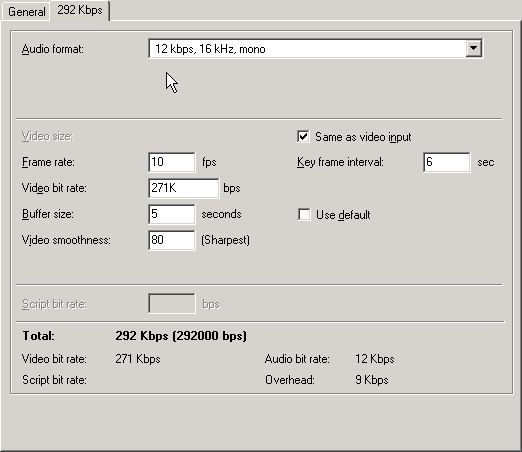
Audio: Windows Media Audio Voice, choose 12 kBit/s, 16kHz, mono
Video: Windows Media Video Screen, choose ~10 fps (the encoder has variable frame rate, so it will determine the necessary fps by itself), ~300 kBit/s (the encoder supports variable bitrate.This is only the maximum bitrate, used, if there is a lot of stuff going on on screen. The final bitratewill be ~20 kBit/s.
Do not scale the image (use 'Same as video input'). Scaling the image will result in higher bandwidthusage, because scaling artifactsand blurringwill have to be compressed
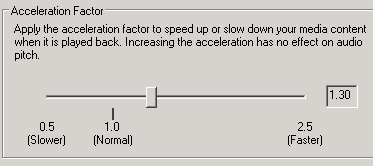
You can use time compression, to change the speed of the movie of the final video. Be careful with these settings – your audience might not be able to follow the film. Users of Windows Media Player can adjust the playback speed of the video, while watching the video, so applying time compression now, does not make much sense– but it is a nice feature to experiment with.

Don'tforget to mention the language for that profile.
Save the profile, giving it a name, that includes info about the language used. You can take this profile later, for batch encoding, using the command line utils, which are described later in that document.
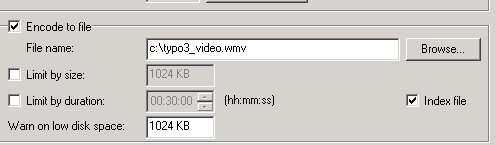
Its important to activate 'Index file' at the Output Pad. This makes seeking positions, while playing back the videos.
Adding Tags to WMV Files
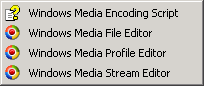
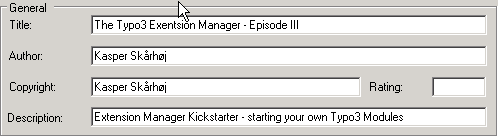
Media Encoder ships with 3 important utils to manipulate the videos afterward.Using 'Windows Media File Editor', we can add Copyright, Author etc. information to videos, that are displayed while playback. This is like ID3 tags for mp3s. It is possible to import and export the TAG info as XML files.
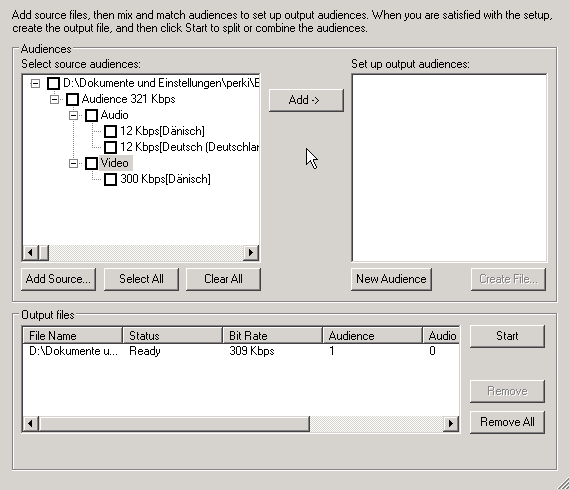
Muxing language streams in one WMV file
Using 'Windows Media Stream Editor', muxing and demuxing video and audio streams is possible. I wont go into a detailed description here, the process is described in the help file, that you can access.
Creating OGM Files
For our Mac/Linux/BSD/BeOS users (and also for users of Windows, who preferopen source technology) we have to offer an alternative Format. We use ffmpeg (ffvfw) for video, vorbis for audio, ogm as the container. Get the necessary software here:
- Virtual Dub Mod: http://virtualdubmod.sourceforge.net
- ffvfw and ffdhow filters: http://cutka.szm.sk
- OGM Direct Show Filter: http://tobias.everwicked.com/
- OGG Mux: http://oggmux.sourceforge.net/
Maybe you've heard of Ogg Vorbis, or Ogg before. First let's get the terms straight because there is quite a bit of confusion in that area and until the day I wrote this document I was confused about the terms myself. So here goes: `Xiph.org <http://www.xiph.org/>`_ is the home of a collection of open source Internet multimedia tools, among other things the `Ogg Vorbis audio codec <http://www.vorbis.com/index.psp>`_ and Ogg Tarkin (a video compression codec, still in the planning phase). Ogg Vorbis is an open source patent free audio codec that can rival the quality of upcoming commercial codecs like AAC, MP3Pro and VQF and which can surpass MP3 and WMA audio.
The Ogg project also loosely defines a media stream that will incorporate Ogg Vorbis and Ogg Tarkin. Just recently a first implementation of that format has been released. It is now possible to have any kind of DivX or XviD video (in fact I used an XviD video to test this guide) and Ogg Vorbis audio tracks. It would also be possible to use MP3 tracks in an Ogg media stream. Ogg audio can achieve great quality at lower bit rates than MP3 which means you'll have more space for the video. [ taken from www.doom9.org ]
Our source material has to be an avi file and a wav audio stream. We will create the ffmpeg encoded video stream first. Start Virtual Dub mod and open the avi.
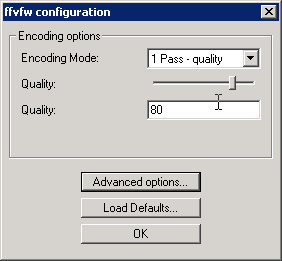
Go to Video->Compression and choose ffvfw MPEG-4 codec. Press configure. Choose '1 Pass -quality', 80%. The rest of the settings should be at the default values. Of course you are free, to install the alpha version of ffmpeg and experiment with the settings. 2-pass encoding, b-frames, quarterpel, enhanced motion estimation (in short the mp4 advanced simple profile features ) can result in higher quality! Check www.doom9.net for more information.Hit 'ok'. Check if Video->Full processing mode is active.
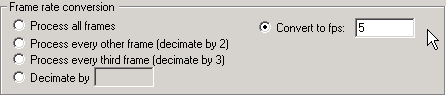
Go to Video->'Framerate'. Here we can convert the frame rate.5 fps is a good maximum value. If your source material has less than 5fps, leave the frame rateas it is.
Check out Streams->Streamlist, that no audio stream is activated, cause we just want to convert the video.
Hit File->Save As. Choose AVI for output and give it a filename. Click Save and the encoding process should start – wait. ;) Play the avi in your favorite player, to check its quality and size. It should not have > 100kBit/s.
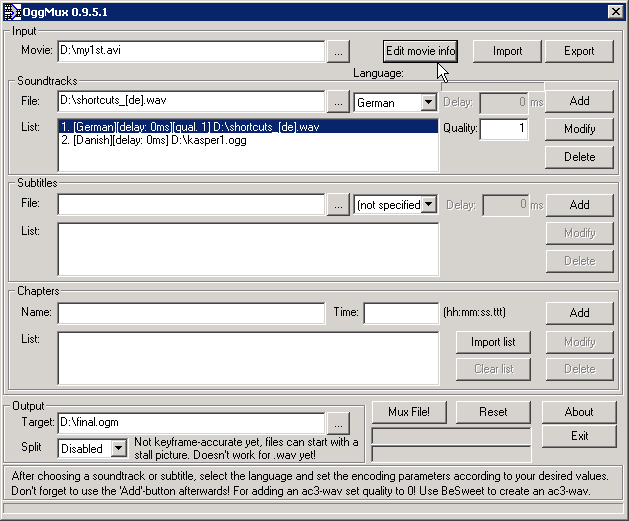
Fire up OggMux by simply double-clicking the OggMux binary. Now hit the "..." button next to the "movie" box, this will allow you to select your avi file which you want to multiplex. In the title box, just write whatever title your movie has.After that, go down to the soundtrack box and hit the "..." button. You now can select your ogg (vorbis) soundfile which you want to add. Next select the appropriatelanguage which should be assigned to that soundtrack. If you have a .wav which you want to encode while multiplexing the files, change the file type of the file open dialog which pops up and select "wave file", after that set the correct language. When you encode wav files while multiplexing, set the quality of the vorbis encoding to .1 represents quality 0.01, 1000 represents quality 10 - you most likely want to encode using quality 0.01 though. When you're done with the correct setup for that soundtrack, hit the "add" button, the file should show up in the list field now. Repeatthis with all soundtracks you want to add.If you did something wrong, just click on the entry in the list and edit the boxes (e.g. change the language), when you're done with that, hit the "modify" button. If you want to get rid of an entry, select it and hit "delete".Now it's time to select your output fileby hitting the "..." button next to the target-field. Just select the directory and modify the filename as you like. ".ogm" is added automatically if you don't specify another suffix for the file.Last, but not least you can setup the split size for the files. Up to now, this isn't key frameaccurate and thus may result in files which begin with a few frames/seconds of a "still picture". Note that splitting doesn't work if you're encoding a wave file while multiplexing!Now you're done with setting up OggMux. Hit the "Mux!" button and enjoy the show!
After that, you can open the file using your favorite player or Virtualdubmod to check quality and audio streams.
Optional Dubbing
If other languages are dubbed over the video they are recorded as simultaneous translations and using VirtualDub the resulting audio- tracks are inserted in the video-streams instead of the "original" sound track.
Making dubbing of videos in other languages is generally possible by a simultaneous translation. And in my experience this can be done more or less error free if the original sound track is not proceeding too fast.
This is the procedure technically:
- Connect a microphone and a headset to your computer.
- Put the headset on, maybe only on the one ear - that might make it easier to keep focus during translation if you can hear yourself.
- Load the video-clip into a player application. Prepare a sound recording application to record from the microphone at 22Khz / 16bit / mono. (See Appendix D for tips and tricks on recording audio!)
- First, start the playback of the video clip, then start the sound application 1-2 seconds delayed... and do the translation to the end.
- After recording you should "normalize" the recorded sound track. (See Appendix D)
- After saving the audio track you need to encode it into a WMA file, so you can mux it into a WMV file, as an additional language. You also have to produce a vorbis file, to mux this into the Ogm container.
About starting the recording of the audio track 1-2 seconds delayed; Then the dubbing recording will be delayed about the same amount as the simultaneous translation will be and the clip can be directly applied to the video track with no modifications!
Tip to playback MSRLE clips non-blurry on WinXP (if that is a problem for you): Simply use VirtualDub to play it back!
Then you use "File > Save as AVI" to save the new dubbed version of the file - ready for distribution.
Generally about simultaneous translation:
- Take it as a freestyle thing: Unless otherwise instructed you should not translate very strict - rather convey the meaning in a natural flowing language!
- The "original" track might contain silent periods while waiting etc. You can use that for improvising, adding more relevant information if you like.
- The "original" track might contain errors - you are allowed to correct them!
Discussion
The Typo3 screen shot-video standard
We made a lot of experiments using several techniques and encoding strategies so that we can end up with an archive of videos, that are a benefit to the Typo3 Users. So the following facts had influence on out decision:
Keep it simple. There are many ways to do a video. This is all a lot of work. So keep it as simple as possible is a good approach, to get the work done. Windows Media Encoder offers the possibilityto make the production of these videos very simple.
File size: The final Video Files have to be as small as possible. Modem Users (56 kBit/s) should be able to download the videos, without waiting for hours.
Image Quality: Screen Capture Videos need to have a sharp and lossless quality. The compression algorithm has to be optimized for this.
Audio Quality: Since there is only voice and no music or other effects, the audio encoder has to be optimized for voice encodings.
Multi language: At the time of writing this document, we have English, German and Danish versions. It would be great, if we could mux all these language streams into one video container, so that the you can switch the language immediately, while watching the film, just like you know it from movie DVDs
Price: The software to produce should not be expensive. Luckily there are great open source and free products available, so it's possible to produce these videos, without investing a giant sum of money
Time Compression: The viewer should have the possibility to change the playback speed, if the videos is too fast or to slow for him. Modern Players offer this feature, without disorting the sound quality and producing 'Micky Mouse' or 'Lord of The Rings' styledvoices. The pitch shouldn't change.
Compatibility: There are 2 kinds of compatibility. First, the software used, to produce the videos. On which platforms(MS Windows , Mac OS X, Linux, BE-OS) is it available? Second, on which platformsis the final product playable? We will see, that this is not so easy to bring into uni-sono with the points above.
The WMV Screen Codec wins the competition. Its only drawback is point 8, which we compensate, offering additional OGM files. We hope, the open source community will bring out more codecs, which are suiteable for screen capturings. At the time of writing this document, there is no codec available (even commercial ones), that can make are able to compete with the Microsofts product.
- There are other containers like Matroska, www.matroska.org – also worth a look is the freely available Helix DNA Producer, found under https://www.helixcommunity.org . The latter is the open source variant of Real Media's Encoder, Player and Server!
- Speex ( www.speex.org ) – This is a new open source voice audio codec. Unfortunaltely its not possible to mux it inot an ogm or mkv container. There is only the ACM version, which only works, using Windows. But I guess this will change..
Streaming: There are possibilitiesto stream the videos. For WMV the commercial and expensive Media Server is necessary. There are open source projects, like http://www.videolan.org/ , the Helix Server https://www.helixcommunity.org and Apples Darwin Streaming Server, www.apple.com .
Other experiences
Finally I'll describe the experiences I have had recording all these videos.
The final conclusion was that it was important to create as good source material as possible so as little editing should be done as possible. This really pays of. So videos should be recorded with video and real time speak with no recording of mouse clicks. That makes the whole process fastest.
I also tried to record videos without speak and intended to do the speak later according to a manuscript I would write. This should produce high quality videos which were not boring and long, but it did the exact opposite (I think). But it turned out that the videos were record all too fast for my script as I wrote it! In other words it became very hard to make the speak match the actual video - at least it would require too much preparation to edit the manuscript to fit! Further creating the manuscript took 6 times longer than to play the video. In other words 10 minutes of video could be texted in 1 hour. That was a LOT of time.
Recording the manuscript took time again. And the result became very bad because having the eyes on both the screen and paper didn't work out - I learned that the best is to comment the video while you capture it! Thus audio and video matches.
So don't make scripts, just capture and comment. If you want shorter and better videos better make a test first so you know what you want to say - that will make it more compressed and effective.
Recording mouse clicks is something that requires a mixer so you can lead the microphone into one channel and the line out from the computer (mouse clicks) into the other channel.
However when audio-dubbings from other languages are to be merged into the video track the most convenient thing is to just use VirtualDub for that - which means the click sounds are not preserved. But it turns out (in my opinion) that the click sounds are not that important! So eventually I just discarded them!
I also had the idea at one point that it would make sense to add the click sounds afterwardmanually by dragging small audio-clips onto the time line in Premiere. Not very clever...
Tips
CoolEdit processing
INTRO: You can use CoolEdit to make post-production on the sound. However I ended up not doing any of this for various reasons. But this was the features typically involved in the post production on the sound:
- Normalize each channel individually
- Remove noise for click-sounds with "Noise reduction". Read help-file about how to use noise-reduction!
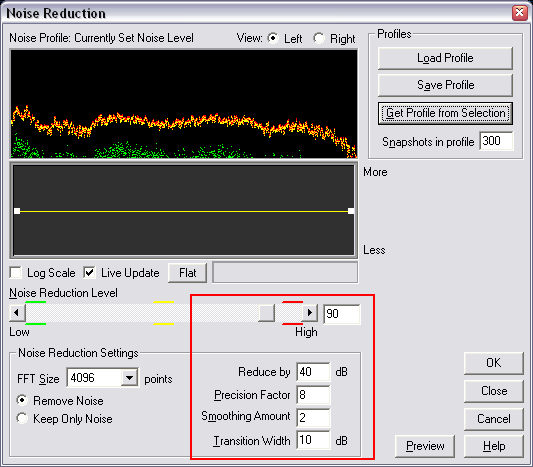
- In CoolEdit you can do processing of the recorded sound. One is to remove noise. I have done that sometimes but I ended up stopping it since the sound got this "in-a-can" sound over it. Further CoolEdit sometimes created errors in the sound I saved - which was of course useless and confusing!
- Filter out high and low frequencies in general.
Editing strategies (OUTDATED)
INTRO: This sectioncontains notes made at an earlier state where I had other ideas of what was the best way to go. I have added update- notes here and there to comment these notes describing my early experiences.
Syncing real time audio
Real timeaudio: This is good for quick videos, but will make longer videos and lower quality since the voice-over is not so intensive and accurate. You can also record realtime audio of mouse clicksand keyboard and then apply speak later after writing script.
UPDATE: In fact the real time audio is the **only* way to go to get quality I think. The videos are longer, yes, but that turns out to be an advantage since they are not so paced up and people can follow them like they follow "beamer-demonstrations" they are used to!*
- Record audio and video in realtime.
- Sync Audio/Video in premiere and edit the tracks down, remove mistakes, insert overlays
- Export audio signal to WAV, make CoolEdit processing of the two channels and save them as mono MP3s.
- Export Video to QuickTime / Animation (see above)
- Make new premiere project with QT movie, the click track and speak track (if available): You now have "source material" as QT movie and mp3 sound tracks (with no noise)
Writing script afterward
syntheticallyspeak afterward: Shorter videos. More accurate voice-over from manuscript. More time consuming?
UPDATE: Absolutely a "killer" in a bad sense - don't waste time on this. The scripts will most likely not fit the pace of the videos and the end result is awful.
- Capture video with mouse clickand keyboard, see above.
- Play the video and write speak-text at the same time. Probably you will also find places to remove stuff from video track. (which means it's nice to have video and audio track with moust/keyboard linked here).
- Make sure to reality check the text length - does it fit the video time?
- Record speak track synchronizedwith video if possible. Otherwise just record each paragraph with 2 seconds of silence between. Important: As little noise as possible - we need to be able to freely cut the voice overas we like in the pauses.
- If the speak-track was recorded simultaneously with video it's easy to import - otherwise it will take some more editing time by cutting it up in pieces.
Recoding audio-dubbings
- Recording the original speak track is best done while playing the video at the same time.
- After translating the texts they should be recorded synchronouswith the original/dummy track. This is easily done by playing the video with original track. The speaker doesn't even have to see the video - just begin speaking each sentence as the English version is spoken (is heard on low volume in earphones). A one-second time delay on the speak is fine - that is corrected when the track is applied.
- All texts should be constructed so that there are at least 2 seconds space between each paragraph. Tests has shown that a normal speed speak is 12-14 characters a second.
UPDATE: These guidelines are not necessary. Dubbing is very easy if the original comment track is not too intense. No written translation is necessary. The translation should be done simultaneously in a microphone while playing the video in another application, then merging them afterward.
Result:
- Edited QT video track with synchronizedclick/keyboard sound in and with any overlay and waiting time/mistakes removed; HQ and low size
- Speak tracks in MP3
- Copyright notice overlay still separate.
- Set up in premiere: Ready for additional audio-dubbings
Finalize:
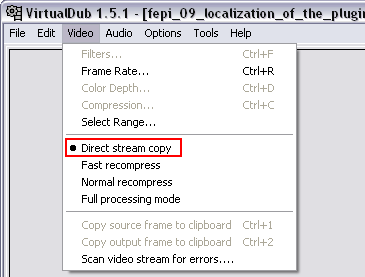
- Export audio-tracks (voice over+ click) from Premiere and mix them with the video track with Virtual Dub for each language. Use "Direct Stream Copy" for video and "Full processing" for audio, selecting some MP3 sound scheme.
- ZIP the whole thing - will bring down the video track FURTHER in size.
- Keep archive copies of the Premiere file, and all separate audio/video files in HQ QuickTime - animation / MP3
Convert a WMV into AVI/WAV Files
Since the WMV format is proprietary owned by MS, we can not edit the files with our tools, like Virtual Dub or Adobe Premiere. So we need to convert the files into AVIS/WAVs. This is done by using Graphedit.
Download Graphedit here.
Start Graphedit and go to File->Render media file. Open the WMV file. A new graph is rendered. What we see, are the involved direct show filters, to show this movie on screen.
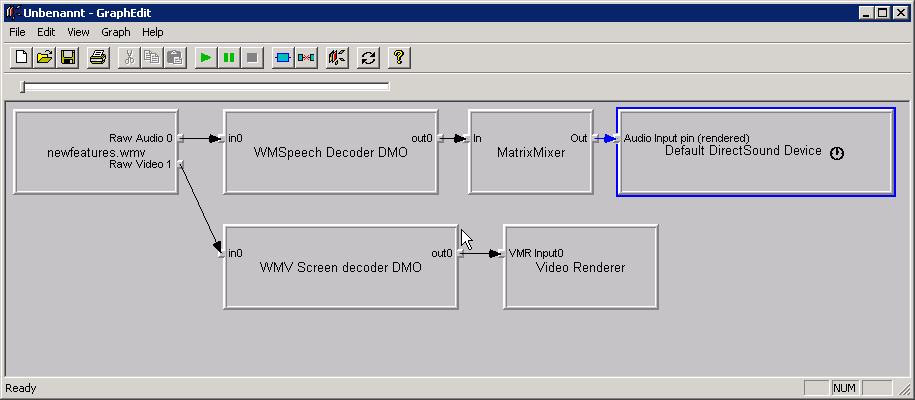
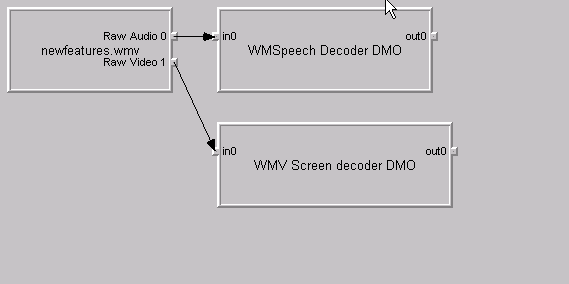
So we just want to decode the audio and video into a file, we have to remove the 'Matrix Mixer', 'DirectSound Device' and 'Video Renderer'.
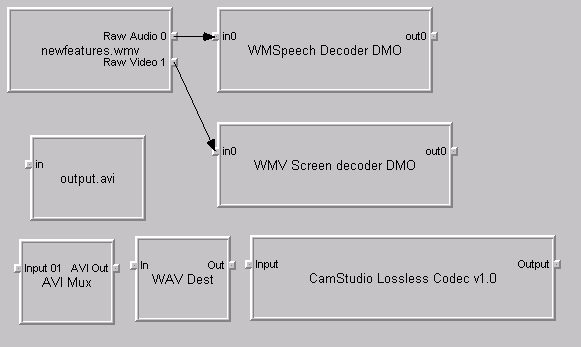
After that we add new direct show filters by using Graph->Insert filter. We will need the Direct Show Filters Wav Dest and 'AVI Mux', from the Video Compressors: A losslesscodec, like 'Camstudio losslessScreen Capture codec' or 'Techsmith Camtasia Screen Capture codec'. Your screen might look like this now:
Connect the appropriateFilters like shown in this image:
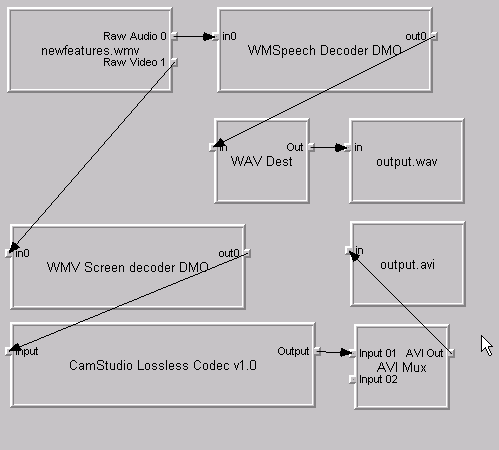
Now press Graphedits 'Play' button.After some time you have the decompressed files on your hard drive.The whole process can take some time – depending on your hardware and the length of your wmv source material.
So – yet you can work with these files in Virtual Dub and all the other applications, that can read avis and wavs. When finished you can feed these files into Windows Media Encoder again, to produce a WMV file.
An alternative way to do this job is to use TSUNAMI TMPEG, http://www.tmpgenc.net/ .
Creating MP3s muxed into AVI Files
We Don't need this feature anymore, but this section is intersting, so I paste it here.With VirtualDub you compress the Audio as MP3 while making a direct stream copy of the video which is compressed good enough.The resulting files are ready for distribution.
Settings for VirtualDub can be downloaded here .
The settings for VirtualDub found in this file linked to above corresponds to this:
Video - Direct stream copy: The video track does not get modified.
Audio - Full processing: The audio track gets processed:
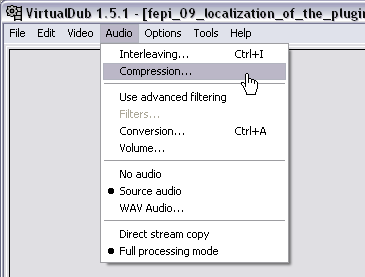
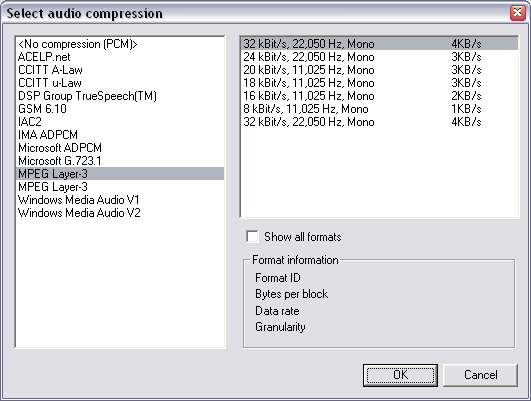
By selecting Compression you select MPEG3 compression, 32 kBit/s, 22KHz, Mono:
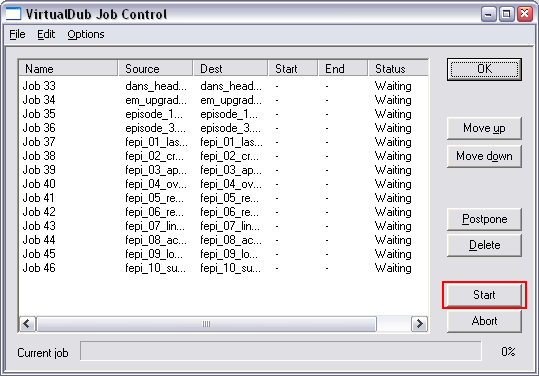
When these settings are selected (or loaded from the file provided with the above link) you can use the "Job control..." function in VirtualDub to perform the compression on a whole folder of clips:
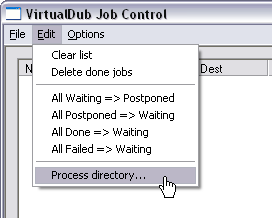
After selecting the folder with the clips you want to process (and the folder where the processed versions should go) you start the process:
Blurry MSRLE videos?
On my Windows XP the videos compressed with MSRLE looks very disorted. They should look like this ( in comparison, this is totally crisp like screendumps should be):
The reason is not the actual video data inside - that is crisp and clear as it should. The problem is something else and I currently don't know what it is.
The thing is that on ONE of my WinXPs the video is crisp and on two others its blurry. The only difference I can spot is that the two machines with blurry playback are upgraded to Service Pack 1, while the first machine is not. Maybe that does the difference. But trying to copy the codec from the original release over the SP1 codec didn't help. So it may be something else.
Michael Perkhofer: The reason of this can be the color depth of the Windows screen. 16-Bit or 32-Bit. Many Video cards only supprt video acceleration at 16-Bit.
Speaking techniques
Speak loud. That makes the voice strong and disturbing noises are no longer perceptible. About so, as one in a discussion with 5 people would talk.
Do not forget to breathe. Without air - no loud and clear language.
Work without headphones. Since the recording is still worked over again, headphone disturbs only, since the speaker unnatural hears each breath and then becomes under-consciously jerky.
- "Narrate", not holding a speech. Imagine, you present your text a group of people. If you cannot imagine that, set up before you a picture of your dearest ones or something similar before you and tell to it.
- Smile! Even if nobody sees it, the result sounds often audibly better, if one shows with speaking mimic.
- Speak complete sentences. Even if you can cut later, you should repeat the whole paragraph or at least the sentence before the error in the case of a speech error.
- Speak somewhat away of the micro. Chose a good room for audio recordings, then it does not sound like a sheet metal bucket.
- Put the micro not directly in speech direction, but somewhat laterally. This will decrease the noises of your mouth, we don'twant to record.
- Eat or drink nothing 5-10 minutes before.
- Most humans have a huge respect and even pros make speaking mistakes repeatedly, if they are faced a microphone. Here only industrious practicing helps to lose around the shyness. That is connected with the fact that one wants to express oneself suddenly selected and error free and besides still tries high-language to speak. You should try (at least with the first attempts), to thus talk like you always talk in every day life, with all the slang etc. When hearing, one notices very fast, what is to be improved (e.g. the pronunciationof the individual words). Also one should not use office- or writing language, do not speak swollen or unnatural. Best is a normal conversation language.
- The texts should be spoken briskly, but not fast.
- The texts should be examined, whether individual words, or even whole sentence parts do not repeat themselves.
- Before the final admission the text should be read out several times loud and a sample admission will show whether everything is optimal, or whether improvements are necessary.
- In order to avoid sound artifacts of text sheets, these should be inserted into plastic coverings, or one prepares the text sheets in such a way that the narrator does not need to touch them.
- Remember - Typo3 is a great piece of software! ;)
 Creating videos for TYPO3 - 27