DEPRECATION WARNING
This documentation is not using the current rendering mechanism and is probably outdated. The extension maintainer should switch to the new system. Details on how to use the rendering mechanism can be found here.
Futuristic Template Building (FTB)
| Author: | Kasper Skårhøj |
|---|---|
| Created: | 2002-11-01T00:32:00 |
| Changed by: | Donald Duck |
| Changed: | 2004-02-02T15:34:47 |
| Author: | Kasper Skårhøj & Robert Lemke |
| Email: | kasper@typo3.com / rl@robertlemke.de |
| Info 3: | |
| Info 4: |
Futuristic Template Building (FTB)
Extension Key: doc_tut_ftb1
Copyright 2004, Kasper Skårhøj & Robert Lemke, <kasper@typo3.com / rl@robertlemke.de>
This document is published under the Open Content License
available from http://www.opencontent.org/opl.shtml
The content of this document is related to TYPO3
- a GNU/GPL CMS/Framework available from www.typo3.com
Table of Contents
Futuristic Template Building 1
Introduction 1
What does it do? 1
Goal 2
The extension “TemplaVoila” 2
Dedication 2
The extension 2
WARNING - beta software 3
Integration of an HTML page template - with TemplaVoila 4
Introduction 4
The HTML template 4
Install “TemplaVoila” and “CSS Styled Content” 6
The Storage Folder 7
Create the TypoScript Template Record 8
Creating the Template Object for the page template 9
Applying the TO as page template 16
Setting up css_styled_content for content rendering 17
Adding page content 17
Creating the dynamic menu 21
Setting the stylesheet and <body> tag 24
Summary 26
Creating additional page templates 28
Modifying a formerly made DS/TO 28
A print version 30
Alternative template for a sub section 35
Creating a two-column page? 40
Icons for TOs and DSs 45
“ Flexible Content Elements” 47
Creating a basic Flexible Content Element (FCE) 48
Creating a “grid” Content Element 55
Creating an alternative template for the 2-columns FCE 57
Content Element with repetitive data objects 59
Creating a “pseudo-record” list 69
Miscellaneous 75
Working with TypoScript inside of Data Structures 75
Hints about mapping 81
ToDo of TemplaVoila 83
Introduction
What does it do?
This extension is a from-scratch tutorial about how to build a CMS- powered website with TYPO3 based on a HTML-template and the extension TemplaVoila (ext key: “templavoila”).
It is based on the same basic material as the reknown “Modern Template Building, Part 1” but demonstrates the templating concepts taken to a new level compared to the Modern Template Building tutorial.
The document is recommended for developers on beginner level. However, before doing this tutorial you should have gone through “Getting Started” and “Modern Template Building, Part 1” in order to equip yourself with basic TYPO3 knowledge.
The website you will be guided to build will look like this:
Goal
The goal of the tutorial is to present to you a newly developed concept of templating revolving around the extension “templavoila” mixed with what is known as “FlexForms” and “Data Structures”. Further it turns the traditional way of working with content elements around from being “columns”-centered to being totally hierarchically nested inside each other.
Whether this tutorial provides a best-practice implementation or not is not sure yet - that will depend on the general success and adoption of these techniques. But it is backed by high motivation from sponsors and personally we believe it holds great potentials.
The extension “TemplaVoila”
The extension “TemplaVoila” was developed by Kasper Skårhøj and Robert Lemke for a project in a large, french company, Dassault Systemes. TemplaVoila was the result of the innovation that followed some problem solving for the project. In particular the problems that TemplaVoila addresses are how to create more flexible page structures than currently known in TYPO3s concept of “columns”. Further, it integrates traditional templating on the content element level but with a far more flexible point-n-click style than seen before. Finally the development of TemplaVoila also lead to some enhancements of the TYPO3 Core, in particular a concept called FlexForms which allows TYPO3s backend to build hierarchical forms and store their content into XML structures.
Dedication
<kasper> This time want to dedicate this document to my friends at Dassault Systemes in France. I want to thank you from my hearts deep for your generouscity, both personally and professionally, and I have loved to work with and for you all the time, both in Denmark and Paris. It has truely blessed my life on all levels and for TYPO3 your adoption has been a major reward and testimony to the quality it holds.</kasper>
The extension
This tutorial has all its files contained in a TYPO3 extension (doc_tut_ftb1). Extensions normally contain scripts and resources that extend the capabilities of TYPO3. However this tutorial extension does not interact with TYPO3s core if you install it - it merely serves as a vehicle for transporting the tutorial files to your server and for presenting the tutorial document online on typo3.org.
Therefore to follow this tutorial;
- first install the dummy-package (see The Basics section of the tutorial “Modern Template Building, Part 1”)
- then import the extension "doc_tut_ftb1" from TER (TYPO3 Extension Repository) with the EM (Extension Manager) and you will have all files at hand on your server when you need them.
This tutorial document can either be read online or you can download it as a SXW file from typo3.org for your convenience. If you are lucky some merciful soul might have uploaded a PDF version for you as well...
WARNING - beta software
Although TemplaVoila is used in production it is far from finished. The same goes for FlexForms - a core feature of TYPO3 3.6.0
You must be aware that what you are reading about in this document is all subject to change and we expect to revise this tutorial heavily upon the final release of the TemplaVoila extension. Please bear this in mind while you play with this!
Also notice that TYPO3 in version 3.6.0 is a requirement for this tutorial!
Integration of an HTML page template - with TemplaVoila
Introduction
This chapter will demonstrate an implementation parallel to “Modern Template Building, Part 1” but with TemplaVoila instead of the “Auto- parse Template” extension. This will show you how powerful TemplaVoila is!
As an introduction to the principles we are following please read the chapter “Implementation of a CMS” in “Modern Template Building, Part 1” first.
Installed the dummy-package and page-tree?
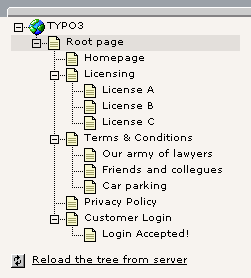
At first you have to make sure that you did install a blank TYPO3 database - basically the “dummy”-package is what you need. Further you should create a page tree structure as outlined in the `“The Basics” < http://typo3.org/doc.0.html?&tx_extrepmgm_pi1[extUid]=442&tx_extrepmgm _pi1[tocEl]=1267&cHash=885ac047ea>`_ chapter of “Modern Template Building, Part 1” (MTB/1). You don't need to follow the rest of “The Basics” section in MTB/1 - just create the page structure.
What you should see in the backend is a page tree like this:
The HTML template
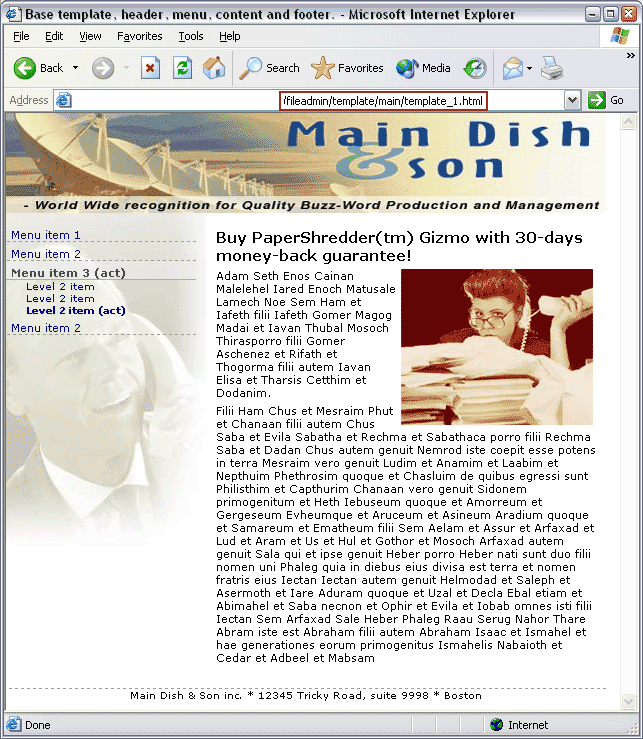
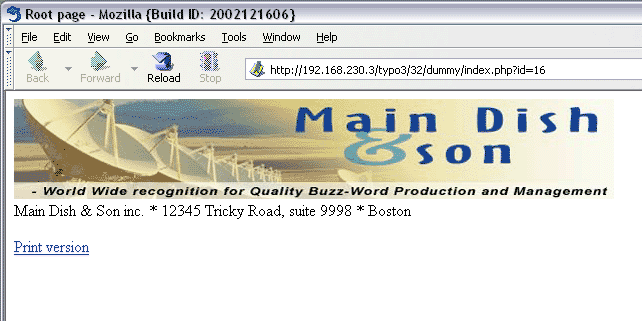
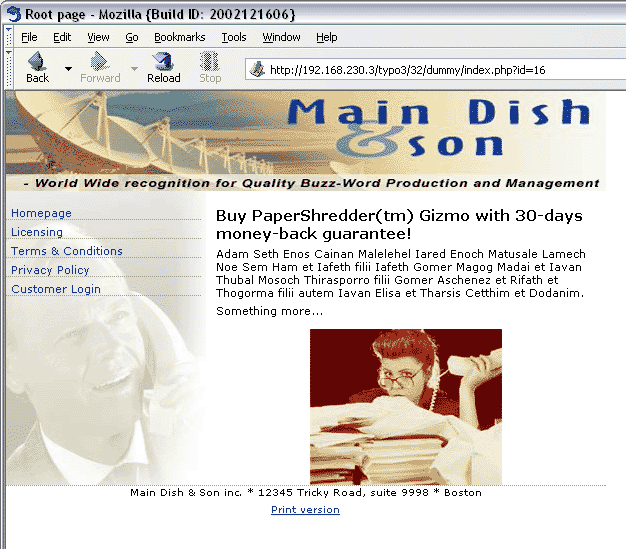
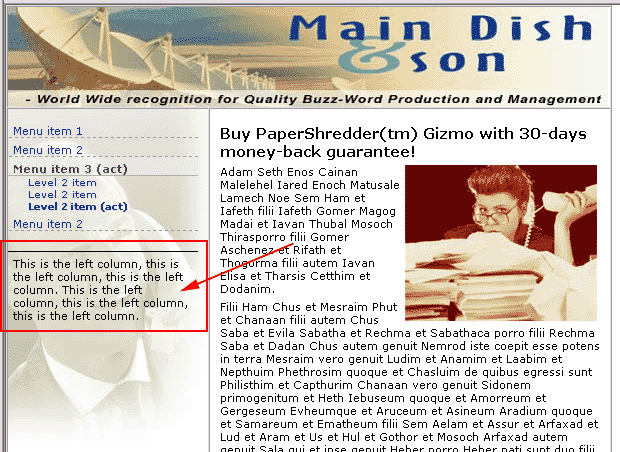
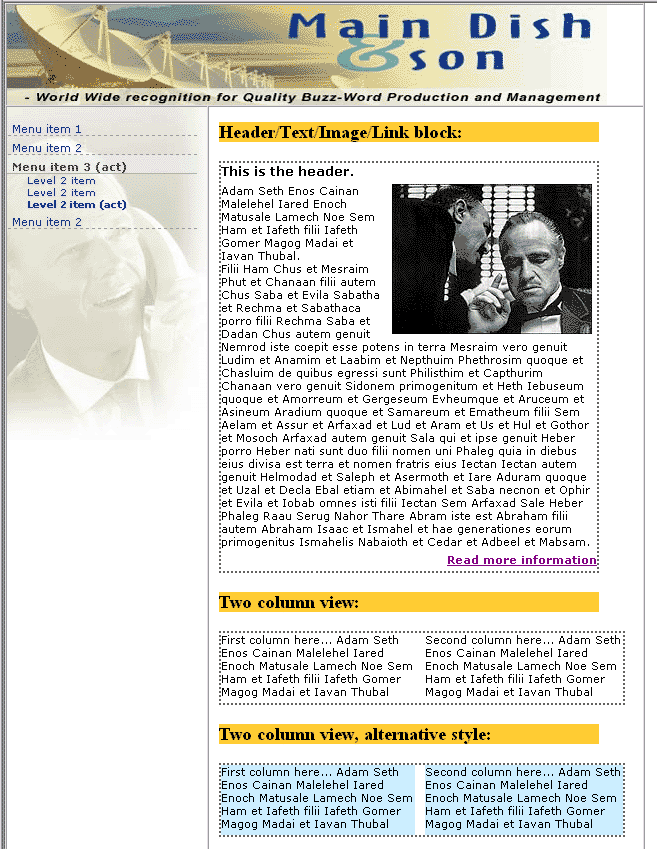
The web team has just got a new customer - Main Dish & Son - and Raphael, the artist on the team, has produced the website template as a regular HTML file:

This HTML file “template_page.html” is put into the directory "fileadmin/template/main/" relative to the TYPO3 installation (the dummy-package).
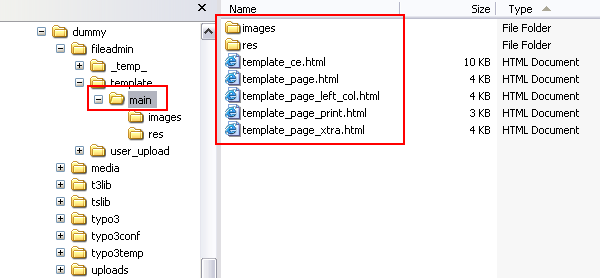
To follow this tutorial you should now copy the folder "template/" from this tutorial extension into the folder "fileadmin/”. If you didn't import the tutorial extension "doc_tut_ftb1" from TER you should do that now!
Well, back to Raphaels work; the template HTML file is really just a regular HTML page. But when TYPO3 imports this file as a template the point is to make certain parts dynamic. This includes the menu to the left and also the section with dummy content to the middle/right.
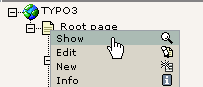
Lets look at the source code of this file. In TYPO3 that is easy - just go the the File > Filelist module, click the title of the main/ folder and click the image in the list:

This will open the file in a webbrowser.
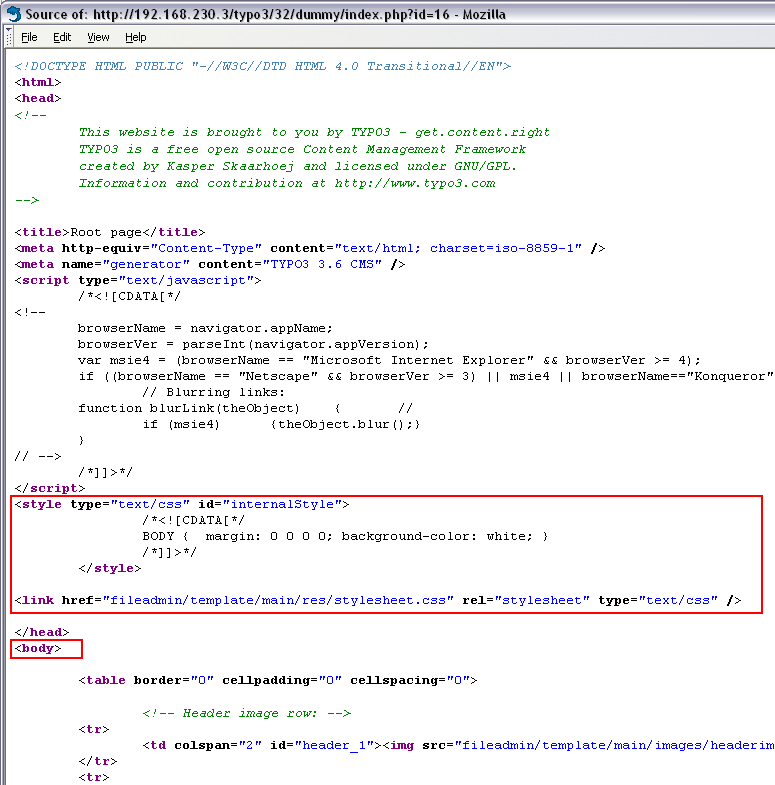
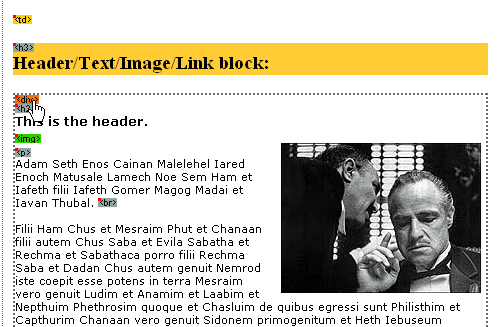
Looking into the source code of the HTML template reveals a simple XHTML compliant document referring to a stylesheet and using a single table to position various elements on the page:
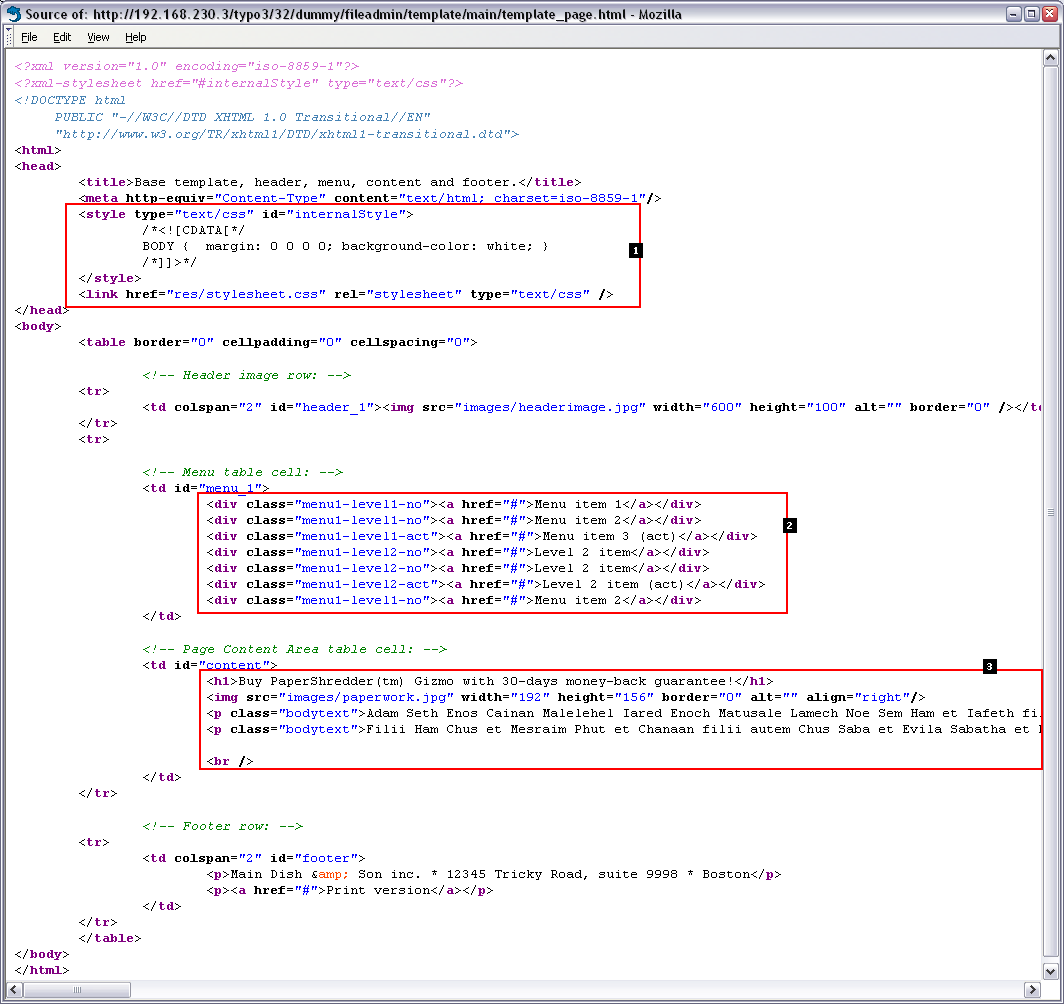
Here follows some commentary on this HTML template and the challenges we are facing:
This section from the header of the document must go into our webpage since it refers to the stylesheet used. Challenge: We must make sure to extract this part of the document into the header section generated by the frontend engine!
The menu on the left is made by a <div>-section per menu item. Each of these <div>-elements has a class assigned to it. By this class name the design of the element is controlled in the CSS stylesheet.This is a very clever way to create a menu since each element consists of a minimum amount of HTML-code (good for TypoScript implementation), they are easily repeatable (necessary when the menu will be dynamic). Challenge: We must substitute the dummy-menu here with a dynamically generated one!
This is dummy content that Raphael put into the template file just to get the visual impression right. Notice how it is formatted with <h1> and <p> tags (using the class "bodytext") - this is clever since the dynamic content inserted by TYPO3 later on will use those tags / classes for formatting as well! (Raphael must have cheated with some TYPO3 experience on beforehand, eh?) Challenge: We must substitute the dummy-content with dynamically generated page content.
Now the tutorial files are safely in place. Next step - installing the needed extensions.
Install “TemplaVoila” and “CSS Styled Content”
The next step is to install TemplaVoila which will be our template- and content rendering engine. Further we need “CSS Styled Content” which will render the regular content elements as for other normal TYPO3 websites.
If you didn't do it yet, import “TemplaVoila” from TER (TYPO3 Extension Repository) through the EM. When that is done, install the two extensions:

For TemplaVoila you should make sure to enable the Page Template Selector in the update screen:
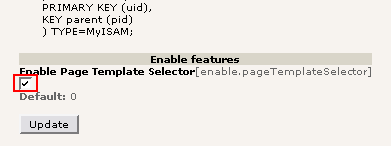
Press “Update” and all database tables and fields will automatically be created for you!
After you installed TemplaVoila, please reload the whole backend since the extension contains backend modules.

The Storage Folder
Now you are about to create an important element for the website - the “Storage Folder”. Normally you store elements related to a page on the page itself, eg. Content Elements or maybe even frontend users. However you will often find that for a website you need some general purpose page to place records which are related to the whole site and not just single pages - this is what we call a Storage Folder; A “SysFolder” page defined to be a general purpose storage page for elements related to a website in a branch of the page tree.
Steps involved in creating a SysFolder are these:
- Create a page in the page tree of the type “SysFolder”. You might want to place this page as the last page on the first level of the website branch.
- Create a relation for “General Storage Folder” from the page header of the website root page to the new sysFolder page.
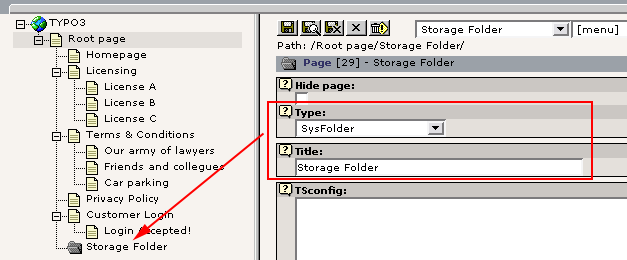
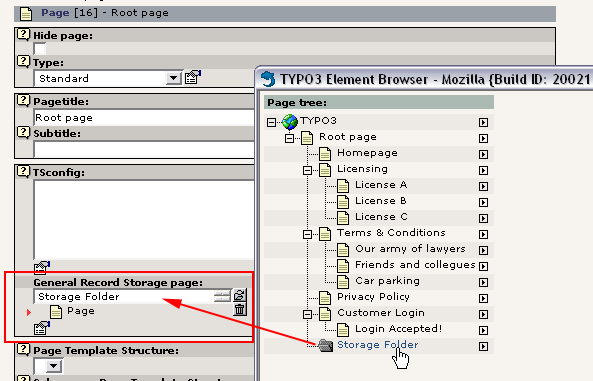
Above screenshot shows the created storage folder. But to make it the storage folder of the website starting from “Root page” we need to edit the page header of “Root page”:
That's it.
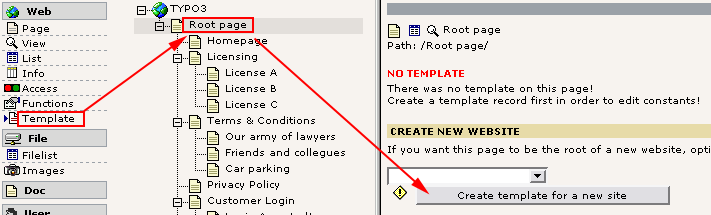
Create the TypoScript Template Record
Next, we create a root template record on the “Root page” page. For details you can refer to “MTB/1” where this process is outlined in details. The point is that you end up with a “Template” record with this contents:
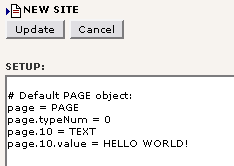
The information you see in the “Setup” field is called “Template TypoScript” - it is configuration code that TYPO3s frontend engine (extension “cms”) interprets in order to render the website pages. In the above case the text “HELLO WORLD” is outputted.
If you know about TypoScript in a historical perspective you know that a) the Setup field might end up being hundreds and hundreds of lines long, b) after a while slightly confusing to manage and c) requiring a lot of TypoScript knowledge, basically all of TSref .
If you know how we did in the MTB/1 tutorial you saw that the amount of TypoScript was not that frightening. In fact we just configured the extension “automaketemplate” to read an external HTML file and insert dynamic content at certain locations. That configuration was only like hundred lines or so (except menus). Far less than the “nightmares” of past times.
If you read on in this document you will see how we do not even add a single line - we just change the last two:
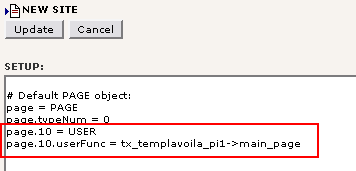
So, all you initially need in order to use TemplaVoila in terms of TypoScript is a code listing like this:
# Default PAGE object:
page = PAGE
page.typeNum = 0
page.10 = USER
page.10.userFunc = tx_templavoila_pi1->main_page
(Admittedly, a little more will be added later since we also have to define the menu....)
Make sure to save this code listing. If you view the website now you should see a blank page with nothing in the body.
Now, the next step is to create a TemplaVoila Template Object for the page template.
Creating the Template Object for the page template
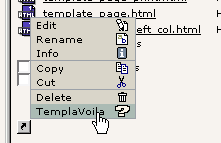
Go to the File > Filelist module, click the “template/main/” folder and then click the icon of the file “template_page.html”:
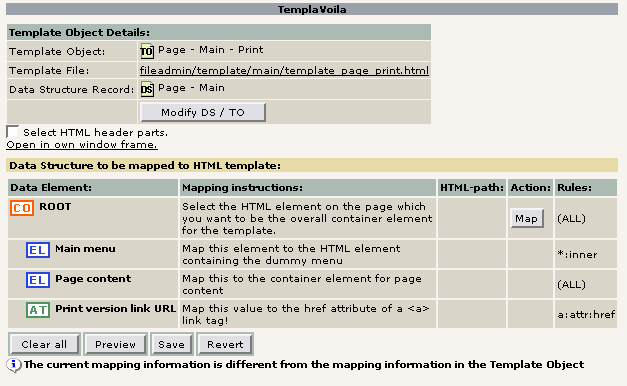
This will bring you to the mapping interface of TemplaVoila:
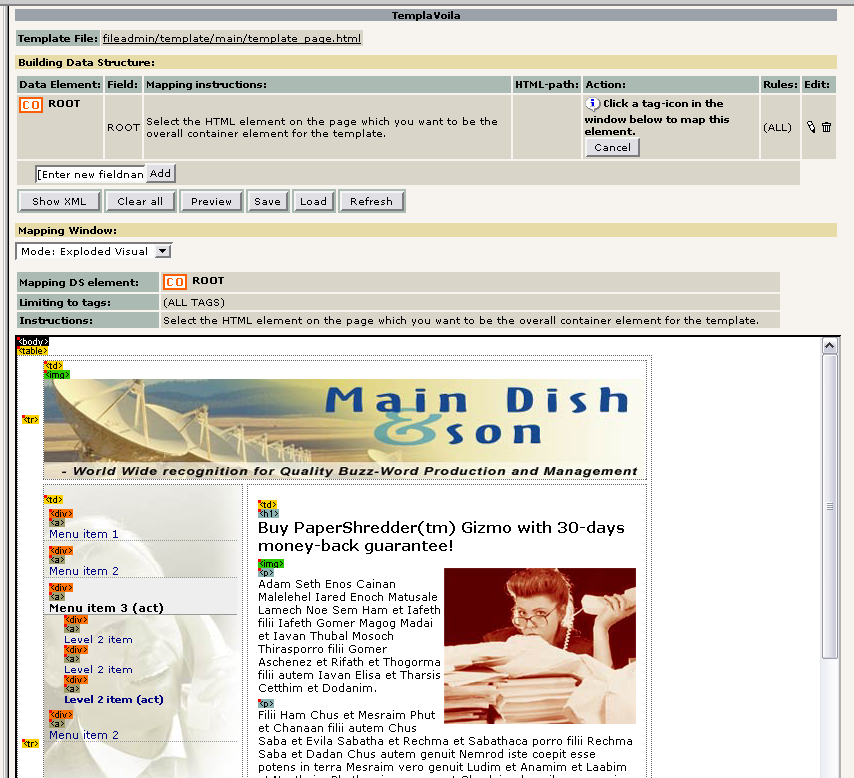
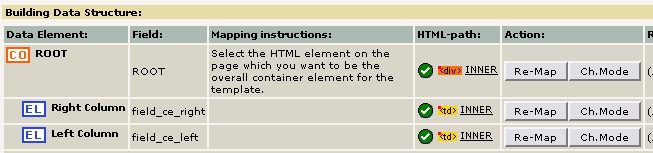
In this interface we will create a Data Structure (DS) for the page template and at the same time map that DS to the HTML elements of this template file and finally store the mapping information in a Template Object (TO) created along with the DS.
Data Structures (DS) and Template Objects (TO)
You can read more technical information about Data Structures in the document “TYPO3 Core API” and the documentation of “TemplaVoila”. However, to give a quick distinction between DS and TO:
- A Data Structure (DS) says which “fields” we can map to a HTML template.
- A Template Object (TO) says which HTML elements the fields from the DS maps to.
By this definition we can see that a TO always refers to a DS which tells the TO which fields can be mapped and by which rules and hierarchies. It also means that you can have many TOs referring to the same DS - thus more templates for the same data!
Creating the Data Structure of “Main Dish & son”
In our tutorial the Data Structure needed for the page template is:
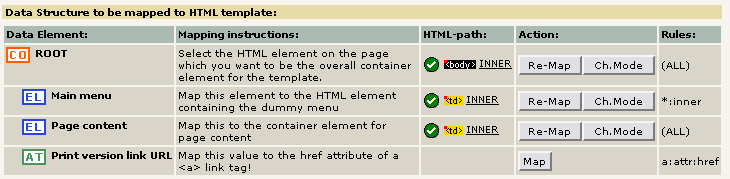
Definition of the overall element containing the page - that is obviously the <body> tag!
- Menu: Define container element for the menu to the left
- Content: Define container element for the content cell.
Such a DS could be manually created by hand if you know the syntax of the DS XML, <T3DataStructure>. However, the whole point of what we are doing just now is that TemplaVoila offers a visual point'n'click tool for automatic kickstarting such a Data Structure! It works like this:
Add an element representing the menu:
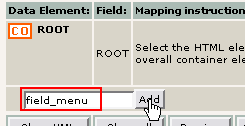
(The name “field_menu” is prefixed “field_” which is a best-practice convention. You can use other field names if you like.)
This gives you a form by which you can enter details for the new element:
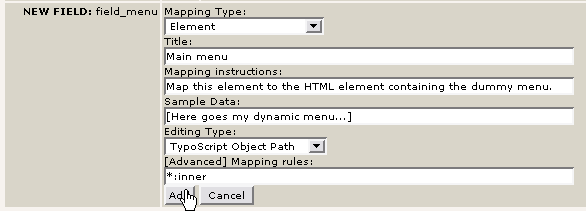
You can enter information like we have done above. Here are a few hints about options not so obvious. For details you should refer to the TemplaVoila documentation.
- Mapping Type: Here you select the behavior of the element in terms of mapping to HTML. Select “Element”
- Editing Type: This selects a preset for the field content. In our case we want to insert content from a TypoScript Object Path - which we will define to be the HMENU cObject later!
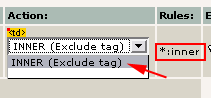
- Mapping rules: Since the menu should probably be contained inside an HTML element like <div> or <td> etc. we define the rule “*:inner” which means that we can map the menu to be inside whatever element in the template.
After pressing “Add” you will see this:

You can repeat this process for the page content:
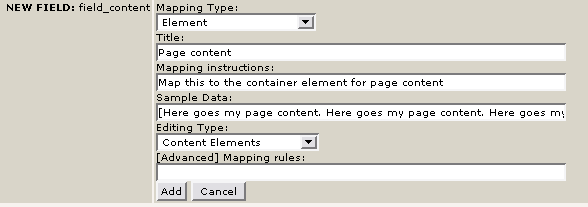
In this case we selected the Editing Type preset to be “Content Elements” - this will give us the ability to insert content elements in this field later.
After pressing “Add” we now have a data structure reflecting what we wrote earlier - basically a menu and content cell:

Mapping the DS to the HTML content
After having created the DS (which you could also have done on the fly when mapping if you liked that better) you have to map the elements in it to HTML elements in the template file.
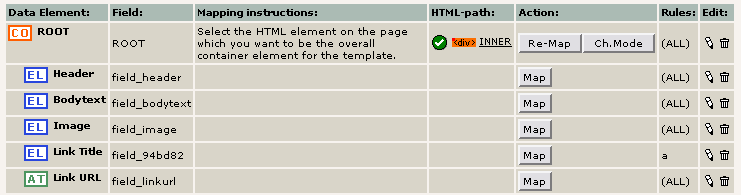
Click “Map” for the “ROOT” element, then click the “<body>” tag icon in the “Mapping Window”:
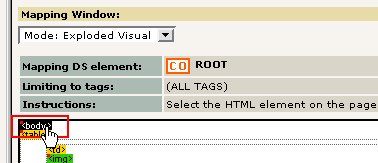
This brings you a little form for the “ROOT” element where you can select mapping type:
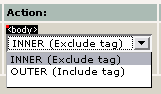
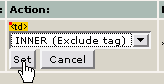
For all “block-elements” (my name for HTML elements which has a beginning and an end, eg. <td>...</td> or <div>...</div>, contrary to eg. <img ....>) you can select INNER or OUTER mapping. This means whether we capture the content of the tag inside the tag (excluding the tag) or outside the tag (including the tag). Since we only want the contents of the <body> tag excluding the <body> tag we select “INNER”.
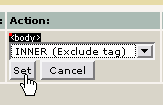
The result is this:
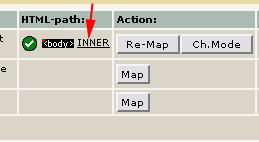
The DS listing now shows that the “ROOT” element has successfully been mapped to the <body> tag of the template! And since the “ROOT” element in the DS is parent element to the menu and content area elements we can now perform mapping of those DS elements as well.
Click the “Map” button for the “field_menu” element in the DS. Then click the “<td>” tag icon representing the <td> tag inside of which our dummy menu of the template was found:
Notice that we do not have other options that “INNER” this time:
This is as expected because we made a rule that any element selected can only be mapped by the “INNER” mode - thus keeping the tag in the template and substituting only the contents with dynamic content.
So again, create an “INNER” mapping for the element:
Now, do the final mapping of the “Page content” DS element:
Like with the other elements, just map it to “INNER” again.
You should see this result:

You can always verify a mapping by clicking the “HTML-path” link. This will shown only the mapped portion of the template marked-up:
Previewing the mapping
Since we entered a little sample data for our entries in the Data Structure we will be able to perform a simple preview of how a substitution in the template will look. Simply press the “Preview” button:
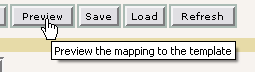
This will render this “Mapping Window” for you:

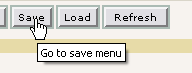
Saving the DS and TO
Until now all you have done has been stored in the session data for your backend user profile. To complete the job you have just done you must click the “Save” button...
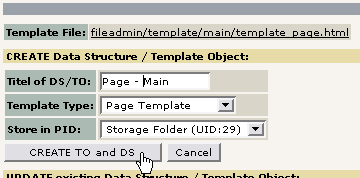
... and then
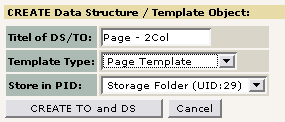
- Enter a title of the DS / TO (can be changed later)
- Enter a type, in this case “Page template” (tells TYPO3 that this Data Structure is for a whole page). You should set this correctly now!
- Select a Storage Folder to store it in - and you should only have one at this point in time.If you do not see a storage folder in the selector box you have a problem - you didn't configure the Storage Folder correctly according to the steps outlined earlier in this document!)
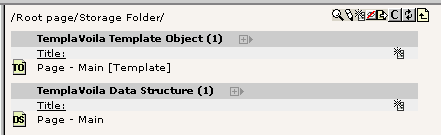
If everything went well you should see this acknowledgment:

And in the “Storage Folder” page you will find the DS and TO records just created!
Applying the TO as page template
Let's summarize what we have done till now:
- Template Files: Placed pre-made HTML files from a designer in “fileadmin/template/main/”
- Extensions: Installed TemplaVoila and CSS Styled Content
- Storage Folder: Configured a storage folder for the website.
- TypoScript Template record: We created a simple TypoScript Template record in the root of the website - only containing a USER cObject triggering TemplaVoila.
- Create DS/TO: Creating a Data Structure (DS) and Template Object (TO) for the main page template
All we need now is to select the newly created TO as the page template to be used. This is very easy. Just edit the page header of “Root page”:

This selects the DS for the page template - this is needed as a first step in order to tell TYPO3 which “features” the page will have (in this case two things; a menu and page content). Now, save the page header.
After that you will have to select the “Template Design” (the TO record):
Then save - maybe even click “Save Document and View”:

... and as a reward you will see this:
Yes, the template is used! But, reward? At least we are not at the end yet! What we miss is:
- Setting up css_styled_content for content rendering
- Adding page content
- Creating the dynamic menu
- Setting the stylesheet and body tag
Setting up css_styled_content for content rendering
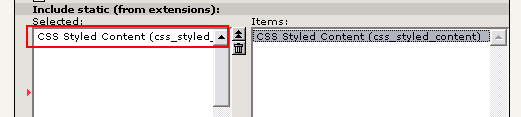
Before content elements can be rendered we need a static TypoScript template to do that for us. This is known from all other implementations of TYPO3 so there is nothing new here; just edit the Template Record and add the “CSS Styled Content” static template file:
Save and close.
Adding page content
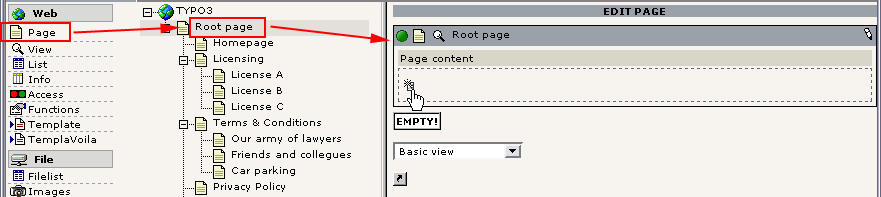
One of the new things that comes with TemplaVoila is a totally new concept for integrating page content. Normally we use the concept of organizing content elements in columns on a page. Thus the content elements gets shown because they belong to a page and to a column.
In TemplaVoila content elements should still belong to the page they are shown on but the relation goes from the page (or higher level content element) to the content element inserted! This is the inverse direction of what you are used to, since normally content elements refer to their parent page and column! We'll add a little more details to this later. For now, just lean back and enjoy the new Page module:
WARNING: At this point the page module is under construction. Therefore screenshots are far from finished!
To create content a page page, just click the new icon:
This inserts a new content element. Edit that:
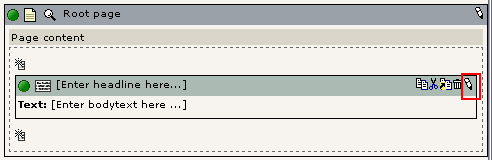
Here we added some of the dummy text from the template file:
Close, and you will see this:
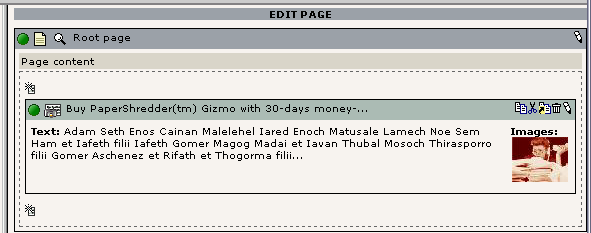
This is the way to add content to the page with TemplaVoila. You can insert more elements, you can copy/cut/paste them around, even make references to elements on other pages and you can also nest elements - this is shown later.
You can click the “View” icon to see the site now:
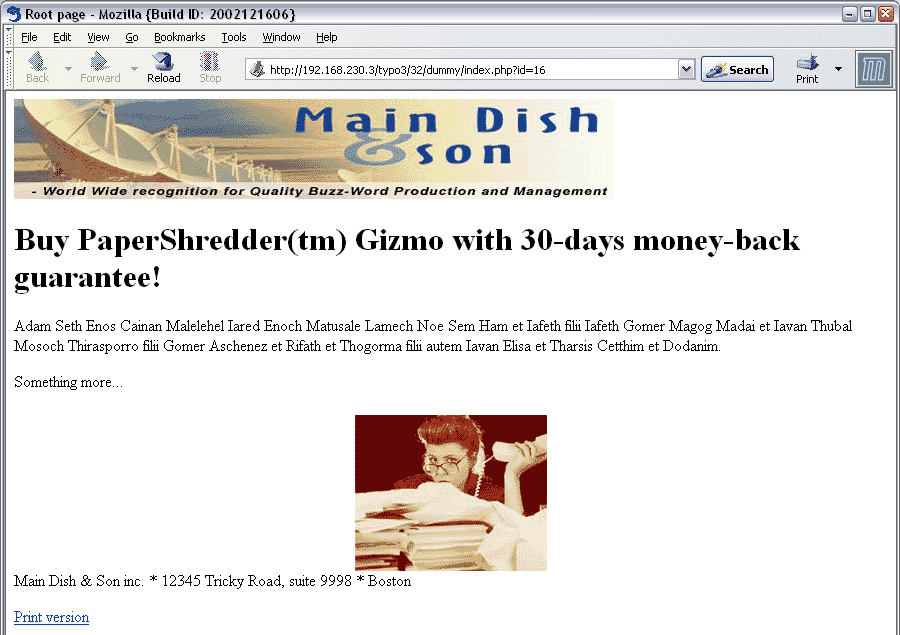
Still not that pretty - we clearly miss the stylesheet. Well...
Behind-the-scenes of TemplaVoila's new Content Element management
This is for the interested developers; how does TemplaVoila manage the relations from pages to content elements?
Well, first of on a user level all that should be taken care solely by the new “Web > Page” module you have just used. But behind the scenes you can look into the page header and see that a new field has been added which allows you to add content elements to the page:
You can in fact modify the structure shown visually by the Web > Page module by adding relations to content elements manually with this form! But... that is not what you want to try and explain the average user!
FlexForm and the Data Structure behind
Another note on this is that the contents of this form is not going into a dedicated table cell - it is going into an XML structure in a database field of the page record (tx_templavoila_flex) which can potentially contain many more fields defined by the Page Template Data structure you have just created. This is one of the really thrilling and brilliant features of Data Structures. The concept is called “FlexForms” and this field is just one of those. Very beautiful stuff.
Basically the Data Structure we created along with the Template Object defines this. If you go to the “Storage Folder” page with the List module, click the DS records icon, in the context menu select “TemplaVoila” you will have a chance to see the XML of the DS:
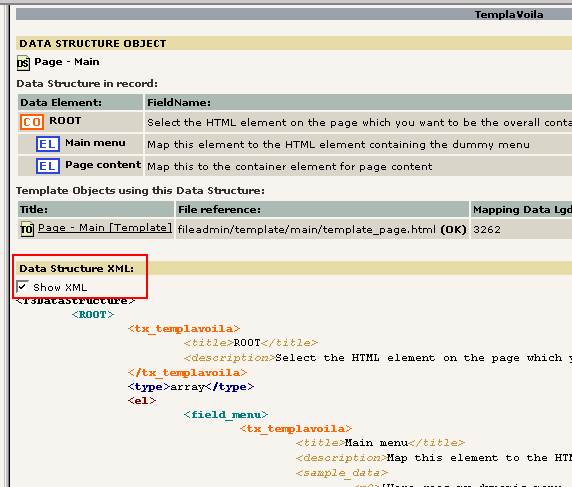
If you study this XML code you will find that for the field name “field_content” there is a section defining some “TCEforms” values (lines 35-46) - in fact this is what rendered the field with relations to the Content Elements:
   1: <T3DataStructure>
   2:   <ROOT>
   3:           <tx_templavoila>
....
  20:                   </field_menu>
  21:                   <field_content>
....
  35:                           <TCEforms>
  36:                                   <config>
  37:                                           <type>group</type>
  38:                                           <internal_type>db</internal_type>
  39:                                           <allowed>tt_content</allowed>
  40:                                           <size>5</size>
  41:                                           <maxitems>200</maxitems>
  42:                                           <minitems>0</minitems>
  43:                                           <show_thumbs>1</show_thumbs>
  44:                                   </config>
  45:                                   <label>Page content</label>
  46:                           </TCEforms>
  47:                   </field_content>
  48:           </el>
  49:   </ROOT>
  50: </T3DataStructure>
Peaking into the value of the “tx_templavoila_flex” field of the page record also reveals an XML structure - <T3FlexForm>. It looks like this:
 1: <?xml version="1.0" encoding="iso-8859-1" standalone="yes" ?>
 2: <T3FlexForms>
 3:   <meta>
 4:           <currentSheetId>sDEF</currentSheetId>
 5:   </meta>
 6:   <data>
 7:           <sDEF>
 8:                   <lDEF>
 9:                           <field_content>
10:                                   <vDEF>1</vDEF>
11:                           </field_content>
12:                   </lDEF>
13:           </sDEF>
14:   </data>
15: </T3FlexForms>
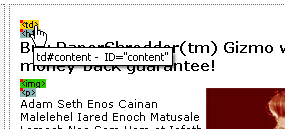
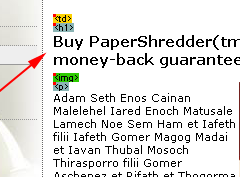
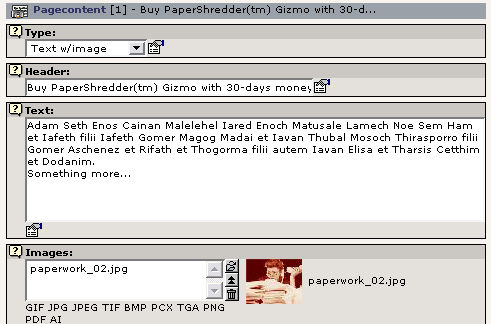
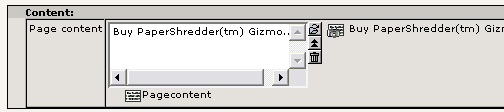
Notice the value between the <vDEF> tags - that is the uid of the content element “Buy PaperShredder(tm) Gizmo with 30-days money-... ”
Rendering the content elements
One thing is to create the relations to the content elements. Another thing is how they are rendered. Apparently the good old static TypoScript templates like “CSS Styled Content” are still used - but how?
The answer is also in the Data Structure created. Look at the lines 29-33 (gray background):
....
  21:                   <field_content>
  22:                           <tx_templavoila>
  23:                                   <title>Page content</title>
  24:                                   <description>Map this to the container element for page content</description>
  25:                                   <sample_data>
  26:                                           <n0>[Here goes my page content. Here goes my page content. Here goes my page content. Here goes my page content. Here goes my page content. Here goes my page content. Here goes my page content. ]</n0>
  27:                                   </sample_data>
  28:                                   <eType>ce</eType>
  29:                                   <TypoScript>
  30: 10= RECORDS
  31: 10.source.current=1
  32: 10.tables = tt_content
  33:                                           </TypoScript>
  34:                           </tx_templavoila>
....
Those lines contains TypoScript code which looks quite as we have seen it before: It's a RECORD cObject, rendering elements from the “tt_content” table, taking the uids from the “current value” - which seems to be loaded with the content of <vDEF> tag in the scope where this TypoScript is used for processing (which is inside the “tx_templavoila_pi1” plugin as you might be able to figure out from previous code listing).
Want to know more:
FlexForms, Data Structures and all that is documented fully in the “TYPO3 Core API” document.
Creating the dynamic menu
The menu we want in the left table cell will be done with exactly the same TypoScript code as used for the MTB/1 tutorial. Nothing is different here; TypoScript turns out to be quite effective for configuring menus and image generation.
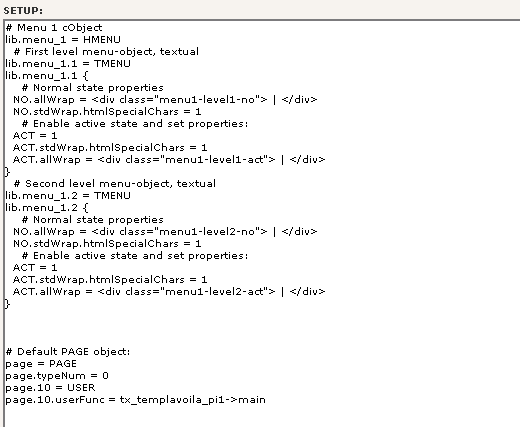
So, basically lets copy and paste the code listing from MTB/1 *with one exception* ; “temp.menu_1” is changed to “lib.menu_1”:
# Menu 1 cObject
lib.menu_1 = HMENU
  # First level menu-object, textual
lib.menu_1.1 = TMENU
lib.menu_1.1 {
    # Normal state properties
  NO.allWrap = <div class="menu1-level1-no"> | </div>
  NO.stdWrap.htmlSpecialChars = 1
    # Enable active state and set properties:
  ACT = 1
  ACT.stdWrap.htmlSpecialChars = 1
  ACT.allWrap = <div class="menu1-level1-act"> | </div>
}
  # Second level menu-object, textual
lib.menu_1.2 = TMENU
lib.menu_1.2 {
    # Normal state properties
  NO.allWrap = <div class="menu1-level2-no"> | </div>
  NO.stdWrap.htmlSpecialChars = 1
    # Enable active state and set properties:
  ACT = 1
  ACT.stdWrap.htmlSpecialChars = 1
  ACT.allWrap = <div class="menu1-level2-act"> | </div>
}
(Taken from the chapter “Adding XHTML compliancy”)
Copy this listing into the Setup field of the Template Record:
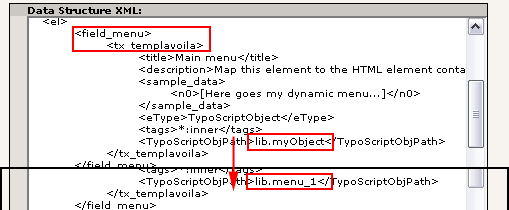
In MTB/1 we have to refer to or copy this definition of a HMENU object. In this case we need to do the same in principle - but the reference must be set in the Data Structure we just created! Here there will already be a dummy-pointer to “lib.myObject” - but we will change that!
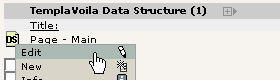
So what you do is click the DS records icon, select “Edit”:
In the field “Data Structure XML” you will find the DS XML and for the element “<field_menu>” there is “application” configuration for TemplaVoila which contains a default reference to “lib.myObject” - this is the object path from the TypoScript Template record which will render the contents for this field. So just change this to “lib.menu_1” and you are set!
You may look at the page again:

It hasn't become nicer but at least the menu is there!
Setting the stylesheet and <body> tag
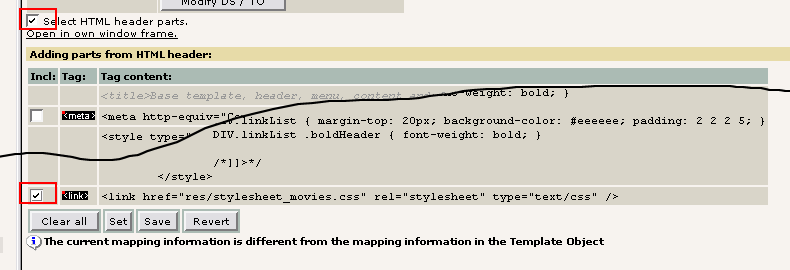
The final step is to edit the Template Object which we were not able to do when we created the DS and TO; configuring inclusions from the header and <body> tag!
This is a walk in the park - just like most other things with TemplaVoila. Simply click the icon of the TO record, select “TemplaVoila”:
Then select the option “Select HTML header part”:
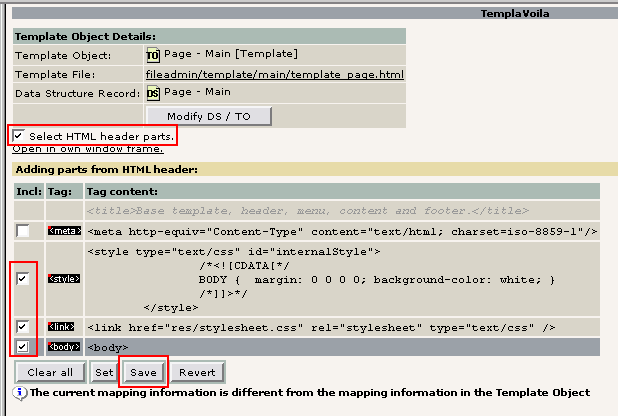
Then you select to include the two stylesheet definitions and the body tag. We don't want the charset definitions since TYPO3 will automatically render that for us (which is the case with most <meta> tags). As a rule of thumb you should include all <style>, <link> and <script> sections you encounter here!
Finally, press save.
And if you dare - look at your website after clearing the cache:
And... Voila!
For the curious souls you can also see how nicely this works by looking into the HTML source:
This demonstrates how cleanly the selected header parts and the body tag from the template file has been included into the header which TYPO3 always has to control for purposes like automated charset, title tag value and JavaScript sections which might depend on such as dynamic menus etc.
Summary
Let's summarize the steps involved in this process, rearranging them in optimum order:
- Template Files: Placed pre-made HTML files from a designer in “fileadmin/template/main/”You can ask an HTML designer to create basically any design he likes as long as it is valid HTML, nested correctly and generally clean (otherwise the mapper will have its problems).
- Extensions: Installed TemplaVoila and CSS Styled ContentNo problem, GPL is here to serve us!
- Storage Folder: Configured a storage folder for the website.Nice thing to have anyways - use it for your frontend users as well! This is recommended “best-practice”.
- TypoScript Template record: We created a simple TypoScript
Template record in the root of the website;
- Contained a basic call to a USER cObject triggering TemplaVoila's plugin “tx_templavoila_pi1”
- Including the static template “CSS Styled Content”
- Included a HMENU definition in object path “lib.menu_1”
- Create DS/TO: Creating a Data Structure (DS) and Template Object
(TO) for the main page template
- First step: Create the DS and TO records
- Second step: Include certain <head> parts and <body> tag.
- Setting page template: Edited the header of the root page, setting the Page Template Data Structure and Template Object.
- Added dummy page content: Created page content elements with TemplaVoilas “Web > Page” module - just for testing purpose.
Creating additional page templates
With the method shown in the previous section of this tutorial the next question is; how can we define more templates for alternative purposes?
This could include:
- Templates for print-versions or other languages?
- Templates for sub sections of the website?
- Templates with 2 columns (other Data Structures)?
All these problems are easy to solve and they follow the same principles as used for the main template. Therefore in the coming chapters we will focus on what is different and assume that you can handle what has already been explained earlier without further introduction.
Modifying a formerly made DS/TO
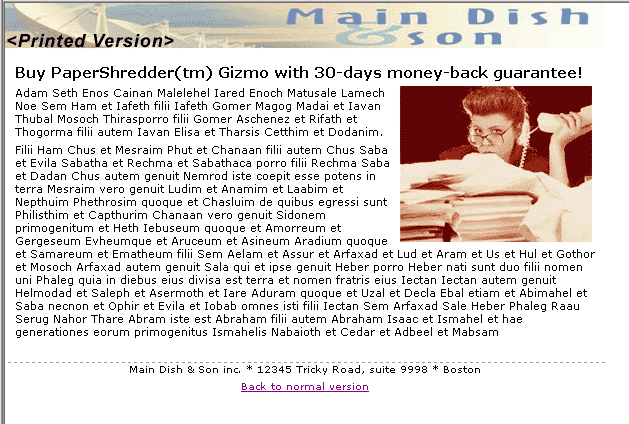
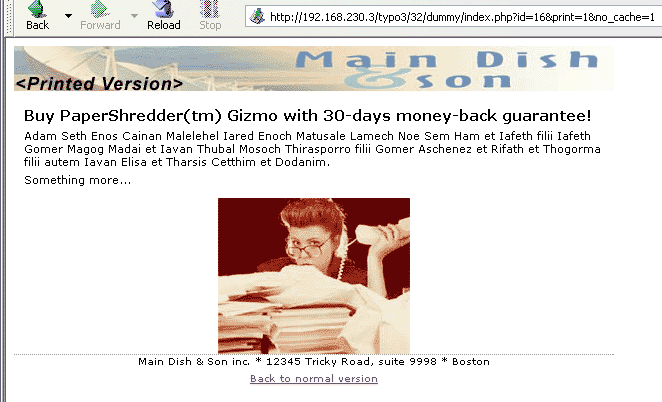
The first step we want to take is to create a print-version template based on the HTML file “template_page_print.html”. However it suddenly strikes us that the link “Back to normal version” (see buttom of file) has a counterpart in the main template, “Print version” - and we didn't map this field before! D'oh.
So, we have to take a little detour now since we would like to have that link mapped to a dynamic destination value of course.
In a situation like this what you want to do first and foremost is to modify the Data Structure to include the capability to map the href- attribute of a link. You have two options:
- Modify the DS XML inside the DS record by hand. This is hard and requires knowledge of the Data Structure format, but can be done at any time you like regardless of other custom modifications.
- Modify the DS by “re-creating” the DS/TO we made earlier. This is fun - but will remove all custom changes made to the DS XML - in our case the TypoScript Object path “lib.menu_1”!
We choose the fun option.
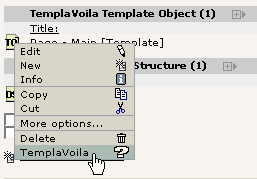
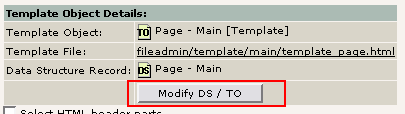
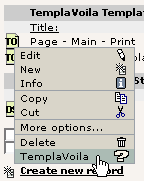
So, click the icon of the TO record, select TemplaVoila and then click the button “Modify DS / TO”:
After clicking “Yes” to a warning box you will see this screen:
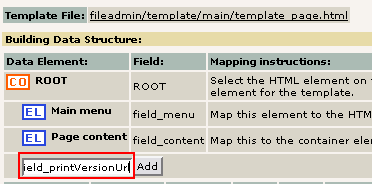
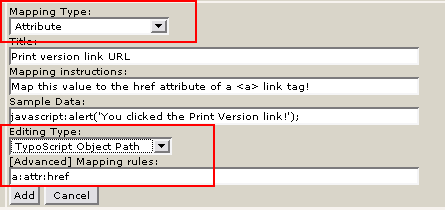
Enter the fieldname (here “field_printVersionUrl”) and press “Add”. Then fill in the form. In particular set the Mapping Type to “Attribute” since we want to set a value in an HTML element attribute (<a href =”...”>), selecting Editing Type to “TypoScript Object Path” (we will have to dynamically set the link value) and if you like, you can set the Mapping rules to “a:attr:href” - meaning “map this DS element only to an “href” attribute of an <a>-tag!”
Add the DS element and map it:
The only choice is “ATTRIBUTE “href” (= #)” so you will select that:
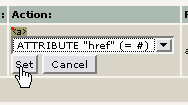
Then, press the “Set” button and in the next screen you will update the original DS/TO set:
 This has saved the modified Data Structure and Template
Object back. Now, there are two things to remember:
This has saved the modified Data Structure and Template
Object back. Now, there are two things to remember:
- Any custom modifications to the DS XML will have to be redone most likely. (In our case that is the change of the TypoScript object path from “lib.myObject” to “lib.menu_1”)
- Any mappings of header parts or body tag in the TO will be lost. Redo them.
- Any other Template Objects pointing to this DS might also have to have the new field mapped to the “Print version” link they might contain.
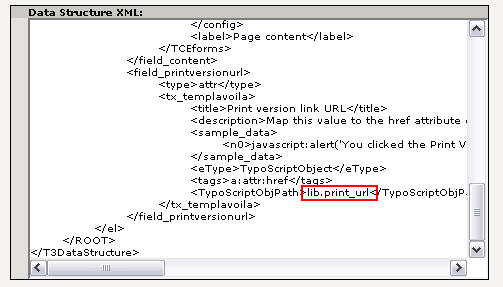
Fixing the DS XML and TO:
Edit the DS record and change in the XML the values for <TypoScriptObjPath>:
- lib.myObject to lib.menu_1 (for <field_menu>)
- lib.myObject to lib.print_url (for <field_printversionurl>)
After fixing the DS record, open the TO record with TemplaVoila and map the header parts and body tag again. See former chapter.
Then save - and maybe clear cache / preview that you site is still working...
Rendering the Print Version URL
In order to insert the URL to the Print Version all we have to do is to render it with a cObject in the TypoScript template, object path “lib.print_url”:
#Print Version URL:
lib.print_url = TEXT
lib.print_url.value = index.php?id={page:uid}&print=1&no_cache=1
lib.print_url.htmlSpecialChars = 1
lib.print_url.insertData = 1
[globalVar = GP:print > 0]
lib.print_url.value = index.php?id={page:uid}
[global]
This code will insert a link pointing to the current page but with the “&print=1” parameter. Further, if the &print-parameter is set and a print template presumably is used the link will point back to the non- print page - thus working in the other direction as well!
A print version
For the print version of our website we have a template prepared from the designer. This is found in the file “template_page_print.html”:
This print template is supposed to be compatible with the main template, “template_page.html”, although the menu field will not be mapped then. Therefore we will use the same DS as for the main template. This means we will not be creating a new DS and TO like previously done - only create a new TO pointing to the same DS but to a new file!
To complete the integration of a print version we have to
- Create a TO record, pointing to the template file and DS needed. Set it as a child to the main template.
- Map the TO record with TemplaVoila.
Create the TO
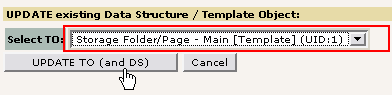
Create a new TO:

Then enter the information for the TO:
Please notice:
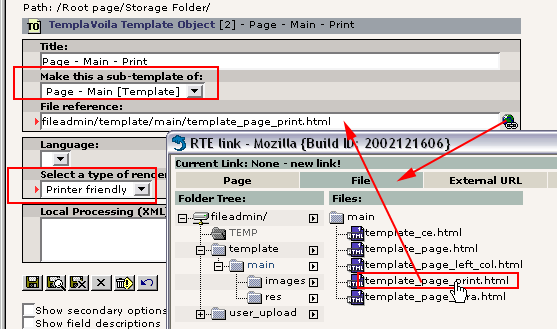
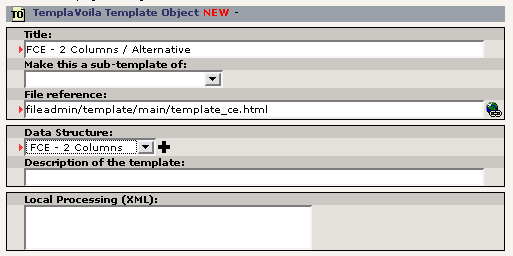
- Make sure to make the template a sub-template of the main template! This means that this template in it self cannot be selected in TYPO3 at other places since it is a special version of another template and automatically selected for its purpose by TemplaVoila.
- Set the file reference to the print version available.
- Select the type of rendering to “Printer Friendly” - this will instruct TemplaVoila to use this TO record if the “&print=1” parameter is set and the main template will be used otherwise.
Then save and close.

Now, click the icon of the new TO record again and select TemplaVoila:
Then you will see that the DS from the main template is indeed selected but no mapping information has been collected as of yet - obviously, since the TO is brand new and we are going to do the mapping now!
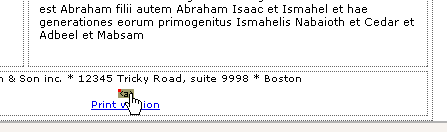
Now, do the mapping, just like you did with the main template, just leave the “Main menu” element out. When you are done, press the “Preview” button - this will show you that the “Page content” sample data is inserted:
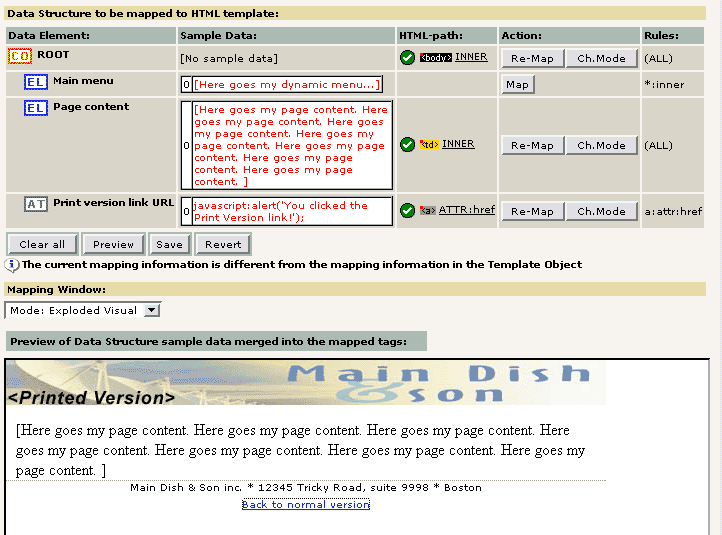
You can even click the “Back to normal version” link and a little JavaScript Alert will pop up!
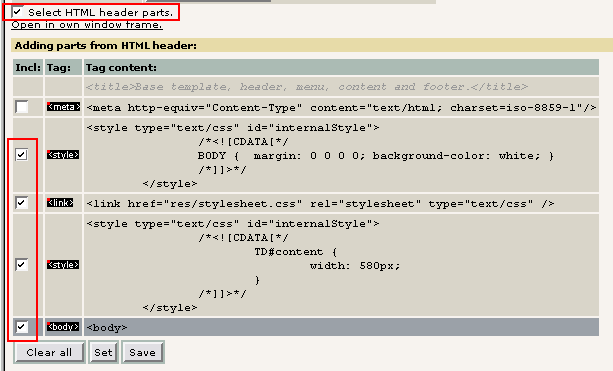
Before you are done, enable “Select HTML header parts” and do your selection there:
Then press “Save”.
You are done! When you click the link in the bottom of the frontpage you will see the print version right away!
(If you don't see this, make sure that you didn't forget to paste in the TypoScript code in the previous chapter!)
Alternative template for a sub section
In this example we want to create an alternative template for a sub section of the website:
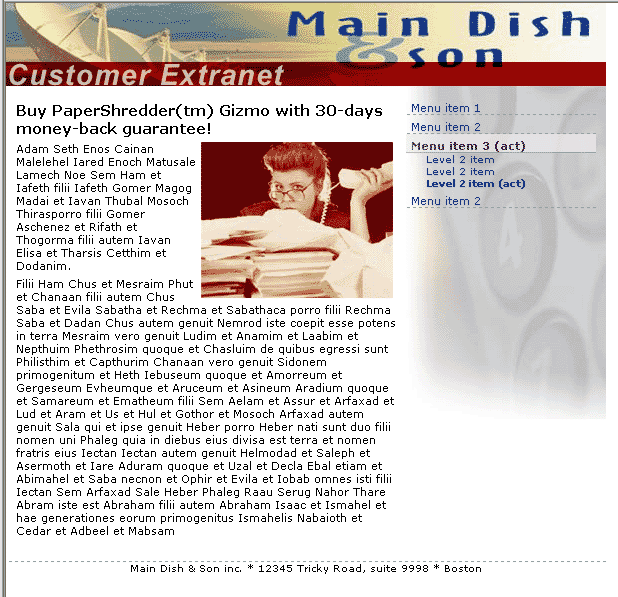
(This template is the file “template_page_xtra.html”)
The section will be an extranet for customers and password protected as well - but that is not relevant here. All we want to know is - how can we enable TYPO3 to select an alternative template for a section of the website?
In this case it is very easy - it turns out that this template design can use the same Data Structure as the main template.
Create a new TO
Basically the steps are the same as for the print version template; create a new TO. But there are some different settings:
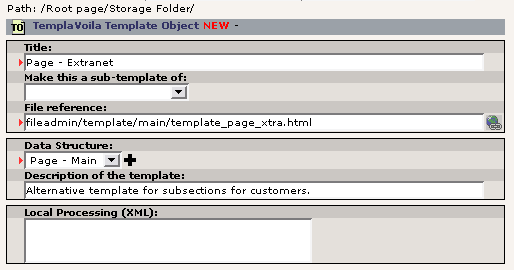
Notice:
- The main Data Structure has been selected for the TO
- This is not a sub-template of any other - thus it will be a fully valid alternative to the main template for pages!
Now, save and close. Then click the TO records icon and select “TemplaVoila”. You should now begin mapping the elements:
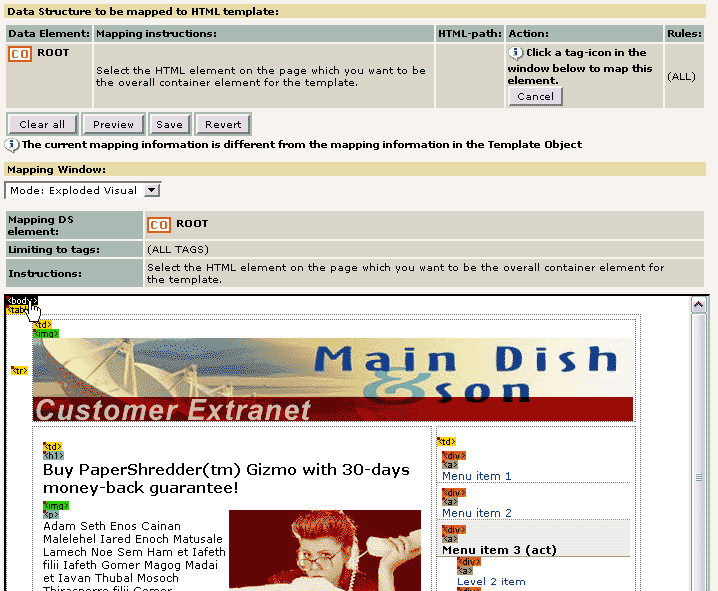
When you are done the Data Structure listing should look like this:
You can see that the “Print version link URL” has not been mapped - since there was no such link in the template file.
Remember to also select the appropriate header parts to include:
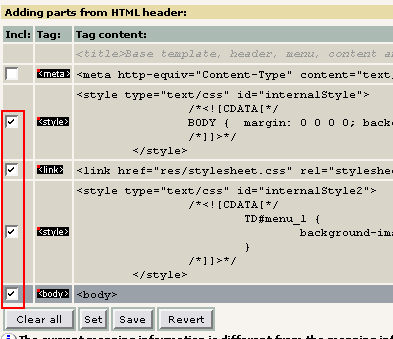
... and Save.
Select the alternative templates for a sub section
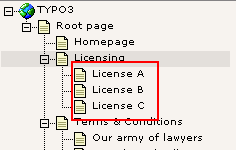
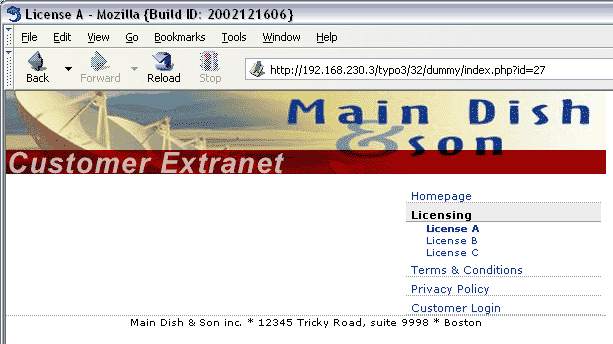
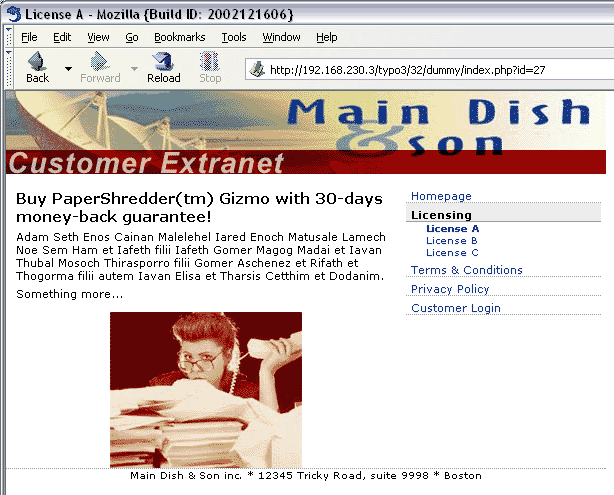
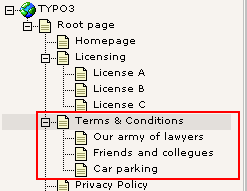
You want to apply this template to all subpages of “Licensing” page - basically those marked here:
To do so, edit the page header of the “Licensing” page:
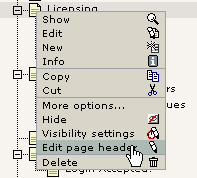
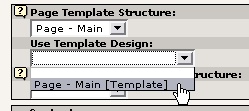
In the page header, set “Subpages - Page Template Structure” to “Page - Main” (which it basically already is, inheriting from the root page, but...:-)
Then select the Template Design (TO record) labeled “Page - Extranet”:

Thats all!
If you wanted to include the page “Licensing” in the section having the alternative template design you could have done so by setting the value of the “Page Template Selector” rather than “Subpages - Page Template Selector”.
Dummy content on the page?
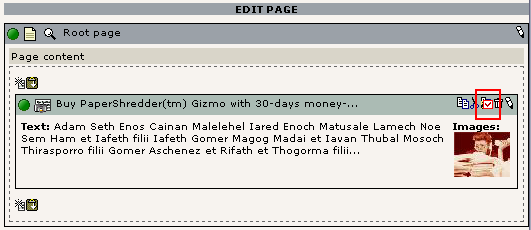
Well, maybe we were a little hasty. What about putting some content elements on the page to test?
See, in this case you cannot just copy/paste elements as you are used to. Remember, for TemplaVoila it is not enough to just copy a content element onto a page - you have to bring it into the hierarchy of references going from the page to the elements. But this is easily done. Just use the new Web > Page module that TemplaVoila provides:
With that module, go to the root page and click the “Reference” icon:
Then go to the “License A” page and click the paste icon:
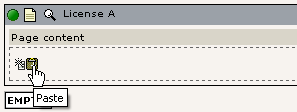
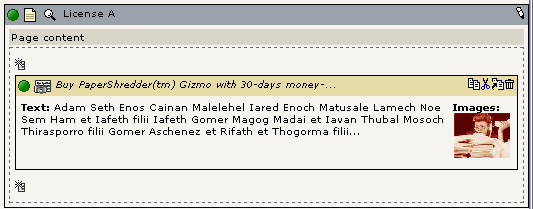
What you will see now is a reference created to the element on the root page - thus the two pages are sharing a content element! The reference is yellow because the content element is located externally from this page - namely on the root page!
Testing the frontend again brings even better results:
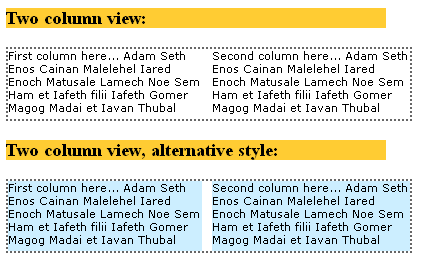
Creating a two-column page?
What about that? Two columns on a page. Or even more. Or “zones”. Or... you name it!
None of this is a problem for TemplaVoila - rather it is the very reason for its existence - the need for this kind of extreme flexibility.
In the case of a two-column layout there is a template file, “template_page_left_col.html”, which contains an additional left column under the menu.
We are now going to create a new DS and TO after the same principles by which we made the main template:
Now, you do the mapping of the ROOT, Page content and Menu element just like with the main template. No changes.
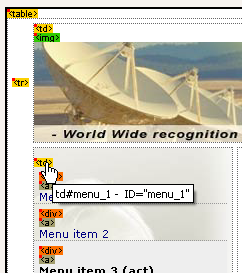
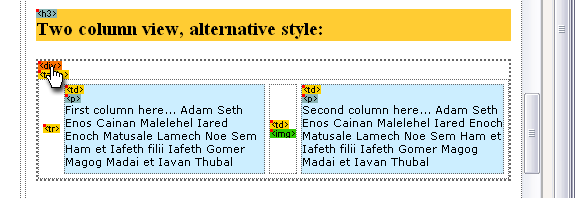
During the mapping process we find that the old way of mapping to the menu is not possible anymore without wiping out the <div> tag which is surrounding the left column. The reason is that both the menu and the left column <div> sections are in the same <td> tag. This is illustrated in this screenshot.
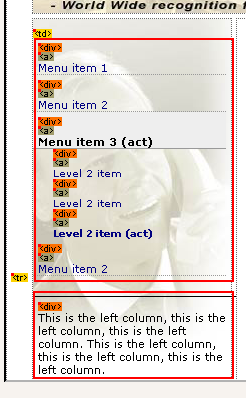
We could now change the template HTML to yield a better structure for our mapping needs. In some cases that is needed. However, we can in fact map this anyways using a mapping mode known as “range”. To map the menu you simply click the first <div> element and in the mapping mode selector you select the second-last <div> tag - thereby indicating that you want to grab all the <div> tags from the one you clicked and to the one selected.
For the left column <div> its just trivial mapping, no adventurous features to use there, sorry...
Result DS
The resulting DS looks like this:

In this case we were too lazy to add mapping instructions and mapping rules etc. However what was very important is the settings for the “Left content” field (field_left) and the “Page content” field (field_content). There are two major points:
- “Page content” and “Left content” should both have the Editing type “Content elements”. This is necessary if you want TemplaVoila to allow content into the cells!
- You should use “field_content” for the “Page content” field name (while for the “new” column, “Left content” you can choose any you like). The reason is that you gain compatibility between this data structure and the main data structure if you use the same field name - otherwise reference information to content elements will be lost! Obviously.
Finally, you create the DS and TO:
Before you are done with the DS / TO work you have to
- Set which header parts to include for the TO
- Modify the DS XML so “lib.menu_1” is referred to.
You can do that now.
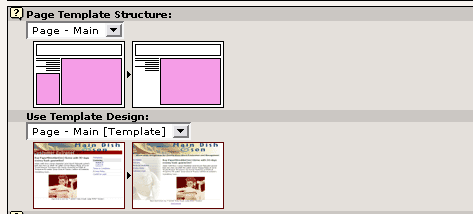
Setting the new Page Template Structure
We want to apply the two-column design to this section of the website:
Just like with the Extranet template we edit the page header of “Terms & Conditions”. Notice how we have two possibilities for Page Template Structures:
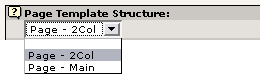
As soon as you select the Template Structure “Page - 2Col” and save you will see that the FlexForm field called “Content:” changed to include two content element fields!
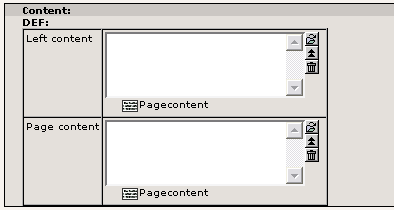
This shows a glimpse of what FlexForms can offer since the content of these two fields are stored in an XML data structure in a single database field rather than two separate - thus there are no limits to how many fields you can have in a form and how much nesting you can apply to them. Anyways, more about this later.
Before you exit the page header you must also select the template on the second pass:

Adding dummy content again
Before we test our solution we will create a few references (or copies if you like) of the dummy content element on the frontpage. We notice how the Web > Page module has automatically reflected the reality of two content columns which is now the case for the section “Terms & Conditions” on the website:
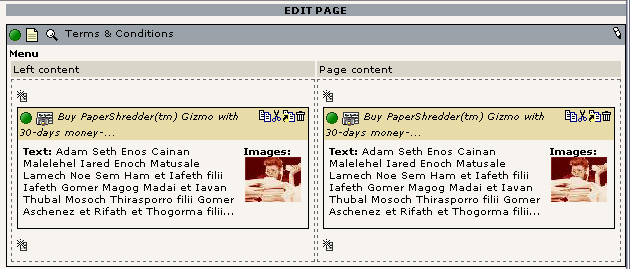
Now, we can preview:
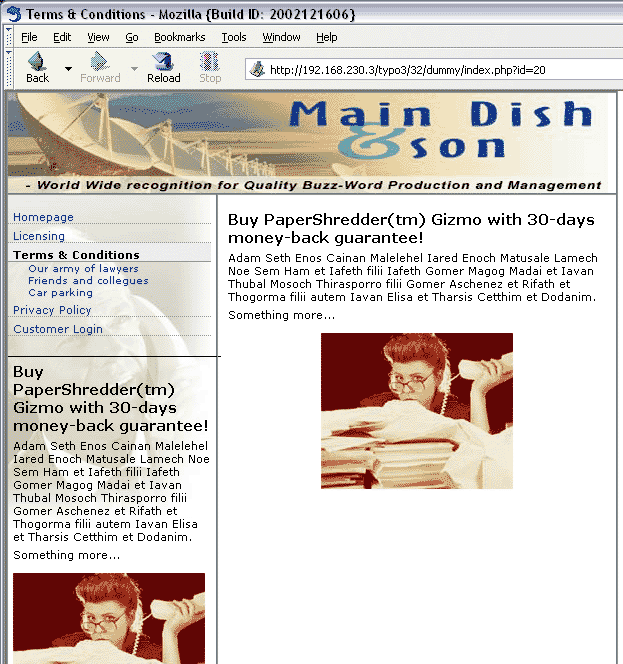
Precisely as it should be... :-)
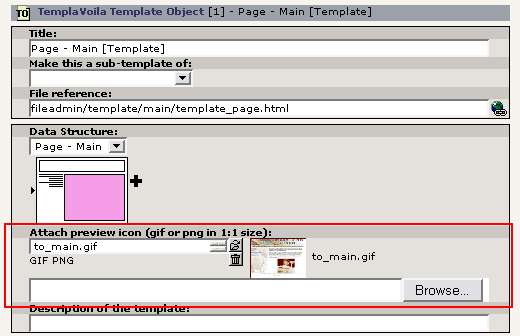
Icons for TOs and DSs
A really nice touch of DS and TO records is that you can attach icons to them which and used in the forms where people select them as templates/data structures.
Consider this example:
This is the root page of the website we are working on here. All that is done to it is that the DS and TO records has got icons attached to them - which are in turn shown here.
By using icons for the Data Structure you can easily describe the abstract mode of a Data Structure; basically what possibilities there are. And for Template Object you can show people which designs are available for the selected Data Structures.
For both TO and DS record there are fields for the icons in their records. Just make sure to prepare the icons first; they are not automatically rescaled by the system:
“Flexible Content Elements”
Now you have seen how TemplaVoila provides a point'n'click interface to templating the overall structure of a TYPO3 based website. And why not take this concept to other levels!
A natural extension is that a new kind of content element is born - a content element of the type “Flexible Content” - or “Flexible Content Element” (FCE).
This kind of element has an arbitrary amount of data fields using FlexForms and Data Structures. On top of it all it is rendered in the frontend using Template Objects.
For our example here there is a template file which contains a set of templates for such “Flexible Content Elements”; template_ce.html. It looks like this inside:
The idea is that a single file contains small templates for numerous Flexible Content Elements - this is to save space and present them in a “natural environment”.
Creating a basic Flexible Content Element (FCE)
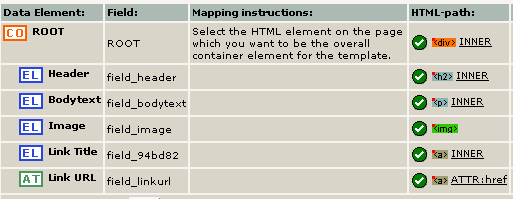
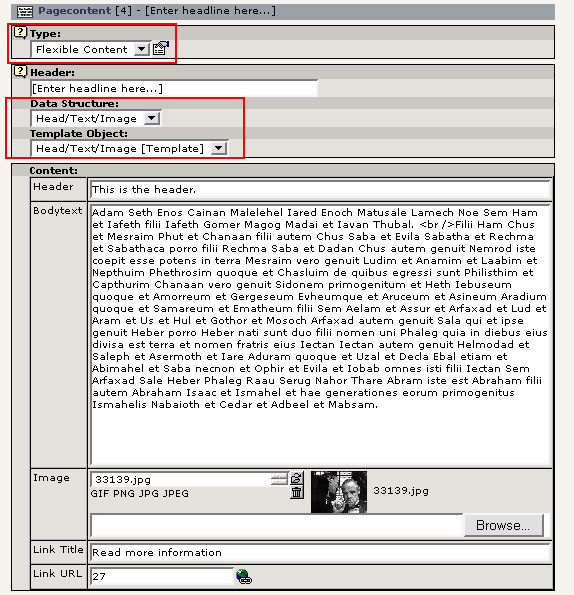
First we will create a Flexible Content Element (FCE) with a Header, Text, Image and a link.
The first step is - like with the page template - to go to the File > Filelist module, click the template file, select “TemplaVoila” and then begin to build the Data Structure that fits our needs. We will do so here as well.
Hint: If you experience that old mapping information is shown to you in the module, then just press “Clear all” and it will be gone.
The ROOT element
When mapping the ROOT element you will have to choose differently than the <body> tag for once. Because in this case the container element is not the <body> tag but the <div> tag which has been wrapped around each FCE for convenience and order:
Child elements
Then you create the fields you need in the DS:
For each of these we have been a bit too lazy to supply good mapping instructions, rules and sample data. This is what happens... :-)
We have a few comments though:
- Fieldnames: Notice the “Link Title” field - that has become a field name “field_94bd82” which is random. AVOID THIS! Rather delete such an entry and use carefully designed names. In particular, REUSE those fieldnames across your collections of FCEs since that enhances the internal compatibility.
- Editing Types: For each fieldname we have selected an Editing
Type. The Editing Types are presets which defines what default
configuration the element will get in the DS. An example we already
know was how to set editing type to “Content Element” or “TypoScript
Object Path”.We want to comment on those we have set here:
- Header: The Editing Type is “Header field” - this will be the same as plain input although it might allow for a typolink
- Bodytext: The Editing Type is “Text area for bodytext”
- Image: The Editing Type is “Image field”. Another option was “Image field, fixed W+H” but selecting “Image field” will allow us to insert an image and if TemplaVoila's logic can figure it out it will detect the current width of the image and use that as fixed width - that is nice!
- Link title: Plain input.
- Link URL: The Editing Type is “Link field” - this will make a little box with a link selector wizard which lets us select a link as usual. It will also preset the TypoScript needed to make the link.
After mapping is in place it looks like this:
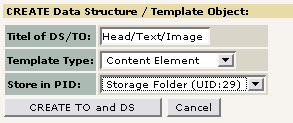
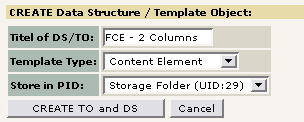
Then click “Save” and press “Create TO and DS” button:
Adding a Flexible Content Element to a page
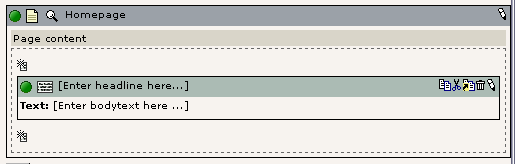
This is done by Web > Page of course by clicking the “New” icon. At some point this will lead you to a wizard! For now you will just get a plain element created straight away:
Now, edit this element, select the Type “Flexible Content”. This will ask you to save which you do. Now you can select a Data Structure. When that is done you save again and you will see this form:
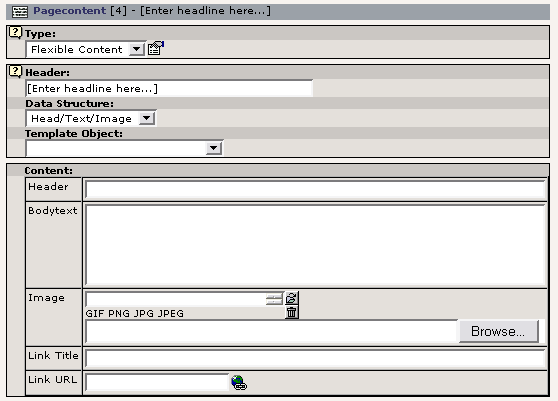
Now, select the Template Object used for the Data Structure - as you did for page templates! - and fill in the form with content. You can preview immediately with “Save Document and View”:
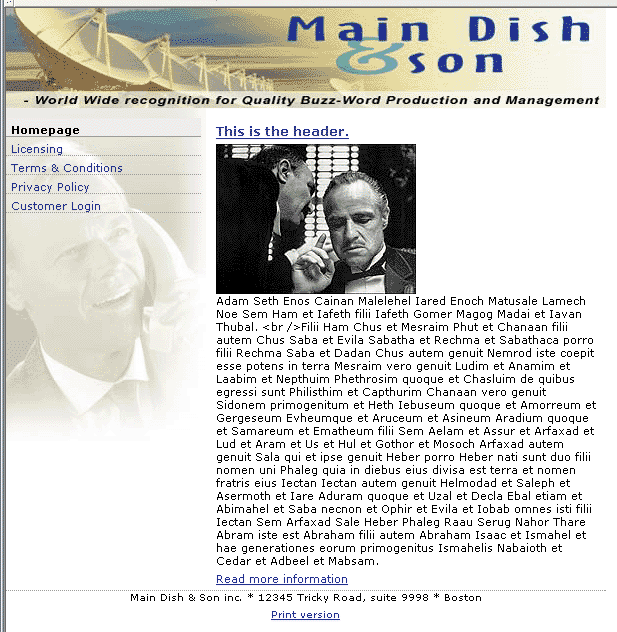
Result:
Something we forgot
It turns out that we forgot to add possible header parts to the TO record. Lets do that:
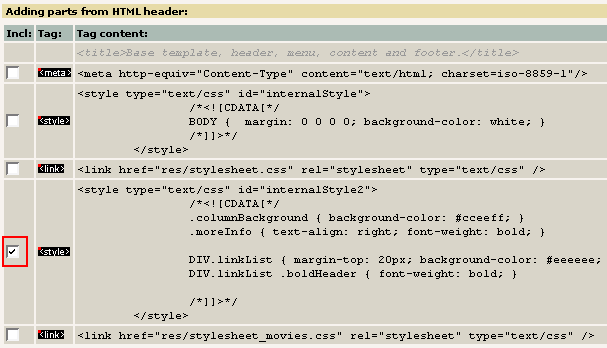
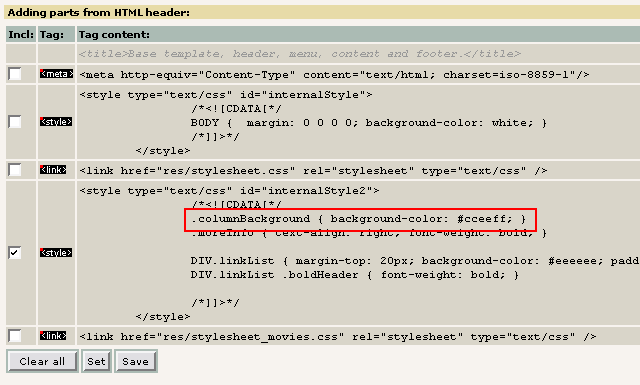
This time we avoid the two first stylesheet definitions because they are just a part of the main template which happens to wrap these examples of elements; no need to select them again - even though it wouldn't make any difference since they are automatically detected as included if they are exactly the same.
Then, the last stylesheet is not included either - we happen to know that it contains styles which are only active for the last template.
Adding image parameters
Another problem is that the image tag of the image has not been preserved but re-generated by TYPO3. And in that process we lost a few attributes, in particular ' align="right" style="margin-left: 10px; margin-right: 5px;"'
These can be added again by editing the Data Structure - which will reveal something - to us very appealing - namely, TypoScript:
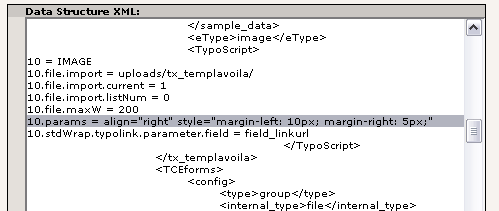
Here we just modify the code listing with a single line (the one highlighted above):
10.params = align="right" style="margin-left: 10px; margin-right: 5px;"
That does it and the image is now displayed correctly:
The link
Another note to this example is that the header and the image has automatically picked up the data from the link URL field as link source - this is just the default behavior, you can of course remove and customize it all - in the Data Structure of this FCE:
<T3DataStructure>
<ROOT>
<tx_templavoila>
<title>ROOT</title>
<description>Select the HTML element on the page which you want to be the overall container element for the template.</description>
</tx_templavoila>
<type>array</type>
<el>
<field_header>
<tx_templavoila>
<title>Header</title>
<sample_data>
<n0>This is a header...</n0>
</sample_data>
<eType>input_h</eType>
<TypoScript>
10 = TEXT
10.current = 1
10.typolink.parameter.field = field_linkurl
</TypoScript>
</tx_templavoila>
<TCEforms>
<config>
<type>input</type>
<size>48</size>
<eval>trim</eval>
</config>
<label>Header</label>
</TCEforms>
</field_header>
<field_bodytext>
<tx_templavoila>
<title>Bodytext</title>
<sample_data>
<n0>Body text Body text Body text Body text Body text Body text Body text Body text Body text Body text Body text Body text Body text Body text Body text Body text Body text Body text </n0>
</sample_data>
<eType>text</eType>
<proc>
<HSC>1</HSC>
</proc>
</tx_templavoila>
<TCEforms>
<config>
<type>text</type>
<cols>48</cols>
<rows>5</rows>
</config>
<label>Bodytext</label>
</TCEforms>
</field_bodytext>
<field_image>
<tx_templavoila>
<title>Image</title>
<sample_data>
<n0></n0>
</sample_data>
<eType>image</eType>
<TypoScript>
10 = IMAGE
10.file.import = uploads/tx_templavoila/
10.file.import.current = 1
10.file.import.listNum = 0
10.file.maxW = 200
10.params = align="right" style="margin-left: 10px; margin-right: 5px;"
10.stdWrap.typolink.parameter.field = field_linkurl
</TypoScript>
</tx_templavoila>
<TCEforms>
<config>
<type>group</type>
<internal_type>file</internal_type>
<allowed>gif,png,jpg,jpeg</allowed>
<max_size>1000</max_size>
<uploadfolder>uploads/tx_templavoila</uploadfolder>
<show_thumbs>1</show_thumbs>
<size>1</size>
<maxitems>1</maxitems>
<minitems>0</minitems>
</config>
<label>Image</label>
</TCEforms>
</field_image>
<field_94bd82>
<tx_templavoila>
<title>Link Title</title>
<sample_data>
<n0>My Link</n0>
</sample_data>
<eType>input</eType>
<tags>a</tags>
<proc>
<HSC>1</HSC>
</proc>
</tx_templavoila>
<TCEforms>
<config>
<type>input</type>
<size>48</size>
<eval>trim</eval>
</config>
<label>Link Title</label>
</TCEforms>
</field_94bd82>
<field_linkurl>
<type>attr</type>
<tx_templavoila>
<title>Link URL</title>
<sample_data>
<n0></n0>
</sample_data>
<eType>link</eType>
<TypoScript>
10 = TEXT
10.typolink.parameter.current = 1
10.typolink.returnLast = url
</TypoScript>
<proc>
<HSC>1</HSC>
</proc>
</tx_templavoila>
<TCEforms>
<config>
<type>input</type>
<size>15</size>
<max>256</max>
<checkbox></checkbox>
<eval>trim</eval>
<wizards>
<_PADDING>2</_PADDING>
<link>
<type>popup</type>
<title>Link</title>
<icon>link_popup.gif</icon>
<script>browse_links.php?mode=wizard</script>
<JSopenParams>height=300,width=500,status=0,menubar=0,scrollbars=1</JSopenParams>
</link>
</wizards>
</config>
<label>Link URL</label>
</TCEforms>
</field_linkurl>
</el>
</ROOT>
</T3DataStructure>
Creating a “grid” Content Element
With TemplaVoila you might not even need to consider a two-column layout of a page for something you add on the page template level - you can just as well integrate it with a content element being the placeholder for two columns. This is the case in the next example:
The mapping process is the same as above, just remember to clear the old mapping first...:
For each field we chose “Content Element” for Editing type.
Then we save:
On the page from before we can now create a new FCE based on the DS “FCE - 2 Columns”:
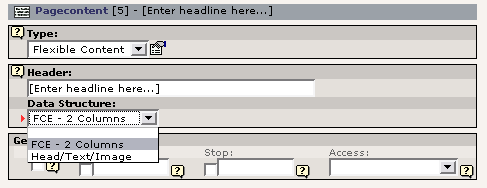
Of course this will yield a form like this with two form fields ...
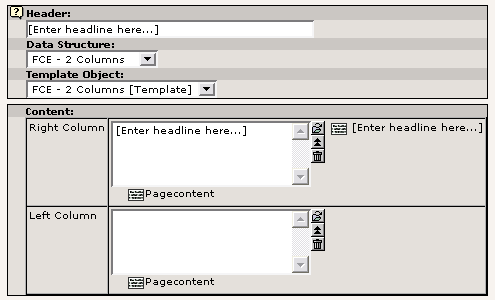
... which we will leave over to the Web > Page module to fill in:
(BUT remember to set the “Template Object” field!!!)
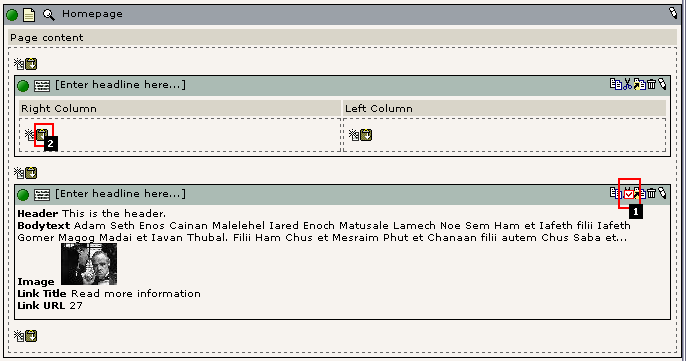
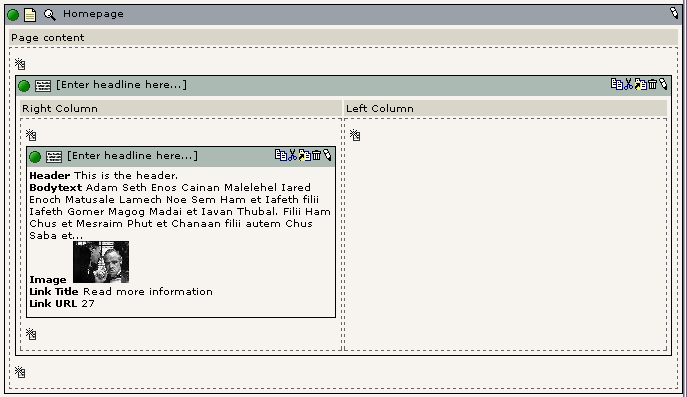
Of course we will move the current element into one of the columns as shown above (Click #1, then #2) and the result is:
NOTICE: Forgetting the Template?
One thing on the ToDo list is enhancement of the DS / TO selection. There are some ideas. For now, just be warned - it is very easy to forget to set the TO value after having set the DS value. If you forget it you just get a blank spot - which is rather confusing... will change soon...
Creating an alternative template for the 2-columns FCE
You have done this before with the main page template - created an alternative TO. This basically works by creating just a TO and not a DS along. So instead of going to the File > Filelist module and starting TemplaVoila's mapping engine from there you should just go to the sysFolder, create a TO record, set the template filename and map it:
Then to and map the TO:
Don't forget to include the custom style section:
Then, press “Save”.
You might want to add icons for the TO and DS just like you did for the page templates.
Using the Alternative template
Now, edit the “2 Column” content element you have created:

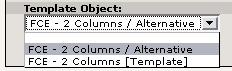
Then you see that there are now two templates for the “FCE - 2 columns” data structure:
We have also added DS and TO icons here. The DS icons still convey the overall concept of the possibilities of the element while we have communicated the difference in the background color of the two templates for the TOs.
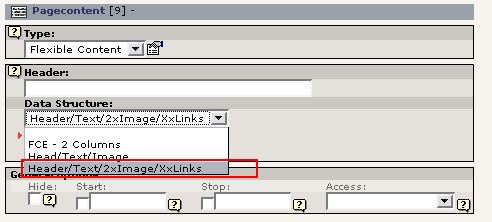
Content Element with repetitive data objects
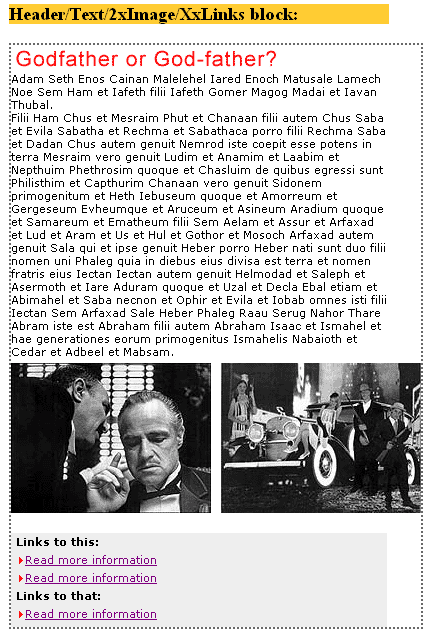
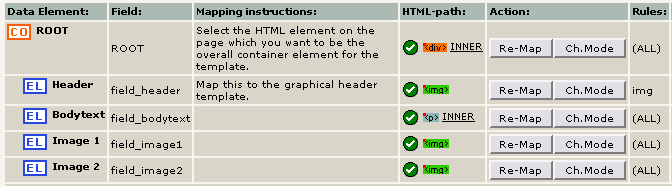
The next example is a little more advanced. The most trivial thing is basically the two images and the bodytext. But the header is a graphical header and below the two fixed images you see a list of links repeated , even with optional titles in between:
So we can express the data structure that is needed like this:
- 1 Header - graphical
- 1 Bodytext
- 2 Images
- ? number of a) Title text or b) text-link with image bullet
Mapping the DS and TO
In the File > Filelist module you select TemplaVoila for the template file “template_ce.html” and for the ROOT element you map to the <div> tag of the block:
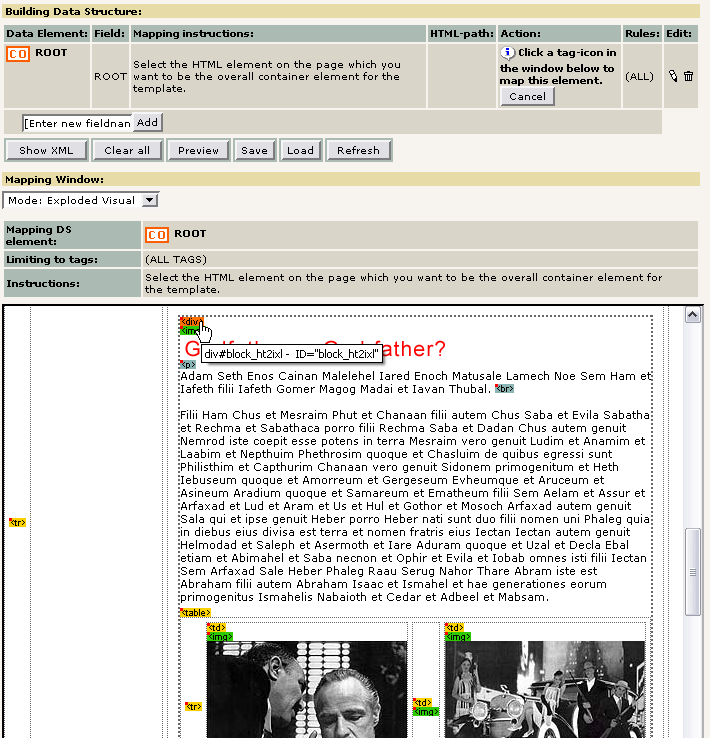
Then you create the Header element:
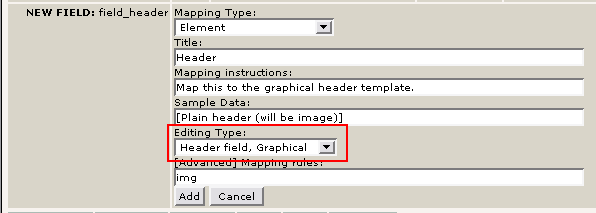
Notice that the header DS element has two significant attributes:
- Fieldname: It (re-)uses the field name “field_header” - thus striving for compliance with other Flexible Content Elements (so you can change type of Data Structure without loosing the current header information)
- Editing Type: It uses “Header field, Graphical” - and it will try to read image information about the current graphical title for the template and use as much information from that as possible in order to provide some default GIFBUILDER configuration. More details later...
- Mapping rules: Maps only to <img> tags.
Do the mapping and you should see:

Now, create the elements for bodytext and the two images (fieldnames could be “image1” and “image2”) by following the way you did with the cases in previous chapters:
Creating the repeatable data objects
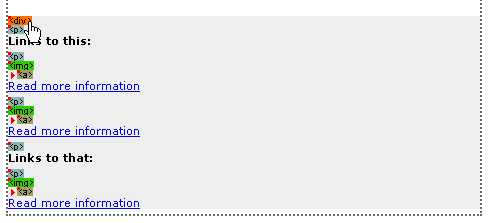
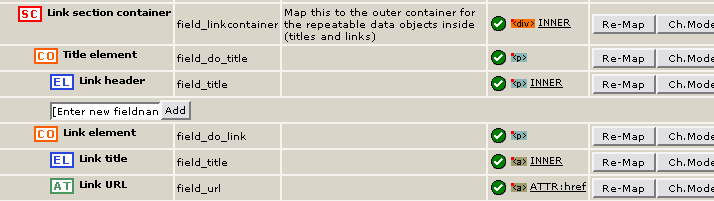
For the list of links you have to think a few minutes about what is required to create this; We have two basic kinds ; a Title element (#1) and a Link element (#2). We want to be able to create any number of these elements in any order:
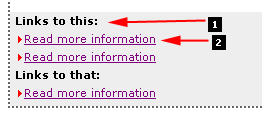
In order to realize the involved complexity of templating look at this screenshot:
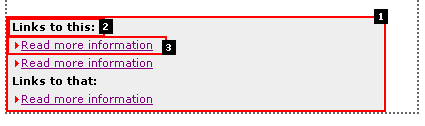
The two inner data objects: When we are going to do templating for the inner data objects (Title and Link elements) we will map templates from only one of the examples provided for each (#2 and #3 above) - the additional examples below play no role.
Structure of each inner data object: Obviously the Title element will have at least a “Title” field. Likewise the Link element will have at least a “Link title” and “Link URL” field - ergo, we have to define each data object as a collection of fields which go together - this is handled by the DS element type called “container”.

The container element: Finally, we have to remember that the dynamic content has to go into the overall container element of this section (#1). This means we have to create an element for this container element so such a substitution can occur. This is handled by the DS element type called “section” (array + section flag set).

Creating the “section” DS element:
In the mapping process we first create a “section” DS element:
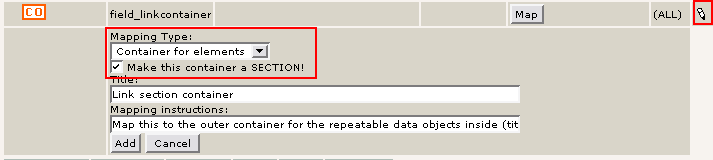
Notice that such a “Section” element (SC) must be created by first creating a “Container” element (CO) and then re-editing and selecting the flag “Make this container a SECTION!”. See above.
Now, do the mapping by clicking the <div> tag which the designer has gently wrapped the link list in:
Select the “INNER” mapping mode. After doing that you will see the Link container section and a field to add DS elements on a new level in the structure!
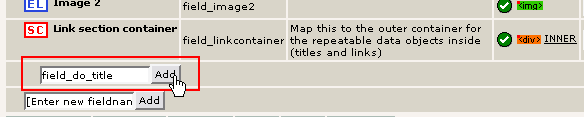
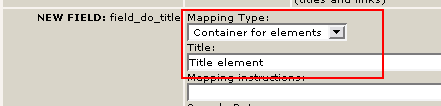
Create the field “field_do_title” (“do” for “Data Object”). This time, make it a “Container for elements” (but do not re-edit and check the section flag of course).
And the same for “field_do_link”:
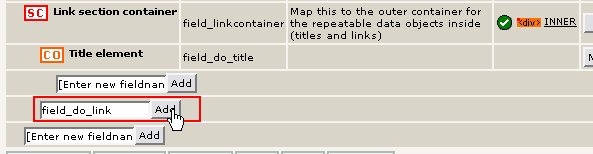
The result should be:
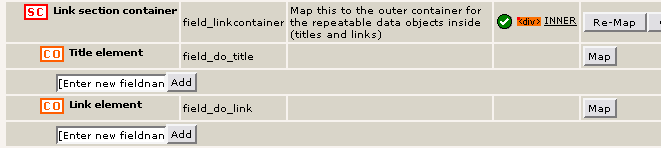
Now, for each of the two “data objects” - or “Containers for elements” - you create a Title field (for the “Title element”) and Link title / Link URL fields for the “Link element”. In the case of the Link URL field you should select the DS Element type “Attribute” (since you want to map it to the attribute of an <a>tag; <a href=””>). The result will be:
Mapping the hierarchical structure
Then you begin to map. For the “[CO] Title element” you map it into the <p> tag which apparently is the “container” tag for the text:

Notice: In this case you want to make an “OUTER” mode mapping - since you want to include the <p> tags in the Title element container:
Now, you do the same for the Link element, also clicking the <p> tag which contains the whole data object:
Do the same as for the Title element regarding mapping mode; make sure to select “OUTER” (which includes the <p> tag as a part of the section.
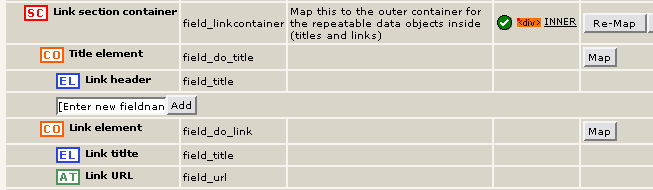
Finally, map the header, titles and links attributes (as you have done before):
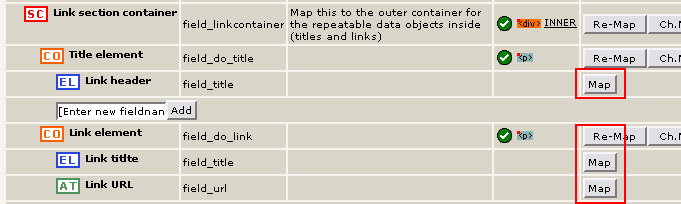
For “Link header”, click the <p> tag:
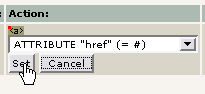
For “Link title”, click the <a> tag:
For “Link URL” click the <a> (like above) and select the “ATTRIBUTE href”:
The mapping is complete and you should see this result:
Now, save the DS and TO you have build. Click the Save button and then enter a new name:

Creating a content element using the new DS / TO
Well, create a Flexible Content Elements with the Data Structure “Header/Text/2xImage/XxLinks” (you might have found a better name by now!):
After saving the element you will see this form:
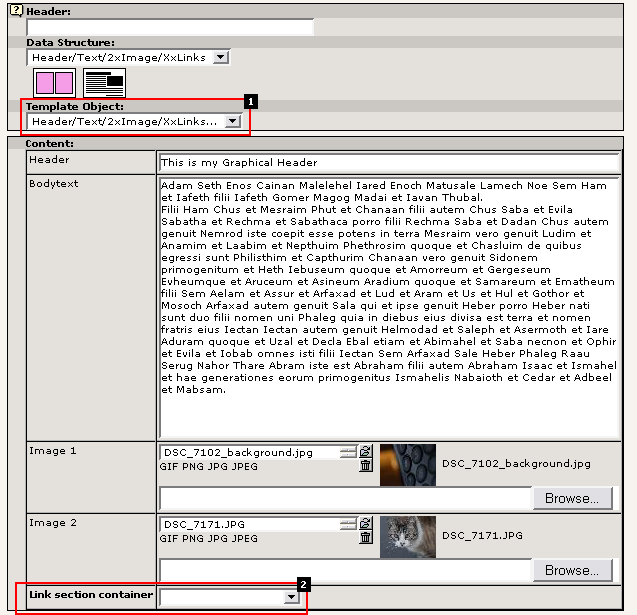
We have filled in the form with dummy content as you can see. For the Header, Bodytext and the two image fields you see nothing new really - except the amazing fact that this totally improvised data structure is impossible without adding fields to the database but solely with a Data Structure definition saving the content into XML... :-)
But there are two things you should notice especially;
- #1: Make sure to select the Template Object - as always!
- #2: At the bottom of the form you will see a selector box representing our “Section” element - the overall container for the link section.
Creating multiple data objects in random order and amount
Open the “Link section container” selector. What you see is the two “data objects”; “Title element” and “Link element”:
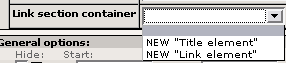
For each time you add one of these elements you have to save the form. And unfortunately the handling of the order is not that flexible at the moment; you are currently working on beta version of FlexForms.
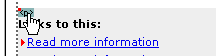
After creating some elements you will see this:
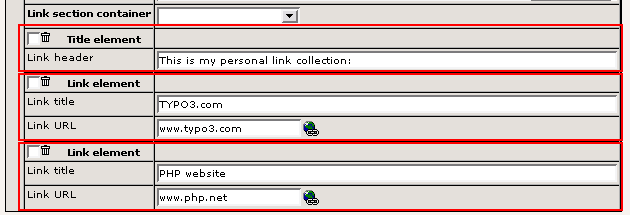
The interface is still a little confusing visually but we will soon improve it. Anyways, you can clearly see that we have created a link header and two links.
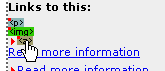
All you need now is to view the element in the frontend. Should look like this:
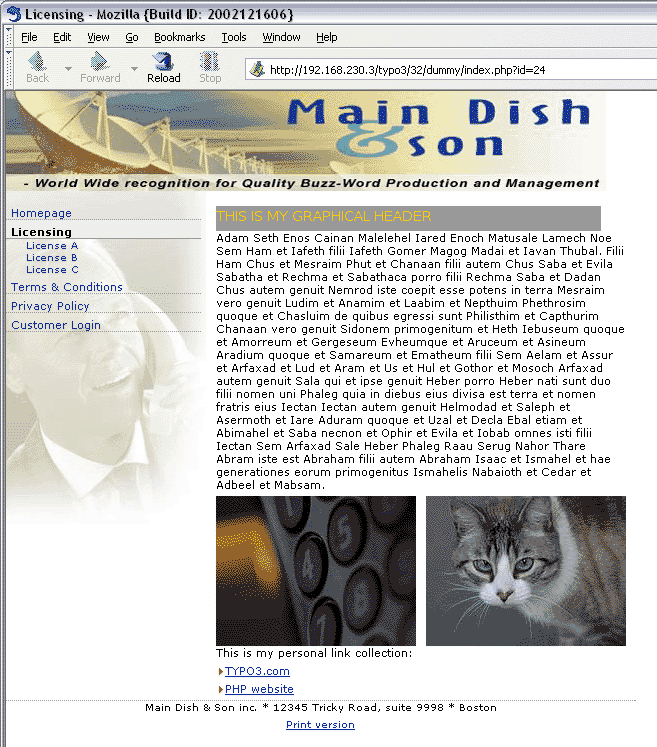
As you can see the links are there... :-)
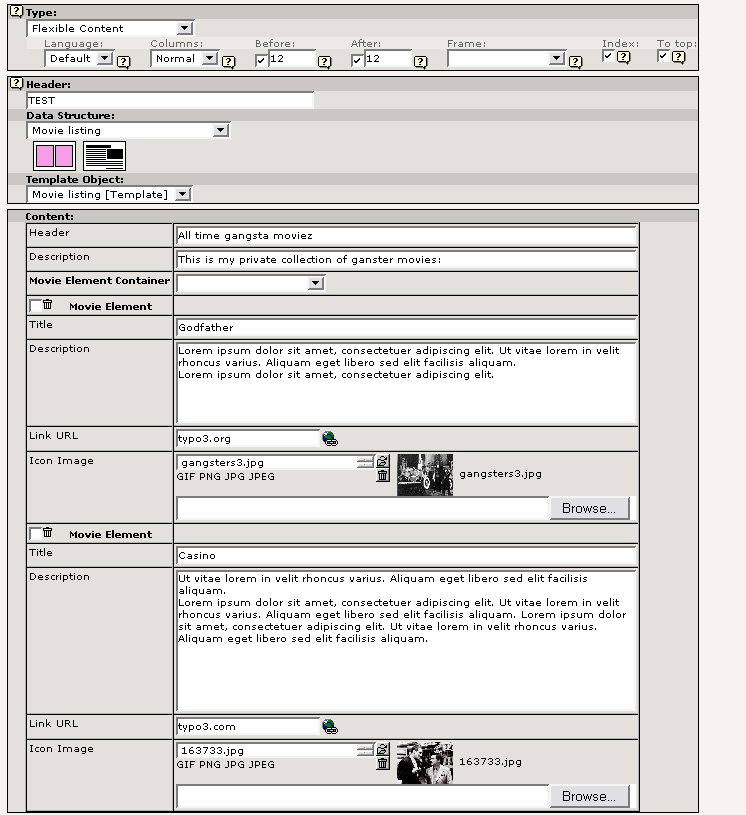
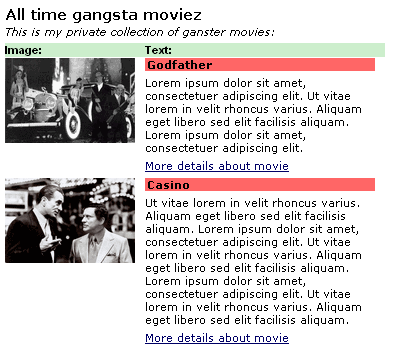
Creating a “pseudo-record” list
This example is basically another example of hierarchical data structures. This is your second chance to practice and understand the principles from the former case with “repetitive data objects”.
In this case we will implement this design as a single content element:
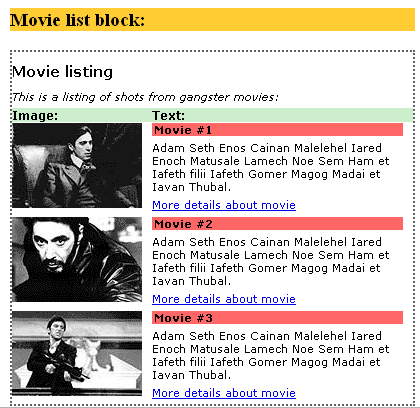
We can express the data structure that is needed like this:
- 1 Header
- 1 Description
- ? number of “movie-element” consisting of
- Title
- Description
- Link URL
- Image (fixed dimensions)
Contrary to the former element where we had either a title or a link as data objects we have only one type here; the “movie-element”.
Let's begin the creating of the Data Structure (DS) / first Template Object (TO).
Creating the DS / TO
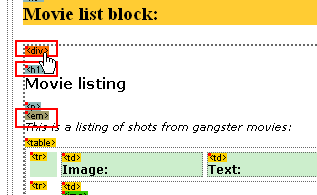
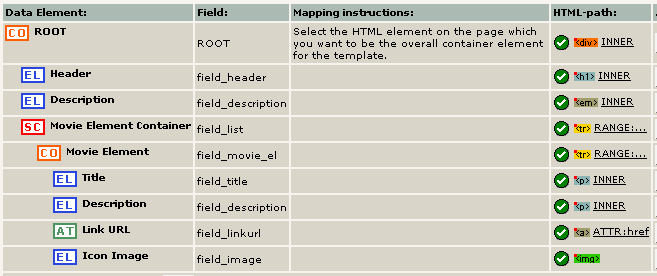
The ROOT element of the DS is mapped to the DIV tag which has been placed there for that purpose. The header and description fields are mapped to the <h1> and <em> tags respectively.
The DS looks like this now:

(Notice, the all have INNER mode which is the most typical when mapping content into HTML).
Next steps is to create a new Section element in the data structure. Remember the process; First create a “Container” type element, then edit the settings and check the “Section” flag. The Data Structure should look like this now:
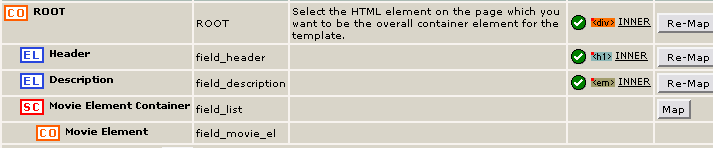
Now, map the two elements. The Section element (field_list) must be mapped to the inside of the HTML element which should wrap around the repeated movie elements inside. When we click the Map button we see this:
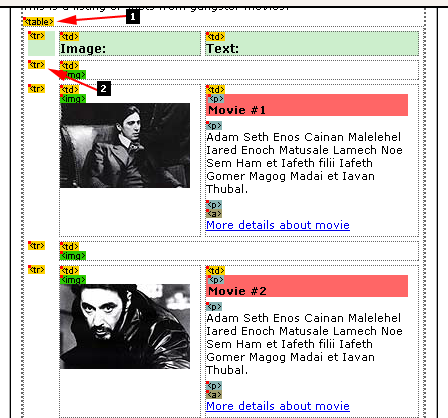
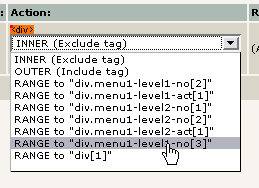
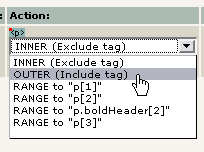
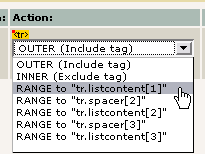
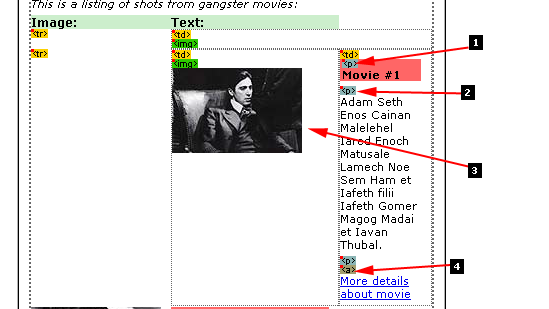
Normally, mapping to the <table> tag would be a good choice (#1) since that wraps the table rows which are repeatable. However we would loose the header row then! Bummer! So instead you map the Section element to the second <tr> tag (#2 - first content row) and in the Action selector you select the last of the RANGE types:
This actually means that your mapping will span over several HTML elements on the same level effectively cutting out all the table rows except the header row! Cool, eh!
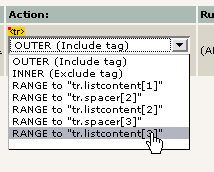
Next, you are going to map the movie element (field_movie_el) and again you will have to use the RANGE action for mapping since each movie element must contain two table rows; the spacer row above the element and the element row itself. That is no problem though, using the technique from before:
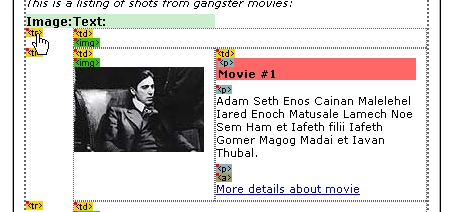
After clicking the first row, you select the range to be the next row:
The result of the mapping looks like this:

Finally, you create the four field types inside the movie element:
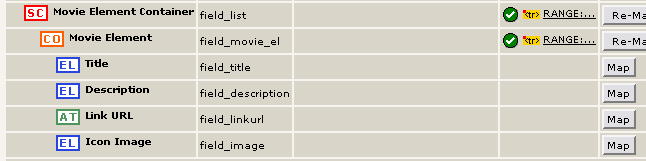
Editing Types used:
The Title element (field_title) was a “Plain input field”
The Description element (field_description) was a “Text area for bodytext“
The Link URL field (field_linkurl) was a “Link field” (and notice the DS element type is “Attribute”!)
The Icon Image field (field_image) was a “Image field, fixed WxH”
Each element should be mapped according to this (match the numbers with above list!):
Mapping #1 and #2 is the INNER type (content should go INTO the tag), mapping #3 is fixed to OUTER (no other options for an image tag) and mapping #4 is an attribute, should be the “href” of the <a> tag. Result looks like:
Except the fact that I have been too lazy to provide mapping instructions (important information for someone who is going to map a second TO) and sample data this looks good. Now click “Save”, give it a name and that's it.
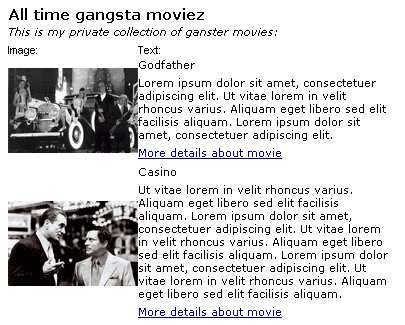
Testing the new Content Element
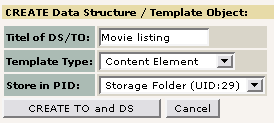
Create a new content element of the “Flexible Content” type and select “Movie listing” as Data Structure. Then fill it in with content - and don't forget to select the template object as well!
In the frontend you will see something like this:
Fixing the stylesheet
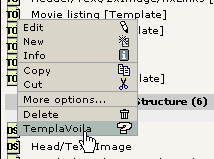
One final thing - we forgot to include any special parts of the header for this element - apparently the styles does not match the ones in the template file. So enter TemplaVoila by clicking the icon of the Template Object:
Then select “Select HTML header parts” and click the checkbox at the last stylesheet (which apparently is specially designed for this particular content element!)
Clear cache and check the frontend again; this fixes the problem... :-)
Miscellaneous
Working with TypoScript inside of Data Structures
When you map an element from a Data Structure to a position in HTML it is expect that some dynamic content is inserted in that position at render time. There are various ways of determine the output:
- By default the field content is inserted directly. Possibly configured with a few available flags like “htmlspecialchars()” processing, integer conversion or passing to stdWrap function (known from TypoScript)
- Alternatively, you can enter a TypoScript content object array (COA) which will be executed. This can be used for building menus, graphics or just plain processing if you please. In this way you work with TypoScript in the context where it is used.
- Alternatively, you can also call a TypoScript object path from the main TypoScript Template of your website. This means you keep your TypoScript at a central place.
Default pass-through of content
In this example the content of the field “field_paragraph” is processed only by htmlspecialchars() because the <HSC> tag is set in line 106:
  98:                   <field_paragraph>
  99:                           <tx_templavoila>
 100:                                   <title>Paragraph</title>
 101:                                   <sample_data>
 102:                                           <n0></n0>
 103:                                   </sample_data>
 104:                                   <eType>text</eType>
 105:                                   <proc>
 106:                                           <HSC>1</HSC>
 107:                                   </proc>
 108:                           </tx_templavoila>
...
 117:                   </field_paragraph>
The options for default processing in the <proc> tag applies to all content (even that coming from TypoScript or TypoScript Object path tags) outputted and the options are:
- <int> (boolean) - Forcing to integer before output
- <HSC> (boolean) - Passing through the PHP function “htmlspecialchars()” which will provide protection for use of HTML and XSS attacks.
- <stdWrap> (array) - stdWrap processing
TypoScript object path
Image processing
You can also use the <TypoScript> tag to perform processing on the values.
Before writing TypoScript you will need to know that
- The value of the tag in the context of that TypoScript is found as the “current value” in TypoScript.
- The value of all tags in the Data Structure from the same level is found in the internal data array and can be addressed with the “.field” attribute of stdWrap
   9:                   <field_image>
  10:                           <tx_templavoila>
  11:                                   <title>Image</title>
  12:                                   <tags>img</tags>
  13:                                   <TypoScript>
  14: 10 = IMAGE
  15: 10.file.import = uploads/tx_templavoila/
  16: 10.file.import.current = 1
  17: 10.file.import.listNum = 0
  18: 10.file.maxW = 266
  19:                                   </TypoScript>
  20:                           </tx_templavoila>
...
  35:                   </field_image>
In the example above you can see how the field “field_image” from the Data Structure is processed as if it contains an image. The TypoScript configures the path of the image (line 15), loads the “current” value (line 16) and selects the first image in the list (should there be more than one) (line 17) and finally the maximum width is set to 266 (line 18)
When you select “Editing Types” during the kickstarting process of DS/TOs this kind of default TypoScript configurations is what you get! You can always edit the Data Structure and change them to whatever you need them to do!
Graphical headers
Now comes a more complicated example. The code here combines two fields into one rendering of a graphical headline where the content of both fields will show up.
Lets look at the code listing:
36:                   <field_header>
37:                           <tx_templavoila>
38:                                   <title>Header1</title>
39:                                   <sample_data>
40:                                           <n0>Lorem Ipsum Dolor</n0>
41:                                   </sample_data>
42:                                   <tags>img</tags>
43:                                   <TypoScript_constants>
44:                                           <textColor>black</textColor>
45:                                           <text2Color>{$_CONSTANTS.colorSet.gray7}</text2Color>
46:                                           <backColor>{$_CONSTANTS.colorSet.white}</backColor>
47:                                   </TypoScript_constants>
48:                                   <TypoScript>
49: 10 = IMAGE
50: 10.file = GIFBUILDER
51: 10.file {
52:   XY = 200,45
53:   backColor = {$backColor}
54:
55:   10 = TEXT
56:   10.text.current = 1
57:   10.text.case = upper
58:   10.fontColor = {$textColor}
59:   10.fontFile =  {$TSconst.font_bold}
60:   10.niceText = 1
61:   10.offset = {$textPosition}
62:   10.fontSize = 20
63:
64:   20 = TEXT
65:   20.text.field = field_header2
66:   20.text.case = upper
67:   20.fontColor = {$text2Color}
68:   20.fontFile =  {$TSconst.font_light}
69:   20.niceText = 1
70:   20.offset = {$text2Position}
71:   20.fontSize = 18
72: }
73:                                                           </TypoScript>
74:                           </tx_templavoila>
75:                           <TCEforms>
76:                                   <config>
77:                                           <type>input</type>
78:                                           <size>48</size>
79:                                           <eval>trim</eval>
80:                                   </config>
81:                                   <label>Header (colored)</label>
82:                           </TCEforms>
83:                   </field_header>
84:                   <field_header2>
85:                           <type>no_map</type>
86:                           <tx_templavoila>
87:                                   <title>Header2</title>
88:                           </tx_templavoila>
89:                           <TCEforms>
90:                                   <config>
91:                                           <type>input</type>
92:                                           <size>48</size>
93:                                           <eval>trim</eval>
94:                                   </config>
95:                                   <label>Subheader (gray)</label>
96:                           </TCEforms>
97:                   </field_header2>
The two fields are “field_header” and “field_header2”.
- Notice how the “<type>” of “field_header2” is set to “no_map” - this is done because this field in the Data Structure exists only for backend input to support the rendering of “field_header” which is mapped to the HTML template!
- In line 55 and 64 a “TEXT” GIFBUILDER is created, one for each field.
- In line 56 the “current value” is loaded for the first TEXT object - thus getting the value of “field_header”
- In line 65 the value of the field “field_header2” is fetched by the “.field” attribute of TypoScript - we can do that because all values of the tags on the same level as “field_header” is found internally in cObj->data array
TypoScript Constants in Data Structures
In the above example you can also see how certain values in the TypoScript code comes from constants (lines 53, 58, 59, 61, 67, 68 and 70). This is as we know it from TypoScript Template records - but the constants are coming from the local scope of this TypoScript code! That means only the constants defined by the tags in line 44-46 can be used! That means {$textColor}, {$text2Color}, {$backColor}
Constants in Constants
In line 43-47 you can also see that some of these constants are referring back to other values, for example “{$_CONSTANTS.colorSet.white}” - these values are object paths pointing to the TypoScript Template Setup field ( not the Constants field!)
In this case those value would be found in the TypoScript Object Tree at these positions:

These values are set by first setting this in the Constants field of the TypoScript Template record:
# Define color sets:
colorSet.gray1 = #B4B3B3
colorSet.gray2 = #333333
colorSet.gray3 = #eeeeee
colorSet.gray4 = #F7F7F7
colorSet.gray5 = #555555
colorSet.gray6 = #444444
colorSet.gray7 = #828282

colorSet.red = #E80C0E
colorSet.orange = #FF7200
colorSet.TO1 = #BA3957
colorSet.TO2 = #217EA1
colorSet.TO3 = #849724
colorSet.TO4 = #608375
colorSet.TO5 = #7469A4
colorSet.TO6 = #96AA00
colorSet.white = #FFFFFF

# Define font sets:
font.light = EXT:user_3dsplm/fonts/FRANGWC_.TTF
font.medium = EXT:user_3dsplm/fonts/FRANGMC_.TTF
font.bold = EXT:user_3dsplm/fonts/FRANGDC_.TTF
Then in the Setup field of the Template Record you will find these lines:
# Moving constants into the Setup scope (for use from PHP scripts and Template Objects)
_CONSTANTS.colorSet {
  gray1 = {$colorSet.gray1}
  gray2 = {$colorSet.gray2}
  gray3 = {$colorSet.gray3}
  gray4 = {$colorSet.gray4}
  gray5 = {$colorSet.gray5}
  gray6 = {$colorSet.gray6}
  gray7 = {$colorSet.gray7}
  red = {$colorSet.red}
  orange = {$colorSet.orange}
  TO1 = {$colorSet.TO1}
  TO2 = {$colorSet.TO2}
  TO3 = {$colorSet.TO3}
  TO4 = {$colorSet.TO4}
  TO5 = {$colorSet.TO5}
  TO6 = {$colorSet.TO6}
  white = {$colorSet.white}
}
_CONSTANTS.font {
  light = {$font.light}
  medium = {$font.medium}
  bold = {$font.bold}
}
Constants directly from the Setup field
Finally in line 59 and 68 the constant has a special prefix, “TSconst.” and when that is found the constant is a reference to the object path “plugin.tx_templavoila_pi1.[constant]”, thus in this case “plugin.tx_templavoila_pi1.TSconst.font_bold”
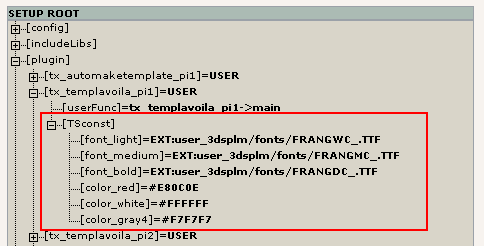
These values were also set from constants in the TypoScript Template record (see above):
plugin.tx_templavoila_pi1.TSconst {
  font_light = {$font.light}
  font_medium = {$font.medium}
  font_bold = {$font.bold}
  color_red = {$colorSet.red}
  color_white = {$colorSet.white}
  color_gray4 = {$colorSet.gray4}
}
These options might seem a bit confusing but the implementation is like this for performance reasons. You will most likely think that the logic is to set object paths from the TypoScript Constants field, not the Setup field. However this is not possible at render-time since constants are substituted in TypoScript at parse time (and that result is cached).
Therefore if you want to channel TypoScript Constants into your Data Structures you should set the constants in object paths (like “_CONSTANTS.colorSet.white”) from where you can insert them into the constants defined in <TypoScript_constants>
Overriding values from Template Objects
Mainly, processing instructions of all kinds are stored in the Data Structures. However if can be necessary to override some of these values from the Template Objects. That is easily done by setting alternative values for the tags inside the <tx_templavoila> tag of a Data Structure using the “Local Processing (XML)” field of Template Objects:
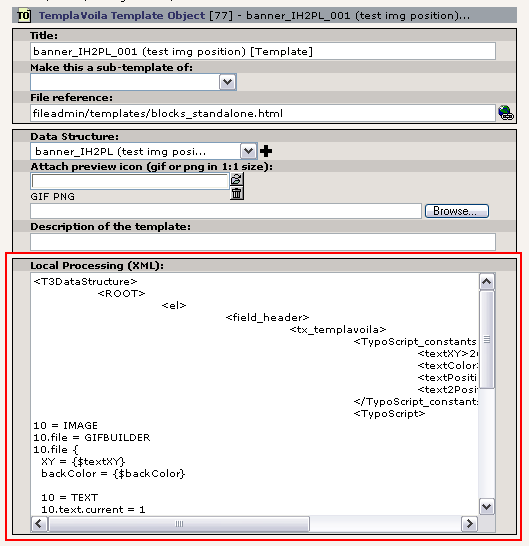
The XML content looks like this in color markup:
 1: <T3DataStructure>
 2:   <ROOT>
 3:           <el>
 4:                   <field_header>
 5:                           <tx_templavoila>
 6:                                   <TypoScript_constants>
 7:                                           <textXY>266,50</textXY>
 8:                                           <textColor>{$_CONSTANTS.colorSet.TO3}</textColor>
 9:                                           <textPosition>0,21</textPosition>
10:                                           <text2Position>0,42</text2Position>
11:                                   </TypoScript_constants>
12:                                   <TypoScript>
13: 10 = IMAGE
14: 10.file = GIFBUILDER
15: 10.file {
16:   XY = {$textXY}
17:   backColor = {$backColor}
18:
19:   10 = TEXT
20:   10.text.current = 1
21:   10.text.case = upper
22:   10.fontColor = {$textColor}
23:   10.fontFile =  EXT:user_3dsplm/fonts/FRANGDC_.TTF
24:   10.niceText = 1
25:   10.offset = {$textPosition}
26:   10.fontSize = 18
27:
28:   20 = TEXT
29:   20.text.field = field_header2
30:   20.text.case = upper
31:   20.fontColor = {$text2Color}
32:   20.fontFile =  EXT:user_3dsplm/fonts/FRANGWC_.TTF
33:   20.niceText = 1
34:   20.offset = {$text2Position}
35:   20.fontSize = 18
36: }
37:                                   </TypoScript>
38:                           </tx_templavoila>
39:                   </field_header>
40:           </el>
41:   </ROOT>
42: </T3DataStructure>
Notice that all values overriding the Data Structure is at the exact same location of the XML structure as they are in the Data Structure XML!
In this example lines 7- 10 overrides the constants with other colors.
Further the TypoScript is even changed (although that is usually not needed if you use constants correctly) in lines 13 - 36
Loading and restoring TypoScript register values
Assume that you are creating a page template with two areas of content of differing width. Normally you set one global setting for the maximum image width in the Constants setup of your templates:
styles.content.imgtext.maxW = 600
styles.content.imgtext.maxWInText = 300
However, you want to override this value when content is rendered inside the smaller of the two columns (since that was designed for secondary content.
This is easily done by a small modification to the field in the Data Structure which renders the content elements inside:
  13:                   <field_ce_right>
  14:                           <tx_templavoila>
  15:                                   <title>Right Column</title>
...
  20:                                   <TypoScript>
  21:
  22: 5 = LOAD_REGISTER
  23: 5.maxImageWidthInText = 100
  24: 5.maxImageWidth = 180
  25:
  26: 10= RECORDS
  27: 10.source.current=1
  28: 10.tables = tt_content
  29:
  30: 15 = RESTORE_REGISTER
  31:
  32:                                           </TypoScript>
  33:                           </tx_templavoila>
...
  46:                   </field_ce_right>
In this example line 26-28 is what you normally find as preset TypoScript rendering when you select the Editing Type “Content Elements”. Line 22-24 on the other hand is manually inserted and will load the internal registers with values that will override the settings from the Constants while rendering content inside this column. Line 30 makes sure to restore the old state again.
Using CDATA
When editing TypoScript in Data Structures you might quickly find it very useful to wrap the content in CDATA tags to avoid parsing of the content. This is true especially when you enter HTML codes for wrapping etc.
Using the CDATA tags looks like this (line 13 and 17):
12:                                   <TypoScript>
13: <![CDATA[
14: 10 = TEXT
15: 10.current = 1
16: 10.wrap = <b> | </b>
17: ]]>
18:                                   </TypoScript>
The alternative looks like this (using the HTML entities < and > for < and >):
12: <TypoScript>
13: 10 = TEXT
14: 10.current = 1
15: 10.wrap = >b< | >/b<
16: </TypoScript>
Hints about mapping
The mapping from TemplaVoila is designed to work without anything but pure HTML. However if you rearrange elements in the HTML source and wants to do a re-mapping you might find that everything fails. Therefore it is a good idea to “tag” cornerstone elements with an “id” attribute or class attribute. These are a part of the “HTML-path” which is used to identify an element in a template. And if you use ids at strategically good places (like the wrapping <div> elements in the template_ce.html) you will come a long way.
Cached templates
Also notice; if a template file changes or even is deleted, the Template Objects will still work since they cache a parsed version of the mapped template in the moment you save them! Therefore they are very robust and only missing images, stylesheets etc. used by the templates will break.
Other features than mandatory caching will come later.
ToDo of TemplaVoila
The todo list is in the extension, doc/TODO.txt
However here are a few major things which does not work fully yet:
- Web > Page module - lots to do. Ask Robert.
- Mapping will fail if you map an attribute which is in a tag containing others. There might be other bugs as well, slightly confusing.
- Mapping may fail if you map ANY HTML file - the file should be nested correctly etc. Generally, the HTML must be clean. But we want to improve those parts so it can accept more “lousy” HTML as well...
- Documentation!
 Futuristic Template Building (FTB) - 83