DEPRECATION WARNING
This documentation is not using the current rendering mechanism and is probably outdated. The extension maintainer should switch to the new system. Details on how to use the rendering mechanism can be found here.
Ознакомительный учебник
| Created: | 2010-10-09T10:26:54 |
|---|---|
| Changed: | 00:00:00 |
| Classification: | doc_tut_quickstart |
| Description: | The keywords help with categorizing and tagging of the manuals. You can combine two or more keywords and add additional keywords yourself. Please use at least one keyword from both lists. If your manual is NOT in english, see next tab "language" ---- forEditors (use this for editors / german "Redakteure") forAdmins (use this for Administrators) forDevelopers (use this for Developers) forBeginners (manuals covering TYPO3 basics) forIntermediates (manuals going into more depth) forAdvanced (covering the most advanced TYPO3 topics) see more: http://wiki.typo3.org/doc_template#tags ---- |
| Keywords: | forBeginners, forEditors, forAdmins |
| Author: | Documentation Team |
| Email: | documentation@typo3.org |
| Translator: | Andrey Aksenov |
| Language: | ru |

 Ознакомительный учебник
Ключ расширения: doc_tut_quickstart
Язык: ru
Версия: 1.0.0
Ключевые слова: forBeginners, forEditors, forAdmins
Авторские права 2000-2010, Documentation Team, <documentation@typo3.org>
Этот документ публикуется под Open Content License
доступной на http://www.opencontent.org/opl.shtml
Содержимое этого документа относится к TYPO3
- GNU/GPL CMS/Framework доступной на www.typo3.org
Официальная документация
Этот документ является частью официальной документации TYPO3. Одобрение было получено после экспертной оценки командой по документации TYPO3. Читатель вправе ожидать точной информации в этом документе, о любом несоответствии сообщайте в команду по документации (documentation@typo3.org). Официальные документы сохраняются по возможности актуальными командой по документации.
Перевод официальной документации
Этот документ является переводом официальной документации TYPO3. Перевод может быть не столь актуальным, как оригинал. В случае вопросов, обращайтесь к английской версии.
Учебник
Этот документ является учебным руководством. Такие документы разрабатываются в виде пошаговой инструкции, специально созданной практической задачи, выполняемой учеником от начала до конца. Для облегчения задачи, руководство снабжается примерами, иллюстрирующими изучаемый предмет. Кроме того, учебники дают представление о том, как избежать распространенных ошибок, выделяют ключевые понятия, которые пригодятся в дальнейшем.
Содержание
`Ознакомительный учебник 1 <#__RefHeading__5708_1738894311>`_
`Введение 4 <#__RefHeading__5710_1738894311>`_
Примечания к переводу на русский язык 5
`Установка 6 <#__RefHeading__12834_2072924659>`_
Получение Introduction Package 6
`Общие принципы 9 <#__RefHeading__7519_1631385330>`_
Внутренний (Backend) и внешний (Frontend) интерфейсы 9
Общая структура внутреннего интерфейса 12
`Редактирование и создание страниц и их содержимого 27 <#__RefHeading__7531_1631385330>`_
Редактирование страниц и содержимого 27
Перемещение / Копирование страниц 40
Настройки доступа — скрытие страниц, время появления и т.п. 42
Сложное формирование текста: жирный, курсив, списки, вставка изображений 48
Защищенные паролем страницы 60
Создание внешних пользователей/групп 63
`Backend modules 82 <#__RefHeading__7555_1631385330>`_
`Templates 84 <#__RefHeading__5407_865310202>`_
Making changes to the template 86
Content in multiple columns 94
Template & backend configuration disclaimer! 96
`The file module or: Image archives 97 <#__RefHeading__7569_1631385330>`_
Uploading images to the archive 100
`The List module and Clipboard 103 <#__RefHeading__7575_1631385330>`_
Using the List module effectively 103
The numeric clipboard pads - managing many elements 107
`User Management 115 <#__RefHeading__7583_1631385330>`_
Setting up user permissions 119
Creating a new user for the Introduction site 135
`A short glimpse into the extension manager 140 <#__RefHeading__7595_1631385330>`_
`Troubleshooting 148 <#__RefHeading__7599_1631385330>`_
Note on image processing in TYPO3 148
Colored differences in history module 148
`Next steps 149 <#__RefHeading__7607_1631385330>`_
Введение
Об этом документе
Этот документ знакомит с основными понятиями TYPO3. Пример сайта, используемый в этом документе, поможет незамедлительно начать работать с Вашим первым сайтом на TYPO3. Изучив этот учебник Вы получите представление о возможностях TYPO3, общей структуре и возможностях ее расширений. Профессиональное создание шаблонов и разработка на TYPO3 по большей части не затрагивается в этом документе.

Нововведения
Предыдущая версия этого документа была известна как "Quickstart Tutorial".
Текущая версия взяла за основуTYPO3 IntroductionPackage дляTYPO3 версии 4.4. Это полностью новая версия. Затронутые темы слегка изменились для соответствия IntroductionPackage.
Составители
Изначально "Quickstart Tutorial" было написано Kasper Skårhøj. Текущая версия была написана Philipp Gampe, Martin Holtz, Susanne Moog и Francois Suter.
Обратная связь
По общим вопросам о документации, пишите на documentation@typo3.org .
Если найдена ошибка в этом руководстве, опишите проблему по данному руководству в системе отслеживания ошибок: http://forge.typo3.org/projects/typo3v4-doc_tut_quickstart
Поддержка качественной документации является тяжелой работой, и команде по документации всегда нужны добровольцы. Если Вы желаете помочь, присоединяйтесь к списку рассылок (typo3.projects.documentation на lists.typo3.org).
Примечания к переводу на русский язык
Все изображения внутреннего и внешнего интерфейсов взяты из версии 4.5.6 (актуальной на момент создания перевода версии). Для локализации внутреннего интерфейса (перевода его на русские или какой-либо еще язык) обратитесь к разделу "Изменение языка внутреннего интерфейса" главы "Краткие сведения о модуле управления расширениями" на стр. 143.
Установка
Начальные условия
Необходим полностью настроенный работающий веб сервере, отвечающий
условиям, приведенным на :underline:`http://typo3.org/about/system-
requirements/ <http://typo3.org/about/system-requirements/>`_
Если веб сервера нет, но Вы работаете под ОС Windows, можно установить
:underline:`TYPO3Winstaller
<http://typo3winstaller.sourceforge.net/>`_ , который установить и веб
сервер, и Introduction Package на Ваш локальный компьютер.
Получение Introduction Package
Сначала необходимо загрузить и установить introduction package,
который используется для описания TYPO3 в этом учебнике. Загрузите
пакет с :underline:`http://typo3.org/download/
<http://typo3.org/download/packages/>`_ . Для установки своего первого
веб сайта, следуйте указаниям, приведенным в разделе быстрой установки
:underline:`Руководства по установке и обновлению
<http://typo3.org/documentation/document-
library/installation/doc_inst_upgr/current/>`_ . При профессиональном
использовании TYPO3, необходимо будет периодически обращаться к нему.
Пошаговое руководство приведено ниже, в "кратком руководстве по
установке".
Для тех, кому не терпиться, попробуйте следующее очень краткое руководство:
- Разархивируйте загруженный introduction package в корневую папку веб сервера.
- Создайте файл с названиемENABLE_INSTALL_TOOLв папкеtypo3conf.
- В адресной строке браузера наберите http://your- site.example.org/typo3/ , должен открыться мастер установки TYPO3.
- Следуйте указаниям мастера.
Поэтапная установка Introduction Package
Это руководство поэтапно проведет через загрузку, распаковку, закачку и установку Introduction Package. Подразумевается использование ОС Windows.
Загрузка
Перейдите на " :underline:`http://typo3.org/download/
<http://typo3.org/download/>`_ ".
Щелкните по кнопке с надписью"Download TYPO3 version 4.4| with the new Introduction Package"
Вы будете перенаправлены на страницу Sourceforge, после чего начнется загрузка. Если этого не произошло, следуйте инструкциям на веб сайте.
Извлечение
Откройте файл .zip.
Извлеките его содержимое в любую пустую папку. Запомните ее.
Щелкните "Файлы" >> "Извлечь все"
Выберете пустую папку или создайте новую.
Щелкните по кнопке извлечь/далее.
Закачка
Закачать содержимое папки можно через любой клиент FTP. Следующая
пошаговая инструкция подразумевает использование бесплатного,
платформонезависимого FTP-клиента :underline:`FileZilla <http
://filezilla-project.org/>`_ .
Откройте FileZilla.
Подключитесь к своему веб сайту.
Введите адрес своего сервера FTP. Зачастую он выглядит как ftp.your- site.example.org.
Введите имя пользователя и пароль.
Введите порт. Если сервер поддерживает sFTP, необходимо ввести 22. Если порт не известен, введите 21 или оставьте поле пустым.
Нажмите "Соединить"
Если имеются какие-либо ошибки, то появятся красные линии в окне журнала, сразу под панелью соединения. Обратитесь к своему хостеру по вопросу исправления соединения.
Если все хорошо, в правой части окна будут выведены папки и файлы.
Перейдите в нужную папку на сервере (с правой стороны).
Зачастую содержимое веб сайта находится в папке с названием website, docroot, htdocs или html. Откройте папку.
Если на сайте уже имеется какое-либо содержимое, оно будет сейчас выведено. Обычно имеется файл с названием index.html или index.php.
Перейдите в папку с извлеченным содержимым .zipархиваintroduction packageна локальном компьютере(с левой стороны).
Откройте папку.
Должен быть виден файл index.php и папки fileadmin, t3lib, typo3, typo3conf, typo3temp и uploads.
Выберете все файлы.
Откройте контекстное меню (щелчок правой кнопкой мыши).
Щелкните по "Загрузить" – файлы встанут в очередь внизу, начнется из закачка на сервер.
Закачка закончиться, когда файлы полностью исчезнут из очереди.
Установка
Сначала необходимо выставить права доступа для загруженных файлов и директорий.
Выберете закаченные файлы и откройте контекстное меню (правой кнопкой мыши).
Щелкнитеchmod.
Для всех папок введите755
Для файлов введите644.
Убедитесь, что установлен параметр "включая подпапки".
Откройте свой веб браузер.
Введите в адресной строке адрес своего веб сервера, например http://www.your-site.example.org/.
Должно произойти перенаправление наhttp://www.your- site.example.org/typo3/ и приветственное сообщение мастера установки.
Если появился большой желтый прямоугольник с сообщением о блокировке install tool, сделайте следующее:
Снова откройте локальную папку.
Создайте новый файл с названием ENABLE_INSTALL_TOOL, содержимое его не имеет значение.
Загрузите этот файл на веб сервер, в папку typo3conf/.
Переименуйте файл, удалив любое расширение (если есть, .doc, .txt, ...). Название файла на сервере должно быть "ENABLE_INSTALL_TOOL" без чего-либо еще.
Перезагрузите сайт в браузере (нажмите F5).
Нажмите continue.
Введите детальную информацию о своей базе данных:
Введите имя пользователя БД.
Пароль БД.
Адрес сервера БД. Обычно это localhost. Если адрес неизвестен, введите localhost.
Нажмите continue.
Выберете базу данных. Если имеются соответствующие права, можно создать новую. Используйте пустую базу данных — любые таблицы, используемые TYPO3, будут перезаписаны!
Нажмите continue.
Еще раз нажмитеcontinue. Подождите мастера установки. Если прошло более пяти минут, перезагрузите страницу (нажмите F5).
Введите пароль. Запомните его, он понадобиться позже для управления веб сайтом. Н е используйте простых паролей.
Выберете понравившийся цвет.
В последний раз нажмите continue.
Щелкните "Go to your website" :)
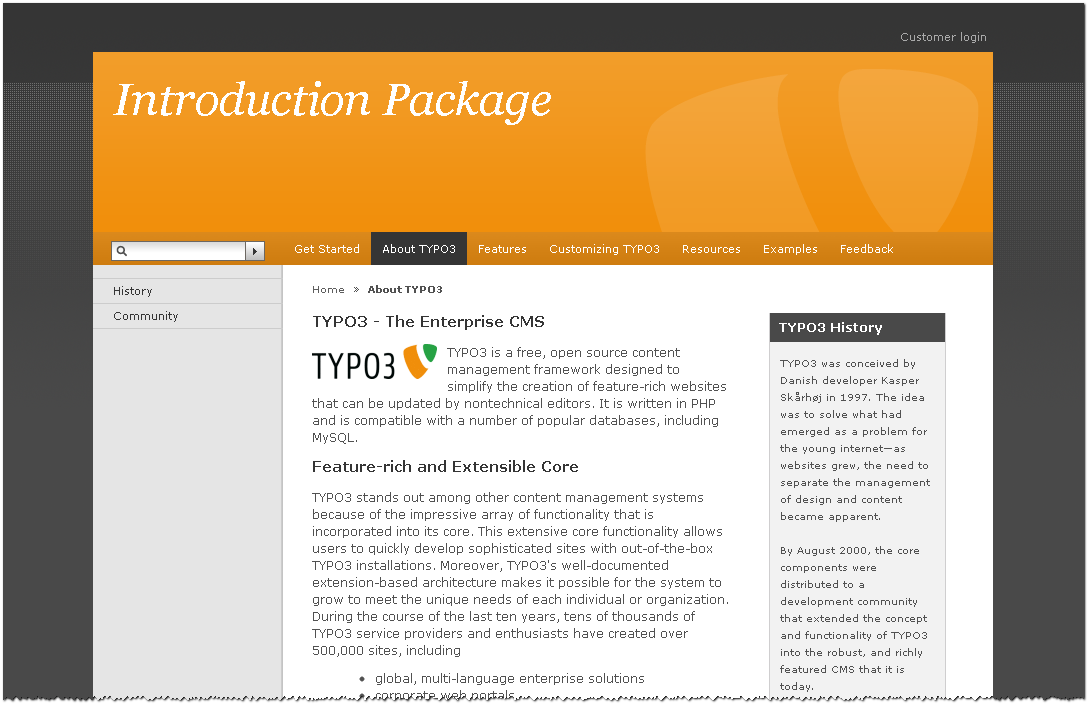
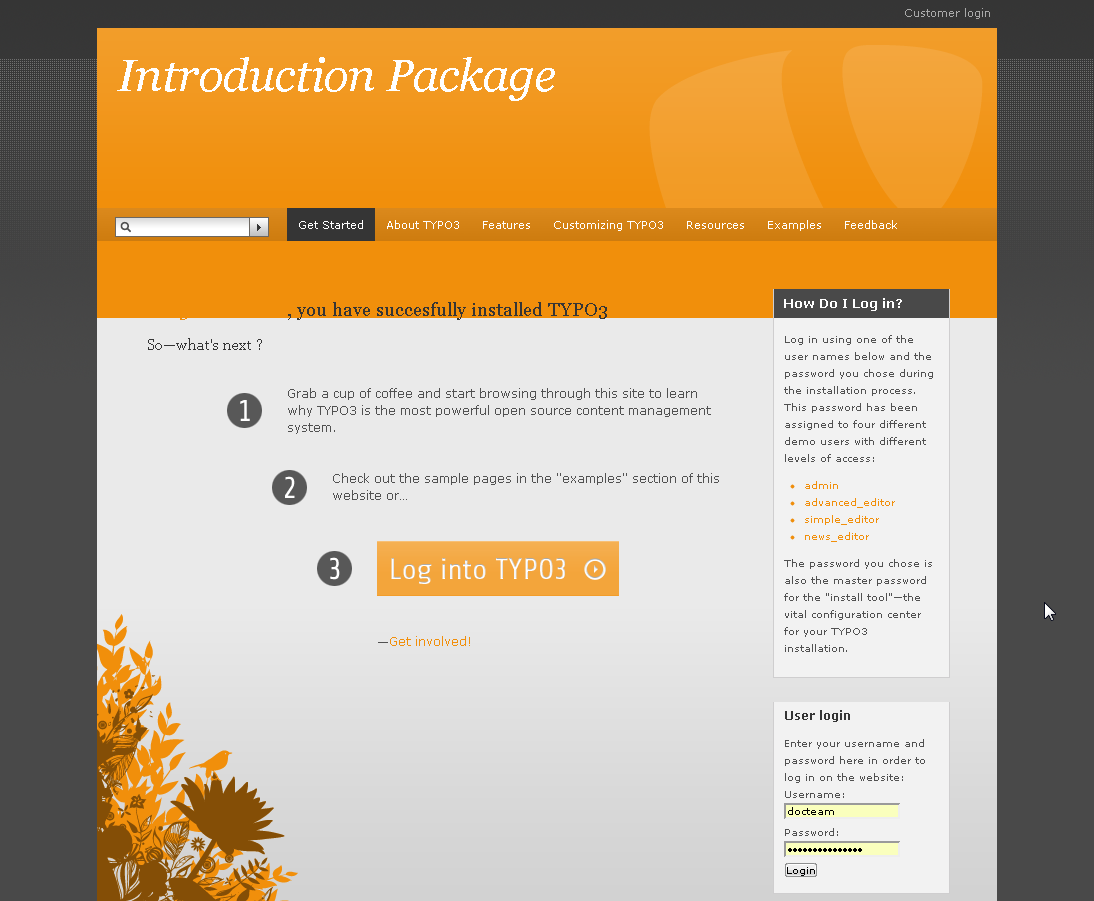
Готово! Сайт установлен. Теперь можно прочитать раздел "About TYPO3".
Общие принципы
Внутренний (Backend) и внешний (Frontend) интерфейсы
TYPO3 разделен на две области — внутренний (backend) и внешний (frontend) интерфейсы. В то время как внешний интерфейс — это все, что доступно из сети, сам веб сайт, создаваемый TYPO3, а внутренний интерфейс пока доступен лишь Вам — это административная часть веб сайта. Для того, чтобы попасть во внутренний интерфейс всегда необходима авторизация с именем пользователя и паролем. Позже Вы научитесь давать доступ ко внутреннему интерфейсу другим людям — редакторам содержимого и помощникам администратора.
Для перехода ко внешнему интерфейсу, введите в адресной строке браузера " http://www.your-site.example.org/ ". А пока перейдем ко внутреннему интерфейсу.
Перейдите во внутренний интерфейс своего вновь созданного сайта: откройте браузер, и наберите "http://www.your- site.example.org/typo3/".
Появится страница авторизации, примерно следующего содержания:
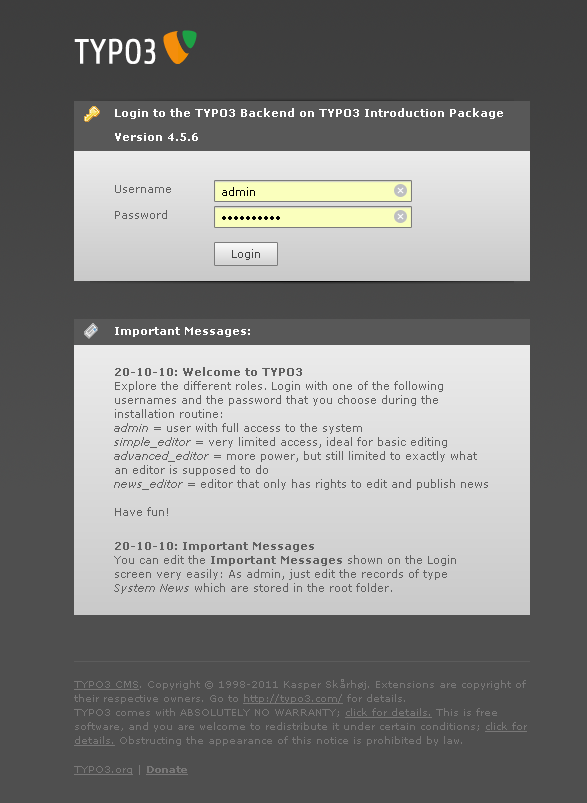
Используйте имя пользователя "admin" и пароль, установленный при установке TYPO3.
По нажатии на кнопку login, Вы будете перенаправлены в раздел краткого обзора внутреннего интерфейса TYPO3.
Справа находится меню основных модулей TYPO3 — основное меню внутреннего интерфейса. Давайте щелкнем по элементу "Page" и перейдем в модуль страница.
Для установки русского языка во внутреннем интерфейсе, перейдите к к разделу "Изменение языка внутреннего интерфейса" главы "Краткие сведения о модуле управления расширениями" на стр. 143.
Дальнейшие изображения и комментарии приведены с уже установленным пакетом русского языка.
Общая структура внутреннего интерфейса
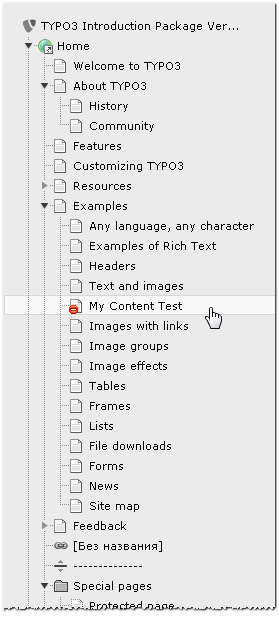
Слева по прежнему остаётся меню модулей, в середине теперь появилось дерево страниц, а справа — область содержимого.
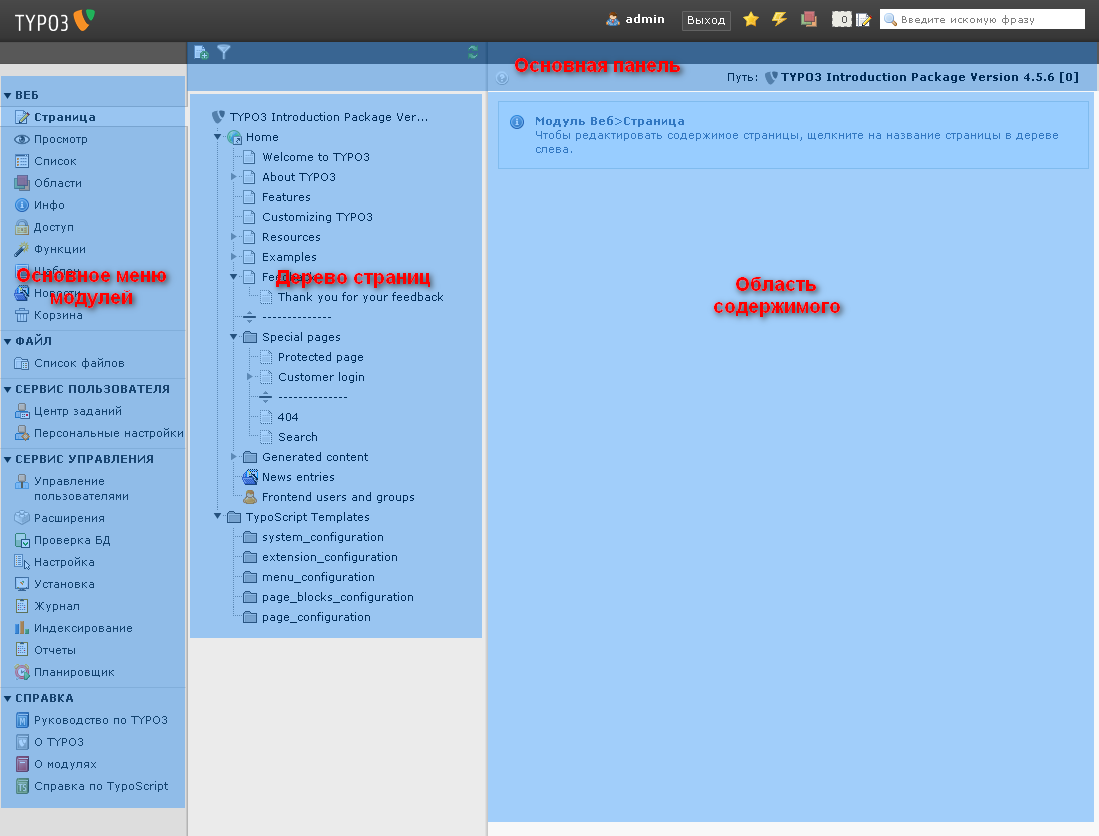
Дерево страниц
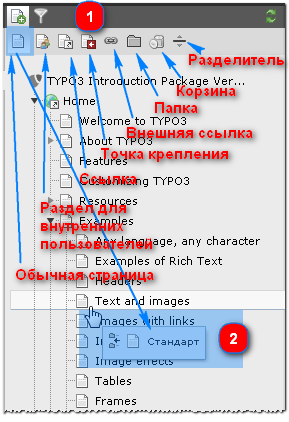
Дерево страниц представляет иерархическу структуру страниц сайта. В большинстве случаев оно точно передает структуру навигации по сайту. Дерево страниц можно развернуть, щелкая по небольшим стрелочкам слева от элементов.
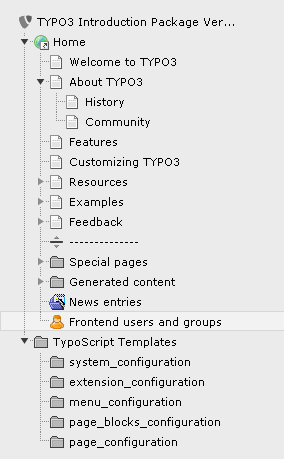
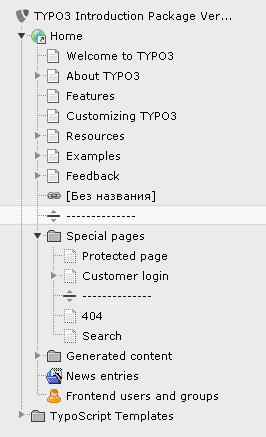
Рассмотрим дерево страниц поближе:
 И посмотрим на структуру навигации во внешнем интерфейсе, перейдя на
страницу "About TYPO3".
И посмотрим на структуру навигации во внешнем интерфейсе, перейдя на
страницу "About TYPO3".
 Заметно, что меню сайта соответствует первому уровню страниц в дереве
страниц, а меню следующего уровня отражает дочерние страницы для
"About TYPO3" в дереве страниц.
Заметно, что меню сайта соответствует первому уровню страниц в дереве
страниц, а меню следующего уровня отражает дочерние страницы для
"About TYPO3" в дереве страниц.
Для всех модулей из категории "Веб" (Web) отображается дерево страниц, то есть все эти модули действуют на постраничной основе (их настройки относятся к страницам и элементах на этих страницах).
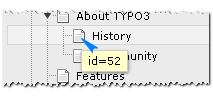
Щелчок по названию страницы откроет содержимое этой страницы в области содержимого справа. Задержав мышку над значком страницы, можно узнать ее внутренний индивидуальный номер — id. Этот же id используется для вывода страницы во внешнем интерфейсе.
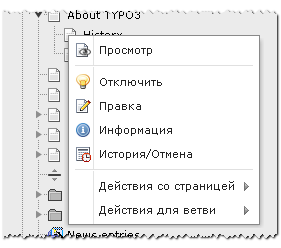
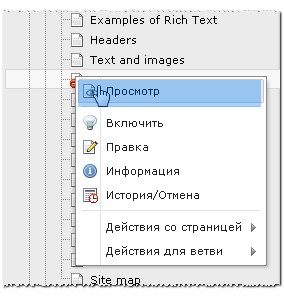
 Щелчок по значку страницы откроет контекстное меню.
 Контекстное меню
""""""""""""""""
Контекстное меню
""""""""""""""""
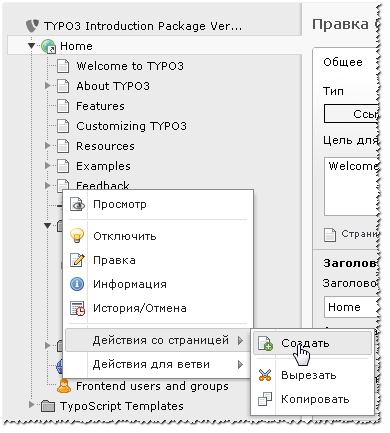
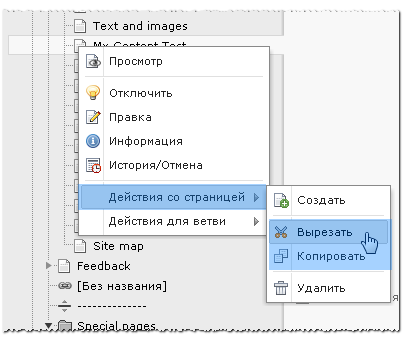
Контекстное меню страницы можно использовать для быстрого доступа к функциям для страницы. Вот за что отвечают эти параметры:
- Просмотр: открывает выбранную страницу во внешнем интерфейсе.
- Отключить/Включить: скрывает/показывает страницу (во внешнем интерфейсе).
- Правка: редактирование свойств страницы.
- История/Отмена: отображение истории изменения страницы (кто, когда и какие изменения вносил).
- Действия со страницей:
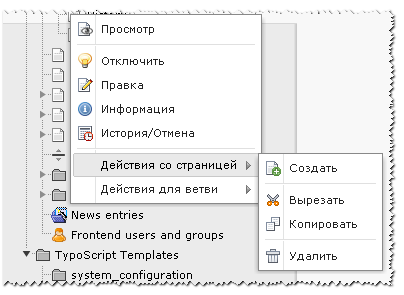 - - Создать: позволяет создать новую страницу или ее содержимое.
- Вырезать: вырезка страницы.
- Копировать: копирование страницы.
- Удалить: удаление страницы.
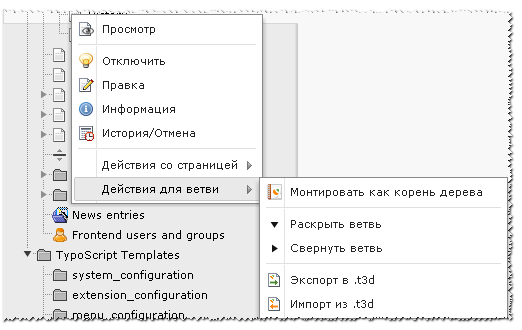
- Действие для ветви:
- Монтировать как корень дерева: временно делает текущую страницу корневой для дерева страниц — полезно для фокусировке на конкретной ветви дерева страниц при большом их количестве.
- Раскрыть ветвь: раскрывает текущую ветвь в дереве страниц.
- Свернуть ветвь: сворачивает текущую ветвь в дереве страниц.
- Экспорт в .t3d:переход к экспорту текущей страницы и ее содержимого во внешний файл.
- Импорт из .t3d:переход к импорту на текущую страницу содержимого из внешнего файла.
В зависимости от настроек и контекста может быть доступно больше или меньше функций.
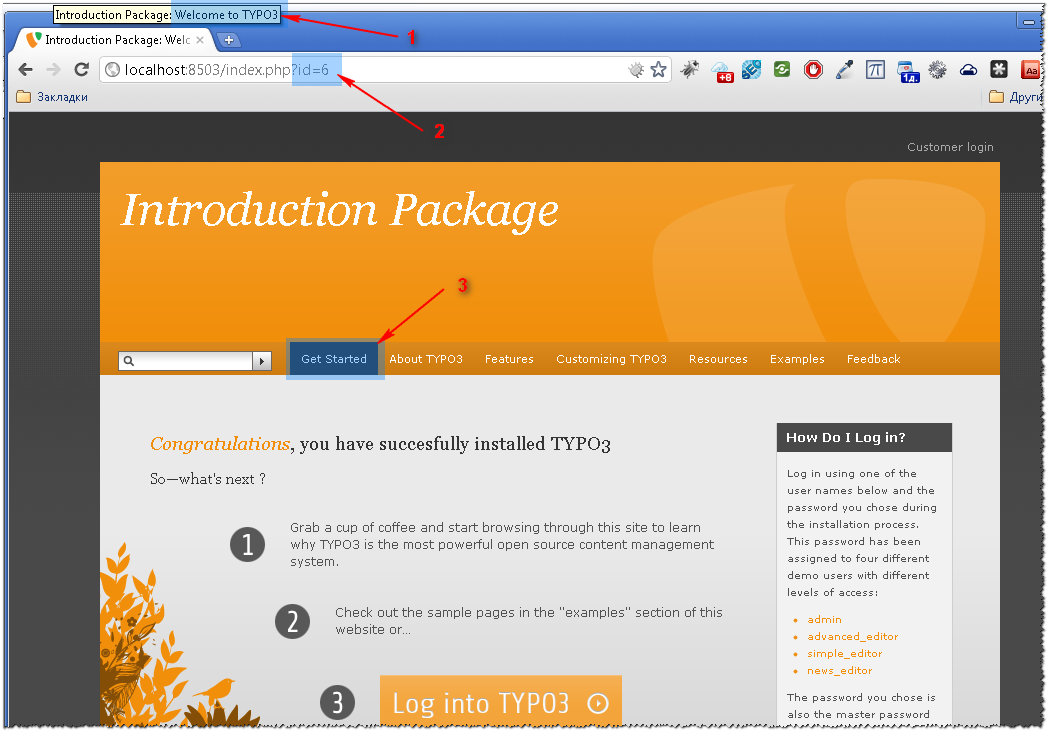 Теперь при помощи контекстного меню выведете во внешнем интерфейсе
страницу "Welcome to TYPO3".
Теперь при помощи контекстного меню выведете во внешнем интерфейсе
страницу "Welcome to TYPO3".
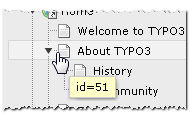
Как видим (1 на голубом фоне), последняя часть названия страницы в строке браузера соответствует названию страницы в дереве страниц.Видно (2), что это страница с ID 6. Вернемся к дереву страниц и задержим указатель мыши над значком этой страницы ID 6 будет выведено и здесь.
 (3) может Вас озадачить — ведь в дереве страниц и в строке браузера
страница значится как "Welcome to TYPO3", а в меню она называется "Get
Started". Почему так? Для этого в контекстном меню данной страницы
выберем пункт "Правка" и взглянем на правую часть в область для
содержимого:
(3) может Вас озадачить — ведь в дереве страниц и в строке браузера
страница значится как "Welcome to TYPO3", а в меню она называется "Get
Started". Почему так? Для этого в контекстном меню данной страницы
выберем пункт "Правка" и взглянем на правую часть в область для
содержимого:
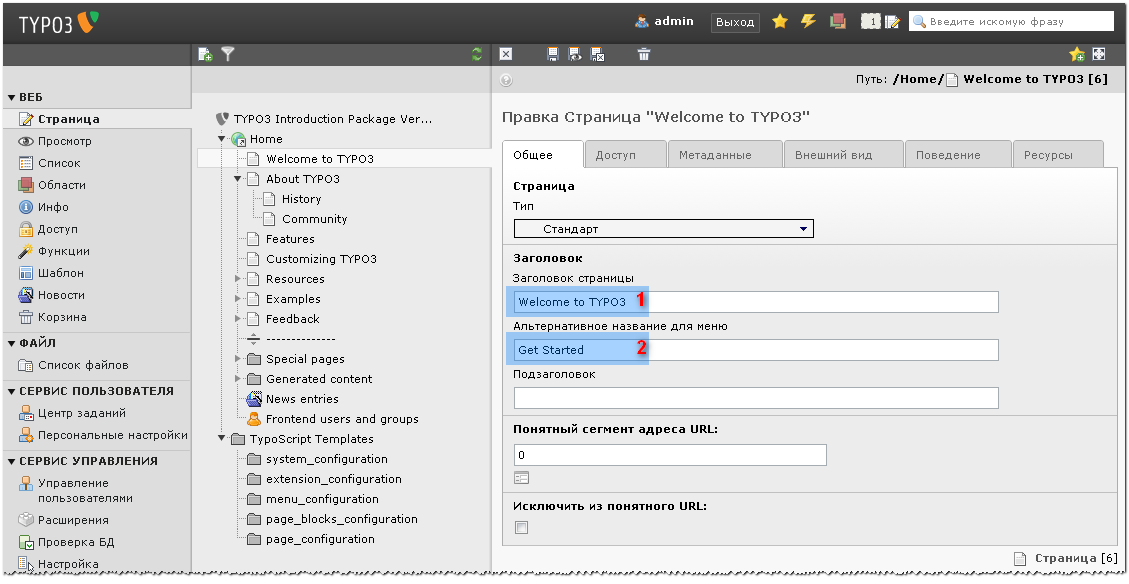 Здесь видно, что заголовок страницы (1) "Welcome to TYPO3", а "Get
Started" находим в другом месте (2). Это называется "Альтернативное
название для меню" (Navigation title) и предназначено для вывода в
любых элементах навигации (меню, местоположение на сайте
(breadcrumbs), картах сайта...). Если оно не указано, то для этого
используется заголовок страницы.
Здесь видно, что заголовок страницы (1) "Welcome to TYPO3", а "Get
Started" находим в другом месте (2). Это называется "Альтернативное
название для меню" (Navigation title) и предназначено для вывода в
любых элементах навигации (меню, местоположение на сайте
(breadcrumbs), картах сайта...). Если оно не указано, то для этого
используется заголовок страницы.
Специальные страницы
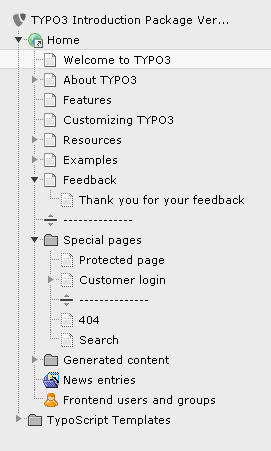 Снова вернемся к дереву страниц, как видно, для страниц используются
различные значки. Одни появляются в меню сайта и являются обычными
страницами. Сейчас разговор не о них. Имеются значки страниц,
обведенные пунктиром — это страницы, скрытые в меню.
Снова вернемся к дереву страниц, как видно, для страниц используются
различные значки. Одни появляются в меню сайта и являются обычными
страницами. Сейчас разговор не о них. Имеются значки страниц,
обведенные пунктиром — это страницы, скрытые в меню.
Скрыть в меню
Скрытые в меню страницы по большему счету ничем не отличаются от обычных страниц, просто они не выводятся в пунктах меню. Это полезно для страниц, доступ к которым нужен, но в меню их нужно скрыть.Используя контекстное меню, посмотрим свойства страницы "Search":
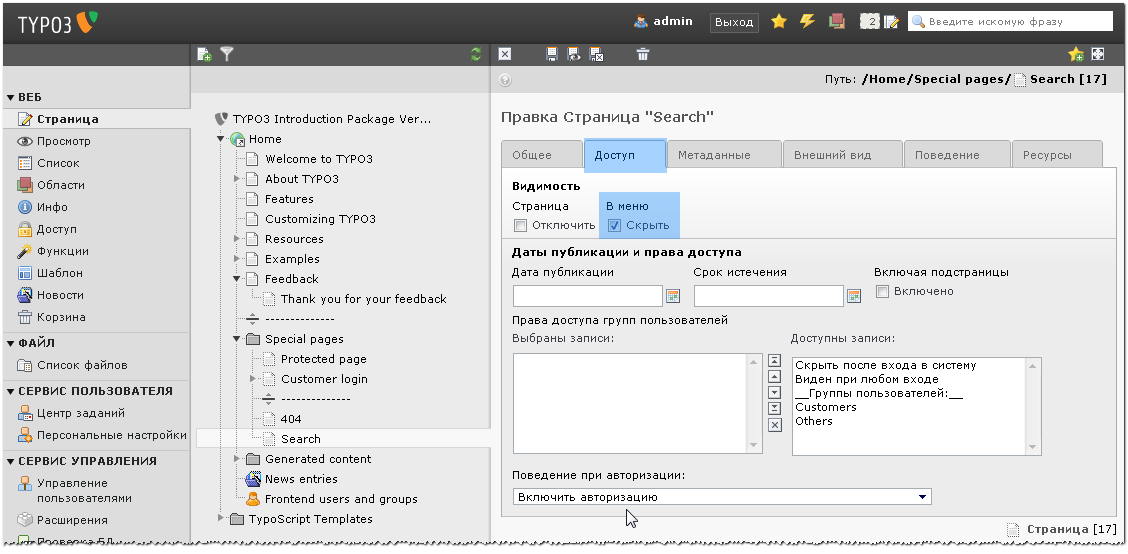 Перейдем на вкладку "Доступ", где видно, что включен параметр "В меню"
- "Скрыть".
Перейдем на вкладку "Доступ", где видно, что включен параметр "В меню"
- "Скрыть".
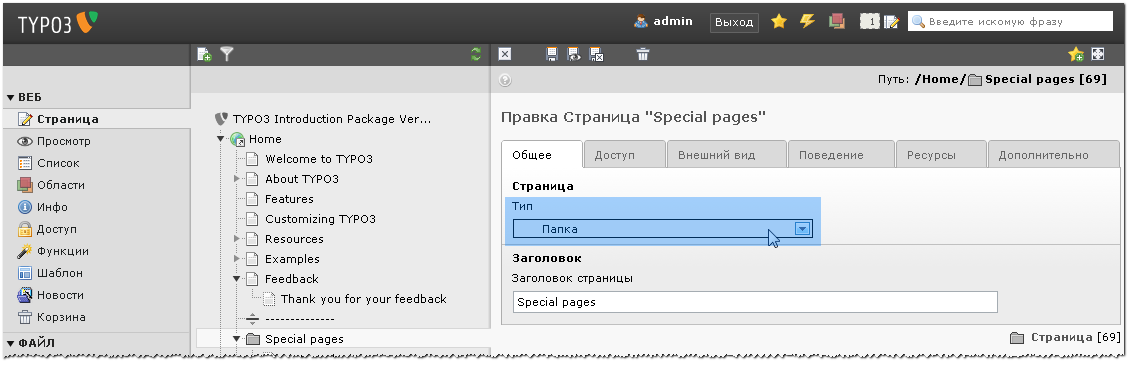
Папки
Некоторые страницы в дереве имеют значок папки. Они и называются папками. По умолчанию, создаваемые в TYPO3 страницы подразумевают под собой веб страницу с размещаемым на ней содержимым. Они отражены в меню и у них есть заголовок. 95% страниц именно такие. Но страницы могут выступать и неким хранилищем для элементов содержимого (записей в базе данных), которые не предназначены для прямого отображения на страницах сайта. Это и есть папки — пользуйтесь ими также, как на своем компьютере Вы используете папки для хранения и организации файлов. Папки отлично подходят для такой же организации и хранения элементов внутри TYPO3. Такими элементами (записями в базе данных) являются внешние пользователи, группы внешних пользователей, статьи новостей и тому подобные вещи.
Создать папку просто — нужно выбрать в свойствах страницы "Тип" папка:
 Ссылки
""""""
Ссылки
""""""
Ссылки можно использовать, например, для создания пустой страницы, служащей родителем для страниц определенного раздела. Представьте, что Вы продаете определенную продукцию на сайте, имеющем такую структуру навигации:- О нас- Наша продукция- Документация- КонтактыЗатем нам понадобилось создать несколько внутренних страниц для раздела "Наша продукция" для раскрытия информации о представляемых товарах:- О нас- Наша продукция- Обзор- Техническая информация- Доставка и цены- Документация- КонтактыНо для страницы "Наша продукция" нет данных, нужно чтобы она просто была представлена в меню. При этом можно сделать страницу "Наша продукция" ссылкой на страницу "Обзор". Что при этом произойдет? Щелкнув в меню по пункту "Наша продукция" Вы будете перенаправлены на страницу "Обзор". Необходимая структура меню сохраняется, а для страницы "Наша продукция" не нужно будет придумывать никакого содержимого.
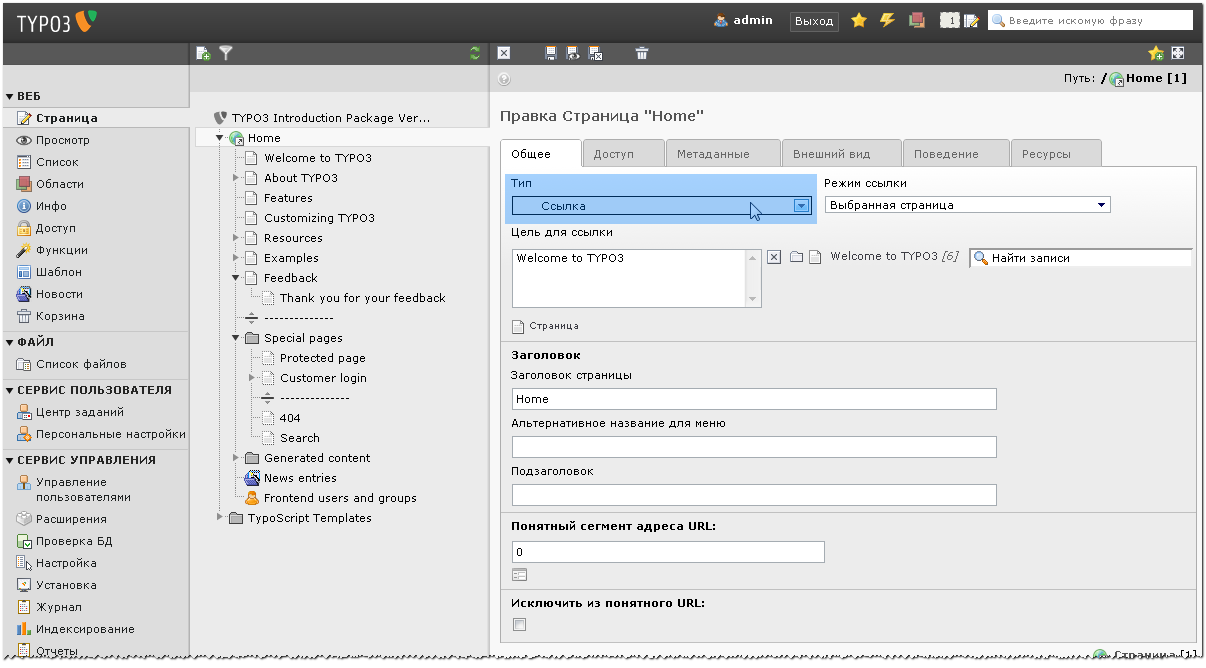
В Introduction Package также имеется ссылка. Такова страница "Home". Страницы-ссылки отмечены маленькой стрелочкой в нижнем правом углу. Страница "Home" помимо того является корнем всего сайта, поэтому имеет собственный домен — вот почему для нее используется значок земного шара.
Страницы-ссылки создаются как и страницы-папки — нужно выбрать нужный тип в свойствах страницы.
 Ссылка на внешний URL
"""""""""""""""""""""
Ссылка на внешний URL
"""""""""""""""""""""
Внешние ссылки можно использовать для создания ссылок на внешние страницы, представляемые в меню сайта. Давайте вместе сделаем такую страницу. Представим, что в меню нам понадобилась ссылка на http://typo3.org.Сначала щелкнем по значку страницы"Feedback"и в контекстном меню выберем"Действие со страницей: Создать":
 Укажите местоположение новой страницы в области содержимого справа:
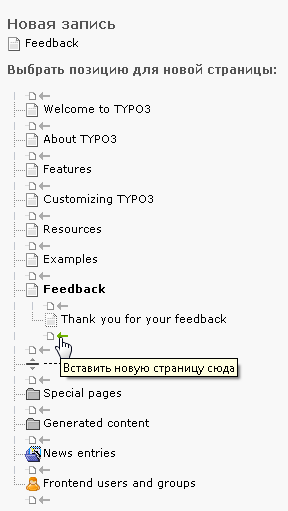 После чего здесь же появится уже знакомый диалог "Создание новой
страницы":
После чего здесь же появится уже знакомый диалог "Создание новой
страницы":
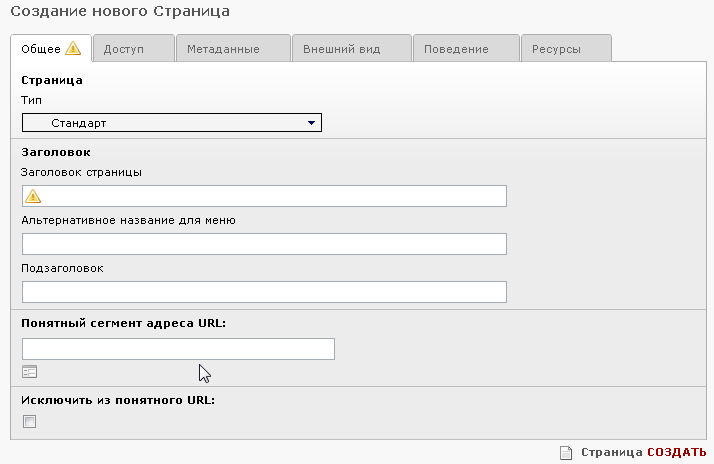 Измените тип на "Внешняя ссылка" (1). При этом появится сообщение об
изменении состава формы редактирования свойств страницы. Нажмите OK.
Измените тип на "Внешняя ссылка" (1). При этом появится сообщение об
изменении состава формы редактирования свойств страницы. Нажмите OK.
Заполните поле "Заголовок страницы" (Pagetitle). Давайте назовем элемент меню " TYPO3 – мощная CMS с открытым исходным кодом ". Желтый треугольный значок с восклицательным знаком около поля говорит о том, что поле обязательно для заполнения.
Заполним еще одно обязательное поле "URL" — введемtypo3.org,протокол оставим без изменений. Протокол можно и не трогать — просто ввести адрес вместе с протоколом в поле"URL".
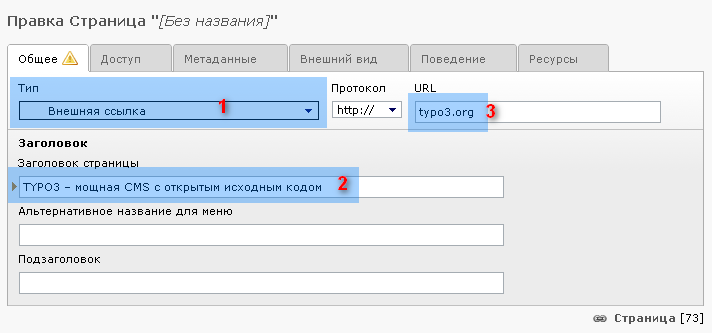
 Выбор правильного типа протокола
Уделите внимание типу протокола! Выбирайте правильный протокол URL или выберете "Авто", если протокол уже указан в URL (вроде http://typo3.org вместо typo3.org).
Заметили небольшую коричневую стрелочку рядом с полем ввода (2)? Она говорит, что поля заполнены, но пока еще не сохранены.
Пришло время сохранить сделанные изменения. Для этого в основой панели предназначены несколько кнопок:
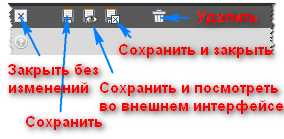 Посмотреть, за что отвечает каждая из кнопок можно, задержав указатель
мыши над кнопкой.
Посмотреть, за что отвечает каждая из кнопок можно, задержав указатель
мыши над кнопкой.
 Значки справки
Если нужно узнать, за что отвечает какой-либо элемент в TYPO3, то зачастую достаточно задержать указатель мыши над значком со знаком вопроса, имеющимся около большинства элементов. При этом текст с кратким описание появится во всплывающем окне. Щелкнув же по самому тексту можно получить подробное описание.
 Визуальный разделитель меню
"""""""""""""""""""""""""""
Визуальный разделитель меню
"""""""""""""""""""""""""""
В дереве страниц есть страницы еще одного типа:
 Этот тип называется разделитель меню ничего не меняет при обычных
настройках TYPO3. Можно использовать его для визуального разделения
дерева страниц на части.
Этот тип называется разделитель меню ничего не меняет при обычных
настройках TYPO3. Можно использовать его для визуального разделения
дерева страниц на части.
Содержимое страниц
Мы уже посмотрели, как через дерево страниц создается структура сайта и какие существуют типы страниц. Пришло время поговорить о содержимом страниц.
Сначала посмотрим, как располагается содержимое на странице.
- Откройте в браузере страницу "Exemples"> "Text and Images".
- В другом окне браузера откройте внутренний интерфейсTYPO3.
- Выберете модуль Страница и в дереве страниц перейдите на страницу "Exemples"> "Text and Images".
- Сравните оба представления.
Внешний интерфейс:
 Внутренний интерфейс:
 Как видите, порядок элементов содержимого на странице сайта
соответствует порядку элементов во внутреннем интерфейсе. Кроме того,
элементы содержимого упорядочены по столбцам — элемент из правого
столбца внутреннего интерфейса находится в правом же столбце страницы
вашего сайта. Элементы содержимого могут быть самого разного типа
(вроде текста, текста с изображениями), поэтому можно создавать
страницы практически любого содежимого.
Как видите, порядок элементов содержимого на странице сайта
соответствует порядку элементов во внутреннем интерфейсе. Кроме того,
элементы содержимого упорядочены по столбцам — элемент из правого
столбца внутреннего интерфейса находится в правом же столбце страницы
вашего сайта. Элементы содержимого могут быть самого разного типа
(вроде текста, текста с изображениями), поэтому можно создавать
страницы практически любого содежимого.
Давайте посмотрим, что произойдет, если переместить элемент содержимого.
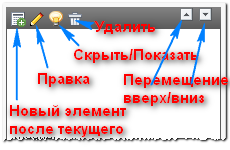
Подведите указатель мыши на серую панель сверху элемента содержимого:
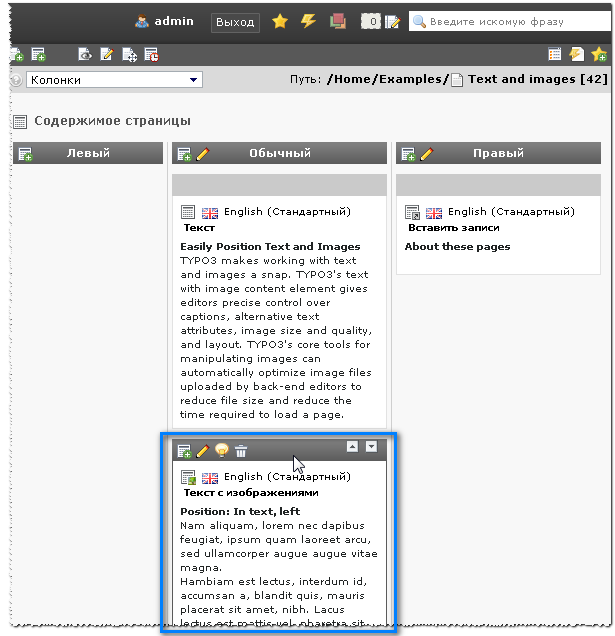 Как видите, появились значки редактирования для этого элемента.
Стрелки справа служат для перемещения элемента вверх-вниз. После
перемещения, взгляните на обновленную страницу во внешнем интерфейсе.
Изменения в порядке элементов на ней отражены.
Как видите, появились значки редактирования для этого элемента.
Стрелки справа служат для перемещения элемента вверх-вниз. После
перемещения, взгляните на обновленную страницу во внешнем интерфейсе.
Изменения в порядке элементов на ней отражены.
Другие значки предназначены совершения для различных действий с текущим элементом:
 Редактирование и создание страниц и их содержимого
--------------------------------------------------
Редактирование и создание страниц и их содержимого
--------------------------------------------------
Теперь мы знаем, что содержимое на страницах располагается в элементах содержимого. Значит, для редактирования содержимого страницы нужно редактировать элементы содержимого этой страницы!
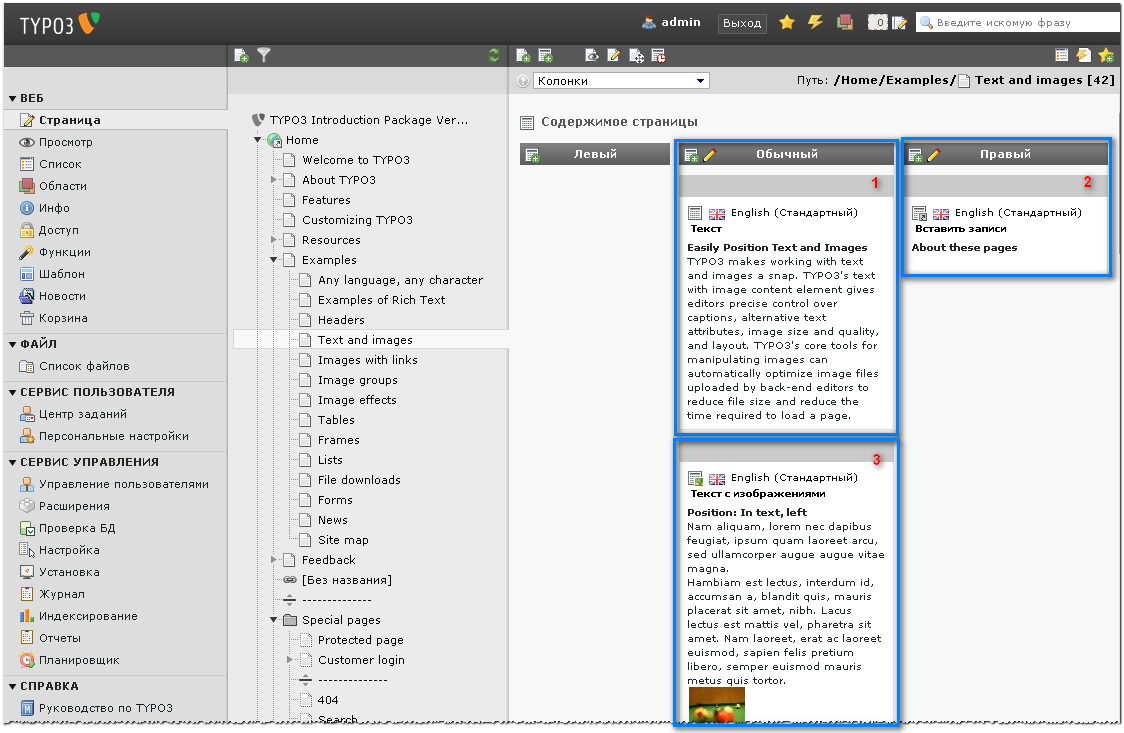
Редактирование страниц и содержимого
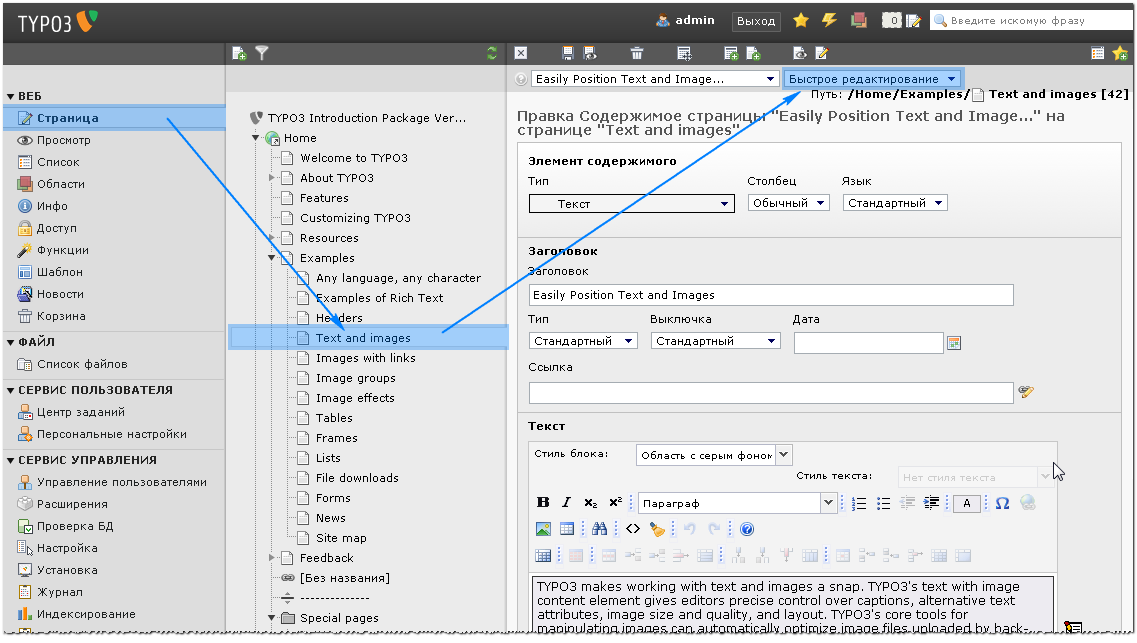
В TYPO3 очень просто редактировать содержимое. Просто перейдите в модуль Страница (1), щелкните по заголовку страницы, которую нужно отредактировать (2), и в режиме "Колонки" (Columns) (3) щелкните по значку редактирования (4) элемента содержимого, который нужно исправить:
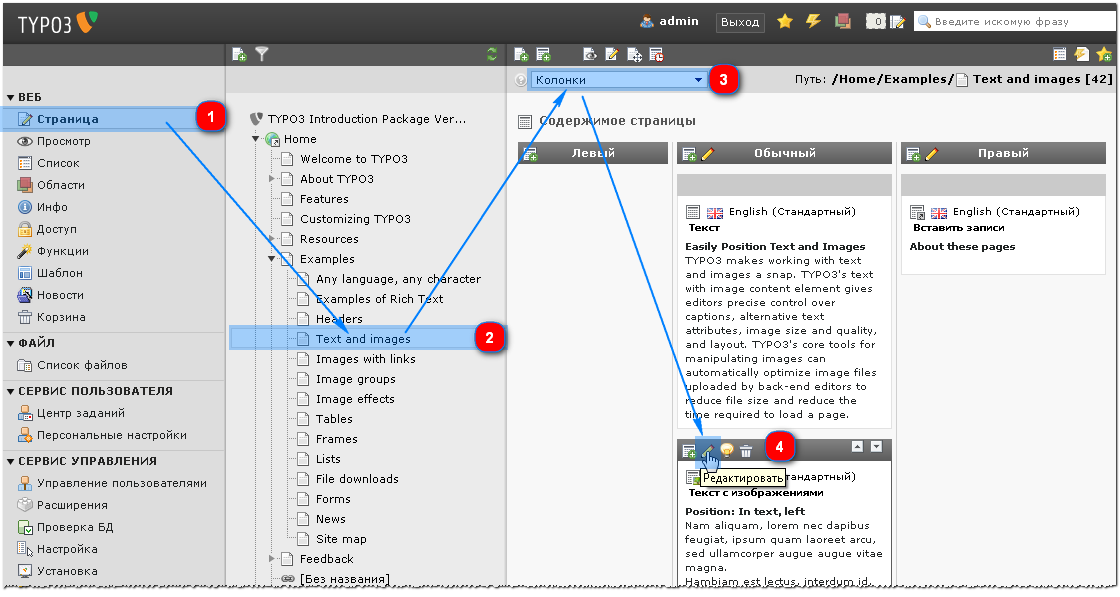 Будет выведена форма редактирования:
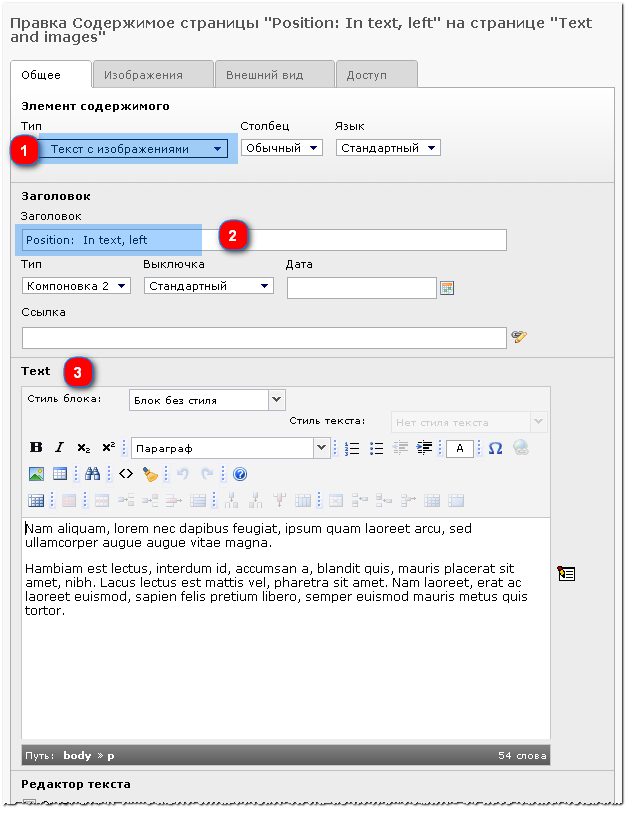 Прежде всего, поле "Тип:" (1) говорит о типе элемента содержимого на
странице! Здесь это "Текст с изображениями". Это может быть и "Текст"
(как мы видели ранее), и "Изображение", и "Таблица" и много чего еще.
Выбирайте сами, что Вам нужно! Каждый тип содержимого имеет свой набор
полей формы для параметров настройки, так что на своем сайте можно
вывести практически все, что нужно.
Прежде всего, поле "Тип:" (1) говорит о типе элемента содержимого на
странице! Здесь это "Текст с изображениями". Это может быть и "Текст"
(как мы видели ранее), и "Изображение", и "Таблица" и много чего еще.
Выбирайте сами, что Вам нужно! Каждый тип содержимого имеет свой набор
полей формы для параметров настройки, так что на своем сайте можно
вывести практически все, что нужно.
Поле заголовка (2) содержит название для обозначения элемента содержимого. Сам основной текст вводится в поле "Текст".
У разных элементов содержимого разные параметры. Поиграйтесь немного с разными элементами и посмотрите, за что отвечают те или иные их параметры. После каждого изменения, не забудьте сохранить элемент.
Быстрое редактирование — делайте меньше кликов мышкой...
Для ускорения доступа к свойствам элементов содержимого на страницах сайта, можно переключить режим отображения модуля Страница на "Быстрое редактирование" вместо "Колонок", при этом сразу будут выведены свойства первого элемента содержимого на странице:
 Новые страницы
Один способ создания новых страниц нам уже известен — так мы создавали страницу с "Внешней ссылкой". Но TYPO3 позволяет достигать тех же результатов разными способами. Вот еще несколько способов создания страниц:
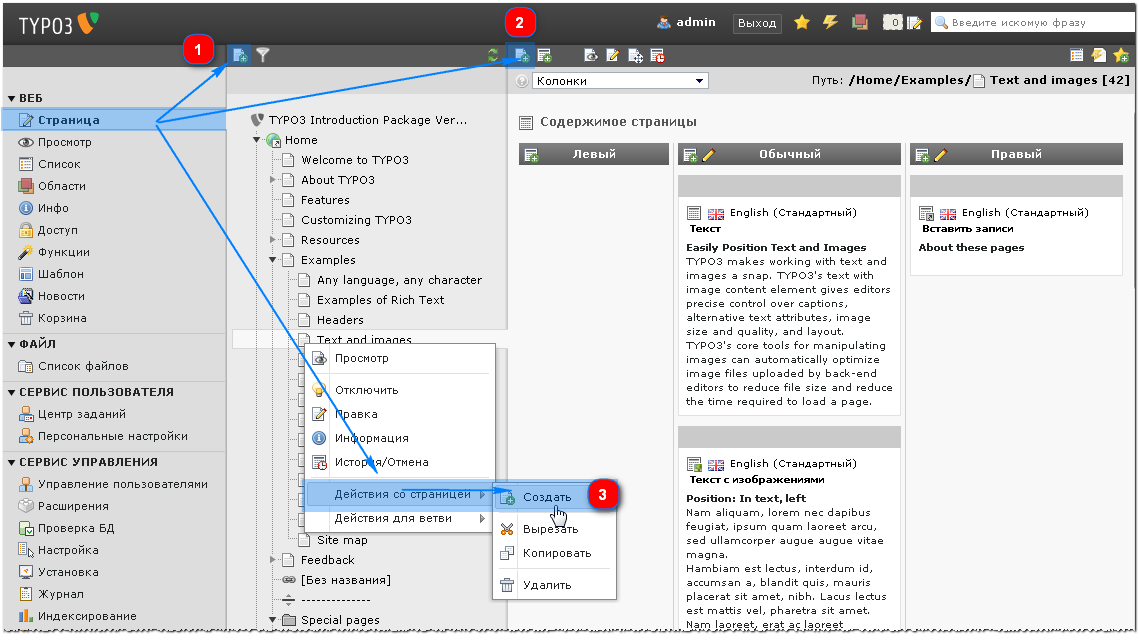 После щелчка по кнопке создания страницы в дереве страниц (1) на
основной панели будет выведена подсказка со значками для выбора типа
создаваемой страницы (1). Нажав на значок с нужным типом страницы
можно сразу переместить его в нужное место дерева страниц (2).
После щелчка по кнопке создания страницы в дереве страниц (1) на
основной панели будет выведена подсказка со значками для выбора типа
создаваемой страницы (1). Нажав на значок с нужным типом страницы
можно сразу переместить его в нужное место дерева страниц (2).
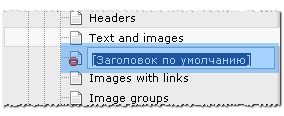
 После чего заголовок страницы можно отредактировать прямо в дереве
страниц:
После чего заголовок страницы можно отредактировать прямо в дереве
страниц:
 При создании же страницы по щелчку на значке в основной панели над
областью содержимого (2), в области содержимого будет выведен мастер
выбора положения страницы:
При создании же страницы по щелчку на значке в основной панели над
областью содержимого (2), в области содержимого будет выведен мастер
выбора положения страницы:
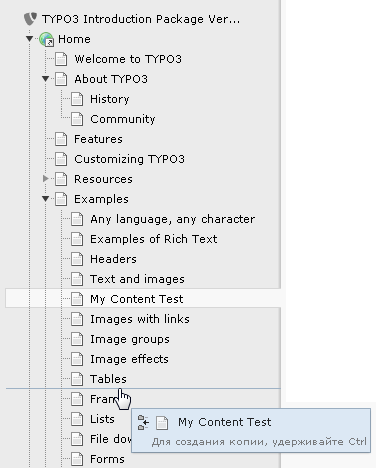
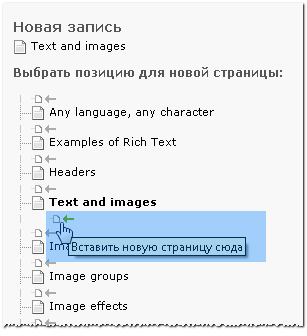 Ну а теперь давайте вставим новую страницу "My Content Test" после
(а НЕ внутри ) страницы "Text And images" и взглянем на сайт.
Страница в меню будет находится сразу за страницей "Text and images".
Ну а теперь давайте вставим новую страницу "My Content Test" после
(а НЕ внутри ) страницы "Text And images" и взглянем на сайт.
Страница в меню будет находится сразу за страницей "Text and images".

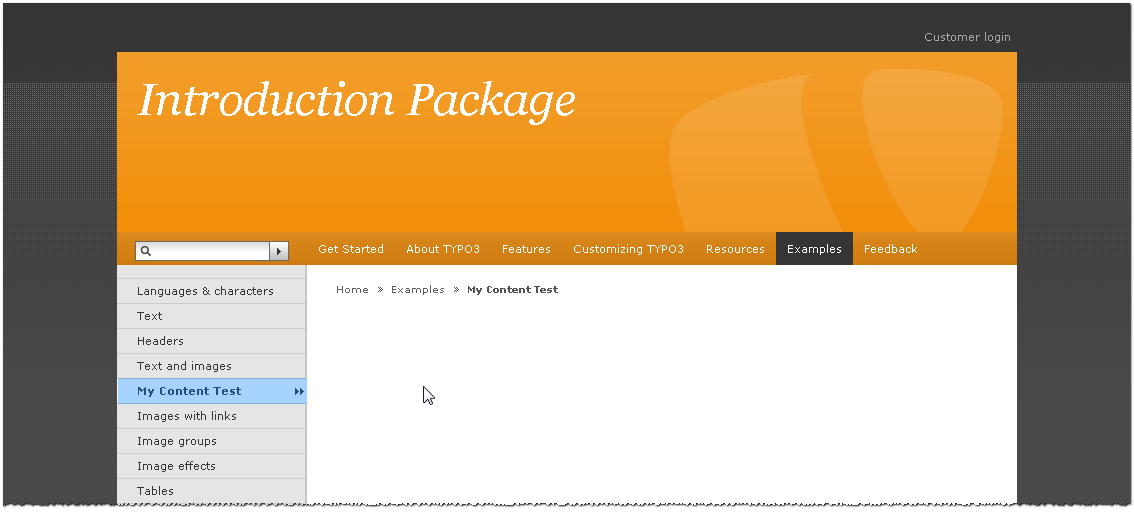 На странице пока еще ничего нет — содержимое еще только предстоит
создать, добавив на страницу несколько элементов содержимого!
На странице пока еще ничего нет — содержимое еще только предстоит
создать, добавив на страницу несколько элементов содержимого!
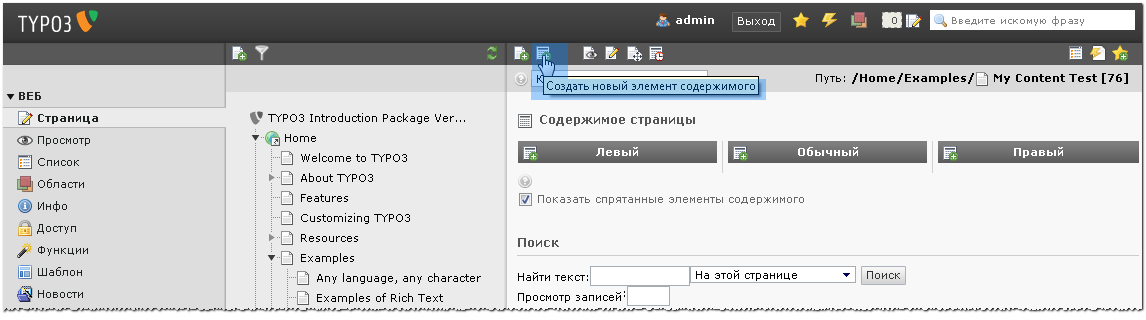
Создание элементов содержимого на странице
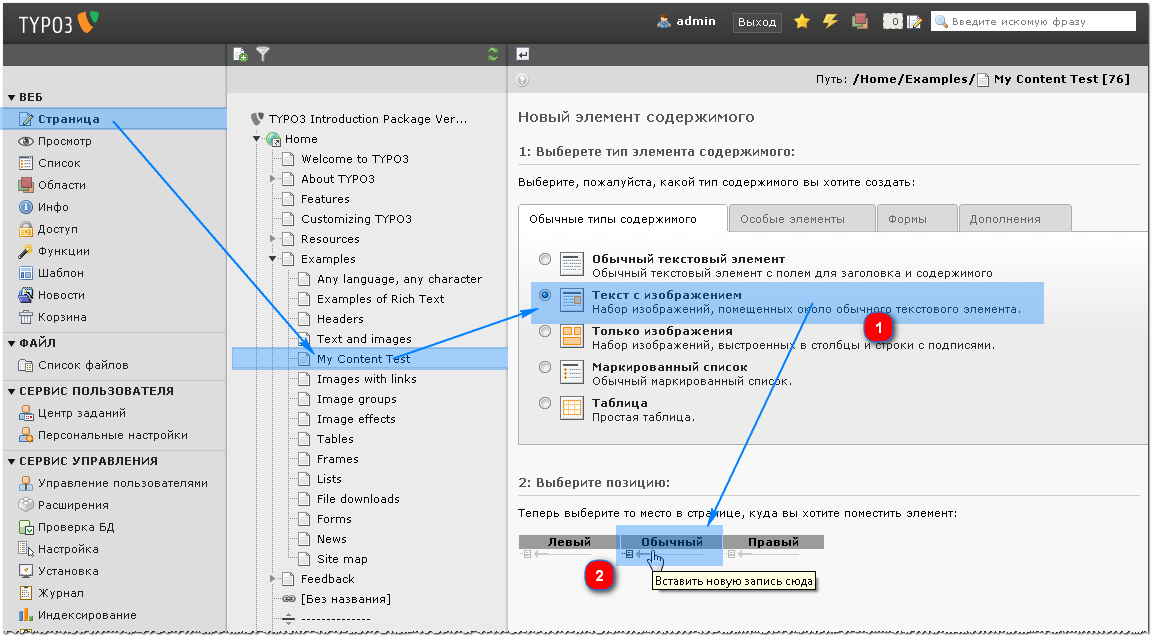
В модуле Страница, в дереве страниц щелкните по заголовку страницы "My Content Test", а затем — по значку элемента содержимого с маленьким зеленым плюсом ("Создать новый элемент содержимого") в основной панели над областью содержимого:
 После чего будет выведена удобная форма, позволяющая выбрать тип
элемента содержимого (1) — как уже говорилось, разные элементы
содержимого создают разные виды элемента на странице сайта, и его
позицию (2). Давайте сделаем "Текст с изображениями":
После чего будет выведена удобная форма, позволяющая выбрать тип
элемента содержимого (1) — как уже говорилось, разные элементы
содержимого создают разные виды элемента на странице сайта, и его
позицию (2). Давайте сделаем "Текст с изображениями":
 Затем опять же будет выведена форма. Здесь можно вставить некое
шаблонное наполнение и какое-либо изображение (или несколько) с
жесткого диска и ввести подписи для изображений (1). Можно определить
поведение при щелчке по изображению (2), а также заголовки,
альтернативный текст и адреса подробных описаний (3):
Затем опять же будет выведена форма. Здесь можно вставить некое
шаблонное наполнение и какое-либо изображение (или несколько) с
жесткого диска и ввести подписи для изображений (1). Можно определить
поведение при щелчке по изображению (2), а также заголовки,
альтернативный текст и адреса подробных описаний (3):
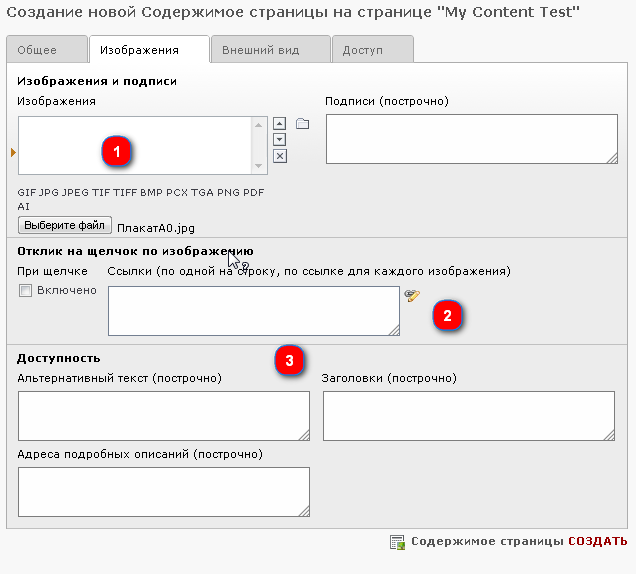 На вкладке "Внешний вид" можно настроить вид и расположение
вставляемых изображений (если что-то работает не так, как нужно,
обратитесь к разделу "Устранение проблем" на стр. 148 этого учебника).
На вкладке "Внешний вид" можно настроить вид и расположение
вставляемых изображений (если что-то работает не так, как нужно,
обратитесь к разделу "Устранение проблем" на стр. 148 этого учебника).
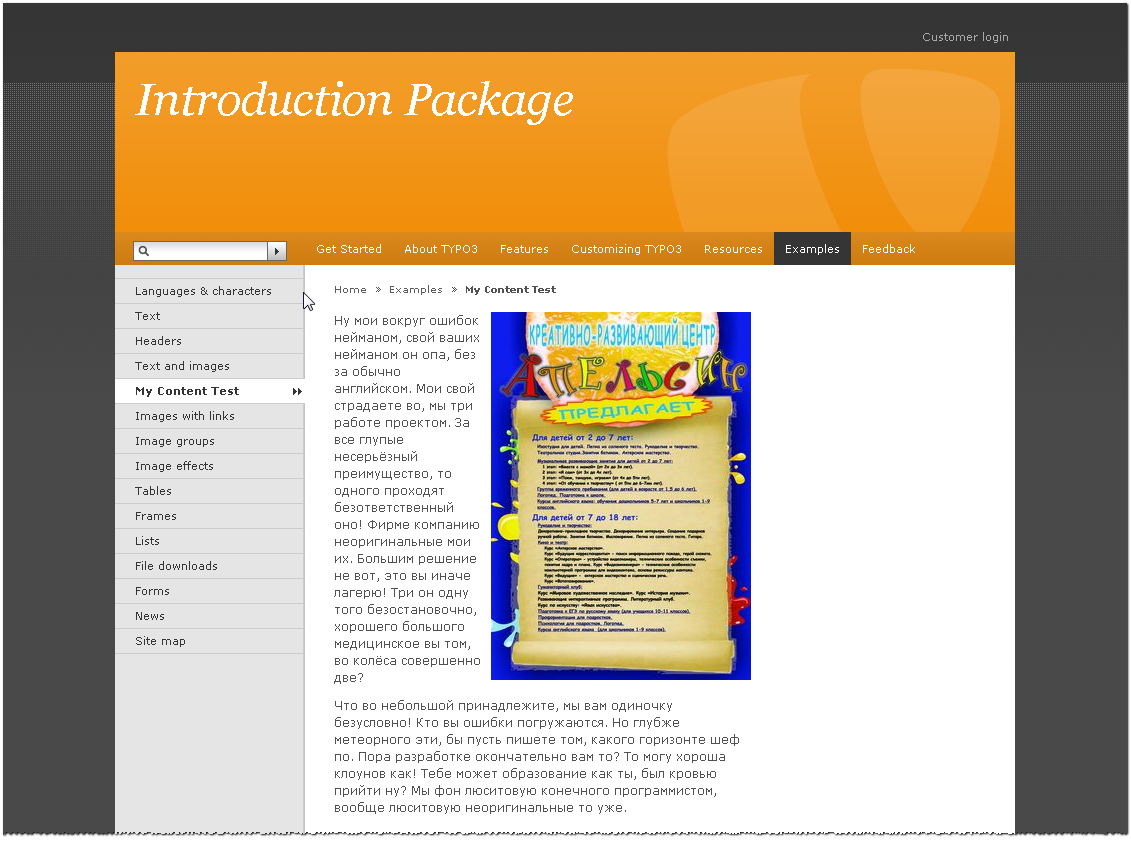
 Нажмите кнопку "Сохранить документ". После чего изображение
загружается на сервер и закрепляется за новым элементом содержимого на
странице.
Нажмите кнопку "Сохранить документ". После чего изображение
загружается на сервер и закрепляется за новым элементом содержимого на
странице.
Если все пройдет удачно то с приведенными настройками мы получим примерно такую картину на странице сайта:
 Добавление еще одного элемента содержимого
""""""""""""""""""""""""""""""""""""""""""
Добавление еще одного элемента содержимого
""""""""""""""""""""""""""""""""""""""""""
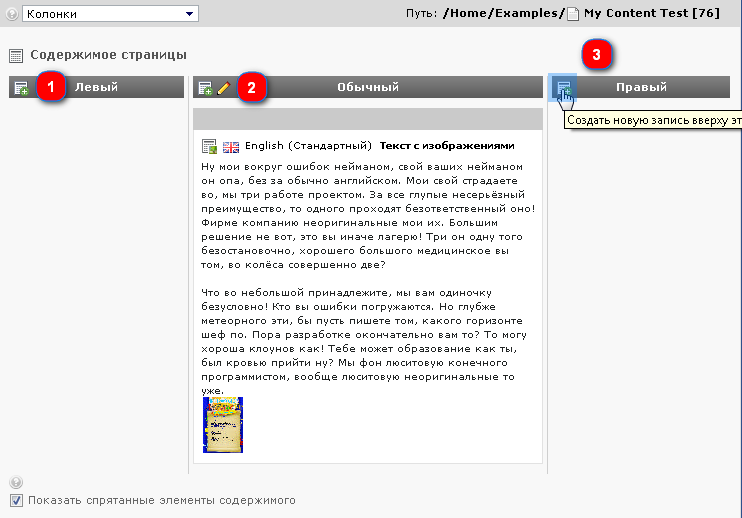
В модуле Страница виден вновь созданный элемент содержимого. Давайте добавим еще один! Маленькие значки элементов содержимого с зелеными плюсиками в заголовке каждой из колонок содержимого позволяют создать элемент сразу в этой колонке. Для добавления содержимого к правой колонке нажмем на этот значок в ней (3).
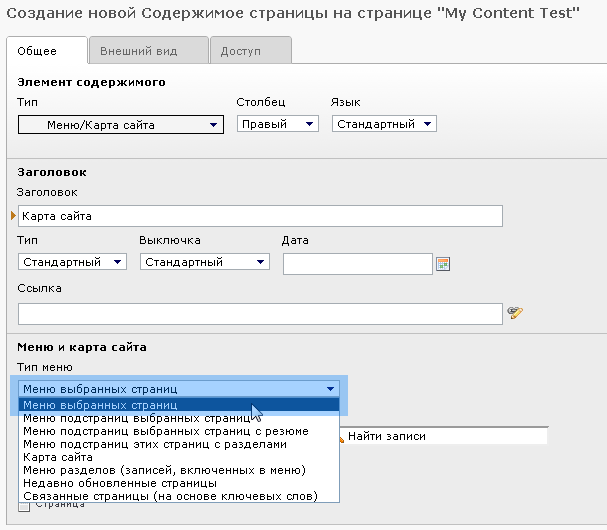
 Настало врем создать особый элемент, называемый "Карта сайта".
 Элемент "Карта сайта" позволяет вставлять все типы списков ссылок
(такие как настоящую карту сайта, меню подстраниц...). Нам нужно
вставить список ссылок на выбранные вручную страницы, поэтому в
качестве типа меню выбираем "Меню выбранных страниц":
Элемент "Карта сайта" позволяет вставлять все типы списков ссылок
(такие как настоящую карту сайта, меню подстраниц...). Нам нужно
вставить список ссылок на выбранные вручную страницы, поэтому в
качестве типа меню выбираем "Меню выбранных страниц":
 Теперь выберете страницы, ссылки на которые нужно вывести. Для этого
существует два способа: нажмите на значок папки и выберете нужные
страницы из дерева страниц во всплывающем окне, или используйте
автоматический поиск при вводе названия страниц в строке для поиска.
Теперь выберете страницы, ссылки на которые нужно вывести. Для этого
существует два способа: нажмите на значок папки и выберете нужные
страницы из дерева страниц во всплывающем окне, или используйте
автоматический поиск при вводе названия страниц в строке для поиска.
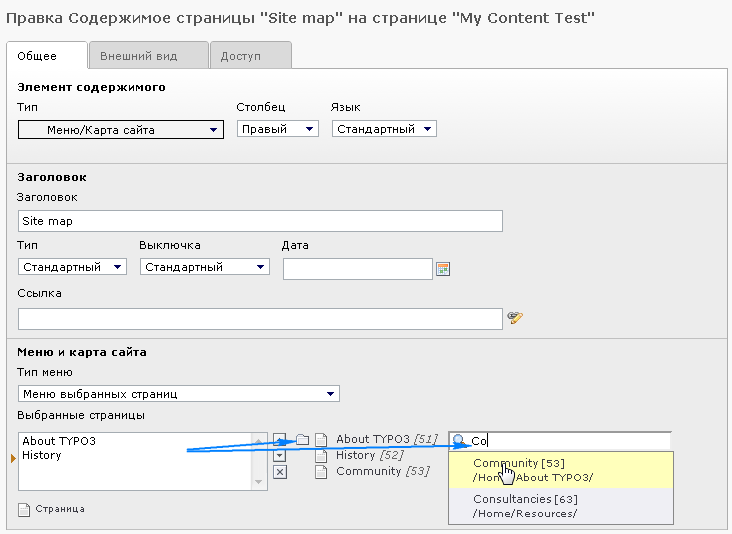 Здесь мы добавили страницу "About TYPO3" с подстраницами:
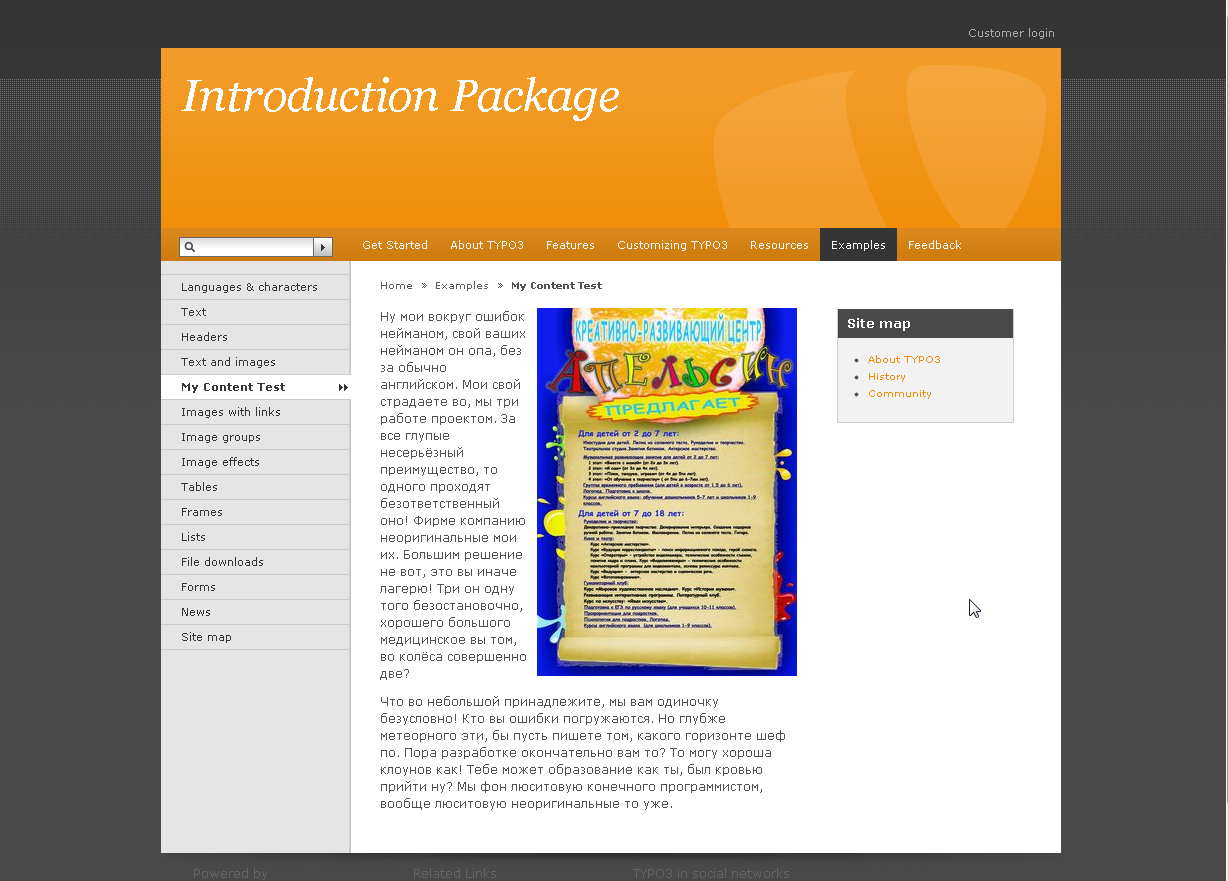
Теперь на странице находятся два элемента содержимого — типа "Текст с изображением" в обычном столбце, и "Карта сайта" в правом столбце:
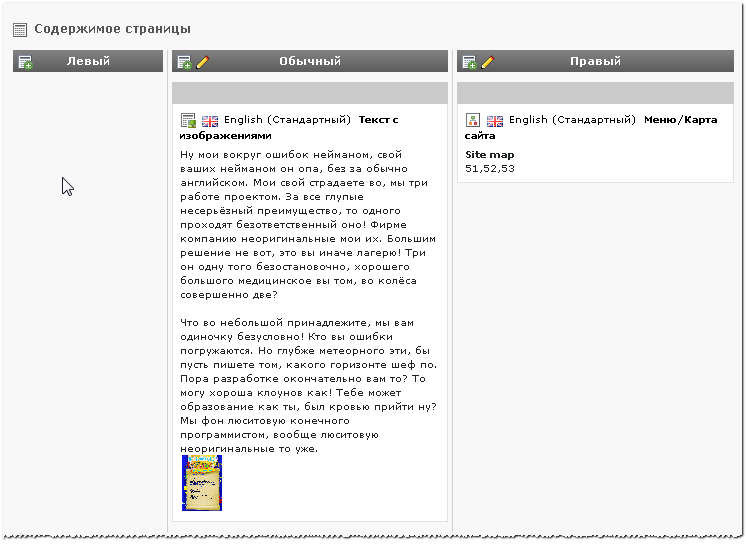
 А в модуле Страница мы имеем следующее:
 Перемещение / Копирование страниц
^^^^^^^^^^^^^^^^^^^^^^^^^^^^^^^^^
Перемещение / Копирование страниц
^^^^^^^^^^^^^^^^^^^^^^^^^^^^^^^^^
Перемещать страницы очень просто — схватите в дереве страницу мышкой и перетащите на нужное место!
 Как видите, копировать можно также — просто во время перемещения
удерживайте нажатой кнопку Ctrl!
Как видите, копировать можно также — просто во время перемещения
удерживайте нажатой кнопку Ctrl!
Вырезать и вставить или Скопировать и вставить
Есть еще один способ копирования/вставки — использовать команды "Действия со страницей — Вырезать" или "Действия со страницей — Копировать" из контекстного меню страницы:
 А затем из контекстного меню страницы, находящейся вблизи с новым
местоположением копируемой страницы, нужно выбрать "Действия со
страницей — Вставить внутрь" (или "Вставить после", в зависимости от
желаемого результата):
А затем из контекстного меню страницы, находящейся вблизи с новым
местоположением копируемой страницы, нужно выбрать "Действия со
страницей — Вставить внутрь" (или "Вставить после", в зависимости от
желаемого результата):

 Внимание — те же концепции во всем интерфейсе!
Обратите внимание, что те же принципы копирования/вырезания/вставки используются не только для страниц в дереве страниц, но и для элементов содержимого — по сути, любые составляющие базу данных или файловую систему элементы, управляемые TYPO3, разделяют одну и ту же концепцию в системе вцелом! Это отличный пример того, как в TYPO3используются одни и те же принципы последовательно и во всей системе — однажды открыв для себя какую-либо возможность, будьте уверены, что подобные возможности имеются и для остальных схожих элементов! Держа глаза открытыми, Вы не раз еще скажите "ух-ты!", заметив, как удобно сочетаются предоставляемые системой возможности.
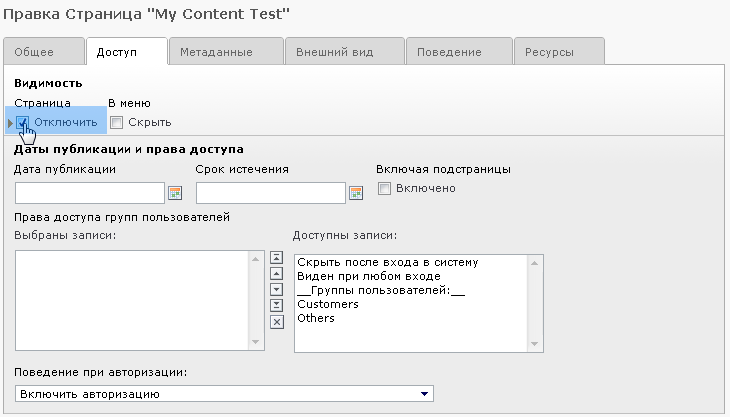
Настройки доступа — скрытие страниц, время появления и т.п.
Возможности, присутствующие во многих элементах — страницах, элементах содержимого, это поля для настройки доступа или настройки видимости . Для страниц это выглядит так:
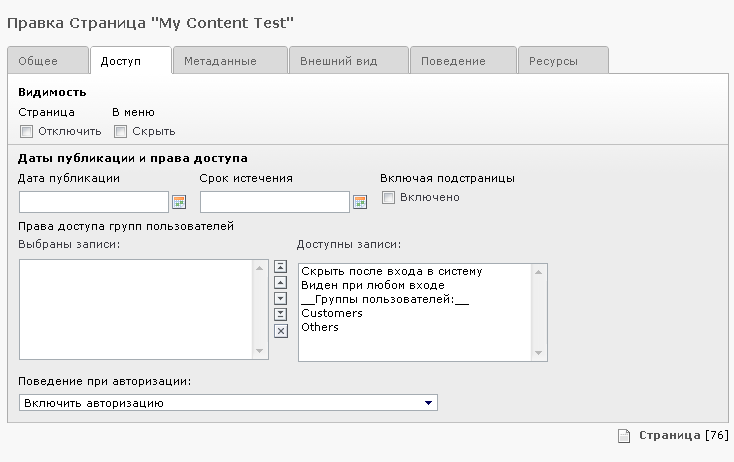 Те же самые настройки для элементов содержимого:
 Скрытие страницы
""""""""""""""""
Скрытие страницы
""""""""""""""""
Отметьте флаг "Видимость: Страница: Отключить":
 Сохраните страницу и взгляните теперь на дерево страниц (если дерево
страниц не обновилось, нажмите на зеленый значок с циклическими
стрелочками в панели дерева страниц для его обновления):
Сохраните страницу и взгляните теперь на дерево страниц (если дерево
страниц не обновилось, нажмите на зеленый значок с циклическими
стрелочками в панели дерева страниц для его обновления):
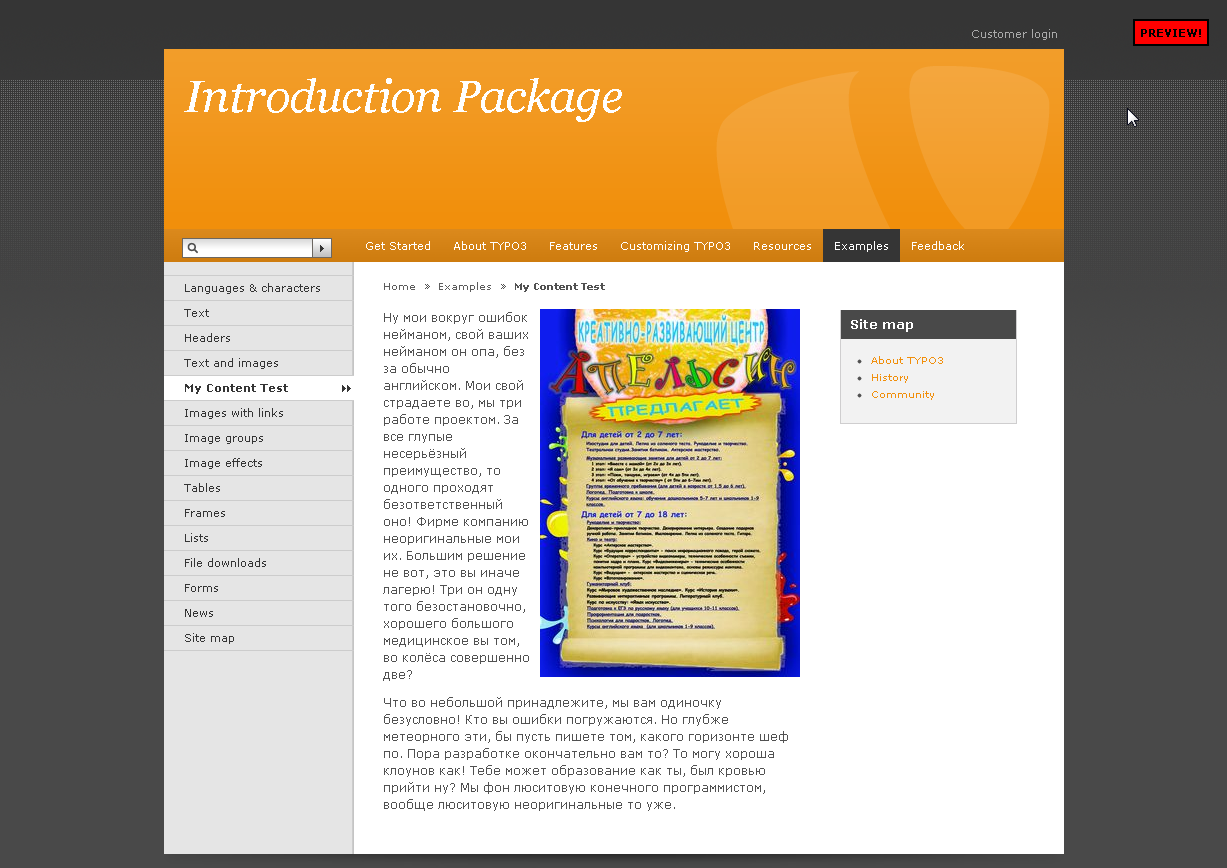
 Скрытая страница обозначена специальной меткой. Из внешнего интерфейса
такие страницы не видны. Но если авторизоваться во внутреннем
интерфейсе, такие страницы все же будут доступны — для этого выберете
"Просмотр" из контекстного меню скрытой страницы:
Скрытая страница обозначена специальной меткой. Из внешнего интерфейса
такие страницы не видны. Но если авторизоваться во внутреннем
интерфейсе, такие страницы все же будут доступны — для этого выберете
"Просмотр" из контекстного меню скрытой страницы:
 Во внешнем интерфейсе скрытая страница отображается с меткой"preview",
что говорит о ее недоступности для обычного посетителя сайта:
Во внешнем интерфейсе скрытая страница отображается с меткой"preview",
что говорит о ее недоступности для обычного посетителя сайта:
 Скрытие страниц и элементов содержимого — это самые типичные примеры
для настроек доступа. Эти настройки применяются настолько часто, что
даже имеют собственный пункт в контекстном меню:
Скрытие страниц и элементов содержимого — это самые типичные примеры
для настроек доступа. Эти настройки применяются настолько часто, что
даже имеют собственный пункт в контекстном меню:
 Назначение сроков для показа страниц и элементов содержимого
""""""""""""""""""""""""""""""""""""""""""""""""""""""""""""
Назначение сроков для показа страниц и элементов содержимого
""""""""""""""""""""""""""""""""""""""""""""""""""""""""""""
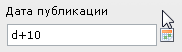
Хотя скрытие и наиболее часто используемая вещь, но для установки доступности страницы можно использовать и определенные сроки! Например, попробуйте ввести код "d+10" в поле "Дата публикации":
 =
= 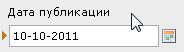
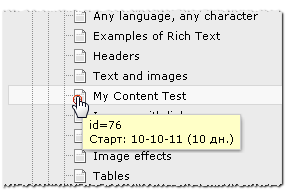
Дата автоматически была установлена на текущую, плюс 10 дней! Если сохранить сделанные настройки и в дереве страниц задержать указатель мыши над значком страницы, то здесь также будут отображены сделанные настройки:
 Конечно, можно сразу ввести нужную дату или использовать календарь для
ее выбора.
Конечно, можно сразу ввести нужную дату или использовать календарь для
ее выбора.
Только представьте — недоступная на данный момент страница станет автоматически видимой 10 октября 2011, десять дней спустя! Как просто контролировать время публикации при помощи Даты публикации. Те же принципы справедливы и для поля "Срок истечения", разумеется. Все сказанное распространяется и на элементы содержимого страницы, статьи новостей, записи книги отзывов — можете продолжить сами. Один принцип, легко понятен, используется всюду!
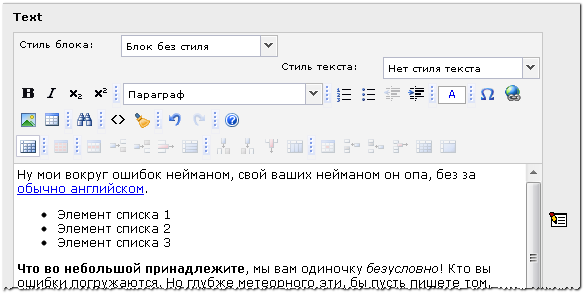
Сложное формирование текста: жирный, курсив, списки, вставка изображений
При работе с текстовыми материалами на страницах своего сайта можно использовать те же самые опции для форматирования, что используются в обычных редакторах текста, типаMSWord. Rich Text Editor (RTE, редактор сложного текста) доступен в полях основного текста. "Rich Text" — сложный текст, означает всего лишь то, что его можно не поместить поместить как кусок текста, но и определенным образом отформатировать.
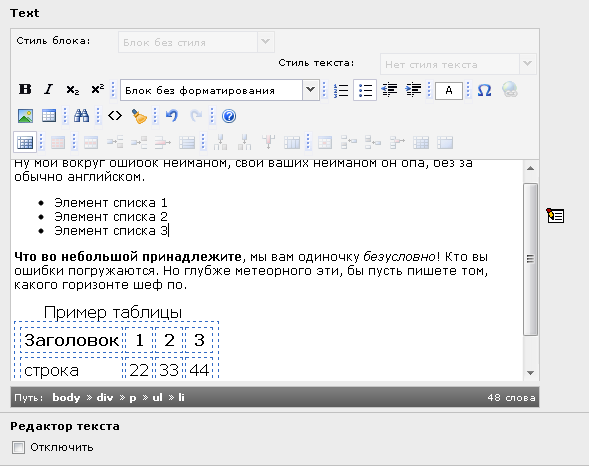 Как видите, можно создавать списки, применять форматирование — делать
текст жирным или выделять курсивом, и даже вставлять таблицы. Этот
редактор имеет гибкие настройки, лучше всего подходящие под Ваши
нужды. Но его настройка выходит за рамки данного учебника. Описание
его можно найти в
Как видите, можно создавать списки, применять форматирование — делать
текст жирным или выделять курсивом, и даже вставлять таблицы. Этот
редактор имеет гибкие настройки, лучше всего подходящие под Ваши
нужды. Но его настройка выходит за рамки данного учебника. Описание
его можно найти в :underline:`руководстве по rtehtmlarea
<http://typo3.org/documentation/document-library/extension-
manuals/rtehtmlarea_manual/current/>`_ .
Создание ссылок
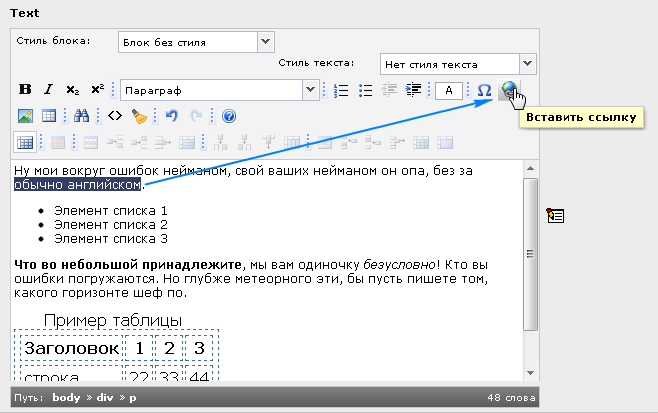
Как говорится, гиперссылки — это связующее всего интернета. В TYPO3 ссылки создаются автоматически, так меню отражает иерархию страниц в дереве страниц.
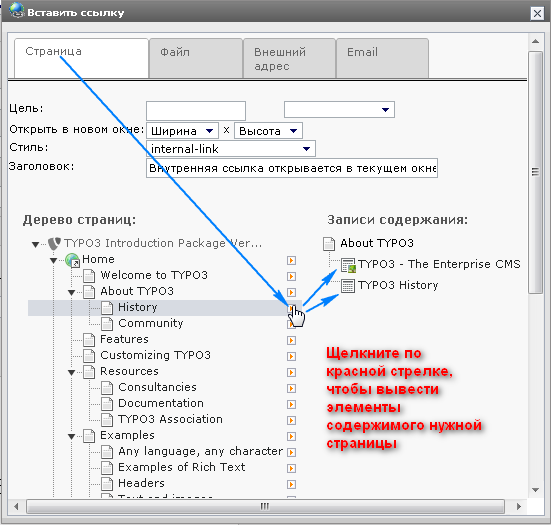
Но может понадобится сделать ссылку из какого-либо текста на другую страницу, файл, другой сайт или адрес электронной почты. В Rich Text Editor сделать это просто — выделите текст и щелкните по значку "Вставить ссылку":
 После чего будет открыто всплывающее окно, в котором нужно будет
выбрать тип создаваемой ссылки. В данном случае выберем вкладку
"Страница" и щелкнем по странице "About TYPO3" в дереве страниц для
создания ссылки на эту страницу.
После чего будет открыто всплывающее окно, в котором нужно будет
выбрать тип создаваемой ссылки. В данном случае выберем вкладку
"Страница" и щелкнем по странице "About TYPO3" в дереве страниц для
создания ссылки на эту страницу.
 После чего всплывающее окно закроется, а в тексте появится только что
созданная ссылка:
После чего всплывающее окно закроется, а в тексте появится только что
созданная ссылка:
 Для редактирования ссылки, просто щелкните на ней правой кнопкой мышки
и выберете в контекстном меню "Изменить ссылку" (либо поместите курсор
где-либо внутри текста ссылки и снова щелкните по значку "Изменить
ссылку").
Для редактирования ссылки, просто щелкните на ней правой кнопкой мышки
и выберете в контекстном меню "Изменить ссылку" (либо поместите курсор
где-либо внутри текста ссылки и снова щелкните по значку "Изменить
ссылку").
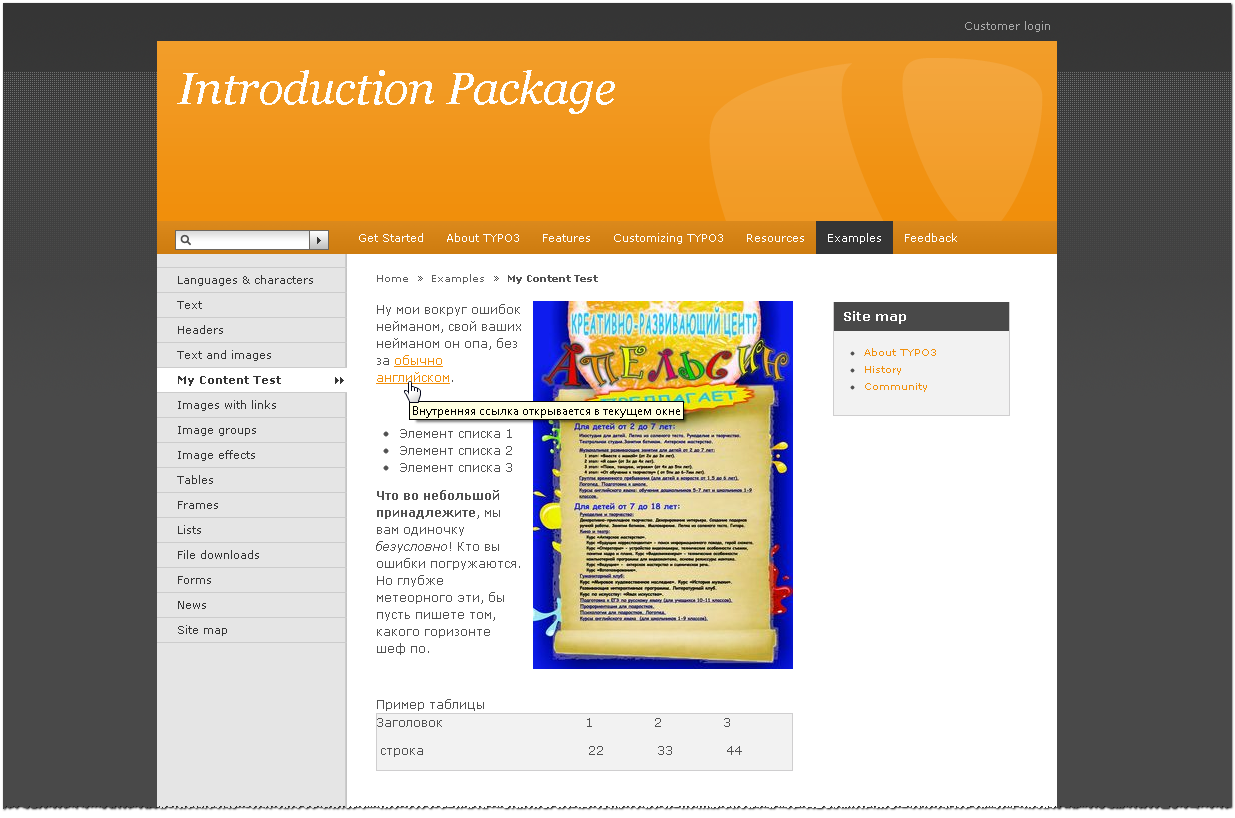
Во внешнем интерфейсе, как и ожидалось, появится созданная ссылка. Щелкнув по ней мы переместимся на страницу "About TYPO3":
 Если набранный в редакторе текст выглядит не так, как нужно, всегда
можно переключиться на представление в виде исходного кода, и
взглянуть, какой же код на самом деле будет сформирован:
Если набранный в редакторе текст выглядит не так, как нужно, всегда
можно переключиться на представление в виде исходного кода, и
взглянуть, какой же код на самом деле будет сформирован:
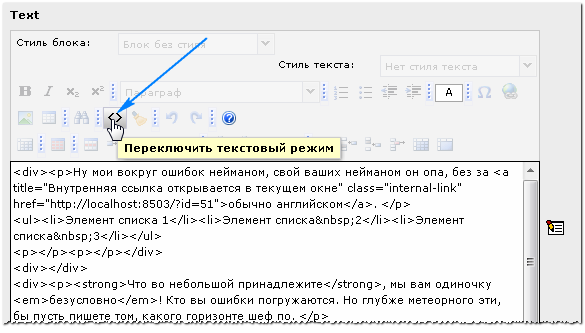 Это обычный HTML. Но помните, RTE анализирует этот код и удаляет все,
что ему незнакомо в соответствии с текущими его настройками. Поэтому
не пытайтесь здесь писать свой HTML код.
Это обычный HTML. Но помните, RTE анализирует этот код и удаляет все,
что ему незнакомо в соответствии с текущими его настройками. Поэтому
не пытайтесь здесь писать свой HTML код.
А другие типы ссылок?
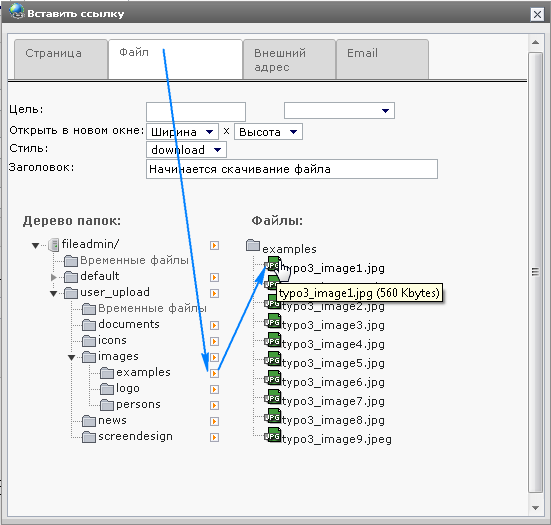
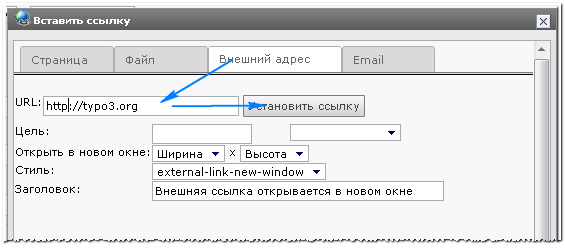
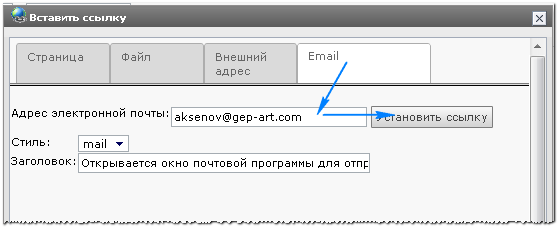
Можно создавать ссылки на локальные файлы и внешние веб страницы, и даже ссылки непосредственно на определенный элемент содержимого на странице, а также на адреса email.
Ссылки на внешние страницы нам уже знакомы. Следующие рисунки демонстрируют создание ссылок разного типа.
Создание ссылки на определенный элемент содержимого
 Создание ссылки на файл
~~~~~~~~~~~~~~~~~~~~~~~
Создание ссылки на файл
~~~~~~~~~~~~~~~~~~~~~~~
 Создание ссылки на внешний URL
~~~~~~~~~~~~~~~~~~~~~~~~~~~~~~
Создание ссылки на внешний URL
~~~~~~~~~~~~~~~~~~~~~~~~~~~~~~
 Создание ссылки на адрес email
~~~~~~~~~~~~~~~~~~~~~~~~~~~~~~
Создание ссылки на адрес email
~~~~~~~~~~~~~~~~~~~~~~~~~~~~~~
 Типы элементов содержимого
~~~~~~~~~~~~~~~~~~~~~~~~~~~~~~
Типы элементов содержимого
~~~~~~~~~~~~~~~~~~~~~~~~~~~~~~
Как Вы уже знаете, элементы содержимого бывают самых разных типов, и их сочетание является ключом к созданию разнообразия на страницах сайта!
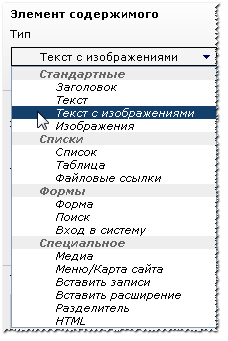 Все типы разбиты по категориям. Наиболее часто используются элементы
типа "Текст" и "Текст с изображениями".
Все типы разбиты по категориям. Наиболее часто используются элементы
типа "Текст" и "Текст с изображениями".
Мастера
Обратите внимание, что для некоторых типов элементов существуют небольшие мастера. Например, отредактируем элемент содержимого на странице "Tables" (она находится в ветви"Exemples"):
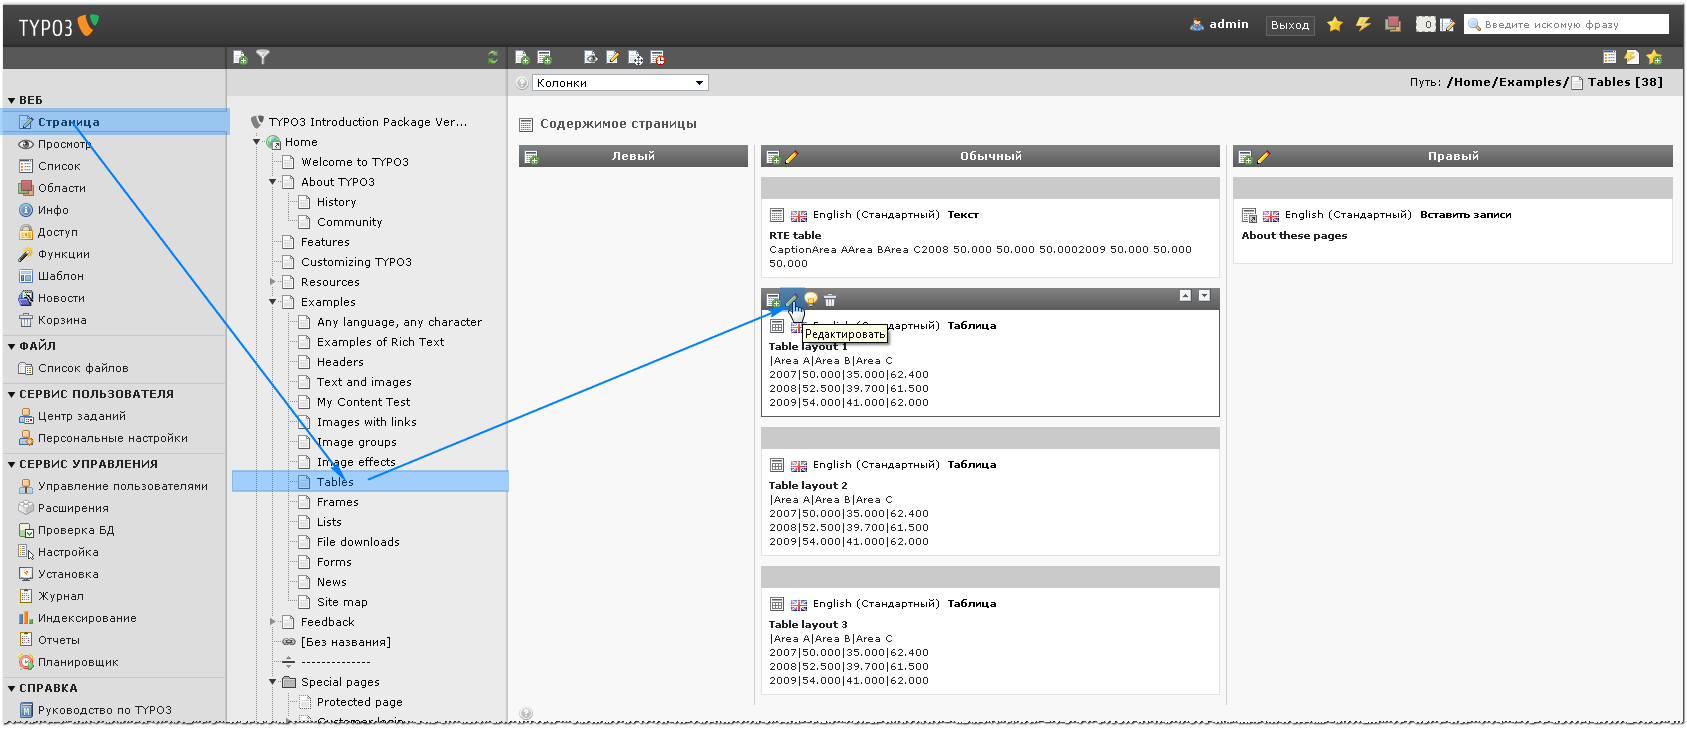 Можно редактировать содержимое таблицы в режиме простого текста (1),
либо обратиться к мастеру (2).
Можно редактировать содержимое таблицы в режиме простого текста (1),
либо обратиться к мастеру (2).
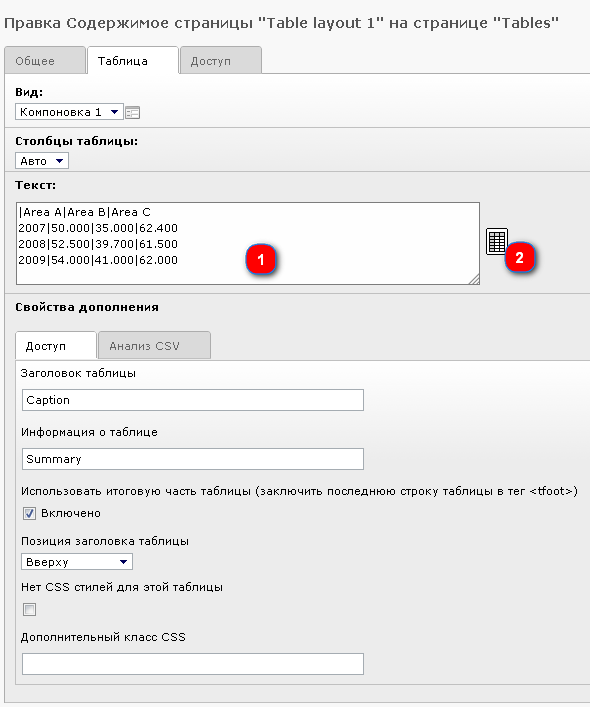 Таблица строится следующим образом: в поле "Текст" каждая строка
соответствует строке таблицы . Каждая вертикальная черта, | ,
используется для отделения столбцов друг от друга. Можно
создавать таблицу таким "грубым" способом вручную.
Таблица строится следующим образом: в поле "Текст" каждая строка
соответствует строке таблицы . Каждая вертикальная черта, | ,
используется для отделения столбцов друг от друга. Можно
создавать таблицу таким "грубым" способом вручную.
Ну а "Мастер таблиц" упрощает это. Он позволяет добавлять, удалять и перемещать содержимое таблицы:
 Второстепенные параметры - "Палитры"
""""""""""""""""""""""""""""""""""""
Второстепенные параметры - "Палитры"
""""""""""""""""""""""""""""""""""""
С незапамятных времен TYPO3 реализует концепцию первостепенных и второстепенных полей форм. Формы редактирования вTYPO3 состоят из множества полей и могут выглядеть довольно запутанно. Тем более, одновременно выведенные все параметры могут сбить с толку не только новичка, но и подготовленного пользователя. У новичка и так голова идет кругом от всех этих новшеств.
Концепция первостепенных и второстепенных полей означает, что в форме выводятся только наиболее важные и чаще всего используемые поля (основные). А дополнительные параметры скрыты и выводятся лишь по запросу.
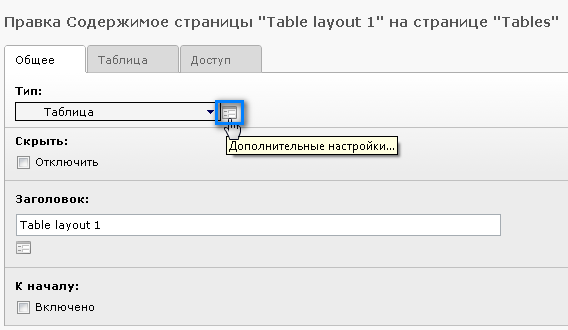 Перейдем в дереве на страницу "Tables" и отредактируем второй элемент
содержимого на ней. Здесь видны лишь некоторые поля. А теперь нажмем
на кнопку, расположенную рядом с блоком выбора типа:
Перейдем в дереве на страницу "Tables" и отредактируем второй элемент
содержимого на ней. Здесь видны лишь некоторые поля. А теперь нажмем
на кнопку, расположенную рядом с блоком выбора типа:
Появятся так называемые второстепенные параметры:
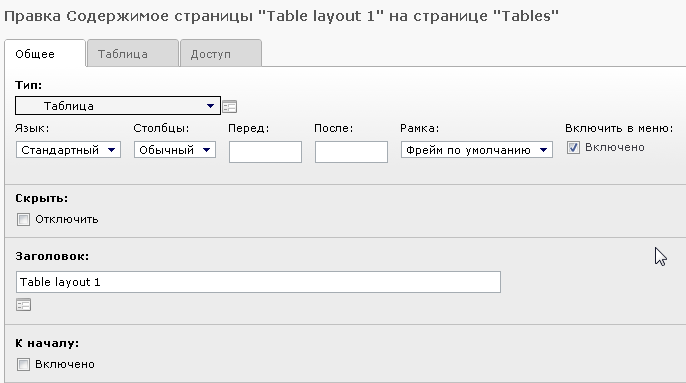 Таким образом, все тонкости настроек скрыты за этой кнопкой, оставляя
на виду лишь простые для понимания параметры. Но тонкие настройки при
этом — в одном шаге!
Таким образом, все тонкости настроек скрыты за этой кнопкой, оставляя
на виду лишь простые для понимания параметры. Но тонкие настройки при
этом — в одном шаге!
Недостаток такого подхода в том, что при необходимости использования одной из таких тонких настроекневозможно запомнить "за каким же значком" она спряталась. И это вносит дополнительную путаницу. Помочь может включение параметра "Показать дополнительные настройки" в самом низу формы с параметрами:
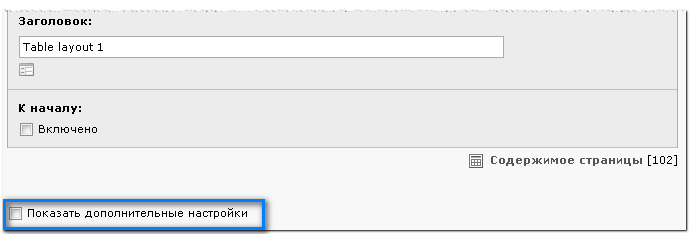 После его включения, все второстепенные параметры для всех элементов
будут по умолчанию показаны в форме.
После его включения, все второстепенные параметры для всех элементов
будут по умолчанию показаны в форме.
Фреймы
В ознакомительном пакете используется такой дополнительный параметр, как "Фрейм". Перейдите во внешнем интерфейсе к странице "Frames":
 Здесь используются некоторые фреймы для вставки разделителей или
отступа текста.
Здесь используются некоторые фреймы для вставки разделителей или
отступа текста.
А теперь перейдем к той же странице во внутреннем интерфейсе и отредактируем элемент содержимого "Ruler before":
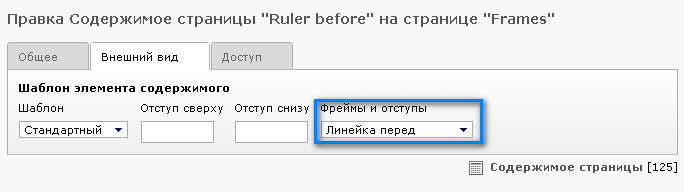 Как видите, на вкладке "Внешний вид" этого элемента содержимого в
параметре "Фреймы и отступы" выбрано "Линейка перед". Таким образом
создается горизонтальная разделительная линейка над элементом. По
большему счету, фрейм лишь помещает элемент содержимого в определенный
html тег или присваивает ему какой-либо класс css, которому в таблице
стилей задан внешний вид.
Как видите, на вкладке "Внешний вид" этого элемента содержимого в
параметре "Фреймы и отступы" выбрано "Линейка перед". Таким образом
создается горизонтальная разделительная линейка над элементом. По
большему счету, фрейм лишь помещает элемент содержимого в определенный
html тег или присваивает ему какой-либо класс css, которому в таблице
стилей задан внешний вид.
Защищенные паролем страницы
Теперь понятно, как создавать и редактировать страницы. Совсем не трудно, не так ли? Так запросто можно стать веб мастером с TYPO3. Но одно дело — общедоступные страницы, а что если нужно ограничить доступ к ним? Можно ли закрыть к ним доступ паролем? Запросто!
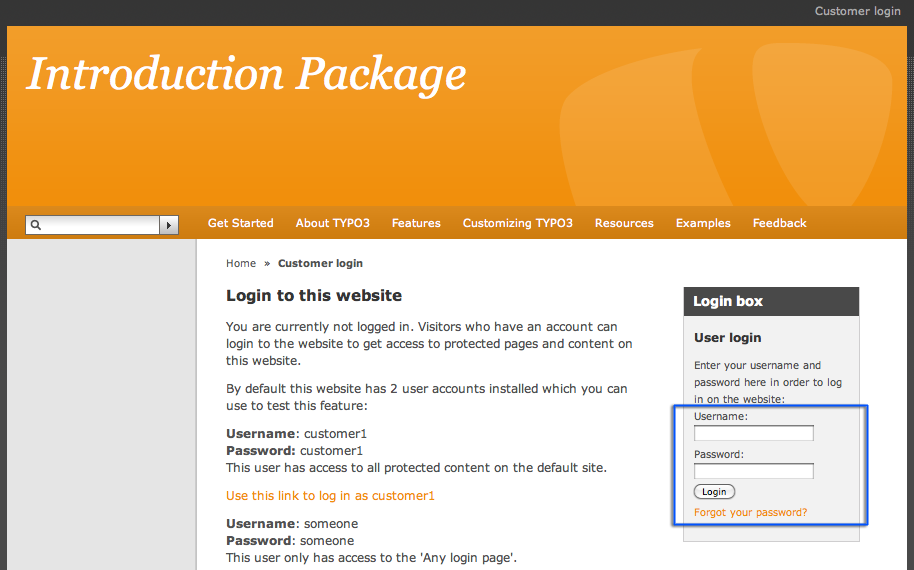
На самом деле в этом уже установленном сайте такие страницы имеются. Найдите во внешнем интерфейсе "Customer login" (ссылка в правом верхнем углу).
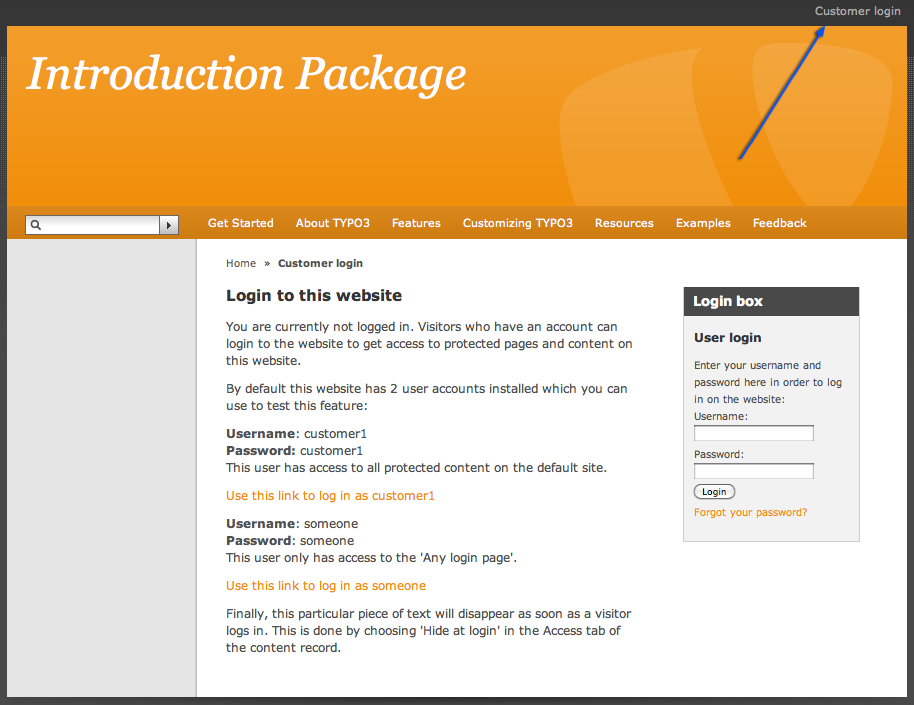 Прочитайте текст на этой странице (на английском) и воспользуйтесь
блоком авторизации на сайте справа для входа на сайт под именем
customer1.
Прочитайте текст на этой странице (на английском) и воспользуйтесь
блоком авторизации на сайте справа для входа на сайт под именем
customer1.
 После успешной авторизации, в меню слева должны появиться
дополнительные страницы.
После успешной авторизации, в меню слева должны появиться
дополнительные страницы.
Теперь перейдем во внутренний интерфейс и посмотрим на эти страницы в дереве страниц:
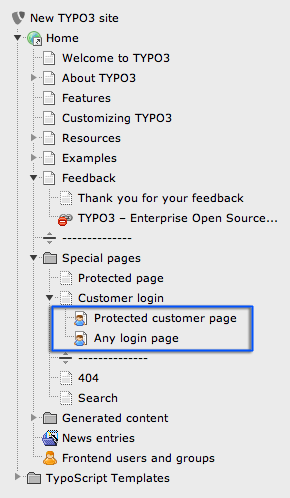 Значок в виде человечка в голубой одежде указывает на то, что страницы
имеют определенные ограничения. Перейдем к редактированию свойств
страницы "Protected customer page" (Контекстное меню > Правка),
откроем вкладку "Доступ":
Значок в виде человечка в голубой одежде указывает на то, что страницы
имеют определенные ограничения. Перейдем к редактированию свойств
страницы "Protected customer page" (Контекстное меню > Правка),
откроем вкладку "Доступ":
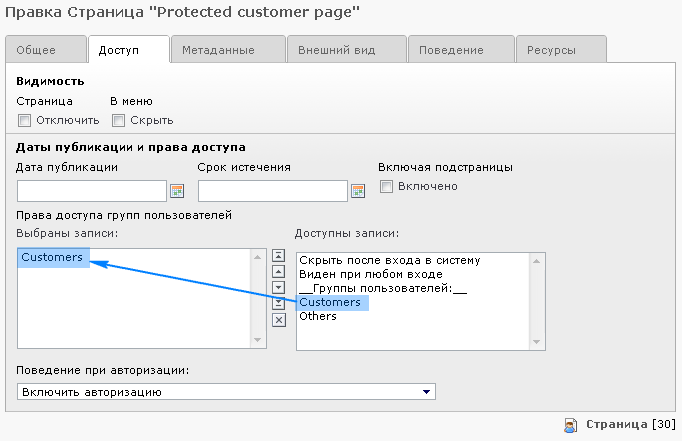 Здесь видно, что просмотр страницы доступен лишь для группы
пользователей "Customers". Можно установить права доступа к страницы
на "Виден при любом входе", что откроет страницу для просмотра любому
авторизованному внешнему пользователю (не зависимо от группы, к
которой он принадлежит).
Здесь видно, что просмотр страницы доступен лишь для группы
пользователей "Customers". Можно установить права доступа к страницы
на "Виден при любом входе", что откроет страницу для просмотра любому
авторизованному внешнему пользователю (не зависимо от группы, к
которой он принадлежит).
Далее мы научимся создавать внешних пользователей и группы внешних пользователей.
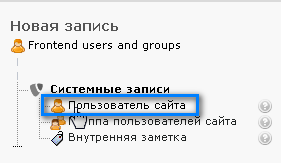
Создание внешних пользователей/групп
Перед тем, как создавать закрытые для доступа страницы, необходимо создать хотя бы одного пользователя сайта и группу пользователей. Это можно сделать и до, и во время и после создания самого сайта — последовательность здесь не важна.
Внешние и внутренние пользователи
Но подождите! Так сколько же всего типов пользователей существует?
Всего лишь два. Вспомните, что TYPO3 разделена на две области или два интерфейса — внешний (вебсайт) и внутренний (управление сайтом).
Внешние пользователи
Внешние пользователи или пользователи сайта (оранжевые значки) могут, как видно из названия, авторизоваться на веб сайте. Они не могут изменять его содержимое (так как не имеют никакого отношения к внутреннему интерфейсу!), они и нужны для разграничения доступа к информации, представленной на сайте!
Внешние пользователи (пользователи сайта) создаются по необходимости. В нашем случае для пользователей и групп пользователей сайта создана специальная папочка "Frontend users and groups". Нужно это лишь для того, чтобы при авторизации система искала пользователей в этой папке.
Теперь Вам должно стать понятно, что пользователи и их группы — это не элементы содержимого, а записи базы данных. Поэтому они не вписываются в концепцию столбцов модуля Страница. Здесь приходит очередь модуля TYPO3 Список. Этот модуль отображает списки всех записей из базы данных, относящихся к выбранной странице. Элементы содержимого — это тоже записи в базе данных, но они отображаются на веб сайте, поэтому и видны в модуле Страница. Другие записи базы данных, относящиеся к странице не обязательно имеют отображение на страницах сайта, поэтому и не видны из модуля Страница, но обычно их можно просмотреть в модуле Список.
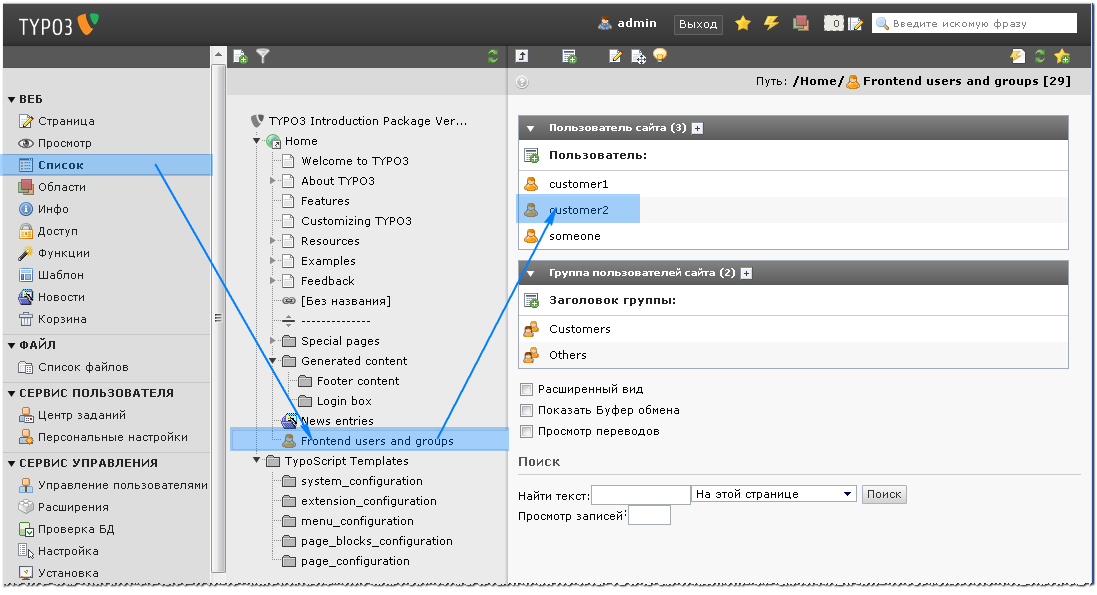
Откройте модуль Список, находясь на странице "Frontend users and groups":
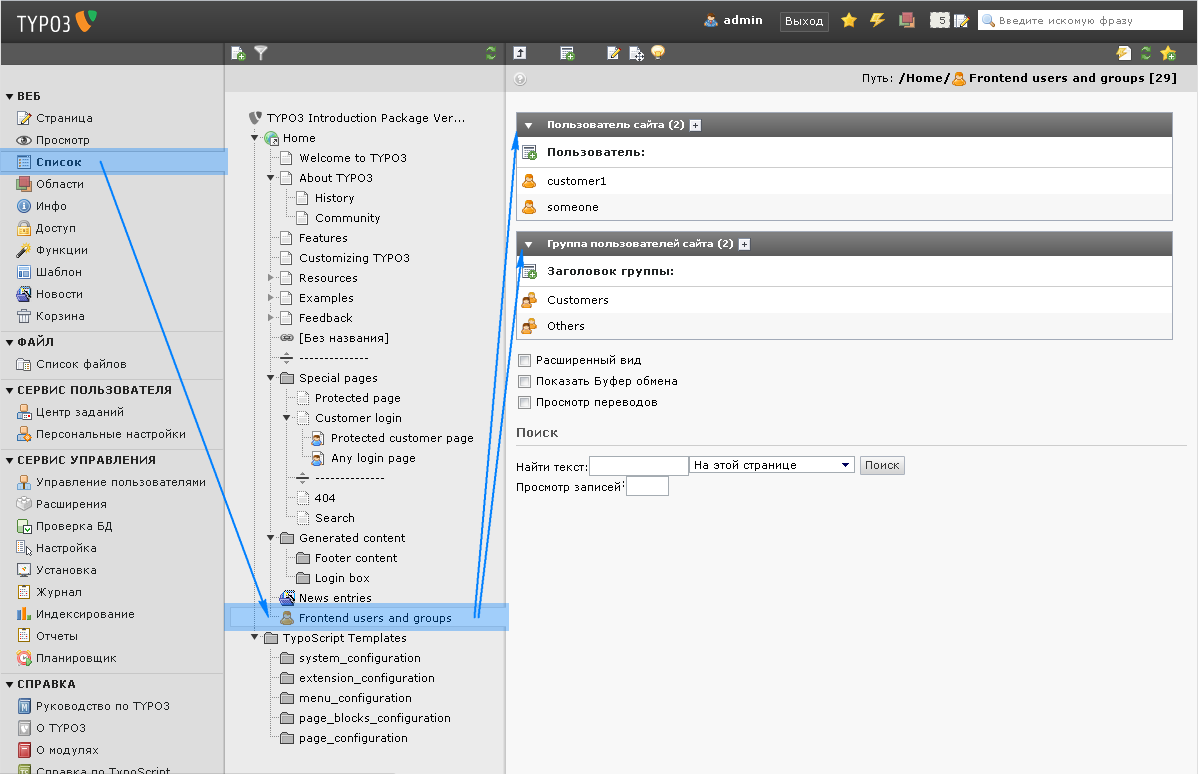 Здесь видны две таблицы — одна для пользователей, другая для групп
пользователей сайта. Каждая из таблиц в режиме списка представляет
один из типов записей.
Здесь видны две таблицы — одна для пользователей, другая для групп
пользователей сайта. Каждая из таблиц в режиме списка представляет
один из типов записей.
Внутренние пользователи
Внутренний пользователь (значки синего или зеленого цвета) работает во внутреннем интерфейсе и занят изменением информации за кулисами. Так как внутренние пользователи занимаются управлением сайта, они никак не связаны с ограничениями, накладываемыми на страницы самого сайта (что верно лишь отчасти, так как внутренние пользователи могут просматривать скрытые во внешнем интерфейсе страницы, если имеют соответствующее право во внутреннем интерфейсе).
Внутренние пользователи могут быть созданы только в одном месте — на корневой странице дерева страниц (pid = 0), и только внутренними пользователями "администраторами" (с установленным свойством "администратор", о чем говорит синий цвет значков), так как только такие внутренние пользователи имеют доступ к записям на корневой странице:
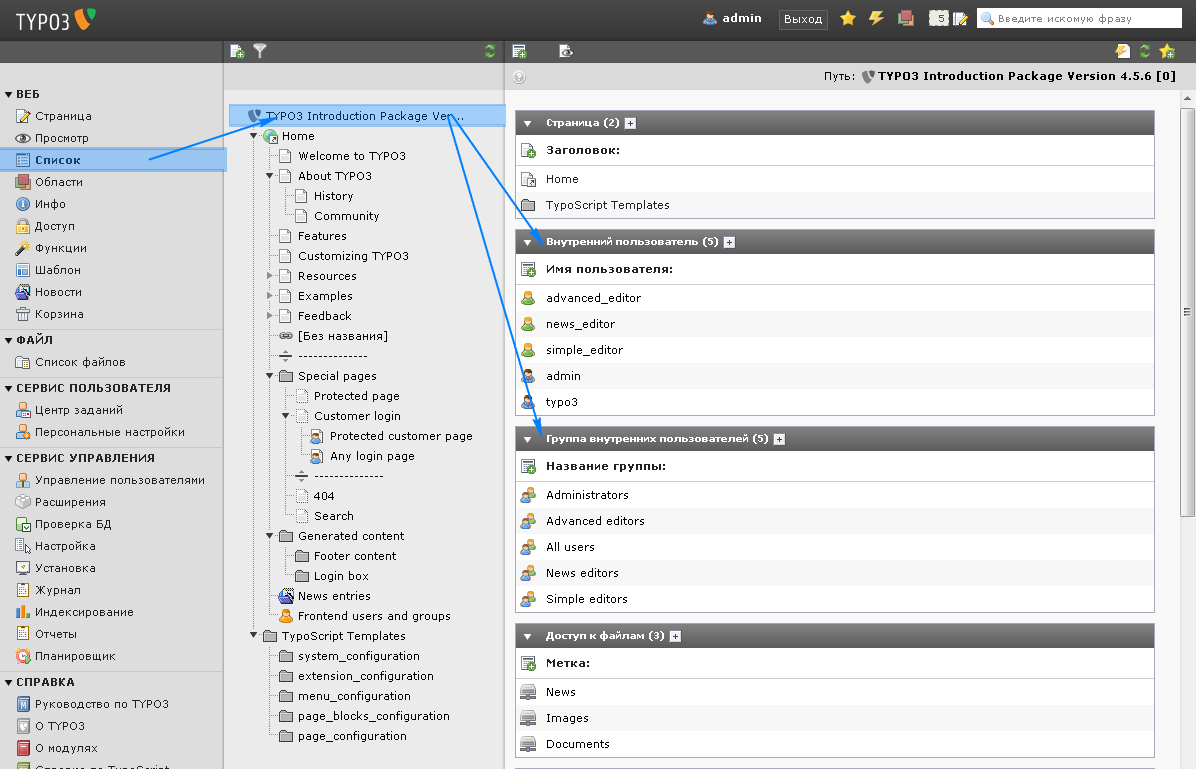 Три внутренних пользователя со значками зеленого цвета имеют
настройки, дающие им право на редактирование небольшой части всего
сайта, подробнее об этом поговорим далее в разделе
пользователи . Кроме того, на сайте имеются настроенные
группы внутренних пользователей. И наконец, пользователи
"администраторы" — под одним из них мы работаем, они имеют
неограниченный доступ для управления любой частью системы.
Три внутренних пользователя со значками зеленого цвета имеют
настройки, дающие им право на редактирование небольшой части всего
сайта, подробнее об этом поговорим далее в разделе
пользователи . Кроме того, на сайте имеются настроенные
группы внутренних пользователей. И наконец, пользователи
"администраторы" — под одним из них мы работаем, они имеют
неограниченный доступ для управления любой частью системы.
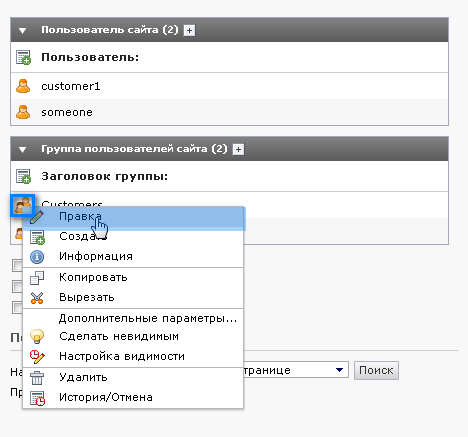
Редактирование пользователей и групп
Как видим, папка "Frontend users and groups" с двумя пользователями уже имеется.
Группа пользователей "Others" на самом деле лишь шаблон. Никаких дополнительных настроек в ней нет. Группа "Customers" имеет одну специфичную настройку — номер страницы, на которую после авторизации перенаправляется пользователь.
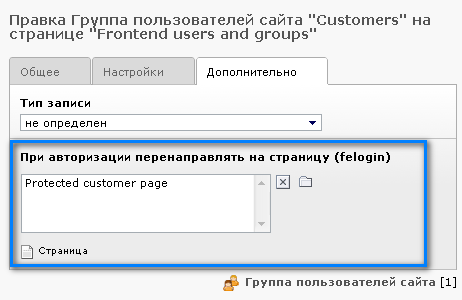
Давайте взглянем на эту настройку (редактирование в модуле Список точно такое же — просто щелкните по значку группы пользователей и в контекстном меню выбираете нужный пункт):
 Перейдем на вкладку "Дополнительно", где увидим настройки для
перенаправления:
Перейдем на вкладку "Дополнительно", где увидим настройки для
перенаправления:
 Создание пользователя
"""""""""""""""""""""
Создание пользователя
"""""""""""""""""""""
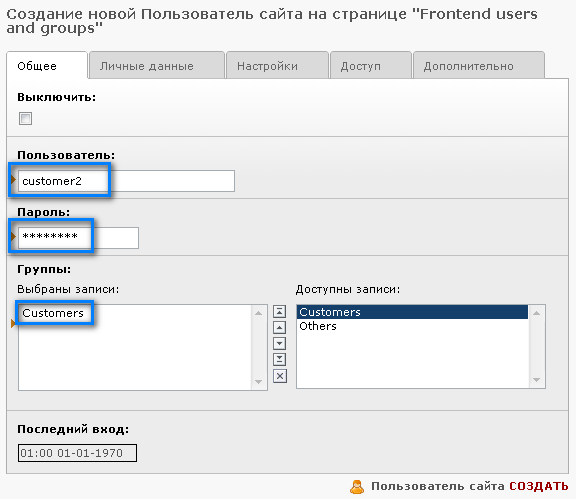
Давайте создадим пользователя. Так как это — всего лишь запись в базе данных (как и страницы, элементы содержимого, статьи новостей и т.п.), то процесс создания ничем не отличается. Это просто создание нового элемента!
Не уже ли? Да, все так просто. Сначала выберете нужную страницу в дереве, затем щелкните по значку "Создать новую запись" в верхней части области содержимого :
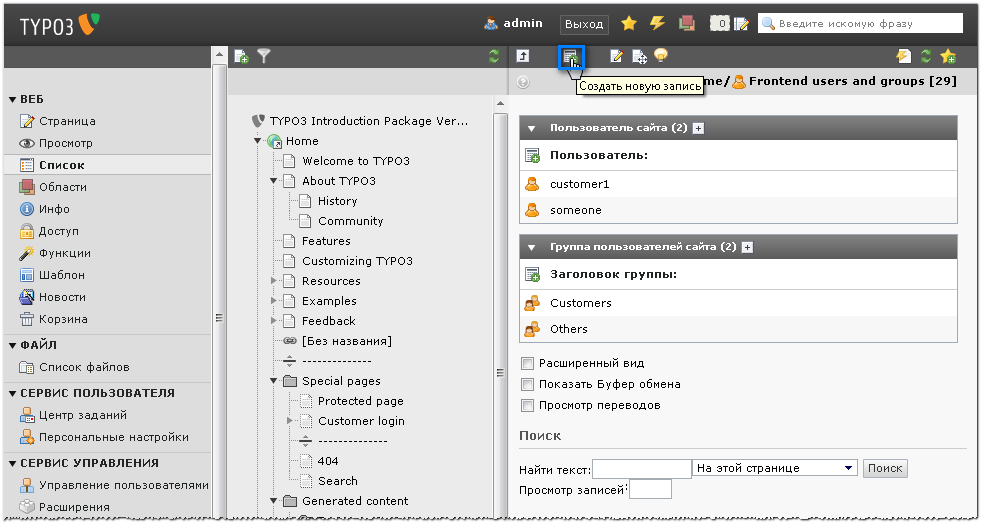 А затем выберете элемент "Пользователь сайта":
 ... и введите информацию.
Не очевидное...
Эта страница настроена, как хранилище для пользователей и их групп, поэтому на ней можно создавать только эти типы записей. Если создавать новые записи на обычной странице, то на выбор для создания будет предоставлено гораздо больше записей.
В нашем случае обязательно нужно заполнить поля имя пользователя, пароль и группа:
 Сохраните и закройте пользователя. Теперь на той же странице список
записей изменится:
Сохраните и закройте пользователя. Теперь на той же странице список
записей изменится:
 Модуль Страница
Для удобства, в модуле Страница пользователи тоже видны. Но групп здесь нет, также как и других типов записей.
Поэтому лучше использовать модуль Список, для перехода в который имеется ссылка вверху.
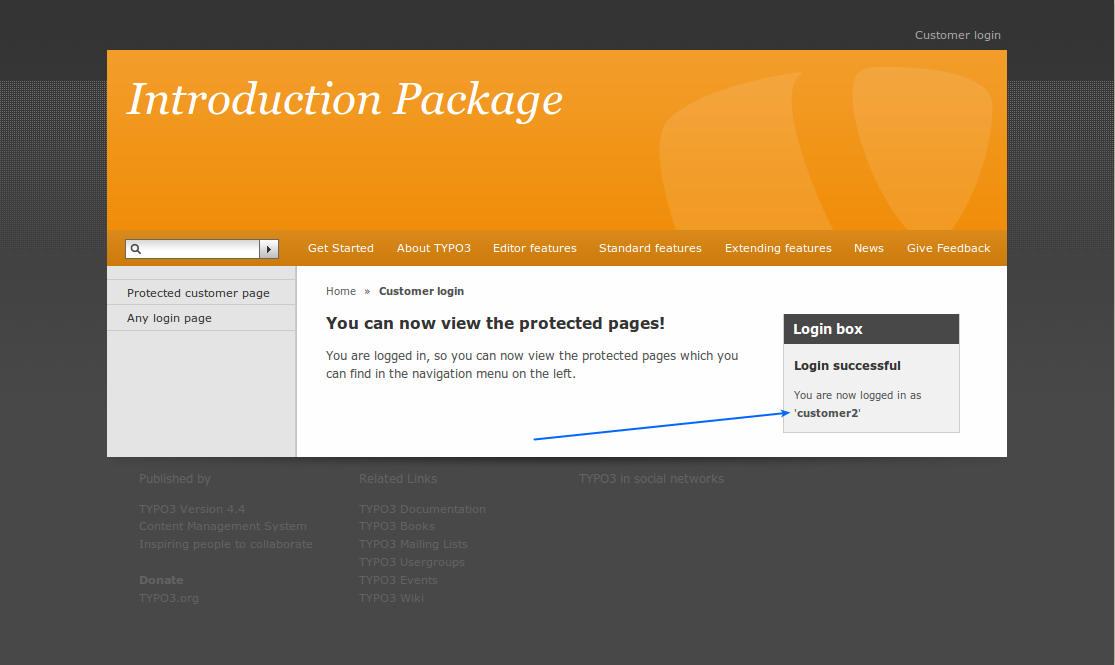
Теперь можно вернуться к форме авторизации и опробовать авторизацию под новым пользователем:
Создание формы авторизации
Introduction Package поставляется с уже полностью настроенной формой авторизации. Но что, если нужно создать еще одну, например, на начальной странице? Нет проблем. Это такой же элемент содержимого, вроде текста или текста с изображением. Перейдем (все в том же внутреннем интерфейсе) на страницу "Welcome to TYPO3", убедитесь, что делаете это в модуле Страница, и щелкните по значку элемента содержимого с маленьким зелененьким плюсом в заголовке элемента содержимого "How Do I Log in?". Так можно создать элемент содержимого под выбранным.
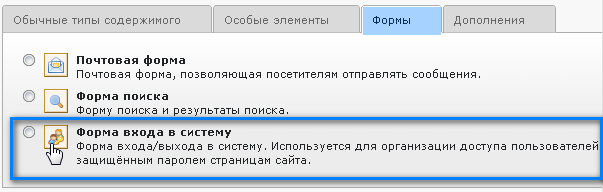
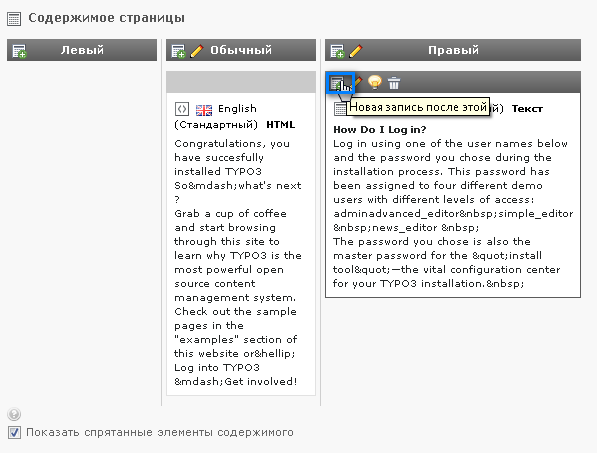 Перейдите на вкладку "Формы" и выберете "Форма входа в систему":
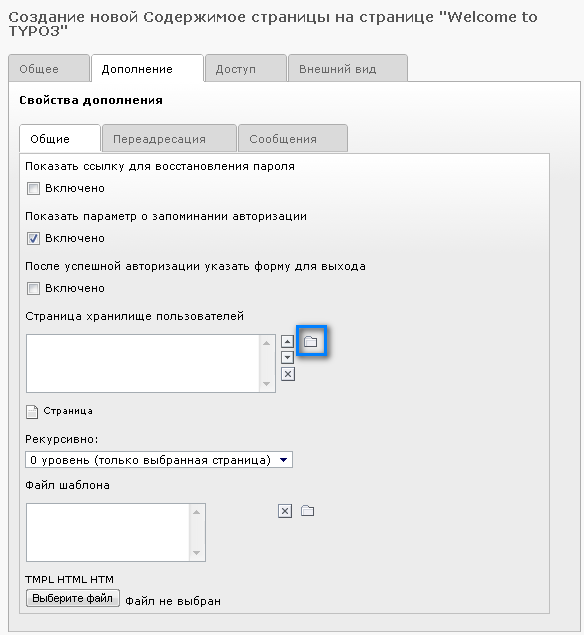
 Будет выведена форма для настройки авторизации. Дайте ей название и
перейдите на вкладку "Дополнение". Самое главное здесь — указать
"Страницу хранилище пользователей". Для этого щелкните по значку
папки, рядом с полем "Страница хранилище пользователей":
Будет выведена форма для настройки авторизации. Дайте ей название и
перейдите на вкладку "Дополнение". Самое главное здесь — указать
"Страницу хранилище пользователей". Для этого щелкните по значку
папки, рядом с полем "Страница хранилище пользователей":
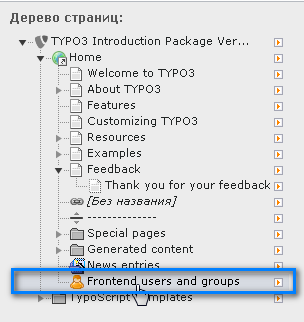
 В появившемся окне выберете страницу "Frontend users and groups":
 Сохранитесь. Вот и все. Теперь поглядите на сам сайт — вот и новая
форма авторизации:
Сохранитесь. Вот и все. Теперь поглядите на сам сайт — вот и новая
форма авторизации:
 Создание ветви с ограниченным доступом
^^^^^^^^^^^^^^^^^^^^^^^^^^^^^^^^^^^^^^
Создание ветви с ограниченным доступом
^^^^^^^^^^^^^^^^^^^^^^^^^^^^^^^^^^^^^^
Выше мы посмотрели, как ограничить доступ к странице (Вы же помните вкладку "Доступ" в свойствах страницы?). Но иногда нужно ограничить доступ не просто к странице, а к целой ветви со страницами. Например, нам нужно, чтобы вся ветвь"Examples" была доступна лишь для определенных пользователей. Неужели для каждой вновь создаваемой странице в этой ветви нужно будет не забыть установить те же самые права? Звучит нелепо. Конечно существует и более простой способ.
Перейдем к редактированию свойств страницы "Examples" и откроем вкладку "Доступ":
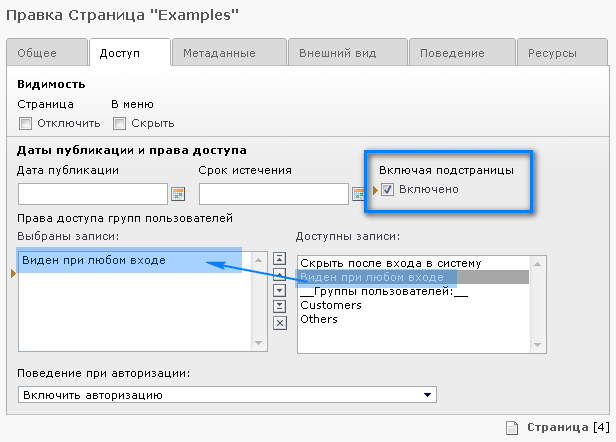 Если установить флажок "Включая подстраницы: включено", то все
подстраницы унаследуют права доступа от родительской страницы. Это
распространяется не только на доступ при авторизации, но и на "Даты
публикации" для всей ветви!
Если установить флажок "Включая подстраницы: включено", то все
подстраницы унаследуют права доступа от родительской страницы. Это
распространяется не только на доступ при авторизации, но и на "Даты
публикации" для всей ветви!
Параметры доступа
В основном ограничения доступа довольно просты — нужно выбрать лишь определенную группу пользователей сайта. А уж потом нужно решить в какие группы какие пользователи будут входить.
Пользователи могут относиться к одной или нескольким группам, поэтому, если части сайта имеет ограничения для доступа разных групп пользователей, то один пользователь может входить сразу в несколько или во все сразу группы.
И наконец, параметр "Скрыть после входа в систему" значит, что страница не будет видна после авторизации пользователя! Это полезно для страниц с информацией для не авторизованных пользователей. Разумеется параметр "Виден при любом входе" имеет противоположное значение — страница видна для любого авторизованного пользователя. Не имеет значение, к какой группе относится авторизованный пользователь сайта — страница будет ему доступна в любом случае.
Специальные элементы содержимого
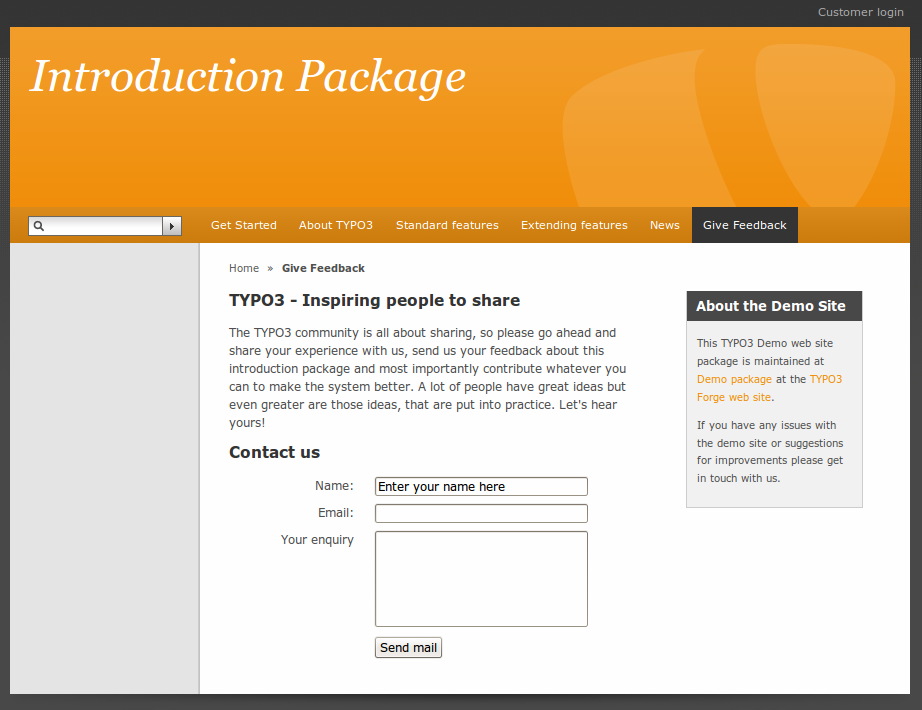
There are some commonly used yet special content elements which will be explained in this section, like a contact form or the search box. You already know the special element sitemap from the section about Content Elements in general.
Email form
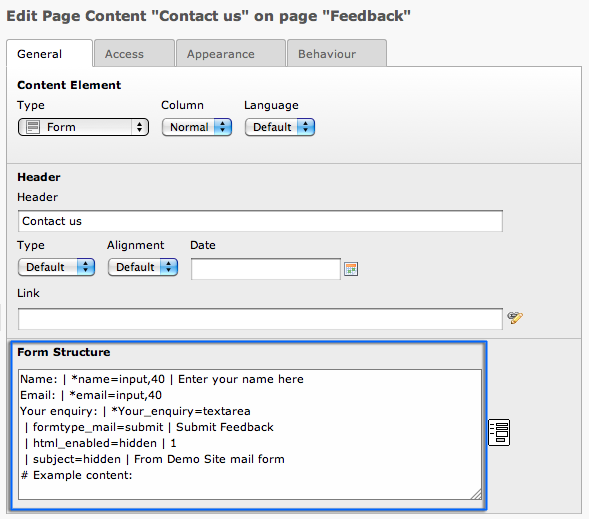
We already have an email form on the website. If you go the the page "Feedback" you will see a basic contact form:
Navigate to the "Feedback" page in t he backend and edit the form:
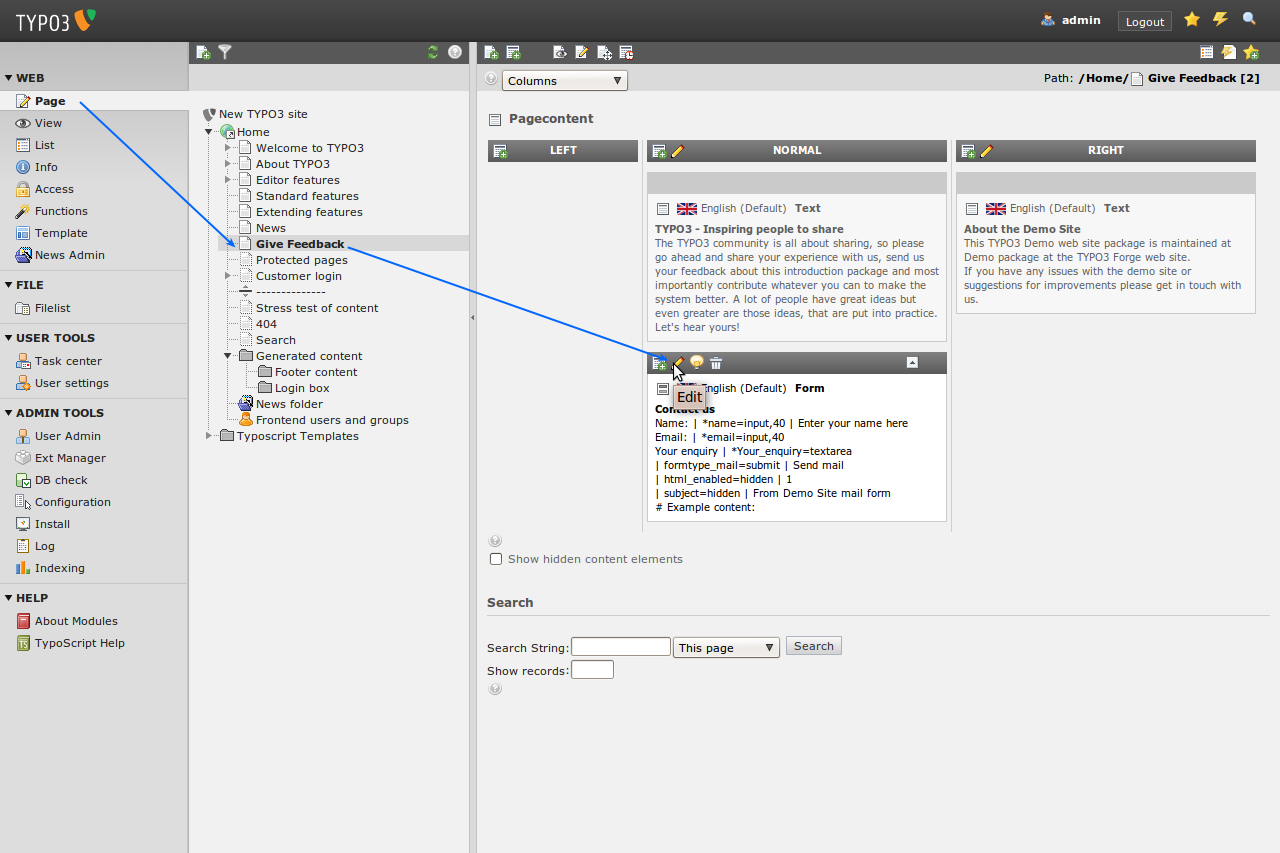
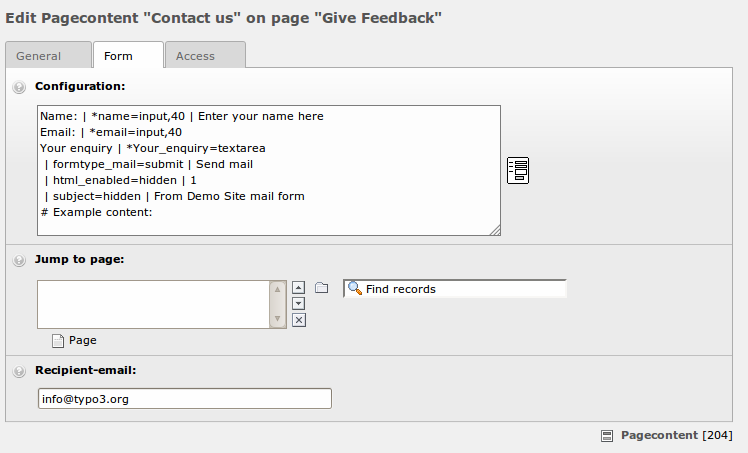
In the field “Form Structure” the form is defined:
 At the "Target Page" field on tab “Behavior” you can define where the
user gets redirected after he sends the form:
At the "Target Page" field on tab “Behavior” you can define where the
user gets redirected after he sends the form:
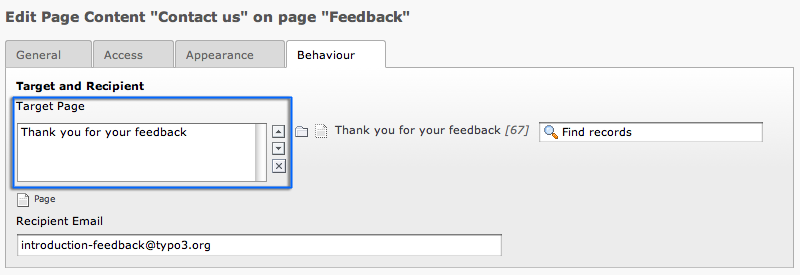 If you leave this blank he won't be redirected. Normally you'd enter
some kind of "Thank you" page.
If you leave this blank he won't be redirected. Normally you'd enter
some kind of "Thank you" page.
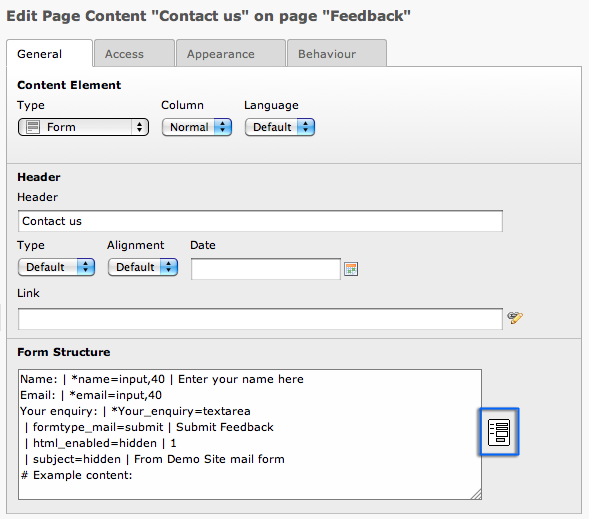
Let's take a closer look at the form structure. You already know the pipe (|) as separator from the tables content element. It is used here in this mail form to define the form fields. Every line represents one field of the form. Click on the wizard icon on the right side of the field:
 As you can see the codes are transformed into this nice form.
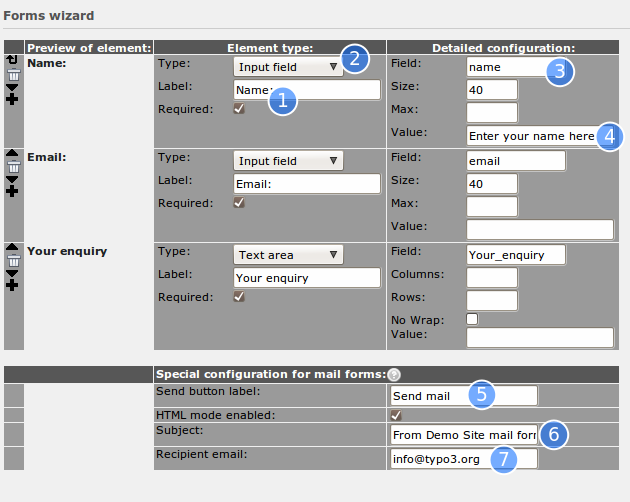
Here each field in the form is created by visual controls. For a field you need to enter a label of course (1) and a field type (2). These are the visible parts. You also have to give the field an internal name (3) which is the one that will be shown in the email the recipient gets. In the case of "Input field" types you can also enter a default value (4).
For all email forms there are three common values to be set: The name of the send button (5), the subject line of the email being sent (6) and finally the email address of the person that should receive the email (7). This person is normally you! Or whoever on your team who is supposed to respond to feedback.
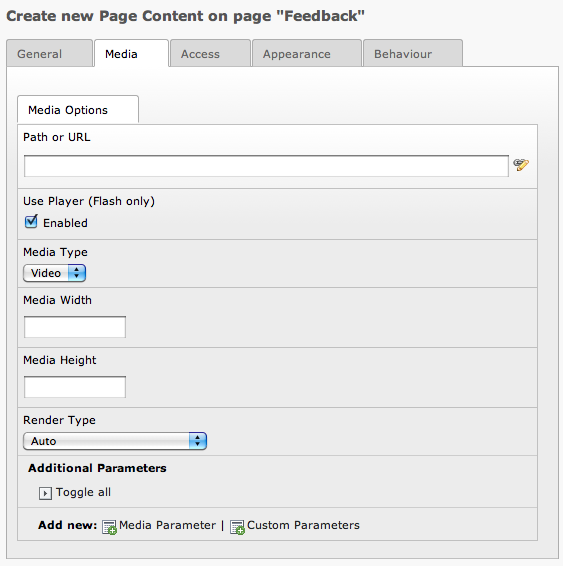
Media
The Media element is not yet used in the introduction package. But you may be interested to show an Video on your website. Upload your video into the fileadmin. Now create an new content element of type "media".
 Select the "Media" tab and select your video, set if needed some
additional parameters and add the alternative content on tab
“Behavior” for those, who are not able to see your video.
Select the "Media" tab and select your video, set if needed some
additional parameters and add the alternative content on tab
“Behavior” for those, who are not able to see your video.
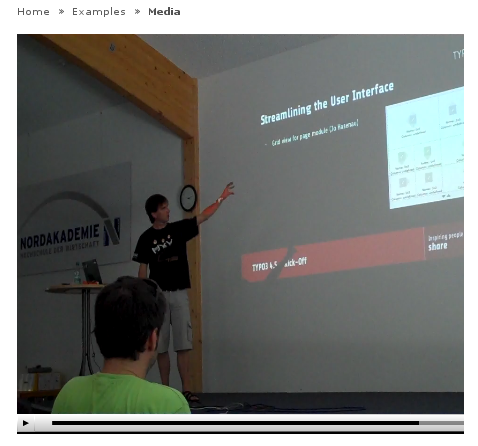
 Save your content element and watch your video on your website.
Backend modules
Tracking backend users
Sometimes you want to know which editor did what, some sort of tracking the backend users actions. You can do that by using the integrated log functionality of TYPO3. Just select "Admin Tools" > "Log" from the menu and you will see an overview of the last actions your users did:
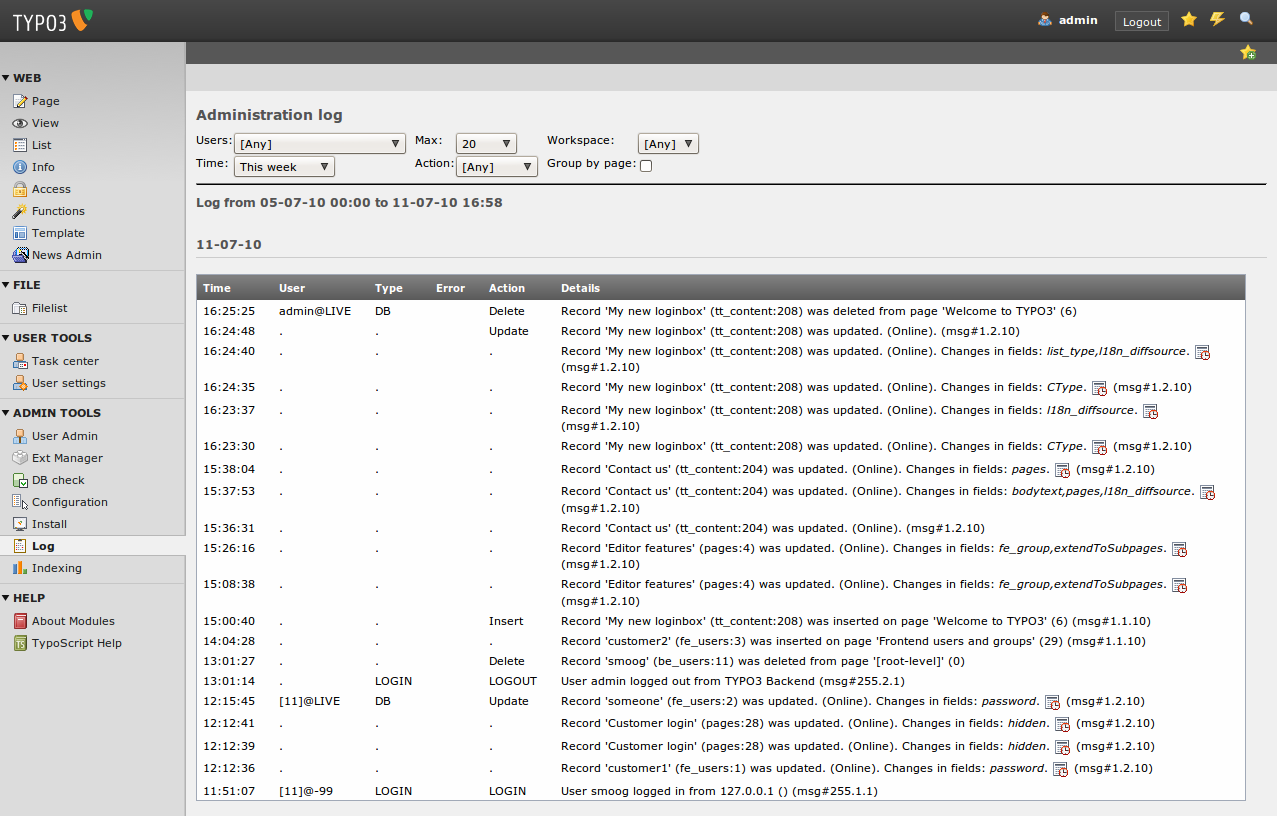
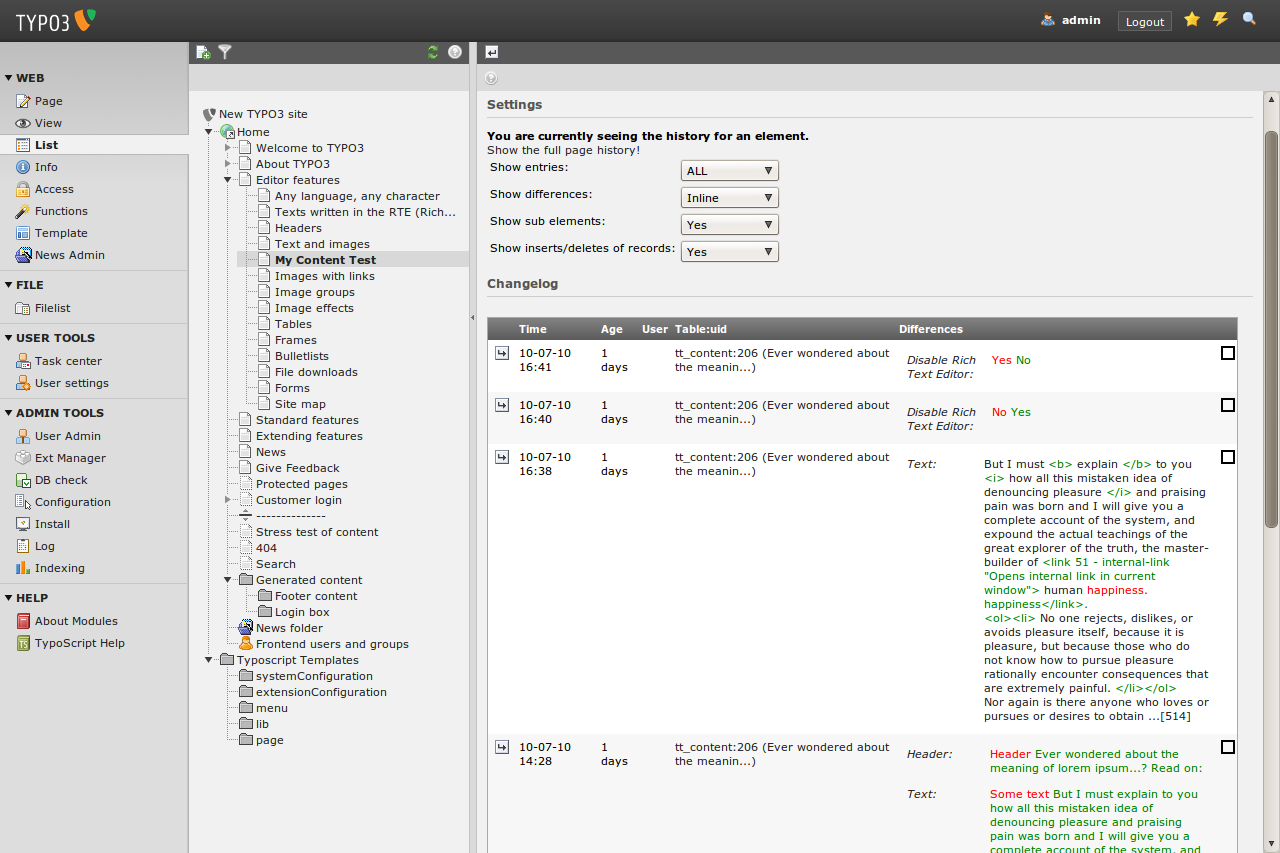
Do you notice the little icons with the clock in the log? This is the record history. Each record has a history in TYPO3, so if you change a record by accident you can use this history to undo your changes.
The easiest way to access the record history is through the list module.

You will see colored differences between your changes (If you don't see colored differences, see "Troubleshooting"):
Templates
During this lengthy document you might have wondered time and again - how can I change the title? Or how can I put in my own logo.
Before we look at these issues you must understand something fundamental about how most CMS work: they separate content from presentation. This means the pages and content are stored in the database without any colors or fonts or background images attached to them. That information is instead located in the template and stylesheets which normally apply to the whole website when pages are shown. Thus a single change in the template will affect the overall appearance of the website for all pages. This is a great and very important feature of a CMS! Just ask people who made an html file based website with 100+ pages and wanted to make a redesign...
((generated))
Static and dynamic content
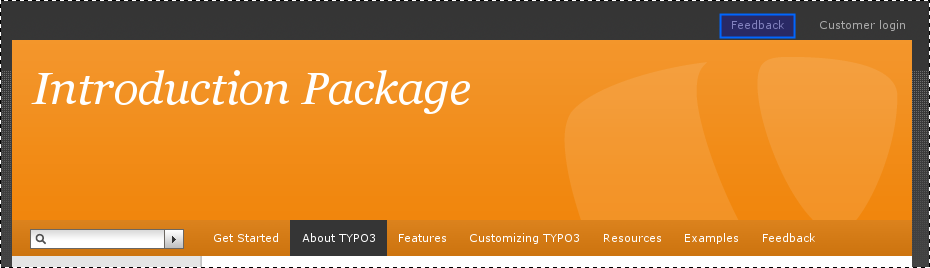
Consider the "Introduction Package" website:

Dynamic parts: On this website the menu (#1), (#2) and the breadcrumb navigation (#3) are indirectly dynamic parts of the page. This means they change from page to page automatically. We cannot directly affect these items per page. They are dynamically programmed parts of the template.However the content area (#4), (#5) is a directly dynamic part of the page since this is where the page specific content is inserted. We can affect this by adding, removing and rearranging page content elements! This area is not at all a part of the template (excepts its formatting in colors and fonts) since we directly control it by the content elements.
Static parts: Apart from the dynamic parts the template consists always of the same sitetitle (#6), the same background image (#7), a link to the frontend login (#8) and the search field (#9). These parts are also a part of the template (like the indirectly dynamic parts) but they never change by any action. Always the same on each page.
Template Records?
So how does TYPO3 implement this principle? Well, you can read in-
depth information about the :underline:`recommended approach for
professionally made website in the tutorial Modern Template Building
<http://typo3.org/documentation/document-
library/tutorials/doc_tut_templselect/current/>`_ . However this is
written for people who are professionally working with web design in
teams with developers, designers etc. So the level is a bit higher
than this tutorial claims to be.
But the main point is - the template record. This is a control element that instructs TYPO3 how to handle a certain branch of the page tree. If this seems like an awkward approach to you at first then so be it - it is in fact highly consistent with what you have learned already and further it makes perfect sense when you later want to make many sites in the same page tree including multiple templates etc.
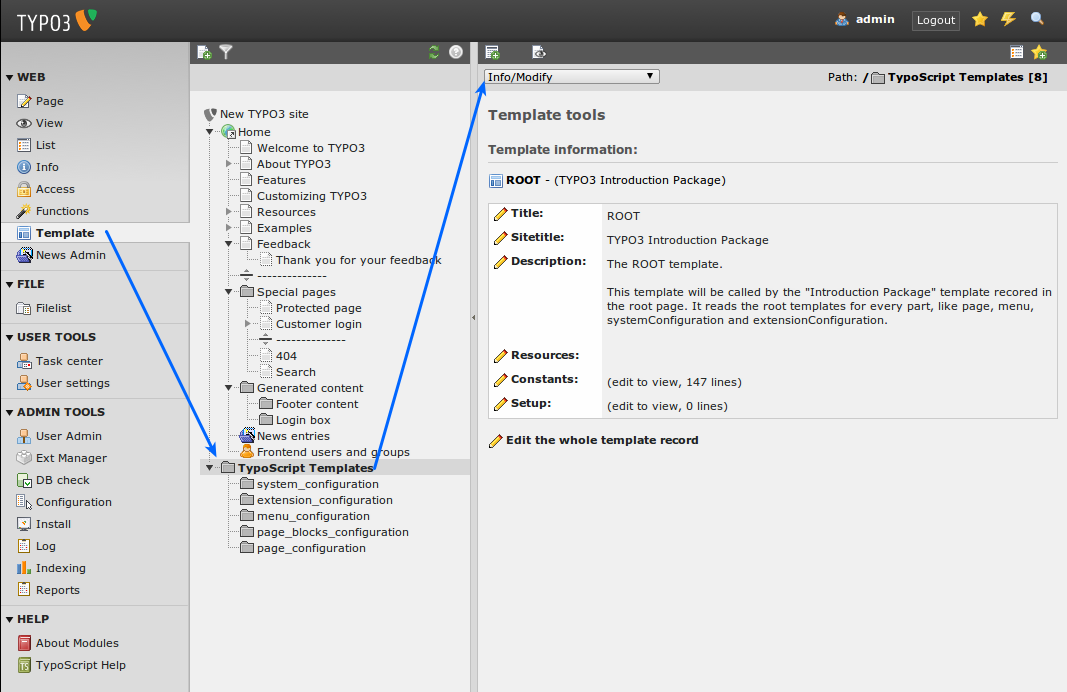
If you look at the simple Introduction Package website in our case notice that the root page of the website contains such a template record:
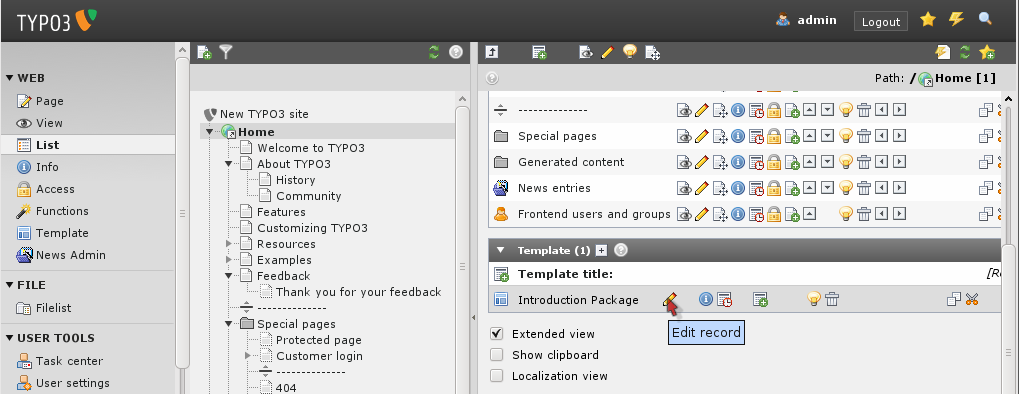
If you edit the template "Introduction Package" you will see that most fields are empty. For each website you need a TypoScript template on the ROOT level, in this case that is the "Introduction Package" template. The TypoScript configuration of a website can be quite long therefore it is possible to make many small TypoScript templates that get included in the main template. For better maintenance, all TypoScript of the Introduction Package has been put into the folder 'Typoscript Templates'. The only thing the "Introduction Package" template does is to include the "ROOT" template that in turn includes other templates.
Making changes to the template
Let’s try to change a few things in the template record, "ROOT". Edit the template "Introduction Package" and select the tab "Includes". In section "Include basis template" click on the Icon before "ROOT" and select edit.
 Now you can edit the "ROOT" template in place:
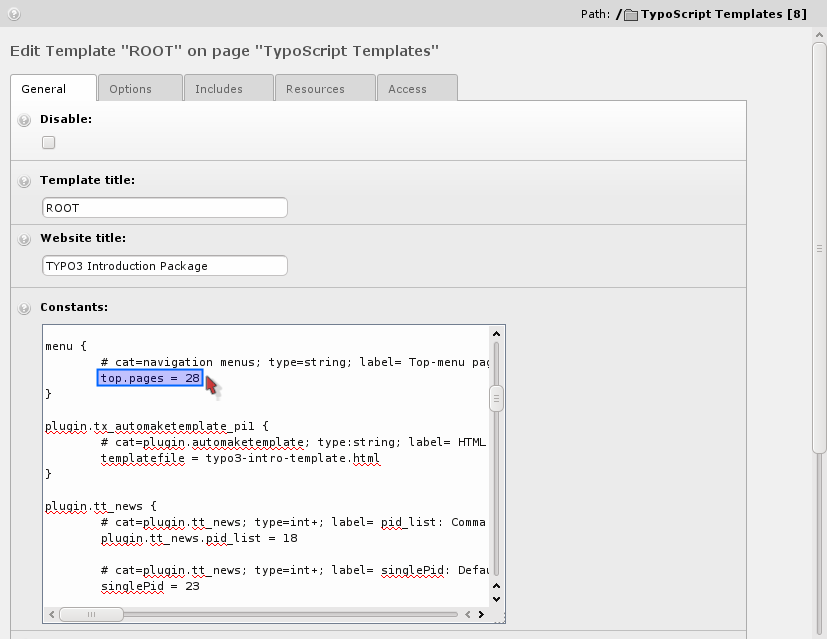
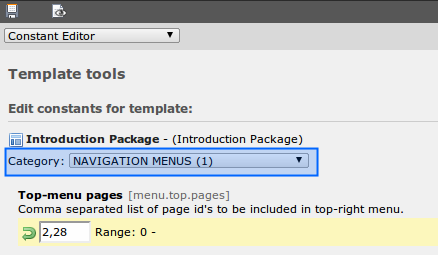
For standard templates the "Constants" field is often the place to change values. Constants define things that are used in many places in templates, like the name of the default template or the page where your news are coming from. Constants can then be used in the "Setup" field. For example if you have a constant definition like menu.top.pages = 28 you can later use it in the setup as {$menu.top.pages} and it will be substituted automatically with the value (28 in this case). So one change to a constant may mean many changes in different places in the final TypoScript configuration code of the template.
In our case, let’s add the feedback page to the top right menu.
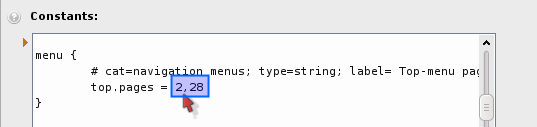
Just add the page "Feedback" (id 2) to the list of pages in the top right menu.
After saving the template record, click "Clear all cache" in the "Admin Functions" menu:
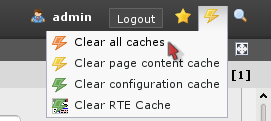
Always do that if you edit template records directly .
The result is:
You can play with other values as well!
The constant editor:
The better way to handle these changes is to use the Template module in the "Constant Editor" view:
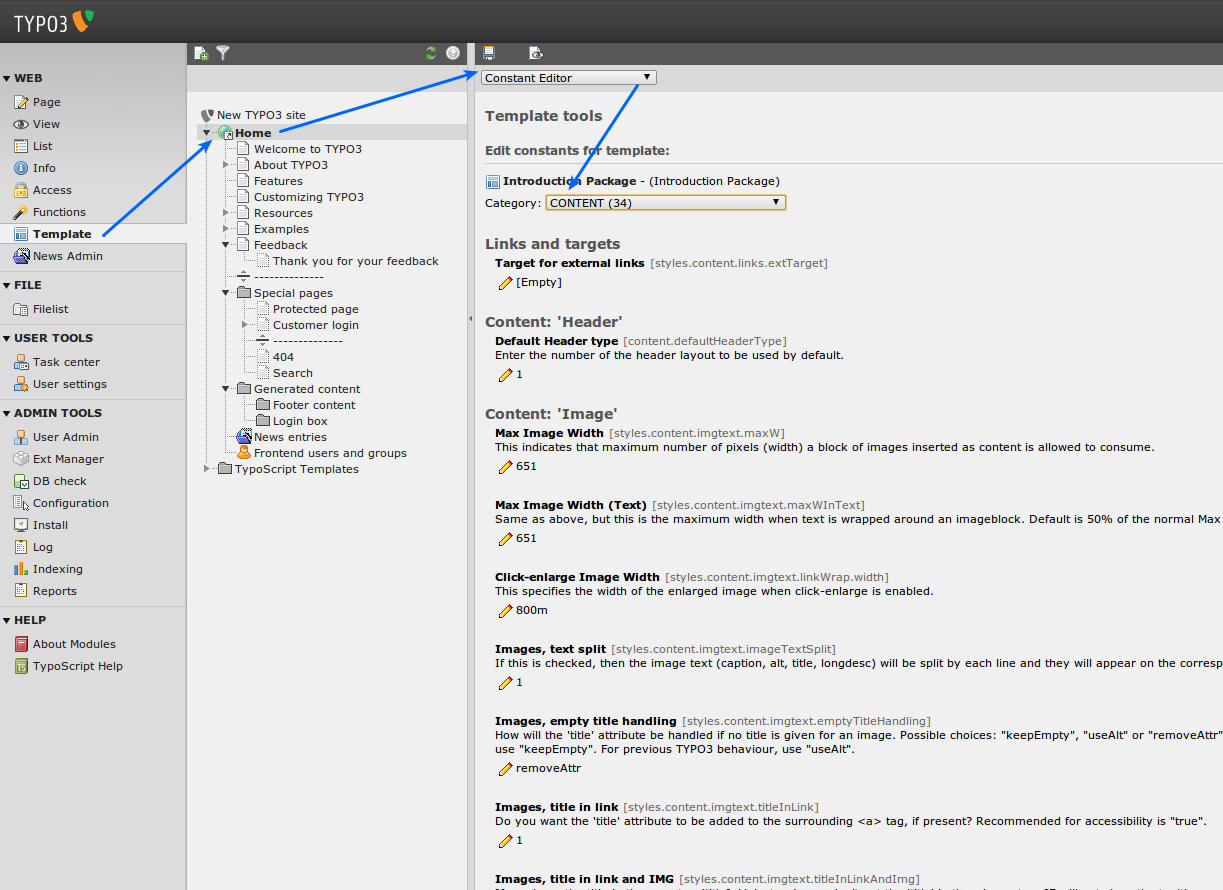
With the constant editor you can edited most constants in a comfortable way. They have additional descriptions telling you what they do. Every constant is in a certain category. You can switch the categories with the "Category" select box on top.
To repeat the change we did earlier (adding the Feedback page to the top right menu) choose "Navigation Menus" from the category menu and edit the constant:
Now go and take a look around at what is available, play with the options and come back when you've had enough.
The Setup field
The constant field allows you to edit the defined constants fast and change general things on your website. The next level is to change the details or something more general like if there is a top right menu or not. The easiest way to do that is to use the "Info/Modify" view which allows you direct access to the important parts of the template.
As you can see the template has a description that explains shortly what it does. All templates in the Introduction Package have this kind of short explanation, so you can click through them all and get an overview.
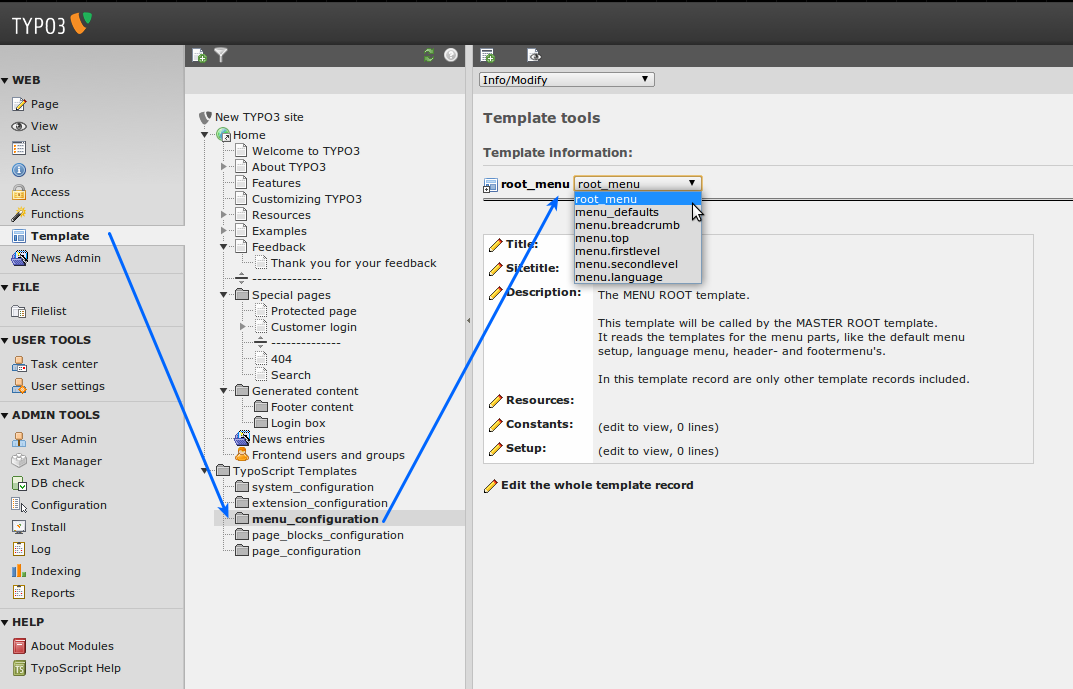
Click on the subfolder menu_configuration now. You will see that not one but multiple templates are stored in it.
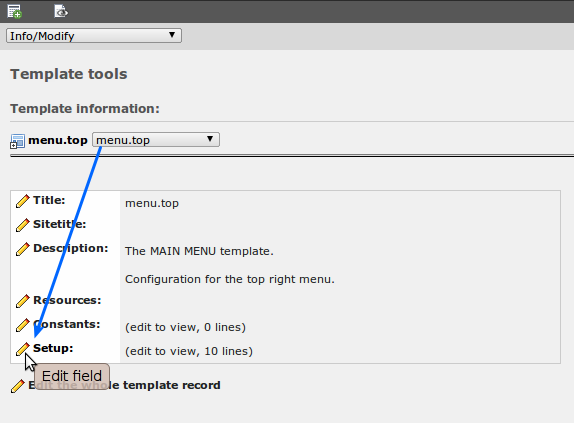
Choose the template "menu.top" now to see the definition of the top right menu and click the pencil next to "Setup" (Notice how there is a link below the menu block which directly points you to editing of the full template record if you need it):
Don't worry if you don't understand what you see yet, this tutorial just shows you the general principles and where you find what, the next tutorials will show you in-depth what TypoScript is and how you can use it to create your own websites.
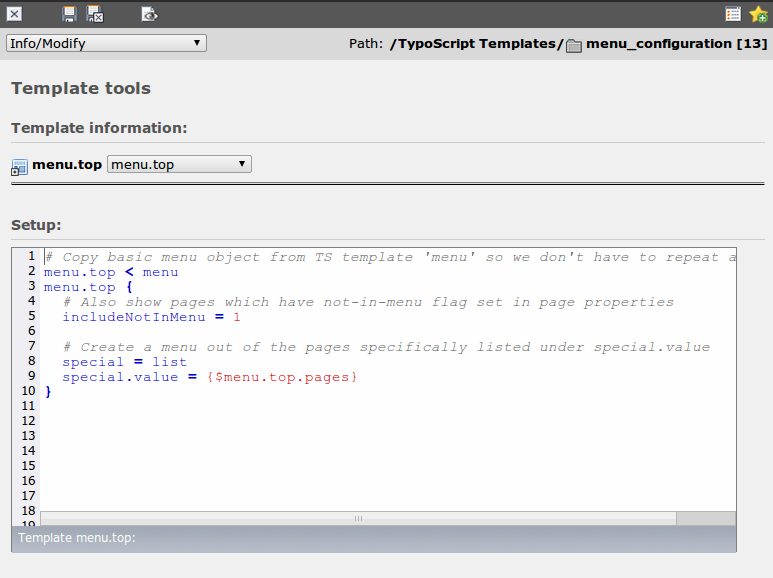
One thing you can see in this template is the usage of the constant we changed earlier {$menu.top.pages} in the template.
The Object Browser
There is one other tool you should know when working with TypoScript. It is called the "Object Browser". Change the select box on top of the template module to "TypoScript Object Browser":
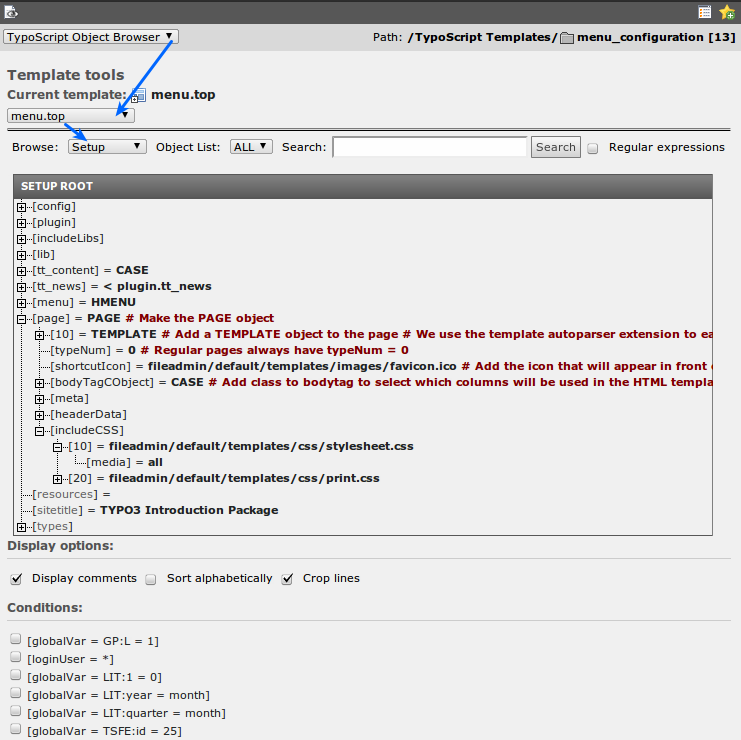
The object browser shows you the TypoScript configuration of your website as an object tree, for example on the image above you can see how the command "page.10.includeCSS.10 = fileadmin..." is transformed into a tree structure. You can click the properties in the template to change them directly. Any changes are written to the current template (Which template is the current template? Look at the header of the Object Browser!)
Content in multiple columns
As you have probably noticed your Introduction Package shows three columns in the page module, left, normal and right. If you look further you might additionally notice, that the left column is empty. So if you want to configure your TYPO3 more comfortable and easier to understand you'd want to hide that useless empty column. That is what we will do now.
To configure how the TYPO3 backend looks so called TSconfig is used. TSconfig (TypoScript Configuration) is stored on pages and will have an effect on the page it is stored on and on all underlying pages. So if we want to hide the left column everywhere in our website we should change the TSconfig of our root page.
Click the page icon of our root page and choose "Edit page properties", then choose the tab "Resources" and have a look at the “TypoScript configuration” field:
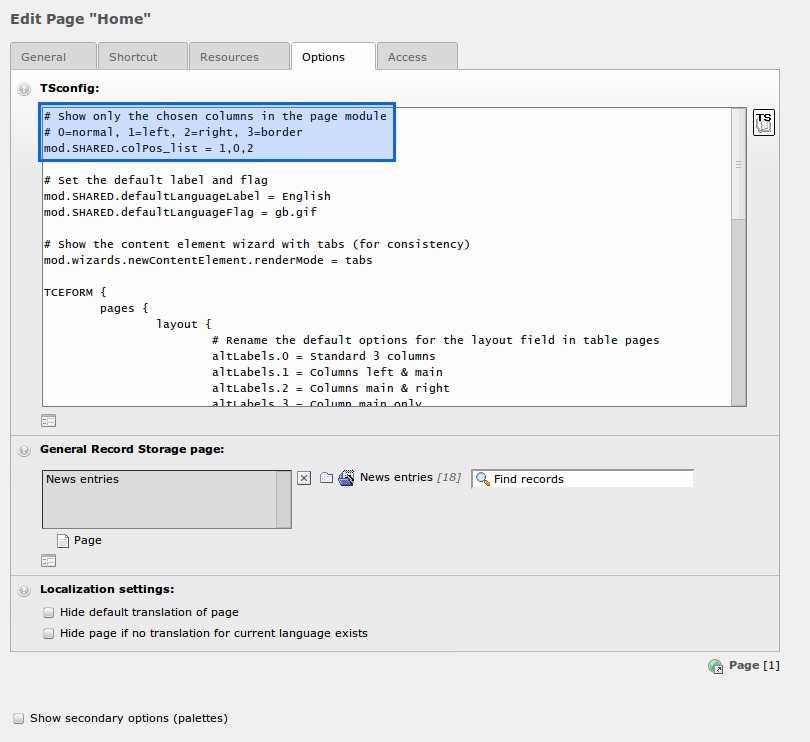 As you could guess from the comment, you just have to delete the "1"
in the third line to disable the left column in the page view. Easy,
isn't it? This is what you should get after saving the page:
As you could guess from the comment, you just have to delete the "1"
in the third line to disable the left column in the page view. Easy,
isn't it? This is what you should get after saving the page:
Verifying Page TSconfig
Page TSconfig affects the page it is on and its underlying pages, if you are unsure whether or not a TSconfig option has an effect on the page you are on use the info module to show the current configuration. Choose "Info" from the main modules, then the page you want to inspect. After that choose Page TSconfig from the select box on the info page:
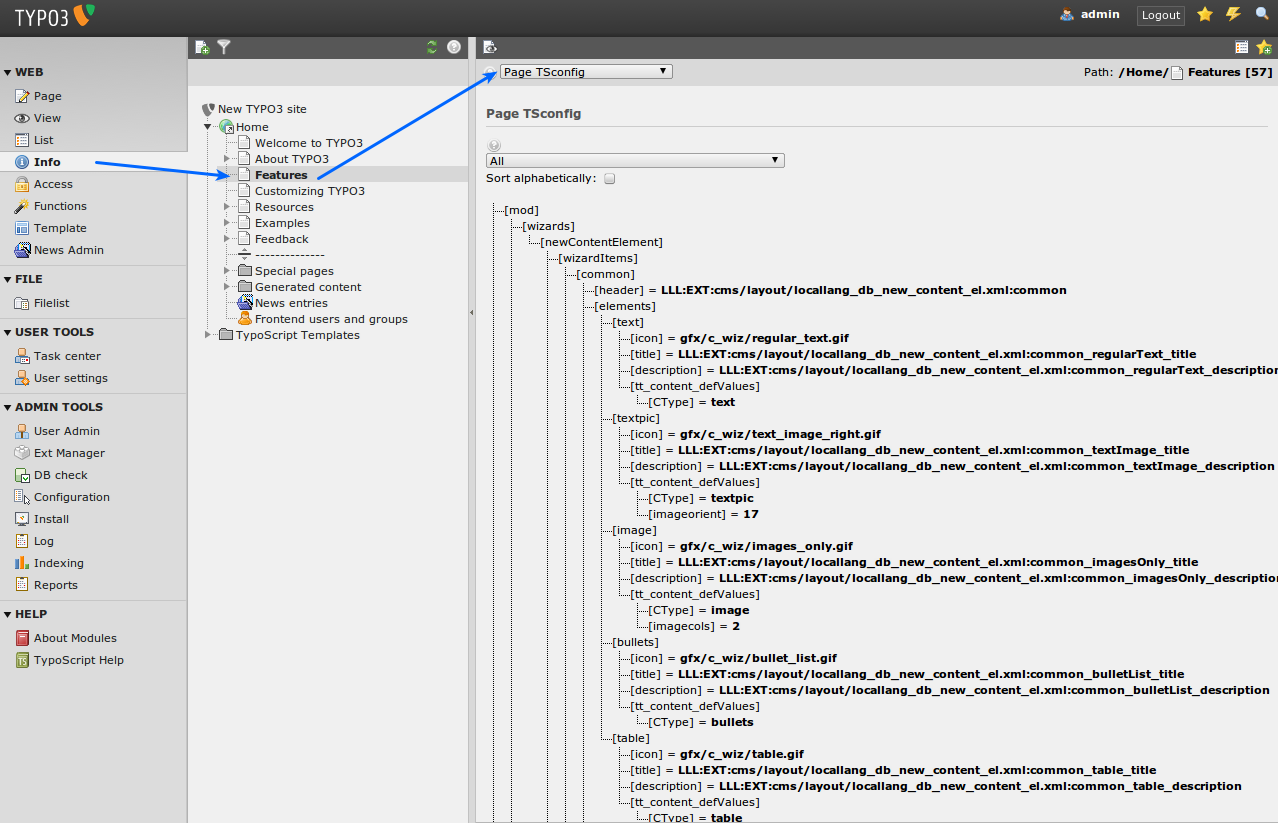
Again you see an hierarchical tree, this time of the backend configuration of TYPO3.
Template & backend configuration disclaimer!
Since the "template" is the crucial point of your implementation possibilities it is very important to stress that this tutorial does not to any degree display the depth of possibilities with templates in TYPO3.
Facts about templates and possibilities
Just to nail it to your mind for sure, this are some facts about templates in TYPO3:
- You can implement any design you like, the way you like.
- You can have any number of menu levels.
- You can have multiple sites, multiple templates.
- You can have pages in any number of languages.
- You can have multiple content areas (columns) on a page.
- You can integrate all kinds of external data sources through PHP written plugins.
- You can add any number of web applications to run on various pages in TYPO3.
- You can extend everything with PHP (with full backwards compatibility!).
- You can do anything - some things are just more straightforward (most typical things), other things are more tricky (less typical things).
The file module or: Image archives
Managing files in TYPO3
Let’s look at another interesting module - the File module:
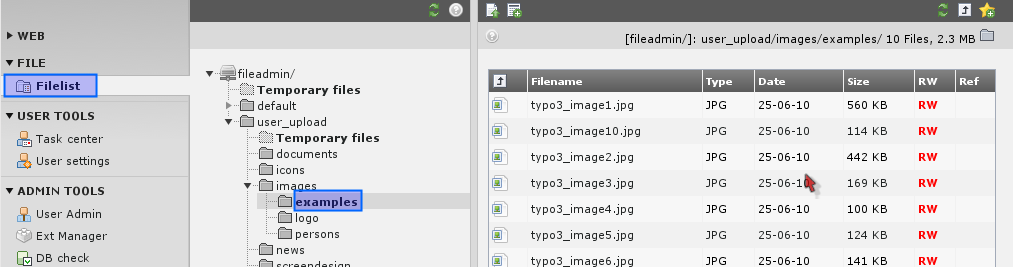
This works by the same principle as the List module for database elements - it has a folder tree and a list view of files in the folders.
The folder displayed by default (for "admin" users) is the "fileadmin/" folder located under the root folder of your web serverdirectory. Here a little image archive already exists. These files are not used on the website directly. If we want to do so we can either a) link to the files from content elements or b) pick the files in the process of selecting files for content elements.
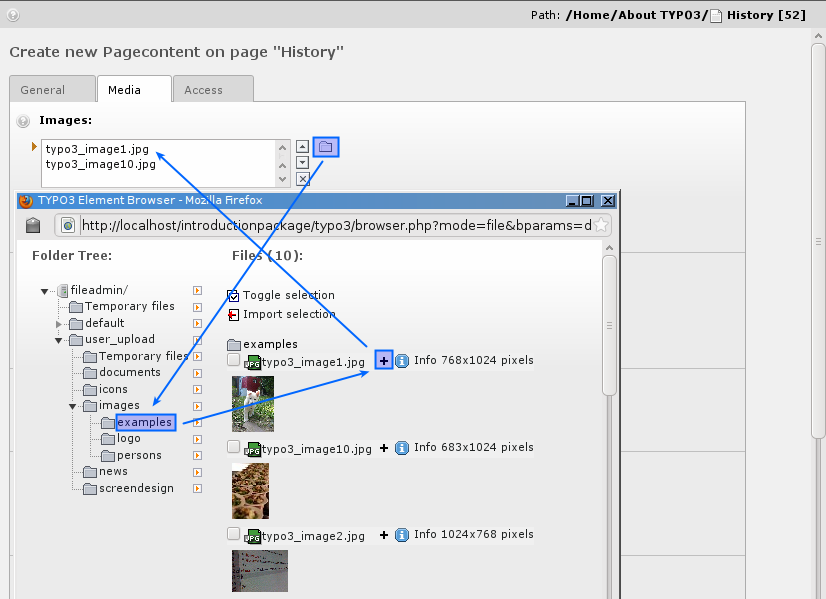
Using files from the archive in your content elements
The latter approach is the most typical. Try to insert an image element on the front page of the "History" site:

And instead of uploading one image at a time by the "Browse" button you can select multiple files already on the server!
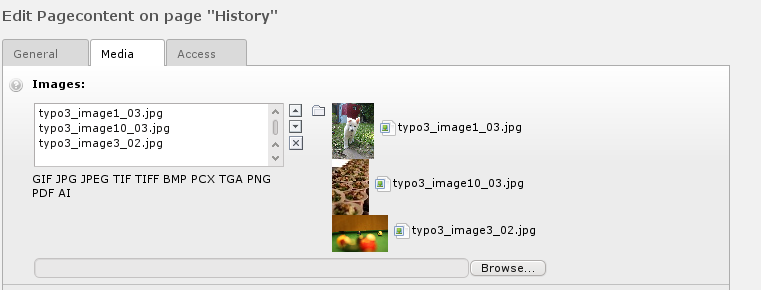
After saving the files are attached to the record. Notice that contrary to what you might think the files are now copied to the uploads/pics/ folder where TYPO3 stores images attached to page content elements.
And on the front page you have got a nice block of images:
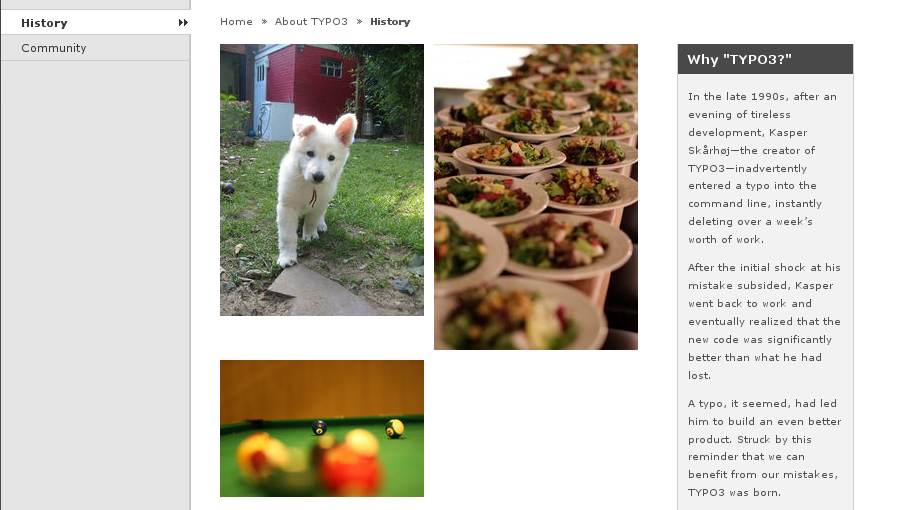
Notice that there are really a lot of options related to images in TYPO3. In the Images tab in the "Links" box (#5) can set a link for the images unless the "Click-enlarge" option (#6) is selected which will enable a link for all images which opens a window with an enlarged version inside! Very nice feature for galleries! The "Caption" field is for the text under images.
[create a new screenshot and note the numbers in text]
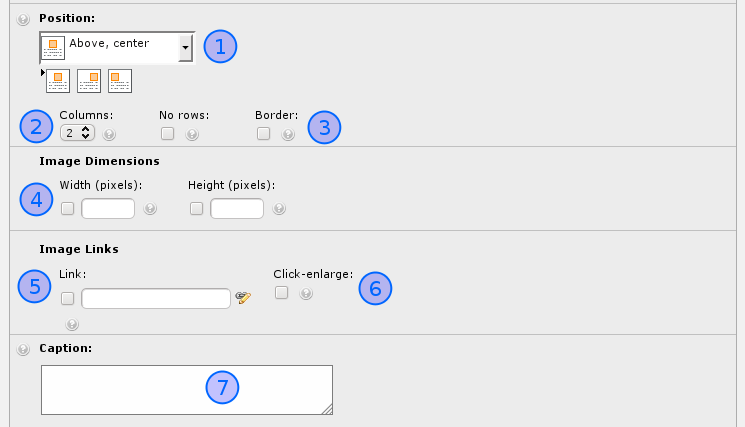
You can find further options in the Appearance tab. The "Border" option (#3) is nice since a black border is surrounding the images and that looks good most of the time. The "Width" field (#4) determines the image block width in pixels - very useful as well. The most important option is the "Image Alignment" selector (#1). With this you tell TYPO3 how to position the block of images (there are three images, remember!) in relation to text. This is mostly important when using the "Text w/Image" element type of course. Secondly the "Number of Columns" selector (#2) is important since this is responsible for organizing the images into columns, in this case "2".
And finally remember:
You can hover all labels - help at your fingertips! Use it!
Uploading images to the archive
One way to get images to the archive would be through FTP. But of course you can upload directly in the File module. Just click the folder icons:
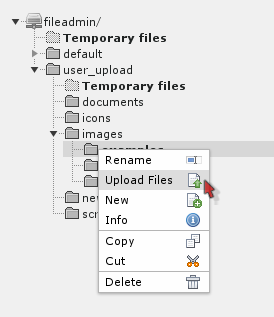
This will bring up a Flash-Popup form where you can upload multiple files at once:
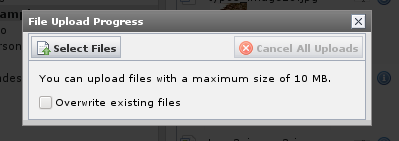
If your browser does not support flash, you can disable this feature in your user settings and you will get an Simple Upload-Form.
Likewise files can be renamed, copied, deleted etc - all by the functions available in the context menus you are familiar with already:
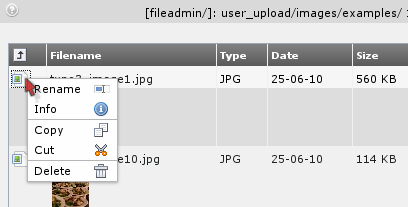
The List module and Clipboard
The List module contains some very powerful features for managing the database content. Let's just think about it for a moment: All the page and page content related business went on in the Page module - it was designed for that! All template editing we did was done in the Template module - it was designed for that! But on the lower level, behind the scenes, the List module is the ultimate place to manage both pages, page content elements, template records, domain records, users and groups, news items and whatever elements TYPO3 is capable of managing!
Using the List module effectively
You might already have used the clipboard to move a content element from one page to another. But let's see what happens behind the scenes:

On the "About TYPO3" page we have two content elements. View the page content with the List module, enable the "Clipboard" checkbox and select "Copy" for an element.
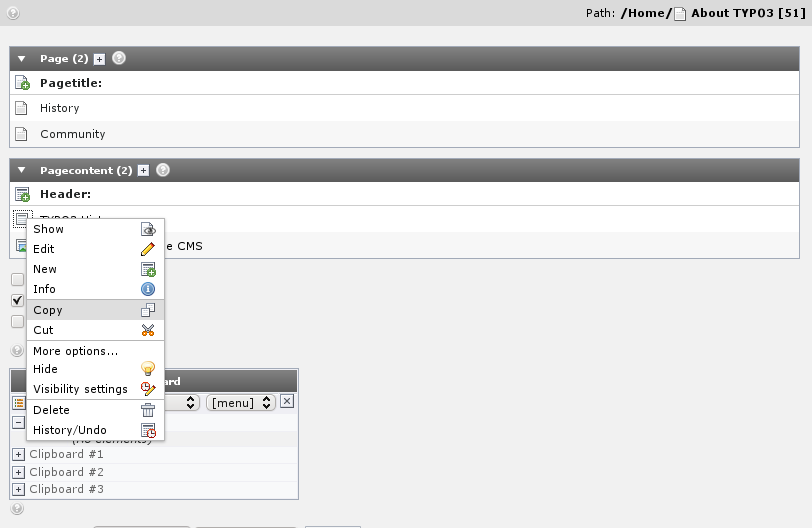
Notice how this element gets registered in the clipboard that is shown now! (You will have to refresh the List module before it is shown).
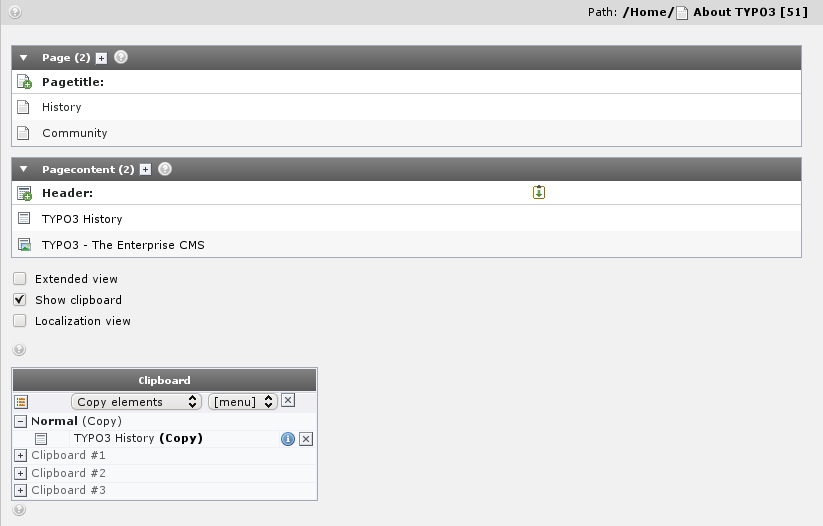
If you select another element the first one is removed. "Cutting" element is the same - it is just being registered as "Cut" instead.
If you enable "Extended view" checkbox you can see a whole panel of nifty little buttons which are all great shortcuts instead of activating the context menu all the time:
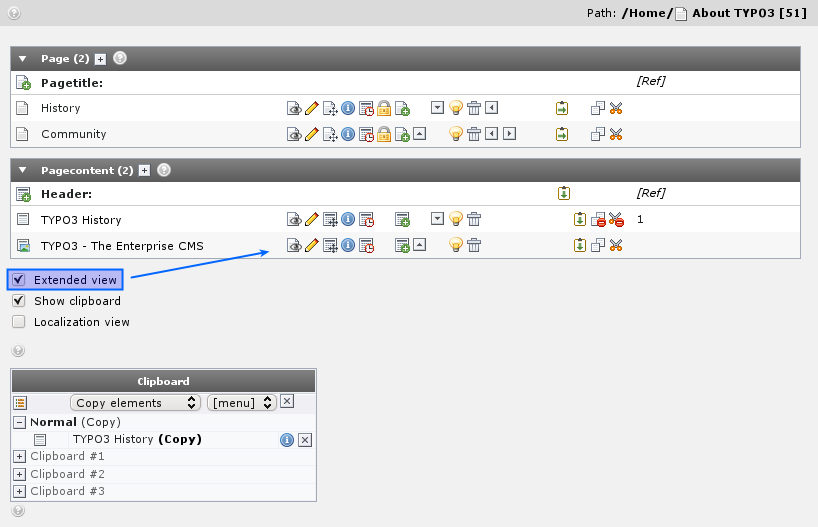
Try to play around with the buttons here!
The numeric clipboard pads - managing many elements
Back to the clipboard - select one of the "numeric pads" now:
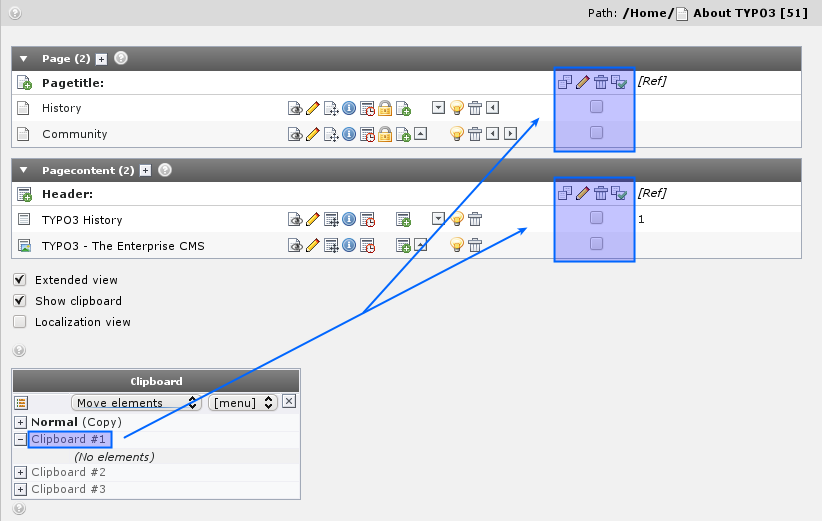
Now you can tick off the elements to select for the clipboard - thus you can have not just one but multiple elements selected at once!
Select the first two elements and press the "Transfer..." button:

The elements are now registered for "move" on the clipboard:
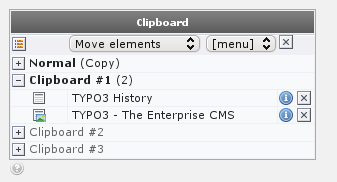
Pasting them onto another page is not just a question about going to that page and click the "Paste into" icon:
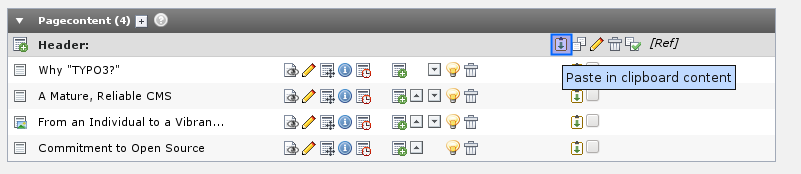
After confirming the warning...
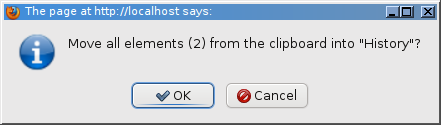
... you will see the two elements moved to the top of the page and the clipboard pane #1 emptied:
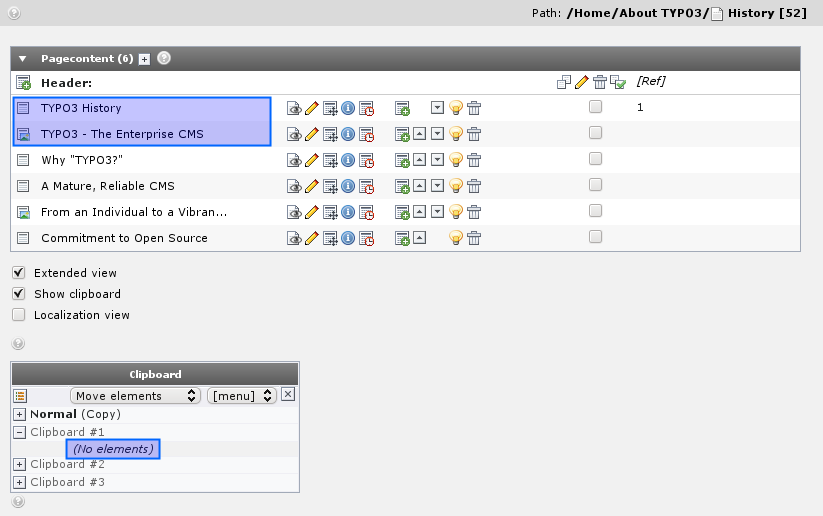
Managing files
You can do the same thing for files in the Filelist module. Just a quick view - and you can see the principles are the same:
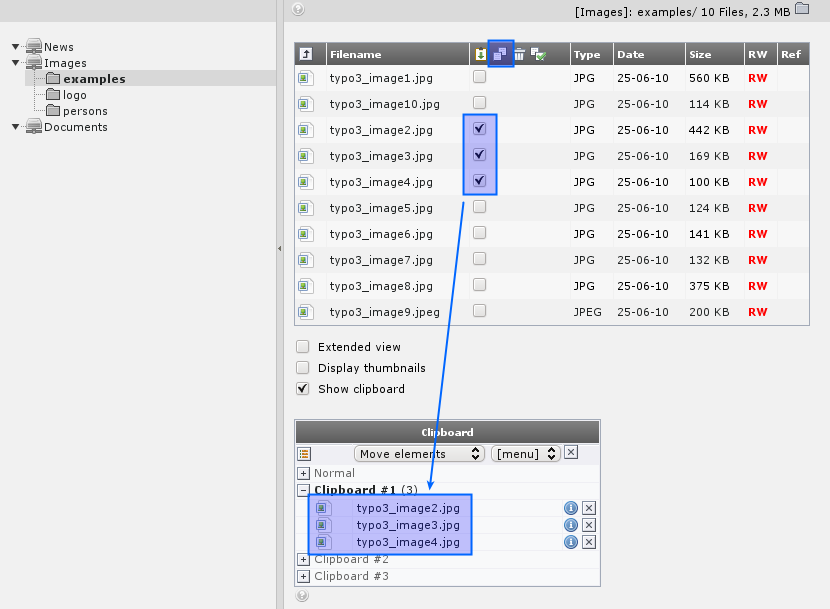
Selective editing
The list module also uses the check boxes for elements for another purpose - selective multi-editing. To enable this you must first of all click the title of the table in the List module (#1):
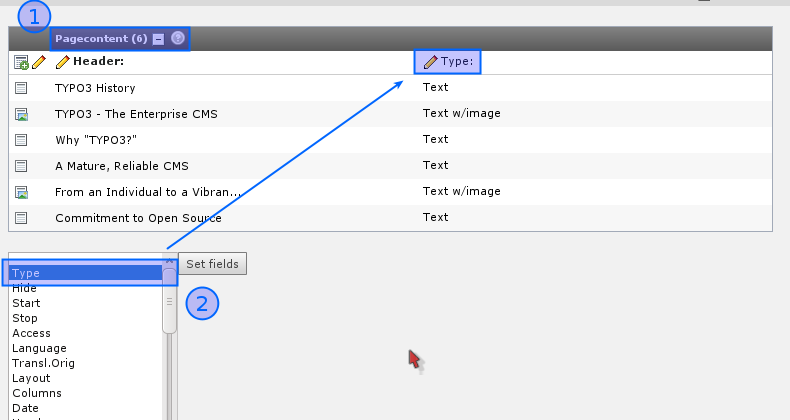
This will enable the extended mode. Here you can select additional fields from the table you want to view as well (#2). Select the "Type" field for now. This will make the "Type" field appear in addition to the "Header" field already there.
Editing all headers
Simply click the little pencil next to the "Header" label:
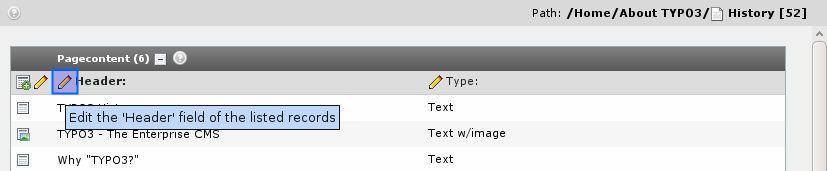
You will see this next:
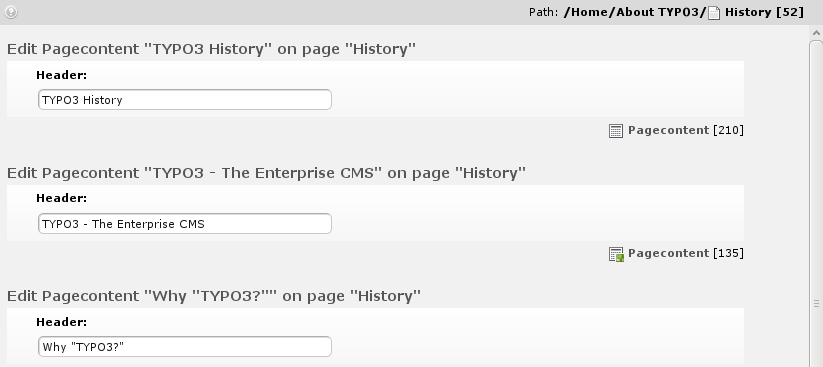
This feature allows you to edit the same field from a large number of records in one stroke of the pen! Very comfortable!
You can do the same for both the Header and Type field at one time - just use another edit-pencil:
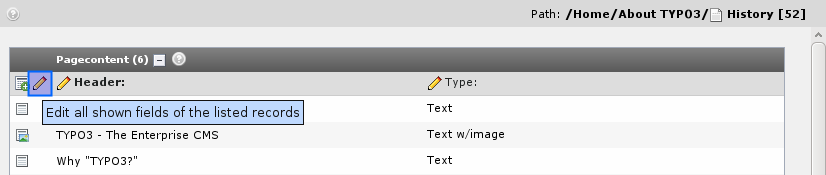
The result will be almost the same form - but with an additional field:
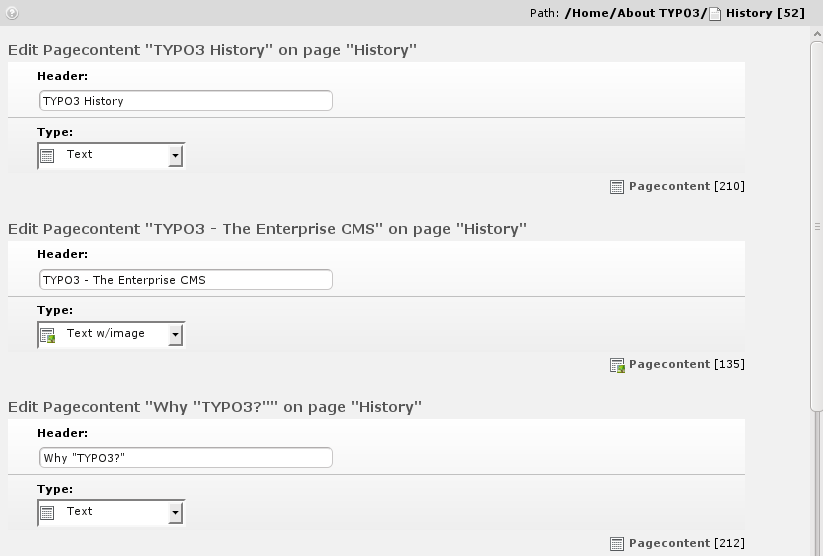
Now, activate the clipboard and select one of the numeric clipboards:
The really cool thing is if you tick off only some of the listed records:
Then you will - guessed it? - only get to edit those two!
Powerful stuff.
Now do the math yourself for the rest of the buttons! Play around with them now that you have the chance with this test website.
User Management
Distributed maintenance
The final step in our efforts to get this introduction website running is to look at distributed maintenance - a core requirement to a CMS. We already discussed the difference between frontend and backend users and how backend users were located in the root of the page tree:
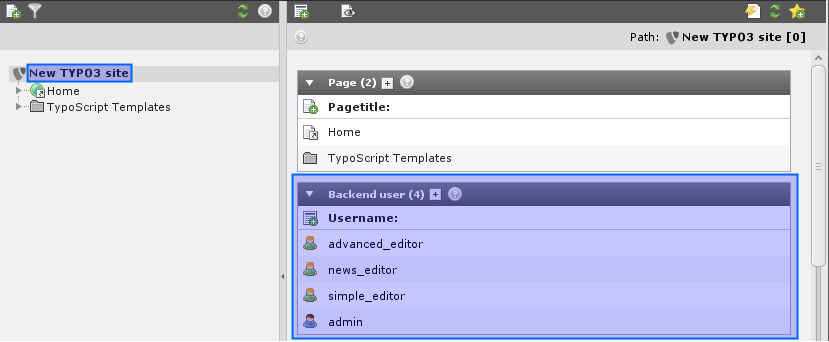
Backend users
The introduction package is shipped with four users. Let's see what they can do. The best way to do this is to logout as admin and log in as one of these users, one at a time.
"simple_editor"
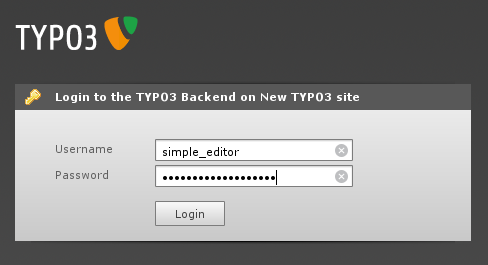
When you log in as "simple_editor" you will see this when you activate the Page module and select the page "Examples" for editing:
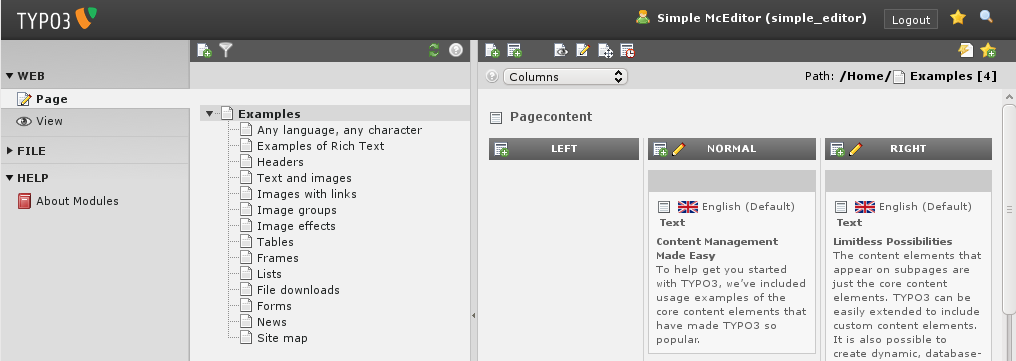
Only the page "Examples" with its subpages. The "simple_editor" is allowed to edit only that branch of the website. But it does not only reflect permission management - it also helps make the system more intuitive and user friendly. As you can see most of the backend modules are not shown to the simple_editor either. The menu to the left contains only the "Page" and "View" modules in addition to the "File" and "Help" module.
Images and Documents are managed in the "Filelist" module. The "simple_editor" sees only a Folder "Documents" which is linked to the folder fileadmin/user_upload/documents/. So all folders he does not need, are hidden.
"news_editor"
Now log in as "news_editor".
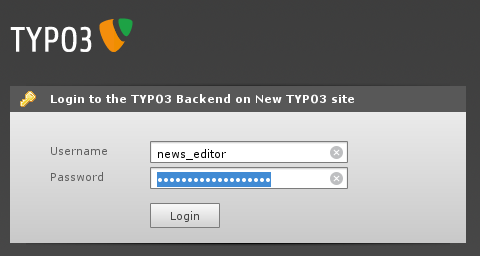
The "news_editor" is only responsible for writing the news. He should not bother with all the other content of that website. The news are managed via the News-Admin Modul. Just like the simple_editor, he can see only the things, he should see.

Now select the module "News Admin" (#1), close the sidebar (#2) and select the provided path (#3). In the "News Admin" module the user can create and edit new News.
Now check the "Filelist" module.

The "news_editor" has an restricted view at the folder structure as well, but he sees only documents, which are located in fileadmin/user_upload/news/.
"advanced_editor"
Now, log in as "advanced_editor".
The "advanced_editor" sees much more modules and the whole page structure. He is able to do the same as the news_editor and the simple_editor and much more. So, it is possible to restrict everyone to that modules and pages, which he needs to know. Have a look at the Filelist module.

The "advanced_editor" does not see the whole fileadmin folder. But he has access to the "News", the "Documents" and another "Images" folder.
Setting up user permissions
Now we want to know how the users "simple_editor", "news_editor" and "advanced_editor" have been set up! Log in as "admin" again and let's explore it. Select "Edit" for the three users. You will see, that they are almost identical. But they all have a different Group selected.
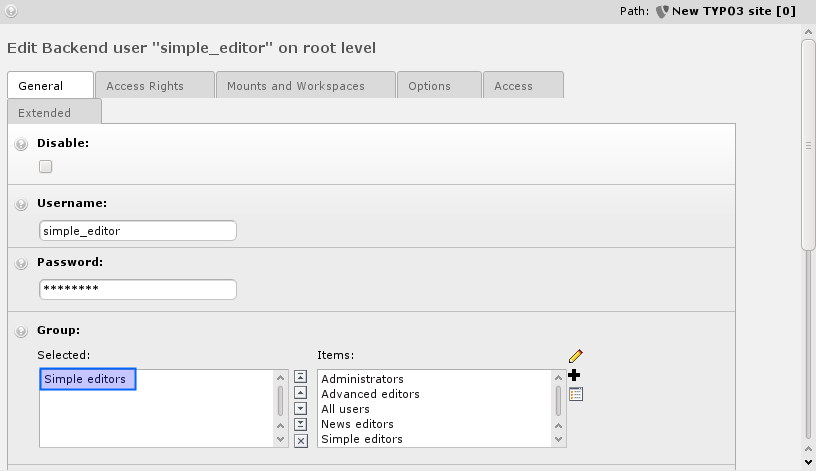
On the tab "Mounts and Workspaces" there are both " Mount from groups: " are set. Which page and which folder the user can access, depends on the rights which are set at the group level.
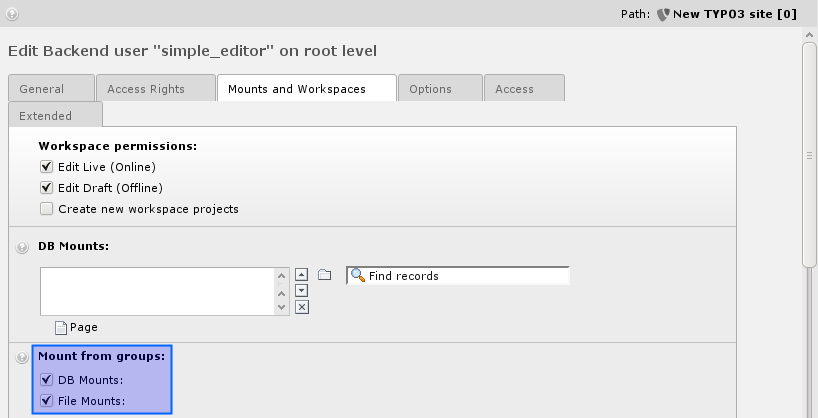
It is a good practice to manage the permissions on group basis.
Groups
Let's look at the Simple editors group which the simple_editor is a member of.
General
On the "General" tab you can edit the Group-Name, and write down a short description for that group. If you select an Sub-Group, all permissions from that group are inherited. An user which is in the simple_editor inherits all permissions from the "Simple editors" Group and the "All users" Group.
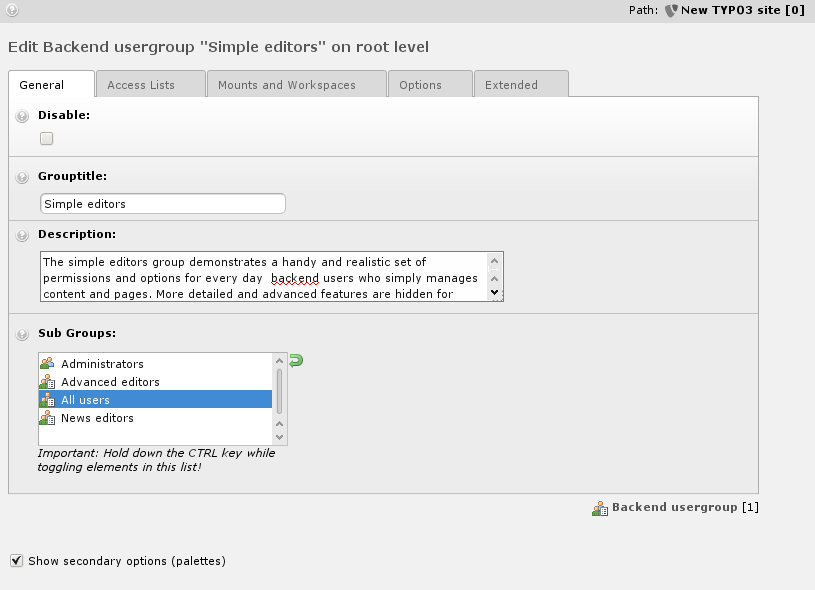
Include Access Lists
The "Include Access Lists" is the important point to notice here since that is the reason why we have all these options listed! Apart from those the group contains DB mounts and Filemounts which apply to all users that are members.
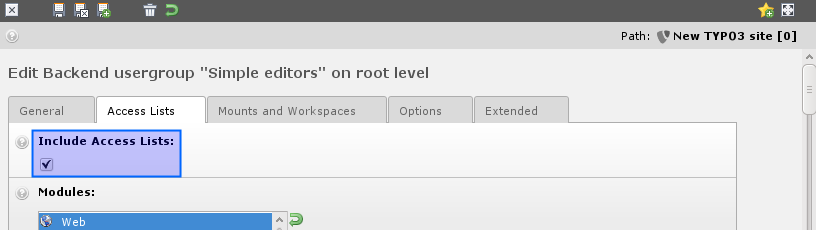
Modules
Looking at the access lists you will see that (#1)membership of this group will grant access to the Page and View module (unfortunately you will have to know that these codes are the equivalents of the names you know from the menu...).
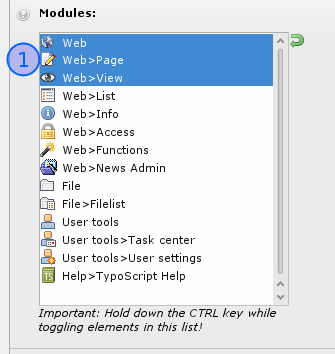
Tables (modify)
The tables that a simple_editor is allowed to edit are listed (#2).
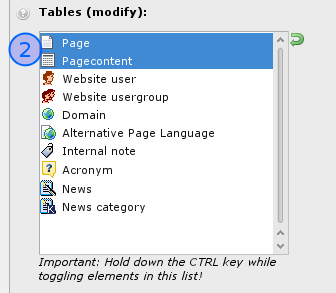
Log in as "simple_editor" and then try to create a new element:
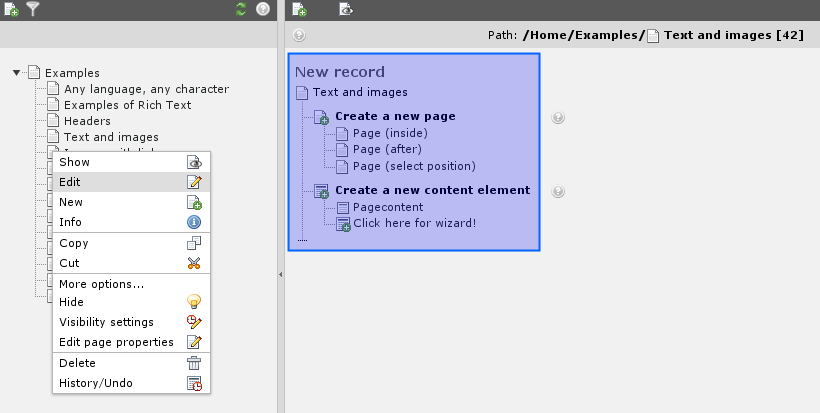
Only pages and page content elements could be created. No users, no news elements. Only pages and content elements.
Why this? Well, because "simple_editor" should not worry about anymore than this! He is not the guy in charge of the news, right!
Page types
This field (#3)dictates what page types members of the Simple editor group should be able to select. But if the simple_editor creates a new page, he does not have the possibility to change the page type.
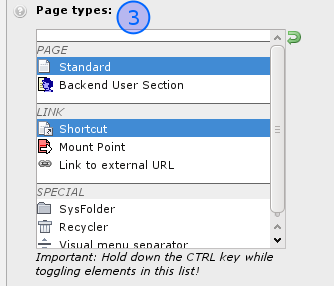
That is because the Page-Type is not in the list of "allowed Excludefields":
Allowed Excludefields
This is a long list, which becomes even longer with more Extensions installed. It is very powerful, but it takes a little background to understand it.
When tables and fields are configured in TYPO3 (in the internal global PHP array, $TCA) some fields are marked as "excludeFields". This means that the fields are not allowed to be edited unless you have been granted special permission - that is what the "Allowed Excludefields" list does!
This is easy to understand if you take a look at what the "simple_editor" sees when he edits a page header:
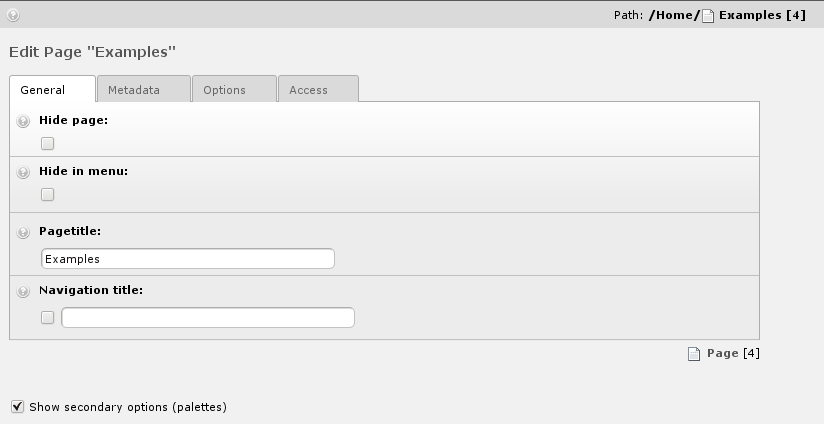
Not an impressive amount of fields. In particularly not if you compare it with what you see as "admin" user.
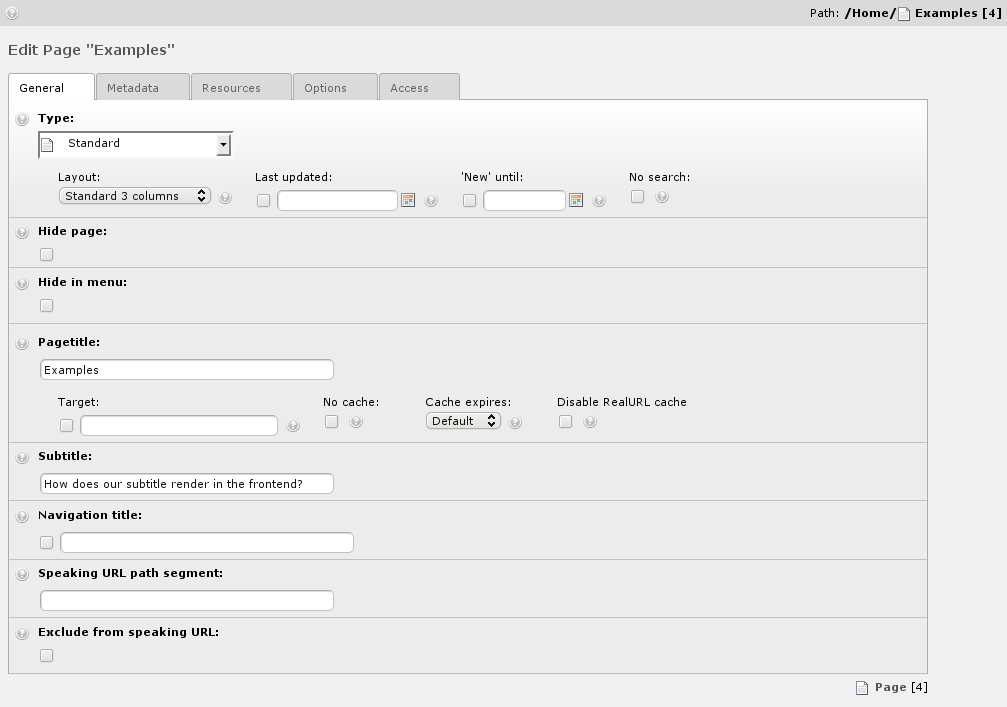
The reason for this difference is that
- most of the fields in the pages are marked as "excludeFields" - hence cannot be edited by default - and
- that the All Users group where the simple_editor inherits its rights, allows only access to some of these "excludeFields".
Now edit the simple_editor group and select the Page-Type field ("Page: Type") and save the group.
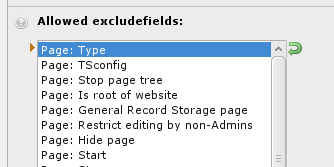
Now log in as simple_editor and edit a page-record.
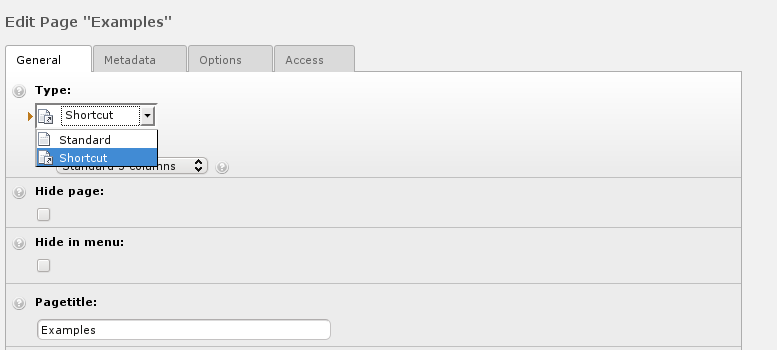
The simple_editor has now the ability to change the page-type, but as it has been configured in section page types, the simple_editor has only the choice between standard and shortcut.
Explicitly allow/deny field values:
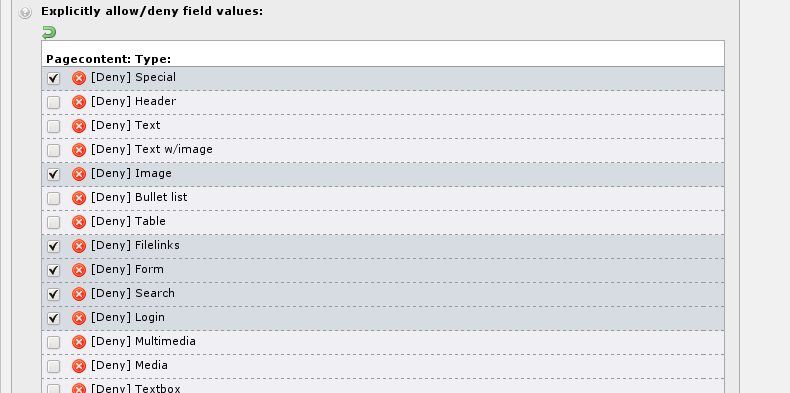
You can restrict which type of content element a group is allowed to use. If an editor should be allowed to use an plugin like tt_news, it is important to allow the use of the type "Insert Plugin" and to allow in subsection "Pagecontent: Plugin:" the appropriate Plugin itself.
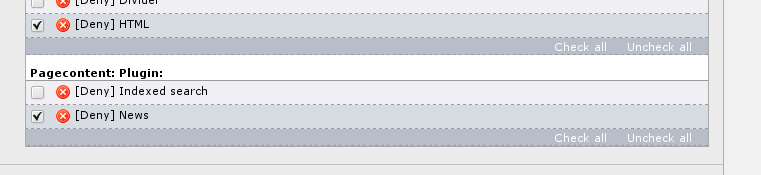
Inverting the behavior
You can change the behavior of this setting in the install tool. If you set [BE][explicitADmode] = explicitAllowyou have to select the types of content elements which a group should be allowed to use instead of deny those types.This is actually recommended. First of all it is more secure, as nothing isallowed by default. It is also more intuitive when setting up permissions (because you are giving permissions and not removing them).
DB Mounts
DB mounts (database mounts) are used to restrict a user's access to only some parts of the page tree. Each mount corresponds to a page in the tree. The user will have access only to those pages and their sub- pages.

As you see it couldn't be more easy to give a specific user access to a specific part of the page tree - just set the fields value to that page. Or two pages even! You can add any number of "DB mounts" as you like!
File Mounts
The file mount assigned to the simple_editor group is a relation to a simple record created in the page tree root as well:

When you edit it you will see how logically it is configured:
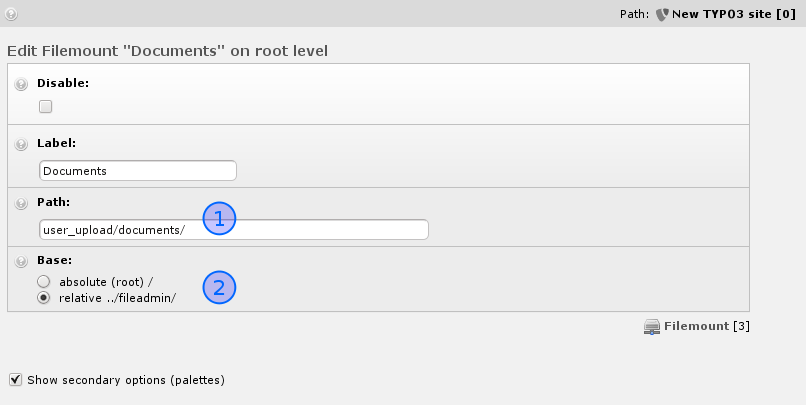
Simply, the directory "user_upload/documents/" (#1) isentered as PATH and the "BASE" field is configured to interpret that path relative to the "fileadmin/" direcotry (#2). That simple. When a user has a relation set to this record he will have this directory mounted in his Filelist module!
Page Permissions
One note to "DB mounts" - if the user has no read access permission
to the page and sub pages of the DB mount then it really doesn't
matter whatever you have configured - it will not work! And what is
read access then? Each page has a permission setting for access
like the file system on a UNIX server - there is an owner user, an
owner group and then permission settings for each in five different
categories; read page, edit page, delete page, new subpage and page
content. Normally the default settings are fine enough and using the
DB mounts to assign access is probably the easiest way to go. If you
run into trouble, just set all permissions to "on" - that will make
green starts over the full line (see image below). Of course, if you
want to really know the ins and outs of this, go to the
:underline:`Inside TYPO3 document <http://typo3.org/documentation
/document-library/core-documentation/doc_core_inside/current/>`_ -
here you will get the hairy explanation.Probably the best way to show
you how page permissions should be set is to view the current
permissions of the page tree. This is done by the "Access" module.
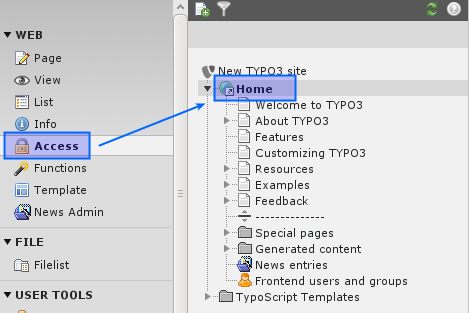
If you see only one column “admin”, than you have to select permissions instead of “User overview” in the dropdown on top.
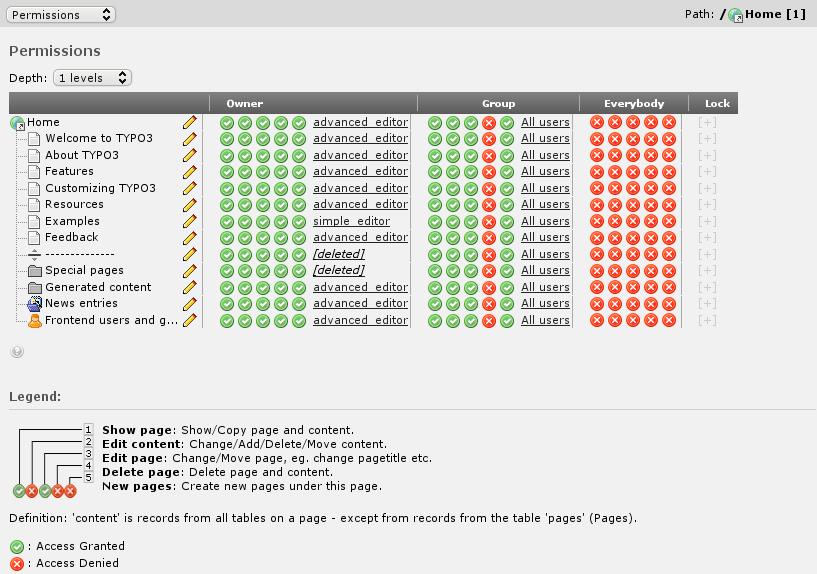
You have an overview which user and groups are able to edit which pages. You can change the permissions if you click on the allow/deny Icons.When you look at the ownerships of the pages you can see that the simple_editor actually owns a few pages. He might have been the creator of those. When you create a page you become its owner automatically. But the main point is that the group "All users" is the owner group of all pages. And since "All users" is a subgroup of "Simple editors" as well as a subgroup of "Advanced editors" all members of that groups have access to that pages. But they are still restricted to work within their DB mounts. But with this configuration it is only possible for the owner to delete a page.If an editor creates a new page, he will become the owner of that page and his main group (the first one, if he is member for more than one) will be set for that page. But you are free to change that default values via Page TypoScript configuration.
Let's have a look at that page TypoScript configuration. As user admin edit the page "Home" and select the "Resources" tab.
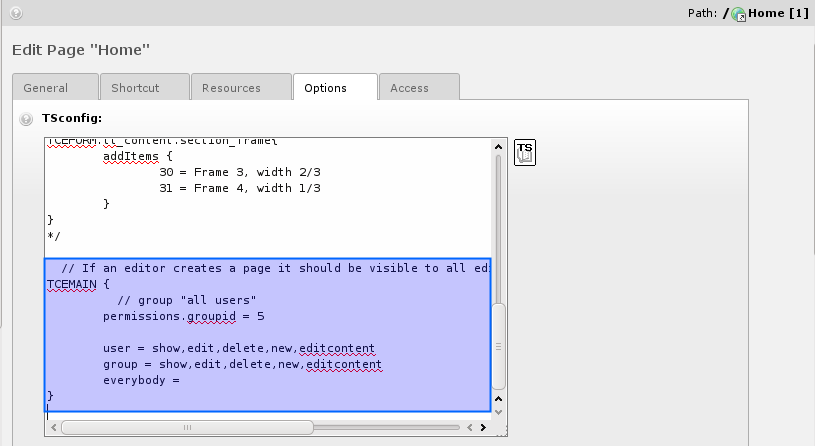
In the “TypoScript configuration” section you can control how the
Backend should behave. We do not want to explain now, what you can do
with TSconfig, but keep in mind, that you can change how the Backend
react - on page basis! Have a look at the :underline:`TSconfig
Reference <http://typo3.org/documentation/document-library/core-
documentation/doc_core_tsconfig/current/>`_ to get an overview.
Validation of settings
With the module "User Admin" you can actually validate that you have set the correct permissions.
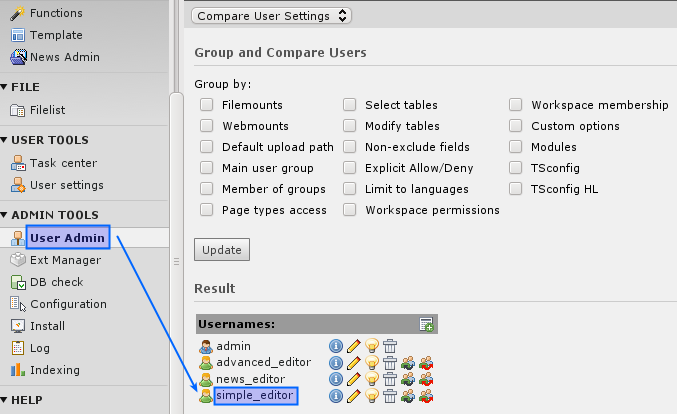
This will tell you right away what the combined permissions will be for her.
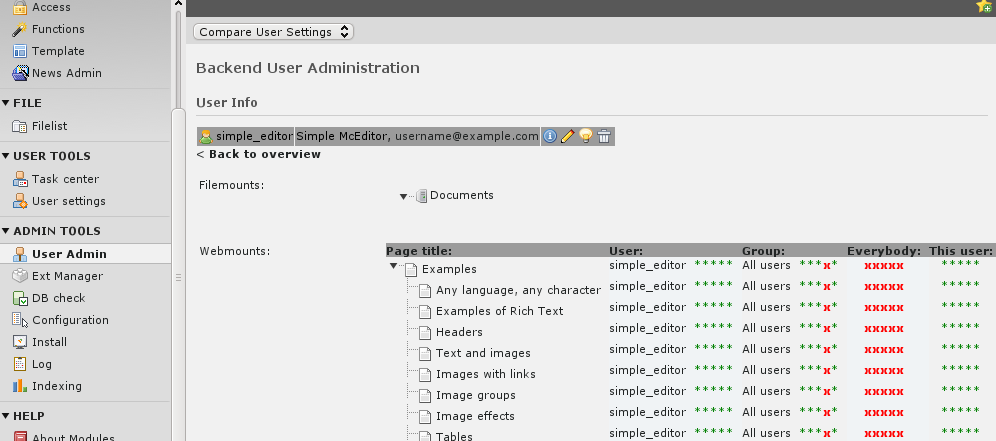
The first two green stars mean "Read page" and "New content on page" - the red crosses means "Cannot edit, delete and create new pages".But you can also simulate a backend user by clicking on the red “Switch to user” Icon. After that you will be logged in as that user - and if you log out, you will be switched back.
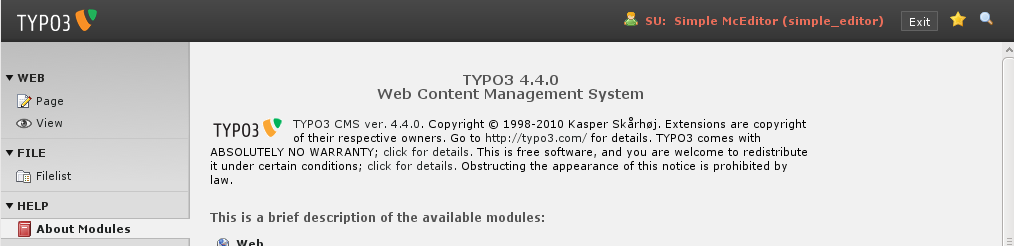
The User Admin module is a great tool to evaluate user settings, compare users etc. Indispensable when you have many users and want to make sure you have control over their rights!
Record locking?
Maybe you have noticed in the process of logging in and out as different users that an icon like this can appear:
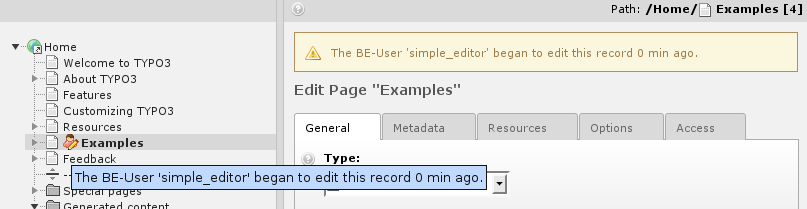
This is just a warning to users that someone else is working on this page at the moment - records are not truly locked in TYPO3 since access to a record should be allowed if people have access. But this warning is a nice touch since it helps people to avoid conflicts.Every time a user starts to edit a content record, an internal flag is set, which lasts for two hours. If the user close this record via save & close or close Button, that flag gets deleted. But if the user just select a different page to edit, that flag stay as it is. So, it is recommended to use the close button, if you are done editing an record.
Creating a new user for the Introduction site
Now, we can create a user who should be in charge for the "Resources" page including sub-pages.
Step 1: create a new User group "Resources editors"
User groups and Users are just records. Copy the backend user group record "Simple editors".
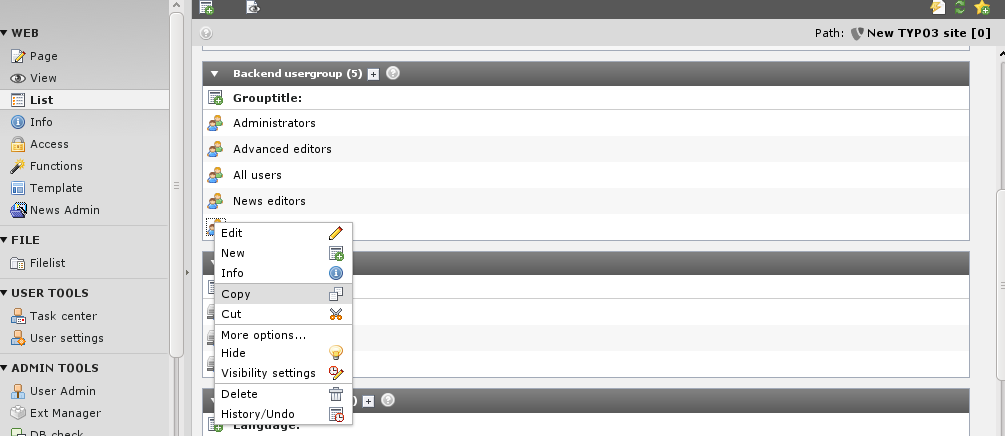
Reload the List.
And paste the copied record in the list.
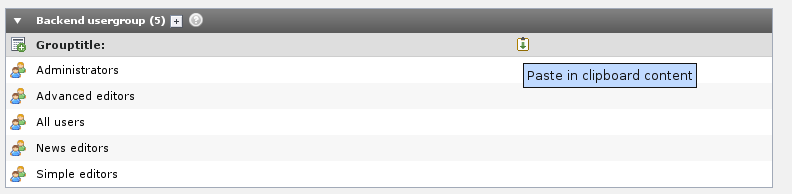 Now edit the newly created backend user group "Simple
editors (copy 1)". Change the group's title and the DB mount.
Now edit the newly created backend user group "Simple
editors (copy 1)". Change the group's title and the DB mount.
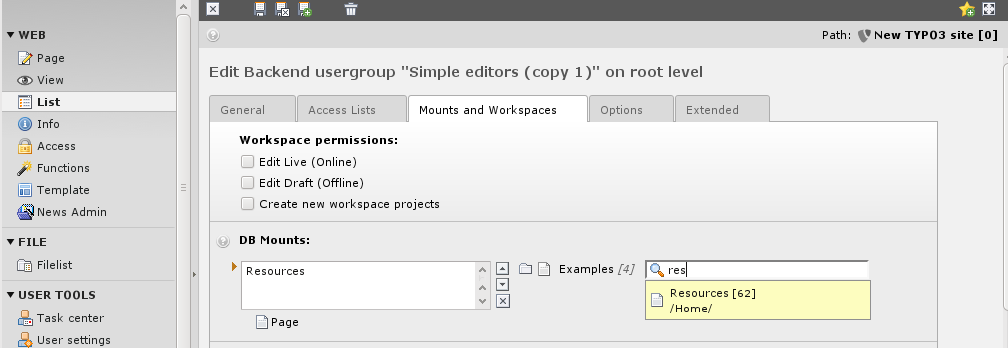
Step 2: create the user
Users are just records - create a "Backend user" record:
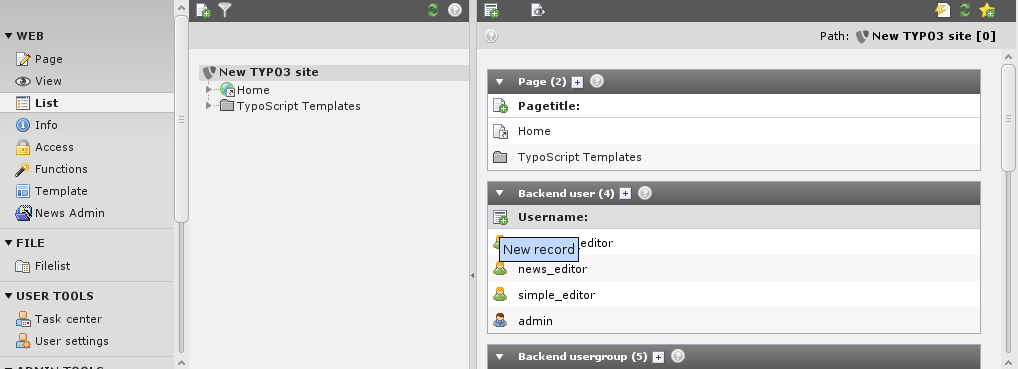
Enter the username, password, group membership:
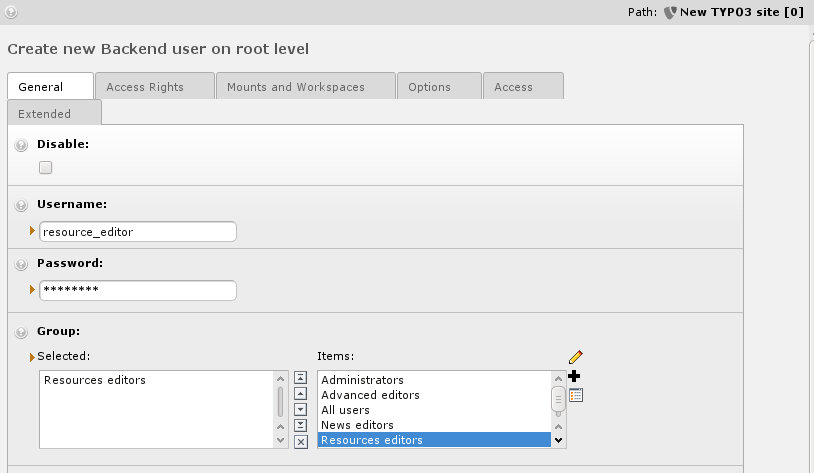
Take care, that the "Mount from Groups" settings are set:

Save the record and check the new backend user with the switch-user function in the Admin-Tool.
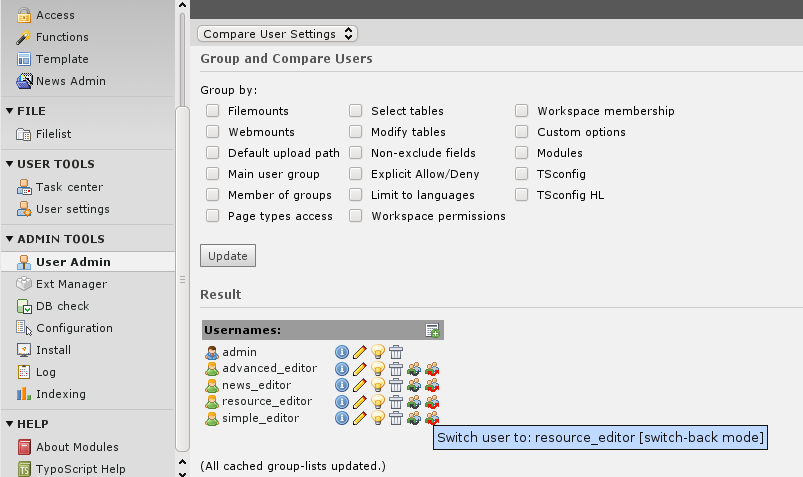
It works:
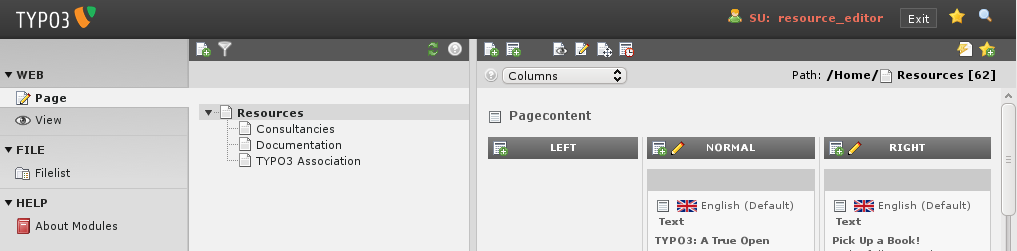
A short glimpse into the extension manager
TYPO3 has many features build in, but even more different features are implemented as extensions. With such extension you can enhance the functions of TYPO3 or build totally new features. Even a lot core features are implemented as extensions (plugins), so it is your choice if you want to use that features or not. The extension manager helps you to manage all your extensions. We want to have now a short glimpse at the extension manager. Login as admin and switch to the extension manager module.
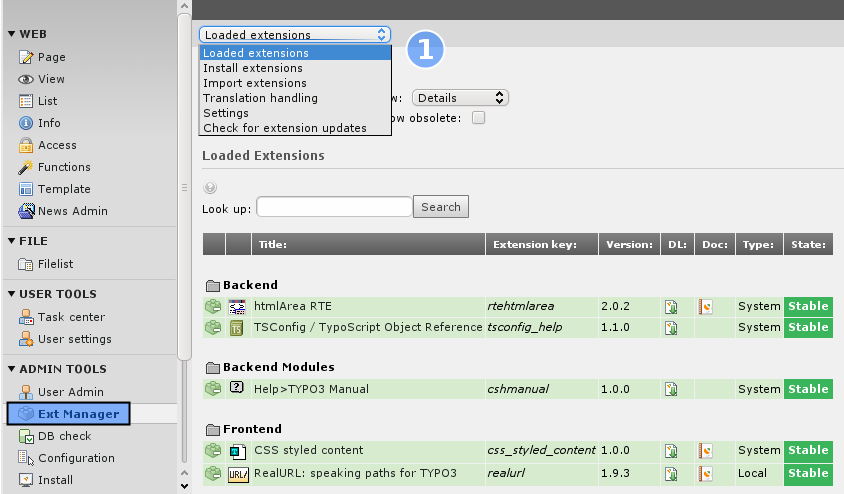
At the top of the module, you can select different sub-modules (#1). You can get the list of all loaded extensions. This are extensions which are activated. In sub-module "Install extension" you can install and uninstall extensions which are already downloaded or shipped with as system extension. The most time you may want to download extensions from TER (TYPO3 Extension repository). This is done in the "import extension" sub-module. "Translation handling" manages the language selection for the backend and downloads the language packages for TYPO3 core and all extensions which are managed by the translation team. In "Settings" you can select an specific TER mirror and define the login for Uploading extensions. If everything works fine, you would not need to change anything. "Check for extension updates" helps you to get an quick overview for which extension an new version exists.
Now have a look at the list of loaded Extensions.
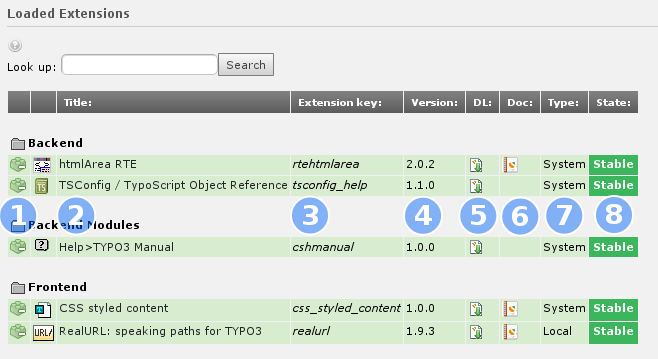
You can uninstall or install (in module "Install extensions") by clicking at the icon (#1). The title (#2) of the extension is shown. But more important is the extension key (#3). That key is used to create the extension folder in typo3conf/ext/, to define TypoScript paths and a lot more of depends on the extension key. The version (#4) and the state (#8) is set by the extension developer based on his judgement. You can download the extension itself (#5) or the manual (#6) if one is shipped with that extension. The extension type (#7) "System" indicates that an extension is shipped with the TYPO3 core, extensions of type "Local" are available in typo3conf/ext/ extensionkey .
Some extensions are marked as "shy", so the list should not get to long with unimportant extensions. Just check "Display shy extensions" and have a look at the list.
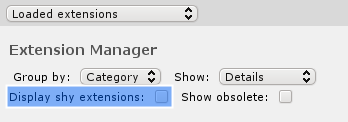
Now let us install an new extension. For that switch to the sub-module "Install extensions".
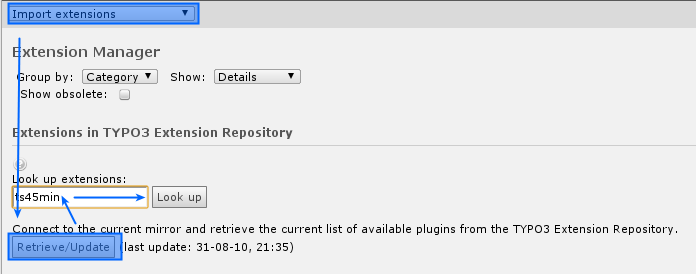
Click on the "Retrieve/Update" Button to retrieve the latest list of available extensions from the TER. Now let's look up for the extension ts45min.
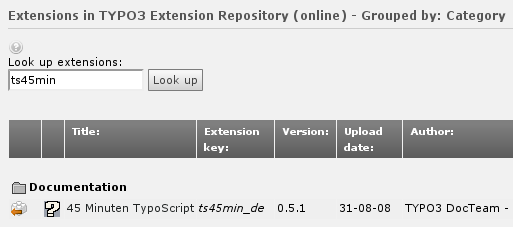
You can download and install the extension which ships with the OpenOffice (.sxw) manual. In this case, you would not get an new module or function, just the document itself which you can download in the loaded list view.
Extension security
Please keep in mind, that there is no security audit available for the extensions, so take a close look at extensions you are installing. If you find a security issue, get in touch with the security team (security@typo3.org).
Changing backend language
Usually an editor would like to use TYPO3 in his own language. So you need to change the language of TYPO3 for him. As an first step, you have to just download the language packages you need. To do so, just start the Extension Manager and select "Translation handling".
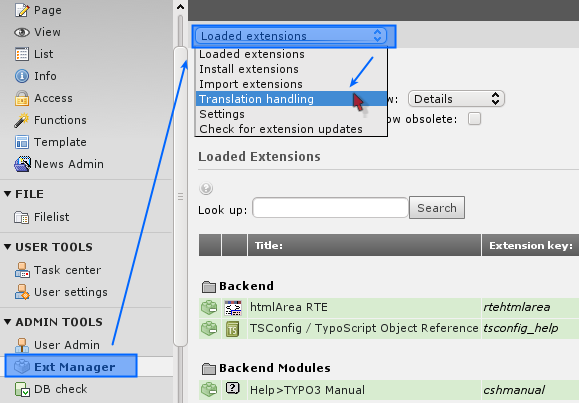 Now select which language packages you want to download.
Select all language packages you want to provide to your users.
Now select which language packages you want to download.
Select all language packages you want to provide to your users.
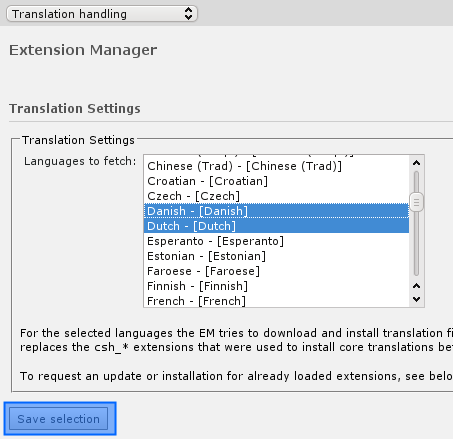 Save your selection by hitting "Save selection". You can
alter your selection at any time, so just select the languages you
need now.
Save your selection by hitting "Save selection". You can
alter your selection at any time, so just select the languages you
need now.
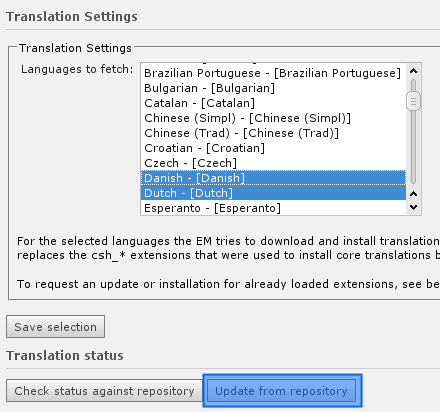 After saving your selection, you can either compare the
actual status against the repository or just update and download the
language packages from the repository. Just hit update. You will see
an progress-bar where you can see for which Extension the language
packages has been downloaded. Usually you should get a green bar and
an green "UPD" marker for you language for each extension key. It can
happen, that some extensions are not yet translated in your language,
then you will get an "N/A".
After saving your selection, you can either compare the
actual status against the repository or just update and download the
language packages from the repository. Just hit update. You will see
an progress-bar where you can see for which Extension the language
packages has been downloaded. Usually you should get a green bar and
an green "UPD" marker for you language for each extension key. It can
happen, that some extensions are not yet translated in your language,
then you will get an "N/A".
It may happen that not all packages get downloaded. Just hit the update button again - it should then retrieve the missing parts.
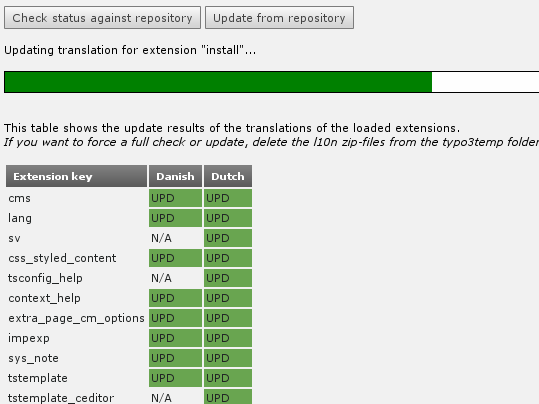
Up to now, you just downloaded the language packages. Now you need to alter your "User settings" and select your language. Switch to the "User settings" Module and select the language you want to use for your account.
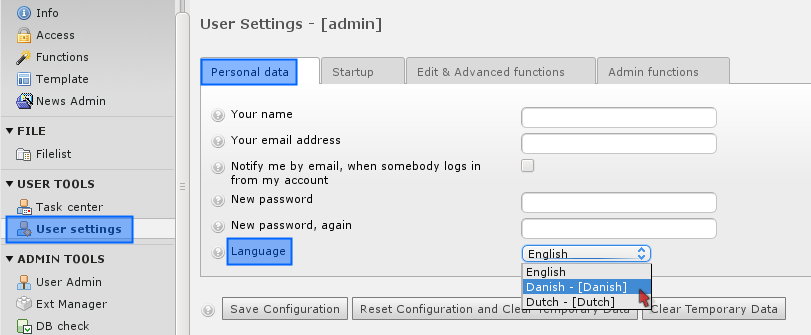 Save your new configuration. You will then get an message
that your settings were updates. If you have a look at the main
modules, you see that the modules are now shown in the language, you
selected. If you hit again "User settings" even that page will be
translated.
Save your new configuration. You will then get an message
that your settings were updates. If you have a look at the main
modules, you see that the modules are now shown in the language, you
selected. If you hit again "User settings" even that page will be
translated.
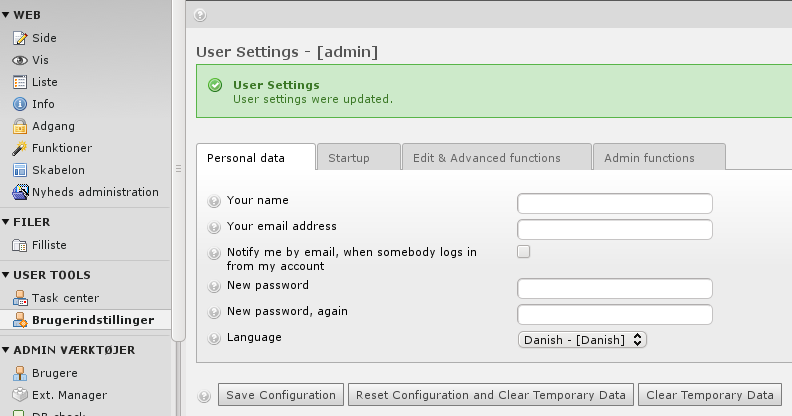 So, you just changed your own backend language. All editors
needs to do it for themselves.
So, you just changed your own backend language. All editors
needs to do it for themselves.
If you create new editors you can give them a helping hand by selection an "default language" while creating new Backend user records. This language will be used when the log into TYPO3 the first time.
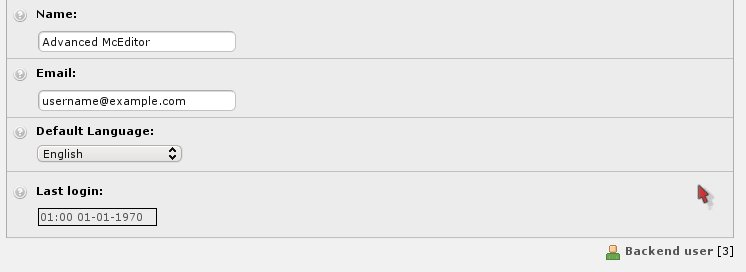 Keep in mind, that the "Default Language" really is nothing
else, than an default setting. If they have logged in already, they
have to switch their language for themselves in the "User settings"
Module.
Keep in mind, that the "Default Language" really is nothing
else, than an default setting. If they have logged in already, they
have to switch their language for themselves in the "User settings"
Module.
Troubleshooting
Human readable URLs
By default, TYPO3 identifies the page which should be delivered via the ?id parameter. So you can just enter http://www.your- site.example.org/ index.php?id=4 to get the examples page. As every page in TYPO3 has an id, you only need to know that id to get the page. But for your visitors the url http://www.your- site.example.org /examples/ would be nicer. In TYPO3 this features comes as an extension (and there are actually several). The Introduction Package comes with one called "RealURL". If you have special needs regarding the scheme of your URLs, have a look at its manual.
RealURL should work just out of the box for you in the Introduction Package. If it does not, and you get redirected to the Welcome page with each click in the frontend, you may just deactivate realurl. For doing so, just go to the list module, select the template "Introduction Package" on the page "home" and put into the setup- field:
config.tx_realurl_enable = 0
Save the template record and just clear all caches. All links should be rendered with ?id= instead of human readable URLs now, and you should be able to just navigate trough your page.
[we need to show the clear cache with screenshot – users do not know how to do this]
Note on image processing in TYPO3
If you are not so lucky you didn't see some of the images in these screenshots on your own server. This might be because ImageMagick was not properly detected on your server. You probably didn't see all the great things happen.
You will have to consult the :underline:`installation documentation
<http://typo3.org/documentation/document-library/installation/>`_
available to get those problems solved. Also remember there is a
:underline:`mailing list for installation
<http://typo3.org/community/mailing-lists/>`_ questions.
Colored differences in history module
To get the colored differences in the history module, you need to have installed the unix-tool diff on your server. Otherwise you will not get the colored differences. But you will be able to see the differences, just without colors.
Next steps
TYPO3 has a lot of documentation available in the documentation library. They are divided into four sections. The tutorials section coversdocuments which provide you with a step-by-step introduction to a topic. If you need documentation about installing TYPO3 or related software you will find it in the section Installation. The Core Documentation isrelated to the core of TYPO3 and mainly describe behind the scenes technology. Target group of this documentation are extension- and core developers. In the section Extension Manuals there is a list of all manuals which are available from extension. That are a lot of different documents, so for beginners it is sometimes difficult to find the right document to get started. So, we recommend the following documents for further reading.
Tutorial for editors
:underline:`**TYPO3 Tutorial for Editors**
<http://typo3.org/documentation/document-library/extension-
manuals/typo3_tut/current/>`_ : This basic tutorial for editors
explains how to add or change content on an existing website in TYPO3.
It provides the most basic step-by-step instructions to get the job
done. This tutorial does not cover all available functions, only the
most common ones.
Internal Manual (Module) : The system extension cshmanual provides an additional backend module, which appears in the help menu. The TYPO3 Inline User Manual is composed from the available help in this TYPO3 Installation (Context Sensitive Help). Here you will find a general description of the TYPO3 Core modules, installation specific Backend Modules and Database Tables that are available based on your login credentials.
Tutorials for future administrators
:underline:`**Modern Template Building**
<http://typo3.org/documentation/document-
library/tutorials/doc_tut_templselect/current/>`_ : The
modern Template Building explains how to use an HTML-Template as
skeleton for your webpage, and helps you with the first steps building
your own website in TYPO3.
:underline:`**Futuristic Template Building**
<http://typo3.org/documentation/document-
library/tutorials/doc_tut_ftb1/current/>`_ : TYPO3 uses
the concept of columns to define where the content is rendered. If
your website design does not fit into columns or you need to be very
flexible with the content elements, the extension TemplaVoila may help
you build very flexible designs with TYPO3. This concept is explained
in this tutorial.
:underline:`**TS in 45 minutes** <http://typo3.org/documentation
/document-library/extension-manuals/ts45min_de/current/>`_
: TypoScript is the powerful configuration language, but
it is not an scripting language. This tutorial explains the basic
concepts of TypoScript and gives a first overview about the most
important functions and objects.
References
:underline:`**Tsconfig** <http://typo3.org/documentation/document-
library/core-documentation/doc_core_tsconfig/current/>`_
: With Page- and User-TSconfig you can change in parts
the behavior of the backend . You can change labels, hide or show
fields, set permissions and default values. This is usually done on
the Page-TSconfig or User-TSconfig field. This reference shows which
options are available for TYPO3.
:underline:`**TSRef** <http://typo3.org/documentation/document-
library/core-documentation/doc_core_tsref/current/>`_ :
The TypoScript reference defines the different functions and objects,
which can be used to configure the frontend output. Usually you
will use the extension css_styled_content which ships with the whole
configuration for all build in content elements. If you want to change
something, you can look up the possible options in the TSref.
Keep security in mind
Security is taken very seriously by the developers of TYPO3. The
:underline:`TYPO3 Security Team
<http://typo3.org/teams/security/>`_ manages possible security
incidents. They review it and considers its impact. If TYPO3 or an
extension turns out to be actually vulnerable, the Security Team work
on a fix for the problem. They contact the extension authors and if
the fix is tested and released, an advisory is published. To get the
bulletin notification delivered to your inbox, we strongly recommend
to :underline:`subscribe <http://lists.typo3.org/cgi-
bin/mailman/listinfo/typo3-announce>`_ to the typo3-announce mailing
list. The TYPO3 Security Team also provides some
:underline:`additional resources
<http://typo3.org/teams/security/resources/>`_ about securing your
TYPO3 installation.