DEPRECATION WARNING
This documentation is not using the current rendering mechanism and is probably outdated. The extension maintainer should switch to the new system. Details on how to use the rendering mechanism can be found here.
TYPO3.org - manual for developers
| Author: | Kasper Skårhøj |
|---|---|
| Created: | 2002-11-01T00:32:00 |
| Changed by: | Kasper Skårhøj |
| Changed: | 2003-12-15T16:41:31 |
| Author: | Kasper Skårhøj |
| Email: | kasper@typo3.com |
| Info 3: | |
| Info 4: |
TYPO3.org - manual for developers
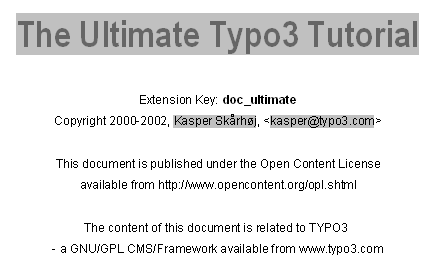
Extension Key: doc_typo3org
Copyright 2000-2002, Kasper Skårhøj, <kasper@typo3.com>
This document is published under the Open Content License
available from http://www.opencontent.org/opl.shtml
The content of this document is related to TYPO3
- a GNU/GPL CMS/Framework available from www.typo3.com
Table of Contents
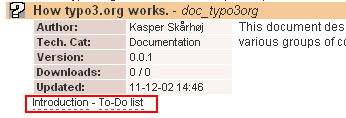
TYPO3.org - manual for developers 1
Introduction 1
What does it do? 1
Writing documentation for TYPO3 2
Using Open Office Writer 2
Rules for writing SXW documents 3
Managing manuals on typo3.org 12
Proofreading documents 18
Proofreading coordination 18
Tools for review 18
Managing extensions 20
The “Edit” menu item 20
Translating extensions 23
Chiefs and Assistants 23
Translation workflow 24
Merging the translations into the repository 25
Using pending translations 27
The knowledge base system 28
Annotations 28
To-do list: 29
Annotations notes: 29
Introduction
What does it do?
This extension is a user manual for the developers using the TYPO3.org online platform. It should cover all relevant issues ranging from management of extensions to translating extensions, reviewing documents and writing documents.
Writing documentation for TYPO3
Using Open Office Writer
Documentation of TYPO3 is an issue for everyone contributing to the project. From experience you learn that documentation is very important. What you remember clearly today is gone from your brain tomorrow. So get used to it - document it.
On typo3.org everyone is able to contribute documentation. And it has been made as easy as it possibly can be. The technology for documentation is a regular, cross platform and free/GPL word processor, Open Office Writer ( www.openoffice.org ). Using OpenOffice Writer has these major advantages:
- Comfort The author can edit the documentation locally and allows him to comfortably write the documentation in one single text document with tables, images, headlines, code listings all included.
- Easily online OpenOffice Writer uses XML (zipped) as file format (SXW). Therefore a single SXW-file uploaded to typo3.org can be decoded and displayed online as HTML without any further conversion!
- Nice print version Since the documentation will be available as the original SXW file it easily downloads and prints for anyone who wants a print of it all. Further people using other paper formats than A4 will be able to easily set eg. “Letter format”.
The only requirements/drawbacks about using Open Office Writer for documentation is that it cannot (AFAIK) be configured to strictly allow only certain paragraph styles. For typo3.org a limited set of paragraph styles are allowed and using other styles will render the paragraph in gray text or not at all. So it requires a little discipline by the authors to adhere to a set of rules for Paragraph styles. However this is a minor issue compared to the endless flexibility we gain!
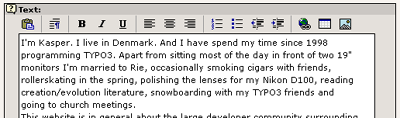
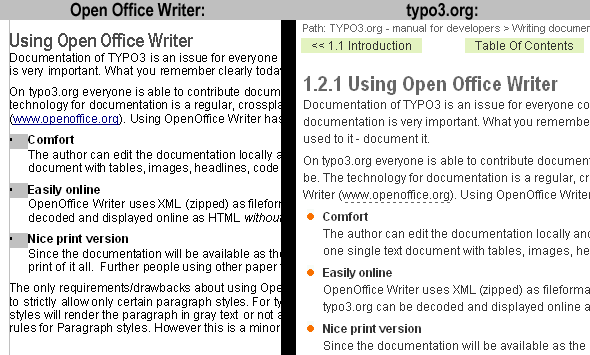 In the image to the left you see the part of a document as
shown inside Open Office Writer. That content is shown on typo3.org by
directly extracting it from the Open Office SXW-file (which is stored
as XML).
In the image to the left you see the part of a document as
shown inside Open Office Writer. That content is shown on typo3.org by
directly extracting it from the Open Office SXW-file (which is stored
as XML).
Rules for writing SXW documents
Here follows the simple set of steps/rules for writing documentation for TYPO3 which can readily be shared on typo3.org.
Get the template
On typo3.org there is an extension “EXT: My Extension” (doc_template) . Go and get the source file as a template for your own extension:
You can also download the file from the “Details” view of the extension:

Store the SXW-file in the extension directory of your extension. Use the path “doc/manual.sxw”.
Edit the meta information
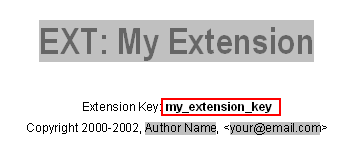
When you open the template file you'll see something like this:
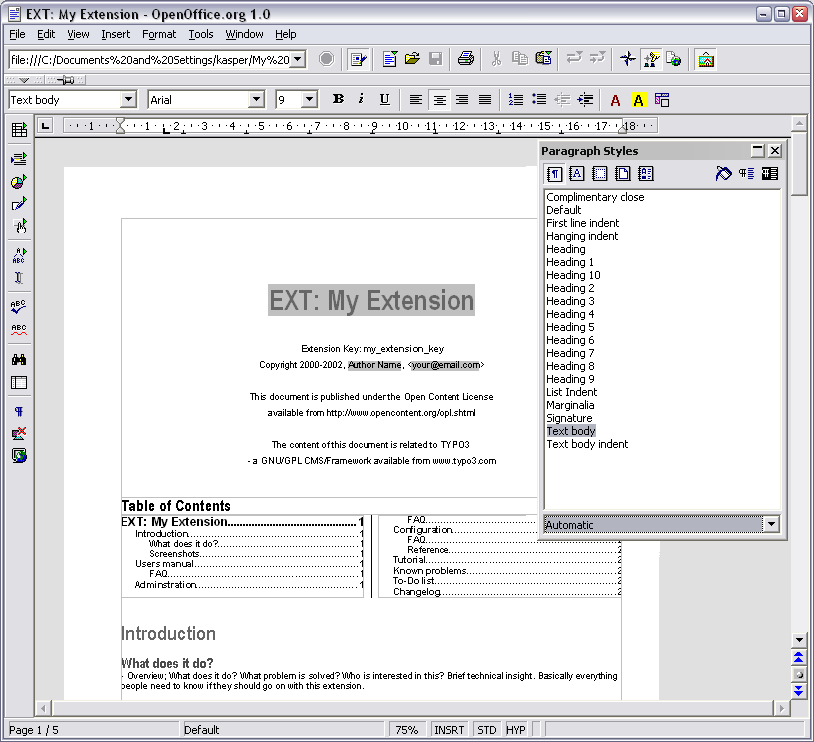
First, change the extension key which is just ordinary bold bodytext:
Then open the dialog “File > Properties...” and edit the meta information which is shown in the gray fields:
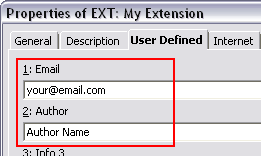
Enter your name, your email address and in the “Description” tab enter the document title. After that your document header looks like this:
Using styles
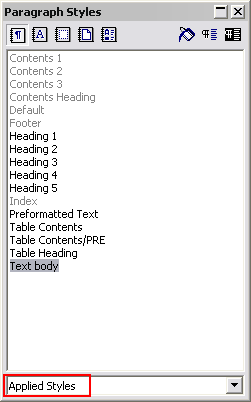
Since we have rules about the layout of the documentation you must use certain paragraph styles only. By default OpenOffice shows the style collection “Automatic Styles”. It would be better if you change to the view “Applied Styles” which will show all allowed styles since each of the styles is used at least once in the template document (until you delete the dummy content).
From this palette your are allowed to use the non-gray styles you see here:
Heading 1: Used for the document header. Use this if your document is very large and needs division into major sections (see documents like Inside Typo3 or TSref as examples). Typically you don't use this.On typo3.org the headlines are numbered and “Heading 1” has the first position in the numbering: X .x.x
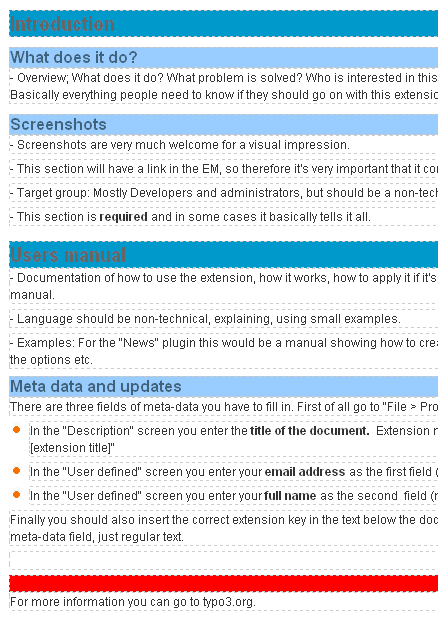
Heading 2: For regular sections in your documentation. The template document (doc_template) recommends a certain set of sections. These thematic sections are described so we can unify the approaches in the documentation and tag the content so it makes it easier to find for people. The sections are described as follows:
- Introduction Overview; What does it do? What problem is solved? Who is interested in this? Brief technical insight. Basically everything people need to know if they should go on with this extension. Screen shots are very much welcome for a visual impression. This section will have a link in the EM, so therefore it's very important that it conveys relevant information.
- User manual Documentation of how to use the extension, how it works, how to apply it if it's a website plugin. A user manual. Language should be non-technical, explaining, using small examples. Target group: Users (green), Administrators or Developers in that priority. Depends on the extension.
- Administration Describes how to manage the extension from a superuser point of view. That relates to Page/User TSconfig, permissions, configuration, etc., which administrator level users have access to. Language should be non-/semi-technical, explaining, using small examples. Target group: Administrators (blue)
- Configuration Technical information; Installation, Reference of TypoScript, configuration options on system level, how to extend it, the technical details, how to debug it. Language should be technical, assuming developer knowledge of TYPO3. Small examples/visuals are always encouraged. Target group: Developers (orange)
- Tutorial A full point-a-to-b-to-c walk-through of an application of the extension. Include screen dumps. Language: As tutorials are... Target group: Whatever fits.
- Known Problems Use this section for important warnings about bugs, problems or performance issues. This is where you should explain shortcomings of the extension, so people are properly warned. Be honest. Target group: Mostly Developers
- To-Do list A wish list of things you want to add or fix. This includes smaller problems/bugs which are best described as a todo item. Visions for what the extension could become with more development.
- Change log Use this section to document all the changes through the versions.
These categories of content are designed especially for extension manuals. For other kinds of documents they may not really apply. Apart from the “Introduction” section (which you should always make in order to describe the purpose of the extension/document) the others can be left out as you like. No worries.On typo3.org “Heading 2” has the second position in the numbering: x. X .x
Heading 3: For subsections in your documentation.On typo3.org “Heading 3” has the third position in the numbering: x.x.X
Heading 4: Headlines inside a section
Heading 5: Headlines inside a section, typically used for the header “Example”.
Preformatted Text: For code listings.
Text body: For all bodytext. NOTICE that the style “Default” easily sneaks in instead of “Text body” but you must use “Text body” for your document.
Table Heading/Table Contents: Styles automatically used for tables: Headers and content
Table Contents/PRE: This is a custom style which must be used for code listings inside of tables. The code listings will be shown with a slightly smaller font than “Preformatted Text”. Generally be careful not to make too long non-breaked lines in code listings inside of tables; On the web pages on typo3.org those listings will expand the table horizontally and make it hard to print.
The other styles are automatically used for the footer and index table in the document top. Don't use them. Don't worry about them.
Testing the correct use of styles
Most likely you will not manage to make your document right in the first attempt. In particular it can be hard to spot where you have used various styles. But typo3.org helps you to “validate” the use of styles. When your document is uploaded you can test it like this:
Click the document title as it is available from “typo3temp/manual....sxw” (which is the temporary position of the document on the server. Then you'll see something like this:
All paragraphs are shown with dotted lines so you can easily see them. Headlines are shown in a special color scheme for “Heading 1-5”, tables as well. But most importantly if you have used an invalid style it has a red background! So in this case you go back to OpenOffice, place the cursor in that line and then you'll find that...
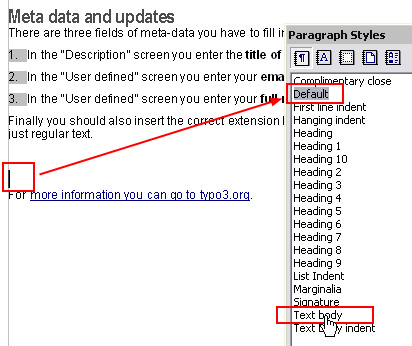
... the style “Default” was used for that paragraph! Simply double- click “Text body”, save the document, upload the extension and the problem is gone.
Tables for TS properties
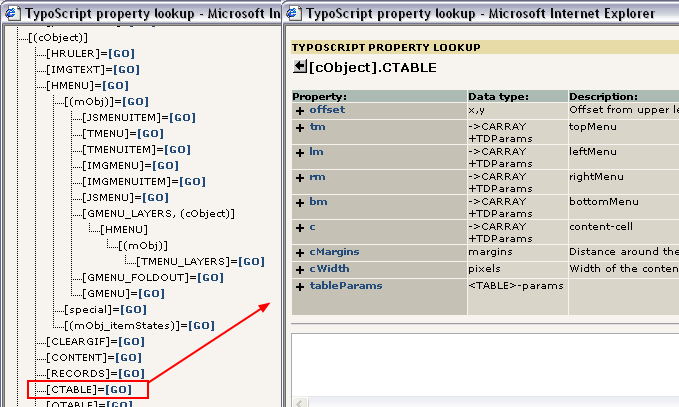
The extension “TSConfig / TypoScript Object Reference” contains a static table with the structure of TypoScript objects for three cases: TypoScript template building, Page TSconfig and User TSconfig. The access to this local reference is normally found as a little “TS” icon like this:
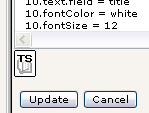
Clicking the icon will bring forth this view:
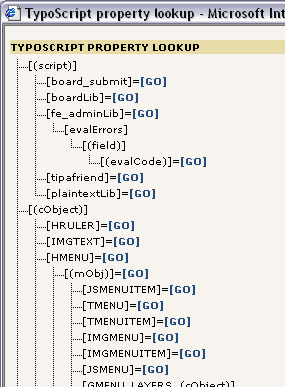
The information for this tree is directly extracted from the total number of documents on typo3.org. That includes any manuals you make!
If you look into a document like TSref or TSconfig you'll see that the four-column property tables all have a little code encapsulated in square brackets in the first paragraph after the table:
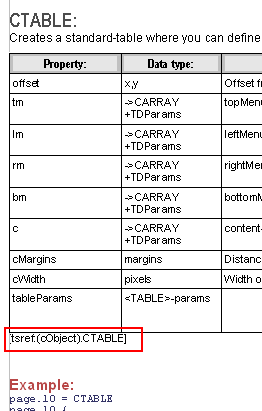
In this case the code
[tsref:(cObject).CTABLE]
will add the content of the property table to the structure:
Syntax:
This is the syntax for the code line:
[type-ref] : [object-path] / [object-path] / ... ; [type-ref] : [object....
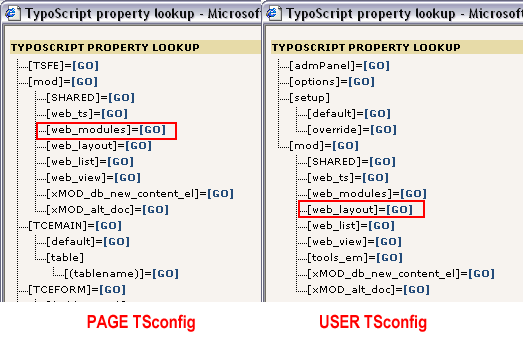
- [type-ref] can be “tsref”, “page” or “beuser”
- [object-path] is the path to the position in the tree in the browser. You can specify many object-paths separated by “/”
- Use the semicolon “;” to separate references to different types of references (that is if some properties apply to both “page” and “beuser” config. See example).
Example 1:
[page:mod.web_modules; beuser:mod.web_modules]
This adds the properties to the position “mod.web_modules” for both the Page TSconfig and User TSconfig.
Example 2:
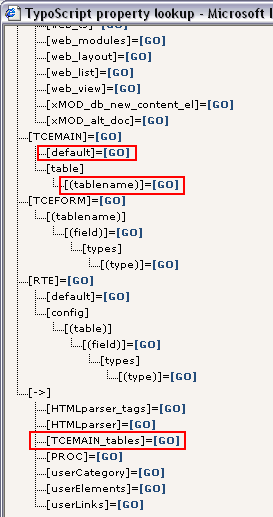
[page:TCEMAIN.default/TCEMAIN.table.(tablename)/->TCEMAIN_tables]
This adds the properties to the 3 positions “TCEMAIN.default” and “TCEMAIN.table.(tablename)” and “->TCEMAIN_tables”
Example 3:
[tsref:plugin.tx_t3references_pi1]
This would add the root properties for the plugin “t3references” where it should appear in the reference. This is how you should probably use it!
When describing new features...
When writing your documentation, please consider to:
Note at which version a feature was introduced
It has been requested that manuals like TSref put in a note which tells from which version of the extension a certain property is available. This is now recommended as a good practice.
Highlight keywords
Also there has been requests for highlighing object names and properties of TypoScript you enter.
myObject = HTML
myObject.value = <tagstart>something</tagend>
(Above the object and property names have been highlighted in red)
Linking
You can make hyperlinks in the documents as absolute URLs. Use menu “Insert > Hyperlink”:
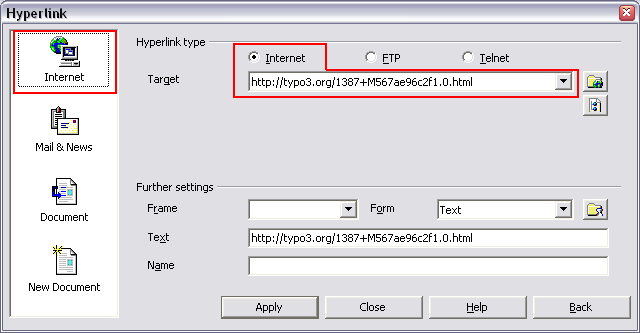
Use absolute URLs only (for now). When linking to other pages on typo3.org just browse to the page and copy the link into this box. Make sure you are browsing the pages at “http://typo3.org/” (not “http://www.typo3.org”). We want “internal links” to be recognized by the main domain “typo3.org”.
Finalizing
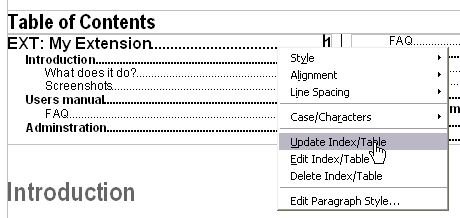
When you are finished with your document you should update the index in the top of the document. It doesn't automatically reflect the structure, so simply 1) place the cursor in the index table and then 2) right-click and select “Update Index/Table”:
Other notes about “doc/manual.sxw”
One thing you should be aware of is that the file “doc/manual.sxw” is not downloaded with extensions by default! Simply because most people don't need the manual locally. If you wish to download the full extension with doc/manual.sxw, simply tick the checkbox for that option when you download extensions:
Number of pages and filesizes
It is important that you try to make your manual.sxw file as small as possible. If the file exceeds about a megabyte you (and others) will have problems having the file included in the extension directory. The EM will simply make some errors. So keep it small. In particular that has to do with the way you handle images. So make images well compressed. Please read the section about images for details.
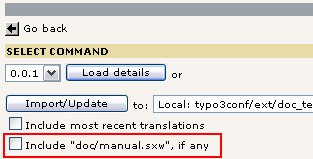
However it is not always possible to keep the filesize down below 1MB. If that is not possible, simply 1) upload your extension with a blank document in “doc/manual.sxw” and then 2) go to typo3.org, manage your extension so that the “doc/manual.sxw” has been recognized, then upload the real manual.sxw file in the “Doc-review” menu and press the “Merge?” button just as if the document had been submitted for review.
Documents uploaded by the “Doc-review” menu can be as large as 3MB but still , better spend some time making the document small for the general sake of the typo3.org site, OK!
The amount of content is not so critical regarding filesize since the contents of a Open Office Writer document is compressed. For instance the TSref is a 260K+ text characters large document and that only takes up 200 KB. But when that document is expanded from the zip- archive the content.xml file inside is very large and large amounts of content takes long time for the server to process for comparisons or simple rendering.
Images in Open Office documents
Inserting images
When you insert images you can either:
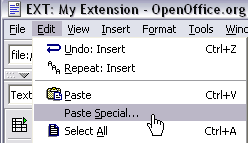
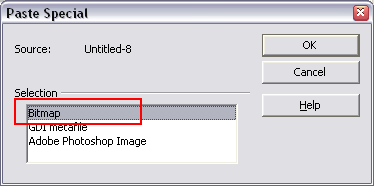
Make a copy/paste from eg. Photoshop, but it's REALLY IMPORTANT that you insert the image into Open Office by the menu “Edit > Paste Special” and then select “Bitmap” . If you don't do it in this way the image cannot be shown (since it will not be stored as a PNG internally in the SXW file). So CTRL+V does NOT WORK! The image will show fine, but internally it's stored as some kind of meta- file which cannot be shown on the web!
Alternatively you can use the traditional way “Insert > Graphics > From file” and insert an image from your hard drive. In particular use this if the image is photographic (JPG) since the internal storage as PNG is not good for photographs.
Generally, please use copy/paste only for screen dumps with large areas of similar color (good png-compression), and use insertion of JPG-files for photographic images. Go for small images, 72 dpi, medium quality.
Insert images without text wrapping around them. So; No text to the left/right of images. Let them have their own paragraph (like you see everywhere in this document).
You can right-click images and select “Caption” in order to add a caption (text below image). That is allowed.
Images from Open Office manuals are displayed online without physical scaling ! So when images are wider than 600 pixels they are scaled down by simply changing the<img>-tag settings. Scaled images on the other hand get linked to a window with the full size image. So people can always click the scaled-down images and see a full, crisp version in a new window. Don't scale/resample screenshots in image processing applications. We want small, crisp screen dumps (see why in the next section below).
Images with dimensions above 50 pixels in both width and height will have a black border applied. Images with one dimension below 50 pixels is considered a “bullet” (a number, icon or something like that) and will not have a black border.
The reason for not scaling the images physically are these; First of all most images are screen dumps. They would probably download faster in their original form than a scaled, antialiased form which takes up more space. Secondly images scaled in HTML still print nicely! (At least with MSIE)
Scaling images
Since the documentation for TYPO3 heavily consists of screendumps it's worth to mention here. First of all visual content like images is highly encouraged! And it's very easy with OpenOffice since you can use plain copy/paste (see above). But it is worth to teach you a couple of things regarding the typical nature of screendumps.
Images displayed on typo3.org will be scaled down if wider than 600 pixels. So the question is: Should you also “resample” the image to 600 pixels width in Photoshop? The answer is NO! The reason is that a screendump consists of large parts of the same color. If you begin to scale an image you will get anti-aliased transitions between those areas of similar color. And consequently that 1) makes the image harder to compress = larger files and 2) the quality gets worse. So larger and uglier files if you scale the image to new pixel dimensions! Contrary you get crisp and small images if you just keep the screendump as-is! And the print-out will be awesome as well!
You can see the difference visually here:
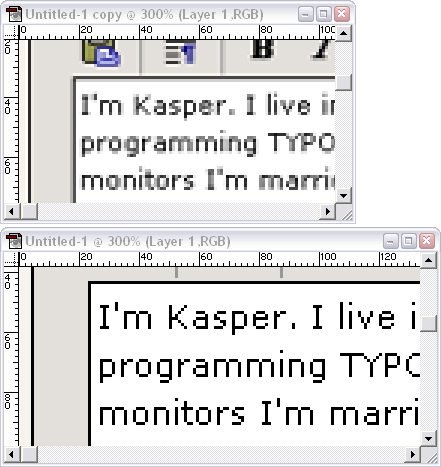
The image at the top has been scaled from 516 pixels to 400 pixels. It is clear that the scaling has introduced a lot of gray tones. These graytones makes the image harder to compress as gif or png. And the image gets more blurry. So what is the point? The point probably was to keep the images as small as possible, but it happened to do the opposite in the end!
Here are the files in full size. So what prints best? What looks best? And notice the file sizes!
 13,76 Kbytes, 64 colors, Gif
 5,48 Kbytes, 64 colors, Gif
How to “debug” large images in Open Office documents
That is in fact very easy. Just renamed the manual.sxw file to “manual.sxw.zip” and open it! This is how you can do in Windows XP:
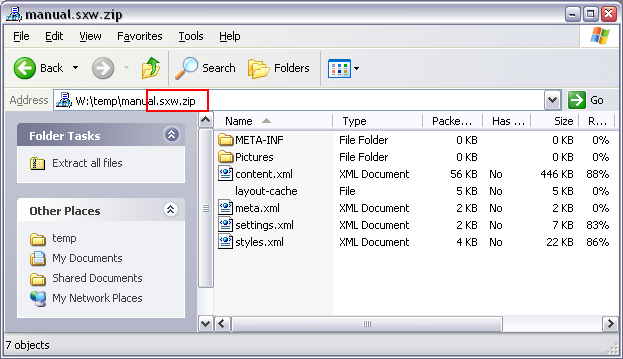
Go to the Pictures folder and sort by size:

From here you can open the largest images in a Photoshop and see if it can be compressed more. Often you'll find that only a few images are taking up far too much space and the overall size of your document can be reduced drastically by a few optimizations.
Either you can save the image back into the archive and rename the archive file back to “.sxw” or you can of course have a copy of the sxw-document open into which you simply paste the modified images.
Managing manuals on typo3.org
Managing the online Table of Contents (TOC)
When you want to share your document on typo3.org simply upload the extension. Then go to typo3.org, find your extension and click “Edit”:
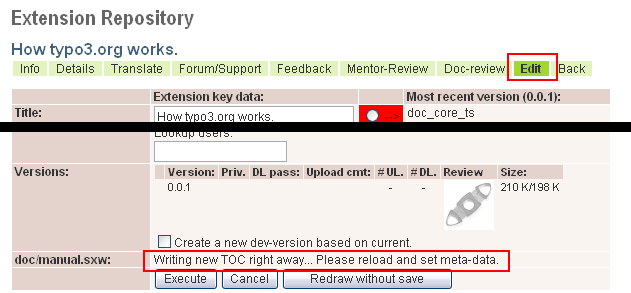
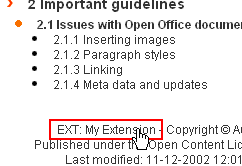
Notice how the field “doc/manual.sxw” will display this message the first time a manual is found for the extension. “Writing new TOC ...” means that the TOC (Table of Contents) is written to the database. The TOC is simply all the “Heading 1-3” paragraphs found in the document and since they reflect the structure of the document they are written to the database in single records.
Click “Edit” again and you'll see that now the document has been recognized and the TOC is written and displayed:
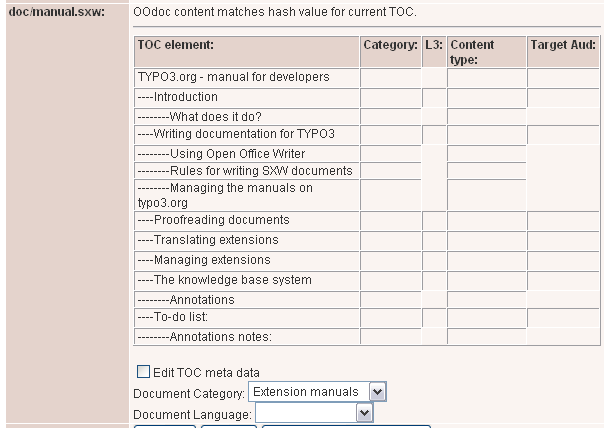
Now tick the “Edit TOC meta data” checkbox and set the meta-data:
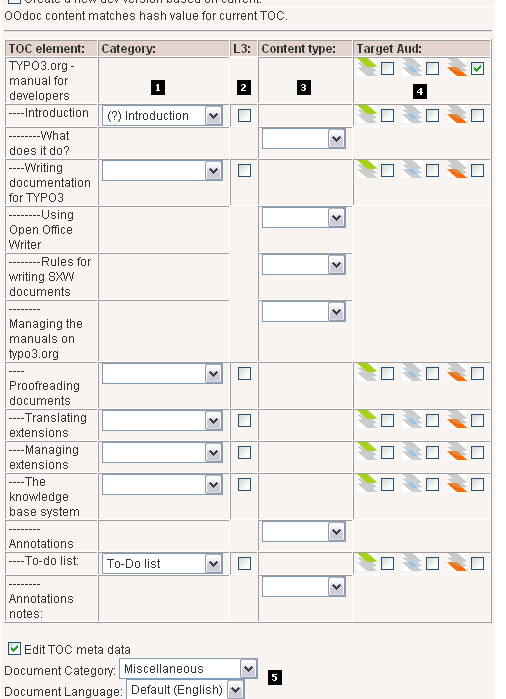
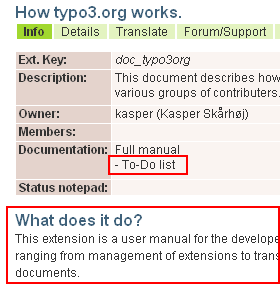
You can tag each of the “Heading 2” levels with a category. If you have adhered to these categories in the making of your document please use this feature. This will be reflected at various places where the extension is shown: Extension Info: Here you will have links directly to the relevant sections if available. Further below the information table you'll have the full content of the “Introduction” section printed.
Extension listing: In the listing of extensions you'll see links directly to the individual sections as well:
 The documentation matrix: Here you'll have a little flag
for each of the sections available in your document. Also notice the
flag indicating language.
The documentation matrix: Here you'll have a little flag
for each of the sections available in your document. Also notice the
flag indicating language.

“L3” means “Level 3” and if you set this flag for a level 2 section it means that the document is NOT divided into single pages for each “Heading 3” found in that section. Rather the full “Heading 2” section will be shown as one single page and the links from the TOC to the level 3 pages will be anchor-point links.This feature is useful if there is only little content for each “Heading 3” section so that a display of the full “Heading 2” section looks better.
You can specify content types (Faq / Examples / Reference) for the Level 3 sections if you like. This is not used yet, but later I imagine that we can have a collection of direct links to examples, faq's and references somewhere.
Target Audience is a kind of rating you can apply. The green/blue/orange color codes represents content directed to Users/Administrators/Developers. Please use this to rate the parts in the document. Thus it will be easily seen by each target group if the content they are reading is also written with them in mind.Setting Target Audience for a higher level (eg. “Heading 2”) will reflect on lower levels unless a flag is specifically set there.
Finally you can select a “Document Category” which defines where the document is listed in the “Documentation Matrix”. Likewise “Language” should be used to set the language of the document. Thus people can easily spot information in the local languages. (See image above with English flag)
Updating the TOC
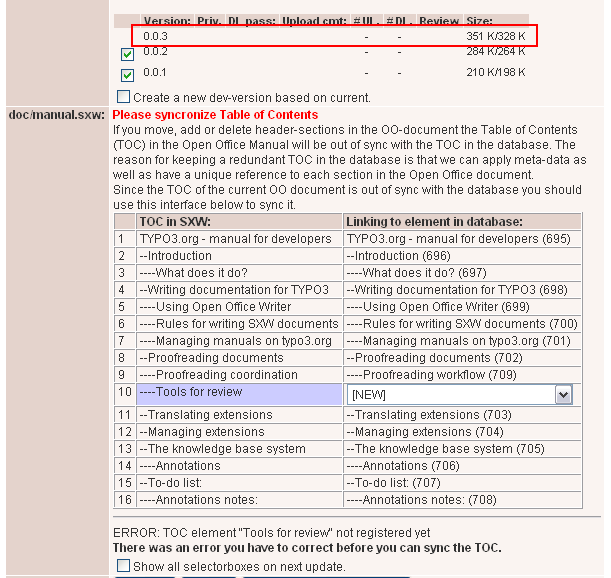
When you edit your document it's most likely - if not the everyday situation - that sections are moved around, renamed or added. In that case you have to synchronize the new structure of your document with the TOC in the database on typo3.org. This screendump shows how that looks:
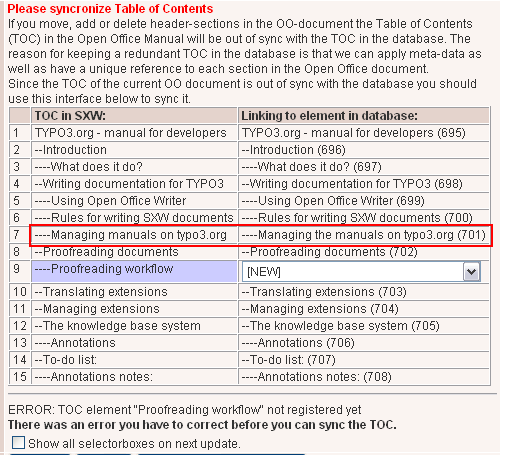
Here you see two very common things; First the header “Managing the manuals on typo3.org” has changed to “Managing manuals on typo3.org”. However in this case that header is automatically recognized. The second and more visible example is the new section “Proofreading workflow”. You need to tell the database that this section is either new or a substitute for an old one (which you can select with the selectorbox).
If you need to make changes in general you can tick of the “Show all selectorboxes on next update”, and you'll have a selector box for each item in the TOC.
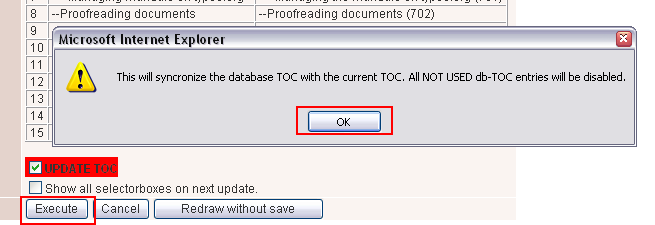
Finally when you have set the TOC as it should be, you'll have to submit the changes. Only when this step is completed the new document is inserted instead of the old!
And you are done.
Why keep a redundant TOC in the database?
Some of you might wonder why we have to maintain a TOC in the database as well. Why not just write a new TOC each time the document is updated? The answer is simple. Since Open Office offers no unique id per header section inside the document we'll have to invent and synchronize that ourselves. There are two very good reasons for that.
First of all, links to a section in the online documentation are tied to the TOC element uid in the database. So if we deleted the old TOC and inserted a new one each time we update documents all links from external sources to that page on typo3.org would be invalid.
Secondly the only way of attaching meta-data as well as annotations to the documentation is if we have a unique identification of the section.
So as you see we need a unique id for each section. Since Open Office doesn't offer that we'll have to keep track of it ourselves.
This tool for managing the TOC could still be improved. In particular it would be nice if we could later delete and move references to old TOC elements by time. That is not possible yet (Dec. 2002).
Verifying the Open Office Document
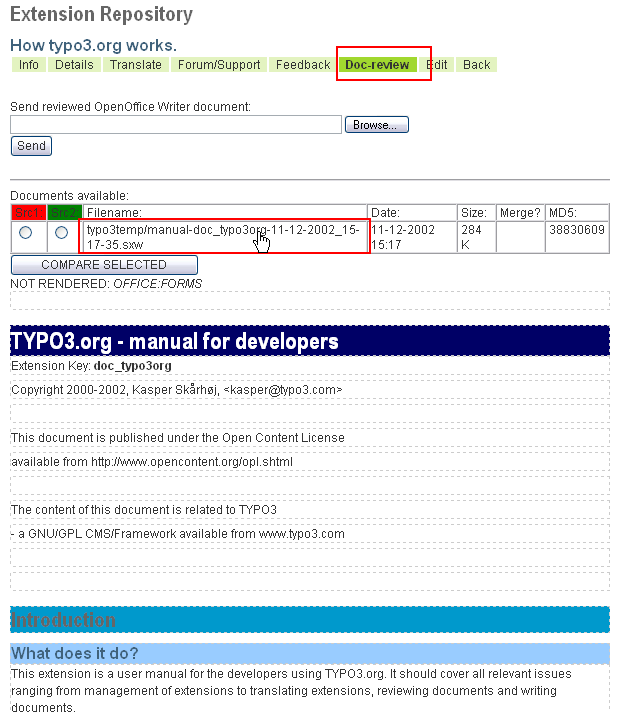
As said, simply upload the extension and all that. Then go the extension page, click “Doc-review” and click the title of the document. You'll immediately have the full content of the document shown in “debug-mode” and you can see if there are invalid paragraphs or missing images.
Proofreading documents
typo3.org features a nice way for proof reading of English documents. First of all there are a group of native English speaking people who have volunteered to proofread documents as authors are ready to let them.
Proofreading coordination
The “Proofreader of English documentation” is found by simply looking for them in the “Contributing users” list. In the coordination of the proofreading I suggest these guidelines:
- All coordination is done between the document author and the proofreader.
- Proofreaders should never begin proofreading without permission from the author. The author knows if the document is ready for it or if there are revised versions which should be proofread instead.
- If an author wants his documentation proofread he writes an email to one or more of the proofreaders asking if one of them is able to help. Conversely proofreaders are of course free to suggest themselves for proofreading a document!
So much for the coordination.
Tools for review
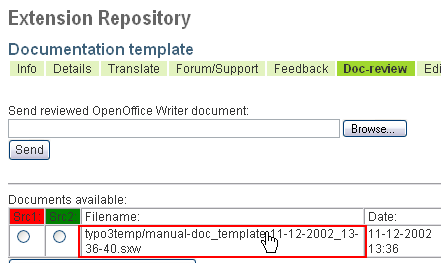
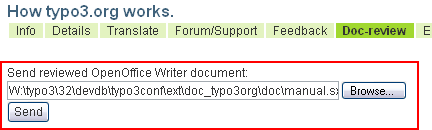
Authors and proof-readers both have access to the menu item “Doc- review” of the extension. This tool will help the process of reviewing the changes:
The proofreader reads the document with Open Office. He makes corrections directly to the text. He should leave the formatting intact and don't add images either! Only text changes. No visual formatting!
When the proofread document is ready, it is uploaded:
 The proofreader can upload more documents and remove the old:
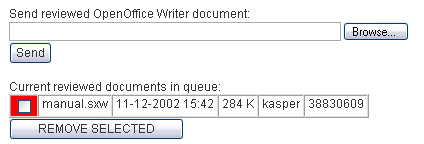
Then the proofreader notifies the owner of the extension by email - there is a new document ready for preview.
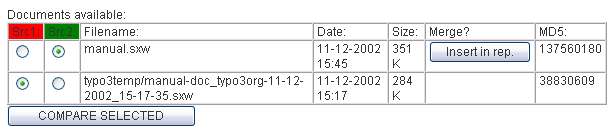
The extension owner/author goes to typo3.org, selects a source 1 and 2 document for comparison:
 The comparison will show the text parts of the document that
have changed:
The comparison will show the text parts of the document that
have changed: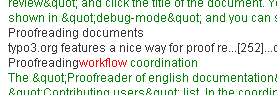
As the settings are in this example the green text is the added content (proofreader's additions/changes), the red is the original value (which was removed) and the black is text not changed. This concept should be sufficient for the author to quickly gain an idea of the changes made.
If the author is satisfied he will simply click the button “Insert in rep.” which will advance the most recent repository version by one dev-version and merge the new documentation into that version:
 This will create a view looking like this (to view this
please click “Doc-review” in the menu first):
This will create a view looking like this (to view this
please click “Doc-review” in the menu first): Obviously the MD5 hash of the submitted manual and the “Most
recent doc/manual.sxw” is the same - so the documents are the same.
The “manual.sxw” file can now be removed.
Obviously the MD5 hash of the submitted manual and the “Most
recent doc/manual.sxw” is the same - so the documents are the same.
The “manual.sxw” file can now be removed.Before the new document is available the author/extension owner must go the the edit menu:
 So since a new “development version” (0.0.3) has been created
similar to 0.0.2 but with the new document inside the author will have
to update the TOC as usual. See elsewhere in this document on how to do this.
So since a new “development version” (0.0.3) has been created
similar to 0.0.2 but with the new document inside the author will have
to update the TOC as usual. See elsewhere in this document on how to do this.
Principles for proofreading documentation for Typo3
These guidelines were provided by Darryl Krause written after his first experience with proofreading. They might be helpful for other proofreaders. Please feel free to comment them “internally” in the proofreader group.
"If it is not broken, don't fix it" If an author (who is not a native speaker of English) has formulated himself in an interesting or unusual way that differs from how a native speaker would likely express himself, yet the message flows clearly and is not confusing, then leave as it is. The proofreader should also avoid making insignificant minor corrections that do not serve any other purpose than "correctness".
Clarity of the message The proofreader may at times come across sentences that are a little "clumsy" or not immediately clear in their meaning. If it is possible to perform simple changes like inserting a comma or an extra word, then this should be attempted. In some cases the proofreader may find it appropriate to come with minor alterations or additions intended to make the document more easily understood, though not necessarily correcting any error.
Professionalism The quality of the Typo3 product and the professional look of the new typo3.com and typo3.org websites call for a certain degree of professionalism in the documentation. In my opinion there are certain small grammatical errors, which although they do not affect the meaning, do have a significant affect on the professionalism of the document (at least for the native English speaker). A common example is when "are" is used instead of "is", or "have" instead of "has". These points of English grammar are often a challenge for the non-native speaker, and they have little effect on the message conveyed. However, correcting such things can give the document a significant "facelift".
Further input There should perhaps also be room for other constructive input, though this should be within certain bounds of reasonableness and restraint. At this point it is important to remember the principle: "If it is not broken, don't fix it". If there is some point of perceived weakness in the document, then the proofreader may be of help to the author in pointing this out.For example I feel that one should avoid statements like: "This feature is not available yet," without giving some time reference. This could be as simple as saying, "...not yet (Dec. 2002)." One can easily end up in the situation were the feature has been added, but the line in the documentation still says that it is not available yet. The simple addition of a date keeps the documentation correct and credible even if it does become outdated. This is perhaps a minor example, but my point is that the proofreader may be of service in "patching some holes" from time to time.
Managing extensions
The “Edit” menu item
For each extension in the TER (TYPO3 Extension Repository) there is a “homepage” featuring a menu with “Info”, “Details”, “Translate”, “Forum/Support”, etc. For the owner of the extension the menu item “Edit” is available. This is how that screen may look:
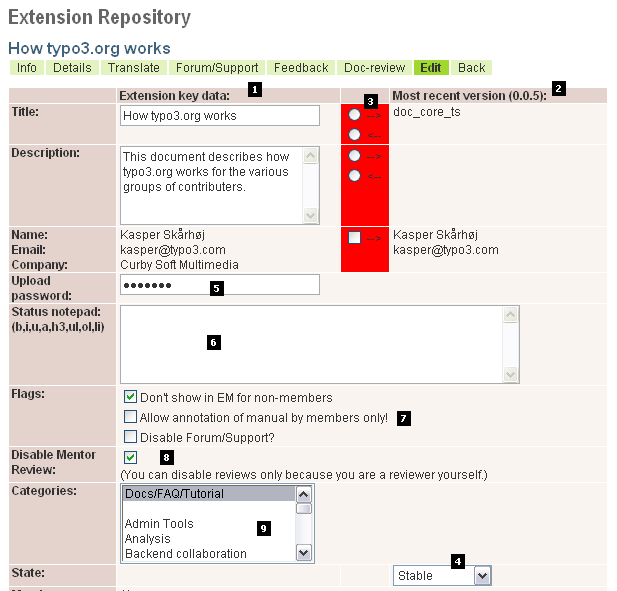
The column “Extension key data” (1) shows the information from the database on TER. The column “Most recent version” (2) shows the information inside the most recent version found in the repository. As you can see (because the column labeled (3) is red) there is a mismatch between the values in the repository's version and the extension key record. Now you can determine what you want to do: Either transfer the title/description from the repository version to the extension key record or the opposite direction.The information found in the “Most recent version” (2) is typically the information that should be updated - so select the radiobuttons pointing to the right. This includes the State (4) which you can also set from TER.
Obviously information such as title and description in the extension key record and the repository versions is stored redundantly. It cannot be otherwise since the repository version contains this (part of the emconf.php content) and so does the extension key table (which should be reasonable enough).
Notice: If you change ANY of the information in the “Most recent version” column (2+4) you'll have to download the extension from the TER to your server where you develop it immediately after. Otherwise the information in the “Most recent version” will obviously be lost the next time you upload a new version!
Set the upload password (5) as you like. Setting this value to blank will disable all uploading of the extension.
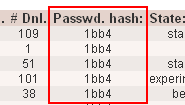
There is a little tip to share about upload passwords: In the listing “My Extension keys” you can see a hash of the upload passwords so you can see if any extension has a different password associated with it than you would expect.
 In the same listing you can even change the upload password
for all your extension keys at once:
In the same listing you can even change the upload password
for all your extension keys at once: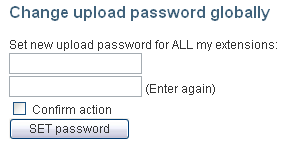
The only people which are able to upload an extension to your extension keys are the extension members and yourself provided they have the right upload password.
Use the “Status notepad” (6) for a primitive “homepage” for your extension. Make announcements, call for help and other public notes or whatever. You can use a limited set of HTML tags as you can see. The information from this field is shown in the “Info” view of the extension.
There are a number of flags you can set for your extension (7):
- “Don't show in EM for non-members” means that the extension will not appear for download in the Typo3 Extension Manager unless people are members. This makes sense only if the extension is a public extension already (otherwise members are the only ones who can see it already). The point is that extensions containing documentation only (that is: no programming code) can be visible on typo3.org but not visible for download (since that makes no sense for most people). So set this flag for “documentation extensions”.
- “Allow annotation of manuals by members only” - will disable the annotation link in the online manual (doc/manual.sxw) for the extension.
- “Disable Forum/Support” - disables the menu item “Forum/Support” on the extension page.
Categories (9) - select one or more categories where you want your extension to appear in the listings.
“Disable mentor review” (8): Only for mentors - this means the “Review icon” for the extension will not be shown. This is useful for certain extensions for which the review concept does not make sense or is for some other reason meaningful to disable. By default all extensions are subject to reviews. If someone thinks he has an extension that does not require review he can ask Kasper by email to turn it off.
Managing members
Members of an extension are able to see and download the extension if it's still “Members-only”. Further membership may have other consequences in the future (moderator, closed development forums, wiki's...). And finally a member having the upload password for the extension will be able to upload the extension to the repository.
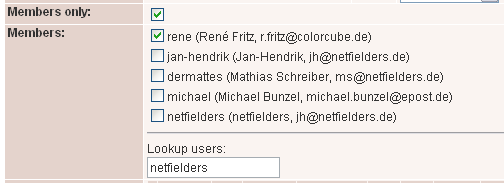
If you disable “Members only” (which is set by default) you cannot set it again. Then the extension is public and that's it. Setting the flag again can be done only by a backend admin (such as Kasper).
You can lookup users for membership very easily by just entering some search word in the “Lookup” field and the users matching will be listed. Then tick of those you want to include.
Cleaning up old versions:
Please be a kind dude and remove old, irrelevant versions from the repository when you can. It keeps the database tidy.
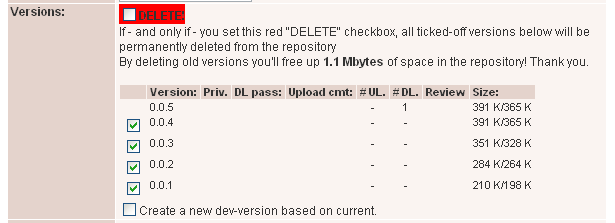
Simply click “DELETE” and update - then the selected versions are thrown out.
You can also tick off the “Create a new dev-version based on current.” This will as it says create a new version totally equal to the more recent. This can be an advantage if you made any changes on TER to the repository version such as setting the title/description/state from the key table record.
Translating extensions
Chiefs and Assistants
The translation of TYPO3 is done by one chief translator being ultimately responsible for the content and then any number of assisting translators.
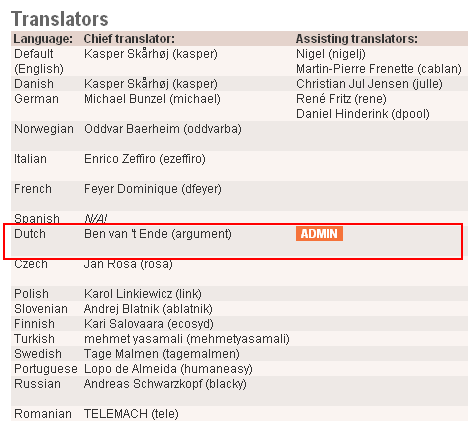
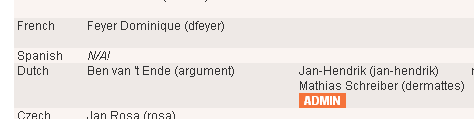
This is the list of translators above. In this case we are logged in as Ben van't Ende (Holland). He is the chief translator of dutch. By clicking the admin-link he can add assisting translators:

This means Jan-Hendrik and Matthias are now able to work with Ben on the dutch translation:
Translation workflow
Being logged in as Mathias this is what we would see:
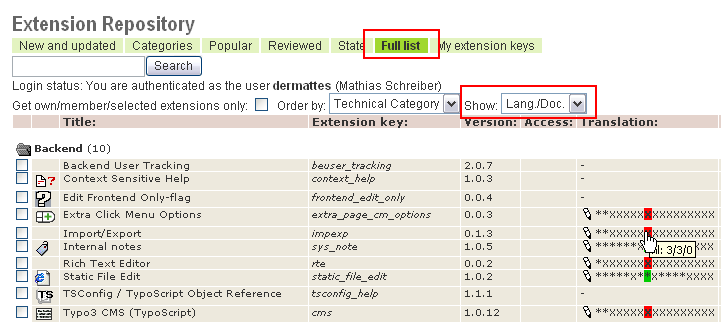
The dutch language status for each extension is highlighted with red/green colors. Apparently the “Static File Edit” extension is nicely translated. However an extension like “Import/Export” seems to have 3 labels in the repository version which are blank. Out of those three blank labels none has been translated yet. So Mathias clicks the pencil icon:
So Mathias enters his content:
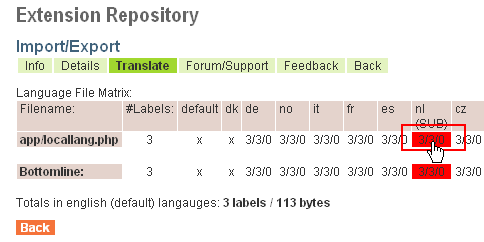
Now we log in as ben (argument) and this is what we see:

The three numbers “3 / 3 / 3” mean: 1) that three labels in the repository version are blank, 2) still three of these has not been translated here but, 3) there are actually three suggestions submitted by an assistant (as opposed to all the other languages which has zero labels translated by an assistant).
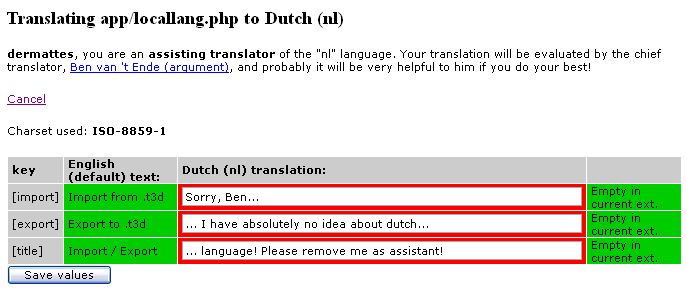
So Ben clicks the link and sees this:
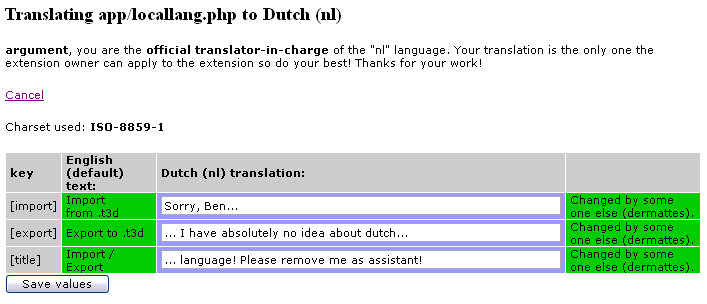
Since Ben thinks that Mathias has a great talent for translation he just presses “Save values”. By doing that Mathias values are saved in Bens “translation storage” and thus becomes Bens officially approved labels:
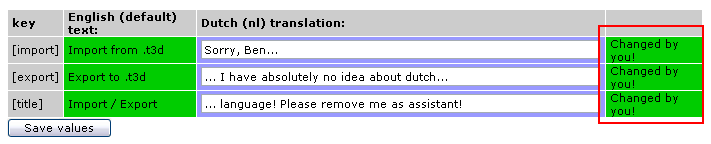
Back in the language file matrix we see that 1) still three labels are not translated in the repository version (the extension owner HAS to finally merge the translation with the extension!) but 2) they have all been translated (zero left) and 3) there are no more suggestions for additions/changes by assistants (zero left):

Merging the translations into the repository
The final act of merging the translations into the repository version is done by the extension owners:
Logged in as Kasper (owning the extension) we see how the general status is:
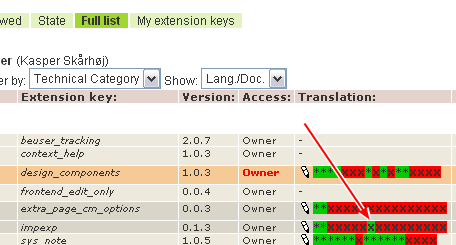
Apparently dutch has been translated. This is even better seen in “Edit” section of the extension view:
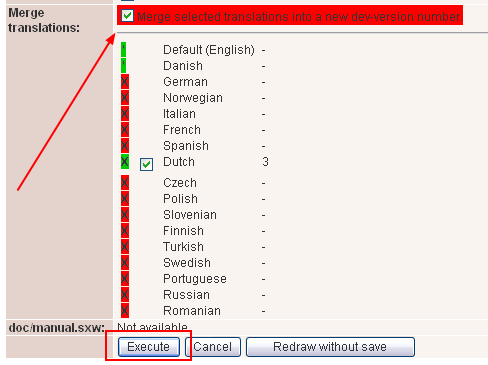
Since there are labels ready for merging in Dutch the owner has the possibility of merging those labels in. The process will create a new development version (which the owner MUST download immediately after!).
Important notes to the owner!
When merging translations into the repository please make sure that the repository has been just updated with your latest version of the extension! Then make the merge and afterward download the new version as your original! Otherwise you'll just overwrite the new translations next time you upload the extension!
(When a translation is merged into the repository the “translation storage” is cleared, but not deleted. This means that translations accidentially removed by an owner who overwrites the TER extension can ultimately be restored on the low database level. But don't depend on it!)
What to translate first?
If you are beginning a new translation you have to realize that its a huge task to do! But you can start at the place of most importance and work your way from there.
So, when you start new translations or update existing, please follow this order:
- Translate the ` extension “lang” <http://typo3.org/1383.0.html?tx _extrepmgm_pi1[showUid]=213&tx_extrepmgm_pi1[cmd]=translate>`_ (“System language labels”) - it contains all the core labels for TYPO3s backend.
- Translate the ` extension “cms” <http://typo3.org/1383.0.html?tx_ extrepmgm_pi1[showUid]=1&tx_extrepmgm_pi1[cmd]=translate>`_ (“Typo3 CMS (TypoScript)”) - it contains all labels used in the default TYPO3 frontend and for most people this as important as the core labels.
- Translate the extensions found as global extensions in the TYPO3 core (look in ext/ of a TYPO3 installation). These includes such as “setup”, “rte”, “viewpage”, “aboutmodules”, “extra_page_cm_options”, “feuser_admin”, “func_wizards”, “imagelist”, “impexp”, “indexed_search”, “info_pagetsconfig”, “lowlevel”, “sys_action”, “sys_note”, “sys_messages”, “sys_notepad”, “sys_todos”, “sys_workflows”, “taskcenter_recent”, “taskcenter_rootlist”, “wizard_crpages”, “wizard_sortpages”,
- Translate the most popular extensions
After having translated/kept up-to-date the extensions according to the list above you may translate anything else you like.
A major project to proceed on may be the extension “context_help” which contains most of the context sensitive help of the TYPO3 core and frontend extension “cms”. It would probably be highly appreciated by others if you do that - but just keep in mind that it is a huge amount of work! See description of this issue below.
Translating Context Sensitive Help (CSH)
In TYPO3 there is a framework for adding context sensitive help through small [?] icons in the backend. The texts for the context sensitive help is secondary to all other translations and therefore translators should not feel obligated to translate context sensitive help since that is usually also a huge amount of additional work!
Whether you are interested in translating CSH or not you should know how to identify “locallang” files with CSH content. The principle is simple: When “locallang” files are suffixed with “_csh” that means they contain CSH content.
This is an example of how the translation screen looks when there are CSH content in files:
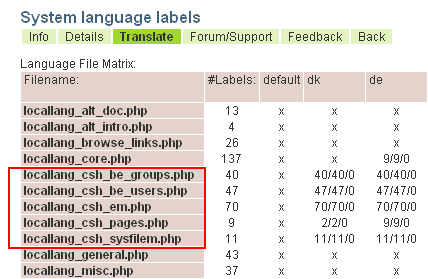
Notice how only the default labels exist for these - they are not translated (yet) to neither danish or german and that is perfectly ok.
The extension “context_help”
There is an extension, “context_help”, which is the extension triggering the usage of context sensitive help in TYPO3 but also contains some amounts of locallang files with CSH content.
Further you will find CSH content in the system extensions “cms” and “lang”.
More information
If you wish to read about the CSH framework, visit the Inside TYPO3 document .
Setting up a reference language
If you are going to implement a translation which is very close to another translation you can ask Kasper to add another of the existing languages as a reference language. This is the case for portuguese and brazilian portuguese - they share many labels but also have some important differences. For a translator it can be of great help to see or copy the content of the other language during the process of translation. The same could be the case for nordic languages like danish, icelandic, norwegian, swedish etc which share some similarity. In these cases the translator may find it useful to be inspired by the wording of another sister-language.
A reference language will make the interface look like this:
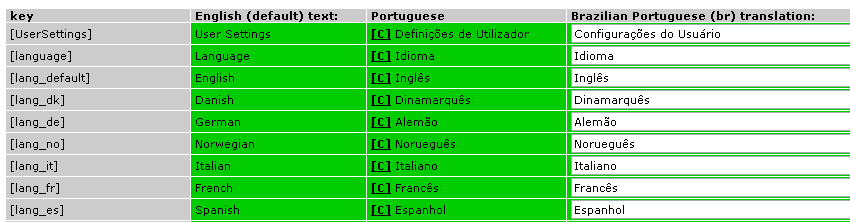
As you can see the translator for brazilian portuguese can see the portuguese labels for the same english words. He can even transfer the content of the portuguese label by clicking the “[C]” link next to the portuguese labels (this is optional).
If you want to have a reference language set up, the chief translator of a language should write to Kasper and tell him which other language keys he wants to view.
Using pending translations
Since an owner/author may take some time to merge in translations - or just prefers to wait for all translations to be done - all translations made/approved by the chief translator are immediately available for download in the Typo3 EM:
Todo for translation system
There are still a list of wishes to be implemented for the translation framework on typo3.org. These include issues like:
- List proof-readers somewhere (and their email addresses comma sep - same for each group of translators...)
- In translation page for extension: A form where a helper can send email to chief about approving. And for a chief to the extension owner about updating extension!
- translation merging available if one is the owner of the extension.
- re-consider colorscheme.
- Facility which keeps track of which labels has been changed in UK lang (internally on TER)
- Ability to export a language as XML, translate locally, then upload again to TER.
The knowledge base system
Annotations
Currently TYPO3 has a concept of annotations for documentation and the same plugin is used for the Forum/Support feature of extensions. However it does not offer any kind of moderator administration or just slightly advanced features YET (Dec. 2002). See the to-do list in this document for more information.
To-do list:
Annotations notes:
It's planned to make an advanced, multi featured plugin for this in the long run. Here are some notes I have collected about this issue. Any suggestions / help for this are welcome. It's planned to develop the annotation/forum bit MUCH more as the next thing on typo3.org. But first we want to establish the main concept, make sure that works.
typo3.org: FAQ / FORUM / GLOSSARY
User annotations______________:
- Better selecting / searching / display for forum listing.
- User status / Rating of answer like HPs site (good answers gives many points) / signatures
- Let every user pick his own avatar.
- moving thread feature (extrep_mgm) notifying people in the thread.
- Clean-up facility/review of attachment.
- A moderator can be assigned for each extension
(Mr. Mathias Schreiber ?)
- to close a thread.
- "sticky threads" - threads can be "stuck" to the top of the forum (announcements)
Make it cross-extension/documentation/normal-extension.
MS comments:
- Instead of closing a thread, a mod can "attach" it to an existing thread. This way newbies have to read one thread instead of reading 12 closed ones.
- Active threads - Threads are not sorted by date but rather by the activity of the users. Thus active threads stay on top while inactive theads move down slowly (very useful with "Attach Thread" Feature)
- un-/subscribtion to threads (email anytime someone posts on this topic)
- "Thank You" Button (instead of posting after a successful help, the users may use the Thank You button (less DB load)
- Tips? / Knowledge base.
 TYPO3.org - manual for developers - 33