DEPRECATION WARNING
This documentation is not using the current rendering mechanism and is probably outdated. The extension maintainer should switch to the new system. Details on how to use the rendering mechanism can be found here.
EXT: DR Wiki¶
| Author: | Kasper Skårhøj |
|---|---|
| Created: | 2002-11-01T00:32:00 |
| Changed: | 2008-03-13T17:44:53 |
| Author: | Denis Royer |
| Email: | webadmin@myasterisk.de |
| Info 3: | |
| Info 4: |
EXT: DR Wiki¶
Extension Key: dr_wiki
Copyright 2000-2008, Denis Royer, <webadmin@myasterisk.de>
This document is published under the Open Content License
available from http://www.opencontent.org/opl.shtml
The content of this document is related to TYPO3
a GNU/GPL CMS/Framework available from www.typo3.com
Table of Contents¶
EXT: DR Wiki 1
Introduction 1
What does it do? 2
FAQ 2
Features of DR_Wiki 2
Wiki Markup 2
Wiki Editing 2
Technical Aspects 2
About 2
Foundations 2
Technical Aspects 3
Administration 4
A Basic Wiki Page 4
How to edit a Wiki page 5
Simple usage scenarios 7
Case 1: Create a new page 7
Case 2: Create a Redirect 8
Case 3: Compare Different Page Versions 8
Case 4: Setting up dr_wiki for a user login 9
Markups 10
General Formatting Markups 10
Wiki Variables 12
Special Characters 12
Rendering of tables 13
Table Examples 13
Further resources 14
Wiki Plug-Ins 14
System Images 14
Adding References 15
Configuration 15
Basic Configuration 15
Configuration options 16
CSS Styles 18
realURL Configuration 19
FAQ 20
Known problems 20
To-Do list 20
Download 20
Changelog 20
Version 1.5.2 20
Version 1.5.1 20
Version 1.5.0 20
Version 1.4.5 20
Version 1.4.4 21
Version 1.4.3 21
Version 1.4.2 21
Version 1.4.1 21
Version 1.4.0 21
Version 1.3 21
Version 1.2 21
Version 1.1 21
Version 1.0.0 21
Version 0.9.1 21
Version 0.9 21
Version 0.8.1 22
Version 0.8 22
Version 0.7.2 22
Version 0.7.1 22
Version 0.7 22
Version 0.6.2 22
Version 0.6.1 & 0.6 22
Version 0.5.2 22
Version 0.5.1 23
Version 0.5 23
Version 0.4 23
Glossary 23
Application programming interface (API) 23
Content Management System (CMS) 23
FlexForm 23
GNU General Public Licence (GPL) 23
Markup 23
Typo3 23
References 23
Introduction¶
The DR Wiki aims to be a collaborative wiki system, based upon the Wikipedia wiki system ( http://www.mediawiki.org ) and the a1_wiki extension by Mirko Balluff. It was created for a research program, in order to serve as an exchange point for ideas and thoughts. This extension is in active development as of April 10 th , 2004.
The documentation of this extension is currently done at `http://www.myasterisk.de <http://www.myasterisk.de/>`_ . Please visit this site for further documentation.
What does it do?¶
Generally, a WikiWikiWeb enables documents to be written collectively in a simple Mark-up language using a web browser. Because most wikis are web-based, the term "wiki" is usually sufficient. A single page in a wiki is referred to as a "wiki page", while the entire body of pages, which are usually highly interconnected, is called "the wiki".
One of the defining characteristics of wiki technology is the ease with which pages can be created and updated. Generally, there is no prior review before modifications are accepted, and most wikis are open to the general public - or at least anyone who has access to the wiki server.
FAQ¶
Nothing so far.
Features of DR_Wiki¶
The Wiki extension currently supports the following features (also see changelog for details):
Wiki Mark-up¶
- MediaWiki compliant syntax for Mark-ups (cp Annex).
- Advanced formatting and integration of external resources (links, images, etc.).
- Support for tables, allowing a more complex page layout.
- Support for templates in Wiki pages.
Wiki Editing¶
- General formatting of Wiki page content in an easy to use text-editor.
- Sections for discussing content of Wiki pages
- Read-only versions of a Wiki for public dissemination of closed Wikis.
- Multiple-redirecting of pages.
- InterWiki links to other information repositories (e.g. Wikipedia, FIDIS Wiki, etc.) and rudimentary namespaces for categorising information.
- HTML export of Wiki pages for usage in other documents.
- Versioning of Wiki pages and page history.
- Difference engine to find changes in different page versions (“diff”).
Technical Aspects¶
- Intelligent caching of rendered Wiki pages and template parts for higher performance.
- Wiki plugins for active database access to the Wiki pages (e.g. display of general page Meta data, author, edit history, etc.).
- Highly customisable TYPO3 extension.
About¶
Foundations¶
“ *DR_Wiki* ” is the Typo3 Wiki Engine Extension that has been developed for the FIDIS project to implement the FIDIS Wiki. This extension is used in the project both as a standard Wiki, and to facilitate the work of the individual Workpackages. “ DR_Wiki ” itself is based on another Typo3 Wiki Engine [1] , which was customised to meet all of the FIDIS requirements (e.g. advanced editing, MediaWiki compliance, etc.)
The decision to develop a customised Typo3 extension, rather than using one of many freely available Wiki engines [2] , was motivated by the need to provide an integrated information infrastructure for the FIDIS NoE.
Looking at the FIDIS Communication Infrastructure (FCI), the system resides on a Typo3 [3] content management system (CMS), being installed on the FIDIS servers at [4] :
- The FIDIS project public web site: www.fidis.net and
- The FIDIS project intranet: internal.fidis.net
[1] DR_Wiki is based on the “a1_wiki” extension, available at www.typo3.org.
[2] See c2.com/cgi/wiki?WikiEngines for a list of Wiki engines.
[3] Read more at www.typo3.org.
[4] The details of the FIDIS Communication Infrastructure can be found in deliverable “D1.2: An Information structure to provide categories and subcategories relevant for FIDIS”.
Technical Aspects¶
Typo3 itself is a very modular application server based on PHP and the MySQL database, allowing a developer to extend its functionality using a standardised application programming interface (API). These so called Typo3 extensions are pieces of PHP code which add certain functionalities to a Typo3 installation without changing the original Typo3 code (“core”). [1] Figure 1illustrates the API and the general design of Typo3 in more detail.
Therefore, in order to seamlessly integrate the Wiki system into the existing CMS, the extension is based on this API, using the mechanisms of Typo3, such as intelligent caching, user authentication and handling and its security features. Furthermore, this also enables the system to have several instances of the “ DR_Wiki ” extension, serving different Workpackages, etc.
 Figure 1: The Typo3 API (Source: www.typo3.org/documentation
/document-library/doc_core_inside/This_document-1/)
Figure 1: The Typo3 API (Source: www.typo3.org/documentation
/document-library/doc_core_inside/This_document-1/)
[1] Typo3 core documentation: http://typo3.org/documentation/document-library/doc_core_inside/
Administration¶
A Basic Wiki Page¶
When opening a web-page containing the “ DR_Wiki ” extension [1] , one will find the following four general components:
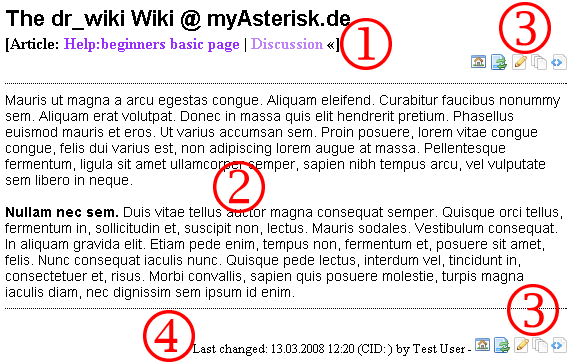 Figure 2: Sample Wiki page of the "DR_Wiki" extension
The headline, including the page title and a link to the discussion of the current page. By clicking on the “Discussion” link on top of a page, the corresponding “talk page”, which contains comments about the page from other Wiki users, will be opened. If a corresponding talk page exists, a “«” will be displayed on the right of the discussion link on top of the page.
The actual page content.
The Wiki toolbar, providing the basic functions, such as:
 Figure 3: The Wiki Toolbar
The “home” link taking the user back to the entry page (“HomePage”) of the current Wiki.
The reload button , updating the content of the current Wiki page. This is useful if several users edit the page at the same time.
The edit button for editing the current page.
The version button , displaying the version history of the current Wiki page.
The download button , to export a plain HTML version of the current page, which can be used in other documents.
The Meta Data, containing information about:
- The last person editing the page.
- The date and the time the last change.
How to edit a Wiki page¶
It is very easy to edit a Wiki page. Simply click on the *edit button* of a Wiki page (top or bottom). This will open up the edit- view of the current Wiki page. The editor consists of the following basic components (see Figure below for details):
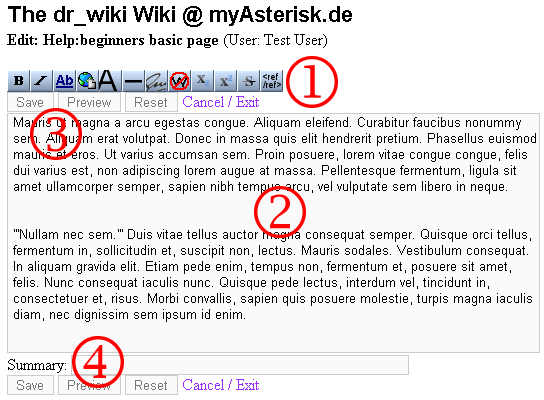 Figure 4: Editor for a Wiki page
The editor toolbar, containing the basic Mark-ups.
The actual text area containing the Wiki source of the current page.
The save, preview and reset buttons.
 Figure 5: Editor Toolbar
The summary field for general editing notes.Bold text [Shift + Alt + B]
Italic text [Shift + Alt + I]
Internal link [Shift + Alt + L]
External link [Shift + Alt + X]
Level 2 headline [Shift + Alt + H]
Horizontal line [Shift + Alt + R]
Add Signature and Date none
No Wiki [Shift + Alt + N]
Subscript none
Superscript none
Strike Through none
Insert a Reference none
The most convenient way to edit the contents of a Wiki page is to use the toolbar, which works similar to a toolbar available in a standard word processor or editor. Figure 5describes the icons and their functions in more detail.
Another way to edit a page is manual entry of the Wiki Mark-ups. A detailed list of all available Mark-ups and several examples can be found in the aMark-ups Section of this document. In general, the Wiki Mark-up language is compliant to the syntax of the de facto MediaWiki [2] , which is used for one of the largest Wiki projects: Wikipedia. This also enables the user to incorporate their own articles into Wikipedia or other projects.
When finishing the edit, one should write a short edit summary in the small field below the edit-box. This text should describe the changes done to a page for the benefit of other editors. After that, the “Preview” function (“ALT + P”) allows the user to see how the changed document will look. If necessary, additional changes can be applied to the preview version. By pressing the “Save” button (or “ALT + s”), the changes will be written to the data repository and immediately applied to the article. The “Cancel / Exit” link on the other hand will abort the editing of a page and will leave the data untouched.
[1] For the administration and the installation of the Wiki extension see “Annex III: Configuration”for details.
[2] MediaWiki is the Wiki used for the Wikipedia project. Please visit www.mediawiki.org/wiki/MediaWiki for further details.
Simple usage scenarios¶
Given below are four simple examples demonstrating a small amount of the Wiki’s functionality. Further Mark-ups, beyond those shown here are given in the Mark-up Section.
Case 1: Create a new page¶
*Summary:* When editing an existing article or if a word or phrase
ought to have an article of its own linked in, just put it in double
square brackets, [[like this]] . This is the first step to
create a new page. By clicking on the new link one will reach a new
empty Wiki page. The page title is automatically set to the text used
in the double square brackets.
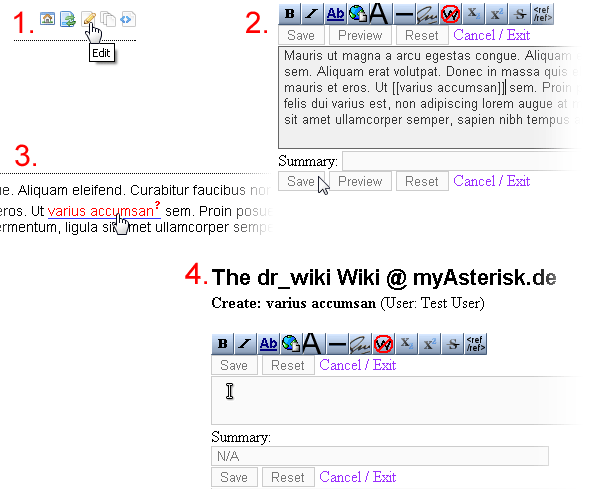 Figure 6: Case 1 in pictures
Method:
Navigate to the text passage where you would like to add a link to a new page and click on the edit button to enter the Wiki editor.
Choose one or a few words and put them into double square brackets. This creates a link to the new page. After that press the save button or [ALT+s] to preserve the changes.
The automatically generated question mark by the new link indicates that the link refers to an empty page. Open this empty page by clicking on the link and then fill the new page with content.
The page title is the text typed into the double square brackets when making the link. At the bottom of the editing screen you have space to write a short summary about what you have done. This summary will be displayed in the page history and is useful for other editors. Press the save button and the new page (in this example ‘porro quisquam’) will be created. The automatically generated question mark by the ‘porro quisquam’ link on the previous page will disappear.
Case 2: Create a Redirect¶
*Summary:* Redirects are used to refer to other pages. If a user tries to access a page, containing a redirect, he or she will be automatically redirected to the page stated in the redirect mark-up. One example usage could be the use of abbreviations, i.e. ‘IDM’ actually refers to the page ‘Identity Management’, another would be if a page has been removed altogether, with its original content added to a different page and a final example would be if a page has had its name changed.
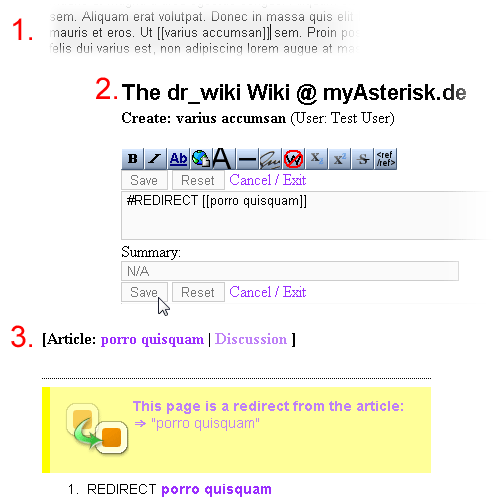 Figure 7: Case 2 in pictures
Method:
The first step is to create a new page by creating a new link (double square brackets, as shown in case 1) or by editing an existing page.
In the page to be redirected from, enter the redirect-Mark-up into the first line, pointing to the target page of the redirect. The redirect Mark-up is shown here in the image to the left of this text, with the target page name in the double square brackets. In this example, anyone attempting to see the page with the redirect link in it will actually be redirected to the page ‘porro quisquam’.
After entering the Mark-up, press the save button or [ALT+s] to preserve the changes.
Now anyone using the ‘varius accumsan’ link will be automatically redirected to the article ‘porro quisquam’.
Case 3: Compare Different Page Versions¶
*Summary:* The “ diff-tool ” is a utility that shows the differences between two page versions, allowing a user to compare any previous version to the current one.
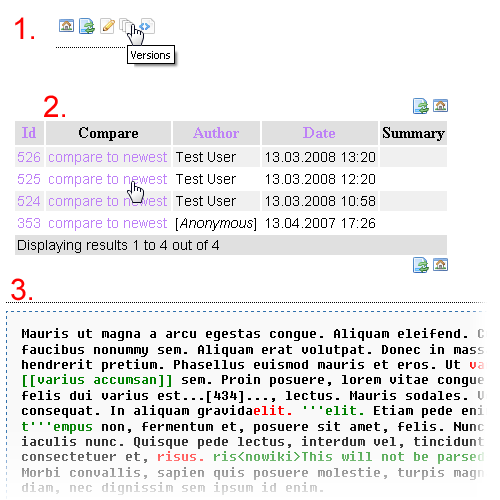 Figure 8: Case 3 in pictures
Method:
The first step to compare different page versions is to click on the version icon in the toolbars at the top or at the bottom of the Wiki.
Now you are shown all the different versions of the Wiki page and any additional information (e.g. date, summary, etc.). By clicking on the ‘compare to newest’ link, the differences between the two versions will be shown.
The comparison of the page versions will be done word by word. If you compare an old version to the latest one, the red colored segments refer to items found in the older version, but not in the latest, while the green segments represent differences found in the latest page version that were not in the older one. Black means that no differences were found.
Case 4: Setting up dr_wiki for a user login¶
This usage scenario describes how to set-up dr_wiki to use a user login. This is useful to restrict the editing of pages to registered users only.
Skills Level needed: Medium (Template, installing and configuring extensions)
Steps to take
Besides dr_wiki, some third-party extensions are needed:
- sr_feuser_register
- newloginbox
Set-up sr_feuser_register ( http://typo3.org/extensions/repository/ view/sr_feuser_register/2.5.7/info/ )
Well, this is an optional step, if you plan to administrate your users by yourself. However useful if you want your users to register for your Wiki project by themselves. Normally I use the sr_feuser_register (http://typo3.org/extensions/repository/view/sr_ feuser_register/2.5.7/info/) extension, which is quite helpful or this task
The following heap of TypoScript is needed to configure the extension. Simply add it to the "Constants" section of your page template.
plugin.tx_srfeuserregister_pi1.pid = PID of the storage folder containing the user records
plugin.tx_srfeuserregister_pi1.userGroupAfterConfirmation = 2
plugin.tx_srfeuserregister_pi1.email = Email address for the administrator
plugin.tx_srfeuserregister_pi1.salutation = informal
plugin.tx_srfeuserregister_pi1.autoLoginRedirect_url = PID of the page to redirect after the registration took place
plugin.tx_srfeuserregister_pi1.formFields = username,password,first_name,last_name,email
plugin.tx_srfeuserregister_pi1.loginPID = PID of the page where the login plug-in is installed
plugin.tx_srfeuserregister_pi1.confirmPID = PID of the page containing the confirmation plug-in of
plugin.tx_srfeuserregister_pi1.editPID = PID of the page containing the edit plug-in
plugin.tx_srfeuserregister_pi1.registerPID = PID of the page containing the registration form
plugin.tx_srfeuserregister_pi1.siteName = your Page Name
plugin.tx_srfeuserregister_pi1.useShortUrls = 0
plugin.tx_srfeuserregister_pi1.linkToPID = 0
plugin.tx_srfeuserregister_pi1.enableAdminNotifyConfirmation = 1
plugin.tx_srfeuserregister_pi1.enableAdminNotifyOnApprove = 1
plugin.tx_srfeuserregister_pi1.enableAdminNotifyOnRefuse = 1
plugin.tx_srfeuserregister_pi1.enableAdminNotifyOnUpdate = 1
plugin.tx_srfeuserregister_pi1.userGroupUponRegistration = 1
The rest of the configuration can be found in the manual of sr_feuser_register ( http://typo3.org/documentation/document- library/extension-manuals/sr_feuser_register/2.5.7/view/ ), which describes the installation process in full detail.
Set-up the newloginbox
This step is necessary:
- Create a sysfolder for the user accounts
- Create a page for the newloginbox plugin
- Set the "General Storage Folder" to the sysfolder containing the user acounts
Set-up dr_wiki
Well that one is easy:
- In the FlexForm of the dr_wiki plugin go to the "Redirect Settings" tab
- Select "Red: Redirect to login page if not logged-in on edit?"
- Set "Red: Page to use if redirecting is active." to the page containing the "newloginbox" plug-in
Mark-ups¶
General Formatting Mark-ups¶
In order to format the content entered into DR_Wiki, the following mark-ups can be used:
::¶
Mark-up
Paragraphs <p>
Description
A single newline generally has no effect on the layout. These can however be used to separate sentences within a paragraph. Some editors find that this aids editing and improves clarity when utilising the ‘diff-tool’ (used by the editors to compare different versions of a page, see Usage Scenario: Case 3).
An empty line starts a new paragraph.
::¶
Mark-up
* item 1
** a
** b
*** c
*** d
* item 2
* item 3
Description
Creates a bulleted list such as:
- item 1
- a
- b
- c
- d
- item 2
- item 3
::¶
Mark-up
# item 1
## a
## b
### c
### d
# item 2
# item 3
Description
Creates a numbered list such as:
item 1
a
b
c
d
item 2
item 3
::¶
Mark-up
* item 1
## a
## b
*** c
* item 2
* item 3
Description
Both types of lists can also be combined:
item 1
a
b
- c
- item 2
- item 3
::¶
Mark-up
: text
:: more text
::: even more text
Description
A colon indents a line or paragraph. Works similar to the bulleted and numbered lists:
text
even more text
even more text
::¶
Mark-up
[[word]]
Description
A word between double square brackets creates a new internal link to a Wiki page, in this case for the term “word”. Links appear as bold text when the article is viewed. See Usage Scenario: Case 1 for more information.
::¶
Mark-up
[[HomePage]]
Description
Creates a link specifically to the starting page of the Wiki.
::¶
Mark-up
[[word|alternative text]]
Description
Creates a new internal link to a Wiki page called ‘word’, but using the ‘alternative text’ as link title.
::¶
Mark-up
[[word]]trail
Description
Creates a new internal link to a Wiki page, using the combination wordtrail as link title.
[[machine]]s --> machines (link to page called: machine)
::¶
Mark-up
[[ns:word]]
Description
Creates a new internal link to a Wiki page called ‘word’ in the namespace ‘ns’. Currently the following namespaces are available:
- Wikipedia --> creates an external link to the English version of the Wikipedia encyclopaedia.
- Discussion --> discussion pages of the individual Wiki pages.
- IMDB --> Link to the international movies database.
- FIDIS --> Link to the FIDIS Wiki on Identity related terms (e.g. “[[FIDIS:WP1]]”)
- User --> User pages.
- Categories are also used as namespaces:
- Category:IDM
- Category:Identity
::¶
Mark-up
=word=
Description
Creates a heading (level 1 - H1-tag).
::¶
Mark-up
==word==
Description
Creates a heading (level 2 - H2-tag).
::¶
Mark-up
===word===
Description
Creates a heading (level 3 - H3-tag).
::¶
Mark-up
====word====
Description
Creates a heading (level 4 - H4-tag).
::¶
Mark-up
=====word=====
Description
Creates a heading (level 5 - H5-tag).
::¶
Mark-up
======word======
Description
Creates a heading (level 6 - H6-tag).
::¶
Mark-up
imageURL
Description
Inserts an image from ‘imageURL’ into the Wiki page. Currently only gif, jpeg, jpg, and png images are allowed.
Example:
::¶
Mark-up
URL
Description
URLs and email addresses are automatically converted to real HTML links. Currently ftp, http(s), mailto, irc, gopher, and news URLs are recognised.
Examples:
::¶
Mark-up
[URL link-text]
Description
Creates a link using the name as link-text. Currently ftp, http(s), mailto, irc, gopher, and news URLs are recognised.
Examples:
- [mailto:someone@somedomain.org My Email]
- [http://www.somedomain.org My Domain]
::¶
Mark-up
[URL]
Description
Creates an enumerated link. Currently ftp and http(s) URLs are recognised.
Examples:
::¶
Mark-up
----
Description
Creates a bar / horizontal line (<hr>).
::¶
Mark-up
''text''
Description
Sets the text to italic .
::¶
Mark-up
'''text'''
Description
Sets the text to bold .
::¶
Mark-up
'''''text'''''
Description
Sets the text to bold & italic .
::¶
Mark-up
{ | params | }
Description
Creates a new table (for more detail see “Table Examples”)
::¶
Mark-up
HTML Tags
Description
Some HTML tags are allowed inside a Wiki. By default, the the tags below are currently supported:
<br />, <b>, <i>, <p>, <u>, <center>, <hr />. <sub>, <s>, <small>, <blockquote>, <td>, <tr>, <th>, <table>.
::¶
Mark-up
#REDIRECT [[IDM]]
Description
Redirect one article to another by placing a directive like the one shown on the left on the first line of the article (such as at a page titled "IDM" “Identity Management”).
::¶
Mark-up
You can <s>strike out deleted material</s> and <u>underline new material.</u>
Description
The example on the left would display:
You can strike out deleted materialand underline new material.
::¶
Mark-up
~~~
[Discussion only]
Description
Adds the user’s login name to the article as signature. Only works for the “Discussion” namespaces.
~~~~ will be replaced by “Frank Idis”
::¶
Mark-up
~~~~
[Discussion only]
Description
Adds the user’s login name and date to the article as signature. Only works for the “Discussion” namespaces.
~~~~ will be replaced by “Frank Idis” + date
::¶
Mark-up
~~~~~
[Discussion only]
Description
Adds the current date to the Wiki page.
::¶
Mark-up
{{templatename}}
Description
Templates are an easy way of adding pre fabricated text elements to a Wiki page. This mechanism can be used to insert repeating text elements to a Wiki page, such as notes, pre-formated tables and so on. Generally talking, templates are Wiki pages that reside in the namespace “Template”, such as”Template:templatename”. By adding the name of the template into curled braces without the namespace marker, the content of a template page is added into the Wiki page and rendered into HTML.
Wiki Variables¶
These Mark-ups can be used to automatically display additional/dynamic (Meta-) information on a Wiki page.
{{PAGENAME}}¶
Mark-up
{{PAGENAME}}
Description
Displays the name of the current Wiki page.
{{GETDISCUSSIONLINK}}¶
Mark-up
{{GETDISCUSSIONLINK}}
Description
Returns an internal link to the connected discussion page or an empty string if no discussion is present.
{{REVISIONID}}¶
Mark-up
{{REVISIONID}}
Description
Returns the ID of the current Wiki page.
{{NAMESPACE}}¶
Mark-up
{{NAMESPACE}}
Description
Returns the name of the current namespace.
{{DATE}}¶
Mark-up
{{DATE}}
Description
Returns the current date string (Y-m-d H:i:s).
{{CURRENTMONTH}}¶
Mark-up
{{CURRENTMONTH}}
Description
Returns the current month as numerical value (e.g. 11).
{{CURRENTMONTHNAME}}¶
Mark-up
{{CURRENTMONTHNAME}}
Description
Returns the current month as word (e.g. November).
{{CURRENTMONTHNAMEGEN}}¶
Mark-up
{{CURRENTMONTHNAMEGEN}}
Description
Returns the current month as 3 letter short version (e.g. Nov).
{{CURRENTDAY}}¶
Mark-up
{{CURRENTDAY}}
Description
Returns the current day as numerical value (e.g. 1).
{{CURRENTDAYNAME}}¶
Mark-up
{{CURRENTDAYNAME}}
Description
Returns the current day as word (e.g. Wednesday).
{{CURRENTYEAR}}¶
Mark-up
{{CURRENTYEAR}}
Description
Returns the current year (e.g. 2005).
{{CURRENTTIME}}¶
Mark-up
{{CURRENTTIME}}
Description
Returns the current time (hh:mm).
{{SWATCHBEATS}}¶
Mark-up
{{SWATCHBEATS}}
Description
Returns the current time in Swatch Internet Beats.
{{PAGEAUTHOR}}¶
Mark-up
{{PAGEAUTHOR}}
Description
Displays the author of the current page.
{{NUMBEROFARTICLES}}¶
Mark-up
{{NUMBEROFARTICLES}}
Description
Displays the number of articles in a Wiki.
{{ALLCONTRIBUTINGAUTHORS}}¶
Mark-up
{{ALLCONTRIBUTINGAUTHORS}}
Description
Displays all authors contributing to a Wiki
{CONTRIBUTINGAUTHORS}}¶
Mark-up
{CONTRIBUTINGAUTHORS}}
Description
Displays all authors contributing to an article of a Wiki page.
__NOTOC__¶
Mark-up
__NOTOC__
Description
Deactivates the generation of a TOC.
__NONUMBERHEADINGS__¶
Mark-up
__NONUMBERHEADINGS__
Description
Deactivates the generation of a header numbers.
{{VERSION}}¶
Mark-up
{{VERSION}}
Description
Displays the release number of the Wiki engine.
Special Characters¶
Other special characters such as: Diacritical marks, punctuation, commercial symbols, Greek characters, mathematical characters.
::¶
Mark-up
À Á Â Ã Ä Å Æ Ç È É Ê Ë Ì Í Î Ï Ñ ÒÓ Ô Õ Ö Ø Ù
Ú Û Ü ß à á â ã ä å æ çè é ê ë ì íî ï ñ ò ó ô
œ õ ö ø ù ú û ü ÿ
Description
À Á Â Ã Ä ÅÆ Ç È É Ê ËÌ Í Î Ï Ñ ÒÓ Ô Õ Ö Ø ÙÚ Û Ü ß à áâ ã ä å æ çè é ê ë ì íî ï ñ ò ó ôœ õ ö ø ù úû ü ÿ
::¶
Mark-up
¿ ¡ § ¶ † ‡ • – — ‹ › « » ‘ ’ “ ”
Description
¿ ¡ § ¶† ‡ • – —‹ › « »‘ ’ “ ”
::¶
Mark-up
™ © ® ¢ € ¥ £ ¤
Description
™ © ® ¢ € ¥£ ¤
::¶
Mark-up
α β γ δ ε ζ η θ ι κ λ μ ν ξ ο π ρ σ ς τ υ φ χ ψ ω Γ Δ Θ Λ Ξ Π Σ Φ Ψ Ω
Description
α β γ δ ε ζη θ ι κ λ μ νξ ο π ρ σ ςτ υ φ χ ψ ωΓ Δ Θ Λ Ξ ΠΣ Φ Ψ Ω
::¶
Mark-up
∫ ∑ ∏ √ − ± ∞ ≈ ∝ ≡ ≠ ≤ ≥ × · ÷ ∂ ′ ″ ∇ ‰ ° ∴ ℵ ø ∈ ∉ ∩ ∪ ⊂ ⊃ ⊆ ⊇ ¬ ∧ ∨ ∃ ∀ ⇒ ⇔ → ↔
Description
∫ ∑ ∏ √ − ± ∞≈ ∝ ≡ ≠ ≤ ≥× · ÷ ∂ ′ ″∇ ‰ ° ∴ℵ ø∈∉ ∩ ∪ ⊂ ⊃ ⊆ ⊇¬ ∧ ∨ ∃ ∀ ⇒ ⇔→ ↔
Rendering of tables¶
Tables can be rendered using the following syntax (pipe-syntax):
::¶
Mark-up
{ | params | }
Description
Creates a new table. A table is defined by {| ''params'' |} which is the same as the HTML:
<table ''params''>Insert non-formatted text here </table>
Please note: You must include the space between “{|” and params, else the first parameter is ignored.
::¶
Mark-up
{ | border = 1-n
Description
Create borders. Furthermore, most of the standard HTML table parameters work for Wiki tables too (e.g. cellspacing, cellpadding, bgcolor, etc.)
::¶
Mark-up
|+ Caption
Description
Creates a caption for the table: <caption>Caption</caption>
::¶
Mark-up
!params|cell1
Description
Creates a header-cell (<th>). Functions the same way as <td>, except "!" is used instead of the opening "|". "!!" can be used instead of "||".
::¶
Mark-up
|-
Description
Creates a new row (<tr>).
::¶
Mark-up
|
Description
Creates a cell (<td>).
Table Examples¶
A simple example for a table, using the Wiki Mark-ups:
{| border=1
|-
| bgcolor=red|cell1 || width=300px bgcolor=blue|cell2 || bgcolor=green|cell3
|}
This will result in the following table:
cell1¶
a
cell1
b
cell2
c
cell3
A more complex example using a nested table:
{| border=1
| α
|
{| bgcolor=blue border=2
|nested
|-
|table
|}
|the original table again
|}
This will result in the following output:
α¶
a
α
b
a
nested
a
table
c
the original table again
Please note: Nested tables have to start on a new line.
Wiki Plug-Ins¶
Currently the following dynamic Wiki plug-ins are available. In order to use these, simply insert the following Mark-ups into the source of a Wiki page:
::¶
Plug-In
{###SEARCH###}{###SEARCH###}
Description
Inserts a Search-Form on the Wiki page and displays the result. This plug-in searches the body and the keywords of the database.
::¶
Plug-In
{###LASTCHANGED###}[days]{###LASTCHANGED###}
Description
Inserts a list of the pages changed in the last [days] days.
::¶
Plug-In
{###INDEXLIST###}{###INDEXLIST###}
Description
Lists the Wiki words in a Wiki.
::¶
Plug-In
{###AUTHOR###}{###AUTHOR###}
Description
Displays the creator of the Wiki page. This is done by picking the author of the oldest Wiki page entry and creating a new Wiki page link for the author.
::¶
Plug-In
{###TEMPLATELIST###}{###TEMPLATELIST###}
Description
Displays the list of available templates in the current Wiki.
System Images¶
This is the list of images, which come with dr_wiki
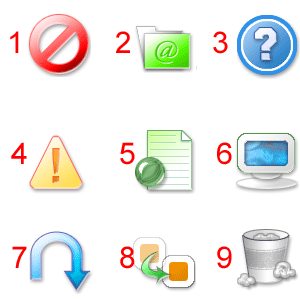 Figure 9: These images come with dr_wiki
{{IMAGE_ERROR2}} or {{IMAGE_ERROR}} for the left-aligned version
{{IMAGE_FOLDER2}} or {{IMAGE_FOLDER}} for the left-aligned version
{{IMAGE_INFO2}} or {{IMAGE_INFO}} for the left-aligned version
{{IMAGE_WARNING2}} or {{IMAGE_WARNING}} for the left-aligned version
{{IMAGE_WEBPAGE2}} or {{IMAGE_WEBPAGE}} for the left-aligned version
{{IMAGE_COMPUTER2}} or {{IMAGE_COMPUTER}} for the left-aligned version
{{IMAGE_RETURN2}} or {{IMAGE_RETURN}} for the left-aligned version
{{IMAGE_COPY2}} or {{IMAGE_COPY}} for the left-aligned version
{{IMAGE_TRASH2}} or {{IMAGE_TRASH}} for the left-aligned version
Adding References¶
Reference Mark-ups
Starting from version 1.5.2, dr_wiki supports references (A reference can be a book, article, or link - whatever you like.) as a Mark-up to add footnotes (A footnote is a note placed at the bottom of a page to comment on a part of the main text, or to provide a reference (a source) for it. Footnotes are often used to add information that might be helpful to later fact-checkers, such as a quotation that supports your edit.)
Here is how to use this Mark-up:
Place a <ref> ... </ref> where you want a footnote reference number to appear in an article—type the text of the note between the ref tags.
Place <references/> in an otherwise empty "Notes" or "References" section near the end of the article—the list of notes will be automatically generated here. If you want to create columns of notes, write <references-2col/>.
Example
Example edit:
The Sun is pretty big,<span style="color:black;">```<ref>```Miller, E: "The Sun", page 23. Academic Press, 2005```</ref>``` but the Moon is not so big.<span style="color:black;">```<ref>```Brown, R: "Size of the Moon", <nowiki>``Scientific American``, 51(78):46
== Notes ==
<references/>
Configuration¶
Basic Configuration¶
In order to use the DR_Wiki, you have to take the following steps:
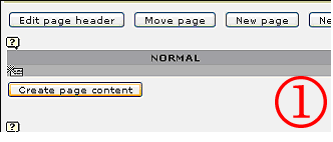 Figure 10: Step 1
 Figure 11: Step 2
Insert the extension into a page, by using either the context menu of the Typo3 page-tree or the “Create page content” button. 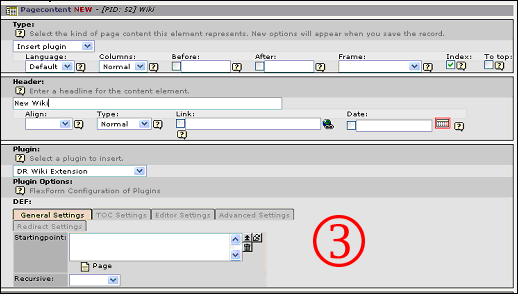 Figure 12: Step 3
Click on the “DR_Wiki” icon in the content element menu, to insert the extension into a page.If necessary set the “Startingpoint” for the plug-in in the FlexForm configuration tabs and click on the “Save” button to store the changes. Further configuration parameters can be found in the following chapter.
Configuration options¶
This section describes the configuration values that can be used to configure the Wiki extension. All the options and values are set in a FlexForm, allowing an easy configuration of “DR_Wiki”.
General Settings
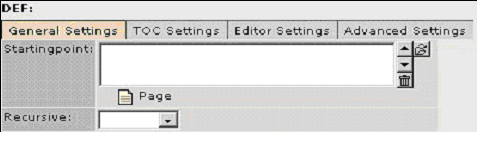 Figure 13: General settings
Startingpoint¶
a
Startingpoint
b
Select manually the page where the DR_Wiki data will be taken from. Default value is the page where the extension is installed.
Recursive¶
a
Recursive
b
Can be set but is generally not necessary. Includes the sub-pages to be searched for Wiki database entries.
TOC settings
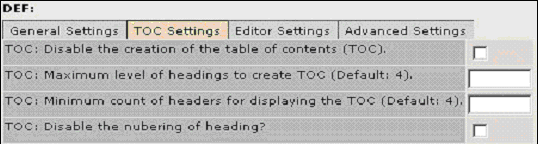 Figure 14: TOC settings
Disable the creation of table contents¶
a
Disable the creation of table contents
b
True or false. By default, this option is false.
Maximum level of headings to create TOC¶
a
Maximum level of headings to create TOC
b
Enter the favoured maximum level of headings. The default level is 4.
Minimum count of headers for displaying the TOC¶
a
Minimum count of headers for displaying the TOC
b
Use this option to limit the count of headers in your TOC. Default value is 4 headers for the creation of a TOC.
Disable the numbering of heading¶
a
Disable the numbering of heading
b
True or false. By default, this option is false.
Editor Settings
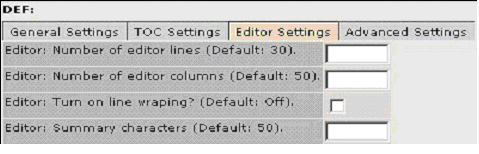 Figure 15: Editor settings
Number of editor lines (Default: 30)¶
a
Number of editor lines (Default: 30)
b
Numeric. Default value is 30 lines.
Number of editor columns (Default: 50)¶
a
Number of editor columns (Default: 50)
b
Numeric. Default value is 50 columns.
Turn on line wrapping?¶
a
Turn on line wrapping?
b
Change the wrapping of lines in the editor field. True or false. By default, this option is false.
Summary characters¶
a
Summary characters
b
Define the number of characters in the summary field.
Advanced Settings
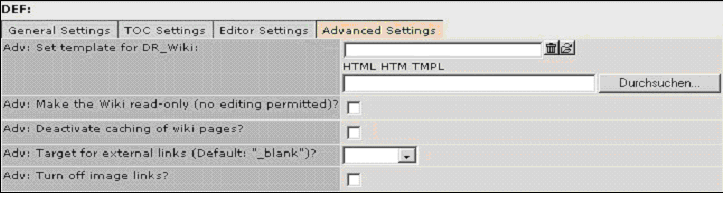 Figure 16: Advanced settings
Set template for DR_Wiki¶
a
Set template for DR_Wiki
b
Use this field to set an alternative template.
Make the Wiki read only¶
a
Make the Wiki read only
b
Activate this button to set the complete Wiki to read-only. True or false. By default, this option is false and so the Wiki is editable.
Deactivate caching of Wiki pages?¶
a
Deactivate caching of Wiki pages?
b
This function deactivates the pre-rendering of Wiki pages. True or false. By default, this option is false.
Target for external links¶
a
Target for external links
b
Choose between _self, _parent, _top. Default configuration is “_blank” (displays external link in a new window).
Turn off image links?¶
a
Turn off image links?
b
Toggles the inclusion of a link-image. True or false. By default, this option is false.
Redirect Settings
 Figure 17: Redirect settings
Redirect edit-user to login page if not logged-in?¶
a
Redirect edit-user to login page if not logged-in?
b
If this option is set, the user will be redirected to a login or information page if he or she is not logged in and tries to edit a Wiki page. True or false. By default, this option is false.
Page to use if redirecting is active.¶
a
Page to use if redirecting is active.
b
Page that is used for the redirect. “Redirect edit-user” needs to be set. Default value is the page where the extension is installed.
CSS Styles¶
The following Cascading Stylesheets (CSS) are used by dr_wiki. They are defined in the setup variable _CSS_DEFAULT_STYLE.
plugin.tx_drwiki_pi1._CSS_DEFAULT_STYLE (
   .tx-drwiki-pi1 A { TEXT-DECORATION: none; }
   .tx-drwiki-pi1 A:hover { TEXT-DECORATION: underline; }
   .tx-drwiki-pi1 H1 {
     FONT-SIZE: 188%; FONT-WEIGHT:
     normal; BACKGROUND:
         none transparent scroll repeat 0% 0%;
         PADDING-BOTTOM: 0.17em;
         MARGIN: 0px;
         COLOR: black;
         PADDING-TOP: 0.5em;
         BORDER-BOTTOM: #aaaaaa 1px solid }
   .tx-drwiki-pi1 H2 {
         FONT-SIZE: 150%;
         FONT-WEIGHT: normal;
         BACKGROUND: none transparent scroll repeat 0% 0%;
         PADDING-BOTTOM: 0.17em;
         MARGIN: 0px; COLOR: black;
         PADDING-TOP: 0.5em;
         BORDER-BOTTOM: #aaaaaa 1px solid }
   .tx-drwiki-pi1 H3 {
         FONT-SIZE: 132%;
         FONT-WEIGHT: bold;
         BACKGROUND: none transparent scroll repeat 0% 0%;
         PADDING-BOTTOM: 0.17em; MARGIN: 0px;
         COLOR: black; PADDING-TOP: 0.5em; }
   .tx-drwiki-pi1 H4 {
         FONT-SIZE: 116%;
         FONT-WEIGHT: bold;
         BACKGROUND: none transparent scroll repeat 0% 0%;
         PADDING-BOTTOM: 0.17em;
         MARGIN: 0px;
         COLOR: black;
         PADDING-TOP: 0.5em; }
   .tx-drwiki-pi1 H5 {
         FONT-SIZE: 100%;
         FONT-WEIGHT: bold;
         BACKGROUND: none transparent scroll repeat 0% 0%;
         PADDING-BOTTOM: 0.17em;
         MARGIN: 0px;
         COLOR: black;
         PADDING-TOP: 0.5em; }
   .tx-drwiki-pi1 H6 {
         FONT-SIZE: 80%;
         FONT-WEIGHT: bold;
         BACKGROUND: none transparent scroll repeat 0% 0%;
         PADDING-BOTTOM: 0.17em;
         MARGIN: 0px;
         COLOR: black;
         PADDING-TOP: 0.5em; }
   .tx-drwiki-pi1 HR {
         height:1px;
         border-top:1px dotted #000000;
         border-left:0;
         border-right:0;
         border-bottom:0; }
   .tx-drwiki-pi1 OL {
         PADDING-RIGHT: 0px;
         PADDING-LEFT: 0px;
         PADDING-BOTTOM: 0px;
         MARGIN: 0.3em 0px 0px 3.2em;
         LINE-HEIGHT: 1.5em;
         PADDING-TOP: 0px;}
   .tx-drwiki-pi1 UL {
         PADDING-RIGHT: 0px;
         PADDING-LEFT: 0px;
         PADDING-BOTTOM: 0px;
         MARGIN: 0.3em 0px 0px 1.5em;
         LINE-HEIGHT: 1.5em;
         PADDING-TOP: 0px; }
   .tx-drwiki-pi1 PRE {
         BORDER: #2f6fab 1px dashed;
         PADDING: 1em;
         COLOR: black;
         LINE-HEIGHT: 1.1em;
         BACKGROUND-COLOR: #f9f9f9;
         font-family:Fixedsys,Courier; }
   .tx-drwiki-pi1 INPUT {font-size:10pt;}
   .tx-drwiki-pi1 TEXTAREA {width:100%; font-size:10pt;}
   .tx-drwiki-pi1 input, textarea {
         border: 1px #ccc solid;
         background: #fafafa;
         color: #777;}
   .tx-drwiki-pi1 input[type=text]:focus, textarea:focus{
         background: #f0f0f0;
         color: #333;
         border-color: #666;}
   .tx-drwiki-pi1-urlextension { display: none; }
   .redirect {
         BORDER: #2f6fab 1px dashed;
         PADDING: 1em;
         COLOR: black;
         LINE-HEIGHT: 1.1em;
         BACKGROUND-COLOR: #FFFFF0;}
   .icons {
         vertical-align:middle;
         float:left;
         margin-right:20px;
         margin-bottom:10px;}
   .wiki-box {
         BORDER: #2f6fab 1px dashed;
         PADDING: 1em;
         COLOR: black;
         LINE-HEIGHT: 1.1em;
         BACKGROUND-COLOR: #f9f9f9; }
   .wiki-box-blue {
         display: block;
         font-size: 1em;
         color: #000;
         padding: 0.5em;
         background: #f0f0f4;
         border-left: 8px #E0E7F5 solid;}
   .wiki-box-red {
         display: block;
         font-size: 1em;
         color: #000;
         padding: 0.5em;
         background: #fee;
         border-left: 8px #fcc solid;}
   .wiki-box-green {
         display: block;font-size: 1em;
         color: #000;
         padding: 0.5em;
         background: #33FF33;
         border-left: 8px #006600 solid;}
   .wiki-box-yellow {
         display: block;
         font-size: 1em;
         color: #000;
         padding: 0.5em;
         background: #FFFF99;
         border-left: 8px #FFFF00 solid;}
   .wiki-table {
         margin: 1em 1em 1em 0;
         background: #f9f9f9;
         border: 1px #aaa solid;
         border-collapse: collapse;}
   .diff-r {color: red;}
   .diff-g {color: green;}
   .diff-result {
         BORDER: #2f6fab 1px dashed;
         PADDING: 1em;
         COLOR: black;
         LINE-HEIGHT: 1.1em;
         BACKGROUND-COLOR: #f9f9f9;
         font-family:Fixedsys,Courier; }
   .diff-table {width:100%;}
   .diff-table-cell-green {
         vertical-align:top;
         text-align:left;
         white-space:normal;
         color:green; font-family:Fixedsys,Courier;
         font-size:10pt;
         BORDER: #2f6fab 1px dashed;
         PADDING: 1em;}
   .diff-table-cell-red {
         vertical-align:top;
         text-align:left;
         white-space:normal;
         color:red;
         font-family:Fixedsys,Courier;
         font-size:10pt;
         BORDER: #2f6fab 1px dashed;
         PADDING: 1em;}
   #toc {
         BORDER: #aaaaaa 1px solid;
         PADDING: 5px;
         FONT-SIZE: 10pt;
         BACKGROUND-COLOR: #f9f9f9 }
   #toc .tocindent {MARGIN-LEFT: 2em}
   #toc .tocline {MARGIN-BOTTOM: 0px}
   #toc P {FONT-SIZE: 10pt; MARGIN: 0px}
   #toc .toctoggle {FONT-SIZE: 10pt}
   #toc .editsection {MARGIN-TOP: 0.7em; FONT-SIZE: 10pt}
 )
realURL Configuration¶
This section describes how to configure your Typo3 website to use realURL and dr_wiki. For a detailed overview on realURL, please refer to its extension manual.
The configuration used here was tested with version 1.1.4 of RealURL ( http://typo3.org/extensions/repository/view/realurl/1.1.4/ ) and Typo3 ( http://www.typo3.org ) versions 3.8.1 following.
TypoScript Configuration
The following needs to be added to the TypoScript template, otherwise the page navigation maps of the wiki will not work.
config {
       simulateStaticDocuments = 0
       baseURL = http://www.yoursite.de/
       tx_realurl_enable = 1
       inlineStyle2TempFile = 1
       # the next line is necessary to make the anchors work again
       prefixLocalAnchors = output
}
Especially the baseURL and the prefixLocalAnchors are the important properties to be set.
realURL Configuration
In order to make dr_wiki working with realURL, the following code has to be added to your configuration:
$TYPO3_CONF_VARS['EXTCONF']['myPostVarSets'] = array(
'_DEFAULT' => array (
    'wiki' => array(
        array(
            'GETvar' => 'tx_drwiki_pi1[keyword]',
        ),
        array(
            'GETvar' => 'tx_drwiki_pi1[showUid]',
        ),
        array(
            'GETvar' => 'tx_drwiki_pi1[cmd]',
        ),
    ),
  ),
);
FAQ¶
Nothing so far
Known problems¶
Nothing so far
To-Do list¶
Nothing so far
Download¶
The latest "stable" version is available at Typo3.org (TER) ( http://typo3.org/extensions/repository/view/dr_wiki/ ) or in the download section of http://www.myasterisk.de/ .
You can also get the latest developers version of dr_wiki from the Subversion repository at Sourceforge.net ( http://sourceforge.net/svn/?group_id=191621 ).
Changelog¶
As of March 13 th 2008. (The latest Changelog can be found online at http://www.myasterisk.de/wiki/changelog/ )
Version 1.5.2¶
- Added rudimentary support for MediaWiki style references using the ref and references tags (More can be found here)
- Extended noWiki Tag to ignore headings
Version 1.5.1¶
- Fixed bug: "last changed pages" shows oldest page instead of newest ( ID1815284 ( http://sourceforge.net/tracker/index.php?func=detail&aid= 1815284&group_id=191621&atid=938116 ))
- Updated extension's meta data
Version 1.5.0¶
Update is highly recommended! ( Download ( http://www.myasterisk.de/f ileadmin/dr_wiki/release/T3X_dr_wiki-1_5_0-z-200802252223.t3x ))
- Fixed several bugs in the SQL handling of Wiki pages (thx to Kasper M. Petersen)
- Fixed bad create without login behaviour for new pages (thx to Cate Deans Smith)
Version 1.4.5¶
- Fixed broken images in editor
- Added note + image when a newer page has been submitted
Version 1.4.4¶
- Adapted NoWiki function to handle br tags
- Fixed a bug in the noinclude directive to prevent inclusion of already parsed and cached code
- Added more buttons to the toolbar
Version 1.4.3¶
- Added <noinclude> directive for templates
- Added <nowiki> button to the editor toolbar
- Updated language files and removed several translation bugs
- Added new icons from http://www.famfamfam.com/lab/icons/silk/
Version 1.4.2¶
Now the used wiki templates are shown in the editor when editing a page.
Version 1.4.1¶
Fixed issue with tables and wiki links, extended the nowiki tags to also remove wiki links - thx to Daniel Minder for this patch
Version 1.4.0¶
- added <nowiki> tags, cleaned up code, made the search plugin work again,
- Added preview on footer and header functionality (FF)
Version 1.3¶
Several security updates and general bug fixing. Special thx goes to Christian Kuhn for pointing out several bugs in dr_wiki. More to come soon :-)
Version 1.2¶
Added DBAL patch provided by Henning Schild.
Version 1.1¶
- Added templating capabilities for Wiki-Templates, which can be inserted automatically in the Wiki editor. This feature can be configured in the FlexForm of dr_wiki.
- Minor fixes in the rendering engine.
Version 1.0.0¶
- Fixed another ":" issue with regard to the rendering of internal links
- Added template support for Wiki pages, introducing the namespace "Template" to store the templates (e.g. {{myTemplate}} references [[Template:myTemplate]])
- Added more variables, providing additional Wiki information (see manual for details)
- Fixed redirect, if a redirect is set to a non-existing page. In this case the creation of a new page will be initiated.
- Updated the diff view. Now, both versions will be displayed for better usability.
- Fixed the creation of the Search lists, if no item is found.
- Extended the search plug-in.
- Added plug-in for displaying the available templates.
Version 0.9.1¶
Removed a bug in the rendering of internal links if a “:” is present, but no actual namespace is referenced (thx to Els Soenens for reporting).
Version 0.9¶
- Added diff function for comparing old page versions to the most up-to- date version.
- Added “redirect to login page” option, if a non-logged-in user tries to edit a Wiki page (see FlexForm configuration).
Version 0.8.1¶
- Solved an SQL query issue, resulting in corrupted queries.
- Added __NOTOC__ and __NONUMBERHEADINGS__ directives for page Mark-ups and TOC manipulation.
Version 0.8¶
- Added more options to the FlexForm configuration of the Wiki editor.
- Added tooltips and shortcuts to the Wiki page editor and the editor toolbar.
- Updated the extension’s template.
- General code cleanup and removal of unused functions.
- Added enhanced internal links (Mediawiki style).
- Added signatures for discussions.
- Added Wiki variables, displaying Metainfo or date/time functions.
Version 0.7.2¶
- Added support for external templates via FlexForm.
- Enhanced the detection of the user [user/username/IP/anonymous].
- Introduced basic namespaces (NS) and InterWiki links.
Version 0.7.1¶
Fixed a bug in the setting of the Startingpoint.
Version 0.7¶
- Added FlexForm configuration for: TOC, Caching, etc.
- Added back-link for discussion.
- Added Read-Only option for Wiki (Wiki-Viewer).
- Added localisation of BE-Module (en/de).
- Clear cache from BE.
- General code clean-up.
Version 0.6.2¶
Got rid of the bug to explicitly set the Startingpoint of the Wiki; now the actual page is used as default value and Sys-Folders can be used as Startingpoint to store Wiki pages.
Version 0.6.1 & 0.6¶
- Added check for newer versions of a Wiki page that has been edited while another user saved his/her changes.
- Got rid of the bug to explicitly set the startingpoint; now the actual page is used as default value.
- Added some additional usability features:
- reload button for Wiki pages,
- link for the key word,
- when aborting the edit of a page, the user gets redirected to the referring page and not to the “HomePage”
- The issue with regard to the " php_flag allow_call_time_pass_reference " is solved, so this flag does not need to be set in the .htaccess file anymore.
- Finally, the bug with regard to the formatting of external links (missing spaces) is solved.
Version 0.5.2¶
- Fixed a bug in the rendering of links.
- Added support for multiple redirects.
- Removed unused "cancelEdit" function from source code.
Version 0.5.1¶
- Fixed a small bug in the discussion section when adding a discussion.
- Added "#REDIRECT [[Link]]" for redirecting to other pages.
Version 0.5¶
- Added caching of rendered pages.
- Added toolbar for the editor.
- Needed JS Code is now externalised for easier maintenance.
- General code clean-up and removal of unused elements.
Version 0.4¶
- First public release, containing basic Mediawiki Mark-ups.
- Added better rendering of headers, including TOC for Wiki pages.
Glossary¶
Application programming interface (API)¶
An application programming interface (API) is a set of definitions specifying the ways one piece of computer software communicates with another. It is a method of achieving abstraction, usually (but not necessarily) between lower-level and higher-level software.
Content Management System (CMS)¶
In computing, a content management system (CMS) is a system used to organise and facilitate collaborative creation of documents and other content. A CMS is frequently a web application used for managing websites and web content, though in many cases, content management systems require special client software for editing and constructing articles. The market for content management systems remains fragmented, with many open-source and proprietary solutions available.
FlexForm¶
FlexForms are a configuration mechanism used by Typo3 to configure extensions in an easy way. Instead of using database fields, the information is stored in XML files for easier and faster retrieval.
GNU General Public Licence (GPL)¶
The GNU General Public License (GNU GPL or simply GPL) is a free software license, originally written by Richard Stallman for the GNU project. It has since become the most popular license for free software. The latest version of the license, version 2, was released in 1991. The GNU Lesser General Public License (LGPL) is a modified version of the GPL, intended for some software libraries.
Mark-up¶
A Mark-up language combines text and extra information about the text. The extra information, for example about the text’s structure or presentation, is expressed using Mark-up, which is intermingled with the primary text. The best-known Mark-up language in modern use is HTML (Hypertext Mark-up Language), one of the foundations of the World Wide Web. Historically, Mark-up was (and is) used in the publishing industry for interoperable communication of printed work between authors, editors, and printers.
Typo3¶
Typo3 is a free, open source content management system written with PHP and MySQL for enterprise purposes on the web and in intranets. It is available for free and licensed under the GNU General Public License. It offers full flexibility and extendability, while featuring an accomplished set of ready-made interfaces, functions and modules.
References¶
Terdiman, D. (2005): “Esquire wikis article on Wikipedia”, CNET News.com, September 29, 2005.
http://news.com.com/Esquire+wikis+article+on+Wikipedia/2100-1038_3-5 885171.html
Royer, D. (2005): “How to cope with Complexity: The usage of Typo3 for Research Projects”, Proceedings of the 1st TYCON3 conference, Karlsruhe (Germany), 2005.
Various (2005): “Typo3 core documentation”,
http://typo3.org/documentation/document-library/doc_core_inside/
EXT: DR Wiki - 24