DEPRECATION WARNING
This documentation is not using the current rendering mechanism and is probably outdated. The extension maintainer should switch to the new system. Details on how to use the rendering mechanism can be found here.
Backend Image Manipulation
| Author: | Peter Russ |
|---|---|
| Created: | 2011-02-03T22:04:04 |
| Changed by: | Peter Russ |
| Changed: | 2011-02-04T00:26:01 |
| Classification: | fdfx_be_image |
| Description: | The keywords help with categorizing and tagging of the manuals. You can combine two or more keywords and add additional keywords yourself. Please use at least one keyword from both lists. If your manual is NOT in english, see next tab "language" ---- forEditors (use this for editors / german "Redakteure") forAdmins (use this for Administrators) forDevelopers (use this for Developers) forBeginners (manuals covering TYPO3 basics) forIntermediates (manuals going into more depth) forAdvanced (covering the most advanced TYPO3 topics) see more: http://wiki.typo3.org/doc_template#tags ---- |
| Keywords: | backend image cropping rotation dam |
| Author: | Peter Russ |
| Email: | peter.russ@4many.net |
| Info 4: | |
| Language: | en |

 Backend Image Manipulation
Extension Key: fdfx_be_image
Language: en
Version: 2.0.0
Keywords: backend image cropping rotation dam
Copyright 2000-2011, Peter Russ, <peter.russ@4many.net>
This document is published under the Open Content License
available from http://www.opencontent.org/opl.shtml
The content of this document is related to TYPO3
- a GNU/GPL CMS/Framework available from www.typo3.org
Table of Contents
`Backend Image Manipulation 1 <#1.Backend%20Image%20Manipulation|outline>`_
`Introduction 3 <#1.1.Introduction|outline>`_
`Users manual 5 <#1.2.Users%20manual|outline>`_
`Administration 14 <#1.3.Administration|outline>`_
Setup option only available in user/group TSCONFIG 16
`To-Do list 18 <#1.4.To-Do%20list|outline>`_
`Known Problems 19 <#1.5.Known%20Problems|outline>`_
`Changelog 20 <#1.6.Changelog|outline>`_
Introduction
What does it do?
Often articles are decorated with images uploaded to the server. This images are optimized to be displayed at a special position or just provide a general overview.But what if an editor just need a special section for a teaser or a header image or some background for CSS?Manipulate it on the local computer is requiring additional programs...
As you can imagine: fdfx_be_image is the beginning of server based image processing focused on the TYPO3-Framework. At the moment it provides the capability to crop images. Further functionality will follow depending on requirements.
Starting with version 1.4.0 it is now automatically detected if DAM is available. If so and icon for image cropping will be added.
That's NEW!
Starting with version 2.0.0 images can be manipulated directly when selected as part of a content element. So far this feature is only available when DAM is available. Further it requires that dam_ttcontent is installed.
Due to the usage of DAM the information, which part of the image is cropped is stored separately. The processed image will be stored in a folder defined in the setup (i.e. ..../temp/...). If the images in this folder get deleted, images will be generated again based on the DAM information and the cropping sets. This gives you the change to exchange images if there are any problems e.g. with resolution or artefacts.
Sponsoring
The initial development of this extension was sponsored by www.weltkunst.de .
Sponsoring for version 2.0.0 was done by bgm GmbH, Munich .
Acknowledgment
This extension is based on developments provided by Alf Magne Kalleland at www.dhtmlgoodies.com .The server based image cropping was totally rewritten to be compatible with the TPYO3-Framework and meet the security requirements. Additional changes on the original Javascript code for the AJAX communication was required.
Screenshoots
Left clicking on a image in your Filelist provides an additional menu entry: FXImage.
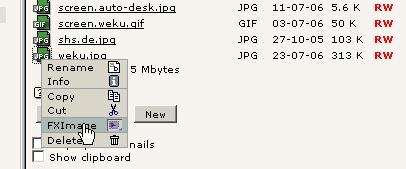 If you have DAM it will look like this:
 With DAM you get two icons: one for cropping and the second for
rotating the image
With DAM you get two icons: one for cropping and the second for
rotating the image
You will get the image manipulation section. You can either crop, scale or rotate an image.
PDF
The actual version of this manual can be downloaded in PDF format at http://www. 4many.net/manual/fdfx_be_image/manual.pdf
Users manual
Image Cropping
a
b
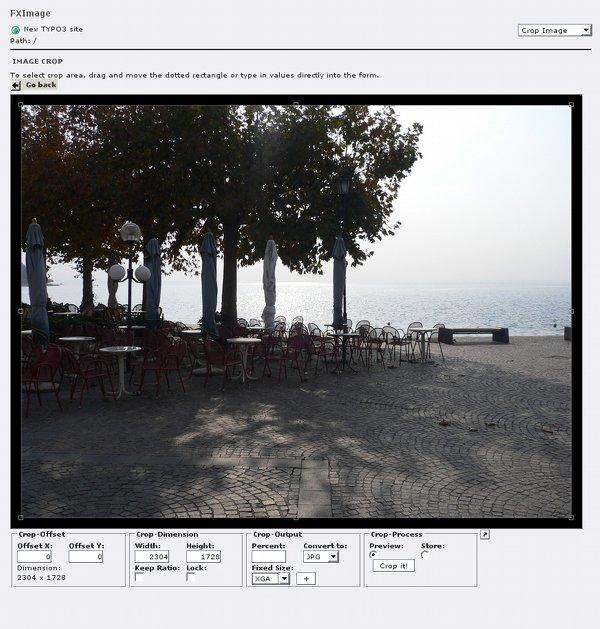
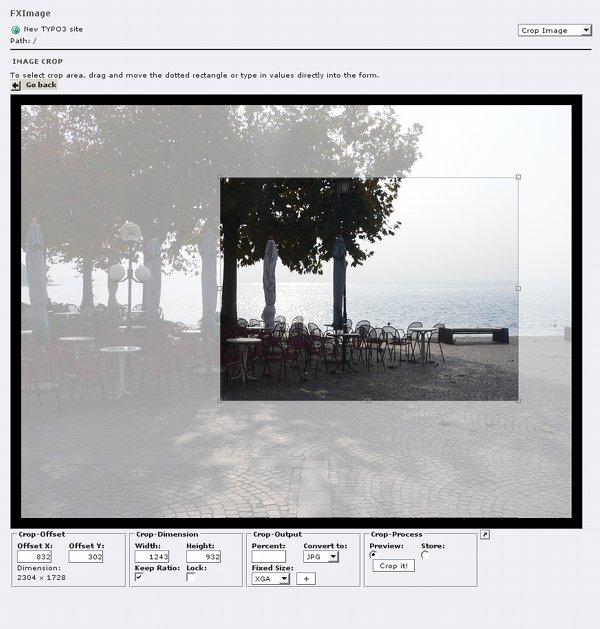
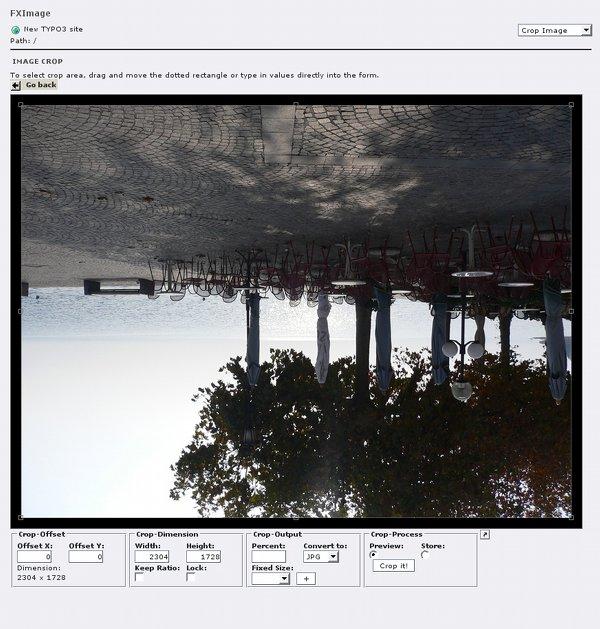
Activating FXImage or clicking on the cropping icon (DAM)brings up the screen for cropping.
Crop-Offset :
Upper left corner of the selection.
Dimension will always display the original image size.
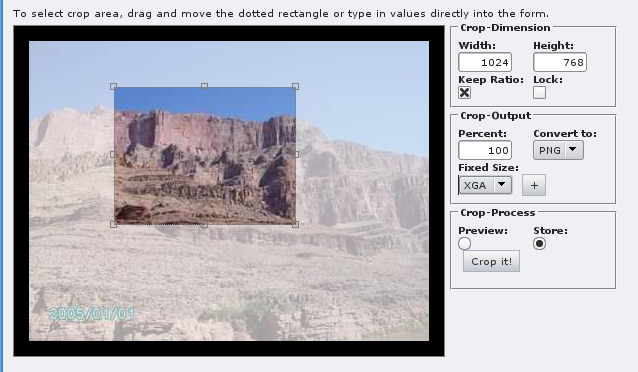
Crop-Dimension :
Will show the width and hight of the selection.
Keep Ratio will ensure that width/height will stay constant when changing either by direct input or by mouse dragging.
Lock will disable changes of width and height by mouse.
Crop-Output :
Set the size and format for the final image.
Fixed Size enables to use presets. If you click on + the preset will be transferred to the cropping area while Keep Ratio gets activated.
Presets for Fixed Size can be defined User/Group TSConfig (s. later)
Percent will be overridden by Fixed Size if selected.
Go back brings you back to the filelist.
a
b
By default Fixed Size is
640x480 VGA
800x600 WGA
1024x768 XGA
To define that to your need s. Configuration.
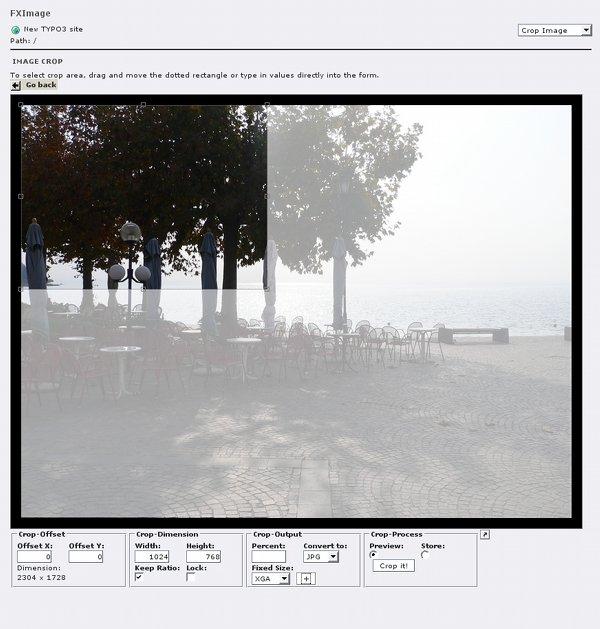
Fixed Size XGA is selected and ' + ' will be clicked. Result will be shown in next image.
a
b
The selection area is adjusted to the selected Fixed Size and Keep Ratio is activated.
Now you can select the image area by moving the selection to the area you like and resize the selection until you get the area you want.
Result is shown on the next image.
a
b
We moved the selection and increased the width and height to get the items covered we want in the final image.
Now we click on Crop It .
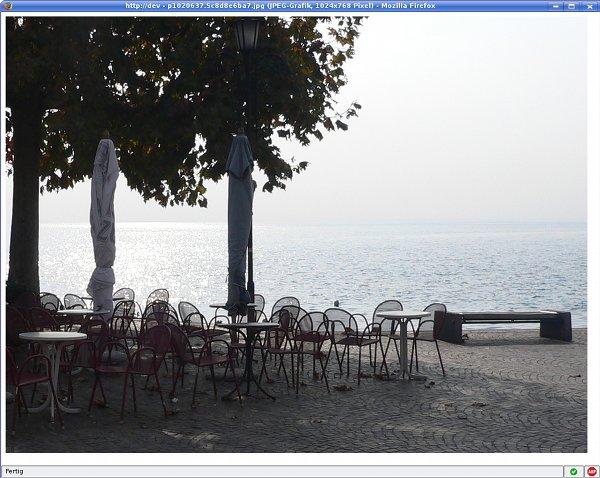
We will get the Preview shown in the next image.
a
b
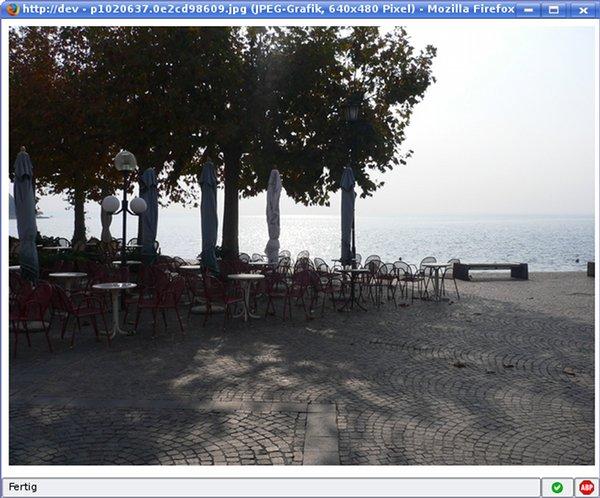
The selection got scaled to the selected Fixed Size (here XGA: 1024x768).
TIPP :
You can use this also to scale your images to the resolution you want without cropping. Just define presets for the required resolution (s. configuration)
a
b
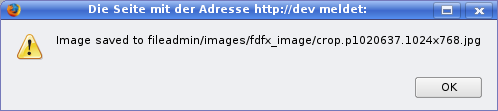
If you want to save the image finally select Store before clicking on Crop It .
As you see the new filename is calculated automatically.
Image Rotation
a
b
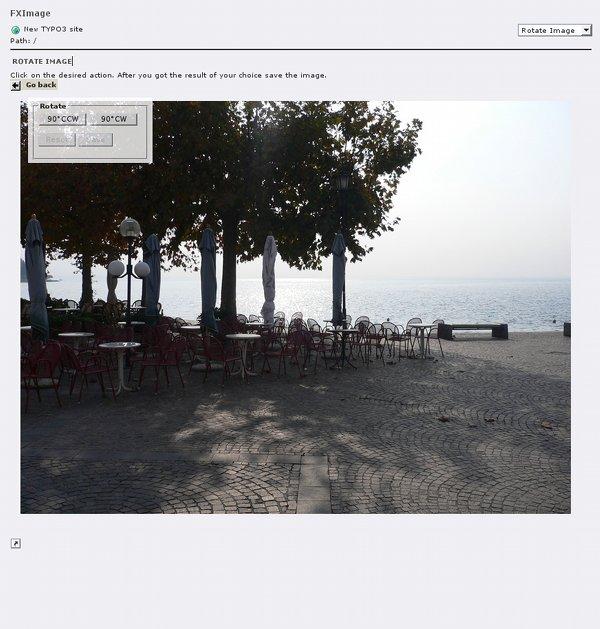
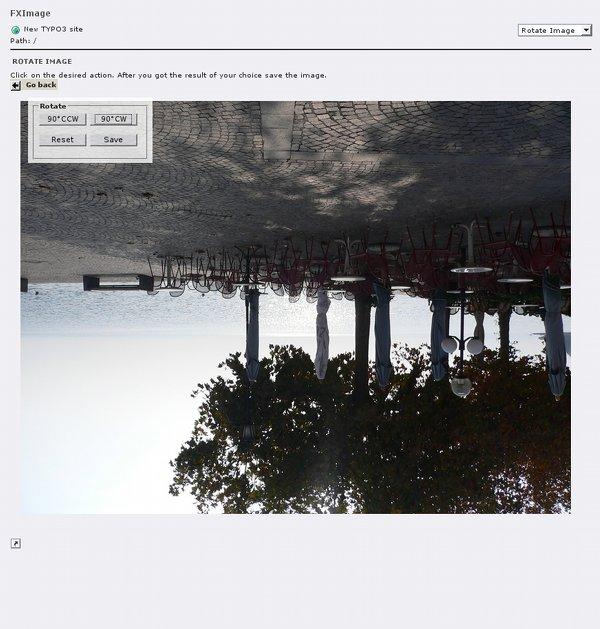
Activating FXImage and the menu item Rotate Image or clicking on the rotation icon (DAM)brings up the screen for rotating.
90° CCW
Rotates the image by 90° counter clockwise (left turn).
90° CW
Rotates the image by 90° clockwise (right turn)
Save
Saves the rotated image to the server.
Reset
Resets the local image to the last state before safe.
Save and reset will only be active if there is an action to perform.
a
b
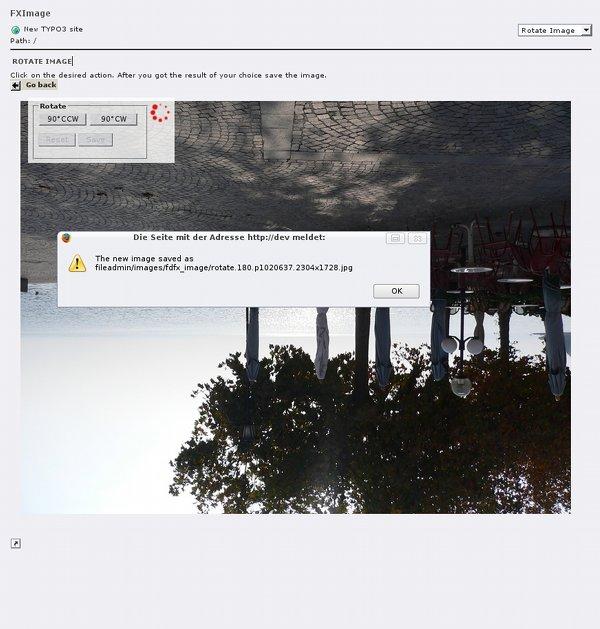
Image rotated twice. The rotation will be performed directly in the browser. To save the rotated image to the server click save .
a
b
After saving the image to the server, the new image is automatically loaded.
So you can use this for further actions, e.g. cropping.
a
b
Image Scaling
a
b
To perform a image scale start cropping.
Crop-Output :
Set the size and format for the final image.
Fixed Size enables to use presets. If you click on + the preset will be transferred to the cropping area while Keep Ratio gets activated.
Presets for Fixed Size can be defined User/Group TSConfig (s. later)
Percent will be overridden by Fixed Size if selected.
The image should be resized to XGA, 1024x768.
To save the scaled image to the server activate Store and click Crop It .
a
b
Here the final image should be resized to 50% of the original size.
a
b
Image scaled to VGA, 640x480
Image Wizard
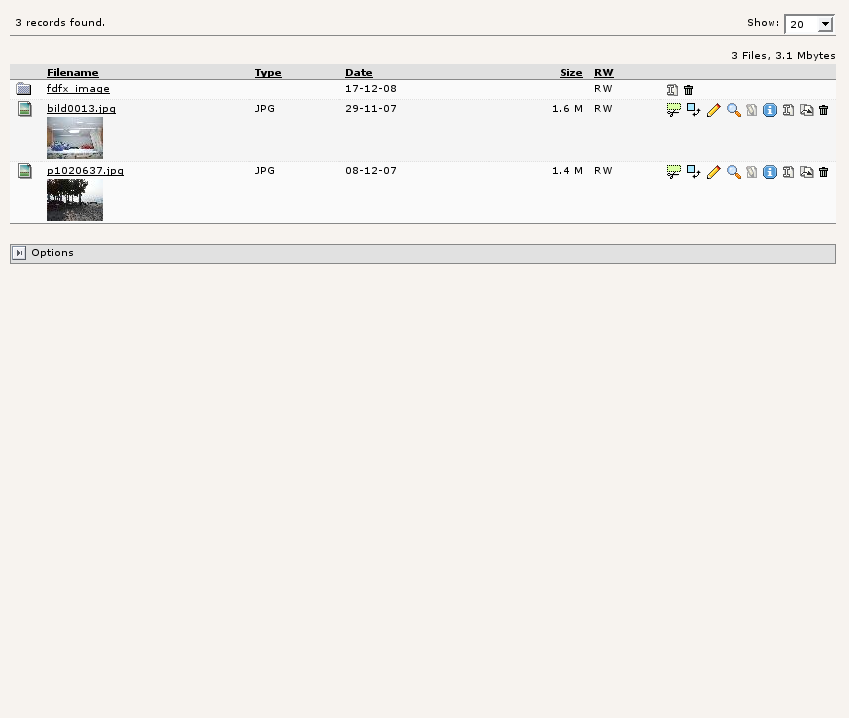
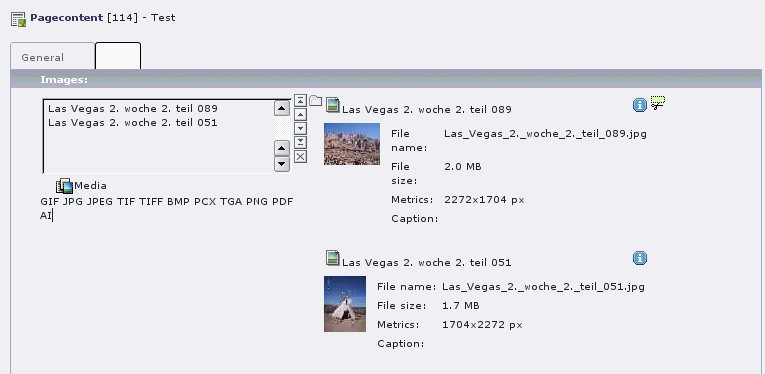
The image wizard allows you to manipulate an image directly when selected in a content element. It requires that following extension are installed: dam, dam_ttcontent. Without this extension the option will not be available (as long as there is no FAL).
a
b
Before you can crop an image you have to select images and active the image you want to crop
a
b
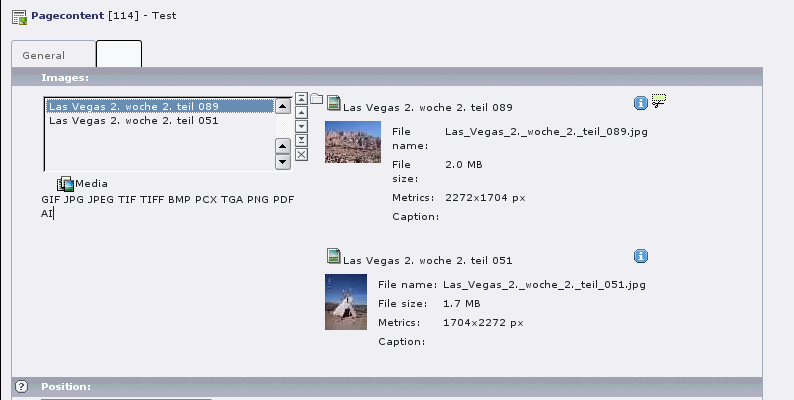
Click on the cropping icon.
a
b
Select the size and area you want to crop, select store to finalize the cropping and click on store.
a
b
Next time you activate the image again for cropping it will show you which part will be used.
Administration
Installation
Just download the extension using the extension manager. Starting with version 1.3.0 local installation is now supported.
Setup
During installation or at any time you click in the extension manager you can setup some general settings.
MAX_WIDTH
Variable
MAX_WIDTH
Definition
Defines the image maximum width for the BE output. This will NOT have any influence on the final output. This is just used to scale larger images nicely on the display and speed up output.
Added version 1.0.0:
Optimized for a resolution of 1024x768 px
Due to the floating CSS layout you should adjust this if you have higher screen resolutions available.
Further you can configure that on BE-user based by Preset (s. Configuration)
Type
Integer
Default
400px
MAX_HEIGHT
Variable
MAX_HEIGHT
Definition
Defines the image maximum height for the BE output. This will NOT have any influence on the final output. This is just used to scale larger images nicely on the display and speed up output.
Added version 1.0.0:
Optimized for a resolution of 1024x768 px
Due to the floating CSS layout you should adjust this if you have higher screen resolutions available.
Further you can configure that on BE-user based by Preset (s. Configuration)
Type
Integer
Default
400px
Comment
Can be overridden on a user based TSCONFIG:
e.g.
FDFX_BE_IMAGE{
   display.maxHeight=600
}
see Configuration
SAME_PATH
Variable
SAME_PATH
Definition
If set, resulting image will be saved in the same path as the original.
Type
Boolean
Default
false
Comment
IS_ABSOLUTE
Variable
IS_ABSOLUTE
Definition
If set, the provided path (see NEW_PATH) will be an absolute path on the server. If SAME_PATH is set (i.e. true) this will be with out any influence.
Type
Boolean
Default
false
Comment
NEW_PATH
Variable
NEW_PATH
Definition
This will define the path where to store the manipulated image depending in the settings of SAME_PATH and IS_ABSOLUTE.
Type
String
Default
fdfx_image
Comment
RESIZE_COMMAND
Variable
RESIZE_COMMAND
Definition
Type
String
Default
resize
Comment
Due to the fact that ImageMagick change the command from 'size' to 'resize' in the past, you can adjust that here if you expercience problems
FIXED_SIZE
Variable
FIXED_SIZE
Definition
This will preset size for possible output
Type
String
Default
640x480
800x600
1024x768
Comment
comma separated list of pairs size=name,
Can be overridden on a user based TSCONFIG:
e.g.
FDFX_BE_IMAGE{
   display.fixedSize= 200x80=small Banner,480x120=Big Banner
}
see Configuration
FIXED_SIZE_DEFAULT
Variable
FIXED_SIZE_DEFAULT
Definition
This will give you the crop frame directly when initializing crop and set it to the given fixed size
Type
INT
Default
Comment
e.g. if your fixedSize is defined like in the example above and value of 1 would directly display a crop frame with with 200x80px
CSS_FILE
Variable
CSS_FILE
Definition
Providing your own CSS File with path gives you the option either to style the layout of the extension or hide elements not important for our user
Type
String
Default
Comment
Can be set on user based TSCONFIG:
eg:
FDFX_BE_IMAGE{
   display.cssFile=/fileadmin/css/style.css
}
IMAGE_FORMAT
Variable
IMAGE_FORMAT
Definition
This gives you the option to define which format will be available for image conversion. Additionally default format will be set on first position
Type
String
Default
png,jpg,gif
Comment
Can be set on user based TSCONFIG:
eg:
FDFX_BE_IMAGE{
   display.imageFormat=png
}
Administrative Hint
When the wizard for images manipulation is available (i.e. dam and dam_ttcontent is installed) processed images will be store at the folder defined by SAME_PATH, IS_ABSOLUTE, NEW_PATH. The resulting path will be extended automatically with .../temp/.
If you want to exchange the source of an image and get the resulting image in the front-end rerendered you just have to deleted the images in the temporary folder. To make it easy for you it might be wise to use an absolute path sitting below typo3temp/.
Setup option only available in user/group TSCONFIG
This options are only available on user/group base i.e. can only be set using TSCONFIG.
disableRotation
Variable
disableRotation
Definition
Setting this will disable the rotation option i.e. user will not be able to rotate images
Type
INT
Default
0
Comment
To disable rotation add this to group TSCONFIG:
FDFX_BE_IMAGE{
   display.disableRotation=1
}
Configuration
Due to different requirements each BE-user or group can be configured individually. To do so add this to the user or group TSCONFIG:
FDFX_BE_IMAGE{
   display
   {
   maxWidth=600
        maxHeight=600
       fixedSize=200x80=small Banner,480x120=Big Banner
    fixedSizeDefault=1
  samePath=0
  isAbsolute=1
        newPath=/path/to/the/images/stored
  imageFormat=png
     cssFile=/fileadmin/css/style.css
   }
}
This will override the general settings made during setup of the extension on a user based and will make the best use of the individual hardware.
To-Do list
Rewrite to completely use jQuery or ExtJS
Add more Ajax functionality
In combination with DAM allow selection of the same image at the same content element for several times to enable cropping of different areas.
Known Problems
When you want to install DAM you should deinstall this extension first. After finalizing the DAM installation install it again.Otherwise you will get a bunch of errors.
Changelog
2.0.0 refactored classesadded wizard support to manipulate images as part of a content elementadded new preset options
1.9.0 same as version 1.8.0 due to TER upload error
1.8.0 changes required for DAM 1.1.0some basic template support for TYPO3 v 4.2 & DAMminor bug fixesnew icons thanks to richard.bausek@moccu.com
1.7.0 added feature to enable default for croppingSAME_PATH, NEW_PATH and IS_ABSOLUTE is now also configurable byUserTsconfig (both features requested by Stig Nørgaard Færch)
1.6.0 bugfix of changing crop dimensions on mouse moveadded new feature for croppingkeep ratio and lockingupdates now fields automatically when movingadded preset for output sizeadded image rotationsponsored a back button
1.5.0 bug fix relies due to a bug that was caused by older versions ofIM 4.2.3 as the command for resizing was changed from size to resize :-(
1.4.0 added support for DAM
1.3.0 support for local installationchange to run also on local installation required move ofclass.fdfx_image.php to folder cm1
1.2.0 enabled non admin user to to access the module
1.1.0 bug fix: if user TSCONFIG was not set, no values were accepted
1.0.0 added translation capabilitychanged CSS to float to improve usages of higher resolutionsadded configuration on user basemanual error fixing
0.8.0 first public upload
Comment
Can be overridden on a user based TSCONFIG:
e.g.
see Configuration