Frontend rendering
Basic code components
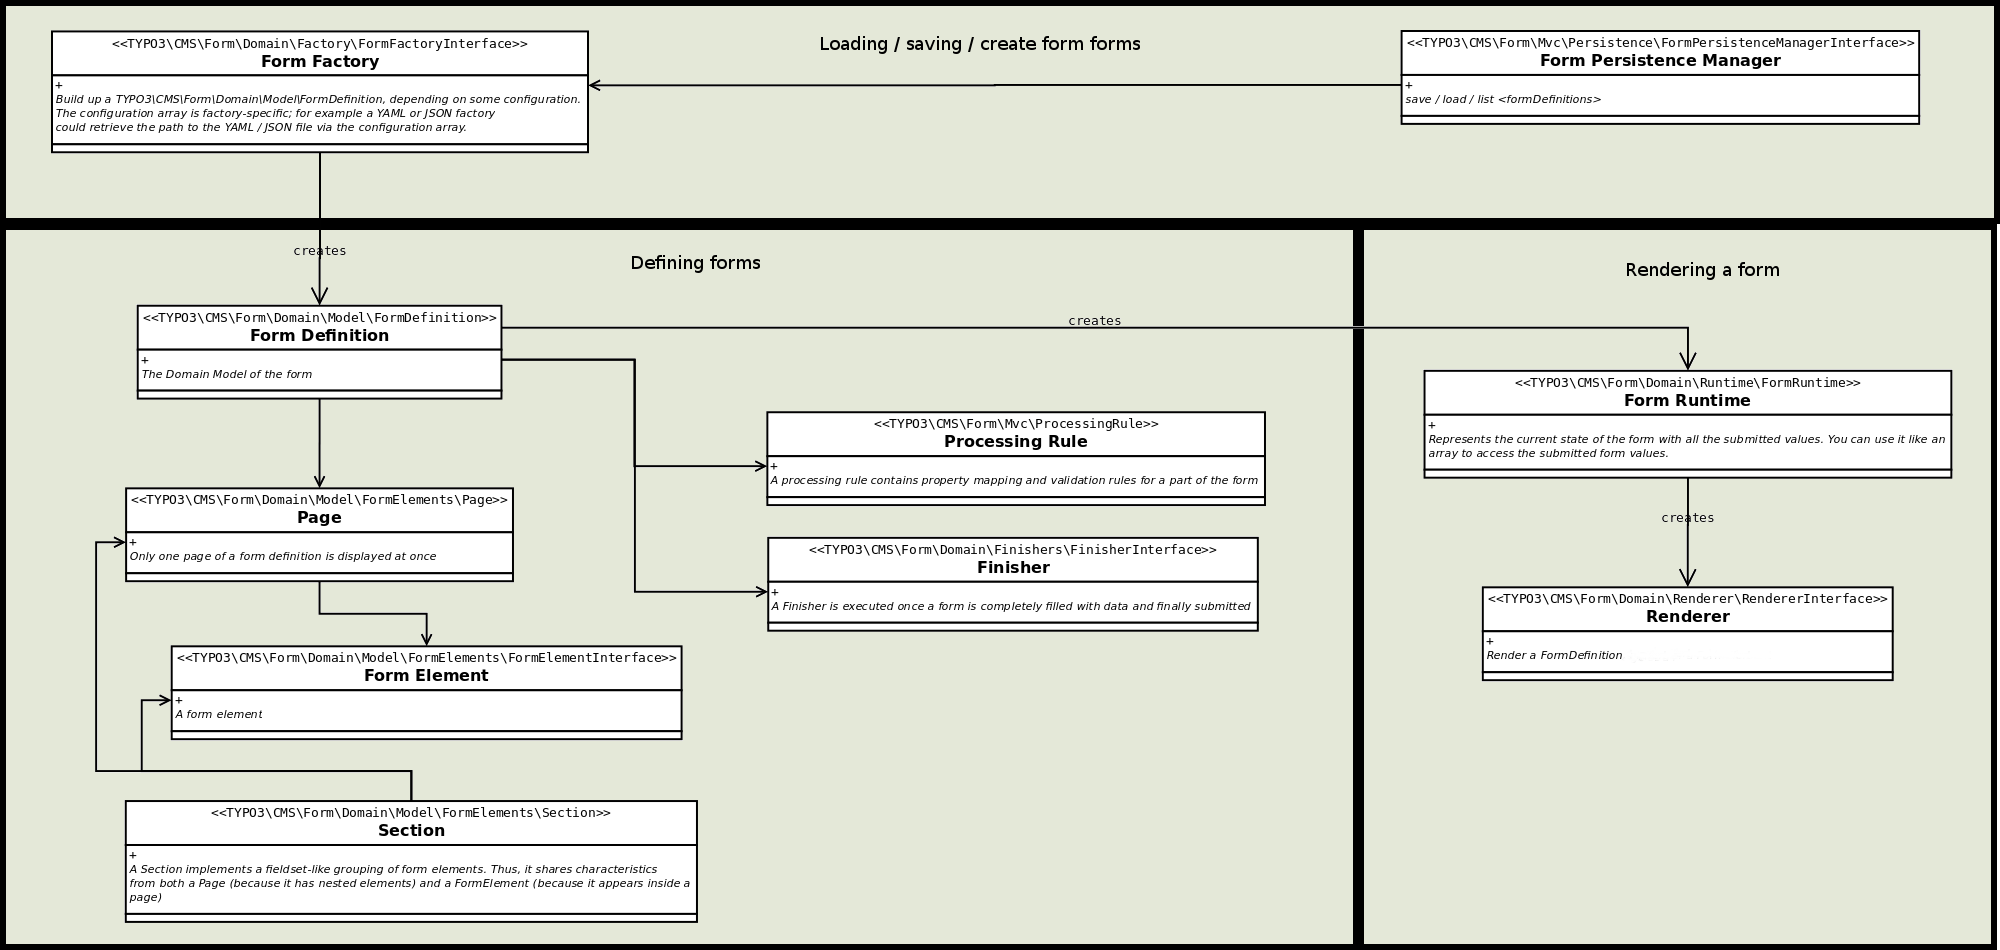
Basic code components
TYPO3\CMS\Form\Domain\Model\FormDefinition
The class TYPO3\CMS\Form\Domain\Model\FormDefinition encapsulates
a complete form definition, with all of its
- pages,
- form elements,
- applicable validation rules, and
- finishers, which should be executed when the form is submitted.
The FormDefinition domain model is not modified when the form is executed.
The anatomy of a form
A FormDefinition domain model consists of multiple Page objects.
When a form is displayed, only one Page is visible at any given time.
Moreover, there is a navigation to go back and forth between those pages. A
Page consists of multiple FormElements which represent the input
fields, textareas, checkboxes, etc. shown on a page. The FormDefinition
domain model, Page and FormElement objects have identifier
properties which must be unique for each given <formElementTypeIdentifier>,
i.e. the FormDefinition domain model and a FormElement object may
have the same identifier but having the same identifier for two
FormElement objects is disallowed.
Example
Basically, you can manually create a FormDefinition domain model just
by calling the API methods on it, or you can use a FormFactory to build
the form from a different representation format such as YAML:
$formDefinition = $this->objectManager->get(FormDefinition::class, 'myForm');

$page1 = $this->objectManager->get(Page::class, 'page1');
$formDefinition->addPage($page);

// second argument is the <formElementTypeIdentifier> of the form element
$element1 = $this->objectManager->get(GenericFormElement::class, 'title', 'Text');
$page1->addElement($element1);
Creating a form using abstract form element types
While you can use the TYPO3\CMS\Form\Domain\Model\FormDefinition::addPage()
or TYPO3\CMS\Form\Domain\Model\FormElements\Page::addElement() methods
and create the Page and FormElement objects manually, it is often
better to use the corresponding create* methods (TYPO3\CMS\Form\Domain\Model\FormDefinition::createPage()
and TYPO3\CMS\Form\Domain\Model\FormElements\Page::createElement()), as
you pass them an abstract <formElementTypeIdentifier> such as Text
or Page. EXT:form will automatically resolve the implementation class
name and set default values.
The simple example shown above should be rewritten as follows:
// we will come back to this later on
$prototypeConfiguration = [];

$formDefinition = $this->objectManager->get(FormDefinition::class, 'myForm', $prototypeConfiguration);
$page1 = $formDefinition->createPage('page1');
$element1 = $page1->addElement('title', 'Text');
You might wonder how the system knows that the element Text is
implemented by using a GenericFormElement. This is configured in the
$prototypeConfiguration. To make the example from above actually work,
we need to add some meaningful values to $prototypeConfiguration:
$prototypeConfiguration = [
    'formElementsDefinition' => [
        'Page' => [
            'implementationClassName' => 'TYPO3\CMS\Form\Domain\Model\FormElements\Page'
        ],
        'Text' => [
            'implementationClassName' => 'TYPO3\CMS\Form\Domain\Model\FormElements\GenericFormElement'
        ],
    ],
];
For each abstract <formElementTypeIdentifier> we have to add some
configuration. In the snippet above, we only define the implementation
class name. Apart form that, it is always possible to set default values
for all configuration options of such elements, as the following example
shows:
$prototypeConfiguration = [
    'formElementsDefinition' => [
        'Page' => [
            'implementationClassName' => 'TYPO3\CMS\Form\Domain\Model\FormElements\Page',
            'label' => 'This is the label of the page if nothing else is specified'
        ],
        'Text' => [
            'implementationClassName' => 'TYPO3\CMS\Form\Domain\Model\FormElements\GenericFormElement',
            'label' = >'Default Label',
            'defaultValue' => 'Default form element value',
            'properties' => [
                'placeholder' => 'Text that is shown if element is empty'
            ],
        ],
    ],
];
Using pre-configured $prototypeConfiguration
Often, it does not make sense to manually create the $prototypeConfiguration
array. Bigger parts of this array are pre-configured in the extensions’s
YAML settings. The TYPO3\CMS\Form\Domain\Configuration\ConfigurationService
contains helper methods which return the ready-to-use $prototypeConfiguration.
Rendering a FormDefinition
To trigger the rendering of a FormDefinition domain model, the current
TYPO3\CMS\Extbase\Mvc\Web\Request needs to be bound to the
FormDefinition. This binding results in a TYPO3\CMS\Form\Domain\Runtime\FormRuntime
object which contains the Runtime State of the form. Among other things,
this object includes the currently inserted values:
// $currentRequest and $currentResponse need to be available
// inside a controller, you would use $this->request and $this->response;
$form = $formDefinition->bind($currentRequest, $currentResponse);
// now, you can use the $form object to get information about the currently entered values, etc.
TYPO3\CMS\Form\Domain\Runtime\FormRuntime
This class implements the runtime logic of a form, i.e. the class
- decides which page is currently shown,
- determines the current values of the form
- triggers validation and property mappings.
You generally receive an instance of this class by calling TYPO3\CMS\Form\Domain\Model\FormDefinition::bind().
Rendering a form
Rendering a form is easy. Just call render() on the FormRuntime:
$form = $formDefinition->bind($request, $response);
$renderedForm = $form->render();
Accessing form values
In order to get the values the user has entered into the form, you can
access the FormRuntime object like an array. If a form element with the
identifier firstName exists, you can use $form['firstName'] to
retrieve its current value. You can set values the same way.
Rendering internals
The FormRuntime inquires the FormDefinition domain model regarding
the configured renderer (TYPO3\CMS\Form\Domain\Model\FormDefinition::getRendererClassName())
and then triggers render() on this Renderer.
This allows you to declaratively define how a form should be rendered.
TYPO3:
  CMS:
    Form:
      prototypes:
        standard:
          formElementsDefinition:
            Form:
              rendererClassName: 'TYPO3\CMS\Form\Domain\Renderer\FluidFormRenderer'
TYPO3\CMS\Form\Domain\Renderer\FluidFormRenderer
This class is a TYPO3\CMS\Form\Domain\Renderer\RendererInterface
implementation which used to render a FormDefinition domain model. It
is the default EXT:form renderer.
Learn more about the FluidFormRenderer Options.
Custom form element implementations
EXT:form ships a decent amount of hooks which are available at crucial
points of the life cycle of a FormElement. Most of the time, own
implementations are therefore unnecessary. An own form element can be
defined by:
- writing some configuration, and
- utilizing the standard implementation of
TYPO3\CMS\Form\Domain\Model\FormElements\GenericFormElement.
TYPO3:
  CMS:
    Form:
      prototypes:
        standard:
          formElementsDefinition:
            CustomFormElementIdentifier:
              implementationClassName: 'TYPO3\CMS\Form\Domain\Model\FormElements\GenericFormElement'
With the provided hooks, this FormElement can now be manipulated.
If you insist on your own implementation, the abstract class TYPO3\CMS\Form\Domain\Model\FormElements\AbstractFormElement
offers a perfect entry point. In addition, we recommend checking-out TYPO3\CMS\Form\Domain\Model\Renderable\AbstractRenderable.
All of your own form element implementations must be programmed to the
interface TYPO3\CMS\Form\Domain\Model\Renderable\RenderableInterface.
It is a good idea to derive your implementation from TYPO3\CMS\Form\Domain\Model\FormElements\AbstractFormElement.
Custom finisher implementations
Finishers are defined as part of a prototype within a
finishersDefinition. The property implementationClassName is to be
utilized to load the finisher implementation.
TYPO3:
  CMS:
    Form:
      prototypes:
        standard:
          finishersDefinition:
            CustomFinisher:
              implementationClassName: 'VENDOR\MySitePackage\Domain\Finishers\CustomFinisher'
If the finisher requires options, you can define those within the
options property. The options will be used as default values and can
be overridden using the form definition.
Define the default value:
TYPO3:
  CMS:
    Form:
      prototypes:
        standard:
          finishersDefinition:
            CustomFinisher:
              implementationClassName: 'VENDOR\MySitePackage\Domain\Finishers\CustomFinisher'
              options:
                yourCustomOption: 'Ralf'
Override the option using the form definition:
identifier: sample-form
label: 'Simple Contact Form'
prototype: standard
type: Form

finishers:
  -
    identifier: CustomFinisher
    options:
      yourCustomOption: 'Björn'

renderables:
  ...
Each finisher has to be programmed to the interface TYPO3\CMS\Form\Domain\Finishers\FinisherInterface
and should extend the class TYPO3\CMS\Form\Domain\Finishers\AbstractFinisher.
In doing so, the logic of the finisher should start with the method
executeInternal().
Accessing finisher options
If your finisher extends TYPO3\CMS\Form\Domain\Finishers\AbstractFinisher,
you can access your finisher options with the help of the parseOption()
method:
$yourCustomOption = $this->parseOption('yourCustomOption');
parseOption() is looking for ‘yourCustomOption’ in your
form definition. If it cannot be found, the method checks
the
prototypeconfiguration for a default value,the finisher class itself by searching for a default value within the
$defaultOptionsproperty:<?php
declare(strict_types = 1); namespace VENDORMySitePackageDomainFinishers;
class CustomFinisher extends TYPO3CMSFormDomainFinishersAbstractFinisher {
- protected $defaultOptions = [
‘yourCustomOption’ => ‘Olli’,
];
// …
}
If the option cannot be found by processing this fallback chain, null is
returned.
If the option is found, the process checks whether the option value will
access FormRuntime values.
If the FormRuntime returns a positive result, it is checked whether the
option value can access values of preceding finishers.
At the very end, it tries to translate the finisher options.
Accessing form runtime values
By utilizing a specific notation, finisher options can be populated with
submitted form values (assuming you are using the parseOption() method).
You can access values of the FormRuntime and thus values of each single
form element by encapsulating the option values with {}. If there is a
form element with the identifier ‘subject’, you can access its value
within the the finisher configuration. Check out the following example to
get the whole idea.
identifier: simple-contact-form
label: 'Simple Contact Form'
prototype: standard
type: Form

finishers:
  -
    identifier: Custom
    options:
      yourCustomOption: '{subject}'

renderables:
  -
    identifier: subject
    label: 'Subject'
    type: Text
// $yourCustomOption contains the value of the form element with the
// identifier 'subject'
$yourCustomOption = $this->parseOption('yourCustomOption');
In addition, you can use {__currentTimestamp} as a special option value.
It will return the current UNIX timestamp.
Finisher Context
The class TYPO3\CMS\Form\Domain\Finishers\FinisherContext takes care of
transferring a finisher context to each finisher. Given the finisher is
derived from TYPO3\CMS\Form\Domain\Finishers\AbstractFinisher the
finisher context will be available via:
$this->finisherContext
The method cancel prevents the execution of successive finishers:
$this->finisherContext->cancel();
The method getFormValues returns all of the submitted form values.
getFormValues:
$this->finisherContext->getFormValues();
The method getFormRuntime returns the FormRuntime:
$this->finisherContext->getFormRuntime();
Custom validator implementations
Validators belong to a certain prototype and are defined within the
validatorsDefinition. The property implementationClassName is used
for the validator implementation.
TYPO3:
  CMS:
    Form:
      prototypes:
        standard:
          validatorsDefinition:
            Custom:
              implementationClassName: 'VENDOR\MySitePackage\Domain\Validation\CustomValidator'
You can provide options for your validator using the property options.
Those will be used as default values which can be overridden within a
specific form definition.
Define the default value of the option yourCustomOption:
TYPO3:
  CMS:
    Form:
      prototypes:
        standard:
          validatorsDefinition:
            Custom:
              implementationClassName: 'VENDOR\MySitePackage\Domain\Validation\CustomValidator'
              options:
                yourCustomOption: 'Jurian'
Override the default value within your form definition:
identifier: sample-form
label: 'Simple Contact Form'
prototype: standard
type: Form

renderables:
  -
    identifier: subject
    label: 'Name'
    type: Text
    validators:
      -
        identifier: Custom
        options:
          yourCustomOption: 'Mathias'
EXT:form implements Extbase validators. That said, your own validators should
extend TYPO3\CMS\Extbase\Validation\Validator\AbstractValidator.
“render” viewHelper
The RenderViewHelper is the actual starting point for form rendering and
not the typical Extbase Controller as you may know it.
For more technical insights read more about the viewHelper’s arguments.
Render through FLUIDTEMPLATE (without controller)
tt_content.custom_content_element = COA_INT
tt_content.custom_content_element {
    10 = < lib.stdheader
    20 = FLUIDTEMPLATE
    20 {
        file = EXT:my_site_package/Resources/Private/Templates/CustomContentElement.html
        settings {
            persistenceIdentifier = EXT:my_site_package/Resources/Private/Forms/MyForm.yaml
        }
        extbase.pluginName = Form
        extbase.controllerExtensionName = Formframework
        extbase.controllerName = FormFrontend
        extbase.controllerActionName = perform
    }
}
my_site_package/Resources/Private/Templates/CustomContentElement.html:
<formvh:render persistenceIdentifier="{settings.persistenceIdentifier}" />
Render within your own Extbase extension
It is straight forward. Use the RenderViewHelper like this and you are
done:
<formvh:render persistenceIdentifier="EXT:my_site_package/Resources/Private/Forms/MyForm.yaml"/>
Point the property controllerAction to the desired action name and
provide values for the other parameters displayed below (you might need
those).
type: Form
identifier: 'example-form'
label: 'TYPO3 is cool'
prototypeName: standard
renderingOptions:
  controllerAction: perform
  addQueryString: false
  argumentsToBeExcludedFromQueryString: []
  additionalParams: []

renderables:
  ...
Build forms programmatically
To learn more about this topic, head to the chapter ‘Build forms programmatically’ which is part of the API reference section.
Runtime manipulation
Hooks
EXT:form implements a decent amount of hooks that allow the manipulation of your forms during runtime. In this way, it is possible to, for example,
- … prefill form elements with values from your database,
- … skip a whole page based on the value of a certain form element,
- … mark a form element as mandatory depending of the chosen value of another form element.
Please check out the ‘API reference section’ for more details.
TypoScript overrides
Each and every form definition can be overridden via TypoScript if the
FormFrontendController of EXT:form is used to render the form. Normally,
this is the case if the form has been added to the page using the form
plugin or when rendering the form via FLUIDTEMPLATE.
The overriding of settings with TypoScript’s help takes place after the custom finisher settings
of the form plugin have been loaded. In this way, you are able to manipulate
the form definition for a single page. In doing so, the altered
form definition is passed to the RenderViewHelper which then
generates the form programmatically. At this point, you can still change the
form elements using the above-mentioned concept of hooks.
plugin.tx_form {
    settings {
        formDefinitionOverrides {
            <formDefinitionIdentifier> {
                renderables {
                    0 {
                        renderables {
                            0 {
                                label = TEXT
                                label.value = Overridden label
                            }
                        }
                    }
                }
            }
        }
    }
}
Templates
The Fluid templates of the form framework are based on Twitter Bootstrap.
Custom templates
If you want to use custom Fluid templates for the frontend output of the
form elements, you cannot register an additional template path using
TypoScript. Instead, the registration of new template paths has to be done
via YAML. The settings are part of the prototypes configuration.
TYPO3:
  CMS:
    Form:
      prototypes:
        standard:
          formElementsDefinition:
            Form:
              renderingOptions:
                templateRootPaths:
                  100: 'EXT:my_site_package/Resources/Private/Frontend/Templates/'
                partialRootPaths:
                  100: 'EXT:my_site_package/Resources/Private/Frontend/Partials/'
                layoutRootPaths:
                  100: 'EXT:my_site_package/Resources/Private/Frontend/Layouts/'
For each form definition - which references the prototype standard -
the form framework will additionally look for Fluid templates within the
path ‘EXT:my_site_package/Resources/Private/Frontend/[*]’ as set above.
Apart from the ‘Form’ element, the process will search for templates within
the partialRootPaths folder. The name of the partial is derived from the
property formElementTypeIdentifier. For example, the template of the
form element Text must be stored within the partialRootPaths folder
named Text.html. In contrast, the template of the Form element must
reside within the templateRootPaths folder. According to the introduced
logic, the template name must be Form.html.
Translation
Translate form definition
The translation of form definitions works differently to the translation
of the backend aspects. Currently, there is no graphical user interface
supporting the translation process.
If the backend editor needed to translate the form definition properties
in the same way the backend aspects are translated, he/ she would see long
and unwieldy translation keys while editing a form within the form editor.
In order to avoid this, rather the element properties are translated than
their values. Thus, the form framework does not look for translation keys
within the translation file. Instead, the system searches for translations
of the form element properties independent of their property values. The
property values are ignored if the process finds a proper entry within the
translation file. As a result, the property values are overridden by the
translated value.
This approach is a compromise between two scenarios: the exclusive usage of
the form editor and/ or the manual creation of form definitions
which can afterwards (theoretically) be edited with the form editor. In
addition, the described compromise allows the editor to create forms in the
default language whose form element property values are displayed as
specified in the form editor. Based on this, an integrator could provide
additional language files which automatically translate the specific form.
Additional translation files can be defined as follows:
TYPO3:
  CMS:
    Form:
      prototypes:
        standard:
          formElementsDefinition:
            Form:
              renderingOptions:
                translation:
                  translationFile:
                    # translation files for the frontend
                    10: 'EXT:form/Resources/Private/Language/locallang.xlf'
                    20: 'EXT:my_site_package/Resources/Private/Language/locallang.xlf'
Due to compatibility issues, the setting translationFile is not defined
as an array in the default configuration. To load your own translation files,
you should define an array containing ‘EXT:form/Resources/Private/Language/locallang.xlf’
as first entry (key 10) followed by your own file (key 20) as
displayed in the example above. The array is processed from the highest key
to the lowest, i.e. your translation file with the key 20 is processed
first. If the look-up process does not find a key within all of the provided
files, the property value will be displayed unmodified.
The following properties can be translated:
- label
- properties.[*]
- properties.options.[*]
- properties.fluidAdditionalAttributes.[*]
- renderingOptions.[*]
The translation keys are put together based on a specific pattern. In addition, a fallback chain that depends on the form element identifiers exists. As a result, the following translation scenarios are possible:
- translation of a form element property for a specific form and form element
- translation of a form element property for a specific form element and various forms
- translation of a form element property for an element type and various
forms, e.g. the
Pageelement
The look-up process searches for translation keys in all given translation files based on the following order:
<formDefinitionIdentifier>.element.<elementIdentifier>.properties.<propertyName>element.<formElementIdentifier>.properties.<propertyName>element.<elementType>.properties.<propertyName>
Form elements with option properties (properties.options), like the
Select element, feature the following look-up process:
<formDefinitionIdentifier>.element.<elementIdentifier>.properties.options.<propertyValue>element.<elementIdentifier>.properties.options.<propertyValue>
Example
identifier: ApplicationForm
type: Form
prototypeName: standard
label: 'Application form'

renderables:
  -
    identifier: GeneralInformation
    type: Page
    label: 'General information'

    renderables:
      -
        identifier: LastName
        type: Text
        label: 'Last name'
        properties:
          placeholder: 'Please enter your last name.'
        defaultValue: ''
      -
        identifier: Software
        type: MultiSelect
        label: 'Known software'
        properties:
          options:
            value1: TYPO3
            value2: Neos
For the form element LastName, the process will look for the following
translation keys within the translation files:
ApplicationForm.element.LastName.properties.labelelement.LastName.properties.labelelement.Text.properties.label
If none of the above-mentioned keys exist, ‘Last name’ will be displayed.
For the form element Software, the process will look for the following
translation keys within the translation files:
ApplicationForm.element.Software.properties.labelelement.Software.properties.labelelement.MultiSelect.properties.label
If none of the above-mentioned keys exist, ‘Known software’ will be displayed. The option properties are addressed as follows:
ApplicationForm.element.Software.properties.options.value1element.Software.properties.options.value1ApplicationForm.element.Software.properties.options.value2element.Software.properties.options.value2
If none of the above-mentioned keys exist, ‘TYPO3’ will be displayed as label for the first option and ‘Neos’ as label for the second option.
Translation of validation messages
The translation of validation messages is similar to the translation of
form definitions. The same translation files can be used. If the look-up
process does not find a key within the provided files, the appropriate
message of the Extbase framework will be displayed. EXT:form already
translates all of those validators by default.
As mentioned above, the translation keys are put together based on a specific pattern. Furthermore, the fallback chain exists here as well. Thus, the following translation scenarios are possible:
- translation of validation messages for a specific validator of a concrete form element and concrete form
- translation of validation messages for a specific validator of various form elements within a concrete form
- translation of validation messages for a specific validator of a concrete form element in various forms
- translation of validation messages for a specific validator within various forms
In Extbase, the validation messages are identified with the help of numerical codes (UNIX timestamps). For the same validator, different codes are valid. Read more about concrete validator configurations.
The look-up process searches for translation keys in all given translation files based on the following order:
<formDefinitionIdentifier>.validation.error.<elementIdentifier>.<validationErrorCode><formDefinitionIdentifier>.validation.error.<validationErrorCode>validation.error.<elementIdentifier>.<validationErrorCode>validation.error.<validationErrorCode>
Example
identifier: ContactForm
type: Form
prototypeName: standard
label: 'Contact us'

renderables:
  -
    identifier: Page1
    type: Page
    label: 'Page 1'

    renderables:
      -
        identifier: LastName
        type: Text
        label: 'Last name'
        properties:
          fluidAdditionalAttributes:
            required: required
        validators:
          -
            identifier: NotEmpty
Amongst others, the NotEmpty validator sends 1221560910 as <validationErrorCode>.
If a user submits this form without providing a value for the field “Last
name”, the NotEmpty validator fails. Now, the look-up process searches
for the following translation keys for the NotEmpty validator combined
with the form element LastName:
- ContactForm.validation.error.LastName.1221560910
- ContactForm.validation.error.1221560910
- validation.error.LastName.1221560910
- validation.error.1221560910
As mentioned above, if there is no corresponding translation key available, the default message of the Extbase framework will be shown.
Translation of finisher options
The translation of finisher options is similar to the translation of
form definitions. The same translation files can be used. If the look-up
process does not find a key within all provided files, the property value
will be displayed unmodified.
As mentioned above, the translation keys are put together based on a specific pattern. Furthermore, the fallback chain exists here as well. Thus, the following translation scenarios are possible:
- translation of finisher options for a specific finisher of a concrete form
- translation of finisher options for a specific finisher of various forms
The look-up process searches for translation keys in all given translation files based on the following order:
<formDefinitionIdentifier>.finisher.<finisherIdentifier>.<optionName>finisher.<finisherIdentifier>.<optionName>
Example
identifier: ContactForm
type: Form
prototypeName: standard
label: 'Contact us'

finishers:
  -
    identifier: Confirmation
    options:
      message: 'Thank you for your inquiry.'

renderables:
  ...
The look-up process searches for the following translation keys for the
<finisherIdentifier> ‘Confirmation’ and the option ‘message’:
ContactForm.finisher.Confirmation.messagefinisher.Confirmation.message
If no translation key exists, the message ‘Thank you for your inquiry.’ will be shown.