DEPRECATION WARNING
This documentation is not using the current rendering mechanism and is probably outdated. The extension maintainer should switch to the new system. Details on how to use the rendering mechanism can be found here.
Formhandler Backend
| Author: | Christopher |
|---|---|
| Created: | 2010-12-18T19:57:23 |
| Changed by: | Michel Baeriswyl |
| Changed: | 2016-01-05T16:41:01.430000000 |
| Classification: | formhandler_backend |
| Description: | The keywords help with categorizing and tagging of the manuals. You can combine two or more keywords and add additional keywords yourself. Please use at least one keyword from both lists. If your manual is NOT in english, see next tab "language" ---- forEditors (use this for editors / german "Redakteure") forAdmins (use this for Administrators) forDevelopers (use this for Developers) forBeginners (manuals covering TYPO3 basics) forIntermediates (manuals going into more depth) forAdvanced (covering the most advanced TYPO3 topics) ---- |
| Keywords: | forEditors, forAdmins, forIntermediates |
| Author: | Michel Baeriswyl |
| Email: | formhandler@pragmas.ch |
| Language: | en |
 Formhandler Backend - formhandler_backend

 Formhandler Backend
Extension Key: formhandler_backend
Language: en
Version: 0.1.0
Keywords: forEditors, forAdmins, forIntermediates
Copyright 2006-2016, Michel Baeriswyl, <formhandler@pragmas.ch>
Idea and sponsoring: Urs Bräm <info@ursbraem.ch>
This document is published under the Open Content License
available from http://www.opencontent.org/opl.shtml
The content of this document is related to TYPO3
- a GNU/GPL CMS/Framework available from www.TYPO3.org
Table of Contents
`Formhandler Backend 1 <#__RefHeading__5708_1738894311>`_
`Introduction 3 <#__RefHeading__5710_1738894311>`_
`Users manual 5 <#__RefHeading__9642_958094943>`_
Pretemplate selection and form redirection 5
Work with multiple languages 9
`Administration 10 <#__RefHeading__31511_818911409>`_
`Configuration 14 <#__RefHeading__31515_818911409>`_
`Known issues 18 <#__RefHeading__31525_818911409>`_
`ChangeLog 19 <#__RefHeading__31623_818911409>`_
((generated))
About this manual
If you want to know, what this extension is good for and if you want to get convinced, that you need it, read the chapter Introduction.
If you want to install the extension or if you need to configure and extend it to fit your own development needs, read the chapter Configuration.
If you want to adapt form pretemplates, the base for frontend forms, you find the necessary information in the chapter Administration.
If you want to add a form to your website and need information about how the backend-display works, read the chapter Users manual.
Introduction
What does it do?
Formhandler Backend is a pragmatic addition to the powerful “Formhandler” TYPO3Extension. It adds a user friendly backend plugin to add and edit forms in a way editors are used to. Formhandler Backend relies on so-called pretemplates, which should be provided and edited by administrators. A pretemplate contains the basic structure and functional definition of a form. Thus, it moreover offers administrators to realize complex forms and to use the waste flexibility of the Formhandler Extension.
It assembles the dynamic form data from the editor backend into the pretemplate definitions from the integrator and creates a new template set, which is finally displayed in the TYPO3Frontend. It covers issues like multi-step forms, multilanguage forms, form validation, initial form values and of course, it provides structure and layout for the different field types that are normally used in forms. Though developed on TYPO34.5 LTS, it is also compatible with extbase TYPO3-Versions.
Use cases for Formhandler Backend:
- You want your users to edit and create forms, but prefer to rely on the customiseability of formhandler instead of other form extensions.
- You have a basic set-up for various forms on a site / in an extension. There are fields that are always the same - and there are fields the editors should be able to modify. For example: create a multistep registration form for different types of events. One part is dynamic (maybe there are fields for the number of persons, for food preferences etc) and is created in the backend. The other part contains the registrant's address data and is the same for all events (this, you prepare in the pretemplate so the editor doesn't have to bother with it).
Screenshot
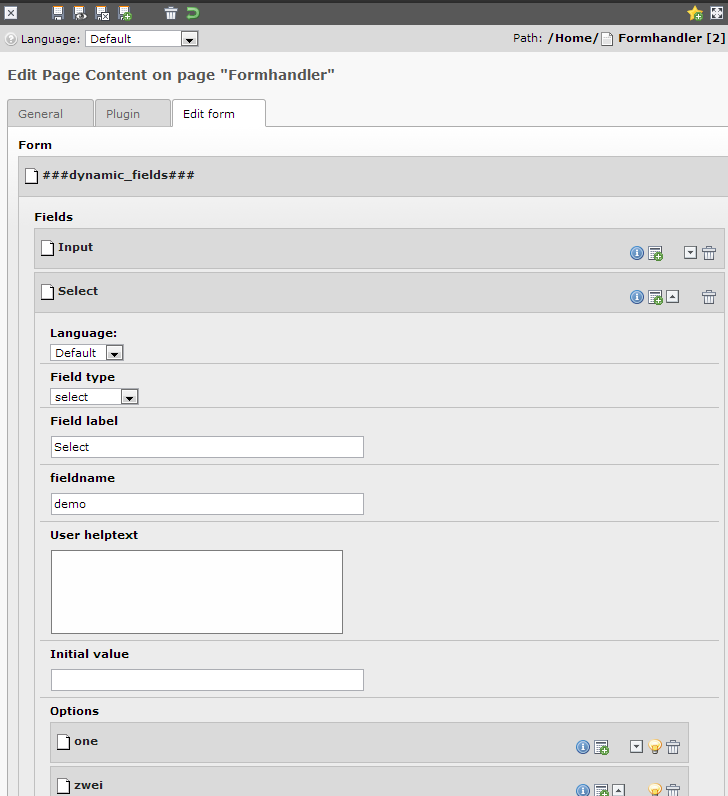 For each "dynamic" region in formhandler_backend there is a
###dynamic_xyz### marker in the plugin where editors can create new
fields:
For each "dynamic" region in formhandler_backend there is a
###dynamic_xyz### marker in the plugin where editors can create new
fields:
Upon saving of the plugin, a new formhandler typoscript template is created - reflecting the changes made in the backend.
The handling of the form on the website is processed by formhandler alone (based on that generated template) without interference of formhandler_backend.
Users manual
Add a form
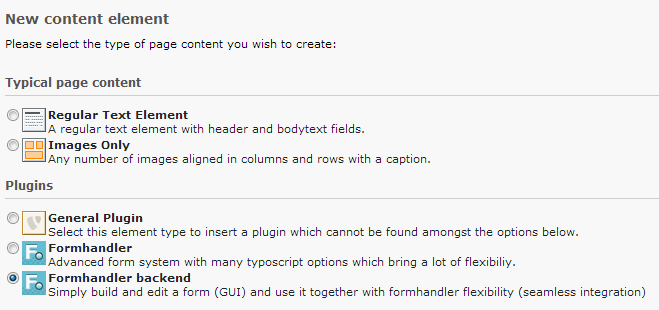
To add a new form to a page, you can add a new content element. Select the plugin “Formhandler backend”.
 Enter a header as requested in the tab “General”. Save the form,
before you switch to the tab “Plugin”.
Enter a header as requested in the tab “General”. Save the form,
before you switch to the tab “Plugin”.
Pretemplate selection and form redirection
Next you can select among the available pretemplates. Pretemplates offer the basic structure and definitions of a form. After selection, the form is automatically saved and refreshed.
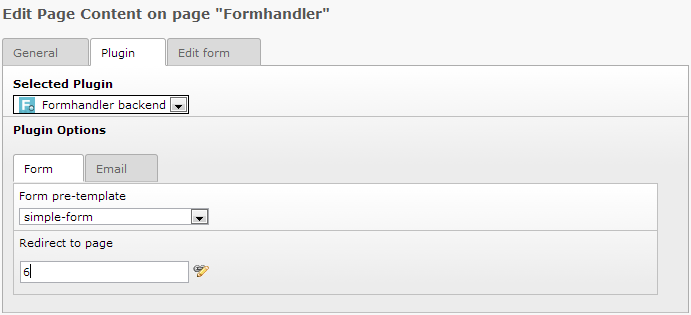 If you want to redirect the user to a confirmation page after he has
successfully submitted the form, enter a redirection page. If
redirection isn't defined, no redirection will take place after
submission of the form. Switch to the tab “Email”.
If you want to redirect the user to a confirmation page after he has
successfully submitted the form, enter a redirection page. If
redirection isn't defined, no redirection will take place after
submission of the form. Switch to the tab “Email”.
Configure the form-to-mail
There are 2 email sections that can be configured. If they are not configured, no email is sent after form submission. The first section is to send an email to the user that submitted the form, the second section deals with the email sent to an administrator.
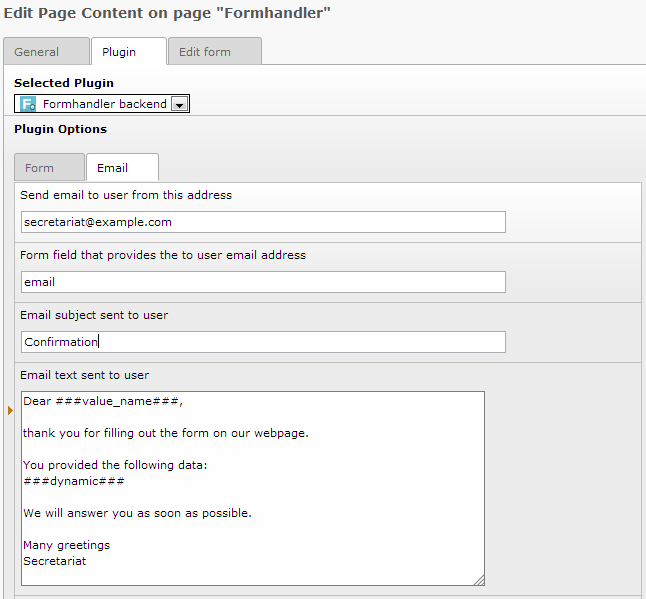
User Email
The first line in the user email section defines the email-address, from which the email is sent to the user. The second line defines the form field in the frontend form, which will contain the user's email- address. The third line contains the email subject. In the email text area, you can use text and markers.
- The marker ###dynamic### will list all user submitted fields that you add to the form. Other fields, which might be present in the pretemplate, are not considered. You can add them separately (see below).
- The marker ###value_X### can be used to send the submitted value of a named field. The field name should replace the X.
- Moreover you could use labels like ###LLL:X###, where X stands for the label of field X.
Admin email
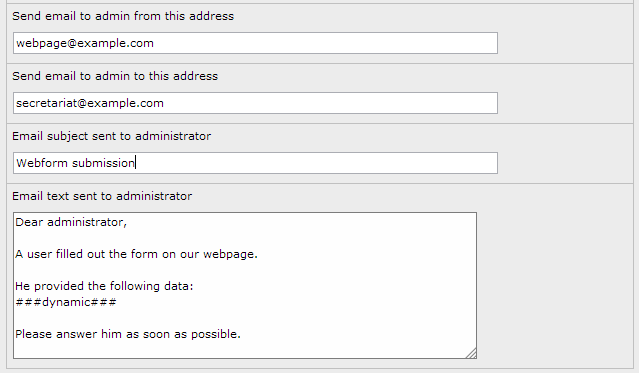 Similar to the user email, the admin email section has a sender email
address, a receiver email address, an email subject and a text part,
that is submitted to the administrator. In the text part, the same
markers can be used as in the user email section.
Similar to the user email, the admin email section has a sender email
address, a receiver email address, an email subject and a text part,
that is submitted to the administrator. In the text part, the same
markers can be used as in the user email section.
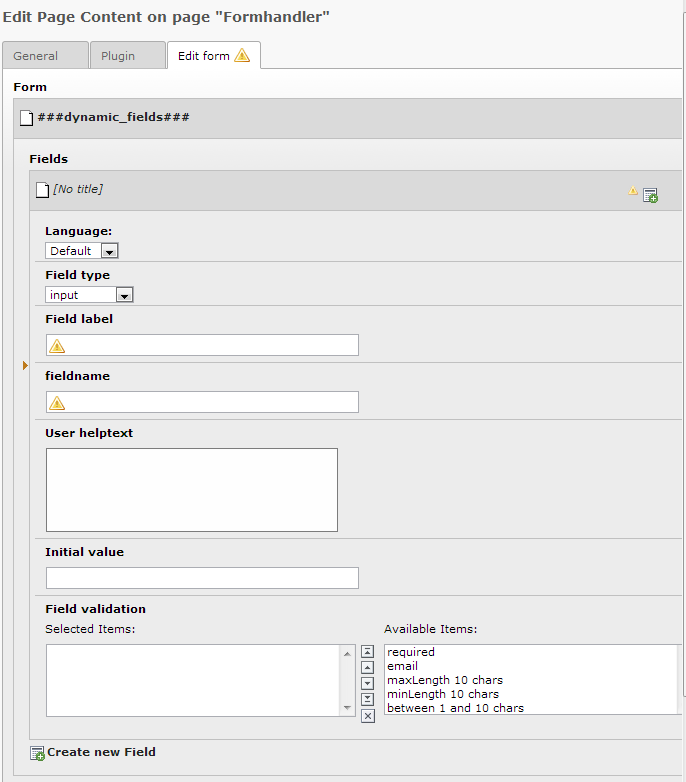
Add and edit form fields
Switch to the tab “Edit form”.
 If thetab appears empty, save the plugin and re-open the tab.
According to the selected pretemplate, one or more form sections appear in the tab “Edit form”. In all these sections, form fields can be added, edited, moved and deleted. There are generally two types of form fields, such with one value like input fields, textareas, checkboxes, buttons and helptext. Or such with a group of values like selects or radio groups. If you select a field type, the display changes automatically, showing only the possible necessary and optional parameters. A field label is allways mandatory and on most fields, there should be a field name as well. Once refreshed you might have to reopen the new field by clicking on its title “[No title]”.
Lets first consider the single value fields on the sample of input fields.
- Don't consider the language select if you are working in the default language (it's only displayed for translation reasons).
- Enter a field label.
- Enter a field name. The field name has to be unique for the form. Only small letters and no whitespace and special characters are allowed.
- You can add a helptext and an initial value if you want.
- Choose one or more field validations.
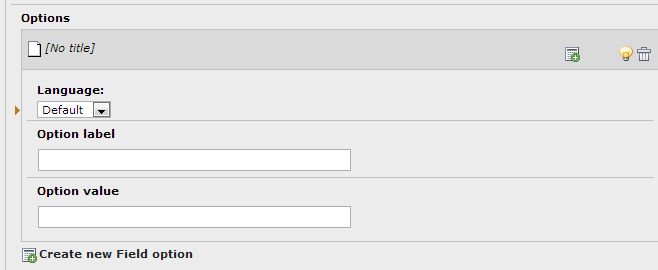
 Add and edit field options
^^^^^^^^^^^^^^^^^^^^^^^^^^
Add and edit field options
^^^^^^^^^^^^^^^^^^^^^^^^^^
If you choose a group type field, you have to enter options. Add and edit options the same way like fields. With options, there is only the label and the value. As field names, option values should be in lower case letters and without whitespace, provide unique values for each form field.
 Update System Cache
^^^^^^^^^^^^^^^^^^^
Update System Cache
^^^^^^^^^^^^^^^^^^^
Formhandler Backend forms are integrated through file templates. This requires to clear the system cache after you changed and saved the form in the backend.
In Typo3 Version 6.2, system cache isn't available in a standard installation. Therefore you need to display the system cache flush function. You have to set “options.clearCache.system = 1” in the user TSconfig.
(see http://kronova.net/tutorials-codeschnipsel/typo3/typo3-flush- system-caches-aktivieren.html)
Work with multiple languages
First build the form in the default language, then translate it
Due to TYPO3-IRRE restrictions, we can only offer an easy translation of a complete content element. By doing so, you get all relations and necessary sys-language selections properly done. Therefore we, strongly recommend to build the complete form in the default language before you translate the content element into other languages.
Before you can translate a content element in TYPO3, remember that you need to have the sys-languages on the site root (normally your administrator configures this for you) and the translation of the page itself into the requested other languages. To translate the content form, use the “copy default content elements”-button in the TYPO3page- module.
Another thing that is necessary for multiple languages support, is that your administrator has extended the pretemplate-language file with additional language markers (see Adding multiple languages).
Due to some programming restrictions, after saving a translation, you
have to go back to the original language and save the plugin again
(see "Known issues").
Adding fields or options after translation
It is possible to add fields or options in other languages after the content element of the form has already been translated before, but some manual work is required. Please fulfill the following steps:
Add the field or option in the default language as usual. Save the default content element.
Add the same field or option in all other languages at the same position. Enter field label and name (the field name is irrelevant in translations though mandatory - so use the same you used in the original language) for a field, enter option label for option.
Change the fields/options language selection to the corresponding language of the content element. Save the translated content element.
Now reopen to the newly added field/option in the translated content element and select the value field/option from the original language. Save the translated content element again.
Administration
Reducing complexity for the user and adding flexibility for the administrator is a hard task. Within this extension we tried to keep all as simple and beautiful as possible. Considering the limits of TYPO3, we rely on different ways of problem solving. So you might find the solution to your administration needs in installation configuration, in adding template-entries into the field type and validation database tables (both described in Chapter Configuration), or you find it in this chapter, were we describe how you can add a form to a page, how to configure and translate this form and how to deal with pretemplates.
How does it work?
After installation of the extension, import of the static database data and updating the extension configuration, the plugin “Formhandler backend” is directly available as new plugin content element. You don't have to include any static templates to your site template. By adding the plugin to a page, you provide a backend form management tool, that automatically integrates into a formhandler plugin that displays the defined form in the frontend. How does this work and where can you take changes? First of all, this extension is an addon for the formhandler-extension. It does only work, if “Formhandler” is already installed.
Formhandler backend is a one-way template editor, that stores dynamic form data in the database and assembles the form-templates in the file-system. So-called pretemplate files are completed with form data from the TYPO3-backend and stored in the upload-folder. The plugin generates as well sys-template-typoscript, which integrates the configuration- and template-filesinto of the form into the plugin content element. If you want to take direct changes on the templates, you should allways work with the pretemplates. The assembled files in the upload-folder are overwritten every time the plugin is saved in the backend.
In the folder EXT:formhandler_backend/res/samples/ we provide two samples for pretemplates, a simple form and a fullfledged form. The simple form as well is available in the folder EXT:formhandler_backend/res/pretemplates/. After installation, the simple form is available in the formhandler backend plugin. The samples are based on http://examples. TYPO3 -formhandler.com/start/ . So it is a good idea to have a look at this link, if you want to create another pretemplate from scratch for a specific need. You can as well upgrade the existing samples. Simple form is intended for bottom up construction, fullfledged form should be reduced top down. Simple form can work as an out-of-the-box form-to-email tool without any adaptations, fullfledged form provides a sample, how pretemplates should be constructed and isn't intended for a direct use. Or you can change the extension configuration “pretemplates” (see Extension configuration) to the sample-folder to play with the provided samples.
If you want to use formhandler backend as a template editor, you could export the generated template-folders and the form-integration- typoscript, transfer both to another site, there you don't even need to have the formhandler backend extension installed (see Exporting created forms (backup to formhandler)).
Pretemplate adaptations
To get an overview of the file structure in the pretemplates folders, please check the chapter Extension configuration.
Fieldset sections
Edit the file html/template.html. Every section with a set of fields, that can contain dynamic form data, is marked with a marker like ###dynamic_XY###. XY is the name of the section. It has to be unique for the form. Formhandler backend creates a set in the backend form, after a pretemplate form has been selected by the user and the plugin content element is saved. The set is an IRRE-element, so the user can freely add fields, options, select validations or change the field types within a section.
Adding multiple step forms
Edit the file html/template.html in the corresponding pretemplate folder. For multiple step forms you need templates for every step. According to the formhandler way of dealing with this issue you can add template code within brackets like
<!-- ###TEMPLATE_FORM1### -->
<form action="###REL_URL###" method="post" class="yform columnar" id="###fieldname###" enctype="multipart/form-data" >
  ###HIDDEN_FIELDS###
  <h2>###LLL:label_fieldset###</h2>
###dynamic_firststep###
<div class="type-button">
  <input type="submit" ###submit_nextStep### class="button submit" value="###LLL:next###" />
</div>
</form>
<!-- ###TEMPLATE_FORM1### -->

<!-- ###TEMPLATE_FORM2### -->
<form action="###REL_URL###" method="post" class="yform columnar" id="###fieldname###" enctype="multipart/form-data" >
  ###HIDDEN_FIELDS###
  <h2>###LLL:label_fieldset###</h2>
###dynamic_secondstep###
<div class="type-button">
  <input type="submit" ###submit_nextStep### class="button submit" value="###LLL:submit###" />
</div>
</form>
<!-- ###TEMPLATE_FORM2### →
and so on. ###dynamic_firststep### will contain the first section of fields, ###dynamic_secondstep### the section section.
Please also check the ts-setup.txt file to add default values and validators markers (see Fehler: Referenz nicht gefunden).
Adding static form fields
As you can see in the template sample for multiple step forms, you are free to add static form fields directly into the pretemplate file, like we have done with the next- and submit-button. The static fields are allways displayed in the form, no matter what dynamic fields the user added. You don't need any static form field, only the form start and end code is required in the template file, even the submit button could by added dynamically by the user.
To give you a sample on how to add static form fields, we use the mastertemplate-way this time. It's nicer to reuse template-code, the static field-replacements are located in the file html/mastertemplate.html. Edit the file html/template.html in the corresponding pretemplate-folder.
<!-- ###TEMPLATE_FORM1### -->
###master_form-start_contact###
  ###master_section-start###
        ###master_input_firstname###
        ###master_input_lastname###
        ###master_input_birthday###
        ###dynamic_address###
        ###master_textarea_message###
  ###master_section-end###
###master_form-end###
<!-- ###TEMPLATE_FORM1### →
As in multiple step forms, dynamic form parts (here address) can be added everywhere within a form and there could even be multiple set sections within one form.
Adding formhandler-tools
The “Formhandler”-extension, on whichs top formhandler backends builds, offers many very flexible configuration and data treatement tools. You can add and use any of this tools. Please check the formhandler-documentation for any details http://www. TYPO3 -formhandler.com/documentation/getting-started/ . You might as well check the way we integrated some of these tools in the fullfledged form sample. In this form-pretemplate we provide a multiple steps, multiple language form with actions like file upload, database storage and auto-db addition of dynamic user-added fields.
Edit the file ts/ts_setup.txt in the corresponding pretemplate- folder. For formhandler backend to work properly, there have to be the following markers in the following places:
###dynamic_defaultValues_X###: This dynamic section covers the typoscript-entries for default field values. X stands for form number. If you don't have a multistep form, it should be 1, on multistep forms, every step should have such a marker with X replaced by the number of the step. The marker(s) should be placed at
plugin.Tx_Formhandler.settings.predef.[formname].preProcessors {
    1.class = Tx_Formhandler_PreProcessor_LoadDefaultValues
    1.config {
      1 {
###dynamic_defaultValues_1###
      }
//      2 {
//###dynamic_defaultValues_2###
//      }
//      ...
    }
  }
###dynamic_validators_X###: This dynamic section covers the typoscript-entries for field validators. X stands for form number. If you don't have a multistep form, it should be 1, on multistep forms, every step should have such a marker with X replaced by the number of the step. The marker(s) should be placed at
plugin.Tx_Formhandler.settings.predef.[formname] {
        1.validators {
                1.class = Validator_Default
                1.config.fieldConf {
###dynamic_validators_1###
                }
        }
//      2.validators {
//              1.class = Validator_Default
//              1.config.fieldConf {
//###dynamic_validators_1###
//              }
//      }
//      …
}
Adding multiple languages
Formhandler backend offers multiple language support. To have consistent field names, all basic field data is covered by the default language entry. Only labels and messages are translated into other languages. This makes it a bit hard to update a form in an other language after a fundamental change of the form structure. But form- extensions like db-storage are kept consistent for all languages. There are two things to consider when we translate a form: the plugin content element and the lang.xml-file of the pretemplate.
For the plugin content element, the easiest way to deal with multiple languages is to build the dynamic part of the form in the default language, then to translate the content element into the other languages. All sys_language references are then automatically added in the correct way. If the form structure changes after translation, and new fields or options have to be added, there is a workaround described in Adding fields or options after translation. This workaround is necessary due to IRRE restrictions in TYPO3.
Edit the lang/lang.xml in the corresponding pretemplate-folder. In this file, formhandler provides all labels and messages of a form. If you have static fields you should enter labels in this file. As well you should edit error messages, e.g. those which are generated by the field validations. All dynamic field and option texts are automatically added to this file.
Therefore, the following markers and positions are required:
###dynamic_default###: this marker covers the default language. It should be between the brackets:
<?xml version="1.0" encoding="utf-8" standalone="yes" ?>
<T3locallang>
        <meta type="array">
                <description>Language labels for Fullfledged Form</description>
        </meta>
        <data type="array">
                <languageKey index="default" type="array">
###dynamic_default###
                </languageKey>
        </data>
</T3locallang>
###dynamic_X###: this is the marker for the any other language. The X must correspond to the sys-language shortcut (like en,de,it,fr,…). Place the marker(s) in the above xml-code as follows:
           <languageKey index="default" type="array">
###dynamic_default###
                </languageKey>
                <languageKey index="de" type="array">
###dynamic_de###
                </languageKey>
                …
Exporting created forms (backup to formhandler)
Once a form has been edited created, you might want to backup the form configuration or copy it to another website. The explicit backup of a formhandler backend plugin requires the form configuration folder to remain on its proper path and a dump of the database tables. The described workaround is intented for an implicit export a form and integrate it on the same or another website by the means of the formhandler plugin only.
To export a form you should consider the form configuration folder and the sys-template typoscript. The configuration folder is stored with all necessary files recursively in the directory uploads/tx_formhandlerbackend/templates/. You find the folders including the name of the pretemplate, which was used to build the form and the id of the content element, that represents the form. The folder name can be changed and it can be placed wherever you want within the TYPO3-installation. To backup, just zip the folder of the wanted form.
Once you have the form configuration folder in your TYPO3-installation, you need to add the following includes to on of your sys-templates above the page, where you need the form:
constants
<INCLUDE_TYPOSCRIPT: source='FILE:/[path to form configuration folder]/ts/ts_constants.txt'>
setup
<INCLUDE_TYPOSCRIPT: source='FILE:/[path to form configuration folder]/ts/ts_setup.txt'>
After that you can simply add a formhandler plugin and select this configuration in the plugin-tab of the content element.
Configuration
Installation
At installation, make sure you update the extension twice: once for
the "Database update" (in order to import the database tables with the
required data for field types and field validation types) and once for
the "Configuration" update to add the initial extension configuration
to localconf .
Installation is simple and you don't have to add any static template to add the formhandler backend to the plugin list of the content elements.
Static Data
The types and validations are suggestions and correspond to the normal needs by building a form. You can use your own type-set and validation-set or you can change the suggested types or add your own field types and validations to the database. If you want to do so, you should not forget to unselect the boxes to not import the static data and to not overwrite your changes.
The following data and markers must be provided in these two tables:
Field types static data
Simplified, we can speak of form fields in two ways. First, there are single types like a text field, a checkbox or a submit button. For these fields, we need to provide a template wrap for the form and the email with the following markers (some are optional):
###fieldname### will be replaced with the field name.
###LLL:###fieldname###### is the formhandler notation for the label of a field. The label will be added dynamically to the language-file and offers multilanguage support.
###is_error_###fieldname###### defines a place, where a possible error mark as defined in typoscript-config (ts/ts_setup.txt) will be displayed. This marker can be used for adding a class to the field wrap.
###required_###fieldname###### defines a place, where a possible required distinction as defined in typoscript-config (ts/ts_setup.txt) will be displayed. Normally, an asterix is used for this intention. The option “required” itself is defined in the validations.
###error_###fieldname###### defines a placeholder for the error message as defined by the form validations.
###formValuesPrefix### is the prefix for the form as defined in typoscript-config (ts/ts_setup.txt)
###value_###fieldname###### corresponds to the value of the field. The predefined value or the submitted value will be displayed in this placeholder.
###LLL:###fieldname###.notice### is a placeholder for the helptext.
###LLL:###fieldname###.validation### is a placeholder for html5-additions as defined by the form validations, could be used for jquery-additions as well.
Second, there are multiple field types like radiobuttons or selectorboxes. For those fields, there is moreover an option part, which consists of the following markers:
###options### define a placeholder for the options in the main template part of a field (see above).
###value### is the placeholder for the value of an option.
###LLL:###fieldname###.###option###### is the placeholder for the label of an option. The label will be added dynamically to the language-file and offers multilanguage support.
###selected_###fieldname###_###value###### or ###checked_###fieldname###_###value###### are the placeholders for the selected or checked statement. The predefined value or the submitted value will be considered in this placeholder.
Field types implement a different amount of parameters to be filled by the backend user. That's why we change the backend-display according to the field type. If you add more field types or change the extensions-field-types, you should also think to upgrade the TCA- definition for 'tx_formhandlerbackend_field'. You could add the following array-item to EXT:formhandler_backend/tca.php
$TCA['tx_formhandlerbackend_field']['types'][X] = array('showitem' => 'sys_language_uid;;;;1-1-1, l18n_parent, l18n_diffsource, hidden;;1, is_type, label, name, instructions, value, options, validation, fieldset');
Where X represents the uid of the added tx_formhandlerbackend_type- element. You can remove parameters according the need of the specific field type, but at least there should be all language fields, is_type, label, name, fieldset.
Template parts for dynamic field types and field validations are not
taken from the pretemplate's formhandler mastertemplate, but are added
in the backend as records. By default, they are both saved on the site
root page with id 0.
Field validations static data
Forms can be validated server- and/or client-side with Formhandler Backend. Validations consists of a name to recognize them.
For server side validation, Formhandler Backend fully relies on the formhandler engine, see http://www. TYPO3 -formhandler.com/documentation/error-checks/ . Serverside validation is dynamically added to the validation-marker in ts/ts_setup.txt. According to the formhandler engine there is a field for first level typoscript and a multiple lines field for second level typoscript.
For clientside validation, there is a validation field that represents HTML5 or jQuery validation as well. The content of this field is displayed in the field type marker ###LLL:###fieldname###.validation###, which is stored in lang/lang.xml. We suggest to use the simpler html5-validation, because it doesn't depend on a further javascript library. If you need javascript validation, try http://ericleads.com/h5validate/ which allows to validate forms with jQuery based on HTML5 markup alone.
Multiple field types and validations in one installation
With a normal installation, the field types and validations are located at site root, means on page with id=0.
In case that you have different form types or different sites in one installation, that require different field types and validations or different types of markers and wrap arrangements for form fields, we added the possibility to change or multiply the storage location of the field types and validations. If you want to do so, you will have to change the TCA first (EXT:tca.php), set the rootLevel of the tables tx_formhandlerbackend_type and tx_formhandlerbackend_validation to 0:
$TCA['tx_formhandlerbackend_type']['ctrl']['rootLevel'] = 0;
$TCA['tx_formhandlerbackend_validation']['ctrl']['rootLevel'] = 0;
You could store field types and validations on multiple pages. To control, which location is considered, use the page-ts-config variables:
TCEFORM.tx_formhandlerbackend_field.is_type.PAGE_TSCONFIG_ID = uid
TCEFORM.tx_formhandlerbackend_field.validation.PAGE_TSCONFIG_ID = uid
Where uid represents the page-id, where the field types and validations are stored. As you can see, you can control field types and validations seperately.
Extension configuration
Further on, you can adapt the following properties in the configuration of the extension (by using the extension manager):
pretemplates
Property
pretemplates
Description
Pre-templates directory.
Directory where pre-templates are stored
Default
EXT:formhandler_backend/res/pretemplates/
Data type
path
ts-contants
Property
ts-contants
Description
Relative path to typoscript-constants file.
Path to file starting from pretemplate subfolder. Has to be consistent, if you install different pretemplates.
Default
ts/ts_constants.txt
Data type
path
ts-config
Property
ts-config
Description
Relative path to typoscript-config file.
Path to file starting from pretemplate subfolder. Has to be consistent, if you install different pretemplates.
Default
ts/ts_setup.txt
Data type
path
html-template
Property
html-template
Description
Relative path to html template-file.
Path to file starting from pretemplate subfolder. For multistep forms, all form-templates have to be stored in one file. Has to be consistent, if you install different pretemplates.
Default
html/template.html
Data type
path
mailuser-template
Property
mailuser-template
Description
Relative path to user-email-template file.
Path to file starting from pretemplate subfolder. Has to be consistent, if you install different pretemplates.
Default
html/email-user.html
Data type
path
mailadmin-template
Property
mailadmin-template
Description
Relative path to admin-email-template file.
Path to file starting from pretemplate subfolder. Has to be consistent, if you install different pretemplates.
Default
html/email-admin.html
Data type
path
lang-template
Property
lang-template
Description
Relative path to typoscript-config file.
Path to file starting from pretemplate subfolder. Has to be consistent, if you install different pretemplates.
Default
lang/lang.xml
Data type
path
templates
Property
templates
Description
Templates directory.
Directory where templates are copied to (must exist)
Default
uploads/tx_formhandlerbackend/templates/
Data type
path
marker
Property
marker
Description
Marker for dynamic parts in pre-template files
Default
###dynamic###
Data type
text
email_html_dynwrap
Property
email_html_dynwrap
Description
Email-wrap: Overall wrap for dynamic part in html-emails
Default
<table>|</table>
Data type
text
email_html_wrap
Property
email_html_wrap
Description
Email-wrap: Wrap for textparts in html-emails
Default
<p>|</p>
Data type
text
sys_template_write
Property
sys_template_write
Description
Automatic frontend-integration.
Should we create or write directly into the sys_template entry on the page, where the configuration folder is located? This feature is required for an automatic frontend-integration.
Default
TRUE
Data type
boolean
Normally, you won't need to change any of these configuration parameters. The paths of the pretemplates and templates directories are needed to let the extension know, in which directory should be searched for pretemplates and to which directory the assembled templates should recursively be copied. The path parameters describe the relative file structure of those files.
The email-wraps are applied to html-mails. There is an overall wrap and a wrap for the single text-entries in the mail.
A configuration value that needs attention is the marker ###dynamic###. This marker points to all different dynamic parts in the pretemplate files. The extension searches and replaces these markers with dynamically generated html, xml and typoscript. If you change the marker configuration, don't forget that the first part (stem) of the markers described in the following should be adapted in the pretemplate files correspondingly.
For different template parts, there are some additions to the stem of the marker:
- ts_setup.txt: In typoscript, we add default values and validators of a form. Therefore, the second part of the marker is either defaultValues or validators. Then, for multiple forms, the third part of contains the number of the form. For on step forms, we just add a 1. Thus we get ###dynamic_defaultValues_1### and ###dynamic_validators_1### for simple forms.
- template.html: In the html-template, we need to add an unique section name as second part of the marker like “fields” resulting in ###dynamic_fields###. The extension allows multiple dynamic formfield parts. Every section should be present in the html-template.
- email-user.html and email-admin.html: In both mail-templates there is plaintext part marked with ###dynamic_plain### and a html part marked with ###dynamic_html###.
- lang.xml: For multilanguage forms, the second part of the dynamic markers in the locallang-file should consist of the language-key. In a single-language environments with the language-key “default”, the marker ###dynamic_default### results. After adding a language like german or french to the default language, this would request ###dynamic_de### or ###dynamic_fr###, capsuled in the necessary xml of course.
You will find samples for all possibilities in the fullfledged form provided by the extensions samples itself.
To integrate a form configuration into a frontend-plugin, we need to add typoscript to a sys-template. If you select automatic integration, the necessary sys-template with the typoscript is either generated or added to the extension-sys-template on the page that contains the plugin. If you don't want this function and add the typoscript manually, you can disable this function.
Known issues
So far we tell you one difficulty and two security warnings:
- The form configuration data is stored directly only in the default language. If you work with translations, you need to save the translated content elements. To make your changes come true in the frontend, you thereafter have to save the plugin in the default language again.
- To write the template files, we made use of non-TYPO3-functions. This makes it possible to write files regardless of the TYPO3-file- permissions of the user. There was no way to construct the extension on another base, storage would only work for administrators.
- It is impossible to check all impacts to already existing sys- templates on the page, where the plugin content element is added to. Therefore we offer the extension configuration parameter to add the necessary typoscript manually.
If you make experience with or find a solution to these problems please report them to us. If you find other issues, please report them as well. Please report anything to our TYPO3Forge ( http://forge. TYPO3 .org/projects/extension- formhandler_backend/issues).
ChangeLog
The following is an overview of the changes in Formhandler Backend. For more details, see the online ChangeLog ( http://forge. TYPO3 .org/projects/extension- formhandler_backend/roadmap) .
0.1.0
Version
0.1.0
Changes
Initial public release.
0.1.1
Version
0.1.1
Changes
Typo3 6.2 compatibility.
Allow option field values in capital letters.
20