DEPRECATION WARNING
This documentation is not using the current rendering mechanism and is probably outdated. The extension maintainer should switch to the new system. Details on how to use the rendering mechanism can be found here.
Advent calendar
| Author: | jari-hermann.ernst |
|---|---|
| Created: | 2011-11-21T16:31:11 |
| Changed by: | Jari-Hermann Ernst |
| Changed: | 2013-11-26T21:02:02.350000000 |
| Classification: | jhe_adventcalendar |
| Description: | The keywords help with categorizing and tagging of the manuals. You can combine two or more keywords and add additional keywords yourself. Please use at least one keyword from both lists. If your manual is NOT in english, see next tab "language" ---- forEditors (use this for editors / german "Redakteure") forAdmins (use this for Administrators) forDevelopers (use this for Developers) forBeginners (manuals covering TYPO3 basics) forIntermediates (manuals going into more depth) forAdvanced (covering the most advanced TYPO3 topics) ---- |
| Keywords: | forAdmins (use this for Administrators) |
| Author: | Jari-Hermann Ernst |
| Email: | jari-hermann.ernst@bad-gmbh.de |
| Language: | en |

 Advent calendar
Extension Key: jhe_adventcalendar
Language: en
Version: 2.0.0
Keywords: forAdmins (use this for Administrators)
Copyright 2013, Jari-Hermann Ernst, <jari-hermann.ernst@bad-gmbh.de>
This document is published under the Open Content License
available from http://www.opencontent.org/opl.shtml
The content of this document is related to TYPO3
- a GNU/GPL CMS/Framework available from www.typo3.org
Table of Contents
`Advent calendar 1 <#__RefHeading__5708_1738894311>`_
`Introduction 3 <#__RefHeading__5710_1738894311>`_
`Installation 6 <#__RefHeading__7107_2102032169>`_
`Configuration 7 <#__RefHeading__1196_1696300574>`_
`Tutorial 8 <#__RefHeading__31523_818911409>`_
Displaying the Advent calendar 10
`Known problems 14 <#__RefHeading__31525_818911409>`_
`To-Do list 15 <#__RefHeading__477_413120346>`_
`ChangeLog 16 <#__RefHeading__31623_818911409>`_
Introduction
What does it do?
An Advent calendar is a special calendar which is used to count the days of Advent in anticipation of Christmas. Usually it starts on December, 1 st .
This extension provides such an Advent calendar for you web project.
It replaces my old extension with the same name from 2011 which was not based on Extbase and Fluid and had this annoying typo in its extension key: jhe_adventcalender
Ext:jhe_adventcalender ist outdated and will be marked as obsolete in TER within the next few days. Do not use it anymore!
Screenshots
Frontend
The content element displays the given image for the Advent calendar showing the single wickets for each day in December before Christmas. The image map is generated with typolinks so we can use the start parameter of each page to make the areas clickable on the day of appearance and not before.
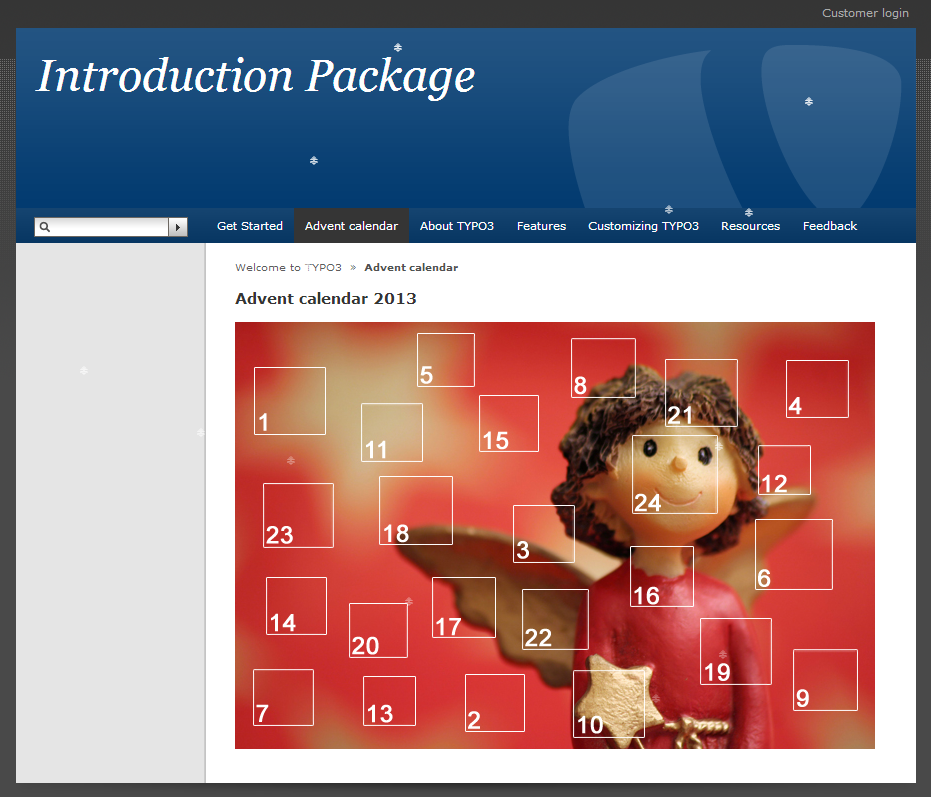 The extension has to modes:
The normal mode:By clicking on a single area the user is directed to a normal page of your site.
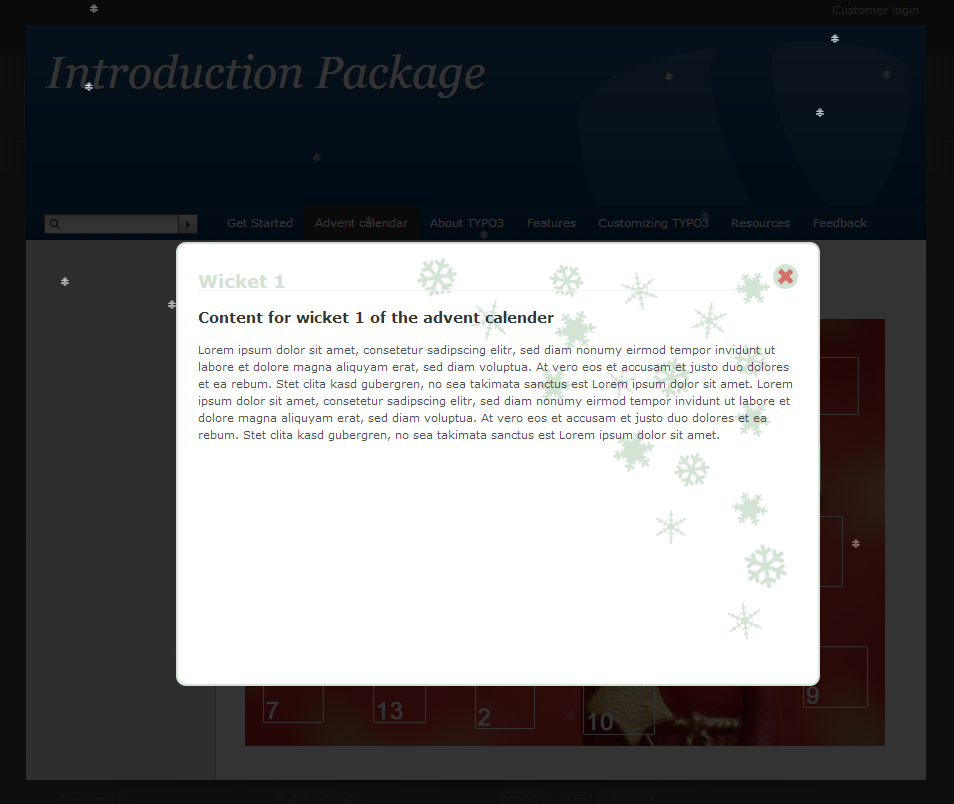
The AJAX way:Using jQuery the content of the target pages is displayed in a modal dialog box.
 Backend
"""""""
Backend
"""""""
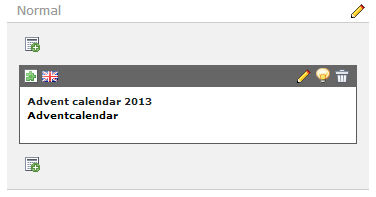
In the TYPO3 backend the extension provides a single content element with all the necessary data to be inserted in a multi-tab flexform.
 Features
- Select your own picture for the Advent calendar
- Use normal TYPO3 pages as the target for each wicket of the Advent calendar
- Use ajax or not for displaying the content of each wicket
- Let it snow if you want! Using the jQuery Snow Effect Plugin from Ivan Lazarevic ( http://workshop.rs/2012/01/jquery-snow-falling-plugin/ ) you can configure your own snowflakes in the days before Christmas.
Installation
To install this extension, just go the Extension Manager, download the extension from TER and install it the usual way.
If you are planing to use the AJAX alternative of the plugin you also have to add the Static Template provided by this extension to your typoscript template.
That's it...
Configuration
There is no further configuration to be done. Everything has to be set up at the content elements' flexform, which is shown in detail at the Tutorial part of this manual.
Tutorial
Preparations
What you need before you can start:
A picture with the 24 wickets on that fits to your web projects design and dimensions.
The HTML code for the image map based upon your picture.Example:
<map name="Map" id="Map">
  <area shape="rect" coords="19,45,91,113" href="#" alt="Wicket 1" />
  <area shape="rect" coords="230,352,290,410" href="#" alt="Wicket 2" />
  <area shape="rect" coords="278,183,340,241" href="#" alt="Wicket 3" />
  <area shape="rect" coords="551,38,614,96" href="#" alt="Wicket 4" />
  <area shape="rect" coords="182,11,240,65" href="#" alt="Wicket 5" />
  <area shape="rect" coords="520,197,598,268" href="#" alt="Wicket 6" />
  <area shape="rect" coords="18,347,79,404" href="#" alt="Wicket 7" />
  <area shape="rect" coords="336,16,401,76" href="#" alt="Wicket 8" />
  <area shape="rect" coords="558,327,623,389" href="#" alt="Wicket 9" />
  <area shape="rect" coords="338,348,410,416" href="#" alt="Wicket 10" />
  <area shape="rect" coords="126,81,188,140" href="#" alt="Wicket 11" />
  <area shape="rect" coords="523,123,576,173" href="#" alt="Wicket 12" />
  <area shape="rect" coords="128,354,181,404" href="#" alt="Wicket 13" />
  <area shape="rect" coords="31,255,92,313" href="#" alt="Wicket 14" />
  <area shape="rect" coords="244,73,304,130" href="#" alt="Wicket 15" />
  <area shape="rect" coords="395,224,459,285" href="#" alt="Wicket 16" />
  <area shape="rect" coords="197,255,261,316" href="#" alt="Wicket 17" />
  <area shape="rect" coords="144,154,218,223" href="#" alt="Wicket 18" />
  <area shape="rect" coords="465,296,537,363" href="#" alt="Wicket 19" />
  <area shape="rect" coords="114,281,173,336" href="#" alt="Wicket 20" />
  <area shape="rect" coords="430,37,503,105" href="#" alt="Wicket 21" />
  <area shape="rect" coords="287,267,354,328" href="#" alt="Wicket 22" />
  <area shape="rect" coords="28,161,99,226" href="#" alt="Wicket 23" />
  <area shape="rect" coords="397,113,483,192" href="#" alt="Wicket 24" />
</map>
This can easily be generated with a common HTML editor like Dreamweaver.
It is important that the order of the areas is correct because the extension rewrites the HTML code from line 1 to 24!
Prepare the pages for the content of the Advent calendar in the TYPO3 backend.You need 24 single pages with the content for the wickets.
To prevent the areas to be click-able before the appropriate date do not forget to set the start parameter of the page to that date and the stop date to 25 th of December!
 If you just use the “normal” mode nothing else has to be done here.
The target pages appear in your design just like the rest of your
project.
If you just use the “normal” mode nothing else has to be done here.
The target pages appear in your design just like the rest of your
project.
If you want to use the AJAX mode you have to be sure that you have added the Static Template provided by this extension to your typoscript template. It brings a new page type with typeNum 2412 that renders the output of the wicket pages to be used by ajax.
Note: By now the extension does not work with user or usergroup permissions on the target pages! This is under current development and I hope to release a solution for this soon!
 Displaying the Advent calendar
^^^^^^^^^^^^^^^^^^^^^^^^^^^^^^
Displaying the Advent calendar
^^^^^^^^^^^^^^^^^^^^^^^^^^^^^^
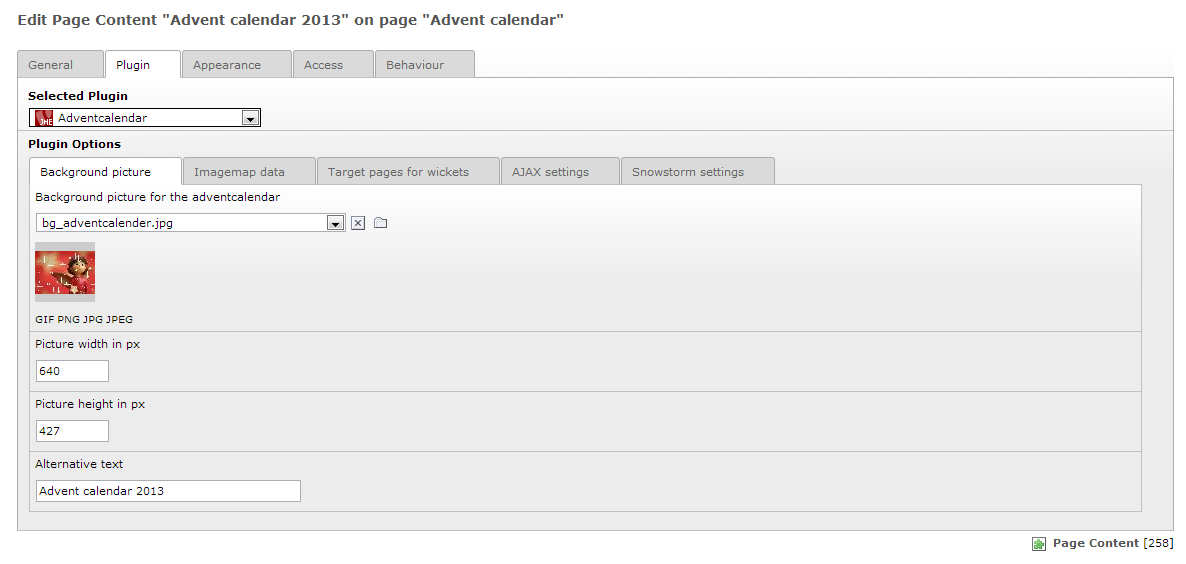
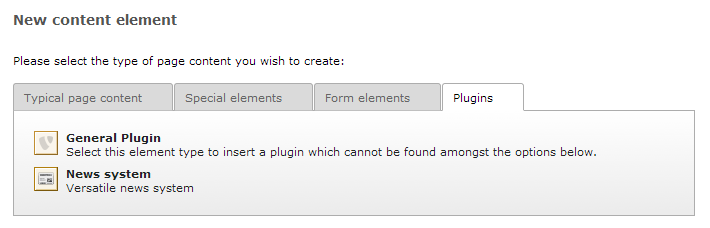
Create a new content element on the page you want by choosing 'Plugins' > 'General Plugin':
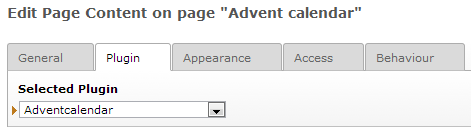
 Select the “Adventcalendar” plugin:
 Upload and select the picture for the Advent calendar in the first tab
'Background picture':
Upload and select the picture for the Advent calendar in the first tab
'Background picture':
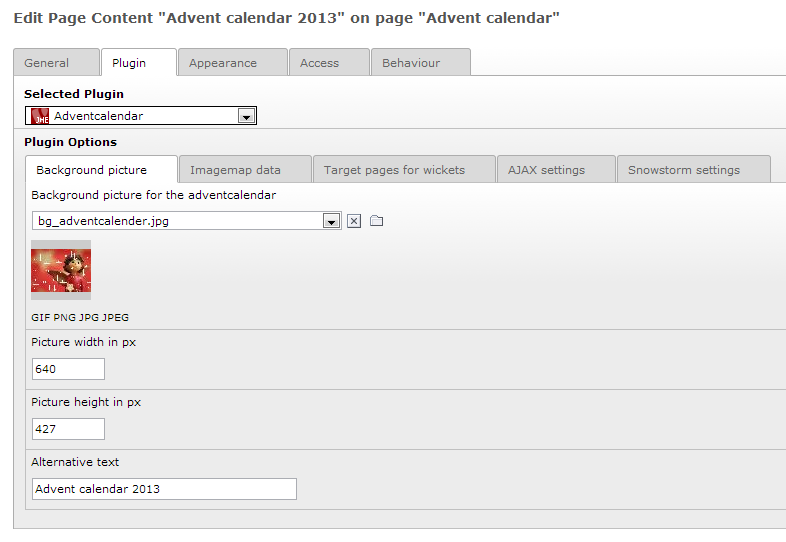 For the correct rendering of the plugin you also should insert the
measurements of the image and an alternative text.
For the correct rendering of the plugin you also should insert the
measurements of the image and an alternative text.
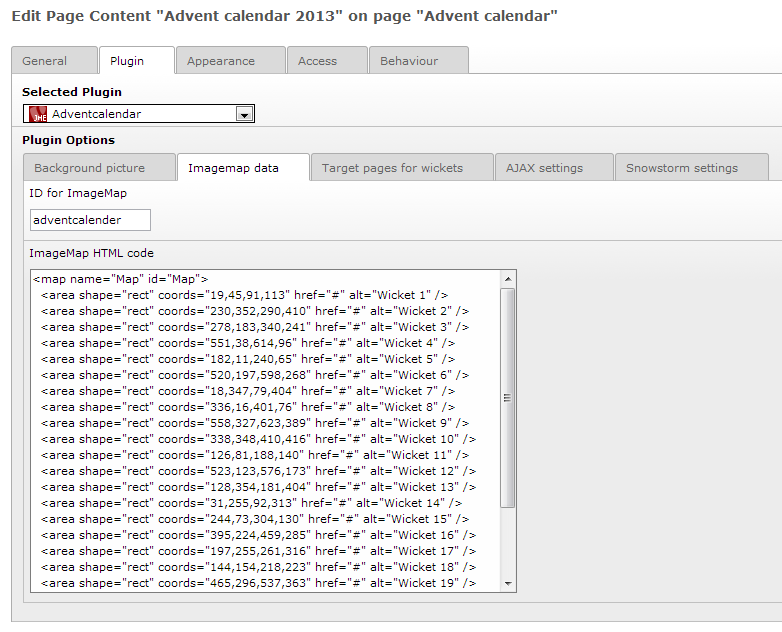 On the next tab you have to insert a name for the image and the image
map at first and then the prepared HTML code into the text field:
On the next tab you have to insert a name for the image and the image
map at first and then the prepared HTML code into the text field:
The insert fields of the next tab combine the rendering of the plugin and the prepared pages for the image maps area targets. Just insert the correct page ids:
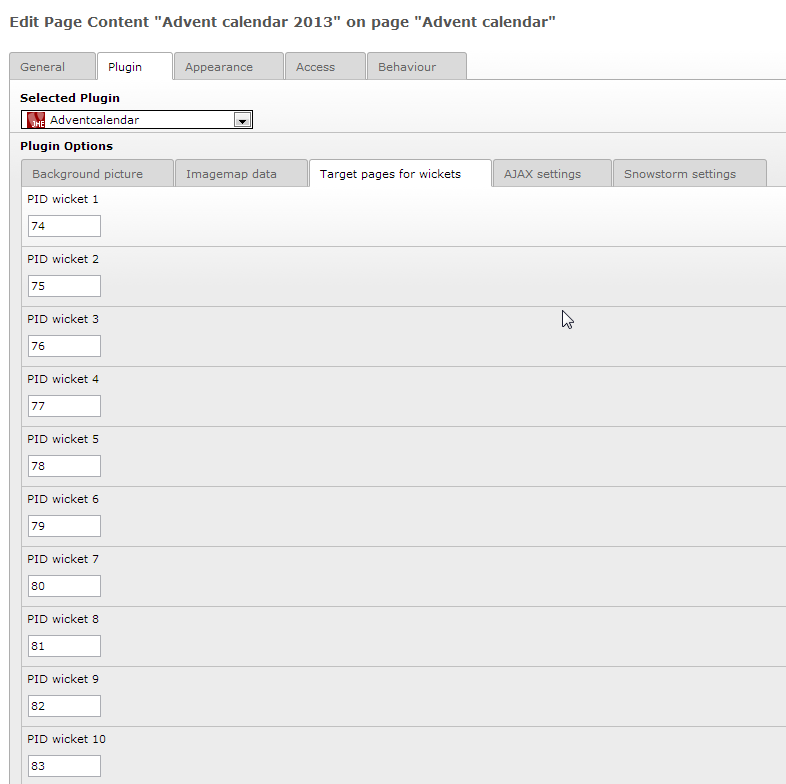 Note: If you change the order of the pages for your wicket's content
you also have to change the pids in this tab, too. Otherwise your
changes will have no effect on the links on your Advent calendar image
map.
Note: If you change the order of the pages for your wicket's content
you also have to change the pids in this tab, too. Otherwise your
changes will have no effect on the links on your Advent calendar image
map.
If you like to use the AJAX mode you have to check the box on the next tab and make some further settings for the modal dialog layer:
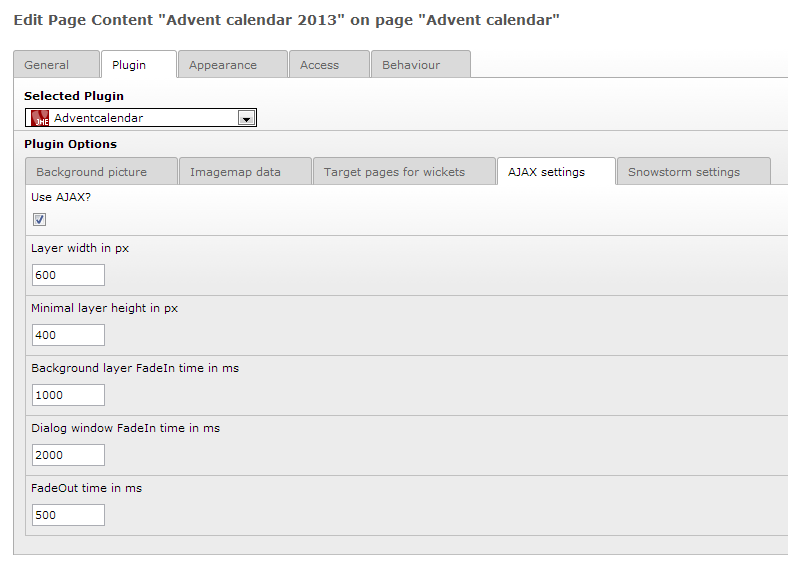 'Layer width in px' and 'Minimal layer height in px' define the
dimensions of the dialog box for the content and the other three
settings define the time in milliseconds the modal layer and the
dialog box need to fade in and fade out.
'Layer width in px' and 'Minimal layer height in px' define the
dimensions of the dialog box for the content and the other three
settings define the time in milliseconds the modal layer and the
dialog box need to fade in and fade out.
If you don't want to use the modal dialog mode just leave the 'Use Ajax?' box unchecked.
The last tab provides the settings for the jQuery Snow Effect Plugin from Ivan Lazarevic ( http://workshop.rs/2012/01/jquery-snow-falling- plugin/ ):
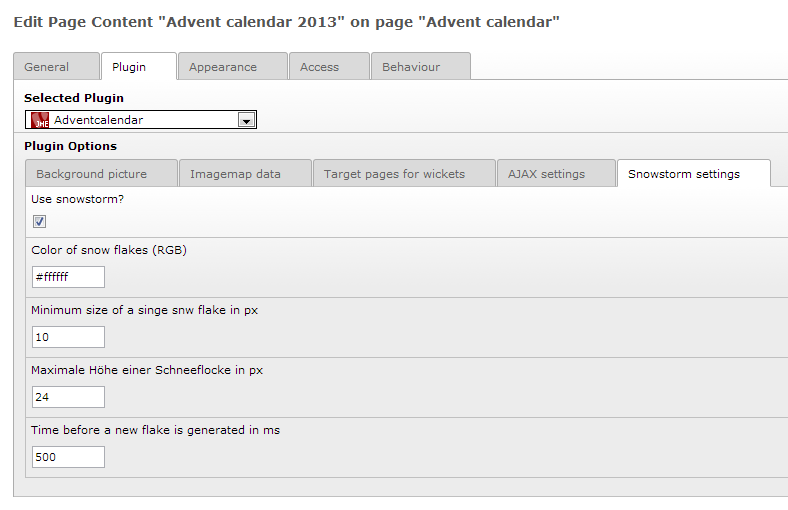 First of all you can decide whether to use it or not.
You can define a color for the snowflakes by inserting a rgb value (don't forget the '#'!).
With the last two boxes you can select the minimum and the maximum width of each snowflake.
The last form field has to be filled by the time that should pass before a new snowflakes is created in milliseconds (ms).Note: If you let it snow too heavily this will need a lot of CPU power on the client, so be careful with this! A period of 500ms worked fine with me.
Just save and see what's happening in the frontend... :-)
Known problems
By now the extension does not work in AJAX mode when the target pages have user or usergroup permissions. This is under current development and I hope to release a solution for this soon!Until then I recommend not to use usergroup access rights at this point of time.
If you find something else here is the link to the GitHub page of this project:
Advent calendar project on GitHub
Feel free to participate...
To-Do list
Nothing, but working on the point of the 'Known problems' part.
If you find something to do or have a issue, feel free to use the issue tracker on Advent calendar project on GitHub .
ChangeLog
2.0.0
Version
2.0.0
Changes
Complete new approach using Extbase and Fluid
0.2.0
Version
0.2.0
Changes
debugging: modal layer now swaps the whole page even if the dialog box is larger than the document itself
necessary changes in the manual
0.1.1
Version
0.1.1
Changes
debugging of some embarrassing typo :-/
0.1.0
Version
0.1.0
Changes
First TER upload (with manual)
0.0.12
Version
0.0.12
Changes
debugging the code rendering in the ajax mode
0.0.11
Version
0.0.11
Changes
some minor localization debuggings
0.0.10
Version
0.0.10
Changes
added the correct ext icons
0.0.9
Version
0.0.9
Changes
general code refactoringdebugging of generating the url to the page to be fetched for the ajax output
0.0.8
Version
0.0.8
Changes
included the check for an already integrated jquery library on includes it when necessarynew graphlical button for closing the dialog box
0.0.7
Version
0.0.7
Changes
debugging of the wrong behaviour of the dialogclose
0.0.6
Version
0.0.6
Changes
added an ajax loader pic to the dialog layer
0.0.5
Version
0.0.5
Changes
added ajax functionality for dynamically generating the target links
0.0.4
Version
0.0.4
Changes
added correct english translation
0.0.3
Version
0.0.3
Changes
added multilingualism to the content element's flexformmade most of the javascript settings configurable via flexform
0.0.2
Version
0.0.2
Changes
finalizing the ajax functionality (nearls 95%)added snowStorm script
0.0.1
Version
0.0.1
Changes
ajax functionality added - but does not work yet :-)
0.0.0
Version
0.0.0
Changes
initial code generated with kickstarter