DEPRECATION WARNING
This documentation is not using the current rendering mechanism and is probably outdated. The extension maintainer should switch to the new system. Details on how to use the rendering mechanism can be found here.
EXT: KB Shop
| Author: | Kasper Skårhøj |
|---|---|
| Created: | 2002-11-01T00:32:00 |
| Changed: | 2009-09-02T11:33:40 |
| Author: | Bernhard Kraft, Tomas Peterson |
| Email: | kraftb@kraftb.at, info@thomas-peterson.de |
| Info 3: | |
| Info 4: |
EXT: KB Shop
Extension Key: kb_shop
Copyright 2000-2002, Bernhard Kraft, Tomas Peterson, <kraftb@kraftb.at, info@thomas-peterson.de>
This document is published under the Open Content License
available from http://www.opencontent.org/opl.shtml
The content of this document is related to TYPO3
- a GNU/GPL CMS/Framework available from www.typo3.com
Table of Contents
EXT: My Extension 1
Introduction 1
What does it do? 1
Screenshots 1
Users manual 1
FAQ 1
Adminstration 1
FAQ 2
Configuration 2
FAQ 2
Reference 2
Tutorial 2
Known problems 2
To-Do list 2
Changelog 2
Introduction
What does it do?
This extension is a special kind of shop system which enables you to dynamically define the table structure of multiple tables similar like in the Extension kickstarter of TYPO3. This allows you to create a shopping system tailored perfectly to your needs. You create “Category” records which define the tables available in the system. Then you create property records like “Title” (Text field), “Description” (RTE field), etc. and assign those properties to the categories. The shop extension automatically creates an ext_tables.sql, ext_tables.php and tca.php file for the defined tables which makes them available like in TYPO3 like normal “News” or “Guestbook” tables.
But this is not the only sense of this extension. It also offers a very configurable FE Plugin which enables you to output lists generated from those tables – the FE plugin is some kind of “general data display” extension – but only allowing you to display tables generated by this extension. You can dynamically define criterias by which the displayed records shall get filtered. You can either choose to display only records with a criteria set to a specific predefined value or you can decide to let the choice which records to display to the website visitor and display “Criteria selectors” in the FE.
The FE plugin is completely extendable via TypoScript as all properties from the tables get passed through stdWrap and custom cObjects can get inserted into the FE Output which get's generated from HTML-Templates. You can not only insert the values of the fields which you created before but also the labels of the specific fields.
The extension supports multilinugal content.
The extension support a shopping basket by storing the user-data (ordered products, wishlist, etc.) in so called “virtual” tables. Those tables don't really get stored in the database but rather in the FE-User session of the visitor.
There exists a mailer extension (kb_shop_mailer) which allows to send mails on successful ordering. This is achieved via a hook. When a virtual-table (an basket) get's stored to the database it becomse an “order” - upon such an event a hook get's called which can perform various tasks like performing payment or simply sending mails.
Screenshots
This screenshot shows a property which is assigned ot a root- category/table and a record of the resulting table when edited:
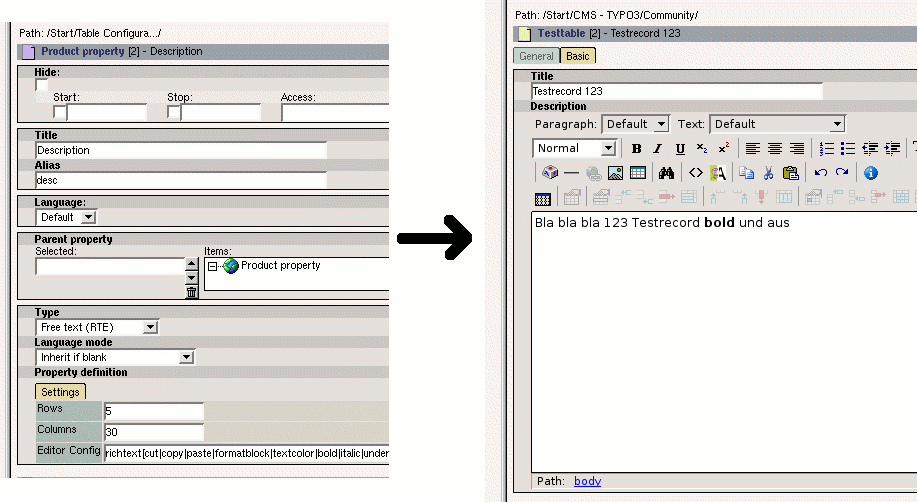 On the left you see how a property/field get's defined. On the
right side you see how the generated field looks when editing a record
having this field assigned.
On the left you see how a property/field get's defined. On the
right side you see how the generated field looks when editing a record
having this field assigned.
New features
Since 0.1.1 (2007-09-03)
- Support for PHP 5.x, TYPO3 >= 4.1 required
- Overlay tables (This feature allows to overlay the currently rendered record by another record of a shop or T3 defined table
- IREE support: Containers/Sections in the backend now get rendered as IRRE fields instead of the old custom-coded container view (which was taken from the kb_tca_section extension)
- A new type of field “Geographical location” can get added to categories/tables which allows to define a geographical location using the rggooglemaps extension (In a slightly modified version at: http ://think-open.org/kraftb/index/T3X_rggooglemap__kb_shop.t3x , I stay in contact with the author to integrate the required hooks into the mainstream version)
- New kb_shop code-team member: “Thomas Peterson” aka. boonkerz (in #typo3)Web: http://www.thomas-peterson.de E-Mail: info@thomas-peterson.de
- Newsgroup at: news.think-open.org
- SVN repository at: https://think-open.org/tosvn/kb_shop/
- add Hooks for Fields
- add an noErros for linking direct to an form with selecting an value
Users manual
To create or edit records in tables which are created by this extension just go to some page where you are allowed to create the specific records and just use the list module to create them as usual.
When you create a record you intially have mostly no fields available an the record look like the following:
SCREENSHOT
You see a category select in which you can select the category the record should be set to. If your adminstrator has not configured a tree of categories to select you will only have one possible option. He can enable a setting which automatically selects this category when you create a new record so you can skip the task of selecting the only available entry.
As soon as you select a category a pop-up window will ask you if you wish to reload the page – do so and you will get a new editing screen with Tabs on the top and more properties/fields available in them. The number and labels of the Tabs are totally dependen on the configuration your administrator set up and can be differenent from installation to installation.
You can simply select the Tabs and edit the fields as you would do with normal pages.
Multilanguage
If your adminstrator has enabled one of the tables / types of records to be multilanguage you can translate the page on which the original languages records are contained and then translate them. You translate a record by editing it and then selecting “Language (NEW)” from one of the select boxes at the top of the record editing screen. Please note that you must have translated the page before this box appears.
Installation
To install the extension simply download it from the TYPO3 Extension Repository and install it via the Extension Manager. When you are installing the extension it requires to create the categories and properties tables and some relation tables and allows you to setup some configuration options.
Some of the options MUST get set to a valid value (sysfolder-page in the pagetree) – some are only optional. Below is a list of the confguration options.
Required options are:
- TCA mode : Must get set currently. KB Shop is intended to also work with flexform storage instead of traditional TCA tables (real database tables) but this is currently not fully implemented. So always let this checkbox stay checked.
- Category Folders : This must be set to a comma separated list of folders which contain properties.
- Property Folders : This must be set at least to the UID of one single page which contains the properties. It is currently not possible to distribute properties amongst different Pages (altough they can be contained in subpages of the given folder – in this case add them AFTER the “Base Page” separated with comma)
TCAmode
Configuration variable
TCAmode
Type
boolean
Description
When this get's set (default) the extension operates in TCA mode. Which means all properties are generated as “real” fields in the tables and not only as XML field in a Flexform.
Currently only the TCA mode works as the work on Flexform mode has been delayed. Flexforms are not that good for searching and ordering the records after their values cause you would have to extract the values to order after from the XML first.
dontCache
Configuration variable
dontCache
Type
boolean
Description
When this option get's set no caching of the generated TCA happens. When you have a large configuration this really slows down work and you should of no course ever set it in production environments as it really causes huge load to regenerate the TCA on each page request either in the BE or the FE.
categoryFolders
Configuration variable
categoryFolders
Type
comma-list
Description
This is a comma separated list of Page UIDs which can contain category records. Those UIDs are checked when generating all tables (Only all tables can get generated at once).
propertyFolders
Configuration variable
propertyFolders
Type
comma-list
Description
This is a comma separated list of UIDs of pages containing all available properties. The first page must be the “Base Page” for all properties. This page may have subpages which should get listed and get checked for properties under special circumstances but it is not possible to have two different “Base Pages” pages with different properties.
fieldPrefix
Configuration variable
fieldPrefix
Type
string
Description
This get's used as prefix to all fields in the database. If you do not set it “kbs_” get's used as field prefix for the fields defined by properties but you can simply insert a shortname for your current project for example. Please note that this value will be directly used in SQL.
configExtension
Configuration variable
configExtension
Type
string
Description
This is the extension key of an extension which act's as a container for the generated ext_tables.php, ext_tables.sql, and similar files. This is nice to have because when you update the main kb_shop extension the current configuration will not get lost (altough it would get regenerated on the next site hit from the table/property configuration stored in DB).
It is just easier to have those quite often chanign files out of the main shop-extension directory.
The extenion itself doesn't need to contain anything. You can simply create a completely empty extension with the kickstarter and insert it's extension key here – a possible candiate for such an extension is the “nothing” extension – which also has a sense now.
listItems
Configuration variable
listItems
Type
integer
Description
The number of elements/records which shall get shown in List mode. This is the value which get's used when multiple tables are shown in List view.
singleListItems
Configuration variable
singleListItems
Type
integer
Description
The number of elements/records which shall get shown in List mode when only a single table is shown because you clicked on one of the Table- Field names or the Table-Title itself.
Adminstration
When you installed the extension you probably not have already created an folder for Categories and Properties. If this is the case do so now and go back to the Extension Manager and enter the UID of the created page(s) into the “Category Folders” and “Property Folders” fields.
It is completely legal to have categories and properties in two different folders altough this wasn't tested heavily and it is more safe to put categories and properties into the same folder.
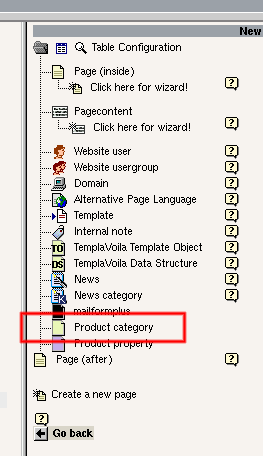
Creating a root-category/table
When you have set up the extension fully go to the “Table Configuration Sysfolder” (called TCSF from now on) and create a new record of the type: “Product category”:
You will then see the record editing screen of the newly created category.
IMPORTANT : When you create the categories you can create a tree- structure of categories. The “lowest level” of those categories will get created as separate tables. So when you created 3 base categories and in each of them 2 sub-categories you will finally have 3 tables more in your database. The 6 sub-categories will not get created as tables but all of the fields assigned to them will be available in their parent table. But only those fields selected for a category (or inherited from parent categories) will be visible when editing a record assigned to this category. This is achieved via the “types” field of TCA.
When you create a category-record on the category-root-level you MUST fill in the fields Title and Alias. Title will be the name of the the table (it is a table because it's a root category) or the Category (or both) and Alias is just required for tables/categories on the root level. The alias will become the name of the table in the database. If you leave away the alias the table will get the uid of the category record as table-name (of course prefixed with some string).
The category record
A short listing of what the different fields of a category are for:
Title
Field Name
Title
Type
string
Description
The title of the table and/or category created.
Alias
Field Name
Alias
Type
string
Description
The name of the table in the databse. It will get prefixed with a shop specific prefix but you should define a suitable name for this table here. Only required when you create a root-category==table, for sub- categories it will not be required.
Virtual
Field Name
Virtual
Type
PALLETE FIELD
select
Description
This allows you to create “virtual” tables which just exist in the session variable of the clients browser. This is useful for the FE to create ordering forms. (See section: Ordering). You can either choose that a table shall be connected to the browser-session or the logged in FE-User.
Allow Table on Pages
Field Name
Allow Table on Pages
Type
PALLETE FIELD
boolean
Description
When this checkbox is set record for this table/root-category can get created on normal pages and not only in sys-folders
Label property
Field Name
Label property
Type
PALLETE FIELD
database relation to shop properties
Description
Here you can select a property which shall get used as label for the records of this table. Sadly currenlty all properties get shown and not only those which are already selected to be part of the table. This can be very annoying as you can select a field to be the label which is not contained in the table. This cannot be fixed due to a bug in TYPO3's ###REC_FIELD_fielname### TCA construct.
Sorting property
Field Name
Sorting property
Type
PALLETE FIELD
database relation to shop properties
Description
This property allows you to select by which field the tables is ordered in the BE by default. The same problem as with the above label field occurs here (all properteis shown not only in “Properties” selected ones)
Sorting direction
Field Name
Sorting direction
Type
PALLETE FIELD
select box
Description
Allows you to select in which order the sorting get's performed.
Language
Field Name
Language
Type
database relation to sys_languages
Description
Shows the language of the current category record. Use the “translate” select-box at the top of the editing screen for translating a category/table. When a root-category/table is translated you will also be able to create translations for the records in the associated table.
Parent category
Field Name
Parent category
Type
database relatation to shop categories
Description
Here you can select the parent category for the actual category. If you select a category the current category will become the child of the selected category and will inherit all it's properties. Sub- categories will be made available in the category selector of each created “product”-record.
Image
Field Name
Image
Type
image field
Description
Here you can upload an image to each table/category which can get used in different places.
Icon
Field Name
Icon
Type
image field
Description
Here you can upload an icon (preferrably 18x16 px) which get's used as icon for the table. This is only visible when you didn't select a parent category – so the actual category is a root-category/table.
Description
Field Name
Description
Type
RTE field
Description
Here you can write a description for each table/category which can get used in different places.
Properties
Field Name
Properties
Type
database relation to shop properties
Description
Here you assign which properties each table should have. You can also assign properties to sub-categories then the table will also contain those fields but they will only get shown in the BE when a “product” record has this category set.
Creating properties
Now you can start to create your first properties.
Go to the page you configured as “Base Page” for the properties (can be the same page where the categories are located) and create a record of type “Shop Property”.
You get a form with some fields of which the Top two (Title, Alias) are mandatory (REQUIRED) . Altough alias is no real requirement it should always get filled. The same as with root-categories/tables the alias will become the fieldname of the fields/properties in the database. The fieldname will be prefixed with the prefix you defined in the Extension Manager Installation Configuration of the extension.
Now a short list of what the different fields are for:
Title
Field Name
Title
Type
string
Description
The title of the field/property. It will get used in the BE as label for the field. When you translate the property record this will be the only available field – letting you define the translated label for BE Users with the language translated to.
Alias
Field Name
Alias
Type
string
Description
The alias of the field property will get used in conjunction with the field prefix you configured in the Extension Manager Configuration as the fieldname in the database. If you do not insert a value here the UID of the the property record will get used as field name which results in quite unreadable tables – which is also not nice for export.
Language
Field Name
Language
Type
database relation to sys_languages
Description
Shows the langauge of the current property. Use the “translator” select box at the top to translate the actual property. The page on which the properties reside must be translated for the “translator” box to be visible.
Parent property
Field Name
Parent property
Type
database relation to shop properties
Description
Some types of properties allow to have child-properties. If you have already created such properties (like select boxes or containers) you can select that the current property shall be a child of the selected property. (See explanation of special container types below)
Parent property value
Field Name
Parent property value
Type
select box
Description
When you have selected that the current property shall be a child of a select-box property you can select which value the parent-property shall have so the current property is visible. (See explanation of special container types below)
Language mode
Field Name
Language mode
Type
select box
Description
Selects how this field/property behaves when the record it is assigned to get's translated. The options are quite self explanatory. But here a short description:
Copy value : The value from the default langauge get's copied over to the translated record.
Don't translate : The field is not shown in the translated record.
Inherit if blank : Nothing get's copied and when the field is empty in the translated record the value from the original record get's used.
Don't copy original contents : The values from the language original are just not copied.
Prefix with Language Title : The values from the language original are copied and prefixed with a “[Translate to .....]:” prefix.
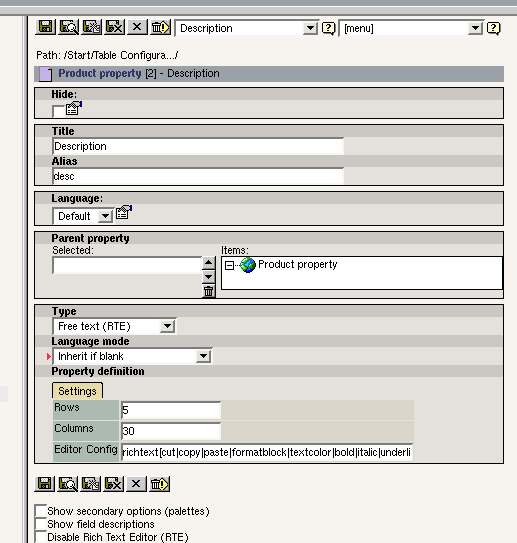
A fully configured RTE field/property looks for example like:
You can play around a little bit with the different kind of properties but you will soon start to ask yourself what the special property “Container” is and why you can select a parent property.
If you want to have a quick start and not get confused at the beginning skip the follwing the follwing two sections.
Special property type: Container
A container is something you probably already know from TemplaVoila FlexForms or from the extension kb_tca_section. A section is an area in the record editing screen which can hold an arbitrary amount of “subsets” which each has fields again.
A picture is more than thousand words so here is a picture of a section/container field as it get's rendered in the BE:
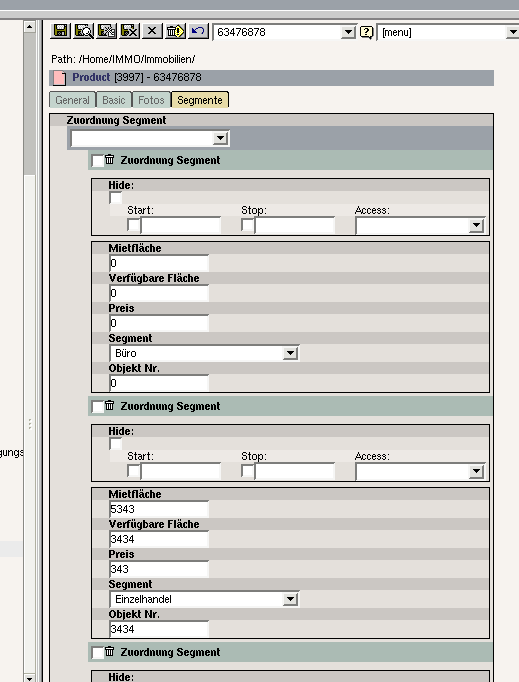
You possibly know that you can add additonal “Zuordnung Segment” entries with the selectbox at the top. Each of those section-elements is again a table in the database which has the shown fields and a relation back to the record they are contained in.
So if you want to create such a section in one your tables/root- categories then just create a “Container” property and then assign this Container property as Parent property to all properties which shall be contained in the section.
UPDATE : Since T3 4.1 supports “Inline relational record editing” (IRRE) - which is exactly the same as containers/sections the extension has been updated to generate IRRE-fields instead of old fashioned containers like in the picture above. So the above screenshot is outdated.
Special property type: DB-REL
When you click on relLang you have in your Select boxes only one Lang not all.
Special property type: Select-Box
When you create a select-box it also counts as property which can get selected as “Parent property”. As soon as you select a Select-Box in the Parent-property field you will get an additonal field called “Parent property value” in the record editin screen of the property.
The current property will now only get shown in the BE when you have set the select-box you assigned as parent to the value selected in the “Parent property value” field. This may be a bit of confusing at the beginning but I will shed some light on it.
It behaves similar like the “type” field of tt_content. Depending on which type of content element you have selected when editing a content element you have different fields available. Now when you have created such a parent/child structre with select boxes for one shop-table then the child-fields will only be visilble when the parent (the select box) got set to a specific value.
This enables you to create very complex BE forms. For example if you have a book shop and you made a select box which allows you to choose what kind of “book” you have (i.e. “Magazine, Technical reference, Child book”) then the input field “Release cycle” wil only get shown when you selected “Magazine” in the select box (as technical references and children books do not have a release cycle – magazines do).
Connecting Categories and Properties
When you have succesfully created a root-category and some properties the only thing left to do is to go to the category record again and select all properties this table/root-category should have in the “Properties” select box at the bottom and to select the Sortin and Label property.
When you have done this delete the Shop-Cache using the Tools>Shop module. Select “Cache” in the select box on the top right and press the button “Clear cache” once.
When you now visit a page in the List module and choose to create a record you should see your newly created table available. If this is not the case you most probably didn't check the “Allow Table on Pages” checkbox in the category record and tried to create the record on a different page than a sys-folder.
When you have created your first record you may suddenly be disappointed because your fields do not show up but only the category selector. This is currently normal. Even if you do only have one category you still have to select it explicitly. You can enable that a specific category shall be set as default by setting the User TSConfig option:
TCAdefaults.tx_kbshop_tbl_yournamehere {
        category = 3
}
Of course replace “yourtablename” with the alias you gave the table and “3” with the uid of the category which you would like to select as default.
Tabs in the Editing screen
You will soon notice that the properties you create are in a Tab (similar like the Tabs from Flexforms) called "Basic" and may ask yourself how you can create additonal Tabs. This is easy: Just create a subpage in the page where your properties are located (only one level deep allowed) and give the page a title which shall be shown as Tab-Title.
You have to enter this page into the “propertyFolder” Installation Configuration which you set when installing the extension. You have to add it to the end of list cause at the top always the main property folder has to get listed.
Now just move over some properties to the new page and hit the clear- shop-cache button in the KB-Shop BE module.
After those steps the properties move should show up in a new Tab. When you are using section/container fields the section will show up in the Tab where the container property is located even if the sub- properties of the container are located on a different page.
The FE Plugin
Now you can start to insert some testing records on a page and you will surely soon want to see some output in the FE. To begin this just go to the page where you want to show a listing of those records and create a content element of type “Plugin: Shop (cached)” there.
When you created the FE plugin the first step you should take is to choose the table you want to display from the field “Displayed Table” after chaning it the forms updates itself.
You can then go through all the available options and set it to your needs. Below is a short table of what each field is for.
Product Folders
Field name
Product Folders
Type
database relation to pages
Description
Here you select all pages from which you want to show records of the selected table.
Product Folders recursive
Field name
Product Folders recursive
Type
select box
Description
Here you can choose if you wish to collect also the records on the subpages of the page specified in “Product Folders”
Template File
Field name
Template File
Type
string
Description
Here you can give the path to a template file to use.
Displayed Table
Field name
Displayed Table
Type
database relation to (root-) categories
Description
Here you have the choice to select from all created tables the one which you want to display using this plugin.
Disable single-view
Field name
Disable single-view
Type
checkbox
Description
When checked the singleView link doesn't get generated when in listView
Disable list-view
Field name
Disable list-view
Type
checkbox
Description
When checked the listView link doesn't get generated when in singleView
Items per page
Field name
Items per page
Type
integer
Description
Defines how many items get listed per page
Show page browser
Field name
Show page browser
Type
boolen
Description
When checked and there are more items for the current query than elements per page a pagebrowser gets shown
Pages in browser
Field name
Pages in browser
Type
integer
Description
Define how many pages get shown in the pagebrowser
Show first and last link
Field name
Show first and last link
Type
boolean
Description
When set a link to the first and last page get generated in the pagebrowser.
Show previous and next link
Field name
Show previous and next link
Type
boolean
Description
When set a link to the previous and next page get generated in the pagebrowser
Show criteria selector
Field name
Show criteria selector
Type
boolean
Description
When set and user-definable criterias are also set a criteria selector gets shown in the FE which a visitor can use to define criterias after which he wants to filter the displayed records
Criterias
Field name
Criterias
Type
SECTION
Description
See following table “Criterias”
Submit Target OK
Field name
Submit Target OK
Type
database relation to pages
Description
Here you can select a page to which the user shall get redirected when all fields of the current forms have been filled properly. This is used for Ordering forms.
Form table
Field name
Form table
Type
SECTION
Description
See the following table “Form tables”
Search page
Field name
Search page
Type
databse relation to pages
Description
Here you can set a page to which full-text search request get posted. Different to the criterias full-text searches (searches after a specific word) can not get cached. For this reason you have to direct serach-request to a special page where an uncached version of the plugin is inserted.
NOT IMPLEMENTED CURRENTLY
Criterias
You can easily define which records shall get shown by defining criterias in the listing plugin. More or less you build up the WHERE part of the query which selects the records from the databse.
To define criterias you should already have used Flexform Sections once else it will be a little bit confusing for you I guess. To create a criteria go to the “Criteria” tab in the FE plugin and choose “NEW Criteria Item” from the select-box. When you selected it at the first moment nothing will happen – you have to save the record first using the normal “Save” button at the top and end of the record editing scren.
After saving the “NEW Criteria Item” selection a new criteria item will show up in the form. Such an item looks mostly like in the follwing picture:

The topmost field in the criteria item is named “Field”. Here you can select which field of the table shall get compared to another value. All other options are explained in the table below:
Field
Field name
Field
Type
select box
Description
Here you can select from all fields the current table has. The selected field will get compared in the WHERE query which selects the items to display in the FE
User selectable
Field name
User selectable
Type
checkbox
Description
If you check this option all other options will disappear and the visitor of the website can choose which value the field selected in “Field” shall have. (See: Criteria selector)
Compare string/integer/etc.
Field name
Compare string/integer/etc.
Type
different
Description
Using the “Compare” field you can select “how” the value of the field is compared to the specified value.
Value
Field name
Value
Type
different
Description
Here you can either input (if you mad a Text/Integer criteria) or select (if you made a db-relation criteria) the value to which to compare against.
Negate compare results
Field name
Negate compare results
Type
boolean
Description
When set the result of the comparison will get negated – this is especially useful for database relation fields to select that specific values should not occur.
Form tables
The KB-Shop extension also supports Ordering Forms for letting website visitors order your products. Currently no billing mechanism is implemented for letting the visitors directly pay in your online-shop but only mails can get sent and orders can (must?) get stored in the database. This requires additonal work from you for each order – to process it manually.
The concept of KB-Shop Ordering Forms is genius if you think some time about it:
In TYPO3 there already exists a “huge” and very powerful forms library for generating fields out of database descriptions (TCA arrays): t3lib_tceforms. This library is normally used for rendering the record-editing screens in the BE for all different kinds records (records of all tables).
Now kb-shop simply utliilzes those form rendering libraries but instead of storing each record in the database it first is simply stored in the user-session of the clients browser which most shopping- cart systems do. This concept is called "virtual" tables.
When a user has finished his ordering process this “virtual” record gets transferred to a real database table and via additonal hooks also mails can get sent to specific addresses (where people process the order then).
The sending of mails and all extra data handling of orders (except storing them in the database) is not part of KB-Shop but will get implemented by add-on extensions which hook into KB-Shop.
You have to create an ordering form table which contains fields like firstname,lastname,address,zip,city for letting the user input his delivery and contact data and in this root-category/table you should have a section where each element contains at least one field: "ordered product" and most probably a second field "ordering amount" which specified how many items of a product have been ordered. This way (the ordered items themselves are section elements) you get a nice display for orders in the backend.
Here a listing of all fields available for a “Form table” section element:
Form name
Field name
Form name
Type
string
Description
The name of this form. (Not used currently?)
Form table
Field name
Form table
Type
database relation to “virtual” root-categories
Description
Here you can select the “virtual” table which gets used to store the data in the user session. This table defines which fields are available in the ordering process (Firstnam, Lastname, etc.)
Save table
Field name
Save table
Type
database relation to “non-virtual” root-categories
Description
Using this field you define to which table the virtual table shall get saved when finishing the order process.
Transfer TS
Field name
Transfer TS
Type
text
Description
Here you can define TypoScript which “translates” the virtual-table values to values acceptable for the real tables. The syntax is explained in the section “Ordering system”
See section “Ordering system” for more details on ordering.
The FE-Plugin HTML templates
Of course for the first test we must not miss an working HTML template. As all fields of kb_shop tables are completely dynmically defined you can hardly give an “default” template. So in the res/ folder of the extensions directory only a template is included which shows some basic things you can do within the HTML template.
First of all there are 2 main parts in a template:
<!-- ###TMPL_listView### begin -->
and
<!-- ###TMPL_singleView### begin -->
You can easily create custom views by defining a template key in your TS-Setup. Then the main part will be called:
<!-- ###TMPL_listView_YOURKEY### begin -->
or TMPL_singleView_YOURKEY respectively (see TS option: plugin.tx_kbshop_pi1.subpart.listView / singleView)
In such a “main part” there are five different possible kind of subparts:
<!-- ###PART_criteriaSelector### begin -->
<!-- ###PART_criteriaSelectorEmpty### begin -->
<!-- ###PART_pageBrowser### begin -->
<!-- ###PART_pageBrowserEmpty### begin -->
<!-- ###PART_listing### begin -->
<!-- ###PART_listingEmpty### begin -->
PART_criteriaSelector contains the criteria selector. PART_listign contains the actual listing of records, PART_pageBrowser the pagebrowser and PART_listingEmpty gets shown instead of PART_listing when no elements are found for the currently defined criteria.
Following is a short reference for all markers allowed in the template. SingleView is completely similar to listView except that only one item is rendered. Whenever a token like “++fieldname++” or “++cobjname++” occurs you have to replace this token by a valid fieldname not including the prefix set in the install tool (so just the alias or UID of the property). In case of a cObject ++cobjname++ has to get replaced with the TS key of the cObject. So if you define for example
graphicalTitle = IMAGE
then the marker would be “###COBJ_ITEM_graphicalTitle###.
Name (without ###)
Name (without ###)
Name (without ###)
Type
Type
Valid in (Level)(without ###)
Valid in (Level)
(without ###)
Description
Description
TMPL_listView
Name (without ###)
TMPL_listView
Type
main-subpart
Valid in (Level)(without ###)
file top level (1)
Description
When you show a listing of records the listView main-subpart of the template file will get used.
TMPL_singleView
Name (without ###)
TMPL_singleView
Type
main-subpart
Valid in (Level)(without ###)
file top level (1)
Description
When you show a single record the singleView main-subpart of the template file will get used.
TMPL_listView_++customkey++
Name (without ###)
TMPL_listView_++customkey++
Type
main-subpart
Valid in (Level)(without ###)
file top level (1)
Description
When you show a listing of records and you have defined that a special main-subpart shoould get used using the subpart.listView TS configuration variable then this main-subpart of the template file will get used.
TMPL_singleView_++customkey++
Name (without ###)
TMPL_singleView_++customkey++
Type
main-subpart
Valid in (Level)(without ###)
file top level (1)
Description
When you show a single record and you have defined that a special main-subpart shoould get used using the subpart.singleView TS configuration variable then this main-subpart of the template file will get used.
ITEMS_found
Name (without ###)
ITEMS_found
Type
marker
Valid in (Level)(without ###)
Anywhere
Description
The number of found items.
ITEMS_index_begin
Name (without ###)
ITEMS_index_begin
Type
marker
Valid in (Level)(without ###)
Anywhere
Description
The index of the first element shown on the current page (changes when browsing through the pages using the page browser)
ITEMS_index_end
Name (without ###)
ITEMS_index_end
Type
marker
Valid in (Level)(without ###)
Anywhere
Description
The index of the last element shown on the current page (changes when browsing through the pages using the page browser)
COBJ_LISTING_++cobjname++
Name (without ###)
COBJ_LISTING_++cobjname++
Type
marker
Valid in (Level)(without ###)
Anywhere
Description
This marker gets replaced by cObject specified by ++cobjname++. You have to set the TS objects in your TS setup like:
plugin.tx_kbshop_pi1.listView.cObjects.myCObject = TEXT
you must of course replace listView by singleView when you are inserting the cObject in the singleView. ++cobjname++ would be myCObject in this case.
LINK_listView_HREF_++linknum++
Name (without ###)
LINK_listView_HREF_++linknum++
Type
marker
Valid in (Level)(without ###)
Anywhere
Description
This marker contains a link to the listView which can be configured via TS. The special about this link markers is that while they get generated by the ->typoLink method the values:
linkViewUid - item to show
linkPageNumber - page to show
are available in the registers of TSFE. which means you can access those values using a
.data = register:linkPageNumber
construct.. ++linknum++ is the number you used in the TS setup to define the link.
LINK_singleView_HREF_++linknum++
Name (without ###)
LINK_singleView_HREF_++linknum++
Type
marker
Valid in (Level)(without ###)
Anywhere
Description
The same as for the above listView link except that this link links to a detail view (specified by the value in the register linkViewUid )
PART_criteriaSelector
Name (without ###)
PART_criteriaSelector
Type
subpart
Valid in (Level)(without ###)
TMPL_*
Description
This subpart contains the criteria selector which allows a website visitor to select criterias for filtering the listing on his own. Normalls this selectors get rendered as checkboxes but you can easily render them as text links or in other forms.
PART_criteriaSelectorEmpty
Name (without ###)
PART_criteriaSelectorEmpty
Type
subpart
Valid in (Level)(without ###)
TMPL_*
Description
When no criteria selector shall get shown then the contents of this subpart get shown instead. This subpart allows no other subparts or markers inside.
PART_pageBrowser
Name (without ###)
PART_pageBrowser
Type
subpart
Valid in (Level)(without ###)
TMPL_*
Description
This subpart contains a page browser which allows to browse between different pages of the listing when the current number of records (depending on the set criterias) don't fit onto one page (set in the FE-Plugin using: Items per page )
PART_pageBrowserEmpty
Name (without ###)
PART_pageBrowserEmpty
Type
subpart
Valid in (Level)(without ###)
TMPL_*
Description
When no page browser has to get rendered (because it is deactivated in the FE plugin or there are less records than shall get shown on a page) this subpart will get rendered instead of PART_pageBrowser. This subpart allows no other subparts or markers inside.
PART_listing
Name (without ###)
PART_listing
Type
subpart
Valid in (Level)(without ###)
TMPL_*
Description
This subpart contains the list of records. Even in single view the single record is contained in this subpart.
PART_listingEmpty
Name (without ###)
PART_listingEmpty
Type
subpart
Valid in (Level)(without ###)
TMPL_*
Description
When no records are available for the currently selected criterias (or there are none at all) then this subpart will get shown. This subpart allows no other subparts or markers inside.
CriteriaItem
Name (without ###)
CriteriaItem
Type
subpart
Valid in (Level)(without ###)
PART_criteriaSelector
Description
This subpart contains a single criteria selector item. Currently there are two options to render a criteria item. As a select box or text links (using this subpart) or as a checkbox (for 0/1 properties). Also lists of checkboxes (up to 10) are possible.
This subpart will get repeated and concatenated for each criteria item a user can select from. Meaning for each select-box.
CriteriaItemCheckbox
Name (without ###)
CriteriaItemCheckbox
Type
subpart
Valid in (Level)(without ###)
PART_criteriaSelector
Description
This subpart contains the code for a checkbox criteria selector item.
TITLE
Name (without ###)
TITLE
Type
marker
Valid in (Level)(without ###)
CriteriaItem
CriteriaItemCheckbox
Description
The title for the current select-box or checkbox.
ELEMENT_NAME
Name (without ###)
ELEMENT_NAME
Type
marker
Valid in (Level)(without ###)
CriteriaItem
Description
This marker contains the <select> tag name attribute value which has to get used for the tag. It is commonly not used when the criteria selectors get rendered as text links.
CriteriaSelectorCheckbox
Name (without ###)
CriteriaSelectorCheckbox
Type
subpart
Valid in (Level)(without ###)
CriteriaItem
Checkbox
Description
This subpart contains the single checkboxes in case of multiple checkboxes (or just one entry in case of a single checkbox)
CriteriaSelectorOption
Name (without ###)
CriteriaSelectorOption
Type
subpart
Valid in (Level)(without ###)
CriteriaItem
Description
This subpart contains a single selector option or Text-Link for normal criteria items (not checkboxes)
Subparts of ###CriteriaSelctorCheckbox# and
Name (without ###)
Subparts of ###CriteriaSelctorCheckbox# and ###CriteriaSelectorOption### (4)
LABEL
Name (without ###)
LABEL
Type
marker
Valid in (Level)(without ###)
CriteriaSelectorCheckbox
CriteriaSelectorOption
Description
This marker contains each label/title for the single values of the criteria item select-boxes (or link lists). It will contain the label for the different checkboxes in the case of multiple checkboxes.
LINK_HREF
Name (without ###)
LINK_HREF
Type
marker
Valid in (Level)(without ###)
CriteriaSelectorCheckbox
CriteriaSelectorOption
Description
This marker will contain links to the current page but with GET parameters set so the listing is filtered to show only records where the current criteria equals the value of the current option.
The links have a cHash parameter and the resulting pages will be fully cached.
VALUE
Name (without ###)
VALUE
Type
marker
Valid in (Level)(without ###)
CriteriaSelectorOption
Description
The value of the current select-box option (or text-link) is contained in this marker. In the case of text-links it is mostly not required cause you should better use the above LINK_HREF marker.
SELECTED
Name (without ###)
SELECTED
Type
marker
Valid in (Level)(without ###)
CriteriaSelectorOption
Description
This marker contains normally nothing but when the current value/option/link is selected for filtering it will by default contain the string:
selected=”selected”
But you can change what the content should be using the TS option:
plugin.tx_kbshop_pi1.listView.criteriaSelector.selectedValue
ELEMENT_NAME
Name (without ###)
ELEMENT_NAME
Type
marker
Valid in (Level)(without ###)
CriteriaSelectorCheckbox
Description
This marker will contain the <input> tag name attribute value for the single checkboxes. Also in the case of just a single selectbox the name will be on this level. The same logic as with listView/singleView is used. A single checkbox is just a list of checkboxes with just one entry :)
CHECKED
Name (without ###)
CHECKED
Type
marker
Valid in (Level)(without ###)
CriteriaSelectorCheckbox
Description
This marker contains normally nothing but when the current checkbox is selected for filtering it will by default contain the string:
checked=”checked”
But you can change what the content should be using the TS option:
plugin.tx_kbshop_pi1.listView.criteriaSelector.checkedValue
ITEM_count
Name (without ###)
ITEM_count
Type
marker
Valid in (Level)(without ###)
PART_pageBrowser
Description
Contains the number of records for the currently selected criterias (or for all available records if no criterias are set)
ITEM_equalWidth
Name (without ###)
ITEM_equalWidth
Type
marker
Valid in (Level)(without ###)
PART_pageBrowser
Description
Contains 100 divided by the above value. It can get used to divide the pageBrowser into html elements of equals width depending on the number of currently shown records.
BROWSE_itemFirst
Name (without ###)
BROWSE_itemFirst
Type
subpart
Valid in (Level)(without ###)
PART_pageBrowser
Description
This subpart contains markers for the “First page” link in the page browser.
BROWSE_itemFirstEmpty
Name (without ###)
BROWSE_itemFirstEmpty
Type
subpart
Valid in (Level)(without ###)
PART_pageBrowser
Description
The contents of this subpart will get shown when the respective subpart (name without Empty) shall not get shown or is not available (i.e. first link will not be available when you are on the first page). This subpart does not contain any further subparts or markers.
BROWSE_itemPrevious
Name (without ###)
BROWSE_itemPrevious
Type
subpart
Valid in (Level)(without ###)
PART_pageBrowser
Description
This subpart contains markers for the “Previous page” link in the page browser.
BROWSE_itemPreviousEmpty
Name (without ###)
BROWSE_itemPreviousEmpty
Type
subpart
Valid in (Level)(without ###)
PART_pageBrowser
Description
The contents of this subpart will get shown when the respective subpart (name without Empty) shall not get shown or is not available (i.e. first link will not be available when you are on the first page). This subpart does not contain any further subparts or markers.
BROWSE_itemList
Name (without ###)
BROWSE_itemList
Type
subpart
Valid in (Level)(without ###)
PART_pageBrowser
Description
This subpart contains another subpart which forms the list of pages in the page browser. This subpart gets repeated and concatenated for each single page.
BROWSE_itemListEmpty
Name (without ###)
BROWSE_itemListEmpty
Type
subpart
Valid in (Level)(without ###)
PART_pageBrowser
Description
The contents of this subpart will get shown when the respective subpart (name without Empty) shall not get shown or is not available (i.e. first link will not be available when you are on the first page). This subpart does not contain any further subparts or markers.
BROWSE_itemNext
Name (without ###)
BROWSE_itemNext
Type
subpart
Valid in (Level)(without ###)
PART_pageBrowser
Description
This subpart contains markers for the “Next page” lllink in the page browser.
BROWSE_itemNextEmpty
Name (without ###)
BROWSE_itemNextEmpty
Type
subpart
Valid in (Level)(without ###)
PART_pageBrowser
Description
The contents of this subpart will get shown when the respective subpart (name without Empty) shall not get shown or is not available (i.e. first link will not be available when you are on the first page). This subpart does not contain any further subparts or markers.
BROWSE_itemLast
Name (without ###)
BROWSE_itemLast
Type
subpart
Valid in (Level)(without ###)
PART_pageBrowser
Description
This subpart contains markers for the “Last page” link in the page browser.
BROWSE_itemLastEmpty
Name (without ###)
BROWSE_itemLastEmpty
Type
subpart
Valid in (Level)(without ###)
PART_pageBrowser
Description
The contents of this subpart will get shown when the respective subpart (name without Empty) shall not get shown or is not available (i.e. first link will not be available when you are on the first page). This subpart does not contain any further subparts or markers.
LINK_HREF
Name (without ###)
LINK_HREF
Type
marker
Valid in (Level)(without ###)
BROWSE_*
Description
This marker contains a link (only the href attribute) to the respective page (depending on the subpart the marker is found in).
LINK_SELECTED
Name (without ###)
LINK_SELECTED
Type
marker
Valid in (Level)(without ###)
BROWSE_*
Description
This marker containts the contents of the LL label text_browser_selected when the currently rendered page is the active/selected/displayed one (makes only sense inside BROWSE_itemList )
LABEL_first
Name (without ###)
LABEL_first
Type
marker
Valid in (Level)(without ###)
BROWSE_*
Description
Contains the LL label label_browser_first
LABEL_previous
Name (without ###)
LABEL_previous
Type
marker
Valid in (Level)(without ###)
BROWSE_*
Description
Contains the LL label label_browser_previous
LABEL_next
Name (without ###)
LABEL_next
Type
marker
Valid in (Level)(without ###)
BROWSE_*
Description
Contains the LL label label_browser_next
LABEL_last
Name (without ###)
LABEL_last
Type
marker
Valid in (Level)(without ###)
BROWSE_*
Description
Contains the LL label label_browser_last
LABEL_item
Name (without ###)
LABEL_item
Type
marker
Valid in (Level)(without ###)
BROWSE_*
Description
This marker contains the label for the currently rendered page. It will contain the contents of the LL label label_browser_page in which the marker ###PAGE### is substituted with the number of the current page. If the page is the current page also the marker ###MARKER_BEGIN### and ###MARKER_END### are substituted with a <span> tag (on pages other than the current those markers are substituted with an empty string)
Subparts of ###PART_listing### or ##PART_++sectionnanme++###
Name (without ###)
Subparts of ###PART_listing### or ##PART_++sectionnanme++### (2,4,6,8, ...)
LIST_item
Name (without ###)
LIST_item
Type
subpart
Valid in (Level)(without ###)
PART_listing
Description
This subpart gets repeated for each record found for the currently setted criterias. In the case of singleView it will get repeated only once.
LIST_++sectionname++
Name (without ###)
LIST_++sectionname++
Type
subpart
Valid in (Level)(without ###)
PART_++sectionname++
(5, 6, 8, 10, ...)
Description
This subpart gets repeated for each section record found for the currently rendered record (or secton record in case of recursion).
Multiple LIST_++sectionname++ subparts also get's created when you define an overlay.
FIELD_SUBPART_++fieldname++
Name (without ###)
FIELD_SUBPART_++fieldname++
Type
subpart
Valid in (Level)(without ###)
LIST_item
LIST_++sectionname++
(4, 6, 8, 10, ...)
Description
The contents of this marker will get kept if the field which is specified in the subpart does contain a value which evaluates to true. When the current field contains a value which evaluates to false thie contents of this subpart get removed.
The markers in this section (on level 4) also can get used in this subpart so they would be on level 5 in fact. This also applies to the below subpart.
FIELD_SUBPART_++fieldname++Empty
Name (without ###)
FIELD_SUBPART_++fieldname++Empty
Type
subpart
Valid in (Level)(without ###)
LIST_item
LIST_++sectionname++
(4, 6, 8, 10, ....)
Description
The opposite of the above subpart.
FIELD_RAWVALUE_++fieldname++
Name (without ###)
FIELD_RAWVALUE_++fieldname++
Type
marker
Valid in (Level)(without ###)
LIST_item
LIST_++sectionname++
(4, 6, 8, 10, ...)
Description
This marker contains the raw database value of the specified field.
FIELD_VALUE_++fieldname++
Name (without ###)
FIELD_VALUE_++fieldname++
FIELD_VALUE_++sectionname++_++fieldname++
Type
marker
Valid in (Level)(without ###)
LIST_item
LIST_++sectionname++
(4, 6, 8, 10, ...)
Description
This marker contains the value of the specified field after some basic processing (RTE fields are passed through lib.parseFunc_RTE and database relations are resolved to the titles of the records they point to.)
The value of this field can also get set using stdWrap using a TS like the below. The ->data array of the cObj which is rendering the stdWrap is filled with the values for the current row. Meaning you can access them via .field = fieldname (where fieldname is an alias you set for a property).
plugin.tx_kbshop_pi1.listView.itemList.fields.myFieldName.stripHtml = 1
of course you have to replace listView with singleView if you want to stdWrap the field in singleView. myFieldName has to get replaced with the value you also use for ++fieldname++ (the alias of the property/field). stripHtml is just an example for some stdWrap property.
The fields of a container record get automatically filled into the marker with the ++sectionname++ included. This helps to distingush between fields of the main-table and containers (or overlayed tables)
PART_++sectionname++
Name (without ###)
PART_++sectionname++
Type
subpart
Valid in (Level)(without ###)
LIST_item
LIST_++sectionname++
(4, 6, 8, 10)
Description
This subpart will contain the elements for a section/container field in a record. The contents of this subpart can be the same as those of a PART_listing subpart except that they render a section-element. As they are themselves contained in PART_listing (exactly in the LIST_item element of a PART_listing subpart) this nesting is recursive. Except that not a LIST_item subpar is repeated inside this element but rather a LIST_++sectionname++ subpart.
A PART_++sectionname++ subpart also get's created when you define an overlay.
PART_++sectionname++Empty
Name (without ###)
PART_++sectionname++Empty
Type
subpart
Valid in (Level)(without ###)
LIST_item
LIST_++sectionname++
(4, 6, 8, 10, ...)
Description
When a section field is empty (i.e: has no section elements) this subpart will get rendered instead and the above will get removed
COBJ_ITEM_++cobjname++
Name (without ###)
COBJ_ITEM_++cobjname++
Type
marker
Valid in (Level)(without ###)
LIST_item
Description
This marker will get replaced with a cObject which get's rendered individually for reach record displayed. Thus it is possible to do a lot of nice things with values like generate GIFBUILDER images out of uploaded files (i.e: watermarks). You have to set the cObjects for the item like in the following TS:
plugin.tx_kbshop_pi1.listView.itemList.cObjects.myCObjName = IMAGE
Again you have to replace listView with singleView when you want to have the cObject available in the TMPL_singleView main template. myCObjName has to get replaced with the same value you used for ++cobjname++.
COBJ_++SECTIONNAME++_++cobjname++
Name (without ###)
COBJ_++SECTIONNAME++_++cobjname++
Type
marker
Valid in (Level)(without ###)
LIST_++sectionname++
(6, 8, 10, ....)
Description
This marker will get replaced with a cObject generated for each record of a section field individually. This means you can create cObjects dependend on the values of a section-element. You set a TS object like in the following TS:
plugin.tx_kbshop_pi1.listView.itemList.++sectionname++.cObjects.myCO bjName = RECORDS
Again you will have to replace listView with singleView when you want to render the cObject for singleView. ++sectionname++ has to get replaced with the name of the section (the alias of the container field). myCObjName should be the same label which you used for ++cobjname++.
Note that in the marker the sectionname must be uppercase.
ITEM_even
Name (without ###)
ITEM_even
++SECTIONNAME++_even
Type
marker
Valid in (Level)(without ###)
LIST_item
LIST_++sectionname++
(4, 6, 8, 10, ...)
Description
Contains 1 when the current item is an even one.
Contains 0 it it is uneven.
When used for a section (wheter the section element is an even or uneven one) then the section name must be written in uppercase.
ITEM_uneven
Name (without ###)
ITEM_uneven
++SECTIONNAME++_uneven
Type
marker
Valid in (Level)(without ###)
LIST_item
LIST_++sectionname++
(4, 6, 8, 10, ...)
Description
Contains 1 when the current item is an uneven one.
Contains 0 it it is even.
When used for a section (wheter the section element is an even or uneven one) then the section name must be written in uppercase.
ITEM_index0
Name (without ###)
ITEM_index0
##SECTIONNAME++_index0
Type
marker
Valid in (Level)(without ###)
LIST_item
LIST_++sectionname++
(4, 6, 8, 10, ...)
Description
Will contain the index of the element actually rendered counted starting from 0 for the first element.
ITEM_index1
Name (without ###)
ITEM_index1
##SECTIONNAME++_index1
Type
marker
Valid in (Level)(without ###)
LIST_item
LIST_++sectionname++
(4, 6, 8, 10, ...)
Description
Will contain the index of the element actually rendered counted starting from 1 for the first element.
Criteria selector
When you have configured some fields in the “Criteria” Tab of the FE plugin as “User selectable” then there will be a criteria selector available. The criteria selector subpart will not get replaced by an empty string then.
The PART_criteriaSelector main subpart has to contain one subpart “<!-- ###CriteriaItem### -->” which will get repeated multiple times – once for each criteria item created in the FE plugin and set to “User selectable”.
Each of those ###CriteriaItem### subparts may contain a marker “###TITLE###” which defines the title for the current criteria (the label of the field). Such a subpart also contains sub-subparts named “###CriteriaSelectorOption###”. Inside those subparts the markers “###LINK_HREF###”, “###SELECTED###” and “###LABEL###” will get replaced by a link pointin to a page with the criteria set to a specific value. The ###SELECTED### marker will contain “selected=”selected”” when this option is currently selected. ###LABEL### will contain the values to choose from.
In the default template the criteria selector is rendered as selector box – but it is easy to create a list of links instead. But this I leave to your cleverness.
Page browser
The structure of the page-browser should be quite clear by the example template coming with the extension. It is of course possible to define other labels for each Page and for Next/Prev/First/Last via TS. See main-section “Configuration”
Listing
###PART_listing### is the most importan subpart of all because it contains the real listing of elements. The structure for singleView and listView is COMPLETELY THE SAME . The reason for this is that “singleView” is implemented very clever as listView which only shows one uid (have a look at class.tx_kbshop_pi1.php method “singleView :) )
The subpart ###PART_listing### may only contain one other subpart ###LIST_item### which gets repeated for each displayed record. This subpart ###LIST_items### may now contain markers for all fields used in a table and also their labels.
The markers which can get used in ###LIST_items### are the following. ++fieldname++ must get replaced by the “alias” set for each property. If you do not have set an alias you would have to enter the UID of the property instead for ++fieldname++ (you see now why it would have been a clever idea to enter aliases :)
- ###LABEL_++fieldname++### : Contains the name of the specified field as set in the property. When another language than the default is displayed of course also the alternate labels get displayed. This eases translation a lot as you don't have to have two different HTML templates if you don not have any extra text in your templates.
- ###FIELD_RAWVALUE_++fieldname++### : This marker contain the “raw” database value of the specified field.
- ###FIELD_VALUE_++fieldname++### : This marker contains the value after a “little bit” of processing. RTE fields are passed trough “lib.parseFunc_RTE” for example and database relations are resolved to the title of the records they point to (so you do not only see UID's).The contents for this marker can also get passed through stdWrap so mostly all transformations should be achievable. When stdWrap properties are defined for this value the “normal” transformations which the shop is performing (lib.parseFunc_RTE, db- rel labels) get not applied (meaing: if you define a stdWrap property for an RTE field you would have to pass it trough lib.parseFunc_RTE yourself using the .parseFunc property of stdWrap)
- ###COBJ_ITEM_++cobjname++### : Using this marker you can insert an arbitrary cObject “bound” to the values of each single record rendered (The fields of each record are contained in $cObj->data – you can access the fields of the rendered record with the .fields operator). This means that COBJ_ITEM markers get rendered once for each record getting displayed (and may by thus only occur in the ###LIST_item### subpart). This is different to COBJ_LISTING markers which may appear everywhere in the template and contain a cObject “bound” to the values of the FE-Plugin (The fields of the FE-Plugin tt_content record are contained in $cObj->data).
cObjects
As already mentioned before you have the possibility to insert arbitrary cObjects into the template. This gives you a really great flexibility as you can insert mostly any thinkable T3 content this way. For example if you have database relations to tt_content elements in one of the tables you created you could let them get rendered in the FE-Plugin listing using a cObject.
There are two different kinds of cObjects for the template. ###COBJ_ITEM_++cobjname++### cObjects which get rendered while the values of each record are in the data array of the cObject. This means that in a COBJ_ITEM cObject you can access the fields you created using the “.field” operator of any stdWrap property. So an cObject which outputs the contents of an RTE field with all tags stripped would look like:
myTextField = TEXT
myTextField.field = rtefieldname
myTextField.stripHtml = 1
To find out where to insert this cObject in the TS configuration read on in the following section “Configuration”.
The other type of cObjects is the LISTING cObject: ###COBJ_LISTING_++cobjname++###. You can use this one at any place in your template. But the contents of such an cObject will be the same for the whole template – i.e: only rendered once. So if you place a COBJ_LISTING cObject into the ###LIST_item### subpart it will contain the same value each time.
When you define a cObject for a field in a section/container or in an overlay the marker of the cObject will be:
###COBJ_SECTION-OR-OVERLAYNAME_++cobjname++###
Configuration
You can configure a lot of the kb_shop FE plugin via TypoScript most notably to mention is the possibility to insert custom cObjects and let get fields passed through stdWrap. For many of you which are not that fit it isn't that clear which possibilities this does offer. stdWrap is some kind of magic function which calls almost any other method of the FE content rendering object (a cObject). It is some kind of branch to mostly the compete functionality of TYPO3 FE capabilities. It allows you to insert custom cObjects TEXT/IMAGE(GIFBUILDER)/RECORDS/CONTENT etc. It also has a lot of text- processing capabilities.
Following is a table of all TS properties of plugin.tx_kbshop_pi1. Those properties will completely be the same as for plugin.tx_kbshop_pi2 which will be the none cached plugin used for displaying full-text-search results.
The main plugin configuration containers
On the top of the plugin configuration in plugin.tx_kbshop_pi1 there are mostly containers for the main parts which get rendered like listing, single view, criteria selector or forms.
forms
Property
forms
Data type
container
Description
Contains all properties for ordering forms.
Default
listView
Property
listView
Data type
container
Description
Contains all properties for listView. They are the same for singleView. The separation between listView and singleView in the TS is here to enable you to have different cObjects and similar for list and single view.
Default
singleView
Property
singleView
Data type
container
Description
The container for the singleView properties can contain the same subproperties than listView (see table below)
Default
subpart.listView
Property
subpart.listView
subpart.singleView
Data type
string
Description
This TS values define which HTML template main-subpart will get used for rendering the current view. Normally TMPL_listView gets used for list view. But when you set
subpart.listView = myTemplate
for example then the subpart ###TMPL_listView_myTemplate### will get used.
Default
criteriaSelector
Property
criteriaSelector
Data type
container
Description
Container for the criteriaSelector configuration
Default
fieldTypes
Property
fieldTypes
Data type
container
Description
Container for the configuration of some field types (like labels for multi checkboxes)
Default
template.listView
Property
template.listView
Data type
string / stdWrap
Description
The template file which get's used when a listiing gets generated.
Default
template.singleView
Property
template.singleView
Data type
string / stdWrap
Description
The template file which gets used when a single record gets shown
Default
plugin.tx_kbshpo_pi1 / plugin.tx_kbshop_pi2
The "criteriaSelector" container
In this container you will find properties useful for configuring the criteria selector selct-boxes, text-links, or checkboxes.
selectedValue
Property
selectedValue
Data type
string
Description
This value gets inserted into the ###SELECTED### marker of a criteria item option/link when it's value has been selected for filtering. For normal criterias.
Default
selected="selected"
checkedValue
Property
checkedValue
Data type
string
Description
This value gets inserted into the ###CHECKED### marker of a criteria item checkbox when it has been checked for filtering. For checkbox criterias
Default
checked="checked"
dateFormat
Property
dateFormat
Data type
string (strftime)
Description
This value specified how dates should get displayed in the critieria selector.
Default
%Y-%m-%d %H:%M,%S
checkbox.yes
Property
checkbox.yes
checkbox.no
Data type
string / stdwrap
Description
Specified the label ###LABEL### for a checkbox criteria which gets rendered as selectbox (Yes/No select-box).
Default
LLL:criteriaSelector_checkbox_yes
LLL:criteriaSelector:_checkbox_no
plugin.tx_kbshop_pi1.criteriaSelector / plugin.tx_kbshop_pi2.criteriaSelector
The "fieldTypes" container
This container allows to set some configuration which define how multi checkbox values get rendered.
multiCheck.nothingSet
Property
multiCheck.nothingSet
Data type
string
Description
The label which gets used when no checkbox of a multi-checkbox field has been set.
Default
LLL:label_none
multiCheck.implodeString
Property
multiCheck.implodeString
Data type
Description
The string which gets used for imploding the single values which have been checked in a mult checkbox
Default
" / "
plugin.tx_kbshop_pi1.fieldTypes / plugin.tx_kbshop_pi2.fieldTypes
The "forms" container
In this container properties can get set which set some aspects of how ordering forms get rendered. The .forms container is available on more than one possition. 3 to be exact. first on the plugin.tx_kbshop_pi1 top level itself. On this first level the following properties are valid:
doublePostDelay
Property
doublePostDelay
Data type
integer
Description
Number in seconds which is waited until a new order with the same content get's accepted. This inhibits double posting of values on final submit. (Only available in the top-level forms container)
Default
600
formAddParams
Property
formAddParams
Data type
string
Description
Parameters which get added to the <form> tag generated for ordering forms. (Only available in the top-level forms container)
Default
respectRequired
Property
respectRequired
Data type
string
Description
A list of tables (comma separated) which defined in which table the fields set as "required" are respected. (Only available in the top- level forms container)
Default
noCache
Property
noCache
Data type
boolean
Description
When set the no_cache parameter will be added to the URL when sending a form to another page or sending the Location header which redirects the user to another page after successful completion of a form (See FE-Plugin field: Submit Target OK)
Default
plugin.tx_kbshop_pi1.forms / plugin.tx_kbshop_pi2.forms
On the other levels (plugin.tx_kbshop_pi1.listView.forms and plugin.tx_kbshop.listView.itemList.forms - you can substitute listView with singleView any time of course if you have a form in singleView and not in listView) properties are available which configure the default value and html code for submit buttons.
The .forms container is available directly on the listView/singleView TS level but also in it's sub-property itemList - similar to cObjects. This is cause a form-item (an input box for example) can get rendered bound to the listing itself (for contact/delivery address data formulars for example) and to a single element (for an "ordering amount" input field i.e.)
submitButton
Property
submitButton
Data type
string / stdWrap
Description
Contains the full HTML of the submit button
Default
<input type="submit" value="Save" name=""doSave />
++tablename++.defVals.++fieldname++
Property
++tablename++.defVals.++fieldname++
Data type
string / stdWrap
Description
Using this value you can predefine the values for fields in the virtual order table. ++tablename++ is the complete tablename of a virtual order table. ++fieldname++ is only the alias you set for a field.
Default
recordPid
Property
recordPid
Data type
integer /
stdWrap
Description
This value specified in which pid the records will get created when it hasn't been otherwise specified by the above .defVals. container/key
Default
plugin.tx_kbshop_pi1.listView.forms / plugin.tx_kbshop_pi1.listView.itemList.forms / plugin.tx_kbshop_pi1.singleView.forms / plugin.tx_kbshop_pi1.singleView.itemList.forms; same for pi2
The "listView" and "singleView" containers
Those containers are the most important for generating the listing. They contain the definition for how each view is rendered. Also with all other occurences listView and singleView are identical.
noCache
Property
noCache
Data type
boolean
Description
When set the no_cache flag will be set during rendering of the paeg which will cause the page to not get cached.
Default
0
cObjects.++cobjname++
Property
cObjects.++cobjname++
Data type
cObject
Description
++cobjname++ must be the name of a TS cObject which will get inserted in the FE as a COBJ_LISTING_ cObject marker.
Default
fieldConfig.rte.parseFunc_RTE
Property
fieldConfig.rte.parseFunc_RTE
Data type
-> parse func
Description
Contains the parse func which gets used to when rendering a RTE field by default (no stdWrap used). When this is not set there is a fallback to:
lib.parseFunc_RTE
and when this is also not set to:
tt_content.text.20.parseFunc
Default
fieldConfig.date
Property
fieldConfig.date
Data type
stdWrap
Description
This property defines how date fields get renderd by default when no special stdWrap is specified
Default
%Y-%m-%d, %H:%M:%S
listViewLink.extra.++linknum++
Property
listViewLink.extra.++linknum++
Data type
-> typolink
Description
Using this TS array and the ###LINK_listView_HREF_++linknum++### marker you can define custom links to a listing of your records. This is especially nice if you want to define links setting specific values which change layout or filter for specific predefined criterias.
The page number which shall get displayed is contained in the register linkPageNumber .
Default
singleViewLink.extra.++linknum++
Property
singleViewLink.extra.++linknum++
Data type
-> typolink
Description
The same as the above option but for links to singleView displays. The itemUid of the value to link to is contained in the register linkViewUid - also the page is available in linkPageNumber like in the above option.
Default
listViewLink.page
Property
listViewLink.page
Data type
integer / stdWrap
Description
This property defines the page-uid which shall get used for links to a listing.
Default
current page
singleViewLink.page
Property
singleViewLink.page
Data type
integer / stdWrap
Description
This property defines the page-uid which shall get used for links to a detail view.
Default
current page
forms
Property
forms
Data type
container
Description
See above section "The forms container" (lower table)
Default
itemList
Property
itemList
Data type
container
Description
See section "The itemList sub-container" below.
Default
noCache
Property
noCache
Data type
Integer
Description
Sets rendering to noCache
Default
plugin.tx_kbshop_pi1.listView / plugin.tx_kbshop_pi1.singleView / plugin.tx_kbshop_pi2.listView / plugin.tx_kbshop_pi2.singleView
The "itemList" sub-container
The above properties are all "bound" to the listing itself but rather not to a single record which gets listed. This means that the ->data array of the cObject instance rendering all the stdWraps and TS cObjects contains the row from the tt_content FE-plugin inserted into the page. When you want to render cObjects which show distinct values for each rendered record you will have to use the itemList sub- container of listView and/or singleView .
These are the properties of the itemList subcontainer:
forms
Property
forms
Data type
container
Description
See above section "The forms container" (lower table)
Default
cObjects.++cobjname++
Property
cObjects.++cobjname++
Data type
cObject
Description
++cobjname++ must be the name of a TS cObject which will get inserted in the FE as a COBJ_ITEM_ cObject marker.
Default
fields.++fieldname++
Property
fields.++fieldname++
Data type
string / stdWrap
Description
This keys contains stdWrap properties for each field (not adding the prefix set during installation). When no stdWrap properties have been given to a field some default processing will occur. When you define stdWrap properties for an RTE field you have to pass it through lib.parseFunc_RTE yourself.
Default
++sectionname++.cObjects.++cobjname++
Property
++sectionname++.cObjects.++cobjname++
Data type
cObject
Description
cObjects rendered for each single section-element record. (With their data row in the cObjects ->data array).
++sectionname++ has to be the name (alias) of the container property forming the section.
This is the same as above property " cObject " in this table but for the sub-records assigned in a section to the currently rendered record.
Default
++sectionname++.fields.++fieldname++
Property
++sectionname++.fields.++fieldname++
Data type
string / stdWrap
Description
This key contains stdWrap properties for each field of the section- element records in the currently rendered record.
++sectionname++ has to be the name (alias) of the container property forming the section.
This is the same as above property "f ields "(in this table) but for the sub-records assigned in a section to the currently rendered record.
Default
overlay.table
Property
overlay.table
overlay.uid
overlay.section
overlay.marker
overlay.select
overlays
Data type
integer
stdWrap
boolean
string
selectConf
Array
Description
overlay.table gives the uid of a category record (which must be a root-category aka. table) from which the record specified by overlay.uid will get "overlayed" over the current ->data array of the rendering cObject and the main rendering method will get called again (which will result in all markers for fields of the overlayed table getting replaced by the appropriate values).
This is useful for overlaying the product table over the virtual ordering table while listing the ordering basket: You list the items in the ordering basket and over each ordered item you overlay the record for this product :)
When you set overlay.table to the name of an T3 table instead of the category uid of an shop-table you can overlay any table – like fe_users or similar
By setting the suboption “section” a sub-section get's created for the overlay – meaning you have to define a ###PART_ and ###LIST_ subpart. Only inside those markers the fields will get replaced.
Using the suboption “marker” you can define the sectioname of the PART/LIST/FIELD_VALUE markers. I.e. if you set:
overlay.marker = prodcuts
overlay.section = 1
You have create a HTML template similar to:
<!-- ###PART_products### begin -->
<!-- ###LIST_products### begin -->
###FIELD_VALUE_products_title###
<!-- ###LIST_products### end -->
<!-- ###PART_products### end -->
Default
overlays
Property
overlays
Data type
container
Description
Inside this container you define sub-configurations referenced by numbers – the allowed directives of such a sub-configuration are the above options for an overlay.
I.e:
overlays {
10 = 1
10 {
table = fe_users
uid.field = kbs_owner
marker = siteuser
}
}
Default
hooks
Property
hooks
Data type
Array
Description
Example:
hooks.kbs_bilder=1
hooks.kbs_bilder < plugin.tx_rgsmoothgallery_pi1
hooks.kbs_bilder {
class=tx_rgsmoothgallery_kbshop
path=uploads/tx_kbshop
big {
file.maxW = 300
file.maxH = 300
}
height = 300
width = 300
showThumbs= 1
thumbOpacity = 0.8
arrows = 1
hideInfoPane = 0
duration = 7500
lightbox=1
}
Default
none
plugin.tx_kbshop_pi1.listView.itemList / plugin.tx_kbshop_pi1.singleView.itemList / plugin.tx_kbshop_pi2.listView.itemList / plugin.tx_kbshop_pi2.singleView.itemList
Tutorial
By now you just got an impression of how you should set up a shop system with kb_shop and a reference to all available properties, markers and fields.
This tutorial aims at giving a short glimpse about what is possible with kb_shop. When you implemented a shop system on your own and you think that you have a nice structure and want to improve this document then write a tutorial how to implement your kind of shop and I will add it to this document in a section called "Real-world examples".
This tutorial doesn't base on a real project but is rather just a little guide on how to set up a basic table containing some fields, two tables (one of them virtual) for letting an order process happen and will show some basic practices how to create nice web-shops.
IMPORTANT: If you haven't noticed it until now by yourself I should point you at the fact that KB-Shop not only is good for real shop systems where people order products and other stuff but for ANY listing of records. For example if you have a website of a customer and have to list entries for "Talks" which have been held, or a listing for "Brochures" ... or a simple "Jobs" listing you will in some cases not be able to use the standard content elements cause some special sorting (for example after a field "Publication Date") has to get used. In this case you could create a table whose name fits their contents and insert a listing plugin on the specific page. Then the Editors just will have to create Records of Type "Brochue" or similar and will get a nice list sorted after criterias you define using the criteria Tab in the FE plugin.
Example 1: An assumed example bookshop
Step 1: Table Configuration Folder
First you have to create a sysfolder somewhere in your page-structure (most common somewhere on the root-level, next to your extension template storage folder probably). This folder will contain the categories and properties used in the shop.
Step 2: Install Extensions
Make settings: TCA Mode = 1, Property/Category Folder = Folder created in Step 1
Step 3: Create some properties
Example how to create a "Title" Text field property and a IMAGE property for exampe.
Step 4: Create a root category
Step 5: Assign properties
Step 6: Clear shop-cache
Not normal blue/red cache buttons!
Step 7: Create example records
Step 8: Insert and configure FE plugin
Insert record directly on page (Allow Table on Pages must be set in Step 4)
Step 9: Create a HTML template.
Step 10: Create custom TS
Step 11: View result
Step 12: Create order properties
firstname, lastname, addres, + section containing fields ordered product (dbrel) and order amount
Step 13: Create order root-categories / tables
And assign them the order properties. There must be one table which has the virtual flag set.
Step 14: Insert a FE plugin for ordering
Fill the Forms Tab.
Step 15: Create a HTML template for ordering
Copy over listing tempate and insert order amount fields, create delivery/billing addres template
Step 16: View result
Other documentation
There is a wiki available at:
http://think-open.org/kraftb/t3wiki/index.php/Main_Page
Which features currently some information about how to set up a basket TS-Setup and HTML template – altough not covering everything.
There is also a newsgroup available at:
news://think-open.org -> not running at this moment
Known problems
labelProperty and searchProperty fields of an root-category/table record show all properties and not only those available for the current table (fix bug in T3)
To-Do list
- Create a billing interface
- Pass criteria items through stdWrap so “real” custom criteria selectors can get created.
Changelog
0.0.1
Version
0.0.1
Date/Time
2006-03-?? ??:?? CET
Uploaded by
Bernard Kraft
Changelog
Initial release. Not documented.
0.1.0
Version
0.1.0
Date/Time
2006-07-27 12:00 CET
Uploaded by
Bernard Kraft
Changelog
Multiple tables, Multilanguage support, Ordering forms support, documentation added.
0.1.1
Version
0.1.1
Date/Time
2007-09-03 23:30 CET
Uploaded by
Bernard Kraft
Changelog
Overlaying other tables, IRRE support for containers/sections, mailer system (separate extension), new field type “Geographical location” (using rggooglemap extension), Wizards for text/number fields, User type defined fields, PHP 5.x support . TYPO3 >= 4.1 required
0.1.2
Version
0.1.2
Date/Time
2008-03-17 03:15 CET
Uploaded by
Thomas Peterson
Changelog
Fixing Language, Fixing Criterias, Adding Hooks for Fields, Adding Settings
0.2.1
Version
0.2.1
Date/Time
2008-03-27 02:55 CET
Uploaded by
Thomas Peterson
Changelog
Add Workspaces Backend Frontend
fix little Bugs
add Relation language Selection
0.2.3
Version
0.2.3
Date/Time
2009-09-02 11:45 CET
Uploaded by
Bernhard Kraft
Changelog
Extension now works with TYPO3 4.2.8Marked the extension as "deprecated"
 EXT: KB Shop - 21