DEPRECATION WARNING
This documentation is not using the current rendering mechanism and is probably outdated. The extension maintainer should switch to the new system. Details on how to use the rendering mechanism can be found here.
LO T3Blog template based
| Author: | Kasper Skårhøj |
|---|---|
| Created: | 2002-11-01T00:32:00 |
| Changed by: | Lina Ourima |
| Changed: | 2009-05-24T17:47:13 |
| Classification: | lot3blog |
| Description: | The keywords help with categorizing and tagging of the manuals. You can combine two or more keywords and add additional keywords yourself. Please use at least one keyword from both lists. If your manual is NOT in english, see next tab "language" ---- forEditors (use this for editors / german "Redakteure") forAdmins (use this for Administrators) forDevelopers (use this for Developers) forBeginners (manuals covering TYPO3 basics) forIntermediates (manuals going into more depth) forAdvanced (covering the most advanced TYPO3 topics) see more: http://wiki.typo3.org/doc_template#tags ---- |
| Keywords: | t3blog, typo3 blog, template, blog, kubrik |
| Author: | Lina Ourima |
| Email: | 112@ourima.de |
| Info 4: | |
| Language: | en, de |

 LO T3Blog template based - lot3blog
LO T3Blog template based
Extension Key: lot3blog
Language: en, de
Keywords: t3blog, typo3 blog, template, blog, kubrik
Copyright 2000-2009, Lina Ourima, <112@ourima.de>
This document is published under the Open Content License
available from http://www.opencontent.org/opl.shtml
The content of this document is related to TYPO3
- a GNU/GPL CMS/Framework available from www.typo3.org
Table of Contents
`Introduction 3 <#1.1.Introduction|outline>`_
`Installation 4 <#1.2.Installation|outline>`_
`Configuration 6 <#1.3.Configuration|outline>`_
Changing the Tagcloud Layout 6
Changing the TypoScript to further customize the T3Blog output 6
`Creating custom Templates 7 <#1.4.Creating%20custom%20Templates|outline>`_
`Known problems 9 <#1.5.Known%20problems|outline>`_
Introduction
What does it do?
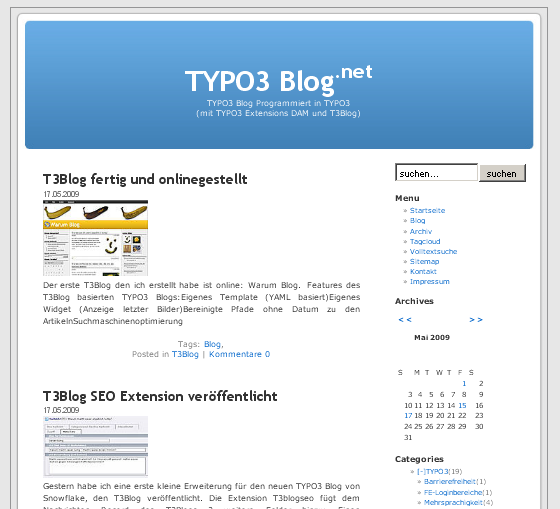
The extension enables T3Blog for template based styling. For a quick start the Wordpress standard template kubrik is delivered with the extension.
Screenshots
Installation
First install T3Blog correctly. See the T3Blog manual or http://typo3-blog.net/blog/t3blog-installieren.html for further information.
Then download and install the lot3blog.
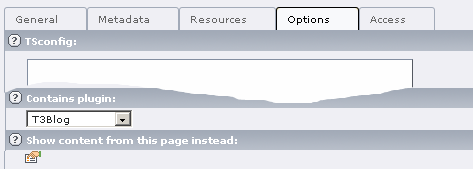
Create one page witch is going to be the root page of your Blog. Edit the page properties and choose “T3Blog” in the “Contains plugin:” section in the page options.
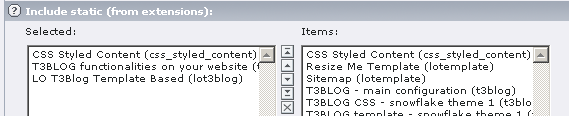
Then either create a new Template or use an existing template. Click on “Click here to edit whole template record”, go to the tab “Includes” and Include the following templates (mind the order):
- CSS Styled Content (css_styled_content)
- T3BLOG functionalities on your website (t3blog)
- LO T3Blog Template Based (lot3blog)
If you want to use the standart (kubrik) Template additionally choose
Kubrik (LO T3Blog) (lot3blog)
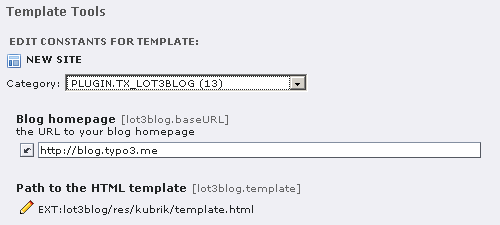
Go to the Constants Editor and edit PLUGIN.TX_LOT3BLOG. It is mandatory to fill out the “Blog homepage” (baseURL) and the id of the page containing the Blog.
Create at least one category and one blog entry.
View the blog.
Configuration
Using your own templates
You can use your own templates simply by inserting the path to the HTML-template and the path to the css and image files in the Constant Editor of your template.
Changing the Tagcloud Layout
The Color and Font-sizes of the tagcloud – as they are not changeable with CSS – can be changed in the Constant Editor.
Changing the TypoScript to further customize the T3Blog output
When you want to change any of the automatic output, make your changes in plugin.tx_t3blog_pi1.widgetName. If you want to make changes to plugins used as Content-Elements make your changes to plugin.tx_t3blog_pi2.widgetName.
After your changes call:
<INCLUDE_TYPOSCRIPT: source=" FILE:EXT:lot3blog/static/lo_t3blog_template/output.txt ">
To make the changes work.
RealURL Konfiguration
An example RealURL configuration is included in the ressources.
Creating custom Templates
Please see the kubrik template as Example.
All Content between <!-- ###HEAD### begin --> and <!-- ###HEAD### end --> is added to the Pages head. All between <!-- ###BODY### begin --> and <!-- ###BODY### end --> will be used to define the page content.
The following markers will be exchanged with the corresponding widgets:
- ###ARCHIVE###
- ###CATEGORIES###
- ###CALENDAR###
- ###BLOGROLLLIST###
- ###SEARCHBOX###
- ###TAGCLOUD###
- ###SOCIALBOOKMARKS###
- ###RSS###
- ###LATESTCOMMENTSNAV###
- ###POSTNAV###
###BLOG_TITLE### is the title of the Blog, ###BLOG_SUBTITLE### corresponding. ###HIERARCHIC_MENU### inserts a normal TMENU.
Wrapping some text with <!-- ###LINK_HOME### --> Some Text<!-- ###LINK_HOME### --> Links to the Blog Home Page, <!-- ###LINK_RSS### --> to the RSS-Feed and <!-- ###LINK_RSS_COMMENTS### --> to the RSS- Feed of the Comments.
All content between <!-- ###CONTENT### begin --> and <!-- ###CONTENT### end --> will be substituted with the contents of the middle column on normal pages, with the Blog-Content on the page specified in the constants as “Blog Pid”.
Content between <!-- ###TEMPLATE_LIST### begin--> and <!-- ###TEMPLATE_LIST### end--> defines the Blog Post Listing, <!-- ###TEMPLATE_SINGLE### begin --> and <!-- ###TEMPLATE_SINGLE### end --> the single view of a Blogpost.
Styling the List-View
In the list view ###PAGEBROWSER### will be replaced with the Page Browser, everything between <!-- ###TEMPLATE_LIST_ITEM### begin --> and <!-- ###TEMPLATE_LIST_ITEM### end --> with the List Items.
Styling a List-Item
The List Item is defined between <!-- ###TEMPLATE_LIST_ITEM### begin --> and <!-- ###TEMPLATE_LIST_ITEM### end --> and has to lie within the ###TEMPLATE_LIST###. Wrapping some Text with <!-- ###SINGLE_LINK### --> Some Text<!-- ###SINGLE_LINK### --> links to the single entry.
The following markers will be replaced:
- ###TITLE### Post Title
- ###TEXT### The complete Content
- ###SHORT_TEXT### The text of the first Content Element cropped to 300 signs
- ###DATE### The date of the post
- ###COMMENTS### Link to the comments
- ###PERMALINK### Permalink
- ###GRAVATAR### Gravator of the post author
- ###TIP_A_FRIEND_LINK_TEXT### Tip a Friend Lnk
- ###EMAIL### Email of author – it is not passed through the spam protect function, a Bug of T3Blog
- ###AUTHOR### Author name
- ###CATEGORIES### list of Kategories with links
- ###TAGS### list to all Tags of the post with links.
- The first Image of the post as thumbnail: <!-- ###HAS_IMAGE### begin --><div class="left_image">###SINGLE_LINK### ###FIRST_IMAGE### ###SINGLE_LINK###</div><!-- ###HAS_IMAGE### end -->
Styling the Single-View
The single view has the same Markers like the List Item of the List view. Additionally the following are possible:
###TIME###
###ADD_COMMENT### A link to add comments.
###TRACKBACKLINK### A link for the trackback
There is no short_text and no first_image availible.
###COMMENT### AND ###TRACKBACK### will be replaced by comments / trackbacks.
Styling the Comment Section
Everything between <!-- ###COMMENT_LIST### begin--> and <!-- ###COMMENT_LIST### end--> will be replaced with the comments if (and only if) there are comments availible. ###PAGEBROWSER### outputs the Pagebrowser, everything between <!-- ###COMMENT### begin--> and <!-- ###COMMENT### end--> the single comment.
Here you have the following options:
###COMMENT_COMMENT_LINK### Link to comment a comment
###COMMENT_TEXT### The actual text of the comment
###COMMENT_NR### The number of comment
###COMMENT_DATE###
###COMMENT_TIME###
###COMMENT_AUTHOR### comment author
###COMMENT_GRAVATOR### Gravator of comment author
###COMMENT_MARGIN### Margin added to the left of the comment to show comment hirarchy.
###COMMENT_WEBSITE### comment author website