DEPRECATION WARNING
This documentation is not using the current rendering mechanism and is probably outdated. The extension maintainer should switch to the new system. Details on how to use the rendering mechanism can be found here.
EXT: objmgr
| Author: | Kasper Skårhøj |
|---|---|
| Created: | 2002-11-01T00:32:00 |
| Changed by: | Joachim Ruhs |
| Changed: | 2007-07-31T14:39:31 |
| Author: | Joachim Ruhs |
| Email: | postmaster@joachim-ruhs.de |
| Info 3: | |
| Info 4: |
EXT: objmgr
Extension Key: objmgr
Copyright 2007 Joachim Ruhs, <postmaster@joachim-ruhs.de>
This document is published under the Open Content License
available from http://www.opencontent.org/opl.shtml
The content of this document is related to TYPO3
- a GNU/GPL CMS/Framework available from www.typo3.com
Table of Contents
EXT: objmgr 1
Introduction 1
What's new? 1
What does it do? 1
Screenshots 2
Installation 5
Reference Installation 5
Inserting data 8
Inserting data the new way 8
Inserting data the old way 12
Availability Check 14
The result of an availability check. 15
Configuration 15
Reference 16
Appendix 16
Known problems 16
To-Do 16
Supported by 16
Sponsored by 16
FAQ 16
Changelog 17
Introduction
Objmgr is an extension based on the extension flatmgr. It allows You to manage different booking objects like vehicles, boats etc. which are rent in a daily manner. Because the extension was derived from flatmgr 1.9.5 I start with version 1.0.0.
What's new?
I added a new view called performance or utilisation view, which shows the performance of object or all objects if the capacity field in objects are set correctly and the field grownups in the booking records is set to the number of persons which rent this object in the booking period. For this purpose I have to add some fields to the objmgr-tables.
Now you can get an extended tooltip, if you click on a booked day in the calendar views and all or some additional fields are activated in the flexform configuration.
What does it do?
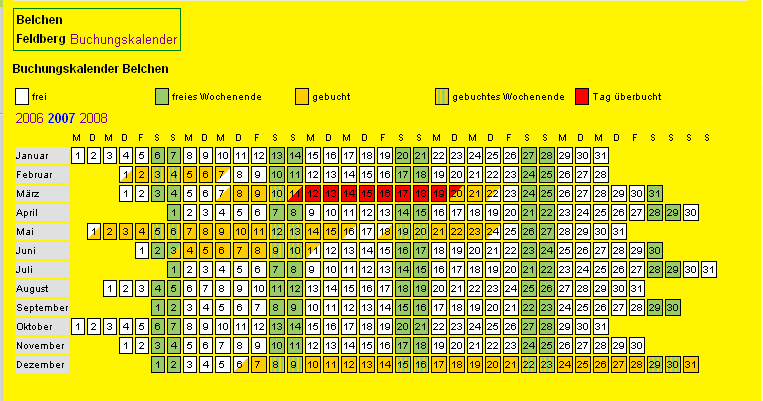
objmgr is a frontend plugin to show a booking calendar of vacation flats. The plugin shows a list of available objects and links to the booking calendars of these. Here the plugin shows vacant days, booked days, weekends and overbooked days in different colors. It is possible to activate tooltips which shows the additional information stored in the booking record. Additional fields can be selected in the flexform of the objmgr. The booking data is stored in the database and can be modified with the admin frontend or in the backend. The frontend can be easily configurated with flexform to adjust the frontend display.
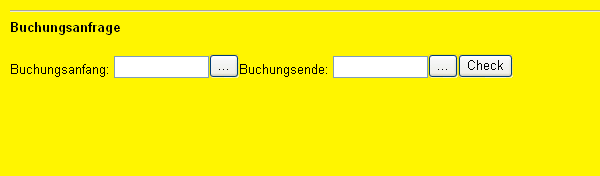
The plugin also offers the possibility to perform an availibility check local or on external typo3-sites for a desired time period. After check, It shows the flats which are vacant for the time period. See Availibility check in this document.
The plugin has an adminmode where flats can be inserted and the booking of these can be done easily.
Notes:
The extension depends on xajax, tt_address and rlmp_dateselectlib, one is used to get a popup-calendar for the adminpage, xajax is used in the availability check. The tt_address can be used to select only known customers in the admiin-pages. If the extensions xajax, tt_address and rlmp_dateselectlib are not installed automatically just install them before the installation of objmgr.
The extension works fine with the calendar extension erotea_date2cal. To simplify booking please install this extension.
If there is only one booking object, the plugin shows no object selecttable to choose one for the display it shows instead the booking calendar of this object.
It is now also possible to book over the end of a year. The bookings in the new year will be displayed correctly in the booking calendar of that year.
It is possible to choose between two different display modi, mark weekends, show daynames shortcuts, show the overbooked legend and adjust the number of calender columns in multi column view
The extension requires the extensions rlmp_dateselectlib and xajax to work correctly.
Screenshots
Months displayed in single rows
Months displayed in multiple rows with active tooltip

Availability check input mask
Utilization or performance view
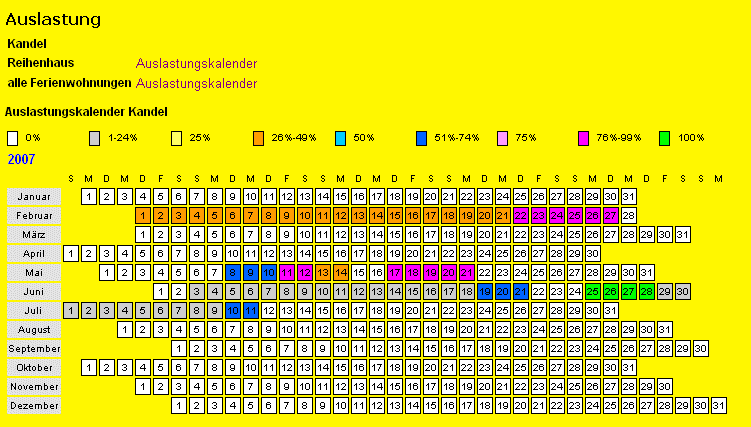
The utilization view shows the performance of a selected flat or all flats together and gives an overview of the efficiency of the flat. Exact efficiency is shown in the title-tooltips of the days.
Availability check output
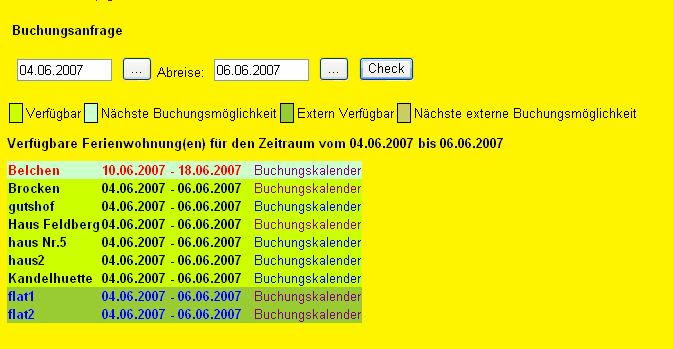
In the output data you see different colors for the booking objects and booking times. They have the following meaning:
Black objectname: flat is available for the desired time and the flat is managed on this host
Red objectname: flat is not available for the desired time, an alternative booking time is displayed
Blue objectname: flat is available and the flat is managed on a different host.
Installation
The extension objmgr depends on the extension rlmp_dateselectlib from Robert Lemke and on the extension xajax. Therefore it is necessary to install rlmp_dateselectlib and xajax too. Then just install the extension like other extensions from the typo3 extension repository TER. If you want use the TYPO3 history functions in the admin frontend of the objmgr see the “Reference Installation” in this manual.
Create a page where you want to use the plugin.
Create a page where only admins of the objmgr have access to.
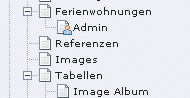
Put the new content element on the desired webpage where you want to use the objmgr, in the picture above the page is called “Ferienwohnungen”. Choose in the flexform configuration the displaytype “display months in single row” or “display months in multi rows”.
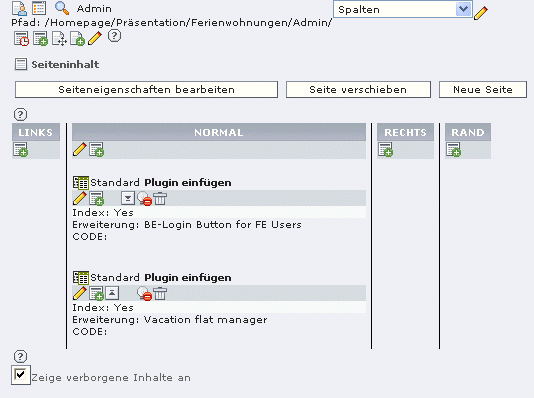
Create a new subpage in this page, name it for example Admin and put another objmgr-plugin to the adminpage.
Choose in the flexform configuration the displaytype adminpage and hide the page for normal users. Choose also the same starting point as in the normal objmgr page “Ferienwohnungen”.
You can also display an availability check which offers the user an input mask, where he insert his booking data and then check the available booking objects for this time period. If the check is positive, the available objects are shown with links to the booking calendars.
Important:
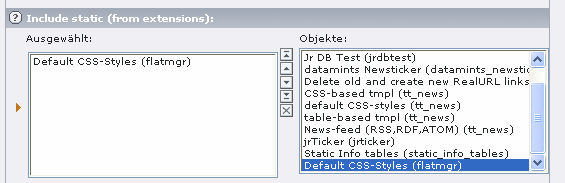
The layout is css-styled. So insert in the template of the page in “include static (from extension)” the object manager object objmgr.
Reference Installation
Create a page where you want to use the plugin (“Ferienwohnungen”).
Create a page where only special website users have access to (“Admin”).
Put the new content element on the desired webpage where you want to use the objmgr, in the picture above the page is called “Ferienwohnungen”. Choose in the flexform configuration the displaytype “display months in single row” or “display months in multi rows”.
The layout is css-styled. So insert in the template of the page in “include static (from extension)” the object manager object objmgr.
Put another objmgr-plugin into the “admin”-page. Choose in the flexform configuration the displaytype “admin”-page. Choose also the same starting point as in the normal objmgr page “Ferienwohnungen”. Hide the page for normal users. This is done via the pagesetup – see 5.
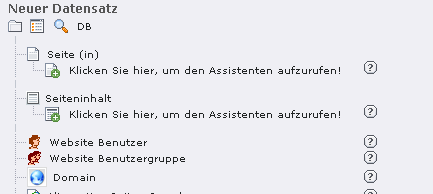
Create a website group named “fewo admin” and a website user named “fewo” and assign the user “fewo” the group “fewo admin”. This can be done in the List module of TYPO3. Website users are stored in a storage folder. If you don't have one – create one. Select in the List module the storage folder and click on the icon of the storage folder and select “new”.
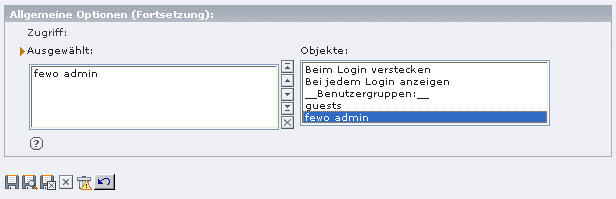
In the page setup of the “Admin”-page select the website group for accessing the “Admin”-page.
If you want to use the history functions of TYPO3 when changing the objmgr data records, you need to be logged in the Backend. This can be done with an modified extension dkd_feuser_belogin (see FAQ in this manual). I also tested the simulatbe extension, but it seems that the backend user isn't instantiated correctly.
In the List module select the storage folder where your website users are and edit the user “fewo”.
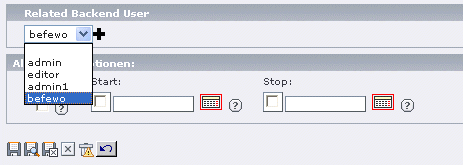
Select a related backend user (which you created before with access rights to Ferienwohnungen) and save it.
Log out from TYPO3 and test it.
- Log in the website with frontend login “fewo”.
- Log in the website with your frontend login.
- In the “Admin”-page you should see something like this.
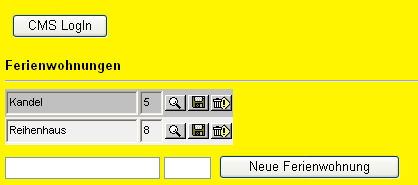
- Click the “CMS Login” button.
- Now you should see something similarly like that.
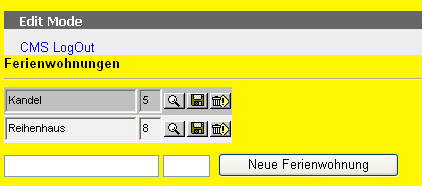
- Change for example the name of the object and save it.
c) Now, if the backend user have enough rights the history tables are filled correctly after changes have been done to any objmgr booking data.
You can test it if you enable the warnings in the objmgr setup of the “Admin”-page. If all works correct no warning should appear when for example you change the name of a object and save it!
When all works, every change you made you can undo with the normal TYPO3 history functions.
Inserting data
There are two ways to insert data to the objmgr. One is done via the old fashioned way in the List-module. The other way is to add a page to the pagetree, name it for example adminflats and insert the plugin here again and choose in the flexform the display option adminpage. To protect this page from all users except the flatsadmins make this page only accessible for special frontend users.
If you plan to work with booking categories, go to the list module and select the page where you store the booking records and add some booking categories (for example “standard”, “family”, “group”...).
Inserting data the new way
This is the other way. Add a page to the pagetree, name it for example Admin and insert the plugin here again.
Hide this page for normal FE-Users. Important is to choose the same Startingpoint for the plugin as in the normal FE-page where the plugin is located.
In the configuration for the plugin choose “adminpage” as view.
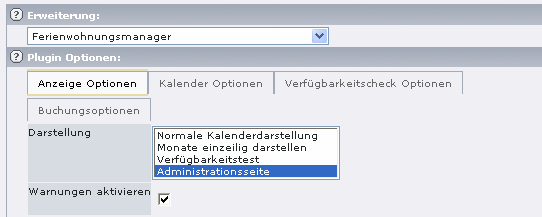
In the booking options you can select the additional fields to use with the objmgr and you can choose to use XAJAX for the data transfer to the server. Only those fields are displayed ( in the tooltip and the admin page) which are here selected. The tooltips can separately be deactivated (see calendar options).
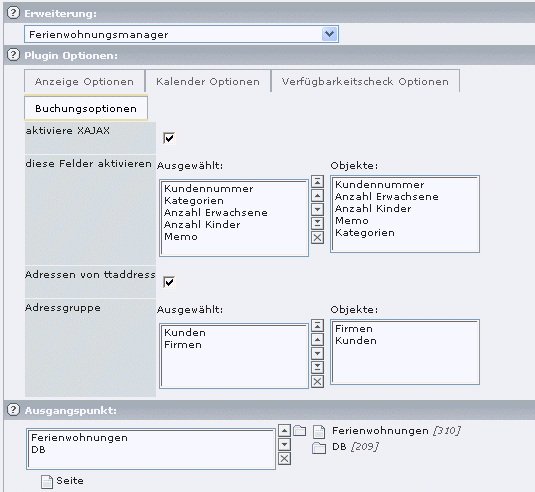
Important: If you want use tt_address for the customers, you must at least select the field Kundennummer (customernumber) because the uid of the tt_address table is stored in this field. Also you have to check the field addresses from ttaddress (“Adressen von ttaddress”) and select at least one addressgroup below.
Now change to the view-module and select this page.
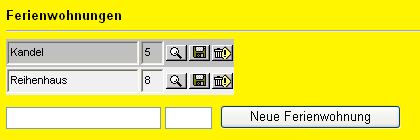
Here for example is a page which shows objects named “Belchen” and “Haus Feldberg” and so on.
To go to the bookings, klick on the magnifier.
 Select this icon of a object to go to the bookings of this
object
Select this icon of a object to go to the bookings of this
object
 . Activate this icon if you changed the objectname and/or the
object capacity and want to save the new data
. Activate this icon if you changed the objectname and/or the
object capacity and want to save the new data
 Activating this icon will hide the object and the bookings
belonged to that object. Unhide can be done in the List- module.
Activating this icon will hide the object and the bookings
belonged to that object. Unhide can be done in the List- module.
At the bottom you can insert a new object to the objmgr by inserting the objectname and if you decided to use the efficiency view insert also the number of person who can rent the object at a time.
You can edit the booking data, change start and end dates and the field bookedby (“gebucht von”) of a single booking record by inserting the changes and activating the save icon.
Activating the edit icon display the additional fields which are configured in flexforms. You can edit these additional fields and save the whole data record.
At the bottom of this page you can insert a new booking data record for this object.
The extension objmgr uses here a popup-calendar from the extension rlmp_dateselectlib written by and thanks to Robert Lemke.

Hint: It may be useful to add a second objmgr content element to the adminpage with one of the months display.
If you got a warning message when you try to save a changed data record then this is because the objmgr-extension will write history- logs and therefore it needs an active be-user to write to the history tables. Changes will be written to the objmgr-tables with or without warning message.
I managed this with a modified “dkd_feuser_belogin” extension – see FAQ of this manual.
Inserting data the old way
In the List-module change to the page where the plugin is located or where you want to store the datasets and add some new entries for booking categories, booking objects and object bookings. Before you can insert a booking, at least one booking object should be present.
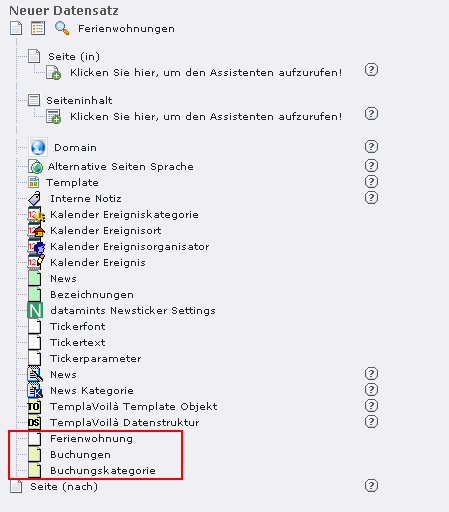
Now insert the booking objects. When you have done, insert the booking data.
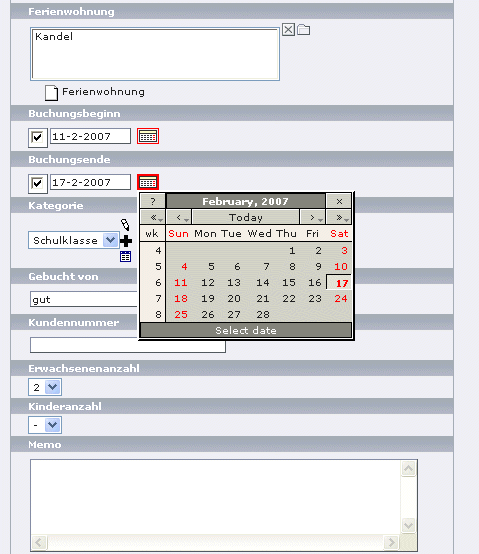
Select a booking object and insert first and last day, select or create a category of the booking and insert the desired number of persons. Then save the whole thing. You can add an memo to booking too.
To get this little calender you have to install the extension erotea_date2cal.
Now go to the page where the plugin is inserted. Select the booking calender link to show the booking of the selected object in the calendar.
To get this little calender you have to install the extension erotea_date2cal.
That's it...Have fun...
Availability Check
The availability check offers the possibility to check the booking objects local and external for vacancies in an given time period.
The configuration of the availability check is done via flexforms.
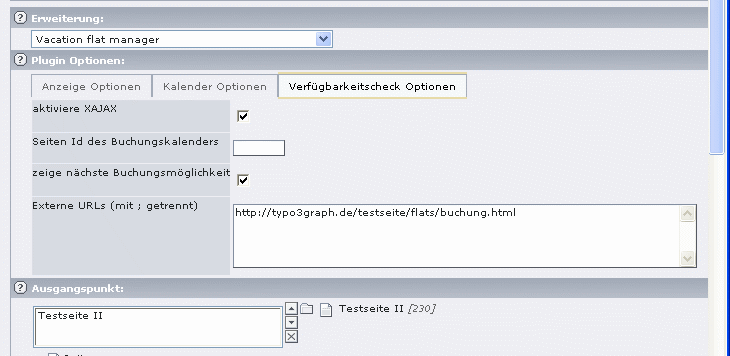
Activating XAJAX to prevent a full page refesh, when the results are shown.
The pageid (Seiten ID des Buchungskalenders) is the id of the page, where the normal objmgr-calendar is shown. This is needed to set the links accordingly.
If show the next vacant time period (zeige nächste Buchungsmöglichkeit) is set, then the next free period is shown if the booking object is not available for the desired time.
In the textarea foreign URL's “Externe URL's (mit ; getrennt)” you can insert URL to other typo3-sites with an installed objmgr and a page where an availabilitycheck is installed. Multiple URL's have to be separated with a semicolon “;”. This is very important! No spaces or newlines allowed.
If all is done correctly your availabiltycheck fetches the data from the desired websites which are set in the textarea and shows the result with the booking objects of this site.
Important: The remote sites to check to have to run objmgr-extension above version 1.6.0. Every availabilitycheck needs time to perform, therefore it is not recommended to check more than 5 external URL's.
The result of an availability check.
Configuration
The configuration of the plugin is done with the flexform.
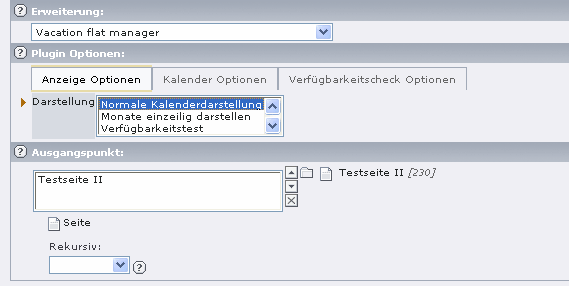
Here you can choose between monthsinglerow- , monthmultirows-, adminpage, availibility check- and efficiency-display. You can configure the calendars to show the shortcuts of the daynames, mark the weekends and show the overbooked legend.
Now choose the startingpoint where you stored the booking datasets of the flat(s).
Important: Choose one of the calendar display modes!
In case of the availability check you can insert the page-id where the normal view of the bookingcalendar is shown, so that the link to the bookingcalendar works correct. If no pageid is given, the actual pageid is used instead.
Reference
Options in the template SETUP:
If this options are set in the template setup, they overrule the flexform-settings.
plugin.tx_objmgr_pi1 :
displayMode
Property
displayMode
Data type
string
Description
The display mode for the calendar. Values are monthMultiRow and monthSingleRow
Default
monthMultiRow
markWeekends
Property
markWeekends
Data type
int
Description
If set, mark the weekends with different color
Default
1
calendarColumns
Property
calendarColumns
Data type
int
Description
The calender columns in monthMultiRow-display
Default
4
StartOfWeek
Property
StartOfWeek
Data type
string
Description
The start of the week [sunday|monday]
Default
monday
showOverbookedLegend
Property
showOverbookedLegend
Data type
int
Description
If set, displays the overbooked legend
Default
1
showDaysShortcuts
Property
showDaysShortcuts
Data type
int
Description
Use this to display the dayname shortcuts at the top of the months
Default
1
showBookedBy
Property
showBookedBy
Data type
Int
Description
If set, shows the bookedby field as title in the calendar view
Default
0
showExtendedTooltips
Property
showExtendedTooltips
Data type
Boolean
Description
If set, shows the additional fields in the calendar tooltips
Default
0
((Unknown Property))
Property
Data type
Description
Default
calendarPageId
Property
calendarPageId
Data type
Int
Description
The pageid where the booking links show to in the availibility check
Default
null
showNextBookingPossibility
Property
showNextBookingPossibility
Data type
int
Description
If set, shows the next possibble booking time period in the availability check
Default
1
showBookedBy
Property
showBookedBy
Data type
boolean
Description
If set, shows bookedby field tooltip in the calendar views
Default
0
useXAJAX
Property
useXAJAX
Data type
boolean
Description
If set, activates XAJAX in the availability check
Default
1
displayAdditionalFields
Property
displayAdditionalFields
Data type
boolean
Description
If set, display the additional fields in the admin frontend
Default
1
displayAdditionalFieldsWithXAJAX
Property
displayAdditionalFieldsWithXAJAX
Data type
boolean
Description
If set, display the additional fields in the admin frontend using XAJAX
Default
1
showWarnings
Property
showWarnings
Data type
boolean
Description
If set, warnings are enabled
Default
1
Appendix
Known problems
if you catch bugs, please report them to postmaster@joachim-ruhs.de
To-Do
any wishes, tell me
Supported by
Andreas Meier (CH), alpha tester
Sponsored by
major-sponsor: heysemedia - Thomas Heyse, http://www.heyse.de/
others: Gabriel Schreiber, http://www.schreiber-online.de .
FAQ
The availability check didn't work on foreign sites – Make sure that on both sites, local and foreign, the same Version of the objmgr ist installed.
The availability check didn't work on multiple foreign sites – the URL's must be entered in flexform field without newline and use a “;” as separator
I get a XML response error – there are illegal characters in the response (check the error message). You can either switch your TYPO3 to utf-8 encoding in the installtool and set the correct page.config.locale_all. I tested with utf-8 and iso8859-1. The extension works fine when TYPO3 is set to [BE][forceCharset] = utf-8.
XML-response error in the availability check – make sure you have set the page.config.locale_all right in the TS page setup. XAJAX of the objmgr uses the page.config.locale_all to switch to the desired encoding. Here is an example of utf-8 setting.
page {
...
config.metaCharset = utf-8
config.additionalHeaders = Content-Type:text/html;charset=utf-8
config.locale_all = de_DE.utf8
....
}
For iso charset you can set
page.config.locale_all = de_DE.ISO8859-15
You get warning about an inactive backend user when trying to save a modified data record..
You have to be logged in the backend to get the history tables updated when you change a data record.
I use for this purpose the modified extension dkd_feuser_belogin.
The modifications are made in the file ext_tables.php of the the extension dkd_feuser_belogin.
"foreign_table" => "be_users",
//"foreign_table_where" => "AND be_users.pid=###SITEROOT### ORDER BY be_users.uid",
"foreign_table_where" => "AND be_users.pid=0 ORDER BY be_users.uid",
I also tried to use for the backend login the extension simulatebe. It seems that the backend user created by simulatbe is not instantiated correctly. So I can't manage to get the history tables work correct with simulatebe.
 EXT: objmgr - 17