DEPRECATION WARNING
This documentation is not using the current rendering mechanism and is probably outdated. The extension maintainer should switch to the new system. Details on how to use the rendering mechanism can be found here.
EXT: Questionaire
| Created: | 2006-12-10T12:05:20 |
|---|---|
| Changed by: | Patrick Broens |
| Changed: | 2013-11-21T14:32:40 |
| Email: | patrick@patrickbroens.nl |
| Info 2: | |
| Info 3: | |
| Info 4: |
EXT: Questionaire
Extension Key: pbsurvey
Copyright 2000-2012, patrick@patrickbroens.nl, <patrick@patrickbroens.nl>
This document is published under the Open Content License
available from http://www.opencontent.org/opl.shtml
The content of this document is related to TYPO3
- a GNU/GPL CMS/Framework available from www.typo3.com
Table of Contents
EXT: Questionaire 1
Introduction 2
What does it do? 2
Features 2
Screenshots 2
Users Manual 6
Installation 6
Localization settings 6
Prepend at copy 6
How to update 6
Preparations 6
Include static extension template 6
Add the plugin 6
How to design a questionaire. 6
The steps in a questionaire project 7
The design 7
The order of questions and answers 7
Add Questionaire items 7
Choice questions 8
1: Choice – Multiple Answers (Checkboxes) 8
23: Choice – Multiple Answers (Selectbox) 8
2: Choice – One Answer (Dropdown) 8
3: Choice – One Answer (Option Buttons) 8
4: Choice – True / False 9
5: Choice – Yes / No 9
Matrix questions 9
6: Matrix – Multiple Answers per Row (Checkboxes) 9
7: Matrix – Multiple Answers per Row (Textboxes) 9
8: Matrix – One Answer per Row (Option Buttons) 9
9: Matrix – Rating Scale (Numeric) 9
Open Ended Questions 10
10: Open Ended – Comments Box 10
11: Open Ended – Constant Sum 10
12: Open Ended – Date 10
13: Open Ended – Number 10
14: Open Ended – One Line 10
15: Open Ended – One or more lines 10
16: Open Ended – Ranking 11
Presentation 11
17: Presentation – Heading 11
18: Presentation – Horizontal Rule (HR) 11
19: Presentation – HTML 11
20: Presentation – Image 11
21: Presentation – Message 11
The Answer Wizard 11
Page Break & Conditions 11
Statistics 13
Scoring 13
FAQ 13
Administration 14
Rights & Permissions 14
Configuration 14
FlexForm-configuration 14
Reference (TypoScript) 16
Template file 18
RealUrl and SimulateStaticDocuments 20
Multilanguage Surveys 21
Exporting results 21
Extending pbsurvey 21
Credits 21
Tutorial 23
Known problems 28
Warnings 28
To-Do list 28
Changelog 30
Introduction
What does it do?
Questionaire is an extension to take surveys from the visitors of your website. The results can be exported to a csv-file to analyze in Microsoft Excel or the statistical program SPSS , it's open source concurrents PSPP or OpenStat. A separate extension, Questionaire Export (pbsurveyexport) is available to export the results. In the future statistical analysation can be done in the TYPO3 backend as well. The development of this extension Questionaire Statistics (pbsurveystatistics) has already started.
Features
24 different questions and presentation items, including 7 open ended questions, 4 matrix types, and 7 choice types
- Visitors can enter the questionaires anonymous or by FE-login.
- Maximum number of responses per logged in user.
- Optional update of response by respondent.
- Different actions after taking a survey, like showing a message or closing the browser window.
- Optional 'Cancel' and/or 'Back'-button
- Multiple options if a user clicks the cancel button while taking a survey.
- Page and question numbering options.
- Possibility to enter a default value for each question.
- Make questions mandatory.
- Pagebreaks
- Show or hide pages from the respondent based on page conditions.
- Form validation on Client Side with JavaScript or Server Side with PHP, especially usefull for accessibility.
- 2 formats of exporting the data format.
- Optional export of unfinished results with separate 'export' extension (pbsurveyexport)
- Styling by template file and Cascading Style Sheets (CSS).
- Configuration by FlexForm or TypoScript.
- XHTML-strict output.
- Optional Captcha check at the beginning of the survey. (Needs the extension sr_freecap to be loaded)
- Redirect respondents to different pages at the end of the survey depending on their scores.
- Send an email to multiple recipients when a visitor finishes a survey, containing the questions with their answers or a message.
Screenshots
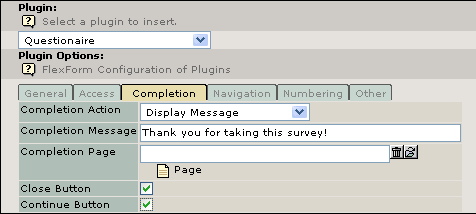 Image 1Configuration of a questionaire using a FlexForm.
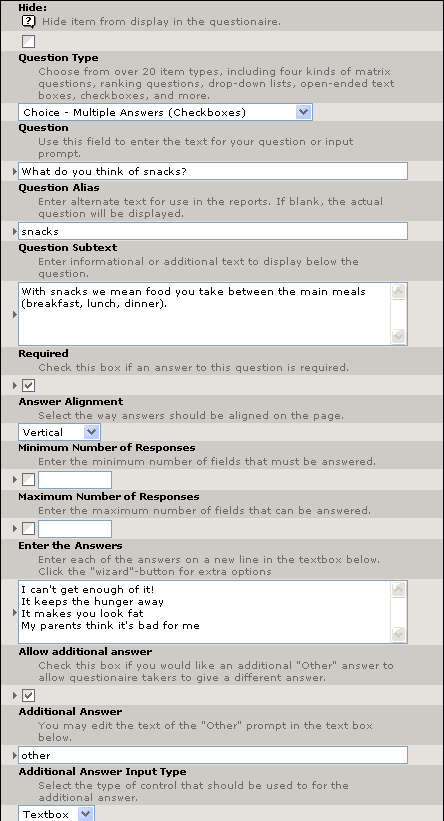 Image 2Add a new question
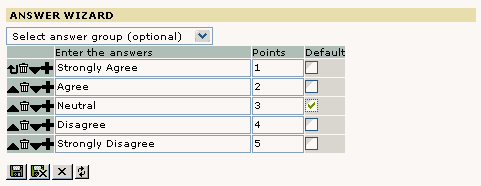 Image 3The Answer Wizard
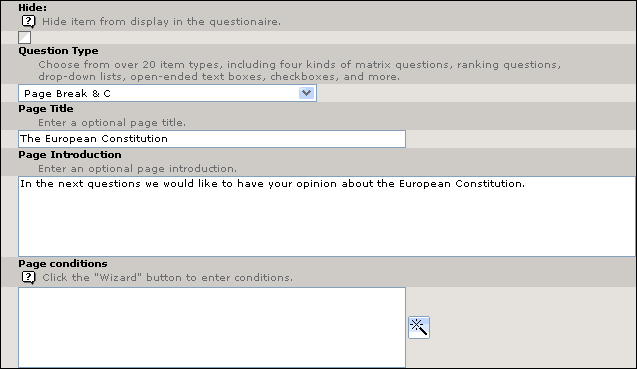 Image 4Add a page break.
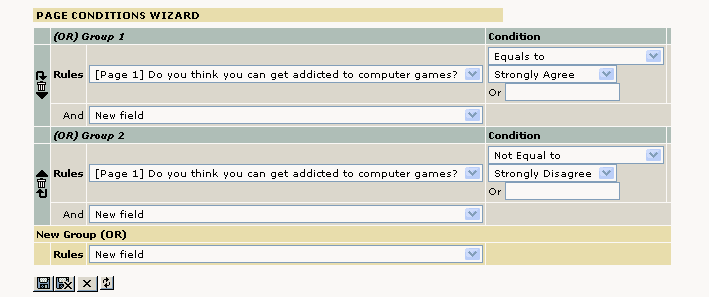 Image 5The Page Conditions Wizard.
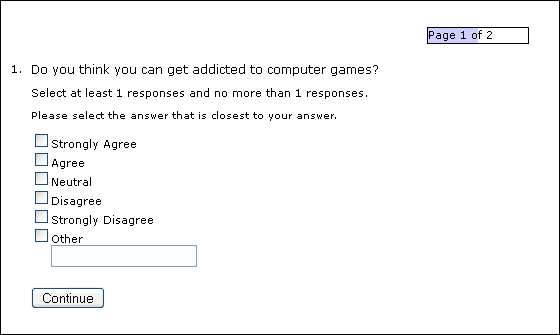 Image 6An example of a questionaire.
Users Manual
Installation
Questionaire is developed for systems running TYPO3 version 3.8.1 and up. Install the extension using the Extension Manager.
WARNING !! if you have installed tx_pbsurvey version <0.1.2 and want to upgrade it to version 1.0.0+ please read the part “How to update”.
Localization settings
Localization mode for text fields By default, all text fields (question, question subtext, alias ...) from a new localized survey item will be prepended with "[translate to ...]". If this is not wanted you can disable it here.
Hide new localizations By default, new localization are immediattely visible at the frontend for visitors. If you are working on a live website, it is possible you don't want this behaviour. By clicking the checkbox you can hide new localizations.
Prepend at copy
Here you can disable adding of the text "(copy [#])" to titles of copied records. This text will be prepended by default when the localization mode for text fields is disabled. Normally it will simply substitute "[translate to ...]" to "(copy [#])".
How to update
tx_pbsurvey 1.0.0+ handles the results completely different than previous versions (<0.1.2). I have tried to build an updatetool, but this tool was very time and processor power consuming, especially with large amounts of results.
It is advisable to finish running surveys, export / backup all data and remove the previous extension from the Extension Manager. Remove the database tables “tx_pbsurvey_items” and “tx_pbsurvey_results” as well. All data in these tables will be useless after upgrading to the new version, so it is better to clean them completely.
I have tried to build a proper base for upcoming versions and features of Questionaire. Hopefully the changes to database tables will not be that big in the future.
Preparations
- Make a new system folder (SysFolder) for storage of the questionaire items and results. This is optional but recommended.
- If not using a anonymous questionaire, make a new system folder for Frontend users and groups as well.
- A default set of CSS styles is included in the extension. To use these CSS styles, include the static extension template “default CSS-styles (pbsurvey)” in your main TS-template at the part “Include static (from extensions):”. For more explanation about static extension templates read the section “Templates” in the TYPO3 document “Getting Started”. If you want to use your own CSS-styles for the extension, simply do not select the static extension template.
- Add a new page which shall contain the plugin. If the questionaire will not be held anonymously, choose a usergroup in 'Access' which users may enter the questionaire. Don't forget to add a page which contains a login-box plugin (standard 'Login form' or 'Better login- box). Read the manuals of these extensions.
Include static extension template
*** Important Note ***There is a major change between pbsurvey 1.0.0 and older versions: In pbsurvey 1.0.0 the default stylesheet is not included automatically.
To use the default CSS-stylesheet it needs to be included with the “Include static (from extensions)” feature.
Add the plugin
Go to the page which shall contain the plugin. Using the module 'Web > Page' you can add a content element to this page. Choose 'Questionaire' under 'Plugins' in the wizard 'New content element'. If not using the wizard, choose 'Insert plugin' from the Type-dropdown and select the option 'Questionaire' in the form field 'Plugin'. (See 'Configuration' for a explanation of the various fields. Warning : Do not use the option 'IP-address' in the select field 'Anonymous check' on the tab 'Access' unless you are aware what you are doing. Using this option can cause loss or overwriting of answers, because of a sudden IP change in a session or people who use the same IP address. Use this option only when you are certain all users have a different IP address which will not change, like in some internal networks.
How to design a questionaire.
When arranging a questionaire, a thorough design process generally goes in advance. The most important factor is to know what your customer, employee or member wants or thinks).
The steps in a questionaire project
Establish the goals of your project – What do you want to learn
Determine your target group – Who do you want to respond
Determine your method – How do you want to ask the questions
Design your questionaire – What are you going to ask
Test the questionaire – Test the questions
Start the questionaire and get results – Ask the questions
Analye the results – Generate statistics and reports
The design
With a online questionaire you always have to take into account that your respondents cannot ask questions directly: “What exactly do you mean?”, if he/she doesn't understand a question.
Keep it short and simple. When respondents are presented 20 pages with questions, they will give up before they even started. Ask yourself at each question what you will do with the collected information. If you cannot answer satisfactorily, omit the question. Avoid the temptation to add some more questions, simply because you are doing a questionaire. If necessary, divide the questions in three groups: Must know, can be useful or nice to know. Remove questions in the last group, except if the first two groups are small.
Start your questionaire with an introduction or welcome message. This can be put as the content of the first page or above the first question. A good introduction can encourage visitors to do the questionaire.
Add a 'Don't know' or 'Not applicable' to each question, except the ones of which you are certain that all respondents have a clear answer .In most of the cases the researcher can't do anything with this answer, but it prevents frustrated respondents. Sometimes these answers can be the most honest answer of the respondent to your question. Respondents who get the feeling they have to give an answer they do not want to give, leave the questionaire without finishing it, where you get without results. For example many people will leave the questionaire at obligatory questions concerning their income.
Add 'Other' or 'None' if this could be a logical answer to the question. If the choice in answer is a list of opinions, preferences or behaviour, it is most likely you have to add these possibilities.
The order of questions and answers
Keep two things in mind when you determine the order of questions and answers. The first is how the question and answer order can stimulate the respondents to finish your questionaire. The second is how the order can influence the results.
The ideal situation would be that the first questions are easy and pleasantly to answer . These questions will encourage the respondent to continue. It is advisable to group questions concerning the same subject on one page. Ask difficult or sensitive questions at the end of the questionaire.
Concerning the visual presentation keep it simple and quiet. Do not use distracting hard colors. Keep enough space ibetween the items on the page. This reads more easily.
Add Questionaire items
In the module 'Web > List' you go to the system folder you made to add questionaire items and results. Click on the icon to insert a new record. Choose 'Questionaire item' in the list 'New record'. A form is shown to you. You can choose the kind of question, a page break or a presentation item in the dropdown list under 'Question Type'.
All the question types have a collection of default fields which we shall describe first. After this, specific settings for each type will be described.
Hide
ITEM Field
Hide
Description
Hide item from display in the questionaire.
This option can be usefull when testing the questionaire. Don't change this setting if the questionaire is 'live' and there are already results from visitors. It will influence the results of the questionaire.
Question Type
ITEM Field
Question Type
Description
Choose from over 20 item types, including four kinds of matrix questions, ranking questions, drop-down lists, open-ended text boxes, checkboxes, and more.
Question
ITEM Field
Question
Description
Use this field to enter the text for your question.
Question Alias
ITEM Field
Question Alias
Description
Enter alternate text for use in the reports. If blank, the actual question will be displayed. Normally, the extension will display the question as column head when exporting the results to a csv-file. When using long questions, these columns can get very wide in Excel or SPSS. Use this field to enter a alternate text to substitute the question as column header, for instance 'Question 1'.
Question Subtext
ITEM Field
Question Subtext
Description
Enter informational or additional text. This text will be displayed between the question and the possible answers.
Required
ITEM Field
Required
Description
Check this box if an answer to this question is required. In the questionaire a little star (*) will be displayed behind the question to show the visitor this question is mandatory. When a respondent forgets to give an answer, the system will display a popup with the error message.
Choice questions
Choice questions are questions with predefined answers. These answers will be provided by the administrator of the questionaire.
 1: Choice – Multiple Answers (Checkboxes)
This type will ask a question to which a visitor can respond with multiple answers. An additional answer (open field) is optional, if the respondent thinks the given answers do not provide his meaning or opinion. Answers are shown as checkboxes.
ITEM Field
Answer alignment
Description
Select the way answers should be aligned on the page. Options are:
- Horizontal, all answers will be displayed behind each other. Not suitable when using a lot of answering possiblities.
- Vertical, all answers on a new line.
ITEM Field
Minimum Number of Responses
Description
Enter the minimum number of checkboxes that must be checked. By clicking the checkbox you can turn this option on and off. The questionaire will display a message if the respondent tries to submit his answers and the amount of checked items is not enough.
ITEM Field
Maximum Number of Responses
Description
Enter the maximum number of checkboxes that can be checked.
ITEM Field
Enter the Answers
Description
Enter each of the answers on a new line in the textbox. Click on the button at the right side of the box to see more options. If the button is not there, save the item by clicking the button 'Save Document' at the top or bottom of the screen. The 'Answer Wizard' button will appear. The options will be described below the items.
ITEM Field
Allow additional answer
Description
Check this box if you would like an additional "Other" answer to allow questionaire takers to give a different answer. This will be displayed as a extra checkbox, a text and a textbox.
ITEM Field
Additional Answer
Description
You may edit the text of the "Other" prompt in the text box below.
ITEM Field
Additional Answer Input Type
Description
Select the type of control that should be used to for the additional answer. This can be a textbox or textarea.
 23: Choice – Multiple Answers (Selectbox)
This type will ask a question to which a visitor can respond with multiple answers. All answers are shown in one selectbox which can have different sizes. When the size of the selectbox is smaller than the amount of questions, the user can scroll in the selectbox. Multiple items are chosen by the user holding the CTRL key when selecting items. Very handy with a large amount of possible answers.
ITEM Field
Minimum Number of Responses
Description
Enter the minimum number of checkboxes that must be chosen. By clicking the checkbox you can turn this option on and off. The questionaire will display a message if the respondent tries to submit his answers and the amount of selected items is not enough.
ITEM Field
Maximum Number of Responses
Description
Enter the maximum number of checkboxes that can be chosen
ITEM Field
Enter the Answers
Description
Enter each of the answers on a new line in the textbox. Click on the button at the right side of the box to see more options. If the button is not there, save the item by clicking the button 'Save Document' at the top or bottom of the screen. The 'Answer Wizard' button will appear. The options will be described below the items.
ITEM Field
Selectbox height
Description
The height in lines of the selectbox. When the height is smaller than the actual possible answers, the user can scroll through the list.
 2: Choice – One Answer (Dropdown)
Ask a question where only one answer can be given. Answers are displayed in a dropdown list.
ITEM Field
Enter the Answers
Description
Enter each of the answers on a new line in the textbox. Click on the button at the right side of the box to see more options. If the button is not there, save the item by clicking the button 'Save Document' at the top or bottom of the screen. The 'Answer Wizard' button will appear. The options will be described below the items.
 3: Choice – One Answer (Option Buttons)
Ask a question where only one answer can be given. The answers are predefined and are displayed as radiobuttons. An additional answer (open field) is optional, if the respondent thinks the given answers do not provide his meaning or opinion.
ITEM Field
Answer Alignment
Description
Select the way answers should be aligned on the page. Options are:
- Horizontal, all answers will be displayed behind each other. Not suitable when using a lot of answering possiblities.
- Vertical, all answers on a new line.
ITEM Field
Enter the Answers
Description
Enter each of the answers on a new line in the textbox. Click on the button at the right side of the box to see more options. If the button is not there, save the item by clicking the button 'Save Document' at the top or bottom of the screen. The 'Answer Wizard' button will appear. The options will be described below the items.
ITEM Field
Allow additional answer
Description
Check this box if you would like an additional "Other" answer to allow questionaire takers to give a different answer. This will be displayed as a extra checkbox, a text and a textbox.
ITEM Field
Additional Answer
Description
You may edit the text of the "Other" prompt in the text box below.
ITEM Field
Additional Answer Input Type
Description
Select the type of control that should be used to for the additional answer. This can be a textbox or textarea.
 4: Choice – True / False
Ask a question to which the only possible answers are true or false. The answers can be displayed as a dropdown, horizontal or vertical radiobuttonlist.
ITEM Field
Default value
Description
This value will be selected as the default for this question.
ITEM Field
Display Type
Description
Select the format for the response to the question.
 5: Choice – Yes / No
The same as Choice – True / False, except the respondent can answer with Yes or No.
 24: Choice – Image rating
Rate images by providing a rating scale.
ITEM Field
Images
Description
Select the images which should be rated
ITEM Field
Beginning number
Description
Start of the rating scale
ITEM Field
Ending number
Description
End of the rating
Matrix questions
With matrix questions you can ask questions in a 2 dimensional way. This is very usefull if you like to know an opinion on different subjects which all can have the same possible answers.
 6: Matrix – Multiple Answers per Row (Checkboxes)
Ask a question in a 2 dimensional format, where the respondent can select each answer in every row. This is done by checkboxes. If an answer is required, the respondent only has to click one of the checkboxes in the entire answerlist.
ITEM Field
Row Names
Description
Enter each row name on a separate line.
ITEM Field
Enter the Answers
Description
Enter each of the answers on a new line in the textbox. Click on the button at the right side of the box to see more options. If the button is not there, save the item by clicking the button 'Save Document' at the top or bottom of the screen. The 'Answer Wizard' button will appear. The options will be described below the items.
 7: Matrix – Multiple Answers per Row (Textboxes)
A textbox is placed in every cell of the table. The respondent can answer with text. When a question is required, the respondent only has to fill one of the textboxes in the entire question.
ITEM Field
Row Names
Description
Enter each row name on a separate line.
ITEM Field
Enter the Answers
Description
Enter each of the answers on a new line in the textbox. Click on the button at the right side of the box to see more options. If the button is not there, save the item by clicking the button 'Save Document' at the top or bottom of the screen. The 'Answer Wizard' button will appear. The options will be described below the items.
 8: Matrix – One Answer per Row (Option Buttons)
Only one possible answer per row. If an answer is required, the respondent has to select an answer in each row.
ITEM Field
Row Names
Description
Enter each row name on a separate line.
ITEM Field
Enter the Answers
Description
Enter each of the answers on a new line in the textbox. Click on the button at the right side of the box to see more options. If the button is not there, save the item by clicking the button 'Save Document' at the top or bottom of the screen. The 'Answer Wizard' button will appear. The options will be described below the items.
 9: Matrix – Rating Scale (Numeric)
The participant can give each item in a row a rating. The rating starts with the given beginning number in the first column and ends with the ending number, raising each column with the value 1. The amount of columns depends on the beginning and ending number.
ITEM Field
Beginning number
Description
Enter the first number for the rating scale.
ITEM Field
Ending number
Description
Enter the last number for the rating scale.
ITEM Field
Row Names
Description
Enter each row name on a separate line.
Open Ended Questions
Open questions show the participant answering possibilities as a text type. The participant can answer with his/hers own obvious opinion.
 10: Open Ended – Comments Box
Displays a textbox containing more textlines in which the participant can put a comment or description.
ITEM Field
Default value
Description
Enter a text to be displayed in the comments box, when a participant enters the question. The participant can change this value.
 11: Open Ended – Constant Sum
Questiontype with multiple textboxes in which a participant can enter numbers. Optional the sum of these numbers has to be a given value.
ITEM Field
Answer total
Description
Enter the total that the value must add up to. To allow any total, leave this field blank.
ITEM Field
Row Names
Description
Enter each row name on a separate line.
 12: Open Ended – Date
Ask a question for which the answer has to be a date. Optional the answer has to be between a minimum value and a maximum value.
ITEM Field
Default value
Description
The date entered below will be the default value. Format for the date is dd-mm-yyyy.
ITEM Field
Minimum value
Description
Enter the earliest acceptable date.
ITEM Field
Maximum value
Description
Enter the latest acceptable date.
 13: Open Ended – Number
Displays one textfield that only accepts numeric values. Optional the answer can be limited with a smallest and largest acceptable numeric value.
ITEM Field
Mimimum value
Description
Enter the smallest acceptable numeric value.
ITEM Field
Maximum value
Description
Enter the largest acceptable numeric value.
ITEM Field
Maximum length
Description
Enter the maximum number of allowable characters for this question.
 14: Open Ended – One Line
You can use this type for answers that can only contain one textline. Also useable to ask a question for which the answer has to be a email address.
ITEM Field
Is E-mail Address
Description
Check this box if the answer to this question must be a valid email address.
ITEM Field
Default value
Description
The value entered below will be displayed as the default for this question.
ITEM Field
Maximum length
Description
Enter the maximum number of allowable characters for this question.
 15: Open Ended – One or more lines
Shows one or more textboxes below each other. The administrator can limit the amount of fields the participant must answer with a mimimum and a maximum response.
ITEM Field
Minimum number of responses
Description
Enter the minimum number of textfields that must be answered.
ITEM Field
Maximum number of responses
Description
Enter the maximum number of textfields that must be answered.
ITEM Field
Maximum lengte
Description
The maximum number of allowable characters for each textbox.
 16: Open Ended – Ranking
The participant has to enter a ranking number for each item in the question. The lowest rating value is always 1, the highest depends on the amount of items. When 4 answers are displayed, the possiblities are 1 to 4. No numeric value can be entered twice.
Presentation
Presentation items are not questions, but parts that can be placed between the questions to explain or to enhance te questions. You can insert headlines, a horizontal rule, images or additional text.
 17: Presentation – Heading
Use this type to display a extra heading in the page.
 18: Presentation – Horizontal Rule (HR)
Display a horizontal line between two elements to separate them from each other.
 19: Presentation – HTML
In some special occasions where the default presentation items will not satisfy, you can enter plain HTML-code in the page by using this textarea. It could be used to display a multimedia element like a Flash file or a movie.
 20: Presentation – Image
To insert a image in the questionaire. Maximum height or width can be entered. You can select a horizontal alignment for how the image should be displayed.
 21: Presentation – Message
Enter a text to display in the questionaire.
The Answer Wizard
You can use the Answer Wizard in most of the Choice- and Matrix questions. It can be accessed using the button at the right side of the textarea 'Enter the Answers'. If you just made a new record and the button is not there, save the question by using the button 'Save Document' at the top or bottom of the page. When you saved the record, the button will appear.
Select answer group
ASSISTENT Field
Select answer group
Description
The wizard provides predefined answer groups, like 'Agree' to 'Disagree', 'Good' to 'Bad' or 'Easy' to 'Difficult'. There are 17 predefined answer groups, which are filled in automatically after selection in the answer fields.
Enter the answers
ASSISTENT Field
Enter the answers
Description
If the groups do not provide proper answers, you can always produce them yourself. Click on the 'Plus' sign to add a row below the current one. With the trashcan you can delete a row. To move a row up or down, use the arrows.
Points
ASSISTENT Field
Points
Description
Statistics software like SPSS work with a point system for answers. It is called 'Scored Surveys'. Answers are transposed to points to generate reports and statistics. Questionaireoffers the possibilityto give points to answers in advance. In a csv export file the answers are then replaced by these points. If you use this, ensure yourself each answer is granted a point.
Default
ASSISTENT Field
Default
Description
Checkboxes and radiobuttons can be turned on by default. You have to check the box behind the answer.
Data generated by the Answer Wizard can be manually inserted in the textarea 'Enter the answers'. Every line in this field represents a new answer, starting with the answer, followed by the points, and finally the default value, each field separatedby a vertical bar ' | '. If the answer is default, the field should say 'on', otherwise leave empty.
Some examples: Agree | | onDisagree | 3
 Page Break & Conditions
The last but certainly not unimportant item in the dropdown list with all the question items is the Questionaire item 'Page Break & Conditions'. You can divide the questionaire in several pages and decide if the following page has to be displayed according to the answers the participantgave in the previous answers. A page break always marks the beginning of a new page.
A page break is optional, but take into account that if you make a questionaire with many questions, you preserve the overview when inserting page breaks. If you want your questionaire to start with a page title or introduction, put a page break as the first record in the questionaire item list. In such a page no conditions can be entered, because there are no questions in front of the break. Separate pages and questions logically. A page which has no embedded question, can generate errors. Do not end a questionaire with a empty page.
Conditions apply to the page following the page break. The conditions define if the questions on the next page will be displayed to the participant. Start inserting conditions when you are absolutely sure the questions are in the right order and all questions have been tested. Changes in items or their order arenot converted to the page breaks. Because of this your questionaire can cause errors.
Conditions are always made by the Conditions Wizard. Click on the Wizard button at the right of the textarea 'Page conditions'. You can produce conditions within a group, but you can also produce new groups. Questionaire first calculates the results of each group separately. Within a group all conditions are calculated using 'AND' to get a 'TRUE'. Mutual groups are compared with 'OR'. If one group has the result 'TRUE', the complete result of the condition will be 'TRUE'. If none of the groups is 'TRUE', the result of the condition is 'FALSE'.
An underlying page is shown when the final outcome of the condition is 'TRUE'. At 'FALSE' the questionaire will continue to the next page, where again possible conditions are calculated. If you want to skip some pages by means of an answer on a question, you must give all intervening pages a condition.
An example:
You do a questionaire concerning games for a game computer. It is possible that some participants have never played on a game computer. Still you want to learn if they know a game from anadvertisement in a newspaper, on the television or the Internet. This participant can skip all questions concerning the functioning of the game and be brought directly to the questions about advertisement. Thus you do not disappoint a participant, because you don't ask him/her questions they do not have knowledge of and you get a picture of the result of advertisement on non-players. Thereforeyou need to place a condition on each page with questions the participant knows nothing about which has as result 'FALSE'.
The Conditions Wizard always starts with one group. You can see this at the start of the wizard on top of the page 'New Group (OR)'.
Beneath this there is a text 'Rules' with a dropdownlist. The dropdown list contains questions in front of this page break which can be calculated in a condition. How further you go into the questionaire, how longer this list becomes.
Choose a question in the dropdown list which must be incorporated in the condition. After this choice more options shall be displayed.
A condition is made as follows:
The answer to question x – must satisfy to the following – possible answer.
The answer to question x
CONDITION Explanation
The answer to question x
Description
The dropdown list with all the possible answers.
Must satisfy to the following
CONDITION Explanation
Must satisfy to the following
Description
The upper dropdown list in the column 'Condition'. This list depends on the chosen question and its type and can contain the following values:
- Equals to
- Not Equal to
- Contains
- Does Not Contain
- Is Greater Than
- Is Greater Or Equal Than
- Is Less Than
- Is Less Or Equal Than
- Provided An Answer
- Did Not Provide An Answer
Possible answer
CONDITION Explanation
Possible answer
Description
Depending on its type, this can be a dropdown list or an open textbox. In the case of questions of the type 'Choice' with predefinedanswers, a dropdown list will always be displayed. If there is a possible additional answer, the option '-- None --' will also be available in this list and below that a textbox. By choosing '-- None --' and fill the textbox, you can make a condition with the additional answer of this question.
At the right side of the selected question, the condition can be defined. Depending on its type, the options will vary. The upper field of the condition will always be a dropdown list.
Deleting a rule is done by clicking the trashcan behind the rule.
When using multiple groups, the groups can be ordered by moving them with the arrows 'Move Up' , 'Move Down', 'Move top Top' and 'Move to Bottom'. It is also possible to delete an entire group at once by clicking the trashcan in front of the group. Keep in mind all the rules within this group will be deleted as well.
Important : When copying a survey from one page to another, the id's of the questions change. The conditions are based on the id's of the questions. When copying the survey records, the conditions are copied as well, containing references to the original survey, which is on another page. There is no way in TYPO3 to change these record references in the conditions automatically. In the 'Page break & conditions' it seems that the conditions are still there, but they refer to questions not available in the copied survey. When entering the 'Conditions Wizard' you will notice that this is completely empty. The check on the available questions is done in the wizard. So whenever you copy a survey from one page or sysfolder to another, you have to redefine the conditions.
Statistics
Statistical calculations can be done several ways.
To calculate your statistics in statistical software like SPSS, or its Open Source concurrents PSPP or OpenStat, you can export all results to a file with comma separated values, a CSV file. A CSV-file is a standardized format which can be imported and processed in most of the spreadsheet and statistics software. To generate a CSV file, a separate extension, “Questionaire Export” (pbsurveyexport) is available. This extension will integrate itself in the backend module Web>Questionaire. See the manual of “Questionaire Export “for more details.
In the near future it will be possible to have statistics in the backend module as well. The development of this extension has already been started. The name of this extension will be “Questionaire Statistics” (pbsurveystatistics). With this module function you can have statistics like cross-tabular data and graphics.
Scoring
Scoring means you can do a test amongst your respondents. Depending on its score, the respondent will be redirected to a certain page, assigned by a minimum and maximum score. Is the score of the respondent higher than the minimum and lower or equal to the maximum, then the respondent will be redirected to this page. The score will be the total points collected by the given answers. These points need to be assigned to each answer in the “Answer wizard”
To enable scoring you must choose the option “Redirect to scoring pages” of the “Completion action” at the “Completion” tab of the plugin. When enabled, you also have to fill the “Scoring” tab of the plugin. At first, this tab will only provide you a dropdown box to enter a “NEW Scoring page”. When you select this option, you have to save the form to get the fields of a scoring page. In these fields you can enter the maximum score, that will be evaluated with the score of the respondent, and the page where the respondent will be redirected if his score matches.
Example:
The total points of the test the respondent can collect by answering all questions with answers with the highest points is 235. We want to have 5 different levels of scoring: Bad – Below average – Average – Above Average – Excellent. 235 diveded by 5 is 47. The first scoring page, Bad, has as maximum score 47 point, the second one, below average 94, the third, Average, 141 and so on.
47 – Bad94 – Below average141 – Average188 – Above average235 – Excellent
The respondent scores 165 points. With this score he gets at the “Above average” level and will be redirected to the corresponding page. The level “Above average” has as a minimum score 142 (the maximum of “Average” is 141) and a maximum of 188 points.
Scoring can only be done with the following question types:
- Choice - Multiple Answers (Checkboxes)
- Choice - Multiple Answers (Selectbox)
- Choice - One Answer (Dropdown)
- Choice - One Answer (Option Buttons)
- Matrix - Multiple Answers per Row (Checkboxes)
- Matrix - One Answer per Row (Option Buttons)
Remember that the scoring of multiple answer questions can raise the score dramatically when the respondent checks all the checkboxes. This way he/she can influence the result. The reason why these question types are made possible with scoring is that you can have, for instance, two answers which could be right and the others are not. You can assign points to the right answers and no points (zero) to the false ones. You can influence the amount of answers the respondent can check in the form of these question types.
For your convenience two parameters are send with the URL of the scoring page. These parameters are the total points a respondent can get in the test (tx_pbsurvey_pi1[total]) and the score of the respondent (ts_pbsurvey_pi1[score]). These parameters can be used when you provide your own plugin on the scoring pages.
FAQ
- Q: Why is the Captcha at the front of the survey and not at the end, like in mailforms? A: The goal of a Captcha is to prevent spamming a form on a website. A user has to answer the Captcha before any form is submitted to the website. A survey can be split into several pages. After submitting each page, the user answers will be stored immediately. So it doesn't make sense to put it at the end of the survey.
- Q: When I install and load the extension in TYPO3, I can't reach the backend module Web>Questionaire? A: This is a standard behaviour of TYPO3. After you install and load an extension in TYPO3, you have to logout and login again to make the backend module to work. Reloading the browser window won't do the trick.
- Q: What can I do with the results, gathered with pbsurvey. I can't see an option to export the results or calculate backend statistics A: Perhaps you've only installed the main extension pbsurvey. To export the results to a CSV file, you need to download the extension pbsurveyexport from the TER as well and load in into TYPO3. This way the backend module will get more functionality. In the future an extension for backend statistics will also be available.
- Q: I don't know how to read the exported results. How do I analyze these? A: Pbsurvey is written for users who know how to handle statistical data. If you don't know how to read the results, don't start a survey at all, buy a book and learn it, or ask a friend who knows how to handle this to do it for you. Maybe a hint: A lot of students on universities learn how to analyze statistical data with software called SPSS.
Administration
Rights & Permissions
The basics about the Rights & Permissions concepts of TYPO3 can be found in the "getting started" document: http://typo3.org/documentation/document- library/doc_tut_quickstart/Setting_up_user_perm/
for some advanced options see: http://typo3.org/documentation /document-library/doc_core_tsconfig/MOD/
Configuration
All configuration of the Questionaire can be done with the FlexForm of the extension, the “Constant Editor” or with the “TypoScript Object Browser”.
To change the configuration using the FlexForm, open the Content Element in “Web > Page” or “Web > List”. Below is the configuration of each tab.
Click on “Web > Template” to go to the “Constant Editor”, select a page which contains the “Root template” in the pagetree and click on “Constant Editor” in the upper right corner of the screen.
All configuration is available in the FlexForm and the Constant Editor. The FlexForm valueswill override values from TypoScript. Tosee the current TS settings for a page, click on “Template” in the “Web” menu, choose this page in the pagetree, and open the “TypoScript Object Browser” on this page. More information about the “TypoScript Object Browser” : http://typo3.org/documentation/document- library/doc_tut_quickstart/The_Object_Browser/
All default configuration of Questionaire is stored in the file ext_typoscript_setup.txt, which is in the folder of this extension.
FlexForm-configuration
General
FLEXFORM Tab
General
Property
Startingpoint
Description
With the button “Browse for records” you can select the page or folder you made to store the questionaire items and results. If this field is empty, the items and results will be stored in the same page as the extension.
Template file
FLEXFORM Tab
Template file
Property
If you want to use your own template file, please select one here in the TYPO3 Element Browser.
Mail
FLEXFORM Tab
Property
Send mail
Description
- No mail: Don't send any mails when a visitor finishes a survey
- Send: Question / Anwer: Send mails with the questions and their answers from a visitor after he/she finished the survey
- Send: Default message: Send a entered message after the visitor finishes the survey.
Subject
FLEXFORM Tab
Subject
Property
The subject of the mail
From
FLEXFORM Tab
From
Property
Email address which will be the sender of the mail
To
FLEXFORM Tab
To
Property
Email address of the main receiver of the mail
Cc
FLEXFORM Tab
Cc
Property
Email addresses (comma separated) of carbon copy receivers of the email
Return message
FLEXFORM Tab
Return message
Property
When in 'Send mail' the option 'Send: Default message' is selected, you can enter the message here.
Access
FLEXFORM Tab
Access
Property
Show Captcha before entering survey
Description
A captcha can be used to prevent comment spam, guestbook spam, automated signups or any area of your website where you fear the evil spammers may target. If cheched a Captcha will be shown (Needs the freeCap CAPTCHA (sr_freecap) to be loaded)
Respondent Access Level
FLEXFORM Tab
Respondent Access Level
Property
- Multiple Response: Respondents are allowed to enter the questionaire unlimited or within a configurable limit.See 'Maximum Responses' on the tab 'Other'.
- Single Response: Visitors can respond only once. They can update their previous questionaire, within a configurable time. See 'Days for Update' on the tab 'Other'.
- Single Response (Not Updateable): Visitors can respond only once. A previous entered questionaire can not be updated. If a respondent tries to login a second time, a message will be displayed the questionaire can only be entered once.
Anonymous check
FLEXFORM Tab
Anonymous check
Property
IP-address: The check is done by the IP-address of the user. This option will be especially used when you expect users with different non-changing IP-addresses. A lot of times company networks use only one IP address to connect to the Internet.
Cookie: After the first submitted answer, a cookie will be set on the users computer with the result id and the amount of responses of this single user to one survey. A disadvantage is a user can delete its cookie from its own computer.
Cookie lifetime (in days)
FLEXFORM Tab
Cookie lifetime (in days)
Property
The amount of days a cookie will reside on the users computer. Most of the time this lifetime needs to be the same amount as the lifetime of the survey.
Completion
FLEXFORM Tab
Completion
Property
Completion Action
Description
Close the browser: This option is only advisable when the Questionaire is displayed in a popup window, otherwise some browsers will show a warning messagethe browser window will be closed.
- Display Message: Displays a message, entered in the field 'Completion Message', when the questionaire is completed.
- Redirect to another page: Redirect the respondent to another page, entered in the field 'Completion Page', when the questionaire is completed.
- Redirect to scoring pages. Redirect the respondent to a page based on its score. When selecting this option, you have to fill the “Scoring” tab as well.
Completion Page
FLEXFORM Tab
Completion Page
Property
Select a page with the TYPO3 Element Browser only when 'Display Message' or 'Redirect to another page' is selected in the 'Completion Action' dropdown. When 'Display Message' is chosen, also select 'Continue Button'.
Close Button
FLEXFORM Tab
Close Button
Property
Display a button to close the browser window. Only possible when 'Display Message is selected in the dropdown 'Completion Action'.
Continue Button
FLEXFORM Tab
Continue Button
Property
If a message is displayed, a 'Continue' button can be shown. Also select a page in the field 'Completion Page'.
Cancel Button
FLEXFORM Tab
Cancel Button
Property
Display a 'Cancel' button and choose the action when a respondent presses the 'Cancel' button. Enter a page in the field 'Cancel Button Page' when you select 'Redirect to custom page'.
WARNING: When a respondent decides to cancel the questionaire, the previous answered questions will not be stored in the database. This is done because canceledquestionaires can influence the total result.
Cancel Button Page
FLEXFORM Tab
Cancel Button Page
Property
Select a page with the TYPO3 Element Browser where the respondent will be redirected when he/she presses the 'Cancel' button.
Numbering
FLEXFORM Tab
Numbering
Property
Page Numbering
Description
There are three methods to show the visitor the progress of the questionaire. The position of the page number depends on the template file of the extension. When using conditions in the questionaire, it is possible to skip some pages. See 'Conditions' for more information.
Do not display page numbers
- Display progress as a progress bar: Display a percentage bar with the text 'Page X of Y'.
- Display progress in 'Page X of Y' format
- Display page number on each page: The page number will be displayed as 'Page X'.
Question Numbering
FLEXFORM Tab
Question Numbering
Property
- Do not display question numbers:
- Number questions within the entire questionaire: Questions will be numbered throughoutthe entire questionaire.
- Number questions within each page: Numbering will start with 1 on every new page.
Scoring
FLEXFORM Tab
Scoring
Property
NEW “Scoring page”
Description
Inserts a new scoring page. When selecting this option, save the form to see the new field.
Maximum score
FLEXFORM Tab
Maximum score
Property
Enter the maximum score of the scoring page. The score of the respondent will be evaluated with this integer as maximum and, if available, the lower integer from another scoring page as minimum.
Redirect to page
FLEXFORM Tab
Redirect to page
Property
Select a page with the TYPO3 Element Browser where the respondent will be redirected when the score matches the minimum and maximum integer..
Other
FLEXFORM Tab
Other
Property
Maximum Responses
Description
Enter a numeric value for the maximum responses on the entire questionaire. When this amount is reached the questionaire will automatically close for future respondents. When a questionaire is closed, it will display a message. Leave at zero if the maximum responses is unlimited or if done anonymously.
Responses per user
FLEXFORM Tab
Responses per user
Property
If the respondent accesslevel is set to 'Multiple Response' you can enter a limit here. When this limit is reached the respondent will be shown a message and can't enter the questionaire anymore.
Days for Update
FLEXFORM Tab
Days for Update
Property
Enter the amount of days in which the respondent is able to update his/hers previous response. This will only work when the 'Respondent Access Level' is set to 'Single Response'.
Form validation
FLEXFORM Tab
Form validation
Property
Normally the form validation will be done on the client side with JavaScript. The processing will not be done on the server, so it doesn't take any valuable resources. However, when you have a website that has to be accessible, it is recommended to do the form validation on the server with PHP.
Reference (TypoScript)
templateFile
Property
templateFile
Data type
resource
Description
The HTML-template (See example: pi1/template.html)
Example:
plugin.tx_pbsurvey_pi1 {
  templateFile = fileadmin/my_templates/pbsurvey.html
}
Default
EXT:pbsurvey/pi1/template.html
pid
Property
pid
Data type
int
Description
The page id (pid) where the questionaire items and results are stored. If this value is not set, the current page is used.
Example:
plugin.tx_pbsurvey_pi1 {
  pid = 23
}
Default
accessLevel
Property
accessLevel
Data type
int [0-2]
Description
Enter a value from 0 to 2 for Respondent Access Level. This is only applicable when a non-anonymous survey is done.The following options are available:
0 = Multiple Response
1 = Single Response
2 = Single Response (Not Updateable)
Example:
plugin.tx_pbsurvey_pi1 {
  accessLevel = 0
}
Default
0
maximumResponses
Property
maximumResponses
Data type
int
Description
Enter the maximum number of responses for this survey. Leave at zero for unlimited responses.
Example:
plugin.tx_pbsurvey_pi1 {
  maximumResponses = 1000
}
Default
0
userResponses
Property
userResponses
Data type
int
Description
Enter the maximum number of responses per user. Leave at zero for unlimited responses.
Example:
plugin.tx_pbsurvey_pi1 {
  userResponses = 5
}
Default
0
daysForUpdate
Property
daysForUpdate
Data type
int
Description
Enter the number of days during which a respondent may update their response. This option only applies when tx_pbsurvey_pi1.accessLevel= 0.
Example:
plugin.tx_pbsurvey_pi1 {
  daysForUpdate = 7
}
Default
60
validation
Property
validation
Data type
int
Description
Defines the method used to validate the form. You can choose between client side javascript or server side PHP. The server side validation is especially handy when doing a survey that has to be accessible.
0 = client side JavaScript
1 = server side PHP
2 = Both client side and server side
Example:
plugin.tx_pbsurvey_pi1 {
  validation = 1
}
Default
1
mode
Property
mode
Data type
Int [0-1]
Description
Do a check by either IP address or a cookie if the user already responded to the survey. Both options can be used for all three access options.
Example:
plugin.tx_pbsurvey_pi1 {
  anonymous {
    mode = 1
  }
}
Default
0
cookie_lifetime
Property
cookie_lifetime
Data type
Int
Description
Amount of days the cookie will reside on the users computer.
Example:
plugin.tx_pbsurvey_pi1 {
  anonymous {
    cookie_lifetime = 1
  }
}
Default
30
captcha
Property
captcha
Data type
int
Description
Questionaire is designed to work together with the extension freeCap Captcha (sr_freecap) from Stanislas Roland. When activating, be sure to install sr_freecap. The Captcha will be shown BEFORE the survey.
Example:
plugin.tx_pbsurvey_pi1 {
  security {
    captcha = 1
  }
}
Default
0
action
Property
action
Data type
int [0-2]
Description
Action after completion. Below are the options:
0 = Close the browser
1 = Redirect to another page
2 = Display Message
3 = Redirect to scoring pages
Example:
plugin.tx_pbsurvey_pi1 {
  completion {
    action = 2
  }
}
Default
2
redirectPid
Property
redirectPid
Data type
int
Description
Pid of the page that will be shown after the participant presses the 'Continue' button when the questionaire is finished or page that will be shown when action is set to 'Redirect to another page'.
Example:
plugin.tx_pbsurvey_pi1 {
  completion {
    redirectPid = 233
  }
}
Default
close
Property
close
Data type
boolean
Description
Displays a 'Close' button when plugin.tx_pbsurvey.completion.action = 1
Example:
plugin.tx_pbsurvey_pi1 {
  completion {
    button {
      close = 1
    }
  }
}
Default
0
continue
Property
continue
Data type
boolean
Description
Displays a 'Continue' button when plugin.tx_pbsurvey.completion.action = 1
Example:
plugin.tx_pbsurvey_pi1 {
  completion {
    button {
      continue = 1
    }
  }
}
Default
0
back
Property
back
Data type
boolean
Description
If set to 0, a 'Back' button will not be displayed to return to the previous question.
Example:
plugin.tx_pbsurvey_pi1 {
  navigation {
    back = 0
  }
}
Default
1
cancel
Property
cancel
Data type
int [0-3]
Description
Action to be taken when a participant clicks the 'Cancel' button.
These are the options:
0 = Do not display
1 = Close browser
2 = Redirect to end of questionaire
3 = Redirect to custom page
Example:
plugin.tx_pbsurvey_pi1 {
  navigation {
    cancel = 1
  }
}
Default
2
cancelPid
Property
cancelPid
Data type
int
Description
Page where participant is redirected ifplugin.tx_pbsurvey_pi1.navigation.cancel = 3.
Example:
plugin.tx_pbsurvey_pi1 {
  navigation {
    cancelPid = 233
  }
}
Default
page
Property
page
Data type
int [0-3]
Description
Method of numbering the pages.
0 = Do not display page numbers
1 = Display progress as progress bar
2 = Display progress in 'Page X of Y' format
3 = Display page number on each page
Example:
plugin.tx_pbsurvey_pi1 {
  numbering {
    page = 1
  }
}
Default
1
question
Property
question
Data type
int [0-2]
Description
Method of numbering the questions.
0 = Do not display question numbers
1 = Number questions within entirequestionaire
2 = Number questions within each page
Example:
plugin.tx_pbsurvey_pi1 {
  numbering {
    question = 2
  }
}
Default
1
[tsref:(cObject)]
Template file
###SURVEYFORM###
TEMPLATE Marker
###SURVEYFORM###
Property
Wrap of the entire questionaire for display
###PROGRESSBAR###
TEMPLATE Marker
###PROGRESSBAR###
Property
Wrap in which the progress baris build
###BACK_BUTTON###
TEMPLATE Marker
###BACK_BUTTON###
Property
Wrap in which the 'Back' button is build
###CANCEL_BUTTON###
TEMPLATE Marker
###CANCEL_BUTTON###
Property
Wrap in which the 'Cancel' button is build
###CLOSE_BUTTON###
TEMPLATE Marker
###CLOSE_BUTTON###
Property
Wrap in which the 'Close' button is build when the questionaire is completed
###CONTINUE_BUTTON###
TEMPLATE Marker
###CONTINUE_BUTTON###
Property
Wrap in which the 'Continue' button is build when the questionaire is completed
###CAPTCHA###
TEMPLATE Marker
###CAPTCHA###
Property
Wrap in which the Captcha will be build.
###COMPLETION###
TEMPLATE Marker
###COMPLETION###
Property
Wrap of the parts that should be displayed when the questionaire is completed.
###ERROR###
TEMPLATE Marker
###ERROR###
Property
Wrap of the error screen
###NO_DATA###
TEMPLATE Marker
###NO_DATA###
Property
Wrap of the screen that will be displayed when there is no data to show the visitor
###0### t/m ###22###
TEMPLATE Marker
###0### t/m ###22###
Property
Wrap of each questionaire item. The numbers correspond with the numbers of each item explained in this manual.
###PAGENUMBERING###
TEMPLATE Marker
###PAGENUMBERING###
Property
Position of the page numbering in the questionaire
###VALIDATIONERR###
TEMPLATE Marker
###VALIDATIONERR###
Property
Will be substituted with error messages if found any. Only with the server side validation.
###HEADER###
TEMPLATE Marker
###HEADER###
Property
Position of the header and subtext
###URL###
TEMPLATE Marker
###URL###
Property
URL to which the form has to be sent after submitting. Do NOT delete
###SUBMITVALUES###
TEMPLATE Marker
###SUBMITVALUES###
Property
Call to the client sideJavaScript to check the participants input
###ITEMS###
TEMPLATE Marker
###ITEMS###
Property
Position of the questionaire items
###STAGE###
TEMPLATE Marker
###STAGE###
Property
Internal counter
###VALIDATION###
TEMPLATE Marker
###VALIDATION###
Property
Validation string used for server side validation.
###BACKBUTTON###
TEMPLATE Marker
###BACKBUTTON###
Property
Position of the optional 'Back' button
###SUBMIT###
TEMPLATE Marker
###SUBMIT###
Property
Local language of the 'Continue' button
###SUBMITVALUES###
TEMPLATE Marker
###SUBMITVALUES###
Property
Validation string used for Client side validation.
###CANCELBUTTON###
TEMPLATE Marker
###CANCELBUTTON###
Property
Position of the optional 'Cancel' button
###PERCENT###
TEMPLATE Marker
###PERCENT###
Property
Progress percentage of the questionaire
###BARTEXT###
TEMPLATE Marker
###BARTEXT###
Property
Text which shows the progress as 'Page X of Y' in the progress bar
###BACK###
TEMPLATE Marker
###BACK###
Property
Local language of the 'Back' button
###CANCELTYPE###
TEMPLATE Marker
###CANCELTYPE###
Property
Depending on its function this can be type=”submit” or type=”button”
###CANCEL###
TEMPLATE Marker
###CANCEL###
Property
Local language of the 'Cancel' button
###CANCELSCRIPT###
TEMPLATE Marker
###CANCELSCRIPT###
Property
Depending on its function this will be filled with a piece of JavaScript
###CLOSE###
TEMPLATE Marker
###CLOSE###
Property
Local language of the 'Close' button
###CONTINUE###
TEMPLATE Marker
###CONTINUE###
Property
Local language of the 'Continue' button
###COMPLETE_CONTINUE###
TEMPLATE Marker
###COMPLETE_CONTINUE###
Property
URL of the page to redirect the participant to, when clicking the 'Continue' button
-> CAPTCHA.items
TEMPLATE Marker
-> CAPTCHA.items
The following items are actually no markers from pbsurvey, but from the extension freeCap CAPTCHA (sr_freecap). When sr_freecap is installed and active, these markers will be filled with texts and an image from the sr_freecap extension. Pbsurvey is only providing the templatepart
###SR_FREECAP_NOTICE###
TEMPLATE Marker
###SR_FREECAP_NOTICE###
Property
Short text what is Captcha all about
###SR_FREECAP_CANT_READ###
TEMPLATE Marker
###SR_FREECAP_CANT_READ###
Property
Link to generate another Captcha image when it is not readable
###SR_FREECAP_IMAGE###
TEMPLATE Marker
###SR_FREECAP_IMAGE###
Property
Marker for the Captcha image
###MESSAGE_TEXT###
TEMPLATE Marker
###MESSAGE_TEXT###
Property
Text to be displayed after completion of the questionaire
###MESSAGE_BUTTONS###
TEMPLATE Marker
###MESSAGE_BUTTONS###
Property
Optional buttons to be displayed below the message text
###MESSAGE_TEXT###
TEMPLATE Marker
###MESSAGE_TEXT###
Property
Text to be displayed when a error occurs
-> QUESTIONTYPE.items (1-16, 23, 24)
TEMPLATE Marker
-> QUESTIONTYPE.items (1-16, 23, 24)
The question types 1, 3, 4, and 5 are available in different variants. These can be identified with the addition behind the number. These additions are:
HOR : To display the answers with a horizontal alignment. (Radiobuttons or checkboxes)
VER : To display the answers with a vertical alignment (Radiobuttons or checkboxes)
DROP : To display a dropdown variant of the answers
###CURRENTITEM###
TEMPLATE Marker
###CURRENTITEM###
Property
Question number
###QUESTION###
TEMPLATE Marker
###QUESTION###
Property
The question
###REQUIRED###
TEMPLATE Marker
###REQUIRED###
Property
Wrap which displays its content when a answer is required
###COMMENT###
TEMPLATE Marker
###COMMENT###
Property
Wrap which displays its content when a answers depends on requirements
###COMMENT_COMMENT###
TEMPLATE Marker
###COMMENT_COMMENT###
Property
The text with the requirements
###SUB###
TEMPLATE Marker
###SUB###
Property
Wrap which displays its content when a subtext of the question is entered
###QUESTION_SUBTEXT###
TEMPLATE Marker
###QUESTION_SUBTEXT###
Property
The subtext of the question
###LIST###
TEMPLATE Marker
###LIST###
Property
Wrap to show the complete list of answers to a question
###COUNTER###
TEMPLATE Marker
###COUNTER###
Property
Counter for questions with multiple answers
###VALUE###
TEMPLATE Marker
###VALUE###
Property
A single answer
###CHECKED###
TEMPLATE Marker
###CHECKED###
Property
To show a 'checked=”checked”' when the answer is on by default or at a update
###SELECTED###
TEMPLATE Marker
###SELECTED###
Property
To show a 'selected=”selected”' when the answer is on by default or at a update
###VALUE_NONE###
TEMPLATE Marker
###VALUE_NONE###
Property
Text if there is a possible empty answer (Dropdown)
###ADDITIONALS###
TEMPLATE Marker
###ADDITIONALS###
Property
Wrap which displays an optional additional answer
###ANSWERS_TEXT_ADDITONAL###
TEMPLATE Marker
###ANSWERS_TEXT_ADDITONAL###
Property
The text of the additional answer
###ADDITIONAL###
TEMPLATE Marker
###ADDITIONAL###
Property
Textbox or area of the additional answer
###VALUE_NONE###
TEMPLATE Marker
###VALUE_NONE###
Property
Local language of – None --
###SELECTBOX_HEIGHT###
TEMPLATE Marker
###SELECTBOX_HEIGHT###
Property
Height of a selectbox in lines
###COLSPAN###
TEMPLATE Marker
###COLSPAN###
Property
The amount of answer columns in a matrix question
###COLWIDTH###
TEMPLATE Marker
###COLWIDTH###
Property
Column widthin a matrix question
###HEADER###
TEMPLATE Marker
###HEADER###
Property
Wrap building the header row of a matrix question
###ROWS###
TEMPLATE Marker
###ROWS###
Property
Wrap building all other rows of a matrix question
###ROWCLASS###
TEMPLATE Marker
###ROWCLASS###
Property
Class for each row in a matrix question. There is a different class for even and uneven rows
###ROW###
TEMPLATE Marker
###ROW###
Property
Name of the row entered on a single line in the item field 'Rows'
###COLUMNS###
TEMPLATE Marker
###COLUMNS###
Property
Wrap to build all columns in a matrix question
###COL###
TEMPLATE Marker
###COL###
Property
Name of the column, entered on a single line in the item field 'Enter the Answers'
###VALUE###
TEMPLATE Marker
###VALUE###
Property
Headline, Message or HTML entered in the presentation item
###ALIGN###
TEMPLATE Marker
###ALIGN###
Property
Horizontal alignment of the image on the screen
###IMAGE###
TEMPLATE Marker
###IMAGE###
Property
Image
###TITLE###
TEMPLATE Marker
###TITLE###
Property
Wrap of the page title
###PAGE_TITLE###
TEMPLATE Marker
###PAGE_TITLE###
Property
Page Title
###INTRODUCTION###
TEMPLATE Marker
###INTRODUCTION###
Property
Wrap of the page introduction
###PAGE_INTRODUCTION###
TEMPLATE Marker
###PAGE_INTRODUCTION###
Property
Page introduction
RealUrl and SimulateStaticDocuments
tx_pbsurvey works with default “typolink” functions to build links. It can be used with “SimulateStaticDocuments” and “RealUrl”.
No extra configuration is necessary when using RealUrl. Almost all data is send by 'POST' and not in the URL.
tx_pbsurvey is a USER_INT so doesn't use any caching.
Multilanguage Surveys
Since version 1.0.0 tx_pbsurvey supports the localization features introduced with TYPO3 3.7.0. You can build a true “one-tree-fits-all- languages” site without breaking this concept by using one pbsurvey sysfolder for all languages.
To integrate tx_pbsurvey in a multilanguage website, follow the steps described below:
Warning: First add all survey items to the sysfolder, assigned to this survey, in the default language. Make sure the survey is working perfectly in the default language. Test it first before entering translations. If you change items in the default language after you added translations, you have to delete the translations of this changed item, otherwise it is possible you get strange results. Especially Page Conditions, the answers and rows fields are sensitive for any changes. Fields that can be translated do not adapt themselves after you change the original default language field. You are warned!
Open the sysfolder where your survey items are located (Web > List) and create a “Alternative Page Language” for each language you want to present the survey in.
Check the “localization view” at the bottom of the page.
When you have assigned flags to each language, these flags will show up at the right of each survey item. You can click on them to localize a survey db-record in the chosen language. The flag icon is moved to the localization column to show that there is a translation record for this item.
Hint: If you don't want the localized survey records to be immediately visible on the website you can enable “Hide new localizations” in the extension configuration (see section “Installation”).
The titles of the survey records have been prepended with “[Translate to {language_label}]”.
Hint: Prepending titles with “[Translate to {language_label}]” can be disabled in the extension configuration. If this is disabled “(copy [#])” will be added to the titles of the localized records. This can be disabled too in the extension configuration.
Language = all: If you set the language in a survey record to “all” , this record will be displayed in all available languages. Although for some content elements in TYPO3 this is fine, it is not for a survey. Good survey results are based on a good understanding of questions by the visitors of your website. If they don't understand the default language completely, this could result into answers they did not want to enter. Be carefull with this one. For instance this is usefull when adding a pagebreak without any title, description or page condition.
Below you see a localized version of a survey item:
As you can notice, some fields are missing compared to the original default language item. These are field that don't need to be translated and will be extracted from the default language.
Below each field, available in the localization, the default language of this record is shown.
Sys_language_mode
Normally when you can translate items in TYPO3, you have the possibility to choose between different language modes. These will define if only translated records will be shown (strict mode) or display also the records in the default language that are not translated (default). tx_pbsurvey always shows its items in “strict” mode, to have a proper survey. This cannot be changed.
Exporting results
Since version 1.0.0 tx_pbsurvey itself has no longer an export function. The export module is available as a separate extension, Questionaire Export (pbsurveyexport), on the TER. I've separated the main questionaire extension from the export moduile because of future functionality like backend statistics. Therefore some people don't need the export module anymore. All extra backend modules like statistics will be available as extensions as well.
Extending pbsurvey
Currently there's only 1 function “hook” in the pbsurvey extension. This hook is called when the question item “Call user defined hook” is inserted in the survey. This can be anywhere within the survey.
- Read the article how to use and implement your own classes and functions to use with a hook. You can find it at http://typo3.org/development/articles/how-to-use-existing-hooks/
- Hook for processing the extra item is availble in the function callHook() and has the identifier “processHookItem”
If you have any suggestions for new hooks, please let me know.
Credits
First of all thanks to Kasper Skårhøj, the founder of TYPO3 and our little king. Without him this extension would not exist at all.Thanks for the Cohiba at T3BOARD06 as well. I took it with the best whisky I've got in stock (approximately 150)
Thanks to Ben van 't Ende from Netcreators in Arnhem, The Netherlands, to give such great support to develop the first version of this extension, for the Dutch translations and the sponsorship. Without Ben Questionaire wouldn't be XHTML-Strict. Let's drink a beer on that.
Thanks to my girlfriend Diane, for telling me to believe in myself and my capabilities.
Thanks to the Nederlandse Spoorwegen (Dutch Railways), for all the delays. This extension in completely written while traveling from and to my work. And that's about 3 hours a day, without the delay.
Thanks to Michael Scharkow, who initiated the survey project and from who I took some code for the first version of Questionaire.
Thanks to Andreas Otto and all the guys at d.k.d. Internet Service gmbh to provide the idea of adding the server side validation. Sorry you had to do this for the old version yourselves.
Thanks to Rupert Germann. He has been my guide in the programming world of TYPO3. Thanks for looking in your kitchen.
Thanks to everybody in the community for your support, positive responses and ideas.
Thanks to Stanislas Roland for sr_freecap. Sorry Kasper I didn't use yours.
Thanks to punkt.de and especially Juergen Egeling for the good ideas.
Thanks to Jochen Weiland and Wmdb for the ideas and the guys at Ameos for initialising the scoring part.
Thanks to Morten Egelund Rasmussen for reporting the very critical bug #5179
Thanks to Markus Kimmel, Jörg Sprung, Tanel Põld and Koen Tilley for your cooperation in finding the solution to bug #5179. Thanks to the people at Metabo for their patience.
And finally thanks to everybody at the core team. Where should we extension developers be without you.
See you all at the next T3CON, T3DD or T3BOARD.
Tutorial
In this tutorial you will learn how to create a questionaire on your website. The questionaire in this tutorial will do it anonymous. Visitors do not need to register and log in. Visitors can enter the questionaire unlimited. You already need to know the basic principles of TYPO3. The default template file will be used.
Create a new SysFolder to store the questionaire items and results. This step is optional but recommended. You can do this by using the module 'Web > Page' or 'Web > List'. In the example below the name of this folder is 'Questionaire Storage'.
Create a new page which shall display the questionaire to the visitors of your website. In the example below this is the page with the name 'Questionaire'.
Go to the module 'Web > Page'. Choose the page you just made in step 2 in the site tree. Click the button 'Create page content'. You will enter the wizard to add new content elements. Click the button 'Questionaire' which is in the subpart 'Plugins'.
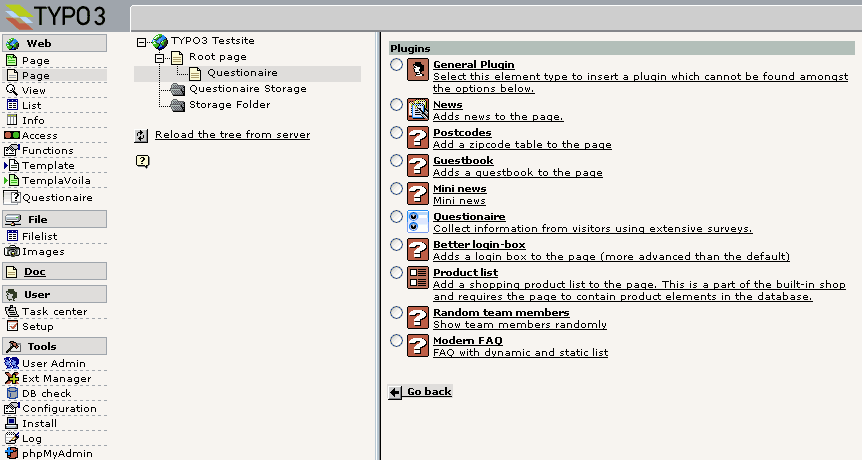
The FlexForm for the configuration of the extension is shown. Click on the tab 'General'. At 'Startingpoint' you click the button at the right side to open the TYPO3 Element Browser. Select the sysfolder you created for storage of the questionaire items and results. In this example this is the folder with the name 'Questionaire Storage'.
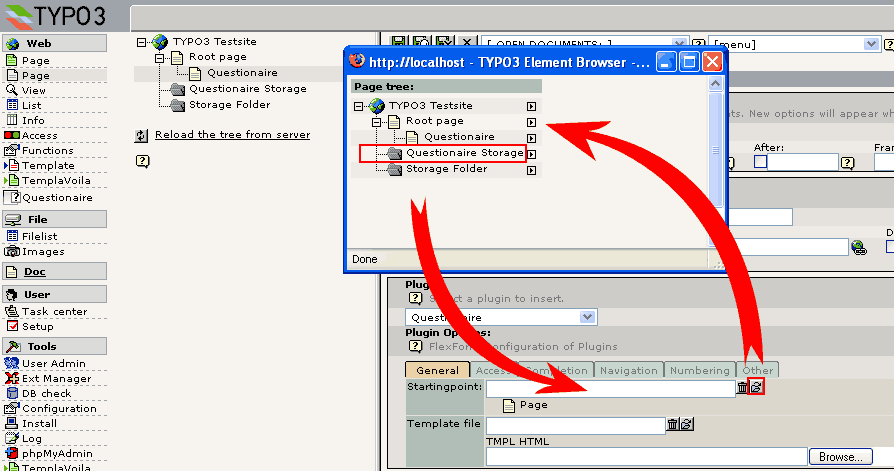
Enter the rest of the configuration according to your wishes.
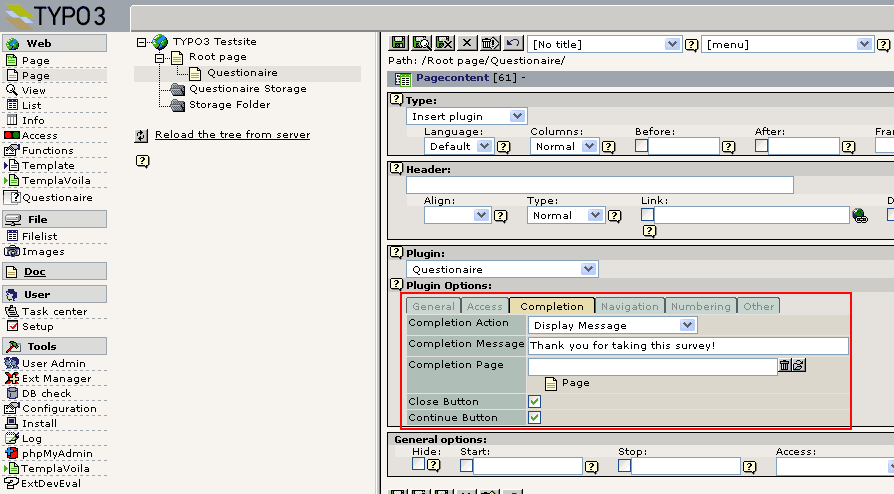
Go to the module 'Web > List' and click on the sysfolder for storage of the questionaire items (in our example 'Questionaire Storage). Click the button 'Create new record'. In the 'New record wizard' you select 'Questionaire item'.
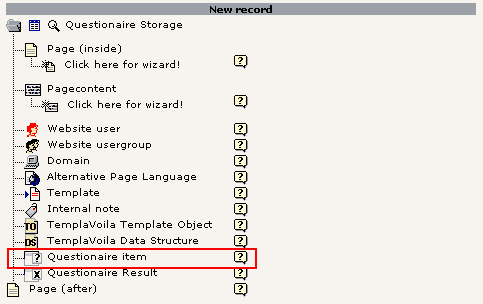
Select a 'Question Type' in the dropdown list. The form will adapt according to the selected type.
Enter the values of the fields the way you like to ask the question.
Answers can be entered using the field 'Enter the Answers'. If you like to enter more options for each answer, click the 'Answer Wizard' button at the right side of this field.
Save the item and close the document. Repeat step 7 till 10 to add more items.
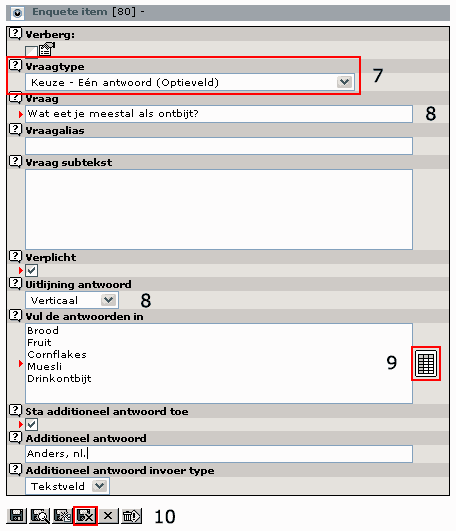
You are back in the module 'Web > list'. An overview of all questions made by you is presented.
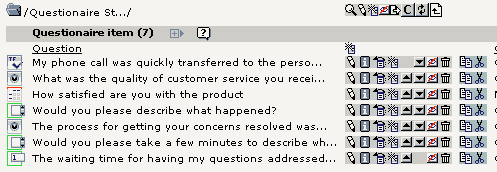
Check if all questions are correctly reflected by checking the page in the frontedof TYPO3. If you still want to do some modifications, you can do this in the backend hereafter.
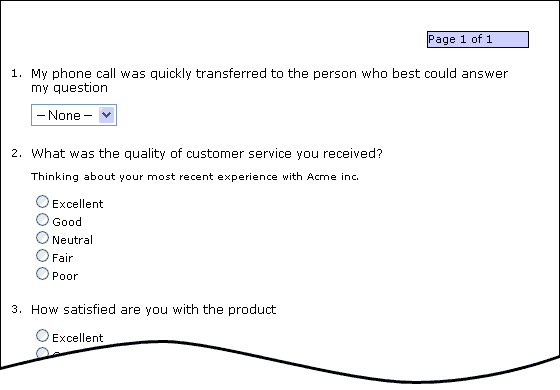
If all questions have been well entered, you can create 'Page Break & Conditions' records in the list . In our example we create a page separation after the second question. The first two questions will be displayed on the fist page, all following on page 2.
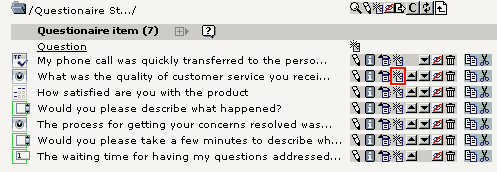
Select 'Page Break & Conditions' in the bottom of the dropdown list. The form will adapt to this choice. Enter a possible page title and an introduction text.
If you want to add conditions to a page, click on the button 'Condition Wizard' at the right side of the conditions field.
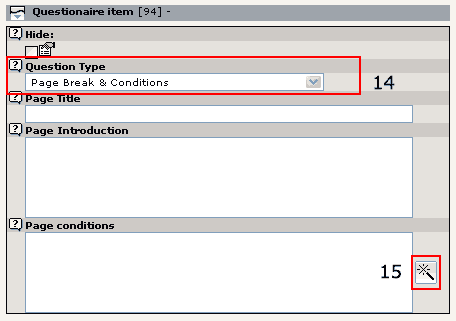
Add conditions which shall be compared to the previous answers. If the conditions evaluateto 'True', the page is displayed. In this manual the functioning of the 'Condition Wizard' is explained separately.
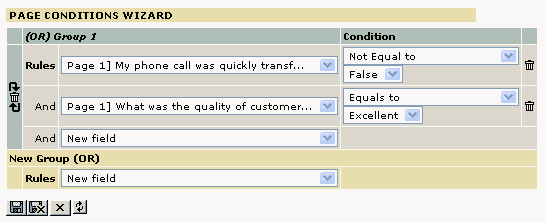
Check in the frontend of TYPO3 if all conditions are satisfying.
Make the questionaire public and visible for your visitors.
After closing the questionaire, you can export all results for use in spreadsheet software as MS Excell or statistical software such as SPSS. Go to the module 'Web > Questionaire'. Select the storage folder for questionaire items in the site structure. The module will show you an overview how many visitors participated in the questionaire. Choose an export method and click the button 'Export CSV file'. Save the file on your local hard disk for further processing.
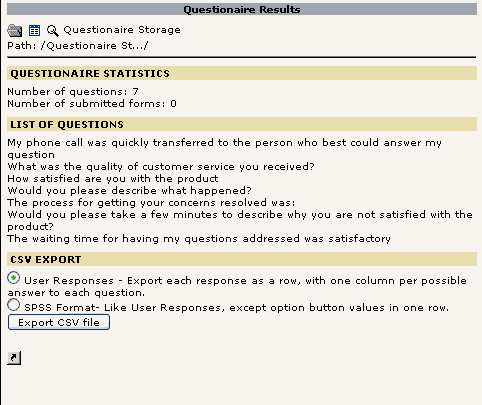
Known problems
None
Warnings
- When IP-address is selected as anonymous check procedure in the tab 'Access' of the flexform, this can cause problems by losing answers or overwritten answers, so the results are worthless. Do not use the IP- address check unless you are very sure what you are doing, for instance having a survey on an internal network where everybody has a different dedicated IP-address. IP-address check is by default off.
- Javascript validation is never safe. Visitors may use a browser which has no Javascript support or Javascript support is turned off. When it has no support it can send empty fields to the database. If no server side validation is done, empty fields are stored in the database, even when the question was mandatory. There is a small feature in pbsurvey which will hide the survey and show only a warning when Javascript support is turned off and the only validation method is Javascript, but this feature can be avoided as well by turning off CSS.When you want to be certain that all submitted values are validated, turn on server side validation. Server side validation is switched on by default.
- When copying questions with “page breaks and conditions” from one page to another, remember to reinitialise all conditions. When copying questions, the id's of the survey items will change. These changes are not corrected in the conditions.
To-Do list
- Make a new extension expanding the Backend module with statistics using cross-tabular data and graphics. (Already in progress).
- Add the possibility to show bar diagrams to respondents after completing the questionaire where they can compare their results with others (Questionaire results)
- Add the possibilityof 'Piping'. Displaying the answer to one question in the text of a subsequent question is called answer piping.
- Add more question types, especially with images and sliders.
- Add the possibility to conditions to jump to another page immediately instead of putting conditions on each page break.
- Make pbsurvey completely object oriented. Why didn't I do that when writing version 1.0.0?
- Delete both validation methods and substitute them with Ajax validation with a server side fall back when Javascript is turned off. If anybody has complaints about this, let me know now :-)
- Add the possibility to every question item to use its own template instead of the default
Changelog
Added French translation (Frontend only)
Small bugfix and thanks to Michael Scharkow for his contribution. Sorry I forgot to mention you.
Added German translation (Front and Backend). Thanks to Andreas Otto, Nils Dehl, Thorsten Kahler and Udo von Eynern.
Small bugfix
Added German csh-translation. Thanks to Nils Dehl.
Small bugfix in conditions wizard
Bugfix: When entering answers manual in answers field, the exported csv file can contain unwanted line breaks. Additional checkbox and radiobutton will be checked automatically when entering an additional value.
Added the whole French translation (Thanks to Pierre-Yves Gadina). Bugfix in redirects after finishing survey. This was not compliant to RealURL.
Bug which was fixed returned somehow: One space too many in CSS Stylesheet.
Added Danish Translation (Thanks to Peter Klein)
Bugfix in Export Module. Results in column were not exported when question had a space behind it. Added Norwegian translation (Thanks to Erik Svendsen) Sorry it took so long.
Bugfix: using presentation items resulted in Javascript errors when validating the form in some cases. Thanks to Koen Tilley.
Changes in pbsurvey 1.0.0
- New feature: Mutlilanguage surveys. You can have a single survey in multiple languages.
- New feature: Choice between client side JavaScript or server side PHP form validation. The server side validation is specially written for accessible websites.
- New feature: Possibility to show a Captcha before entering a survey.
- New feature: All answers from participants are stored in the database, even if they didn't finish the survey.
- New feature: Logging of the users IP-address , start and stop time of the survey session of the user in the results
- New feature: Anonymous surveys are checked against either the IP- address or a cookie. With this check you can restrict the access as usual, multiple, single or single (not updatable) surveys. This is not really safe, because the user can delete the cookie or take a survey on another computer, but can be usefull.
- Other: This version is completely written from scratch. A new table is added, “tx_pbsurvey_answers” and the “tx_pbsurvey_results” has been changed. There were a lot of reasons to do that:
- The extension had to be multilingual, so you can have a single survey in multiple languages.
- I wanted to have a good and decent database layout for future features.
- Store answers immediately after they have been submitted. This way it is possible to export or calculate statistics on surveys that have not been finished. Secondly users can stop their survey and finish it at a later time.
- The next stage in the development of pbsurvey is a separate extension which will extend the backend module “Web > Questionaire” with backend statistics. Although I've tried this on the old version of pbsurvey, it was almost impossible to do with an average survey of approximately 20 questions and 5000 results. Now it is possible to send queries direct to the database to do a lot of calculations.
- Other: The export module has been deleted from pbsurvey. This doesn't mean you can't export results anymore. The export module is available as a separate extension (pbsurveyexport) and will extend the “Web > Questionaire” module of pbsurvey. This has been done because of some future features like backend statistics. Admin users can choose which module functions they will install and load in TYPO3.
1
Main
1
Sub
0
development
1
Changes
Added id for additional fields. They were deleted just before the upload without being aware of the consequences. Inserted two extra db fields for the dimensions of the additional textarea. Bugfix on conditions True/False and Yes/No. Added pagenumber to cookie. Now possible to have multiple cookies for multiple surveys in one website. Thanks to Norbert Desautels for the testing. Improved Danish translation.
((Unknown Property))
Main
Sub
development
2
Changes
Subtext was not inserted by MarkerSub
((Unknown Property))
Main
Sub
development
3
Changes
Bugfix: When no startingpoint was given in TS or FF, it wouldn't take the items from the current page.Bugfix: HTML presentation type was translated by htmlspecialchars().
((Unknown Property))
Main
Sub
development
4
Changes
Bugfix: Client side validation was completely useless because of a dollar sign that wasn't supposed to be in the javascript.
((Unknown Property))
Main
Sub
development
5
Changes
Added new question type: Choice – Multiple Answers (selectbox). Deleted table row 'sql' which was not in use and is a reserved word in MySQL 5.1
((Unknown Property))
Main
Sub
development
6
Changes
Bugfix on client and server side form validation with question type “Open Answer – Number”
((Unknown Property))
Main
Sub
development
7
Changes
Bugfix on not updatable single response with only one page with questions.
((Unknown Property))
Main
Sub
development
8
Changes
Bugfix on question numbering (Thanks to rac00n)
((Unknown Property))
Main
Sub
development
9
Changes
Added remaining point notifier to question type Open Ended - Constant Sum
Added Italian translation to frontend plugin, thanks to Marc Garcia
Added possibility to have both client and server side validation
Changed default values of the extension configuration
Bugfix on maximum field length in question types “Open Answer – One line” and “Open Answer – Multiple lines”
Added random answer order for question types 1,23,2,3,11
Added language field to the result records for multilanguage surveys
Added hook to insert user defined functions (Thanks to Juergen Egeling from Punkt.de)
((Unknown Property))
Main
Sub
development
10
Changes
Changed the question subtext to RTE field instead of regular input field.
Added the possibility to add an extra css class to the fieldset of each question item. (Thanks to Juergen Egeling from Punkt.de)
((Unknown Property))
Main
Sub
development
11
Changes
Bugfix in page conditions wizard (Thanks to Juergen Egeling from Punkt.de)
((Unknown Property))
Main
Sub
development
12
Changes
Changed the page introduction to RTE field instead of regular input field.
((Unknown Property))
Main
Sub
development
13
Changes
Bugfix in page introduction with RTE
From now when a default value is selected for a dropdown in the backend, the –None – value will not be displayed anymore.
((Unknown Property))
Main
Sub
development
14
Changes
Bugfix in maxlength when empty in BE field
((Unknown Property))
Main
Sub
development
15
Changes
Bugfix with all checkboxes from one question not submitted anymore (Thanks to Michael Riedel from Punkt.de)
Hook is not increasing the question numbering anymore
((Unknown Property))
Main
Sub
development
16
Changes
- None - value with dropdown was configured wrong. Had to be with required questions
((Unknown Property))
Main
Sub
development
17
Changes
Again bugfix with all checkboxes from one question not submitted anymore
((Unknown Property))
Main
Sub
development
18
Changes
- None - value in dropdowns can be configured separately
((Unknown Property))
Main
Sub
1
development
0
Changes
Redirect to pages depending on the users score at the end of the survey
((Unknown Property))
Main
Sub
1
development
1
Changes
Added Spanish frontend language (Thanks to Jose Antonio Guerra)Added Chinese Tradiotional frontend language (Thanks to Gideon So)
((Unknown Property))
Main
Sub
1
development
2
Changes
Bugfix in surveys which start with a 'Page & Conditions' record
((Unknown Property))
Main
Sub
1
development
3
Changes
Checks on intvals before inserts and executes on database
Send the values of the current item to the hook
Changed default value of anonymous check in flexform to Cookie
Changed default value of cookie lifetime to 30 days
((Unknown Property))
Main
Sub
2
development
0
Changes
Bugfix to critical #5179: All answers from all users to a question were deleted when using radiobuttons and answering was not required to the question
Moved JS validation from button to form
Added <noscript> tag when only client side validation. Just a simple bypass. Can be avoided by switching off CSS.
Changed default value Form validation to PHP Server Side
Changed default value completion action to "display message"
Changed default value Page Numbering to "Display progress as progress bar"
Changed default value Question Numbering to "Number questions within entire questionaire"
Change in storage of arrUserData. Answers read from database were stored differently from answers read from piVars
Bugfix in conditions. Wrong variablenames in "Not Equal" part
Added some French translations in locallang_db
Maxlength for Open Question - Number was not available in HTML template
((Unknown Property))
Main
Sub
2
development
1
Changes
Important security fix: Please check Security Bulletin TYPO3-20080513-2 for further information.
((Unknown Property))
Main
Sub
2
development
2
Changes
Added mail functionality (Thanks to Charles Bureau, Bruno Tavara and Patrick Gaumond from DMR who implemented this)
Added some hooks (Thanks to Nabil Saleh)
((Unknown Property))
Main
Sub
3
development
0
Changes
((Unknown Property))
Main
Sub
3
development
1
Changes
Security Fix, please UPDATE! For details read: http://typo3.org/teams/security/security- bulletins/typo3-extensions/typo3-ext-sa-2011-004/
((Unknown Property))
Main
Sub
4
development
0
Changes
Add option to have updateable single response survey only before it has finished, bug fixes
((Unknown Property))
Main
Sub
5
development
0
Changes
Add question type “Choice – Image rating”. Thanks to Punkt.de for sponsoring. Bug fixes for 6.x
 EXT: Questionaire - 31