DEPRECATION WARNING
This documentation is not using the current rendering mechanism and is probably outdated. The extension maintainer should switch to the new system. Details on how to use the rendering mechanism can be found here.
EXT: Industry DB
| Author: | Kasper Skårhøj |
|---|---|
| Created: | 2002-11-01T00:32:00 |
| Changed: | 2007-06-28T16:09:55 |
| Author: | Natalia Postnikova |
| Email: | natalia@postnikova.de |
| Info 3: | |
| Info 4: |
EXT: Industry DB
Extension Key: pro_industrydb
Copyright 2000-2002, Natalia Postnikova, <natalia@postnikova.de>
This document is published under the Open Content License
available from http://www.opencontent.org/opl.shtml
The content of this document is related to TYPO3
- a GNU/GPL CMS/Framework available from www.typo3.com
Table of Contents
EXT: My Extension 1
Introduction 1
What does it do? 1
Screenshots 1
Users manual 1
FAQ 1
Adminstration 1
FAQ 2
Configuration 2
FAQ 2
Reference 2
Tutorial 2
Known problems 2
To-Do list 2
Changelog 2
Introduction
What does it do?
This extension creates a industry database (Branchendatenbank in German). You can create a category tree, places and entries, which then can be assigned to categories (up to 3) and a place. Since version 0.1.0 it is possible to edit entries in FE.
Screenshots
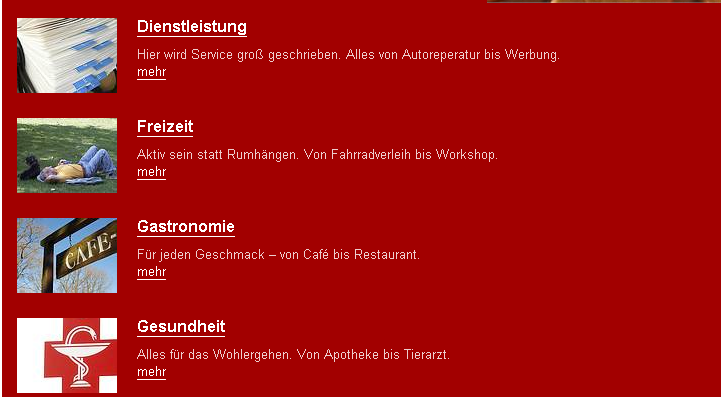
How a CATLIST (listing of main categories) can look like
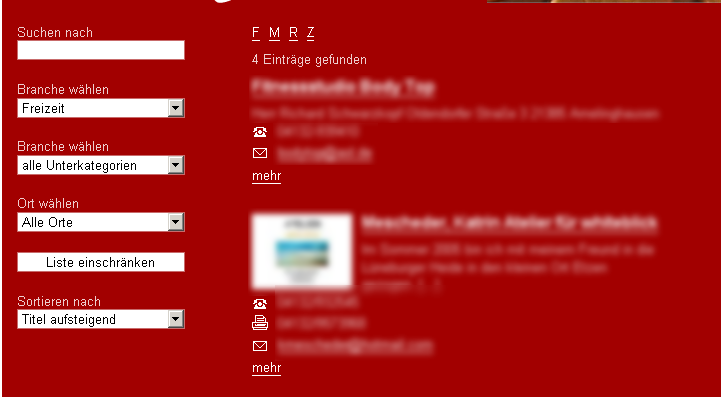 How a LIST (listing of entries) with SEARCH (search and filter
box)
How a LIST (listing of entries) with SEARCH (search and filter
box)
Users manual
Installation
Just install from TER or using the EM.
Create entries
Create a SysFolder where you want your entries to be stored. Set the folder itself as its own General Record Storage Page.
Create places. Create categories - at this time the plugin supports only 2 level category tree. Create entries, assign them to one place and up to 3 categories. At the category view you can set the category to be a food or a living category. This doesn't mean very much in the first place, but the first category (category with the lowest level) set as FOOD category will be displayed in the FOOD list. This assigment also tells the plugin how to handle the price fields. Also there is a partner check box – all the entries with the partner value of 1 will be dipslayed in a LIST where the “Show partners only” is set.
Add Static Template
Add the static template to your template.
Now edit the constants in the constant editor:
Very important are the Storage Page (insert the PID of your SysFolder here). If you have only one List page and only one Single Display Page, you can insert their PIDs here. But since version 0.1.1 you can override this values in the flex form configuration, so you can have multiple lists and single display pages. How this works will be explained in the tutorial later.
Displaying entries
Create multiple pages: one for the CATLIST (if you want one), one for the LIST and SEARCH, one for the SINGLE display.
On the CATLIST page insert the plugin and set “What to display” to CATLIST. Since 0.1.1 you can insert a PID in the field “Show category list for this pid”, that means that not the main categories are displayed, instead you will get a list of the categories with the given PID as parent category. This is useful if you want to display a CATLIST for FOOD entries (then you Cafe, Restaurant etc.). If you did not define the list PID in the Constants, you can set the page where the LIST should be displayed here.
On another page insert the LIST type of the plugin. You can combine the LIST with the SEARCH. Insert another plugin with SEARCH on the same page (like the second screenshot shows). In the flex form set the value of “Show single on this page” (if you want to override the value set in the constants).
On a third page insert the plugin and set its type to SINGLE.
Very important: all this pages must have the no_cache value set to 1.
That's it!
Result
Now you should have a page where the category list, all links pointing to the page with the list. All links from list page should point to the single display page.
FE Editing
Create new FE-users. Assign the entries they can change.
Create a page with the plugin type EDIT. If a user is logged in, he will get a list of all the entries he can edit. He can change the title, description and phone, fax, mail, web.
FAQ
If you have any questions mail me and i will insert the answers here.
Adminstration
Module
The latest version of the plugin also has a module. This module allows you to view the fe users and the assigned entries. It helps you also create fe users from industry db entries and export them in a simple list.
Why
Example: you got a list of entries (about 100), wrote an import script to insert them into your database, now you are happy. Suddenly you customer wants that every entry in the database should be administrated by a single fe user. Now the module can help you: you can automatically create one fe_user for every entry and assign him to a user group. If you want to create 100 fe_users on your own, go ahead, the script can do that for you in a few seconds.
View
The module has three functions. The first one shows a list of all fe users and the entries, they can edit (grouped by users), and a second list with all the entries and the fe users, who can edit them (grouped by entries).
Create
You have to select a usergroup and to insert the pid of the fe users storage page. The first option just displays the SQL queries, the second one also executes them. The username is generated form the entry title, the name of the user is the entry title and the password is a 6 letter word of random letters and numbers.
Export
Shows a list of all fe users with the passwords and entries, so you can give the login data to your customer.
Configuration
You can set the most settings in the constant editor. You find a short description for each value so I think it is self-explanatory.
FAQ
Nothing happened when I set the “redirect to catlist” value. The “catlist pid” has no effect.
The idea was, that if the user has no category selected in the catlist, he will be redirected to the catlist page in order to prevent a very long list of entries. But it doesn't work (yet).
What does “show subcategories” mean?
If you set this value to 1, then a linked list of all subcategories will be displayed in the catlist. When you are on the category listing page and you are interested in “restaurants”, which is a subcategory of “gastronomy”, you can click on the “restaurants” link and see the restaurants, instead of clicking on the category “gastronomy” and then select “restaurants” in the search.
Subheadlines
You can produce subheadlines in a section using “Heading 4” or “Heading 5” (normally used for “Examples”)
Reference
Reference to Constants (are copied to the Setup)
file.templateFile
Property
file.templateFile
Data type
string
Description
Template File path, the template consists only of div and span tags, so you can use your own stylesheets to beautify the output
Default
EXT:pro_industrydb/res/template.html
file.iconWeb
Property
file.iconWeb
Data type
string
Description
Icon, which is displayed in front of the web address in the list and single view (only if web address exists)
Default
EXT:pro_industrydb/res/web_icon.png
file.iconPhone
Property
file.iconPhone
Data type
string
Description
Icon, which is displayed in front of the phone number in the list and single view (only if phone exists)
Default
EXT:pro_industrydb/res/phone_icon.ong
file.iconFax
Property
file.iconFax
Data type
string
Description
Icon, which is displayed in front of the fax number in the list and single view (only if set)
Default
EXT:pro_idnsutrydb/res/fax_icon.png
file.iconMail
Property
file.iconMail
Data type
string
Description
Icon, which is displayed in front of the mail address in the list and single view (only if set)
Default
EXT:pro_instrydb/res/mail_icon.png
showCount
Property
showCount
Data type
boolean
Description
If set, it shows the number of entries in the category, expample: restaurants(10) – DOESN'T WORK YET!
Default
1
cropOptions
Property
cropOptions
Data type
string
Description
The description is cropped with this settings, see TYPO3 TypoScript crop settings for more info
Default
100| [...]|1
showSubcats
Property
showSubcats
Data type
boolean
Description
If set a list of subcategories will be displayed in the CATLIST
Default
1
storagePID
Property
storagePID
Data type
int
Description
The most important value. The PID of the page where your entries are stored. If not set it will be the current page id.
Default
0
imageListW
Property
imageListW
Data type
int
Description
Max widht of the image in the list view
Default
100
ImageListH
Property
ImageListH
Data type
int
Description
Max height of the image in the list view
Default
100
imageSingleW
Property
imageSingleW
Data type
int
Description
Max width of the image in the single view
Default
200
imageSingleH
Property
imageSingleH
Data type
int
Description
Max height of the image in the single view
Default
200
singlePid
Property
singlePid
Data type
int
Description
PID of the page where the SINGLE plugin type is inserted, if not set the current page
Default
0
catlistPid
Property
catlistPid
Data type
int
Description
PID of the page where the CATLIST plugin type is inserted
Default
0
listPid
Property
listPid
Data type
int
Description
PID of the page where the LIST plugin type is inserted
Default
0
redirectToCatlist
Property
redirectToCatlist
Data type
boolean
Description
If set, the LIST will redirect to CATLIST, when no category is selected (DOESN'T WORK YET)
Default
0
backPid
Property
backPid
Data type
int
Description
PID of the page to go back from single view, if 0 it is the page you came from – don't touch the value and everything will be fine
Default
0
searchPid
Property
searchPid
Data type
int
Description
PID of the page to send the form data to, if 0 its the same page
Default
0
showABC
Property
showABC
Data type
boolean
Description
If set, an ABC navigator is shown in the list view, only if the list is sorted by title
Default
1
[tsref:(cObject).TEST]
Tutorial
Read the Administration part, it should explain a lot.
Known problems
Hmmm... sometimes errors occur. Need to fix this.
To-Do list
- fix the bugs
- add RTE to FE editing
- make the redirect to catlist work
- fix the png transparency for IE6 in the icons
- display the category tree as in tt_news
- add multi language support (dont know how to do that)
- do you have any ideas?
Changelog
0.1.1 – added FE editing and the first version of the manual
Important guidelines
Issues with Open Office documentation for TYPO3
There are a few important points to make about writing documentation for TYPO3 in Open Office. Please makes sure to follow these.
Inserting images
When you insert images you can either:
Make a copy/paste from eg. Photoshop, but it's REALLY IMPORTANT that you insert the image into Open Office by the menu “Edit > Paste Special” and then select “Bitmap” . If you don't do it in this way the image cannot be shown (since it will not be stored as a PNG internally in the SXW file)
Alternatively you can use the traditional way “Insert > Graphics > From file” and insert an image from your harddrive. In particular use this if the image is photographic (JPG) since the internal storage as PNG is not good for photographs.
Generally please use copy/paste only for screendumps with large areas of similar color (good png-compression) and JPG-files for photographic images. Go for small images, 72 dpi, medium quality.
Paragraph styles
- Use the paragraph style “Text body” for bodytext
- Use “Heading 1” to “Heading 5” for headers. “Heading 1-3” will be recognized as “sections” on typo3.org. “Heading 4-5” is subheaders, where “Heading 5” is preferrably for “Examples”.
- For code listings, use the style “Preformatted Text” (found under “HTML Styles”). For codelistings in tables there is a custom style called “Table Contents/PRE”.
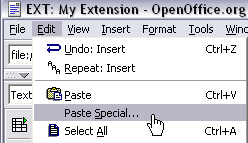
This screenshot shows the only paragraph styles allowed in the documents. The ones grayed out are paragraph styles that are used by default for such as the index table or the footer. The others are the ones you are allowed to use.

Linking
You can make hyperlinks in the documents as absolute URLs. Use menu “Insert > Hyperlink”
Meta data and updates
There are three fields of meta-data you have to fill in. First of all go to “File > Properties...”.
In the “Description” screen you enter the title of the document. Extension manuals are prefixed “EXT: [extension title]”
In the “User defined” screen you enter your email address as the first field (named “Email” / ”Info 1”)
In the “User defined” screen you enter your full name as the second field (named “Author” / ”Info 2”)
Finally you should also insert the correct extension key in the text below the document title, but this is not a meta-data field, just regular text.
For more information you can go to typo3.org .
 EXT: Industry DB - 7