DEPRECATION WARNING
This documentation is not using the current rendering mechanism and is probably outdated. The extension maintainer should switch to the new system. Details on how to use the rendering mechanism can be found here.
User-Manual examiner
Introduction
In this user documentations, the cunctions of the Typo3 extensions "Result Repository" are described and explained in detail. This extension mainly conduces to administrating grades. In order to do so, modules and associated courses can be created and the appropriate examinees can be entered.
Result Repository
The following illustration displays the backend's home page.

1.
The menu bar is situated in the upper-right corner and contains the following different functions: adding new examinees, import and export as well as adjusting the interval lenghts. Existing lists of examinees can be importet with the aid of the import function. Moreover, it is possible to export examinees, courses and modules. The menu option "Adjust Interval" allows adjusting the lenght of an interval. It is possible to measure the interval in semesters or in years.
2.
Depending on the adjusted interval, users can toggle between different semesters or academic years.
3.
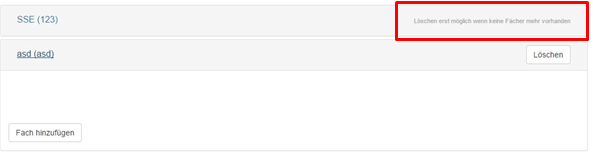
All modules, which have been created so far, are listed in this section When clicking on a module, all corresponding courses are displayed. With the button "Add Course", new courses can be added to a module. With the button "Register/ Display Grades", grades can be added to a course or can be displayed. When clicking on "Assign Examinees", new examinees can be assigned to a course. The symbol x (b) allows deleting courses. In order to delete the whole module, all corresponding courses have to be deleted. Then, the module can be deleted by clicking on the erasing button.
4.
A new module (including a course) can be added by clicking on the button "Add module" (4).
Add a Module/ Course
On this page (ill. 5), settings of new modules and courses can be determined.
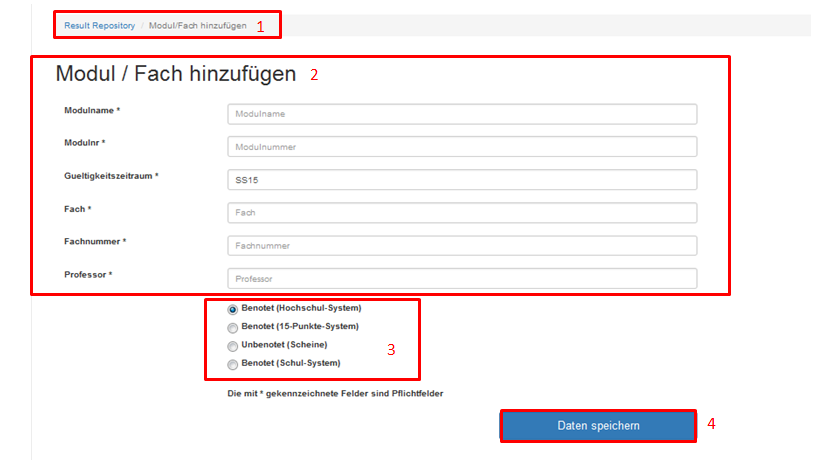
1.
The path leading to the current page is displayed. The particular pages can be reached by clicking on their names, which are blue highlighted.
2.
This blank is used to create a new module and course.
3.
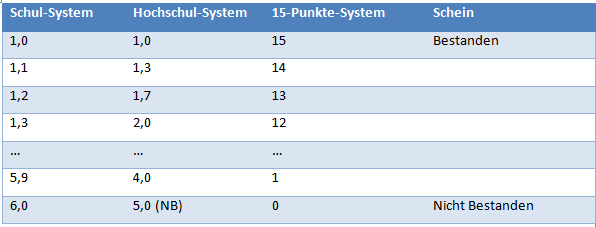
These selection buttons enable determining the system of notation. School grades (school system or 15 points system) or test achievments (higher education system) are available for selection.
The systems of notation are contrasted in the following table (ill. 5).
4.
The entries can be saved by clicking on the button (4).
After the save procedure, the user returns to the start image. Now, users can add examinees by clicking on the button "Assign Examinee" and then assign them to courses. The following site is displayed (ill. 6).
Assignment of Examinees
If no lists of examinees were imported, they have to be created before the examiner can assign them to different courses. The following form (ill. 6) has to be filled in manually.
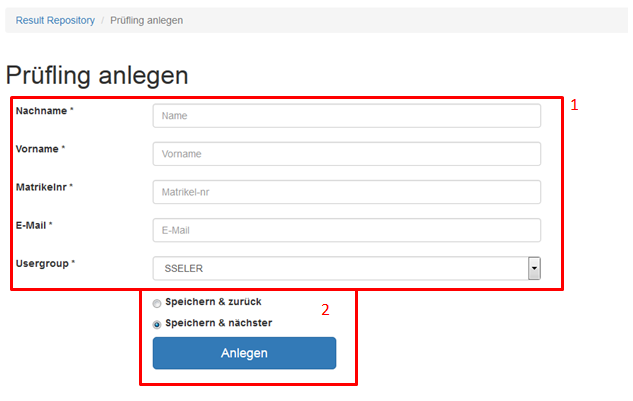
1.
The form has to be filled in with the examinee's data.
2.
When saving the entry, a new examinee is created. At the same time, a Typo3 Frontend User is created. An email containig the examinee's access data is sent to the email adress the examinator has entered.
Having created the examinees, the examinator has to assign them to courses. In order to do so, click on the button "Assign Examinees" (ill. 1 -> Point 3 -> Assign examinees).
Assign Examinees
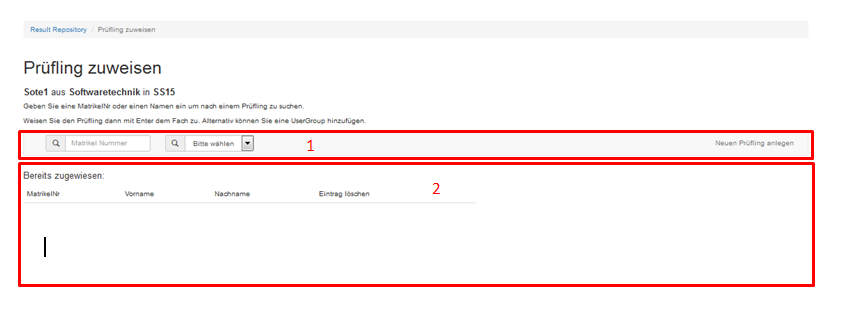
1.
The search bar allows searching for examinees by using their matriculation number. By pressing the enter key, the examinee is assigned to the course. The extension automatically verifies, if the matricualtion number exists.
Moreover it is possible to create user groups, which allows assigning several examinees at the same time. However, these user groups have to be created manually before the assignment.
2.
The examinees, which have already been assigned are displayed. After the assignment, the grades can be entered.
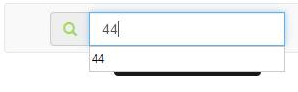
Grade Administration
This site (ill. 7) allows administrating the students' grades.
1.
With this display, the examinator always knows which test achievement (course, module and semester) he is editing.
2.
Examinees can be sorted by various criteria. Moreover, users can search for examinees by using their matriculation number or their surname. Then, the examinees can be edited. Additionally, it is possible to import or export a course.
3.
All examinees corresponding to the user's selection (2) are displayed. A drop down menu allows selecting the grade. It is optional to add a comment. The last line allows assigning an additional examinee and adding his grade.
4.
The statistic analysis of the course is displayed.