DEPRECATION WARNING
This documentation is not using the current rendering mechanism and is probably outdated. The extension maintainer should switch to the new system. Details on how to use the rendering mechanism can be found here.
EXT: rgtabs
| Author: | Kasper Skårhøj |
|---|---|
| Created: | 2002-11-01T00:32:00 |
| Changed: | 2008-06-26T14:28:26 |
| Author: | Georg Ringer |
| Email: | http://www.ringer.it |
| Info 3: | |
| Info 4: |
EXT: rgtabs
Extension Key: rgtabs
Copyright 2000-2002, Georg Ringer, <http://www.ringer.it>
This document is published under the Open Content License
available from http://www.opencontent.org/opl.shtml
The content of this document is related to TYPO3
- a GNU/GPL CMS/Framework available from www.typo3.com
Table of Contents
EXT: rgtabs 1
Introduction 1
What does it do 1
Screenshots 1
Demonstration 2
Users manual 2
Installation 2
Installation with another Mootools EXT installed 3
Using rgtabs 3
FAQ 3
Configuration 3
Reference 3
Advanced configuration 4
Override the records with TS 4
Override the title of the tabs with TS 5
Graphical header for the tab menu 5
Use the idea of rgtabs 6
HowTo: Tabs in TemplaVoila with printing preview. 6
You like the extension? 8
Known problems 8
Changelog 8
Introduction
What does it do
The extension rgtabs lets you toggle content element and it is also possible to have an rgtab inside another one. The content can be loaded with Ajax or can be just switched with some javascript. It is fully style able with CSS and is based on Mootools. Take a look at the the demo to get a nice impression: http://www.rggooglemap.com/dev/rgtabs.html
Screenshots
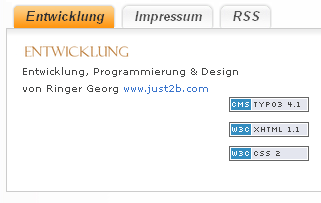 Image 1: You can see 3 tabs, the first one selected and
inside in it there is a content element “Text with image”
Image 1: You can see 3 tabs, the first one selected and
inside in it there is a content element “Text with image”
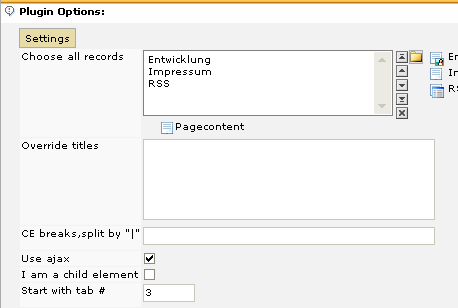
Image 2: The configuration the Backend: Choose the content elements and you are done
Demonstration
To get a better impression about rgtabs, please visit the demo website for some examples:
- In English: http://www.rggooglemap.com/en/dev/rgtabs.html
- In German: http://www.rggooglemap.com/dev/rgtabs.html
Users manual
Installation
Import/Download the extension and install it like every other extension.
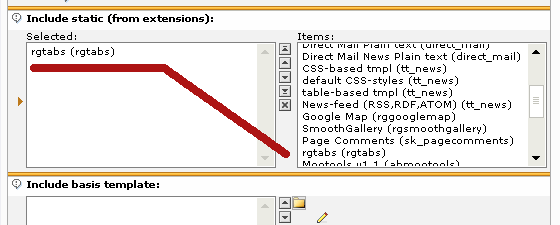
Include the static TS (from extension) in the template record (your root TS or make an ext. template just for the page where you want the extension be displayed). **The steps for the real beginners are** :
Select your root/first page.
Click in the menu on the left side “Template” and choose “Edit whole record”.
Scroll down until you see the the same thing as in the screenshot shown.
Search for the “rgtabs” entry on the right side, click on it to get it on the left side.
Press “Save” and you are done.
Configure the extension using the flexform settings – See the steps below (it is still very easy)
Installation with another Mootools EXT installed
If there is another extension installed which uses Mootools (like pmkslimbox, rgsmoothgallery, rgsmoothscroll, ...) you need to use the extension t3mootools! Please take a look at the manual there – it is very simple to do!
Using rgtabs
To use rgtabs you need to add the extension as content element on a page. Now just select the content elements you want to display with this extension. One possible way is to create an extra sys folder or page which is hidden in the menu and place the content elements there.
There is only one field required and this is the records field because you need at least 1 CE which should get shown (obvious).
Selecting pages
Since the version 2.3.0 it is also possible to select pages. Switch the mode to “Show pages” and select the pages you wanna display. The field “CE break” is used to set how many content elements from each page should get loaded.
Mode
Property
Mode
Description
Choose “Show content elements” to pick content elements or choose “Show pages” to pick pages. After changing you need to save the content element!!
Choose all records
Property
Choose all records
Description
If mode is “Choose content elements”: Choose the records you want to display.
Choose pages
Property
Choose pages
Description
If mode is “Choose pages”: Choose the pages you want to display.
Override titles
Property
Override titles
Description
As default the title of the CE is taken for the title of the menu but you can override it in this field. Every line stands for one tab.
CE breaks
Property
CE breaks
Description
If Mode = Choose all records
It is possible to display as many CE in one tab as you like. Here you can choose which CE is displayed in which tab. Here are some examples:
Empty field: 1 CE per tab.
1|1|2 : 1 CE in 1 st tab, 1 in the 2 nd and 2 in the 3 rd
2|1 :2 CE in the 1 st tab, 1 in the 2 nd
1|3|1 : 1 CE in the 1 st tab, 3 in the 2 nd and 1 in the 3 rd
I hope you get the idea!
If Mode == Choose all pages
Here you can select how many content elements of each page are shown! Which content elements from which language and which column is set by TS, please take a look at the reference!
Use ajax
Property
Use ajax
Description
If checked, the content is called with Ajax. If not, the content is loaded but hidden with CSS.
Pro Ajax:
The page itself is smaller
Con Ajax:
- Search engines and indexed search won't see the content of the other tabs
- The page itself is little bit bigger (but everything is cached by TYPO3, so shouldn't be that big deal).
I'm a child element
Property
I'm a child element
Description
This is just needed if you want to display a rgtab inside a rgtab.
Start with tab #
Property
Start with tab #
Description
You can load another tab than the 1 st one as default
FAQ
- Q: How does it work with multilingual websites? A: You need to select the translated CE yourself!
- Q: How does it work with an Ajax rgtab inside another Ajax rgtab? A: Not at all, sorry!
Configuration
There is not much to configure because everything is quite simple. If you are advanced in TS, take a look at the section “Advanced configuration”.
Reference
mode
Property
mode
Data type
string
Description
The mode which is used! Either use “TTCONTENT” or “PAGES”
Default
pathToMootools
Property
pathToMootools
Data type
string
Description
The path to the Mootools library if t3mootools isn't used.
Default
EXT:rgtabs/res/scripts/mootools.js
pathToJS
Property
pathToJS
Data type
string
Description
The path to the Mootols script for the tabs.
Default
EXT:rgtabs/res/scripts/rgtabs.js
pathToCSS
Property
pathToCSS
Data type
string
Description
The path to the CSS file which is used.
Default
EXT:rgtabs/res/css/rgtabs.css
delay
Property
delay
Data type
Int (ms)
Description
It is possible to make an automatic switch between the tabs by using delay. The value is in milliseconds!An example is online at
http://www.rggooglemap.com/dev/rgtabs/automatischer-wechsel.html
Default
records
Property
records
Data type
string
Description
List of IDs of content elements to override selection inside the plugin.
Default
pages
Property
pages
Data type
string
Description
List of IDs of pages to override selection inside the plugin.
Default
showAsFirst
Property
showAsFirst
Data type
int
Description
The tab which is opened as default.
Default
ajax
Property
ajax
Data type
boolean
Description
Enable ajax, otherwise the tabs are already loaded which is usually faster and search engines can find the hidden tabs too.
Default
breaks
Property
breaks
Data type
string
Description
The CE breaks, read its description one chapter before.
Default
limit
Property
limit
Data type
int
Description
The default count of content elements per page if mode is “Show pages”.
Default
2
orderBy
Property
orderBy
Data type
string
Description
The default used orderby statement of content elements if mode is “Show pages”.
Default
sorting
additionalWhere
Property
additionalWhere
Data type
string
Description
The additional where clause if mode is “Show pages”. This can also be used to just show content elements of one language by using AND sys_language_uid = 0.
Default
AND colPos = 0
Advanced configuration
There are some very nice samples I included at res/helpfull_ts/ and here is a short explanation.
Override the records with TS
With this little script (res/helpful_ts/override_records.txt) it is possible to pass the records with a dynamic TS-script to the plugin. There is no demo website for this because you wouldn't see a difference ;)
00 #TS Code
01 plugin.tx_rgtabs_pi1 {
02      records.override.cObject = COA
03      records.override.cObject {
04              10 = CONTENT
05              10 {
06              table = tt_content
07              select {
08                      pidInList = this
09                      orderBy = sorting
10                      # colPos = 3 = Border column
11                      where = colPos= 3
12                      selectFields = uid
13              }
14
15              renderObj = TEXT
16              renderObj.field = uid
17              renderObj.wrap = |,
18
19              }
20              # only if there are no
21    if.isFalse.field = tx_rgtabsRecords
22
23      }
24 }
Explanation
The script gets all records from the same page which are saved in the column “Border” (#11) but only if there is no CE saved in the plugin itself (#21). With this code you can load any default CE into the tab and override it what you want.
Override the pages with TS
To override pages is working the same way as overriding the records. You can find the sample at res/helpful_tl/override_pages.txt).
Override the title of the tabs with TS
Sometimes you don't want to display the title in the tab menu but any other field of the content element, e.g. the date or even an image. You can do this with the script (res/helpful_ts/override_title.txt). You can take a look at it here in English http://www.rggooglemap.com/en/dev/rgtabs/title-variations.html and in German http://www.rggooglemap.com/dev/rgtabs/titelvariationen.html
00 TS Code
01 plugin.tx_rgtabs_pi1 {
02 title.cObject = RECORDS
03 title.cObject {
04 tables = tt_content
05 # this does the magic and holds the uid of the contentelement
06 source.field = tx_rgtabsTitle
07 dontCheckPid = 1
08
09 conf.tt_content = COA
10 conf.tt_content {
11 10 = TEXT
12 10.field= header
13
14 20 = TEXT
15 20.field = uid
16 20.wrap = <small>(|)</small>
16
17 30 = IMAGE
18 30 {
19 file.maxH = 200
20 file.maxW = 40
21 file.import=uploads/pics/
22 file.import.data = levelmedia: -1,slide
23 file.import.listNum = 0
24 file.import.override.field = image
25 }
26 }
27 }
28 }
Explanation
In the lines #11-#24 the magic does happen. There you can add every cObj of TYPO3 (see TsRef for more details) to the title. With this code you will get the title, followed by the UID of the CE and then, if it is a CE “Image” or “Text with Image” the 1 st image of the CE.
Use the idea of rgtabs
Of course you can also just use the JavaScript of this extension for your own projects! This is very easy and the following example should show you why!
Take a look at the demo http://www.rggooglemap.com/dev/rgtabs/rgtabs- mit-tt-news.html There you will see 4 tabs and the tab title stands for a tt_news category and holds all records of this category!
You will find the TS for this in the extension directory rgtabs/res/helpful_ts/rgtabs+tt_news.txt
If you have got a nice example, please send me a mail, I would like to see it!
HowTo: Tabs in TemplaVoila with printing preview.
Tabs are great, however they have a little disadvantage when it comes to printing. Therefore this small tutorial which covers easy to handle creation of content elements in TemplaVoila, adding them to the rgtabs plugin and accessing them in TemplaVoila's printing mode.
First, we assume, you have two content elements which are containers for elements. The corresponding xml should look something like this:
      <field_content_main type="array">
                   <tx_templavoila type="array">
                           <title>Content_Main</title>
                           <description>Here are some CEs and the tabs plugin</description>
                           <sample_data type="array">
                                   <numIndex index="0"></numIndex>
                           </sample_data>
                           <eType>ce</eType>
                           <tags>div</tags>
                           <TypoScript><![CDATA[
10= RECORDS
10.source.current=1
10.tables = tt_content
10.wrap = <!--TYPO3SEARCH_begin--> | <!--TYPO3SEARCH_end-->
            ]]></TypoScript>
                   </tx_templavoila>
                   <TCEforms type="array">
                           <config type="array">
                                   <type>group</type>
                                   <internal_type>db</internal_type>
                                   <allowed>tt_content</allowed>
                                   <size>5</size>
                                   <maxitems>20</maxitems>
                                   <minitems>0</minitems>
                                   <multiple>1</multiple>
                                   <show_thumbs>1</show_thumbs>
                           </config>
                           <label>Content_Main</label>
                   </TCEforms>
           </field_content_main>
           <field_content_details type="array">
                   <tx_templavoila type="array">
                           <title>Content_Details</title>
                           <description>These are the CEs which will be rendered inside the tabs</description>
                           <sample_data type="array">
                                   <numIndex index="0">Some content for Tabs</numIndex>
                           </sample_data>
                           <eType>ce</eType>
                           <tags>div</tags>
                           <TypoScript><![CDATA[
10= RECORDS
10.source.current=1
10.tables = tt_content
10.wrap = <!--TYPO3SEARCH_begin--> | <!--TYPO3SEARCH_end-->
            ]]></TypoScript>
                   </tx_templavoila>
                   <TCEforms type="array">
                           <config type="array">
                                   <type>group</type>
                                   <internal_type>db</internal_type>
                                   <allowed>tt_content</allowed>
                                   <size>5</size>
                                   <maxitems>20</maxitems>
                                   <minitems>0</minitems>
                                   <multiple>1</multiple>
                                   <show_thumbs>1</show_thumbs>
                           </config>
                           <label>Content_Details</label>
                   </TCEforms>
           </field_content_details>
So, the first CE is mainly for the tabs-plugin to hold. The second CE is for the content elements that will be rendered inside the tabs. Now map both of them into the place you like in your HTML-Template. Do the same in your printing template if you have one.
At this time, you are ready to create content in the Content_Details column with the TemplaVoila page module and add it to the tabs-plugin. The drawback is, that all the content is obviously rendered twice, because it is once mapped in TemplaVoila and once within the tabs. The same happen in the printing page.
Now, how do we avoid this: Let's first see to the printing page because this is easy. In your TS-Template where you define the printing properties add the lines
# Disable Tabs when in printing modus
plugin.tx_rgtabs_pi1 >

So that the whole looks something like
# The Print Modus
[globalVar = GP:print > 0]
        # We do some stuff like disabling CSS
        ...
        # Disable Tabs when in print modus
        plugin.tx_rgtabs_pi1 >
        ...
[GLOBAL]
Preview your printing page and you will notice that the rgtabs plugin is not rendered any more on the printing page.
Now we have to disable the „normal“ version of the content elements on the page, where we only want to see the tabs. This is done by a little trick:
In your TV-XML you have to add some lines (if they aren't already there by default)
<field_content_main type="array">
                     <tx_templavoila type="array">
                             <title>Content_Main</title>
                             <description>Here are som CEs and the tabs plugin</description>
                             <sample_data type="array">
                                     <numIndex index="0"></numIndex>
                             </sample_data>
                             <eType>ce</eType>
                             <tags>div</tags>
                             <TypoScript><![CDATA[
  10= RECORDS
  10.source.current=1
  10.tables = tt_content
  10.wrap = <!--TYPO3SEARCH_begin--> | <!--TYPO3SEARCH_end-->
              ]]></TypoScript>
                             <oldStyleColumnNumber type="integer">2</oldStyleColumnNumber>
                     </tx_templavoila>
                     <TCEforms type="array">
                             <config type="array">
                                     <type>group</type>
                                     <internal_type>db</internal_type>
                                     <allowed>tt_content</allowed>
                                     <size>5</size>
                                     <maxitems>20</maxitems>
                                     <minitems>0</minitems>
                                     <multiple>1</multiple>
                                     <show_thumbs>1</show_thumbs>
                             </config>
                             <label>Content_Main</label>
                     </TCEforms>
             </field_content_main>
             <field_content_details type="array">
                     <tx_templavoila type="array">
                             <title>Content_Details</title>
                             <description>These are the CEs which will be rendered inside the tabs</description>
                             <sample_data type="array">
                                     <numIndex index="0">Some content for Tabs</numIndex>
                             </sample_data>
                             <eType>ce</eType>
                             <TypoScriptObjPath>lib.details</TypoScriptObjPath>
                             <tags>div</tags>
                             <TypoScript><![CDATA[
  10= RECORDS
  10.source.current=1
  10.tables = tt_content
  10.wrap = <!--TYPO3SEARCH_begin--> | <!--TYPO3SEARCH_end-->
              ]]></TypoScript>
                             <oldStyleColumnNumber type="integer">3</oldStyleColumnNumber>
                     </tx_templavoila>
                     <TCEforms type="array">
                             <config type="array">
                                     <type>group</type>
                                     <internal_type>db</internal_type>
                                     <allowed>tt_content</allowed>
                                     <size>5</size>
                                     <maxitems>20</maxitems>
                                     <minitems>0</minitems>
                                     <multiple>1</multiple>
                                     <show_thumbs>1</show_thumbs>
                             </config>
                             <label>Content_Details</label>
                     </TCEforms>
             </field_content_details>
You might notice two differences:
First, both CEs have the tag „<oldStyleColumnNumber type=“integer“> ... </oldStyleColumnNumber> which refers to the column model if you are not using TemplaVoila. The other difference is, that the field_content_details now is an <TypoScriptObjectPath> and is called „lib.details“. Of course, you can give it any name you want. The clue is, that any content element that is an TypoScript Objectpath is not rendered in the FE at all, unless you tell it what to do. So now, in the normal mode, we have the desired result (no rendering of the CEs from the column „Content_Details“ but only from the rgtabs plugin). In the printing mode however we now have none of the content rendered any more. That is why we added the oldStyleColumnNumber tag into the XML. Again, we have to go to our TS-Template and add some stuff where the printing mode is defined. We add the following lines:
# Now we have to import the content that is not shown in the normal view
     # TypoScript Object Path is defined in TV XML
     # will be overwritten with the required content elements
     lib.details = CONTENT
     lib.details{
             #content from the table tt_content
             table = tt_content
             # select statement via old Column Model, remember the lines
             #<oldStyleColumnNumber type="integer">3</oldStyleColumnNumber> in TV XML
             select{
                     pidInList = this
                     where = colpos=3
                     selectFields.uid
             }
     }
With this script, everything should be fine and you can see the tabs on the normal pages and the content without tabs on the printing pages. So, what did the trick?
When in printing mode, we simply select the content from the actual page, but only the elements which are in the „old“ column with the number 3 and render it as content in the HTML-Container into which we mapped the field_content_details. All other content is in the „old“ column 2 and is rendered just normal.
If anyone knows a better way on how to achieve this, please let me know. If you have any comments or improvements for this tutorial, or if you even found an error, please write them to typo3@mda.ch and not to Georg who wrote the great rgtabs extension.
You like the extension?
If you like this extension, you can do one or more of the following things:
- Write me a mail or create a posting at http://www.rggooglemap.com/dev/rgtabs.html
- Please rate the extension in the Repository: http://typo3.org/extensions/ search for rgtabs, click on the title and then at “Ratings” (You need to be registered and logged in at typo3.org)
- Donate something, so that I can write those kind of extensions for you. More information is here: German: http://www.rggooglemap.com/menu/spende.html and English: http://www.rggooglemap.com/en/2/donate.html . Thanks!
One of these things is the least you can do because I spend hours just for this, for nothing!
Known problems
None that i know. Just the usual Ajax-lib-problem: Problems
Changelog
- 2.3.0. Selection of pages and updated Reference.
- 2.2.0. Update of the manual, adding the tt_news example, adding a clear:both in the CSS
- 2.1.0. Enable auto rotation
- 2.0.3. Manual updates, thanks to Tony Lush & Christopher Schnell
- 2.0.2. Just small fix: Setting max tab to 50
- 2.0.1. Manual updates
- 2.0.0. Complete rewrite with Ajax, Mootools and more options
- 1.0.0. Initial release
 EXT: rgtabs - 9