DEPRECATION WARNING
This documentation is not using the current rendering mechanism and is probably outdated. The extension maintainer should switch to the new system. Details on how to use the rendering mechanism can be found here.
EXT: Sixpack-4-T3
| Author: | Kasper Skårhøj |
|---|---|
| Created: | 2002-11-01T00:32:00 |
| Changed: | 2006-02-06T21:14:05 |
| Email: | boeck at mpie de |
EXT: Sixpack-4-T3
Extension Key: sixpack
Copyright 2005-2006, boeck at mpie de, <boeck at mpie de>
This document is published under the Open Content License
available from http://www.opencontent.org/opl.shtml
The content of this document is related to TYPO3
- a GNU/GPL CMS/Framework available from www.typo3.com
Table of Contents
EXT: Sixpack-4-T3 1
Introduction 1
What does it do? 1
Screenshots 2
Users manual 3
The Sixpack-4-T3 frontend editor 4
Controlling the output 5
Adminstration 8
Installation 8
Storage Concepts 8
Preparations 8
Grant users access to the frontend editor of Sixpack-4-T3 8
Importing publication data 8
TypoScript 9
Customizing the output / Modifying the BibTeX Style 9
Languages 9
Reference (TypoScript) 9
To-Do list 10
Changelog 10
Credits 10
Introduction
What does it do?
This extension provides a new Typo3 content element which displays a publication lists. Such publication lists are useful in research facilities such as universities or research institutes. Sixpack-4-T3 allows to extract
- *Publications of 1 person:* The single-person-view is useful for personal homepages. A member of a research facility can extract his/her publications directly from the database
- *Publications of a set of persons:* That view can be used to extract all publications of the members of a research group or a department.
- *The output of the entire database.* This full view is used to provide a full overview about the scientific outcome of the entire research facility.
The extension Sixpack-4-T3 provides a content element to output the query results. In the backend form of this content element the author can choose between several visualization options, such as
- *View mode:* Choose between Author View , Department View , or Full View
- *Show/Hide abstracts:* If abstracts are given the author can decide whether they are printed or not.
- *Include unpublished work:* Sixpack-4-T3 offers handling also unpublished work. Unpublished work refers to publications marked as ' unpublished ', ' submitted ', or ' accepted '. This feature is particularily interesting for the personal homepages ( Author View )
- *Navigation bars:* In case of a huge set of publications Sixpack-4-T3 provides two navigation bars to split up the content into smaller pieces: (a) the year navigation bar and (b) the page navigation bar. The year navigation bar splits up the results into pages with 1 page per year. The page navigation bar can subdivide the output even further. The author can specify the maximum number of publications to be shown on one page.
Sixpack-4-T3 is based on the bibliography and reference manager SIXPACK ( http://sourceforge.net/projects/sixpack/ ). The extension is based on an interface to BibTeX. Hence, Sixpack-4-T3 offers all bibliography types which come with BibTeX.
Screenshots
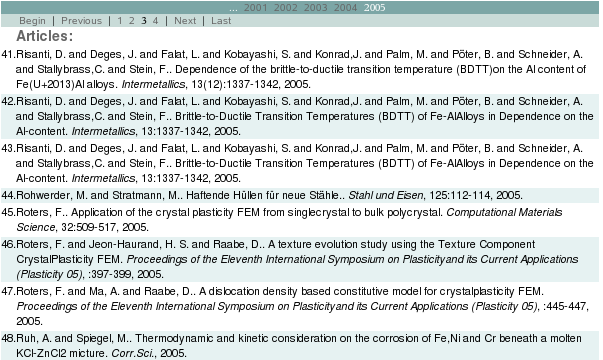
The following screenshot is taken from the web page http://www.mpie.de . The first line is the year navigation bar whereas the second line subdivides the content as a page navigation bar. The content is organized into sections for each bibliography type.
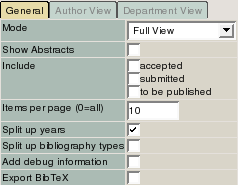
The following screenshot demonstrates how the visualization modes can be easily controlled in the backend form of the content element:
 The Sixpack-4-T3 extension offers also an intuitive frontend
editor in order to manipulate the database entries. The following
example demonstrates how the frontend editor functionalities of Typo3
have been extended to this extension:
The Sixpack-4-T3 extension offers also an intuitive frontend
editor in order to manipulate the database entries. The following
example demonstrates how the frontend editor functionalities of Typo3
have been extended to this extension:
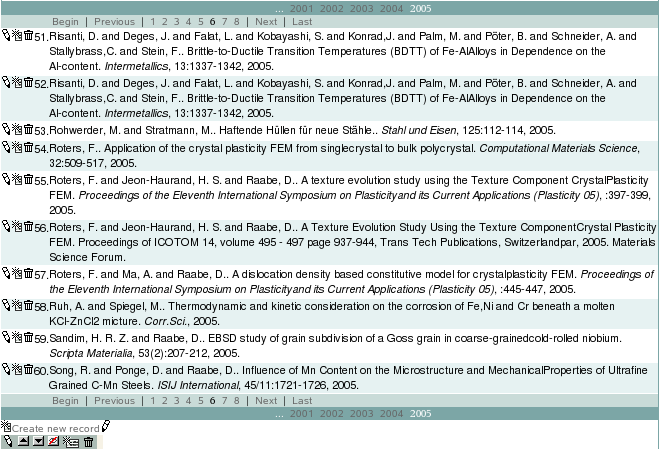
Every entry can be manipulated in the frontend editor of Sixpack-4-T3. Also new entries can be comfortably added to the database. The editor offers a preview functionality:
Users manual
Once the extension has been installed (see below ) a new content element is being provided. Add the Sixpack-4-T3 content element as usual:
login to the backend interface of your Typo3 server
Click on “Page” and choose the page you want to add the content element to
Click on “New content element” and select “Publication List”.
Typo3 asks you for the position where the content element shall be added.
After specifying the location, a form to control the elements behavior apprears.
The Sixpack-4-T3 form should look similar to:
For the sake of simplicity please start with the following settings:
Mode
Parameter
Mode
Value
Full View
Show Abstracts
Parameter
Show Abstracts
Value
No
Include
Parameter
Include
Value
None
Items per page (0=all)
Parameter
Items per page (0=all)
Value
0
Split up years
Parameter
Split up years
Value
No
Split up bibliography types
Parameter
Split up bibliography types
Value
No
Add debug information
Parameter
Add debug information
Value
No
Export BibTeX
Parameter
Export BibTeX
Value
No
If your web page administrator has been added data to the database already you should be able to see some content elements similar to the first screenshot now. Otherwise the output is empty. The following section contains information how to add entries to the publication database.
The Sixpack-4-T3 frontend editor
Creating new records
If the administrator has granted you writing permissions to the Sixpack-4-T3 frontend editor you can add entries to the database easily:
Login to the backend of your Typo3 server
Navigate to the page on which the Sixpack-4-T3 content element has been added to.
The page should contain a link “ Create new record ”. If this link does not appear please contact your administrator to add you to the Sixpack-4-T3 Editor group.
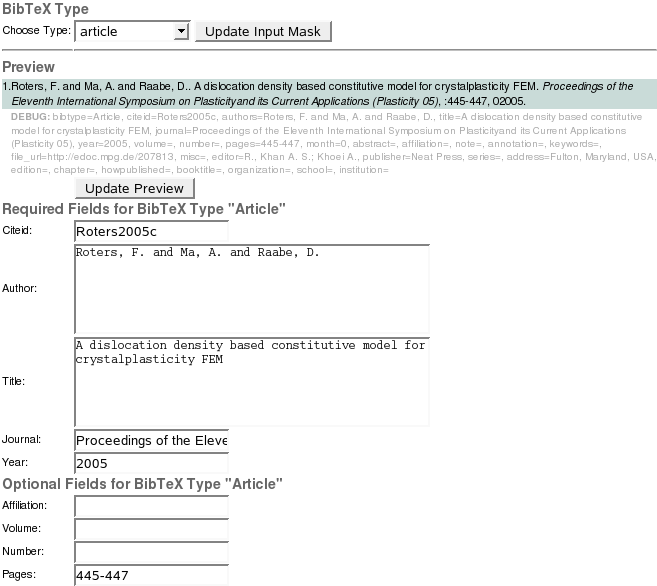
The link leads to an input form similar to this:
When entering a new item first choose the BibTeX type and press the Update Input Mask button. By doing so the required and optional input fields will be regenerated according to the BibTeX rules of the chosen type.
Enter the information into the input fields. You may push the Update Preview button to generate a preview of the current item.
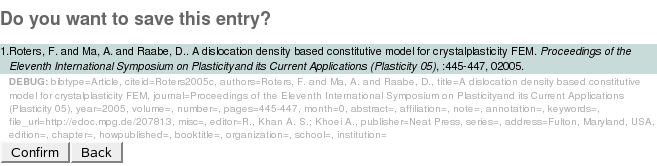 When all information has been entered you may proceed and push
the Save Entry button. A confirmation screen appears likePlease
check your input once again and press Confirm or Back
accordingly.
When all information has been entered you may proceed and push
the Save Entry button. A confirmation screen appears likePlease
check your input once again and press Confirm or Back
accordingly.
If you have a rather large set of data to be entered you may consider using the bref2sql converter which is shipped with this extension. This converter is able to include SIXPACK datasets directly into the database at once.
Edit records
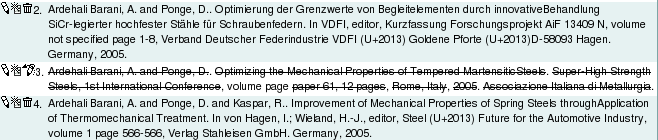
If the database contains a set of records already you may want to edit the data or delete datasets. Authorized users can do that easily in the frontend editor. As in the previous section you must be logged in to the backend of Typo3. In the front end of the page you should now be able to see an output similar to:
In front of each entry new manipulator icons appear on the
frontend editor. The icons have the following meanings
Icon
Action
Edit the record.The data of the selected record will be loaded in the Sixpack-4-T3 editor. Enter all necessary changes in the input mask and save the entry.
Icon
Action
Create new record
Add a new record to the database. Proceed as described in the previous section
Icon

Action
Delete/Undelete a record
Click on this symbol to mark an entry for deletion. All fields of this record will printed striked throught:
Controlling the output
The generated output can be controlled in the content element input mask in the backend interface of Typo3. Hence, please proceed to the backend interface and edit the page content, namely the Sixpack-4-T3 plugin.
In this section all input fields of the above input form are explained in detail:
General: View
With this selector the general view mode can be chosen. The view mode can narrow the seach parameters from all authors ( Full View ), to a subset of authors ( Department View ), or to a single author ( Author View ).
The full view is usually being used to present all publications of all members of a research facility such as universities or research institutes. Depending on the scientific output of the facility the search results can become rather lengthy. As a table with hundreds or thousands of publications is quite tedious to read Sixpack-4-T3 provides ways of splitting up the results as well as organizing them into logical pieces:
General: Split up bibliography items
The default output is rather unorganized and merely sorted by the publication time in descending order. The checkbox “ Split up bibliography items ” will organize the results in the following (BibTeX) groups:
Article
Book
Inbook
Booklet
Conference
Incollection
Proceedings
Inproceedings
Manual
Master thesis
PhD thesis
Techreport
Unpublished
Miscellaneous
String
The groups are only printed if corresponding publication entries are found in the database. Otherwise this bibliography section will be silently ignored.
General: Split up years
With the checkbox “ Split up years ” the output of the publications can be reorganized into smaller pieces. If enabled, the output provides a year navigation bar containing the publication years. The number of visible years in the navigation bar can be controlled in the page template (see below ).
General: Items per page
Another way of simplifying and organizing the search results is to brake up long outputs into smaller pages. The field “ Items per page ” controls how many publication entries shall be printed on a single page. A value of 10 would show the publications 1...10 on page #1, 11.20 on page #2 and so on. An empty field or a value of 0 deactivates this splitting mechanism.
General: Add debug information
Sometimes the output of the datasets might be unexpected. The output is based on the BibTeX rules. Therefore, the shown fields depend on the bibliography type. The way how an article is cited differs to the citation of a book. The debug mode prints all fields to check whether the data are placed properly. Of course, on your production site this feature should be deactivated.
General: Include
The include field has been mainly developed for the author view. The personal page of a member of a research facility might be interested to present also unpublished work. Unpublished work refers here to
Publications which are still to be published
Publications which have been submitted to a journal or an editor.
Publications which have been already accepted .
General: Export BibTeX
This feature is still experimental. In future versions of Sixpack-4-T3 it will generate a link like “ Export BibTeX file ( xxx records) ”. The web site visitor can download the shown dataset in the BibTeX format by clicking on that link.
General: Mode: Full View
The Full View is the simplest view mode as it merely prints the entire database. This mode is most useful for a publication page of the top level web page of the reseach facility. The Full View can be activated in the selector Mode in the tab General
General: Mode: Author View
The Author View is meant to be used on home pages of the staff members. The member adds the content element and sets the proper options to control the output (see above). Once the view mode is set to Author View in the selector Mode in the tab General the actual search phrase can be specified in the tab Author View . A user named John Doe would add a search phrase “ Doe, J. ”in the field “ Author ”.
Example: Search for Author “John Doe”:
Doe, J.
The search phrase must match the actual author name in the database. If no output is generated by the extension the search phrase is probably wrong. Please proceed with switching back to “ Full View ” and activate the debug mode (General: Add debug information ). Check the correct spelling of the author and correct the search phrase. Do not forget to switch off the debug mode afterwards.
In the Author View tab there is also a radio selector called Show Publications . The default setting is Local Publications . Alternatively, External/previous work can be activated. This function is useful if a member of a research institution has previous work which has been published prior to his/her arrival in this facility. Such publications should not appear in the Department View or the Full View . However, on the personal homepage the member might be interested in presenting also such previous publications. If All is chosen then external and local publications will be printed simultaneously. If you want to separate them just use two content elements, one with Local Publications , the other one with External/previous work .
General: Mode: Department View
The Department View is similar to the Author View expecpt that it works for a set auf authors. In the search phrase different authors can be combined (SQL: OR). Hence, this mode can be used to show all publications of members of a research team or a department. Activate the Department View in the selection Mode in the tab General and provide the search phrase of all authors in the tab Department View . The authors have to be separated by semicolons ';'. An example search phrase which includes the authors “ Biblo Baggins ”, “ Frodo Baggins ”, and “ Samwise Gamgee ” would read
Example: Search for authors Biblio Baggins, Frodo Baggins, and Samwise Gamgee
Baggins, B; Baggins, F; Gamgee, S.
The checkbox Split up Authors is meant to generate sections for each author. In the current version this feature is not yet implemented.
Adminstration
Installation
The extension Sixpack-4-T3 can be installed as all Typo3 extension. As administrator go to the Ext Manager module and Import extensions from online repository . Download Sixpack-4-T3 (extension key is sixpack ).
Storage Concepts
Before the extension can be used, the administrator should create a storage page on which the publication records are stored. Alternatively, the publications can also be saved on seperate pages (e.g., on the member's homepages). However, it is discouraged to apply this way of storing data as it is possible to create doubled entries: Assuming two members of the staff have written a shared publication. Both members would add the same publication on their homepages, respectively. In this case this publication would be stored twice! In order to solve this problem it is recommended to save the publictions on a single storage page. Only a limited set of people should have writing permissions to this page.
The following steps are based on this storage approach.
Preparations
As administrator create a storage page anywhere in your page tree. The actual position does not matter. The storage page can be created as follows:
Create a new empty page
Click on Edit Page Header
Change the page type to SysFolder
Choose a proper page name, such as “Publications”.
Note the page id (PID). It is written in the top of the form. That PID will be needed later.
Save page and Exit
Grant users access to the frontend editor of Sixpack-4-T3
Normally, the content element Publication List is a print-only feature. However, the administrator can grant writing permissions to the database and editor privileges to certain backend users. In order to do so a new backend user group has to be created:
Enter the backend module List
Click on your web site logo (usually to top node of the page tree)
Create a new backend group, and call it for example “Sixpack Editor”.
Note the group id (GID) of the newly created backend user group. It will be needed later.
Add all users which should get writing permissions to this backend group.
Enter the backend module Template
Select the page carrying the typoscript template
In the constant editor choose the section “PLUGIN.Sixpack”
Enter the backend GID in the field BE gid .
Backend users which have been added to the “Sixpack Editor” group are now able to access the frontend editor of Sixpack-4-T3. They can add new publication records and edit them.
Importing publication data
If many items have to be entered into the database it might be more convencient to import them from another data source. A simple way to accomplish such an data import is the usage of SIXPACK. SIXPACK is a free bibliography and reference manager and can be downloaded from http://sourceforge.net/projects/sixpack/ . SIXPACK supports the most important bibliography file formats such as
- BibTeX
- refer / BibIX
- EndNote
- tib
- Procite
- RFC1807/1357
- text
- CS Tech Report
- Inspec “Doc Type”
- MEDLINE, Entrez
- Melvyl
- (old) IEEE catalog
- Powell's
Using SIXPACK datasets can be exported in the SIXPACK file format *.bref. A converter bref->sql is shipped with this extension. The conversion can be done in the following steps
Figure out the PID of the storage page(Module Page , Click on the storage page, Edit Page Header , PID is given in the first line of the form)
Copy the converter from TYPO3ROOT/typo3conf/ext/sixpack/scripts/bref2sql(cp TYPO3ROOT/typo3conf/ext/sixpack/scripts/bref2sql ~)
Make it executable(chmod u+rx ~/brefsql)
Edit the converter and modify the variable $pid. Assuming that the PID of your storage page is 1415 the code reads:...my $pid = 1415;...
Convert bref to SQL(cat filename.bref | ~/brefsql > ~/sixpack.sql)
Import the SQL datamysql -u root -p> source ~/sixpack.sql
Check the imported data in the List module of Typo3. See section Edit existing publications .
TypoScript
As a web portal usually has a corporate design certain output modes should be controlled globally by the administrator. To do so, Sixpack-4-T3 can be finetuned in the page template. As administrator go to the page template
Module Template
Click on the page that keeps the template
Choose the Constant Editor
Go to the category PLUGIN.SIXPACK .
Customizing the output / Modifying the BibTeX Style
The actual output can be controlled in the template file which can be specified in the TypoScript. Copy the original file, e.g., EXT:sixpack/sample_templates/plain.html and edit it according to your wishes. Specify the new location in the template:
Copy the original template file somewhere to your fileadmin foldercp typo3conf/ext/sixpack/sample_templates/plain.html fileadmin/mybibstyle.html
Edit the page template (Backend module Template)
Register the new path “fileadmin” (Template -> Constant Editor -> PLUGIN.Sixpack -> Path to template files)
Specify the filename of the new file (Template -> Constant Editor -> PLUGIN.Sixpack -> template file)
In your own copy of the template file (e.g. fileadmin/mybibstyle.html) you can now start to customize the output. This file is nothing but an ordinary html file except that the dynamic content is replacing certain markers. The file is the following structure:
Only text between <!-- ###SIXPACK### begin --> and <!-- ###SIXPACK### end --> is considered
The part between <!-- ###HAS_YEARNAVI### begin --> and <!-- ###HAS_YEARNAVI### end --> defines how the year navigation bar looks like (if it is activated)
The part between <!-- ###HAS_PAGENAVI### begin --> and <!-- ###HAS_PAGENAVI### end --> corresponds to the page navigation bar (if it is activated)
The dynamic part (section title and publication records) can be found between the markers <!-- ###ITEMS### begin --> and <!-- ###ITEMS### end -->
If the output is organized in sections according to bibtex types the section header can be controlled using the part between <!-- ###ITEM_TITLE### start --> and <!-- ###ITEM_TITLE### start -->
The actual publication records are placed within the markers <!-- ###BIBTYPE### begin --> and <!-- ###BIBTYPE### end -->, where BIBTYPE is the BibTeX type of the given record. The markers to describe an article whould hence read <!-- ###ARTICLE### begin --> and <!-- ###ARTICLE### end --> whereas those of a book would be <!-- ###BOOK### begin --> and <!-- ###BOOK### end -->. A list of all markers can be found below.
The BibTeX content is replacing makers with the same BibTeX names, i.e., ###AUTHOR### replaces the author entry, ###VOLUME### the volume, ###BOOKTITLE### the book title and so on.
It is posible to check whether the BibTeX content exists at all. Imagine for example the BibTeX style plain for the type Book: It is “[###AUTHOR###]. [###TITLE###] , volume [###VOLUME###] or [###SERIES###], ... In case of the Lord of the Rings it would be “Tolkin, J.R.R.. The Lord of the Rings , volume 1 of 3, ...”. The problem now is what would happen if no series would be given in the database? In this case the volume string would read “volume 1 of”. Thus, the extension should offer a possibility to check whether an BibTeX entry is empty or not. The solution is to place such “critical” items in <!-- ###HAS_*### begin --> and <!-- ###HAS_*### end --> markers. A better solution would now read
<!-- ###HAS_SERIES### begin -->of ###SERIES###, <!-- ###HAS_SERIES### -- end -->
In the following table all supported markers are listed:
Marker
MarkerLevel 1
Marker
Level 1
MarkerLevel 2
Marker
Level 2
MarkerLevel 3
Marker
Level 3
MarkerLevel 4
Marker
Level 4
MarkerLevel 5
Marker
Level 5
Description
Description
SIXPACK
MarkerLevel 1
SIXPACK
MarkerLevel 2
MarkerLevel 3
MarkerLevel 4
MarkerLevel 5
Description
Everything between the SIXPACK subpart markers is considered.
((Unknown Property))
MarkerLevel 1
MarkerLevel 2
HAS_YEARNAVI
MarkerLevel 3
MarkerLevel 4
MarkerLevel 5
Description
The code inside these markers is generated only if the year navigation bar is actived
((Unknown Property))
MarkerLevel 1
MarkerLevel 2
MarkerLevel 3
YEARNAVICLASS
MarkerLevel 4
MarkerLevel 5
Description
This marker will be replaced with a CSS class name.
((Unknown Property))
MarkerLevel 1
MarkerLevel 2
MarkerLevel 3
MarkerLevel 4
YEAR_NAVI
MarkerLevel 5
Description
This marker is replaced with the content of the year navigation bar.
((Unknown Property))
MarkerLevel 1
MarkerLevel 2
HAS_PAGENAVI
MarkerLevel 3
MarkerLevel 4
MarkerLevel 5
Description
The code inside these markers is generated only if the page navigation bar is active
((Unknown Property))
MarkerLevel 1
MarkerLevel 2
MarkerLevel 3
PAGENAVICLASS
MarkerLevel 4
MarkerLevel 5
Description
This marker is replaced with a CSS class name.
((Unknown Property))
MarkerLevel 1
MarkerLevel 2
MarkerLevel 3
BEGIN
MarkerLevel 4
MarkerLevel 5
Description
Replaced with the “Begin”
((Unknown Property))
MarkerLevel 1
MarkerLevel 2
MarkerLevel 3
PREV
MarkerLevel 4
MarkerLevel 5
Description
Replaced with the “Previous”
((Unknown Property))
MarkerLevel 1
MarkerLevel 2
MarkerLevel 3
PAGE_SELECTION
MarkerLevel 4
MarkerLevel 5
Description
This marker is replaced with the content of the page navigation bar.
((Unknown Property))
MarkerLevel 1
MarkerLevel 2
MarkerLevel 3
NEXT
MarkerLevel 4
MarkerLevel 5
Description
Replaced with the “Forward”
((Unknown Property))
MarkerLevel 1
MarkerLevel 2
MarkerLevel 3
LAST
MarkerLevel 4
MarkerLevel 5
Description
Replaced with the “Last”
((Unknown Property))
MarkerLevel 1
MarkerLevel 2
ITEMS
MarkerLevel 3
MarkerLevel 4
MarkerLevel 5
Description
Only template code inside the ITEMS marker is used to look for the BibTeX type generation.
((Unknown Property))
MarkerLevel 1
MarkerLevel 2
MarkerLevel 3
ITEM_TITLE
MarkerLevel 4
MarkerLevel 5
Description
If BibTeX titles are enabled the code inside these markers is used to generate the section title
((Unknown Property))
MarkerLevel 1
MarkerLevel 2
MarkerLevel 3
MarkerLevel 4
HAS_BIBTYPE_TITLE
MarkerLevel 5
Description
If the section title is given...
((Unknown Property))
MarkerLevel 1
MarkerLevel 2
MarkerLevel 3
MarkerLevel 4
MarkerLevel 5
BIBTYPE
Description
... replace it with the BibTeX type.
((Unknown Property))
MarkerLevel 1
MarkerLevel 2
MarkerLevel 3
ARTICLE
MarkerLevel 4
MarkerLevel 5
Description
Define the template code for the BibTeX type “Article”.
((Unknown Property))
MarkerLevel 1
MarkerLevel 2
MarkerLevel 3
MarkerLevel 4
HAS_CITEID
MarkerLevel 5
Description
If the BibTeX field “citeid” is given...
((Unknown Property))
MarkerLevel 1
MarkerLevel 2
MarkerLevel 3
MarkerLevel 4
MarkerLevel 5
CITEID
Description
... replace this marker with it.
((Unknown Property))
MarkerLevel 1
MarkerLevel 2
MarkerLevel 3
MarkerLevel 4
CITEID
MarkerLevel 5
Description
or replace the marker regardless if citeid is given or not.
((Unknown Property))
MarkerLevel 1
MarkerLevel 2
MarkerLevel 3
MarkerLevel 4
HAS_AUTHOR
MarkerLevel 5
Description
Same as HAS_CITEID but for “Author”
((Unknown Property))
MarkerLevel 1
MarkerLevel 2
MarkerLevel 3
MarkerLevel 4
MarkerLevel 5
AUTHOR
Description
Same as CITEID, but for author
((Unknown Property))
MarkerLevel 1
MarkerLevel 2
MarkerLevel 3
MarkerLevel 4
AUTHOR
MarkerLevel 5
Description
Same as CITE_ID but author
((Unknown Property))
MarkerLevel 1
MarkerLevel 2
MarkerLevel 3
MarkerLevel 4
...
MarkerLevel 5
Description
((Unknown Property))
MarkerLevel 1
MarkerLevel 2
MarkerLevel 3
BOOK
MarkerLevel 4
MarkerLevel 5
Description
Same as for ARTICLE but for the type “Book”
((Unknown Property))
MarkerLevel 1
MarkerLevel 2
MarkerLevel 3
MarkerLevel 4
...
MarkerLevel 5
Description
((Unknown Property))
MarkerLevel 1
MarkerLevel 2
MarkerLevel 3
...
MarkerLevel 4
MarkerLevel 5
Description
Languages
The extension is currently available in English.
Reference (TypoScript)
PID
Property
PID
Data type
int+
Description
Page ID on which the publication records should be stored.
DefaultnYe
be_gid
Property
be_gid
Data type
int+
Description
Backend user group ID, only users belonging to this backend group can access the Sixpack-4-T3 frontend editor
DefaultnYe
0
nYears
Property
nYears
Data type
int+
Description
Maximum number of years to be printed in the year navigation bar. The year navigation can be enabled in the SIXPACK content element setup.
DefaultnYe
5
maxPages
Property
maxPages
Data type
int+
Description
Maximum number of pages to be offered in the page navigation bar. The page navigation can be enabled by providing "Items per page" in the SIXPACK content element.
DefaultnYe
10
path
Property
path
Data type
string
Description
The path where the template files reside
DefaultnYe
EXT:sixpack/sample_templates/
file
Property
file
Data type
string
Description
Bibliography template file
DefaultnYe
plain.html
wrap
Property
wrap
Data type
wrap
Description
Standard wrap for the entire SIXPACK content element
DefaultnYe
bibtypetitle.wrap
Property
bibtypetitle.wrap
Data type
wrap
Description
wrap for the bibliograph title
DefaultnYe
Credits
Ther author would like to thank Franz Roters and Olaf Eichler for testing and suggestions.
 EXT: Sixpack-4-T3 - 11