DEPRECATION WARNING
This documentation is not using the current rendering mechanism and is probably outdated. The extension maintainer should switch to the new system. Details on how to use the rendering mechanism can be found here.
EXT: tinymce_rte
| Created: | 2006-04-05T09:44:51 |
|---|---|
| Changed by: | Thomas Allmer |
| Changed: | 2010-04-22T15:04:25.250000000 |
| Email: | rupi@gmx.li |
| Info 2: | |
| Info 3: | |
| Info 4: |
EXT: tinymce_rte
Extension Key: tinymce_rte
Copyright 2008-20010,Thomas Allmer, <thomas.allmer@webteam.at>,
This document is published under the Open Content License
available from http://www.opencontent.org/opl.shtml
The content of this document is related to TYPO3
- a GNU/GPL CMS/Framework available from www.typo3.com
Table of Contents
EXT: tinymce_rte 1
Introduction 1
What does it do? 1
How To get Help, report bugs... 2
Screenshots 2
Installation 3
Configuration 3
TYPO3 Configuration Utility 4
TYPO3 Specific Configuration 5
Common TinyMCE Configuration 5
Table-, Column and Field-specific Configuration 6
Linkhandler 7
TinyMCE – Templates 7
TinyMCE Plugin typo3filemanager 8
FAQ 8
Advanced Tasks 9
Update TinyMCE locally 9
Spellchecker 9
Using TinyMCE in FE-Plugins 9
Understand the Configuration Limits 10
Understand the Configuration Order 10
How to help 11
Known Issues 11
Rate the extension 11
Credits 11
Version History 12
Introduction
What does it do?
The extension “tinymce_rte” provides the very popular TinyMCE. TinyMCE is a platform independent and browser friendly and lightweight Javascript WYSIWYG editor and supports many languages. It replaces the default TYPO3 RTE “rtehtmlarea” completely.
Features:
- uses the latest TinyMCE version
- a very simple and straight forward port of TinyMCE for TYPO3 (easy update to use the latest Version of TinyMCE)
- supports all languages from TinyMCE with an separate extension (you can choose)
- almost the same configuration format as TinyMCE
- complete configuration with Page TSconfig
- override default configuration for users in the User Tsconfig
- reasonable configuration for RTE Transformations to allow tables, styles, classes, ids, etc. directly in the RTE
- linkhandler support (you can link to tt_news, or any other table content)
How To get Help, report bugs...
We use the TYPO3 forge to handle all of this.
For help see the wiki: http://forge.typo3.org/wiki/extension- tinymce_rte
or the google group at: http://groups.google.com/group/typo3-tinymce_rte
For Bugs see: http://forge.typo3.org/projects/extension- tinymce_rte/issues
Installation
First, the extension must be imported from TYPO3 Extension Repository (TER). To achieve this, go to the Extension Manager and update the extension list, in order to get the latest version. Then search for the extension key “tinymce_rte” and install the extension.
If you do not know how to do this, refer to this document:
http://webempoweredchurch.com/support/howtos/single/install_an_exte nsion/
Follow the recommended installation procedure. All conflicting extensions must be removed. Especially the system extension “rtehtmlarea”. This is the RTE that is installed by TYPO3 by default. But this is (in most cases) no problem because “tinymce_rte” replaces “rtehtmlarea” completely. For exceptions refer to the FAQ section.
ATTENTION: After you have installed the extension you need to at least refresh your TYPO3 BE. It's best to completely restart your browser and relogin to TYPO3. (If that's still not enough please clear your Browser cache)
For more information on compatibility issues with TYPO3 4.1.x and how to support more languages than english and german, see the FAQ section of this manual.
Configuration
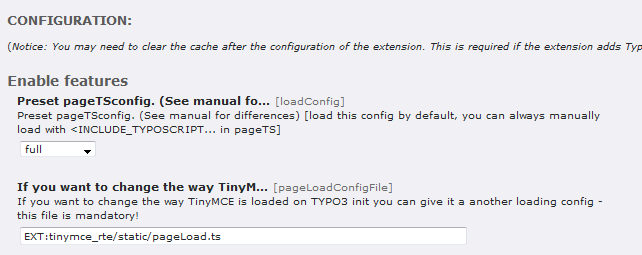
The extension comes with several reasonable configurations, that can be set via the extension manager. So it should be usable out of the box. Each configuration is contained in a separate typoscript file. The default configuration is in the file “EXT:tinymce_rte/static/standard.ts”. Other preconfigured setups range from a minimal to a complete setup containing all plugins and buttons.
It is also possible to explore the configuration via the “Web”-Module, selecting the menu entry “Info” and then choosing “Page Tsconfig” in the drop down menu.
The file “ pageLoad.ts” contains the loading configuration: whether tinymce is gzipped and whether the gzipfilecache is used. Also the path information about the javascript-files can be found here.
Any values can be overridden using Page TSConfig or User TSConfig.
For frontend output a default TypoScript setup is provided in the file “EXT:tinymce_rte/static/setupTSConfig.ts”.
Basically there is a TYPO3 specific and a TinyMCE specific section.
TYPO3 Configuration Utility
To aid you creating your personal tinymce_rte Configuration we created a configuration utility for you. There you can drag and drop the icons around as you like it. Once you are finished just copy and paste the config into your pageTSconfig.
We strongly recommend to not uncheck the Checkbox “Button/Plugin config only.” as this will/may override default Options of tinymce_rte. Use this options only if you need to and know what your are doing.
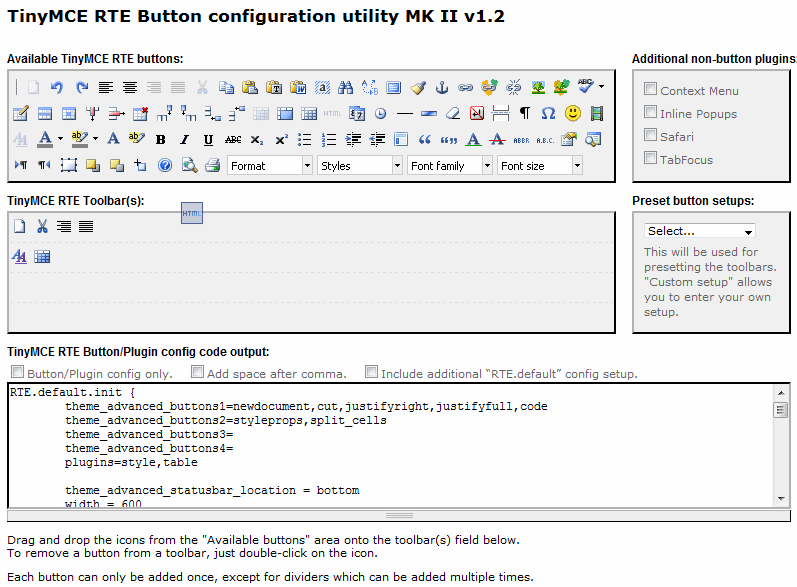
Currently you can find the configuration utility at:
http://www.delusionworld.com/files/tinymce_rte-config-utility/
TYPO3 Specific Configuration
The graphic below shows how to get to the page TSconfig.
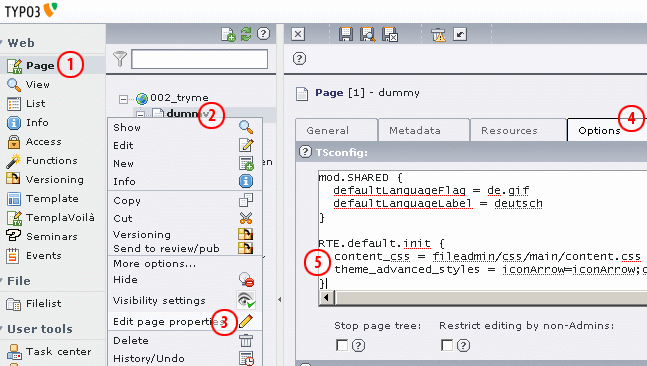 Select the Page module (1), right click the root page (2) and
select Edit page properties (3).Now open the Options Tab (4) and in
the textarea below (5) you should place your tinymce_rte
configuration.
Select the Page module (1), right click the root page (2) and
select Edit page properties (3).Now open the Options Tab (4) and in
the textarea below (5) you should place your tinymce_rte
configuration.
Here are the most common configuration options. They must be included in the “RTE.default” section of your configuration.
gzip
Configuration Option
gzip
Description
enables / disables gzip compression; makes loading much faster
Possible Values
0 | 1
gzipFileCache
Configuration Option
gzipFileCache
Description
enables / disables caching of gzip-files, somewhat faster
Possible Values
0 | 1
typo3filemanager
Configuration Option
typo3filemanager
Description
configures the javascript window that is used for settings links and including files and images. Options include window size, default tabs, thumbnail size.
Possible Values
tiny_mcePath
Configuration Option
tiny_mcePath
tiny_mceGzipPath
Description
path to tinyMCE javascript files; Should not be changed.
Possible Values
linkhandler
Configuration Option
linkhandler
Description
see Chapter “linkhandler” in this manual for more information.
Possible Values
Common TinyMCE Configuration
You can use all TinyMCE configuration options. The options needs to be wrapped inside RTE.default.init { | }.
The only difference between the “original” TinyMCE configuration and the tinymce_rte configuration is that the option value seperator is “=” instead of “:” and you don't need to use “...” for every value.
Here is a simple example.
In most projects a customized css-file must be used within the content area of TinyMCE. Also the selectable css-classes should be limited (otherwise it will include all classes from within the defined css- file).
RTE.default.init {
// define a stylesheet
content_css = fileadmin/templates/main/css/screen.css
// define styles and how they are displayed in the rte
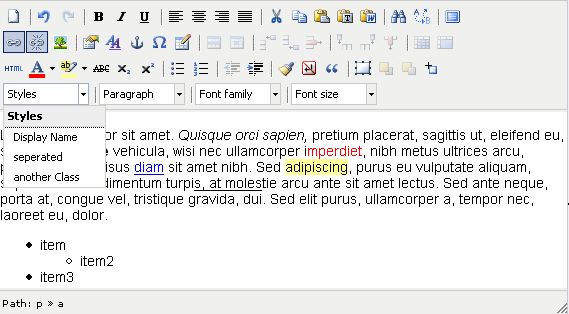
theme_advanced_styles = Display Name=cssClassName;seperated=with;another Class=otherClass;
width = 500px
height = 300px
}
For a complete list of available TinyMCE configuration options see: http://wiki.moxiecode.com/index.php/TinyMCE:Configuration
Advanced note: if you don't want to use links in your TinyMCE you should also set file_browser_callback = '';
Table-, Column and Field-specific Configuration
Since V. 0.4.0 you can add column and field-specific configurations as well as table specific configurations.
In the first place the default config is loaded. Afterwards it will be overridden by a more specific configuration.
Here is an example for tt_content where you see the order in which the config gets overwritten:
- RTE.default
- RTE.default.lang.def
- RTE.tt_content
- RTE.tt_content.lang.def
- RTE.tt_content.ctype.textpic
- RTE.tt_content.ctype.textpic.lang.def
- RTE.tt_content.field.colPos0
- RTE.tt_content.field.colPos0.lang.def
- RTE.tt_content.field.colPos0.ctype.textpic
- RTE.tt_content.field.colPos0.ctype.textpic.lang.def
As you can see there are a lot of specific configurations you can use. It can be based on the FE-Language, the position and the ctype of the Contentelement. In other words the RTE can look different for the left and right column of the page module. It can also be different in the “Text” and the “Text with Image” Contentelement in the same column. If you use Templavoila you can configure the RTE based on the fields. The archive this you can use the following extra specific configuration:
- RTE.tt_content.field.field_contentleft
- RTE.tt_content.field.field_contentleft.lang.def
- RTE.tt_content.field.field_contentleft.ctype.textpic
- RTE.tt_content.field.field_contentleft.ctype.textpic.lang.def
So in this in this example we used an “Text with Image” Contentelement that was placed on the left Column (or the field_contentleft in TV). The Element had the default language.
Here is a another example for an Text Element on the Normal Column (or the field_content in TV). It is an Italien Translation of another Contentelement.
- RTE.default
- RTE.default.lang.it
- RTE.tt_content
- RTE.tt_content.lang.it
- RTE.tt_content.ctype.text
- RTE.tt_content.ctype.text.lang.it
- RTE.tt_content.field.colPos1
- RTE.tt_content.field.colPos1.lang.it
- RTE.tt_content.field.colPos1.ctype.text
- RTE.tt_content.field.colPos1.ctype.text.lang.it
- RTE.tt_content.field.field_content
- RTE.tt_content.field.field_content.lang.it
- RTE.tt_content.field.field_content.ctype.text
- RTE.tt_content.field.field_content.ctype.text.lang.it
So to have a concrete example if I want that the RTE in the left column should have only the bold button your config would look something like this:
RTE.tt_content.field.colPos1.init {
        plugins =
        theme_advanced_buttons1 = bold
        theme_advanced_buttons2 =
        theme_advanced_buttons3 =
}
There is also a hook where extensions can define the array fields in pageTSConfig, that contain the configuration values. The hook array is
$GLOBALS['TYPO3_CONF_VARS']['EXTCONF']['tinymce_rte']['processTableConfiguration']
The respective function is “ process_table_configuration ”. The return value is an array containing strings representing the pageTSconfig array without the leading “RTE.”. A short example to make it more clear: If the configuration should be found in “RTE.your_ext_table.field.your_table_field”, the array must have a field containing the string “your_ext_table.field.your_table_field”. tinymce_rte will split the string at the dots and build the configuration array.
Note: It's currently not possible to use the MOD Template in a specific configuration.
Linkhandler
“tinymce_rte” has linkhandler support, too. That means, that links can be set to nearly any record of any table. The only precondition is to provide a proper configuration.
An example for tt_news is included in the default configuration. Some others are in the project wiki (see link below).
Attention: The linkhandler in tinymce_rte will not add an extra tab, like other RTEs do! It is enough to browse to the page using the filebrowser and to select a record like any other content element. Only those elements are displayed, for which linkhandler is configured.
Attention: Since version 0.3.4 the configuration format changed slightly, because it is now possible to have more than one single view. The new configuration format looks like this:
RTE.default {
        linkhandler {
                tt_news {
                        default {
                                # instead of default you could write the id of the storage folder
                                # id of the Single News Page
                                parameter = 23
                                additionalParams = &tx_ttnews[tt_news]={field:uid}
                                additionalParams.insertData = 1
                                select = uid,title as header,hidden,starttime,endtime,bodytext
                                sorting = crdate desc
                        }
                }
        }
}
New is the level of 'default'. Alternatively a storage folder id can be specified, that is connected to single view page (parameter).
More information is provided in the project wiki on http://forge.typo3.org/wiki/extension- tinymce_rte/Linkhandler_support
Feel free to add more linkhandler configurations to the wiki.
TinyMCE – Templates
TinyMCE has an template plugin, that means that preconfigured content elements can be inserted. You can use it to insert static or dynamic data into the RTE. The template files should to be created in the fileadmin-folder. An example pageTS-configuration looks like this:
RTE.default.init {
        template_templates {
                10 {
                        title = static HTML
                        src = EXT:tinymce_rte/res/tinymce_templates/static.html
                        description = Adds some static HTML an expert could prepare
                }
                20 {
                        title = TYPO3 mod
                        description = Use an TYPO3 mod to get data easily into the the TinyMCE Template
                        include = EXT:tinymce_rte/res/tinymce_templates/advanced.php
                }
                12 {
                        title = simple replace
                        src = EXT:tinymce_rte/res/tinymce_templates/simpleReplace.html
                        description = Adds some HTML where certain variables will be replaced
                }
        }
}
Note: 10 {…} and 12 {…} are “normal” TinyMCE Templates. 20 {…} uses a TYPO3 Mod to easily create dynamic TYPO3 content. As you can see you do not need to define the src (but you can if you want to use a different mod)
The templates are now in an array using an index. They are sorted accordingly. Detailed and commented examples are in the directory “EXT:tinymce_rte/res/tinymce_templates”.
If you have any tinyMCE-templates, that are TYPO3 specific might be useful for the community, feel free to add them to the wiki on http://forge.typo3.org/wiki/extension-tinymce_rte/TinyMCE_templates TinyMCE Plugin typo3filemanager
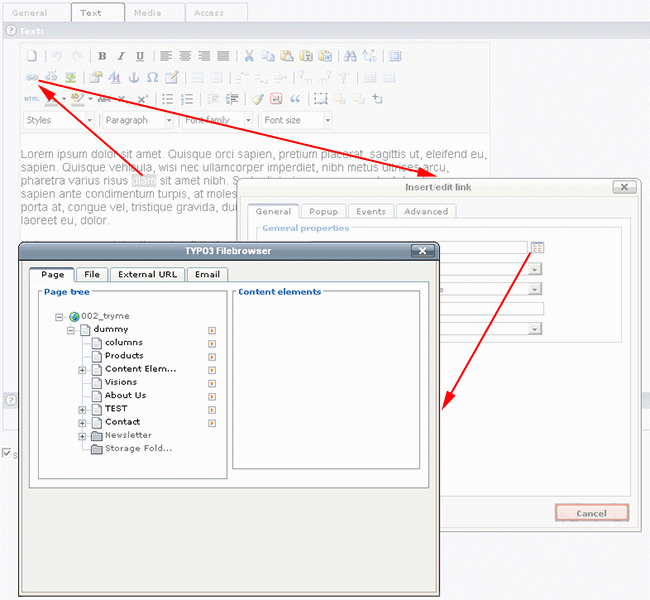
We now also provide an TinyMCE Plugin to allow 2 additional Buttons. These Buttons allow a one click way to the page/file browser and imagebrowser. So no need click on link and browse. These buttons can be quite handy if you just want to create a link and don't care about other attributes like (target, rel...). The default link button will be still available and functional.
To use these 2 Buttons you need to add the plugin and place the Buttons for example like this:
RTE.default.init {
        plugins := addToList(typo3filemanager)
        theme_advanced_buttons3 := addToList(typo3link,typo3image)
}
You can't use addToList in a specific Configuration (like RTE.tt_content.ctype.text) or userTS. For an explanation see “Understand the Configuration Limits”.
If you use this button and don't find a proper description* if you hover the button, then maybe your language hasn't been added so far. Head over to typo3fileadmin language , add your translation and let us know that we should include it in the next release. (mail, google group, dev or rte newsgroup)
* improper would be an description like 'typo3filemanager.link_desc' or 'typo3filemanager.image_desc'
FAQ
I have troubles using tinymce_rte on TYPO3 4.1.x. Is there a solution?
If “tinymce_rte” is installed on TYPO3 4.1.x, there are some compatibility issues. They can be solved by installing the patch extension “tinymce_rte_patch41” from TER. After that everything should work as expected.
Is it possible to have other language labels than english or german?
Yes, of course.In the TER, there is the extension “tinymce_languages". Just install it and enjoy. It includes all language files provided by the tinyMCE-team on http://tinymce.moxiecode.com/download_i18n.php .
I get an javascript Error like ( [Exception... "Component returned failure code: 0x805e000a [nsIDOMHTMLIFrameElement.setAttribute]" …. )
You may be using some kind of popup blocking system. Try to deactivate it or add the TYPO3 installation to the white list. This is a known error with adblock + adblock filterset in Firefox.
The HTML dialog is too big. What can I do?
Set the sizes of the source editor in Page TSConfig to appropriate values
RTE.default.init.theme_advanced_source_editor_width = 500px

RTE.default.init.theme_advanced_source_editor_height = 400px
How do I include a Youtube video?
use the media button and insert the url of the youtube video (for example: http://www.youtube.com/watch?v=hb8xo2ER_Jk ). The rest will be taken care of by the media plugin.
The language labels do not fit in the popup window.
Check the javascript file of the used language either in “EXT:tinymce_rte/res/tiny_mce/langs/” or in “EXT:tinymce_languages/tiny_mce/langs” and add / modify the “cellprops_delta_width:” property of the dialog that does not fit. You are strongly encouraged to submit your changes to http://tinymce.moxiecode.com/ .
I want to see special characters like and ♦ and...
By default tinymce_rte saves special characters as they are, which is pretty nice for UTF8 TYPO3 installations and databases as the characters is always the same. However of course you can configure that with TinyMCE. Just see it's wiki http://wiki.moxiecode.com/index .php/TinyMCE:Configuration/entity_encoding . So just add this to your pageTS to see named charactersRTE.default.init.entity_encoding = named
Advanced Tasks
Update TinyMCE locally
If, by any chance, we are far behind schedule and there has been an newer TinyMCE, than we have in the TER, you can easily update your Version locally.
Just head over to http://tinymce.moxiecode.com/download.php and download the latest version. Replace all files in EXT:tinymce_rte/res/tiny_mce. Then go to the extension manager and select the extension tinymce_rte. In the top dropdown (information, Edit Files....) you find a “new” Element “UPDATE!”. Use it and update all files to make them more TYPO3 friendly.
The tinymce sources do not work across different frames by default. The patch provided did not make it into the tinyMCE core. To make it work with TYPO3, search for the line containing “mceAddFrameControl” (around line 8484). Some lines below this code can be found:
tinymce.DOM.doc = w.document;
tinymce.DOM.win = w;

ed = new tinymce.Editor(v.element_id, v);
ed.render();
Change it to look like this:
tinymce.DOM.doc = w.document;
tinymce.DOM.win = w;

// you need to add the css files again with frames
if (tinymce.DOM.files && v.reAddCss)
        tinymce.DOM.files = {};

ed = new tinymce.Editor(v.element_id, v);
ed.render();
Afterwards compress the file and put the result into the file “tiny_mce.js”. Jsmin ( http://www.crockford.com/javascript/jsmin.html ) could be used for this task.
Spellchecker
There are several spellcheckers around that can be used. More information is in the documentation wiki of tinyMCE:
http://wiki.moxiecode.com/index.php/TinyMCE:Plugins/spellchecker
Using TinyMCE in FE-Plugins
Introduction
Frontend usage of tinymce_rte provides following features:
- Use multiple rte's in the one plugin
- Each rte in a plugin can be configured differently.
- Multiple plugins with rtes on one page are possible.
Source Code Needed
The tinymce_rte class must be included and instantiated.
The following example shows how make the plugin compatible with "htmlarearte" and "tinymce_rte".
if(!$this->RTEObj && $this->conf['RTEenabled'] && t3lib_extMgm::isLoaded('rtehtmlarea')) {
    require_once(t3lib_extMgm::extPath('rtehtmlarea').'pi2/class.tx_rtehtmlarea_pi2.php');
    $this->RTEObj = t3lib_div::makeInstance('tx_rtehtmlarea_pi2');
} elseif (!$this->RTEObj && $this->conf['RTEenabled'] && t3lib_extMgm::isLoaded('tinymce_rte')) {
    require_once(t3lib_extMgm::extPath('tinymce_rte').'pi1/class.tx_tinymce_rte_pi1.php');
    $this->RTEObj = t3lib_div::makeInstance('tx_tinymce_rte_pi1');
} else {
    $this->RTEObj = 0;
}
The plugin needs a class variable "RTEcounter". It has to be initialized with "1" for the first rte. If multiple rte's are used, increment it by one, just before the call of "drawRTE".
Then the "drawRTE" function has to be called. The result is the html source of the rte.
$RTEItem = $this->RTEObj->drawRTE($this, $table, $field, $row, $PA, $specConf, $thisConfig, $RTEtypeVal, '', $thePidValue);
Configuration
A default configuration is delivered with the plugin. It is located in "RTE.default.FE.init". It can be modified via Page Tsconfig and sets values for every rte on this page. The configuration format it the same like the one for the backend. The default settings are in the file “EXT:tinymce_rte/static/pageTSConfig.ts”.
These settings can be overridden using TypoScript setup of the plugin. The configuration format is like the format for BE. The following TS code must be added, where “X” is the number of the plugin:
plugin.tx_myplugin_piX.tinymce_rte {
       1.init {
             # this contains the default configuration and the configuration for the first rte
             # if it exists, it will be merged with pageTS
             # if it does not exist, the configuration will fall back to pageTS
       }
       2.init {
             # this contains the configuration for the second rte.
             # if it does not exist, it will fall back to the configuration of the first rte
       }
       3.init {
             # this contains the configuration for the third rte.
             # if it does not exist, it will fall back to the configuration of the first rte
       }
}
Understand the Configuration Limits
The pageTS is rendered completely out of the TS renderer so it's possible to use advanced functions like addToList in pageTS. The specific Configuration and the userTS is manually merged into the configuration array so these values just get overwritten without the possibility to use any add/remove features.
Example:
## pageTS root page #######################################
RTE.default.init {
        theme_advanced_buttons1 = bold,italic
        theme_advanced_buttons2 = justifyleft,justifycenter
}

RTE.default.init {
        theme_advanced_buttons1 := addToList(underline)
}
# buttons1 value is now: bold,italic,underline
# buttons2 value is now: justifyleft,justifycenter

## userTS #################################################
# in userTS you always need to define the full value
RTE.default.init {
        theme_advanced_buttons1 := addToList(underline)
}
# buttons1 value is now: underline
# buttons2 value is now: justifyleft,justifycenter
# you can't use addToList in userTS
RTE.default.init {
        theme_advanced_buttons1 = bold,italic,underline
}

## pageTS specific Configuration ##########################
RTE.tt_content.ctype.text {
        theme_advanced_buttons2 := addToList(justifyright)
}
# buttons1 value is now: bold,italic,underline
# buttons2 value is now: justifyright
# you can't use addToList in specific Configuration
RTE.tt_content.ctype.text {
        theme_advanced_buttons2 = justifyleft,justifycenter,justifyright
}
Understand the Configuration Order
The Order is as follows
pageTS
userTS
pageTS specific configuration
userTS specific configuration
As you can see you can use the specific configuration in both situations. So it is possible to define a global configuration for all Text Elements on the left column and overwrite it in the userTS. Specific configurations are more explicit and will overwrite the normal configuration.
How to help
Known Issues
- Please see the bugtracker on forge.typo3.org
- http://forge.typo3.org/projects/extension-tinymce_rte/issues
Rate the extension
- If you like this extension, please rate it. http://typo3.org/extensions/repository/view/tinymce_rte/current/
- As ratings are the only way we can see if there's an interest in this extension, updates depends on people rating it. (No ratings = No Updates!)
Credits
- Thomas Schulze (For creating tinyrte the main inspiration for this)
- Tapio Markula (Thanks for all the testing, bug reports and code contribution)
And of course to the team:
- Thomas Allmer, Project Leader ( http://www.webteam.at )
- Peter Klein ( http://www.clioonline.dk )
- Gernot Leitgab ( http://www.webteam.at )
- Stefan Galinski
- Marcus Schwemer ( http://www.netzwerkberatung.de )
Version History
0.5.0
Version
0.5.0
Changes
Updated feature: Advanced configuration for tables, columns and fields
Different handling of configuration (no more manual parsing of pageTs)
Removed deprecated function calls
Small improvements to Pagebrowser
0.4.1
Version
0.4.1
Changes
TinyMCE sources updated to V. 3.2.7
Small update of manual
0.4.0
Version
0.4.0
Changes
TinyMCE sources updated to V. 3.2.5
Minor bugfixes
New feature: Advanced configuration for tables, columns and fields
New feature: Linkhandler now supporting several storage-folders with different single views (Attention: Changed configuration format)
Updated manual
...
Version
...
Changes
...
0.2.2
Version
0.2.2
Changes
New configuration options in EM
Updated FAQ Section
0.2.0
Version
0.2.0
Changes
New configuration for tinyMCE-templates
Updated manual
 EXT: tinymce_rte - 13