DEPRECATION WARNING
This documentation is not using the current rendering mechanism and is probably outdated. The extension maintainer should switch to the new system. Details on how to use the rendering mechanism can be found here.
EXT: WEC Discussion Forum
| Author: | Kasper Skårhøj |
|---|---|
| Created: | 2002-11-01T00:32:00 |
| Changed: | 2013-02-05T21:31:08 |
| Email: | dave(at)webempoweredchurch.org |
| Info 2: | |
| Info 3: | |
| Info 4: |
EXT: WEC Discussion Forum
Extension Key: wec_discussion
Copyright 2005-2011, Christian Technology Ministries International Inc. http://www.CTMIinc.org
Author: Web-Empowered Church Team <devteam(at)webempoweredchurch.org>
Support: http://www.webempoweredchurch.org/support/
This document is published under the Open Content License
available from http://www.opencontent.org/opl.shtml
The content of this document is related to TYPO3
- a GNU/GPL CMS/Framework available from www.typo3.com
((generated))
Table of Contents
`Introduction <#1.Introduction|outline>`_ `3 <#1.Introduction|outline>`_
`About This Extension <#1.1.About%20This%20Extension|outline>`_ `3 <#1.1.About%20This%20Extension|outline>`_
What is the Web-Empowered Church? 3
`Features <#1.2.Features|outline>`_ `3 <#1.2.Features|outline>`_
`How to Use this Manual <#1.3.How%20to%20Use%20this%20Manual|outline>`_ `5 <#1.3.How%20to%20Use%20this%20Manual|outline>`_
`Screenshots <#1.4.Screenshots|outline>`_ `6 <#1.4.Screenshots|outline>`_
`Installation <#2.Installation|outline>`_ `8 <#2.Installation|outline>`_
`Install the Extension <#2.1.Install%20the%20Extension|outline>`_ `8 <#2.1.Install%20the%20Extension|outline>`_
`Create a Discussion Forum Page <#2.2.Create%20a%20Discussion%20Forum%20Page|outline>`_ `8 <#2.2.Create%20a%20Discussion%20Forum%20Page|outline>`_
`Create a Storage Folder <#2.3.Create%20a%20Storage%20Folder|outline>`_ `9 <#2.3.Create%20a%20Storage%20Folder|outline>`_
`Add the Discussion Forum Plugin <#2.4.Add%20the%20Discussion%20Forum%20Plugin|outline>`_ `9 <#2.4.Add%20the%20Discussion%20Forum%20Plugin|outline>`_
`Create an Extension Template Record <#2.5.Create%20an%20Extension%20Template%20Record|outline>`_ `9 <#2.5.Create%20an%20Extension%20Template%20Record|outline>`_
`Install the Static Template <#2.6.Install%20the%20Static%20Template|outline>`_ `9 <#2.6.Install%20the%20Static%20Template|outline>`_
`Set the Startingpoint <#2.7.Set%20the%20Startingpoint%20|outline>`_ `9 <#2.7.Set%20the%20Startingpoint%20|outline>`_
`Configuration <#4.Configuration|outline>`_ `11 <#4.Configuration|outline>`_
`Configuring the Plugin <#4.1.Configuring%20the%20Plugin|outline>`_ `11 <#4.1.Configuring%20the%20Plugin|outline>`_
`F.A.Q. <#4.3.F.A.Q.|outline>`_ `25 <#4.3.F.A.Q.|outline>`_
`TypoScript Configuration <#5.TypoScript%20Configuration|outline>`_ `26 <#5.TypoScript%20Configuration|outline>`_
`Editing TypoScript <#5.1.Editing%20TypoScript|outline>`_ `26 <#5.1.Editing%20TypoScript|outline>`_
`TypoScript Constants Reference <#5.2.TypoScript%20Constants%20Reference|outline>`_ `26 <#5.2.TypoScript%20Constants%20Reference|outline>`_
`Change The Look <#6.Change%20The%20Look|outline>`_ `27 <#6.Change%20The%20Look|outline>`_
`Create the Look <#6.1.Create%20the%20Look%20|outline>`_ `27 <#6.1.Create%20the%20Look%20|outline>`_
`Modifying the Template File <#6.2.Modifying%20the%20Template%20File|outline>`_ `28 <#6.2.Modifying%20the%20Template%20File|outline>`_
`Advanced <#7.Advanced|outline>`_ `31 <#7.Advanced|outline>`_
`Using Version 2.0 Templates <#7.1.Using%20Version%202.0%20Templates|outline>`_ `31 <#7.1.Using%20Version%202.0%20Templates|outline>`_
Upgrading an Old Custom Template 31
Using the New Template System 31
`Administrator/Moderator Functions <#7.2.Administrator/Moderator%20Functions|outline>`_ `32 <#7.2.Administrator/Moderator%20Functions|outline>`_
`Spam Control <#7.3.Spam%20Control|outline>`_ `32 <#7.3.Spam%20Control|outline>`_
`RSS Support <#7.4.RSS%20Support|outline>`_ `34 <#7.4.RSS%20Support|outline>`_
Set Extension Template Constants 35
`Single View <#7.5.Single%20View|outline>`_ `37 <#7.5.Single%20View|outline>`_
`Archive Support <#7.6.Archive%20Support|outline>`_ `37 <#7.6.Archive%20Support|outline>`_
`Frontend RTE Support <#7.7.Frontend%20RTE%20Support|outline>`_ `38 <#7.7.Frontend%20RTE%20Support|outline>`_
`Toggle Hiding/Showing Items <#7.8.Toggle%20Hiding/Showing%20Items|outline>`_ `38 <#7.8.Toggle%20Hiding/Showing%20Items|outline>`_
`Convert TimTab Blog to Discussion Forum <#7.9.Convert%20TimTab%20Blog%20to%20Discussion%20Forum|outline>`_ `39 <#7.9.Convert%20TimTab%20Blog%20to%20Discussion%20Forum|outline>`_
`Adding Hooks <#7.10.Adding%20Hooks|outline>`_ `40 <#7.10.Adding%20Hooks|outline>`_
2) Marker Array TypoScript hook 40
`Multi-language <#7.11.Multi-language|outline>`_ `40 <#7.11.Multi- language|outline>`_
`Administration <#8.Administration|outline>`_ `42 <#8.Administration|outline>`_
`Known problems <#8.1.Known%20problems|outline>`_ `42 <#8.1.Known%20problems|outline>`_
`To-Do list <#8.2.To-Do%20list|outline>`_ `42 <#8.2.To- Do%20list|outline>`_
`Changelog <#8.3.Changelog|outline>`_ `42 <#8.3.Changelog|outline>`_
Introduction
About This Extension
T
What is the Web-Empowered Church?
The Web-Empowered Church (WEC) is a ministry of Christian Technology Ministries International ( http://www.CTMIinc.org/ ) The mission of WEC is to innovatively apply WEB technology to EMPOWER the worldwide CHURCH for ministry.
WEC is helping churches around the world expand evangelism, discipleship, and care through the innovative application of internet technology. WEC web-based tools and training are helping make church ministries more efficient and effective, and they are extending ministry impact to a world in need of Jesus. We are helping to fuel a worldwide movement using the internet to point the world to Jesus Christ, to grow disciples, and to care for those in need. Our vision is to use the web to empower the Church so it can truly be a twenty- four hours per day, seven days per week ministry that is unconstrained by walls, distance, or time.
If you would like to find out more about WEC or our tools, or support us in any way, please go to our website at: www.WebEmpoweredChurch.org .
he Discussion Forum extension allows you to create a forum, blog, or comment system on your site. The forum, blog, and comments were designed for single page viewing, yet you can easily create discussion pages on multiple topics. This extension was created to support a forum system, and we added the blog and comments on top of it because we saw the similarities in functions. This extension promotes community. We have found that on a site with diverse interests, when you have a large forum system that has many conferences and topics, users were less likely to interact. However, if they have a forum page that is customized to their needs and their look, they feel like it is their own private area and more likely to start and sustain personal conversation.
This extension supports:
Discussion page:allows users to both post messages and reply to messages
Blog page: allows a user(s) to post messages and provides an option for readers' replies
Comment section: allows users to post messages.
Preview/teaser of discussion page: allows you to display the last #N messages on a given discussion page/blog/comment page.
RSS feed: allows users to subscribe to a discussion and get updates via their RSS reader.
Features
The features of this Discussion extension include:
- Easily customize colors, layout, and look.
- Rich Text Editor (RTE) to add posts.
- Support users to subscribe and receive new posts by email.
Filter messages for bad/obscene/spam words.
- Moderate the messages (optional).
- Support RSS feed so users can subscribe to the discussion.
- Spam protection of comments and posts by Image Captcha, Text Captcha, links removed, HTML tags, etc.
- The ability to hide an entry and comment form until a specified date/time.
- Search discussion messages.
- Preview/teaser of last #N messages posted. You can add this to any Typo3 page.
- Archive by month.
- Actionbar (top), sidebar, or both supported.
Why Use This Extension?
If you want a simple, but powerful, bulletin board/forum, a blog, or a comment system, we recommend considering this extension. The wec_discussion extension helps build community on your website and allows a customized look, feel, and options for each discussion forum. This extension was created for small to medium sized websites that would have discussions with up to several hundred people. For large websites, we would recommend using mm_forum or an external forum system.
How to Use this Manual
✔ To help make sense of the material on the following pages, we’ve used a few icons in the margin to highlight certain information.
T |img-1| ip : Tips are bits of information that are good to know. They may offer shortcuts to save you time or even make your website better.
N |img-2| ote : These notes are similar to tips, but usually contain information you should pay attention to. It might be details about a step that a whole operation hinges on or it may highlight an essential sequence of tasks.
C |img-3| aution : These notes draw your attention to things that can interrupt your service or website if not done correctly. Some actions can be difficult to undo.
T |img-4| echnical Stuff : These notes will explain how stuff works. If you want to know why certain steps are necessary or are just looking for a fuller explanation, these notes should help answer your questions.
I |img-5| nternet Link : These links will guide you to a website page that will demonstrate How-To do something or link you to more advanced information on the :underline:``http://webempoweredchurch.org <http://webempoweredchurch.org/>`_` or :underline:``http://typo3.org <http://typo3.org/>`_` websites.
Screenshots
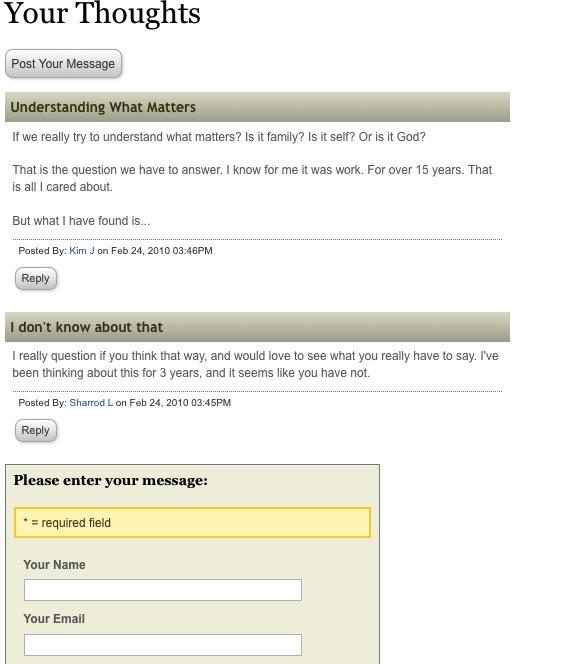
Illustration 1: The Discussion Forum with Sidebar Option (Menu On Right)
Illustration 2: The Discussion Forum with Actionbar Option (Menu On Top)
I |img-7| llustration 3: The Discussion Forum's Preview Mode
I
 Illustration 4: The Discussion Forum's RSS Feed Page
nstallation To install the Discussion Forum extension, you will need to do the following:
Install the Extension
Create a Discussion Forum Page
Create a Storage Folder
Add the Discussion Forum Plugin
Create an Extension Template Record
Install the Static Template
Set the Startingpoint
Install the Extension
Install the wec_discussion extension usingthe Extension Manager Module. You can get the extension file by clicking on the “Import extensions” in the Menu dropdown list, and then either do a Lookup for wec_discussion or click on Retrieve/Update to look for it in the whole list of extensions. If you have the most current WEC Starter Package, the wec_discussion extension is already installed.
Internet Link |img-5| : For details on how to install an extension, refer to the How-To at `http://webempoweredchurch.org/suppo rt/help/tutorial/import_and_install_an_extension/ <http://webempow eredchurch.org/support/help/tutorial/import_and_install_an_extension/> `_ .
When you install the wec_discussion extension, you will be given the option for: Forum Label in List-Module [label]
Which field is displayed in the title column in the web/list module. Can be subject, name(person who posted), post_datetime. The default is subject.
Alternative Label [label_alt]
Defines which field is displayed in the title column in lists if the field is empty, that is configured as label. If no alternative label is defined and the label field is empty the text [No title] will be shown. Default is none.
You can change these at anytime by going back to the Ext Manager->Install Extensions and select the “WEC Discussion Forum”. After you update, you may have to clear the cache.
Create a Discussion Forum Page
For most installations, you will want to create a new page dedicated to your new Discussion Forum. However, if you will be adding the Discussion Forum to an existing page, you may skip this step.
In order for the Discussion Forum to appear on your website, you must install its plugin on a page that is accessible by Frontend users. The location of the page in your page tree is entirely up to you, depending on your need.
Internet Link: Fo  r instructions on how to create a new
page, see the How-To at http://webempoweredchurch.org/support/help/tu
torial/add_a_new_page/ .
r instructions on how to create a new
page, see the How-To at http://webempoweredchurch.org/support/help/tu
torial/add_a_new_page/ .
Tip |img-1| : On many websites, particularly those created using the WEC Starter Package, any added pages will be immediately visible within the website's navigation links. To prevent this while you are working on your newly created page, ensure the page is “hidden” until you are ready for it to be displayed. For instructions on how to hide a page, see the How-To at http://webempoweredchurch.org/support/help /tutorial/hide_a_page_or_remove_a_page_from_the_menu/ .
Create a Storage Folder
Next, create a new Storage Folder to store the Discussion Forum records. We recommend placing the new storage folder as a subpage (“page inside”) of your Discussion Forum page.
Internet Link: See the How-To at http://webempoweredchurch.org/s
upport/help/tutorial/create_a_system_folder/ c
om/support/howtos/ single/create_a_system_folder
for instruction on how to create a Discussion Forum Storage Folder.
N |img-2| ote: The Discussion extension can be configured so that the extension's records are stored in the global Storage Folder. However, for convenience sake, we recommend creating a new storage folder to keep your Discussion Forum records in one place.
Add the Discussion Forum Plugin
To enable the Discussion Forum extension, you must install its plugin on an existing page. If you have created a Discussion Forum page in the steps above, then select it from the page tree for the following step. If you are adding the Discussion Forum to another existing page, then select it from the page tree.
Interne |img-5| t Link: For step-by-step instructions on how to install a plugin, see the How-To at http://webempoweredchurch.org/support/help/tutorial/add_a_plugin/ .
Create an Extension Template Record
In general we recommend installing an extension template record to the Discussion Forum page. This extension template will store the Template constants.
Internet Link: T o install an extension template record,
see the How-To at: http://webempoweredchurch.org/support/help/tutoria
l/add_an_extension_template_record/
Install the Static Template
The static template contains the information used by the web browser to display the Discussion Forum. The Discussion Forum static template can be installed in your site's main Template Record. The name of the Static Templates required by the Discussion Forum extension is *WEC Discussion Forum template.* If you are setting up an RSS feed on the page then you must also add the *WEC Discussion RSS 2.0 Feed* template.
I |img-5| nternet Link: Instructions for adding the Static Templates can be found in the How-To at http://webempoweredchurch.org /support/help/tutorial/add_a_static_template/ .
Set the Startingpoint
By
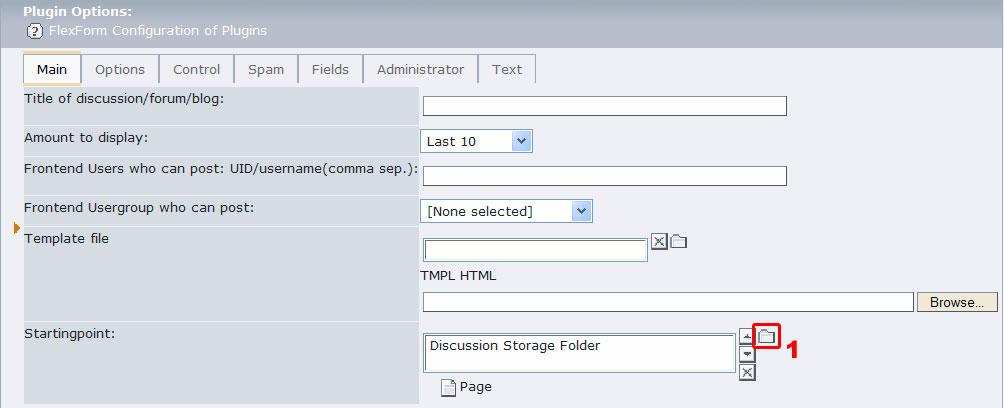 Illustration 5: Setting the Startingpoint
setting the Startingpoint, you are telling TYPO3 where it should create, store, and look for your discussion or blog records. Begin, by accessing the WEC Discussion's Flexform (the plugin's configuration form – see Step 4 above). See Illustration 5: set the Startingpoint by clicking on the file icon ( 1 ) and select the storage folder you created in Step 3.Then save the Flexform.
Internet Link: T o access and edit the plugin's Flexform,
see the How-To at http://webempoweredchurch.org/support/help/tutorial
/edit_a_plugins_flexform/
 Illustration 6: Basic Discussion Forum Screenshot
When you have completed these seven steps, your Discussion Forum will be ready to run. If you have hidden the page (see Tip for Step 2), you will need to unhide it. Then open the page in your Frontend to see your work. It should look similar to the image in Illustration 6.
The rest of this manual will walk you through the many options that are available for the WEC Discussion extension. Many of these options change the way the Discussion looks in the Frontend; others change the way the extension behaves.
Configuration
There are three primary resources to change the look and operation of the WEC Discussion extension. Most of the options are configurable through the plugin's Flexform. The second resource is the Constant Editor. Both of these configuration resources are explained in this section. The third resource for changing the look and operation of the extension is using TypoScript to set options. This resource is detailed in the Advanced section of this manual.
Configuring the Plugin
The plugin's Flexform contains the most common and requested configuration options. The Plugin Options section of the Flexform contains seven tabs, each containing related options. Each of these options is explained in detail below.
Interne |img-5| t Link: To access and edit the plugin's Flexform, see the How-To at http://webempoweredchurch.org/support/help/tutorial /edit_a_plugins_flexform/ .
Be sure to save the Flexform when you have completed any changes.
Main Tab
These are the main options for the Discussion Forum (Illustration 7)
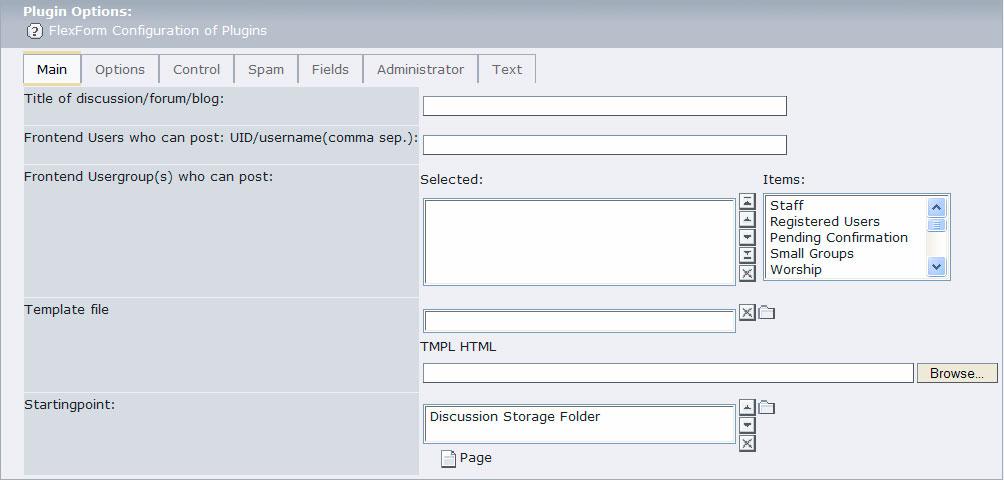 Illustration 7: Configuring the Main Tab
Title of discussion/forum/blog
FLEXFORM OPTION
Title of discussion/forum/blog
DESCRIPTION
The “title” of the discussion, forum, or blog, i.e., “Motorcycler's Forum” or “Current Events Discussion.” If you leave it blank no title will be shown.
Frontend Users who can post: UID/username(comma sep.):
FLEXFORM OPTION
Frontend Users who can post: UID/username(comma sep.):
DESCRIPTION
This is the list of individual users who are allowed to post. The list can be UID (Typo3 User IDs) or usernames (Frontend). Use a comma to separate users. You can mix-and-match UIDS and usernames. In addition, you can select Frontend Usergroup/s to allow a group of people to have posting access (see below).
Note: If you add a fro  ntend user to this field, the
extension will automatically set the Control option so that only
logged in users can post. To allow anonymous posts, leave this field
blank.
ntend user to this field, the
extension will automatically set the Control option so that only
logged in users can post. To allow anonymous posts, leave this field
blank.
Frontend Usergroup who can post:
FLEXFORM OPTION
Frontend Usergroup who can post:
DESCRIPTION
Restricts posting privileges to those who are members of particular usergroup/s. Select usergroups by clicking on usergroups in the Items field. In addition, you can add Frontend users who are not a part of the selected usergroups by adding them to the “Frontend Users who can post” field (above).
Note: If you add a frontend usergroup to this field, the
extension will automatically set the Control option so that only
logged in users can post. To allow anonymous posts, leave this field
blank.
Template file
FLEXFORM OPTION
Template file
DESCRIPTION
If you have created a new template for the Discussion extension, you can select it here (see Modifying the Template for more information). If you do not define one, the default template will be used. To update or re-upload a new template, you must select and delete any existing template identified in this field, save the page, and then choose the new template. The template file will be uploaded into the uploads/wec_discussion/ folder.
Startingpoint
FLEXFORM OPTION
Startingpoint
DESCRIPTION
Choose which Storage Folder you want the data to be saved in and read from. If you do not choose a Startingpoint data location, then the data will be stored and retrieved from the current page (not recommended).
Options Tab
The Options tab sets the Type of display that you want in your Frontend. If you select a Type other than Discussion, the form will reload (click Okay in the popup alert box) and will display relevant options.
Options: Discussion Type
The Discussion type is the default display Type for the WEC Discussion Forum extension (Illustration 8). The Discussion Forum allows users to create Posts and other users to reply to the posts or to create new posts. See the table below for additional types and a description of the options available for the Discussion Forum type.
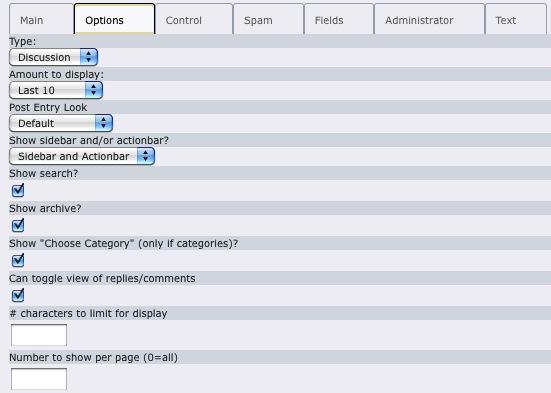 Illustration 8: Configuring the Discussion Options Tab
Not |img-2| e: Changing the Type field option from Discussion to another option will change the available fields. See the relevant Type below for details.
Type
FLEXFORM OPTION
Type
DESCRIPTION
Options:
DISCUSSION – The default setting. A user can either post a new topic or reply to topics previously posted. By default, only three levels of replies are allowed.Topic-Replies (Level 1)-Replies to Level 1 Replies (Level 2)-Replies to Level 2 of Replies (Level 3)
BLOG – Requires login for posting but not replies. Allows 1 level of replies – which are labeled as comments. See Options Tab – Blog Type
COMMENTS – All posts are comments and no replies are allowed. By default anyone can post. See Options Tab – Comments Type.
CUSTOM – Allows you to customize features contained in the Options and Control Tabs. See Options Tab – Custom Type.
PREVIEW – Displays subject, date/time, and a portion of text of posts only. Must be on a separate page from the Discussion forum. See Options Tab – Preview Type
RSS – Sets the plugin as an RSS feed that only outputs XML. See RSS Support .
ARCHIVE – Can show just an archive on a page or in a column on an existing page. See Options Tab – Archive Type
Note: Th ese presets override any other settings in the
Flexform. If you want a custom setup for the above values, then set
the Type=CUSTOM.
Amount to Display
FLEXFORM OPTION
Amount to Display
DESCRIPTION
The number of entries to show on a single page. Additional entries will roll over to an additional page and a Next link auto- generated.
- WEEKLY – shows the current week's entries
- MONTHLY – shows the current month's entries
- LAST 10 – shows the last 10 entries
- LAST 20 – shows the last 20 entries
- LAST 30 – shows the last 30 entries
- LAST 7 Days – shows the last 7 days
- SHOW ALL – shows all entries on the page. Not recommended unless you set the number of entries per page (see below). When the discussion has many entries, this may slow down the display.
Post Entry Look
FLEXFORM OPTION
Post Entry Look
DESCRIPTION
This allows you to change the look for a post entry and style your blog or discussion forum. It does this by loading in different CSS files. These are located in the wec_discussion/template/ folder and start wecdiscussion-entry2.css, wecdiscussion-entry3.css, etc.
NOTE: You need to be using the New Discussion Forum Template. If you try these with the Old template, then it will not work correctly or look right.
The current options are:
- Default : This looks similar to v1.x versions although with a bit more styling.
- Styled Look 2 : A more blog-like look with date, then subject large, post, and author at bottom.
- Styled Look 3: A variation of #2 but puts everything up top.
Show sidebar and/or actionbar?
FLEXFORM OPTION
Show sidebar and/or actionbar?
DESCRIPTION
The Sidebar view is the default Actionbar
- Sidebar only – only show the sidebar, which by default is to the right of the main content
- Actionbar only – only show the actionbar, which by default is on the top
- Sidebar and Actionbar – show both
- Show none – do not show either.
Show search?
FLEXFORM OPTION
Show search?
DESCRIPTION
Enabling this feature allows users to search your Discussion Forum. When enabled, a search box will be displayed.
Show archive?
FLEXFORM OPTION
Show archive?
DESCRIPTION
Enabling this feature creates an archive link in the sidebar (or a dropdown list in the actionbar) for posts sorted by months.
Show “Choose Category”?
FLEXFORM OPTION
Show “Choose Category”?
DESCRIPTION
Enabling this feature creates a link for sorting posts by their assigned categories. See the Fields Tab for more information on Categories.
Can create category?
FLEXFORM OPTION
Can create category?
DESCRIPTION
If a user who can post (not comment) can create a category. If so, they will be able to create a category on their post. Note that this feature is only allowed for Blog and Custom types.
Can toggle view of replies/comments
FLEXFORM OPTION
Can toggle view of replies/comments
DESCRIPTION
Enabling the feature allows users to toggle the display of comments/replies. When enabled, the replies/comments do not show, but a link is generated in each post that has replies/comments so that they all display on the page. This option allows busy discussion boards to not seem to lengthy.
# characters to limit for display
FLEXFORM OPTION
# characters to limit for display
DESCRIPTION
Limits the number of characters that will show in the Frontend list of discussion topics. If there is more text beyond the limit, a MORE link is generated so users can read the whole post. Leaving this blank will allow the whole post to show, no matter how long it is.
Number to show per page (0=all)
FLEXFORM OPTION
Number to show per page (0=all)
DESCRIPTION
Allows you to have paging on your forum. If set to a number like 8, only 8 entries will display. Note that if you have set the Amount to Display to Last 10/Last 20/Last 30, then this value will be ignored. The paging markers allow you to go to next or previous page, or to a specific page number. This option is helpful to very busy blogs/forums.
Options: Blog Type
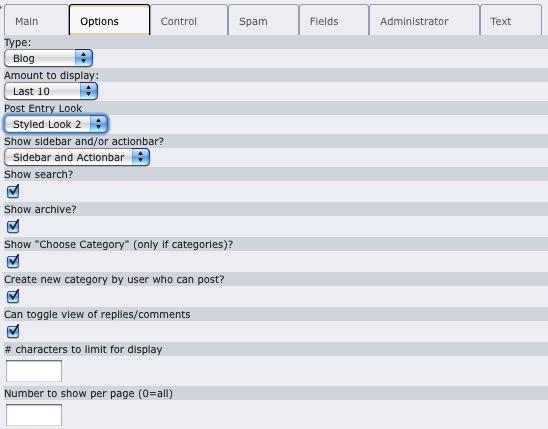 Illustration 9: Configuring the Blog Options Tab
The Blog type will create a blog-style forum that allows only registered users to create Posts, but then allows any user the ability to comment on the Post (the Control tab contains an option that would require everyone to register to reply if desired). See the table below for a description of the options available for the Blog type. The image shown in Illustration 9 is of the form generated for the Blog type. .. ### BEGIN~OF~TABLE ###
FLEXFORM OPTION
FLEXFORM OPTION
DESCRIPTION
DESCRIPTION
FLEXFORM OPTION
Show sidebar and/or actionbar?
DESCRIPTION
See the Options Tab – Discussion Type table.
FLEXFORM OPTION
Show “Choose Category” (only if categories)?
DESCRIPTION
See the Options Tab – Discussion Type table.
FLEXFORM OPTION
Can toggle view of replies/comments
DESCRIPTION
See the Options Tab – Discussion Type table.
FLEXFORM OPTION
Create new category by user who can post?
DESCRIPTION
See the Options Tab – Discussion Type table.
FLEXFORM OPTION
# character to limit for display
DESCRIPTION
See the Options Tab – Discussion Type table.
FLEXFORM OPTION
Number to show per page (0=all)
DESCRIPTION
See the Options Tab – Discussion Type table.
Options: Comments Type
The Comments type will create a forum that allows only registered users to create comments. In effect, this creates a Discussion Forum that creates posts and suspends any replies or comments so that posts follow posts. See the table below for a description of the options available for the Comments type. The image shown in Illustration 10 is of the form generated for the Comments type.
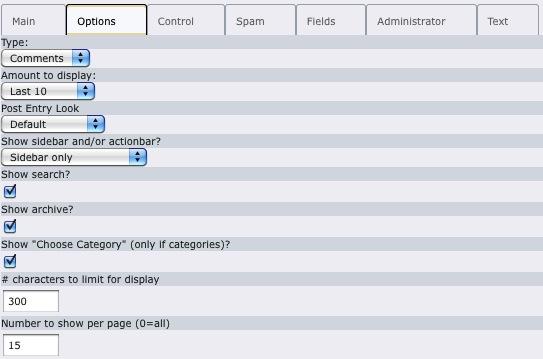 Illustration 10: Configuring the Comments Option Type
Type
Amount to display
Post Entry Look
Show sidebar and/or actionbar?
FLEXFORM OPTION
Show sidebar and/or actionbar?
DESCRIPTION
See the Options Tab – Discussion Type table.
Show search?
Show archive?
Show “Choose Category” (only if categories)?
FLEXFORM OPTION
Show “Choose Category” (only if categories)?
DESCRIPTION
See the Options Tab – Discussion Type table.
# character to limit for display
FLEXFORM OPTION
# character to limit for display
DESCRIPTION
See the Options Tab – Discussion Type table.
Number to show per page (0=all)
FLEXFORM OPTION
Number to show per page (0=all)
DESCRIPTION
See the Options Tab – Discussion Type table.
Options: Custom Type
The Custom type generates a form that allows you to create a forum using any combination of the Type options.
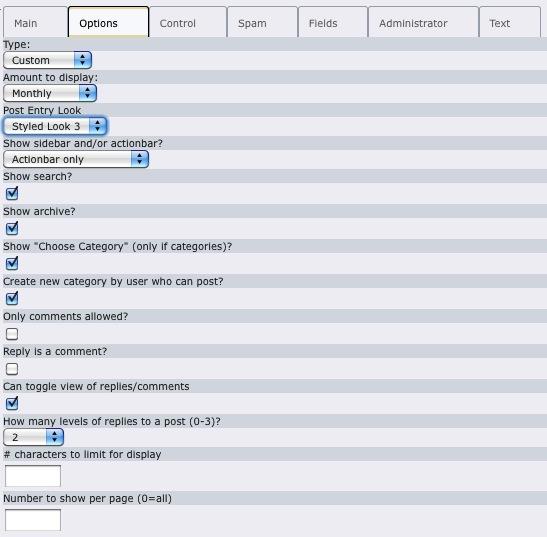 Illustration 11: Configuring the Custom Options Type
Using the Custom type you could create a discussion forum that only allowed one level of replies, or a blog that allows replies rather than comments, etc. See the table below for a description of the options available for the Custom type. The image shown in Illustration 11 is of the form generated for the Custom type. .. ### BEGIN~OF~TABLE ###
FLEXFORM OPTION
FLEXFORM OPTION
DESCRIPTION
DESCRIPTION
FLEXFORM OPTION
Show sidebar and/or actionbar?
DESCRIPTION
See the Options Tab – Discussion Type table.
FLEXFORM OPTION
Show “Choose Category” (only if categories)?
DESCRIPTION
See the Options Tab – Discussion Type table.
FLEXFORM OPTION
Only comments allowed
DESCRIPTION
Enabling this option creates every “post” in a comment format, that is, it loads the Comment form rather than the Post form. If the “How many levels of replies” is set to 0, then comments are treated as if they are posts, but without a reply option – see below.
Comment
Comment 2
Comment 3
FLEXFORM OPTION
Reply is a comment
DESCRIPTION
Enabling this option changes the Reply link to a Comment link. In addition, if this is enabled and the “Only comments allowed” is disabled, then both the Post form and the Comment form will be available in the Frontend when the Comment link is clicked.
FLEXFORM OPTION
Can toggle view of replies/comments
DESCRIPTION
See the Options Tab – Discussion Type table.
FLEXFORM OPTION
How many levels of replies to a post (0-3)?
DESCRIPTION
Set this option to reflect the levels of replies each post is allowed. A setting of None will suspend all replies or comments (unless the “Only comments allowed” is enabled).
Post
First Reply to Post – Level 1
Second Reply to Post – Level 1
Reply to Second Reply – Level 2
Reply to Second Level Reply – Level 3
FLEXFORM OPTION
Create new category by user who can post?
DESCRIPTION
See the Options Tab – Discussion Type table.
FLEXFORM OPTION
# character to limit for display
DESCRIPTION
See the Options Tab – Discussion Type table.
FLEXFORM OPTION
Number to show per page (0=all)
DESCRIPTION
See the Options Tab – Discussion Type table.
Options: Preview Type
The Preview type (a.k.a. Teaser) will generate an abbreviated display of the forum records with limited text and no illustrations (see Illustration 3). The display of replies and comments is configurable. The Preview type must include a link to a page with either Discussion, Blog, Comments, or Custom type selected. The Preview type is handy to use as a sub-menu that calls attention to the Forum/Blog that resides on another page. The image shown in Illustration 12 is the form generated to configure the Preview type.
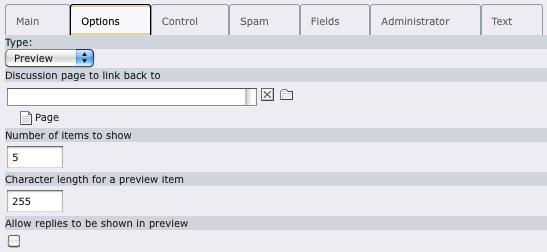 Illustration 12: Configuring the Preview Options Type
Type
Discussion page to link back to
FLEXFORM OPTION
Discussion page to link back to
DESCRIPTION
See the Options Tab – Discussion Type table.
Number of items to show
FLEXFORM OPTION
Number of items to show
DESCRIPTION
Determines the number of items (records) to display beginning with the most current post.
Character length for a preview item
FLEXFORM OPTION
Character length for a preview item
DESCRIPTION
The number of characters in the text that will be displayed. Longer texts are cropped at the nearest whole word and appended with ellipses.
Allow replies to be shown in preview
FLEXFORM OPTION
Allow replies to be shown in preview
DESCRIPTION
Enabling this option will display replies/comments to posts. However, these will be displayed on the same level as the posts and without Subject lines.
Options: RSS Feed Type
The RSS Feed type is the first step to providing an RSS feed for subscribers who wish to receive notification of new posts and replies. The basic steps to setting up an RSS feed are included below, but for more details, see the RSS Support section below.
Easy way : Include the WEC Discussion RSS 2.0 Feed template to your extension template. You can include it on the page where your Discussion Forum template is. You can then set the template constants here too. We recommend changing the constants.
OLD way : The following details the “old way” of doing it. This way is recommended if you want to customize the RSS feed options.
Step 1: Create an RSS page. The RSS page should be a sub-page to main discussion forum page.
Intern |img-5| et Link: For instructions on how to create a new page, see the How-To at http://webempoweredchurch.org/support/help/tu torial/add_a_new_page/ .
Step 2: Create an extension template record on the RSS page.
Interne |img-5| t Link: To install an extension template record, see the How-To at: http://webempoweredchurch.org/support/help/tutori al/add_an_extension_template_record/ .
Step 3: Create the RSS Feed template. Using the Template Module in the Backend, copy-and-paste the following TypoScript to the Setup form.
page = PAGE
page {
 typeNum = 0
 config {
    disableAllHeaderCode = 1
    additionalHeaders = Content-type:application/xml
    xhtml_cleaning = 1
    admPanel = 0
    noPageTitle = 1
 }

 10 < plugin.tx_wecdiscussion_pi1
 10.pid_list = ###STORAGE PID###
 10.type = 6
}
Step 4: Replace the ###STORAGE PID### in the above TypoScript with your page id of your Discussion Storage Folder. Save the template when you're done.
Step 5: Open the Template's Constant Editor and select PLUGIN.TX_WECDISCUSSION from the Category dropdown menu. Enable the RSS Feed On? by selecting the checkbox, updating the form, and then selecting the second RSS Feed On? checkbox when it appears. Update the form again.
Internet Link |img-5| : For instructions on how to change settings using the Constant Editor, see the How-To at http://webempoweredchurc h.org/support/help/tutorial/change_values_in_the_constant_editor/ .
Step 6: Configure the Options tab, RSS Feed Type. Illustration shows the RSS Feed type form.
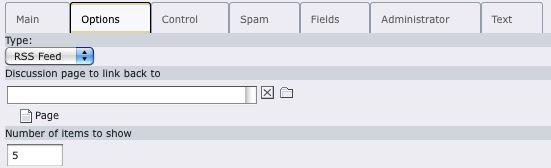 Illustration 13: Configuring the RSS Feed Option Type
The table below defines each of the RSS Feed options. All three fields must be completed. .. ### BEGIN~OF~TABLE ###
FLEXFORM OPTION
FLEXFORM OPTION
DESCRIPTION
DESCRIPTION
FLEXFORM OPTION
Discussion page to link back to
DESCRIPTION
See the Options Tab – Discussion Type table.
FLEXFORM OPTION
Number of items to show
DESCRIPTION
Determines the number of items (records) to display beginning with the most current post.
Once you've completed the above steps, your RSS Feed page will look like Illustration 4 when a user accesses it in the Frontend.
Options: Archive Type
Th
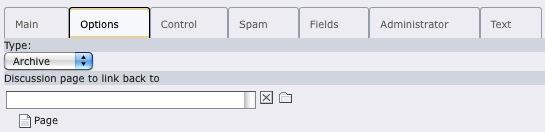 Illustration 14: Configuring the Archive Option Type
e Archive type creates a menu that displays the Archive list of entries on a separate page. This is convenient when the Show Archive in the Discussion, Blog, Comments, or Custom types results in an lengthy side menu. To use this option, a new page must be created and the WEC Discussion extension's plugin must be installed and configured for the Archive type on that page. Illustration 14 shows the form generated for this Option Type. .. ### BEGIN~OF~TABLE ###
FLEXFORM OPTION
FLEXFORM OPTION
DESCRIPTION
DESCRIPTION
FLEXFORM OPTION
Discussion page to link back to
DESCRIPTION
See the Options Tab – Discussion Type table.
Control Tab
The options in the Control tab determines who will have the ability to Post, Reply, or Comments in the WEC Discussion forum's Frontend. Because of the rising problems with spam and inappropriate posts on websites, these controls can be invaluable. Illustration 15 shows the Control tab form.
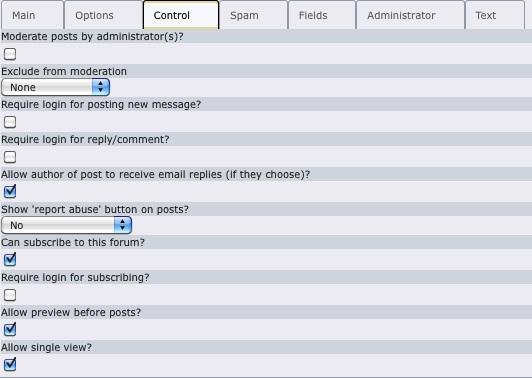
Illustration 15: Configuring the Control Tab
Moderate posts by administrator(s)?
FLEXFORM OPTION
Moderate posts by administrator(s)?
DESCRIPTION
Enabling this option will force all posts to be sent to the moderator for approval before being posted on the Discussion Forum. Enable this only if you have active moderators to ensure timely responses to posts and prevent user frustration.
Exclude from moderation
FLEXFORM OPTION
Exclude from moderation
DESCRIPTION
If you set the moderate posts, then you can choose if there is any group you want to exclude. If they are excluded, that means that if someone in that group posts a message, it will NOT be moderated. Here are the settings:
None: no one will be excludedLogged in User: anyone who is logged in will be excludedAdmin: any administrator (set in Administrator tab) will be excluded
Require login for posting new message?
FLEXFORM OPTION
Require login for posting new message?
DESCRIPTION
Enabling this option will require all users who want to post to be registered and logged into the website. We recommend enabling this option to curtail spamming.
Not |img-2| e: Selecting a Frontend Usergroup or listing Frontend Users who can post ( see the Main tab ) automatically enables this option even though a checkmark will not appear in the checkbox.
Require login for reply/comment?
FLEXFORM OPTION
Require login for reply/comment?
DESCRIPTION
Enabling this option will require all users who want to reply or comment. We recommend enabling this option to curtail spamming.
Allow author of post to receive email replies (if they choose)?
FLEXFORM OPTION
Allow author of post to receive email replies (if they choose)?
DESCRIPTION
If this is set, then in the form for a top-level post, the author can check a box whether to receive replies to this post. If the author is already subscribed to this group or is an admin, they will not receive a double reply – only one. If no email field is given in the form, then this option will not be offered.
Show 'report abuse' button on posts?
FLEXFORM OPTION
Show 'report abuse' button on posts?
DESCRIPTION
You can make your community self-monitoring by offering a 'report abuse' button on your posts. That way, if someone is offended by a post, they can report it to the moderator/administrator(s). Any suspected post is reported but still displayed until the moderator takes action on it.
The settings for this are:
No – no 'report abuse' button will be shown (default)
Comments – only if comments (recommended, especially for blogs)
All – will be shown for all posts (this is useful if you do not require login or have an open-ended forum)
Can subscribe to this forum?
FLEXFORM OPTION
Can subscribe to this forum?
DESCRIPTION
Enabling the option will generate a link that enables users to “subscribe” to the Discussion/Blog/Comments forum. Subscribers will receive an email when a new post or reply is added. In order for the mail program to work, php mail() functionality must be installed and enabled on the server.
Require login for subscribing?
FLEXFORM OPTION
Require login for subscribing?
DESCRIPTION
Enabling this option will require users to login in order to subscribe to the Discussion/Blog/Comments forum. For this option to work, the “Can subscribe to this forum?” option must also be enabled (above).
Allow preview before posts?
FLEXFORM OPTION
Allow preview before posts?
DESCRIPTION
If when a user posts a message (not comments), you can allow them to preview before they post it. This can be helpful to users so they can see how their message looks. This is especially useful if HTML content is posted. However, with straight text or wanting a simpler interface, you can turn this off.
Allow single view?
FLEXFORM OPTION
Allow single view?
DESCRIPTION
If you want to allow single view for a post, you can enable this (default is on). With the single view enabled, you can click on a title or “view single” button to see just the single view. Also, if you add comment or reply to a post, then you will do so in the single view. If you turn off single view, then the single view will not be displayed.
Spam Tab
The Spam tab contains options designed to help limit or eliminate spam threats to your forum. Below is a description of the options available through this form. For a more detailed description and additional options, refer to the Spam Control in the Advanced section of this guide. Illustration 16 shows the Spam options form.
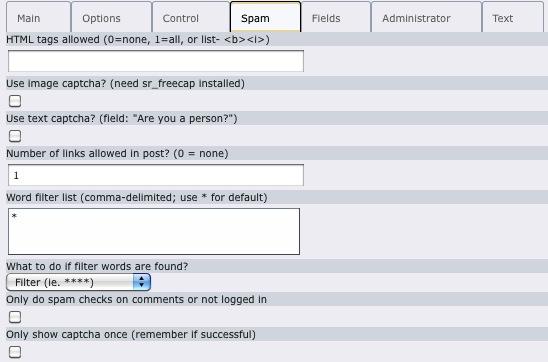 Illustration 16: Configuring the Spam Tab
HTML tags allowed(0=none, 1=all, or list- <b><i>)'
FLEXFORM OPTION
HTML tags allowed(0=none, 1=all, or list- <b><i>)'
DESCRIPTION
You can allow only certain HTML tags in a post, allow NO HTML tags in a post, or allow all HTML tags in a post. If you do allow All, the <script> tag will still be stripped. We recommend either allowing none or only a limited list. You can add whatever tags you want by entering in here all the tags together like “<b><i><span>...”.
Use image captcha?(need sr_freecap installed)
FLEXFORM OPTION
Use image captcha?(need sr_freecap installed)
DESCRIPTION
If you want to use an "image captcha," then install the sr_freecap or captcha extension and check this box.
When enabled, a field will appear above the submit button with the security image and a field where they have to enter the text. If you use sr_freecap, you can customize the sr_freecap so the captcha image is easier or more difficult to read. This form of spam protection will eliminate most, if not all, of spam postings. However, if you have an active Discussion Forum, some users may find it tedious.
Use text captcha?(field: "Are you a person?")
FLEXFORM OPTION
Use text captcha?(field: "Are you a person?")
DESCRIPTION
If you just want a "text captcha" – which is a field that a user has to click on – then you can enable this option. The default text field says “Are you a person?” and the user has to check this for the form to be submitted properly. A spammer will not know or likely understand it with their automated bots, so this can effectively prevent spam. It is less troublesome than the "image captcha" because even those with disabilities can read it through a screen reader and sometimes the "image captcha" is hard to read for older or less technical audiences.
Number of links allowed in post (0 = none)?
FLEXFORM OPTION
Number of links allowed in post (0 = none)?
DESCRIPTION
Many spammers will put many links in their posts, and you can limit the number of links in a post by setting this. If you set it to 0, then no links will be allowed. A link is defined in the context of this extension as either <a href="..">...</a> or http://
Word filter list (comma-delimited; use * for default)
FLEXFORM OPTION
Word filter list (comma-delimited; use * for default)
DESCRIPTION
A list of words to filter. Use * for the default ones which include over 50+ obscene and vulgar terms. Otherwise you can enter your own here. Just separate them by commas. If you do not want to process or care about handling filter words, leave this blank.
What to do if filter words are found?
FLEXFORM OPTION
What to do if filter words are found?
DESCRIPTION
This option allows you to handle “filtered” words. If no filter words are listed, then no filtering will be done.
FILTER : This will put * (or whatever you define in the locallang file) in place of the offeding words.
SEND TO ADMINISTRATOR : This will send the post to the administrator and let them either allow it or they can delete it.
DISCARD THE POST : This will delete the post if any offending words are found.
Only do spam checks on comments or if not logged in
FLEXFORM OPTION
Only do spam checks on comments or if not logged in
DESCRIPTION
If you have a blog, or a forum setup where a logged in person can post, you may want to just check for spam on comments and not on the posts. With this set, the spam checks above as well as the Image/Text Captcha will be disabled for logged in/registered users who post. This is especially helpful to protect the comments from spam, but allow the regular messages to not worry about the restrictions.
Only show captcha once (remember if successful)
FLEXFORM OPTION
Only show captcha once (remember if successful)
DESCRIPTION
Enabling this option will allow the generation of the captcha image once per user. If the user successfully enters the text, the captcha image will not appear again. This option will only work for those users who allow cookie sessions.
Fields Tab
T
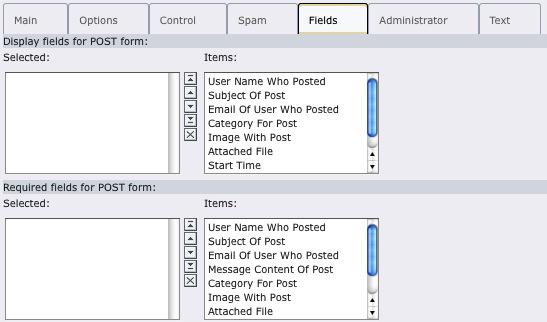 Illustration 17: Configuring the Fields Tab
he Fields tab contains options that change the fields the Post form will display or be required when a Frontend user clicks on the Post Your Message link. Illustration 17 shows the Fields tab form. Note: Addin g an Item to the Display fields for post
form will supercede the default Post template. Any item not in
the selected list will not be displayed.
Fields to display for post form
FLEXFORM OPTION
Fields to display for post form
DESCRIPTION
Choose which fields that will be filled in on the form. If none are selected, the name, message, subject, and category field will be shown in the Frontend by default The messsage field is not listed here because it is always available.
Fields required to post
FLEXFORM OPTION
Fields required to post
DESCRIPTION
Choose which fields that are required to be filled in for the user to post. If a required field is not completed, the system will inform users that the field is required and the post will not be accepted until the required fields are filled in.
Administrator Tab
The Administrator tab contains administrative options for the WEC Discussion extension. Enabling an administrator allows them to edit or delete posts, as well as the option to receive all posts via email whether the forum/blog/comments forums are moderated or not. Illustration 18 shows the Administrator tab form.
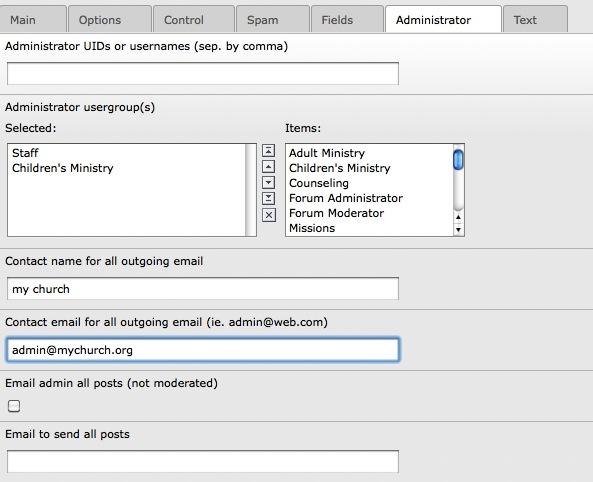 Illustration 18: Configuring the Administrator Tab
Administrator UIDs or usernames (sep. by comma)
FLEXFORM OPTION
Administrator UIDs or usernames (sep. by comma)
DESCRIPTION
If you have enabled the “Moderate all posts by administrator” in the Control form , you must enter the UID or username of the administrators here. Once this has been set, Edit and Delete links will appear at the bottom of each post when an administrator is logged in.
Administrator usergroups
FLEXFORM OPTION
Administrator usergroups
DESCRIPTION
If you would like to have admin usergroups set, instead of individual users, then you can select usergroups here. If you select both individual users and usergroups, BOTH will be used.
Contact name for all outgoing email
FLEXFORM OPTION
Contact name for all outgoing email
DESCRIPTION
This is the contact name that will appear in any email generated by the extension, such as posts sent for the moderator's approval, etc. If you leave this blank, no contact name will appear in these emails.
Contact email for all outgoing email (ie. admin@web.com)
FLEXFORM OPTION
Contact email for all outgoing email (ie. admin@web.com)
DESCRIPTION
This is the contact email address that will appear and be active in any email generated by the extension, such as posts sent for the moderator's approval, etc. This field should contain a valid email address. If this field is left blank, then the contact email will appear as emai@mail.com.
Email admin all posts (not moderated)
FLEXFORM OPTION
Email admin all posts (not moderated)
DESCRIPTION
Enable this filed if the administrator(s) need to receive an email copy of all posts. If the Moderate all posts by administrator is enabled in the Control form, the moderator will not be sent double posts. Use this instead of the option below if it is important for an administrator to see all traffic.
Email to send all posts
FLEXFORM OPTION
Email to send all posts
DESCRIPTION
Enter email addresses to this field for those who need to receive a copy of all posts via email, but who should not have administrator's rights for deleting or editing posts in the Frontend. Separate multiple email addresses by a comma.
Text Tab
The Text tab contains text fields that are related to the Subscribe option of the extension. Illustration 19 shows the Text tab form.
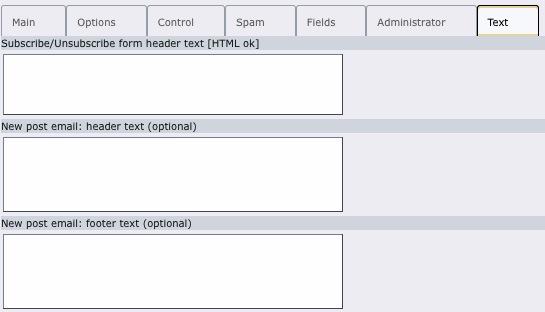 Illustration 19: Configuring the Text Tab
Subscribe/unsubscribe form header text [html ok]
FLEXFORM OPTION
Subscribe/unsubscribe form header text [html ok]
DESCRIPTION
This is the text that will appear at the top of the Subscriber form that will appear when a Frontend user subscribes to the discussion/blog/comments forum. You can use HTML tags within the field if needed or you can leave this field blank.
New post email: header text (optional)
FLEXFORM OPTION
New post email: header text (optional)
DESCRIPTION
Text entered in this field will appear at the top of the email sent when a new post is generated. Use this field to remind the user why they are receiving this email.
F.A.Q.
The following are questions that may help you better understand and use this extension:
Q: I am on v1.x and want to upgrade. How do I get new templates and styled looks for v2.x?
A: Please see the Advanced → Using New Templates section below. This should answer most of your questions.
Q: If I just want to keep on the old template, then what should I do?
A: If you just used the old original template, it should upgrade fine. If you had a custom old template, then you may need to alter it. See below in the Advanced → Using New Templates section below.
Q: I set certain options in the Flexform, like 'require login to post,' but it does not effect it – is this broken?
A: If you set the Type on the Options tab of the Flexform to anything but Custom, then those values may be overwritten. For example, if the Type=Discussion, then require login for posting/reply is cleared.
Q: Can I use this Discussion Form for my blog?
A: Yes, it should work fine. It all depends on what you want in a Blog and what features. See the question below for more info.
Q: Is this extension a better blog than TimTab?
A: This extension supports many features of a typical Blog, just like TimTab, but TimTab is only a blog and has additional blog features like pinging/callback and pre-built blog templates. This extension supports setting up for commenting or discussion forum as well as a blog. Plus it allows for front-end adding and editing of entries. The goal for this extension is easy-to-use and simple. Try this out and see if you like it.
Q: How can I add Subjects for the Replies/Comments?
A: To add this feature, all you need to do is edit the template and under ###REPLY_ENTRY### section, put the ###SUBJECT### above ###MESSAGE###. You can put the same code as ###POST_ENTRY### if you would like.
Q: I setup the preview, but it does not work – what did I do wrong?
A: Usually the problem is with not setting the Startingpoint on the Main tab or the Preview settings on the Options tab. Make sure those are set.
Q: I am wanting to improve (or change) the spam words, how can I do that?
A: You can do it in one of two ways:1) Add additional words in the FlexForm->Spam->Word Filter list. You could add *,spam,remove this , etc. to the Word filter list. Leaving the * will give you all the words already defined in the constants. If you want your own list, then do not use the *.
2) Add additional words in the spamWords and/or addSpamWords constants. You can do this by going to Template->Constant Editor->tx_wecdiscussion_pi1 when on the page. Scroll down near the bottom where you will find the spamWords and addSpamWords constants. The spamWords is a reverse order string, while the addSpamWords is not. To use these constants, you must have * set in the Word Filter List mentioned above.
Q: Some of the posts are getting blocked, how do I edit the spam words?
A: See above #2. You can edit the spamWords constant in the Constant Editor or you can edit the Word Filter list in the Flexform.
TypoScript Configuration
The following is for site developers/administrators who are wanting to customize the Discussion Forum on their system.
A number of constants are available so you can customize the extension to fit your needs. To change the constants, you can either use the Constants Editor or change them in TypoScript. First, you will need to create a new extension template -- which is shown in the Installation above.
Editing TypoScript
To edit constants in the template, you simply edit the extension template and make additions or changes in the TypoScript Setup section of the template.
An example Constant to add would be:
page.templateFile = fileadmin/wec_discussion/my_wecdiscussion.tmpl
After you save the extension template, you can then preview your page and should see the changes if the constant(s) effect the visual / output.
TypoScript Constants Reference
The following constants are available to be changed in the extension template TypoScript (Setup or Constants field) and/or the Constant Editor (Template->Constant Editor). For RSS constants, please see the RSS section.
templateFile
PROPERTY
templateFile
DATA TYPE
string
DESCRIPTION
The template file. Include the full URL path if you change it from the default (i.e., http://www.yoursite.com/fileadmin/wec_discussion/mytempl.tmpl).
DEFAULT
EXT:wec_discussion/template/wecdiscussion.tmpl
pid_list
PROPERTY
pid_list
DATA TYPE
string
DESCRIPTION
The page id of the storage folder. This can be set in the Flexform or be set here. It is included here also for setting up an RSS feed.
DEFAULT
((Unknown Property))
PROPERTY
DATA TYPE
DESCRIPTION
DEFAULT
imageWidth
PROPERTY
imageWidth
DATA TYPE
number
DESCRIPTION
The width limit for images. The images used are for categories. Without any value, the image will be imported the full width
DEFAULT
200
imageHeight
PROPERTY
imageHeight
DATA TYPE
number
DESCRIPTION
The height limit for images. Without any value, the image will be shown in the full height. You can specify just the imageWidth or the imageHeight.
DEFAULT
100
totalWidth
PROPERTY
totalWidth
DATA TYPE
string
DESCRIPTION
The width of the Discussion Forum – including content and sidebar.
DEFAULT
650px
mainContentWidth
PROPERTY
mainContentWidth
DATA TYPE
string
DESCRIPTION
The width of the main content section. This is where the discussion entries go. Note that the mainContentWidth + sidebarWidth should usually add up to 97% or 98% because of possible padding/margin.You could also hardcode a ###px here if you want (i.e., 550px)
DEFAULT
75%
sidebarWidth
PROPERTY
sidebarWidth
DATA TYPE
string
DESCRIPTION
The width of the sidebar. The sidebar contains the navbar (subscribe and moderate buttons), the archive, and categories. If you do not want to display a sidebar, you can set this to zero.
DEFAULT
23%
((Unknown Property))
PROPERTY
DATA TYPE
DESCRIPTION
DEFAULT
archiveLimit
PROPERTY
archiveLimit
DATA TYPE
string
DESCRIPTION
The limit of archives that are searched to build the archive list. If you have a very busy forum, you may want to increase this. If you clear it, then a built-in default of 300 will be used.
DEFAULT
300
spamWords
PROPERTY
spamWords
DATA TYPE
string
DESCRIPTION
List of words to filter for spam. Includes obscene and spam words. If you put * in the Flexform under Spam->Word filter list, these are the words that are used. The list is comma-separated and is reversed, so “test,spam” would become “maps,tset”. If you have access to PHP, you can use strrev() to easily generate or decode these.
DEFAULT
see them in Template>Constant Editor
addSpamWords
PROPERTY
addSpamWords
DATA TYPE
string
DESCRIPTION
List of additional words to filter for spam. The difference between this and 'spamWords' above is that these are not in reverse order. If you just want to add words and not bother with reversing them, then you can do that here.
DEFAULT
singleViewLink
PROPERTY
singleViewLink
DATA TYPE
string
DESCRIPTION
You can set this to allow a link to a single view. This allows you to see a more detailed look at a given post with all comments/replies listed. The following are the settings you can have for this:
subject -- have a link to single view in the subject
view_link -- have a view link next to the Posted By... subject_and_view -- have a link in subject and view link none -- have no links to the single view
DEFAULT
subject
single_view.substitutePageTitle
PROPERTY
single_view.substitutePageTitle
DATA TYPE
string
DESCRIPTION
This is a TypoScript setting only (not in Constant Editor) that you can set so you can control the display of the page title in the single view. The options are:0 = no page title1 = replace message subject with page title2 = append message subject to page title
DEFAULT
1
pid_list
PROPERTY
pid_list
DATA TYPE
string
DESCRIPTION
The PID of the page (or comma separated list pf PIDs) where your entries are located.
DEFAULT
preview_backPID
PROPERTY
preview_backPID
DATA TYPE
string
DESCRIPTION
The PID of the page to go back to from Preview or RSS. You can set this in the Flexform or through this TypoScript contant.
DEFAULT
more_tag
PROPERTY
more_tag
DATA TYPE
string
DESCRIPTION
HTML Tag to look for to signify a stop for "more" when message is too large. Can be real/rare HTML tag or fake. If you want valid HTML, you can use <WBR> (word break which is rare) or HTML tag not used.
DEFAULT
<hr />
duplicateCheckDelaySeconds
PROPERTY
duplicateCheckDelaySeconds
DATA TYPE
string
DESCRIPTION
Delay Time in seconds to check for a duplicate post
DEFAULT
15
RTEenabled
PROPERTY
RTEenabled
DATA TYPE
string
DESCRIPTION
If the RTE Is Enabled for frontend posts. This uses the RTE, but if you do not want it enabled, you can set this to 0. You may not want the RTE enabled if public postings are allowed because they could embed images or urls.
DEFAULT
1
RTEwidth
PROPERTY
RTEwidth
DATA TYPE
string
DESCRIPTION
RTE Width in px or %. This is the actual CSS width of the RTE element.
DEFAULT
100%
RTEheight
PROPERTY
RTEheight
DATA TYPE
string
DESCRIPTION
RTE Height in px or %. This is the CSS height of the RTE element.
DEFAULT
300px
showBlankSubject
PROPERTY
showBlankSubject
DATA TYPE
integer
DESCRIPTION
If the subject field of a post is left blank by a Frontend user, disabling this option will prevent a potentially unsightly blank line from being displayed when the post is complete.
DEFAULT
1
sendOnlyPosts
PROPERTY
sendOnlyPosts
DATA TYPE
integer
DESCRIPTION
If you want to send out only posts (not comments) to subscribers. Before this (v1.6.x and earlier), all posts and comments were sent.
DEFAULT
0
lockInNameEmail
PROPERTY
lockInNameEmail
DATA TYPE
integer
DESCRIPTION
Lock in user name and email on reply form if user logged in. This option is given so that if you require login, then the user cannot change their username or email on the reply/comment form. One note on this – if you are logged in, you cannot post or comment anonymously in a forum.
DEFAULT
1
namePrefill
PROPERTY
namePrefill
DATA TYPE
string
DESCRIPTION
What name to use when pre-fill fields with logged in user . The options are: first_name, last_name, first_last, last_first.
DEFAULT
first_last
sortComments
PROPERTY
sortComments
DATA TYPE
string
DESCRIPTION
If you want to sort the comments so you view latest first (=latest_first), then you can set this. The default is earliest first.
DEFAULT
earliest_first
Change The Look
Create the Look
The Discussion extension allows you to create a new look for the overall page by changing the template and/or by setting the color, font, and CSS constants. The default template is called wecdiscussion.tmpl and is in the extensions folder under /template (typically typo3conf/ext/wec_discussion/template). You can edit and create your own template file, and then upload it using the Flexform configuration when you setup your page.
If you do edit the template file or create your own CSS file, we would recommend that you put it in a location outside the extension directory. You can edit it and then upload it using the Filelistutility. We would recommend to put it in a location like fileadmin/wec_discussion/ or fileadmin/templates/. Note that you have to create the wec_discussion folder in the Filelist utility. You can then upload the file(s) and put them there. To let the extension know about this new location, you need to set the templateFileor cssFile TypoScript constants.
In the template's TypoScriptConstants section, set which files you have setup:
plugin.tx_wecdiscussion_pi1.templateFile = fileadmin/wec_discussion/my_wecdiscussion.tmpl

plugin.tx_wecdiscussion_pi1.cssFile = fileadmin/wec_discussion/my_wecdiscussion.css
Modifying the Template File
The template file determines how the Discussion page will be displayed. It contains HTML code along with markers that show where the data should be inserted.
The following details the template tags:
###TITLE###
TEMPLATE TAG
###TITLE###
DESCRIPTION
The title of the Discussion Forum can be shown. This is from the Flexform configuration.
###SUBSCRIBE_BTN###
TEMPLATE TAG
###SUBSCRIBE_BTN###
DESCRIPTION
The subscribe button. This is for the main Discussion screen.
###MODERATE_BTN###
TEMPLATE TAG
###MODERATE_BTN###
DESCRIPTION
The moderate button. This will only appear if the logged in user is a moderator.
###RESPONSE_MSG_TEXT###
TEMPLATE TAG
###RESPONSE_MSG_TEXT###
DESCRIPTION
The response message for an action. This can also be an error message if they did not fill in a required field in the form.
###POST_YOUR_MESSAGE_BTN###
TEMPLATE TAG
###POST_YOUR_MESSAGE_BTN###
DESCRIPTION
A button at top of discussion board for clicking on which will take you to form for posting a message.
###DISPLAY_POSTS###
TEMPLATE TAG
###DISPLAY_POSTS###
DESCRIPTION
To display the posted messages. To define the look of each post, look at the ###TEMPLATE_DISPLAYENTRY###
###DISPLAY_ARCHIVE###
TEMPLATE TAG
###DISPLAY_ARCHIVE###
DESCRIPTION
To display the archive so can go back to previous month(s). Will only be displayed if the 'show archive' is set in the Flexform.
###DISPLAY_ARCHIVE_DROPDOWN###
TEMPLATE TAG
###DISPLAY_ARCHIVE_DROPDOWN###
DESCRIPTION
Will display the archive in a dropdown menu. Only displayed if 'show archive' is set in Flexform.
###DISPLAY_COMMENTS###
TEMPLATE TAG
###DISPLAY_COMMENTS###
DESCRIPTION
To display the comments, if any.
###DISPLAY_REPLYFORM###
TEMPLATE TAG
###DISPLAY_REPLYFORM###
DESCRIPTION
The main form to enter a message. Can be used to reply to a message too.
###DISPLAY_COMMENTFORM###
TEMPLATE TAG
###DISPLAY_COMMENTFORM###
DESCRIPTION
The comment entry form. This can be hidden until needed (see below).
###COMMENTFORM_TOGGLE###
TEMPLATE TAG
###COMMENTFORM_TOGGLE###
DESCRIPTION
This allows you to wrap the Comment Form in a CSS tag such that the user can toggle the display on or off. You need to put this above the Comment form and include the ###COMMENTFORM_TOGGLE_END###.
###COMMENTFORM_TOGGLE_END###
TEMPLATE TAG
###COMMENTFORM_TOGGLE_END###
DESCRIPTION
If you want the comment form display to be toggled, you must add this to where the Comment Form ends. You must have the above ###COMMENTFORM_TOGGLE### at the top of the Comment Form.
###VIEW_COMMENTS###
TEMPLATE TAG
###VIEW_COMMENTS###
DESCRIPTION
Shows a link which will toggle whether to View Comments. If a user clicks on this link, then they will see all the comments. This works with the ###COMMENTFORM_TOGGLE### above.
###SHOW_ARCHIVE_DROPDOWN######SHOW_ARCHIVE###
TEMPLATE TAG
###SHOW_ARCHIVE_DROPDOWN######SHOW_ARCHIVE###
###SHOW_ACTIONBAR###
###SHOW_COMMENT_BTN######SHOW_MODERATE_BTN######SHOW_SEARCH#### ##SHOW_SIDEBAR###
###SHOW_SUBSCRIBE_BTN###
DESCRIPTION
These are all wrappers that will turn off or on between them based on Flexform settings.
((Unknown Property))
TEMPLATE TAG
DESCRIPTION
**###TOGGLE_HIDE_START_ON######TOGGLE_HIDE_START_OFF######TOGGLE
TEMPLATE TAG
###TOGGLE_HIDE_START_ON######TOGGLE_HIDE_START_OFF######TOGGLE _HIDE_END###
DESCRIPTION
These toggles allow you to hide/show the comments. This puts a special Javascript call to toggle the <div style=”display:block”> to either “block” or “none”. The Start ON make the <div> start with being displayed, whereas the Start OFF starts with it hidden.
###START_POST_ENTRY######END_POST_ENTRY###
TEMPLATE TAG
###START_POST_ENTRY######END_POST_ENTRY###
DESCRIPTION
These are tags around a given post. They encompass the post and comments.
###START_REPLY_ENTRY######END_REPLY_ENTRY###
TEMPLATE TAG
###START_REPLY_ENTRY######END_REPLY_ENTRY###
DESCRIPTION
These are tags around given comments. These encompass all the commments. This is useful for hiding/showing the comments.
###TOGGLE_HIDEALL_ONCLICK###
TEMPLATE TAG
###TOGGLE_HIDEALL_ONCLICK###
DESCRIPTION
This allows you to hide all when it is clicked on. Usually you set this up around the subject and have the rest of the message so it can be hidden when the subject is clicked on.
###DISPLAY_CODE###
TEMPLATE TAG
###DISPLAY_CODE###
DESCRIPTION
Usually blank, but if you use the TOGGLE_HIDEALL_ON_CLICK, this puts special code that must be shown after the reply form.
**###VIEW_SINGLE_LINKSTART######VIEW_SINGLE_LINKEND######PREVIEW_
TEMPLATE TAG
###VIEW_SINGLE_LINKSTART######VIEW_SINGLE_LINKEND######PREVIEW_ LINK_BEGIN######PREVIEW_LINK_END###
DESCRIPTION
These are the bounding markers that can wrap a single view (in list view) or preview view (only in preview). This links to the given message.
###VIEW_COMMENTS_NUM###
TEMPLATE TAG
###VIEW_COMMENTS_NUM###
DESCRIPTION
This allows you to show how many comments there are. The current default configuration shows “# comments” for the list view, and “[#}” in the preview. You can customize the display by setting the locallang variables in pi1/locallang.php for:viewcommentnum_startviewcommentnum _endviewcommentnum_end_pluralviewcommentnum_preview_startviewcomm entnum_preview_endviewcommentnum_preview_end_pluralIf you set the plural to blank, it will not handle plurals, i.e. 1 comment, 3 comments.
((Unknown Property))
TEMPLATE TAG
DESCRIPTION
###CHOOSE_CATEGORY_VERTICAL###
TEMPLATE TAG
###CHOOSE_CATEGORY_VERTICAL###
DESCRIPTION
The choose category interface where the user can select a category to view – or “view all”. This will have the categories listed as vertical links.
###CHOOSE_CATEGORY_DROPDOWN###
TEMPLATE TAG
###CHOOSE_CATEGORY_DROPDOWN###
DESCRIPTION
The choose category interface that is useful when you have many categories. This puts all the categories in a dropdown menu (including “view all”).
((Unknown Property))
TEMPLATE TAG
DESCRIPTION
###DISPLAY_CATEGORY###
TEMPLATE TAG
###DISPLAY_CATEGORY###
DESCRIPTION
The wrapper for the display of categories. This will not be used if there are no categories so you can leave this in even if you do not have categories.
###SHOW_CATEGORY###
TEMPLATE TAG
###SHOW_CATEGORY###
DESCRIPTION
Will show the current category.
###SHOW_SUBJECT###
TEMPLATE TAG
###SHOW_SUBJECT###
DESCRIPTION
Will show the subject. If the subject is blank AND the show_blank_subject is not checked, then the subject field will be deleted. This would be useful for comments.
###CATEGORY_IMAGE###
TEMPLATE TAG
###CATEGORY_IMAGE###
DESCRIPTION
Will show the category image if it is available.
((Unknown Property))
TEMPLATE TAG
DESCRIPTION
###ENTRY###
TEMPLATE TAG
###ENTRY###
DESCRIPTION
The wrapper for an entry.
###SUBJECT###
TEMPLATE TAG
###SUBJECT###
DESCRIPTION
The subject of the entry.
###MESSAGE###
TEMPLATE TAG
###MESSAGE###
DESCRIPTION
The main message.
###CATEGORY###
TEMPLATE TAG
###CATEGORY###
DESCRIPTION
The current category.
###DATE###
TEMPLATE TAG
###DATE###
DESCRIPTION
The date this entry was posted. (i.e., July 25, 2005).
###TIME###
TEMPLATE TAG
###TIME###
DESCRIPTION
The time this entry was posted (i.e., 10:20pm) .
###POST_NAME###
TEMPLATE TAG
###POST_NAME###
DESCRIPTION
The user name posted.
###POST_NAME_EMAILLINK###
TEMPLATE TAG
###POST_NAME_EMAILLINK###
DESCRIPTION
The name posted with the email linked to it. The email is encrypted. If there is no email then it just shows the name.
###POST_DATE###
TEMPLATE TAG
###POST_DATE###
DESCRIPTION
The date posted (i.e., January 15, 2005)
###POST_DATETIME###
TEMPLATE TAG
###POST_DATETIME###
DESCRIPTION
The date and time posted (i.e., January 15, 2005 11:14am)
###POSTEDBY_TEXT###
TEMPLATE TAG
###POSTEDBY_TEXT###
DESCRIPTION
If you want text for saying “Posted By:”. This allows for easy translation and flexibility.
###ON_TEXT###
TEMPLATE TAG
###ON_TEXT###
DESCRIPTION
If you want text for posted by <name> ON <date>. This allows for easy translation.
###ATTACHMENT###
TEMPLATE TAG
###ATTACHMENT###
DESCRIPTION
The file name of any attachment to the message.
###IMAGE###
TEMPLATE TAG
###IMAGE###
DESCRIPTION
Any image that is attached to this.
###IP_ADDRESS###
TEMPLATE TAG
###IP_ADDRESS###
DESCRIPTION
Show the IP Address of the person who posted, i.e. 127.0.0.1
###REPLY_BTN###
TEMPLATE TAG
###REPLY_BTN###
DESCRIPTION
The respond button/link for the entry.
###EDIT_BTN###
TEMPLATE TAG
###EDIT_BTN###
DESCRIPTION
The modify button/link for the entry.
###MARGIN_LEFT###
TEMPLATE TAG
###MARGIN_LEFT###
DESCRIPTION
To allow to shift the message over based on the indent. This isa style =”margin-left:##px” that should be in a <div> or <span>.
((Unknown Property))
TEMPLATE TAG
DESCRIPTION
###FORM_HEADER###
TEMPLATE TAG
###FORM_HEADER###
DESCRIPTION
The header text for a form (default text = “Please enter your message”)
###FORM_ERROR###
TEMPLATE TAG
###FORM_ERROR###
DESCRIPTION
The listing of any errors in the form.
###FORM_NNN###...etc.
TEMPLATE TAG
###FORM_NNN###...etc.
DESCRIPTION
You can use FORM_NNN, FORM_NNN_OBLIGATION, ORIG_NNN, and VALUE_NNN where NNN can be: NAME, SUBJECT, EMAIL, LOCATION, ADDRESS, CITY, STATE, COUNTRY, CATEGORY, and any other entry fields.
The ###FORM_NNN### is the text for the given field (i.e., NAME, SUBJECT) in the form.
###FORM_NNN_REQUIRED###
TEMPLATE TAG
###FORM_NNN_REQUIRED###
DESCRIPTION
If the field is required for the user to enter, then will put up the “required field” marker -- usually a “*”. You should put this field in for every entry field in your template so that the required fields can be configurable. If this field is not required, then nothing is added. (example: If Subject is required, ###FORM_SUBJECT_REQUIRED### is set and so you will see.... Subject * : [_______] ... in the form.)
###VALUE_NNN###"
TEMPLATE TAG
###VALUE_NNN###"
DESCRIPTION
The current value for the field that is used within the form field. The extension may fill in default values where they are known. (i.e., ###VALUE_NAME### may be filled in if logged in user and know name). If there was an error in the form, then these are filled with the previously entered values.
((Unknown Property))
TEMPLATE TAG
DESCRIPTION
###PID###
TEMPLATE TAG
###PID###
DESCRIPTION
The page ID. This is used as a hidden variable so the Discussion can process the forms correctly and make sure they are coming from the right place.
###SUBMIT_BTN###
TEMPLATE TAG
###SUBMIT_BTN###
DESCRIPTION
The text for the submit button in the post message form. “Post Message” is default.
###SUBMIT_COMMENT_BTN###
TEMPLATE TAG
###SUBMIT_COMMENT_BTN###
DESCRIPTION
The text for the submit button in the comment form. “Add Comment” is default.
###CANCEL_BTN###
TEMPLATE TAG
###CANCEL_BTN###
DESCRIPTION
The cancel button for the entry form.
###PREVIEW_BEFORE_POST_BTN###
TEMPLATE TAG
###PREVIEW_BEFORE_POST_BTN###
DESCRIPTION
The preview before post button that is on the main post form.
###FORM_CANCEL###
TEMPLATE TAG
###FORM_CANCEL###
DESCRIPTION
The cancel button value for the subscribe/unsubscribe form.
###FORM_SUBMIT###
TEMPLATE TAG
###FORM_SUBMIT###
DESCRIPTION
The submit button value for the post and subscribe/unsubscribe form.
###ACTION_URL###
TEMPLATE TAG
###ACTION_URL###
DESCRIPTION
The URL for processing the form.
###SUBSCRIBE_HEADER###
TEMPLATE TAG
###SUBSCRIBE_HEADER###
DESCRIPTION
The title of the subscribe form.
((Unknown Property))
TEMPLATE TAG
DESCRIPTION
###PREVIEW_LINK_BEGIN######PREVIEW_LINK_END###
TEMPLATE TAG
###PREVIEW_LINK_BEGIN######PREVIEW_LINK_END###
DESCRIPTION
Allow you to wrap a <a href>...</a> tags around a subject or message in the preview display. The link will jump to the day of the message in the main forum.
###PREVIEW_SHOWIMAGE###
TEMPLATE TAG
###PREVIEW_SHOWIMAGE###
###IMAGE##
DESCRIPTION
To show an image in preview. The SHOWIMAGE wraps the image section. The default is to put the Preview link around the IMAGE, but you can customize it to whatever you would like.
**###CAPTCHA_INSERT######SR_FREECAP_NOTICE######SR_FREECAP_CANT_
TEMPLATE TAG
###CAPTCHA_INSERT######SR_FREECAP_NOTICE######SR_FREECAP_CANT_ READ######SR_FREECAP_IMAGE###
DESCRIPTION
For using the Image Captcha extension called sr_freecap. It is built into the template, but only if you have the extension installed and Image Captcha set will it work.
**###SHOW_TEXT_CAPTCHA######TEXT_CAPTCHA_LABEL######TEXT_CAPTCHA
TEMPLATE TAG
###SHOW_TEXT_CAPTCHA######TEXT_CAPTCHA_LABEL######TEXT_CAPTCHA_FIELD###
DESCRIPTION
These have the Text Captcha information. The Field is the one with the input, and the Label is the question. These markers will be cleared if you do not have Text Captcha enabled.
###POST_LINK_START######POST_LINK_END###
TEMPLATE TAG
###POST_LINK_START######POST_LINK_END###
DESCRIPTION
Wraps an <a href...> (for START) and </a> (for END) around text that points to the given post that is in the search results.
###GOTO_POST_LABEL###
TEMPLATE TAG
###GOTO_POST_LABEL###
DESCRIPTION
The label used for going to a post from search results display.
((Unknown Property))
TEMPLATE TAG
DESCRIPTION
###ARCHIVE_HEADER###
TEMPLATE TAG
###ARCHIVE_HEADER###
DESCRIPTION
The header text above the archive listing.
###SHOW_ALL_ARCHIVE_LINK###
TEMPLATE TAG
###SHOW_ALL_ARCHIVE_LINK###
DESCRIPTION
A link at the bottom of the archive so can see everything (not just the archived month).
###ITEM_SEL_CLASS######ITEM_URL######ITEM_TEXT###
TEMPLATE TAG
###ITEM_SEL_CLASS######ITEM_URL######ITEM_TEXT###
DESCRIPTION
For the archive view, the item class on the div (for selected or not selected), the url which is setup and the text that is shown. You should not alter these and only remove the ITEM_CLASS if you want a custom.
((Unknown Property))
TEMPLATE TAG
DESCRIPTION
###PAGE_NEXT### ###PAGE_PREV###
TEMPLATE TAG
###PAGE_NEXT### ###PAGE_PREV###
DESCRIPTION
For paging, is a link so can advance to next page or go to previous page. The default text is: “< PREV” and “NEXT >”.
###PAGE_NUM###
TEMPLATE TAG
###PAGE_NUM###
DESCRIPTION
Lists the Page number. Default text is “Page #”, where # is the current page number.
###PAGE_NUM_LIST###
TEMPLATE TAG
###PAGE_NUM_LIST###
DESCRIPTION
Lists all the pages, with the current one bold and the rest clickable. Note that this does not handle many pages and will list all that are available. Example: 1 2 3 4 5 6 (is on page 4)
###TOTAL_POSTS### ###TOTAL_COMMENTS######TOTAL_MESSAGES###
TEMPLATE TAG
###TOTAL_POSTS### ###TOTAL_COMMENTS######TOTAL_MESSAGES###
DESCRIPTION
If you would like to see the total # of posts, comments, or messages shown, you can add this to the template. The Total Posts are top-level posts. The Total Messages is Posts + Comments.
((Unknown Property))
TEMPLATE TAG
DESCRIPTION
**###RTE_PRE_FORM######RTE_FORM_VARS######RTE_FORM_ENTRY######RT
TEMPLATE TAG
###RTE_PRE_FORM######RTE_FORM_VARS######RTE_FORM_ENTRY######RT E_FORM_BUTTONS######RTE_POST_FORM###
DESCRIPTION
These are specialized markers for the RTE. If you do not want the RTE enabled, the easiest way is to turn it off in the Constant Editor (RTEenabled=0). If it is turned off or is not avaialble, these markers will be cleared and not used.
((Unknown Property))
TEMPLATE TAG
DESCRIPTION
The following are marker sections within the template file. To change one or all of these, make sure you keep the same template names and the same sub-sections (wrappers) that the template section contains.
###TEMPLATE_PAGE###
TEMPLATE NAME
###TEMPLATE_PAGE###
DESCRIPTION
The main display of the entry form and entries.
###TEMPLATE_DISPLAYENTRY###
TEMPLATE NAME
###TEMPLATE_DISPLAYENTRY###
DESCRIPTION
The sub-template that shows one entry
###TEMPLATE_PREVIEW###
TEMPLATE NAME
###TEMPLATE_PREVIEW###
DESCRIPTION
The display of the “preview” of a discussion.
###TEMPLATE_POSTFORM###
TEMPLATE NAME
###TEMPLATE_POSTFORM###
DESCRIPTION
The post message form.
###TEMPLATE_COMMENTFORM###
TEMPLATE NAME
###TEMPLATE_COMMENTFORM###
DESCRIPTION
The comment message form.
###TEMPLATE_SUBSCRIBEFORM###
TEMPLATE NAME
###TEMPLATE_SUBSCRIBEFORM###
DESCRIPTION
The subscribe/unsubscribe form.
###TEMPLATE_SEARCH_RESULTS###
TEMPLATE NAME
###TEMPLATE_SEARCH_RESULTS###
DESCRIPTION
Entry for showing search results.
###TEMPLATE_ARCHIVE###
TEMPLATE NAME
###TEMPLATE_ARCHIVE###
DESCRIPTION
The display of 'archive'. This is for when the type is set to archive. For the displays in the sidebar or actionbar, see the TEMPLATE_PAGE section.
Advanced
Using Version 2.0 Templates
If you were using version v1.x and either used the default template or a custom template, please read the following steps necessary to upgrade or change to the new templates. If you are a new user (i.e., if this is a new install), refer to the above guide.
Changes
All template and CSS files have been moved to the folder wec_discussion/template/ . To ensure access to the new template system, TypoScript (TS) has been written into the template’s constants for both the template and CSS files:
plugin_tx_wecdiscussion_pi1.templateFile = EXT:wec_discussion/template/wecdiscussion.tmpl

plugin_tx_wecdiscussion_pi1.baseCSSFile =  EXT:wec_discussion/template/pluginstyles.css
plugin_tx_wecdiscussion_pi1.cssFile =  EXT:wec_discussion/template/wecdiscussion.css
The pluginstyles.css file is used as the CSS foundation for most WEC plugins using new templates. This allows custom styling across many WEC plugins for the site's template. It also simplifies and compacts the CSS when multiple WEC plugins are installed. In addition, if the wec_styles plugin is installed, it accesses the pluginstyles.css from wec_styles first. This ensures improvements in pluginstyles.css are incorporated site-wide. Otherwise, if wec_styles is not installed, then it uses the pluginstyles.css from this plugin.
Upgrading an Old Custom Template
If you have an old custom template, you will need to upgrade it. You can choose to either upgrade using the old templating system or using the new templating system. Upgrading to the new system is work- intensive, but offers a significant improvement in the look. We suggest referring to the new template at: wec_discussion/template/wecdiscussion.tmpl and the new CSS in wec_discussion/template/wecdiscussion.css .
If you choose to remain with the older system, you can find the template files at wecdiscussion-old.tmpl and the CSS file at wec_discussion/static/ts/setup.txt .
To upgrade using the old templating system, the main issues you will likely encounter will be:
- The handling of buttons have changed. If you examine the button code you will see that your current buttons will not work right.
- Everything is more semantic HTML. For instance, list views use <ul><li> instead of multiple <div> tags.
- Each section is appropriately called using a consistent naming convention (plugin[*]), e.g., pluginNav, pluginHeader, pluginFooter, pluginSection, pluginAside. We have used HTML5 tags as the base for class names when possible.
To upgrade to the new template system, we strongly suggest using the new template as a foundation and adding CSS or objects to the template as desired. The CSS and HTML structure of the template has changed so significantly that we advise starting from scratch rather than trying to change an existing template.
Using the New Template System
If you want to use the new default template and have installed v1.x, use the TYPO3 Template tool and access the page where the +ext template for the *WEC Discussion Template* is included (generally on the same page as the WEC Discussion plugin). Click the template's edit icon and select the Includes tab. In the Include Static field, delete the *WEC Discussion (old) Template* (older templates were renamed for easy identification). Next, add the *WEC Discussion Template* .Save the template record and clear the caches (the lightning bolt icon at the top right of the TYPO3 toolbar). Test each page that has a WEC Discussion installation. Once you've included the new template, modify the look by accessing the Plugin's Display tab.
Creating a Custom Template
To create a custom template, we recommend beginning with the *wecdiscussion.tmpl* and *wecdiscussion.css* files as models. To change the look of an entry, use one of the wecentry[1-3].css files in the folder wec_discussion/template as a model.
Once you've made your changes, go to the +ext template and in the SETUP section (or you can use the Constant Editor), you can set the *plugin_tx_wecdiscussion_pi1.cssFile* to the location of the new css file, and *plugin_tx_wecdiscussion_pi1.templateFile* to the location of the new template file. The WEC_Discussion extension will then use your new template and/or CSS.
Administrator/Moderator Functions
Before you are set to go live, you should be aware of the FrontEnd administrator functions. If you do not set an administrator, then you will have to process messages in the TYPO3 Backend. If you do set one or more users as an administrator, then you can let them process and handle the support for the Discussion pages.
To set someone as administrator, you just add their TYPO3 Frontend User ID (or their User Name) to the Administrator field in the Flexform. You can have a list of administrators if you want – just separate their IDs or usernames with a comma.
The main functions an administrator can do in the FrontEnd are:
Delete a message
The administrator can go to the Discussion page and choose to delete any messages. Please note that once a message is deleted it cannot be retrieved within the Discussion Forum administration (you can retrieve it using special TYPO3 extensions like 'wastebasket').
Edit a message
The administrator can go to the Discussion page and edit any message. Only under rare circumstances should an administrator edit a person's message. However, if someone posted personal information and the instructions say not to, the administrator may want to keep the post but edit out the personal information.
Process moderated messages
If the Discussion page is moderated, all entries posted to it will be sent to all the administrators before they show up on the page. An email will be sent for the moderated message, and an administrator can then click on the link to access the moderated message list for that Discussion page. Once there, he or she can then choose to approve or discard the messages that are posted. If approved, the message will be shown immediately on the Discussion page. If any messages are discarded, they will be deleted and removed from the moderator queue. Once the moderated messages are processed, no one else is notified unless they subscribe to the Discussion page; those users will see the ones that are approved.
Spam Control
As of version1.3.0, the Discussion extension supports various ways to control spam on posts. These controls also enable you to customize the output. The following details these features:
HTML Tags Allowed
You can set what HTML tags you want allowed in the post. If you set it to 0, then no HTML tags are allowed. If it is set to 1, then all HTML tags are allowed except <script>. If you want only certain tags, you can just add those. Example HTML tags include:<b> or <strong> - bold text<i> - italicize text<h1> -- header #1 (and also <h2>, <h3>, and<h4>)<a> -- link tag<script> -- script tag which allows complex (recommended to never allow this)<div>, <span> -- CSS tags for controlling layout<font> -- allows to set fonts<hr> -- allows horizontal rule<img> -- allows an image<p> - create a new paragraphother HTML tags for tables and HTML pagesNormally, someone would have to enter these in by hand and understand HTML coding. With the planned upgrade of the message section so it supports a FrontEnd Rich Text Editor, this field will be more useful.
Image Captcha
An image captcha requires the user to enter in the distorted letters/numbers shown in an image. This prevents spammers from finding your form and submitting their spam easily. It requires human- interaction for the form. The good about this is that it prevents 99% of spam. The problem is that it requires an extra step for people, and sometimes the distorted letters are hard to read and may take users a few tries – which can be quite frustrating. Also, the image captcha may limit people with visual disabilities from using your form.
This plugin works with 'sr_freecap' or 'captcha' plugin.
Text Captcha
A text captcha is an extra field in a form that requires the user to respond. We have just implemented a very simple one that requires the user to click on a checkbox that says “Are you a person?”. You can change this question to be whatever question you would like by using the tx_wecdiscussion_p1._LOCAL_LANG.default.textcaptcha_field = “your question”. The good about this is that it takes one click for a real person to do this. The problem is that some spammers will set and try to fill in all fields, and so this could be set. It would likely eliminate a large number of spammers, but not as effective as the Image Captcha.
Links Allowed
Most spammers want you to visit their site and often their messages will have many links in them. The default links allowed is 1 and if someone adds more, they are removed. If you set the links allowed to remove all links (if set = 0), then no one can post any links. A link is considered <a href="...">...</a> or http://.
Word Filter
The word filter is for both spammers and for those who may abuse your forum by adding hateful or obscene posts. These allow you to filter, moderate or delete them. With moderating, you can double check to make sure the post has obscene words. This may be helpful at first to make sure no posts get rejected.
You can add onto the existing filter in the Flexform, which includes many spam words by saying “*,spam,superspam...”, etc. where 'spam' is a word you want to filter. If you want to have your own set of words in the Flexform, do not use the *.
To change or add to the spam words, you can also edit the 'spamWords' or 'addSpamWords' constants to add your own spam words. You access these through Template->Constant Editor->tx_wecdiscussion_pi1.
Login Only
One sure way to control 99.9% of spam is to make it so that the user has to login to post or comment. This will eliminate almost all spam problems but will usually limit the number of public users from posting because they do not want to signup at your site just to comment or post. It all depends on the type of forum/discussion/blog you have and who has access to it and how public it is.
Additional Methods
Out of research done, additional ways that could improve your spam control are:
#1 Add a fake form in your template
You could go to your template (or copy the wecdiscussion.tmpl file from the typo3conf/ext/wec_discussion/template folder). You would find the ###TEMPLATE_POSTFORM section and copy the whole form (except the <a name> tag) and then paste it right at the top. Then change the first <div> so it hides the form, and then add a ###INPUT_FAKE_FORM### after the <form>. This will add an “ignore” parameter which will ignore any input. You could also change ###ACTION_URL### to one of your own that goes nowhere. Why this can be effective is that most spam bots grab the first form on a page that looks like a posting form and post to that.
<a name="typeYourMessage"></a>
<div style="text-align:center;display:none;">
 <div class="tx-wecdiscussion-form">
 <form name="forumReplyForm" method="post" action="###ACTION_URL###" enctype="multipart/form-data">
        ###INPUT_FAKE_FORM###
#2 Add onclick for your form processing Many spam bots just scan HTML code and look for the action parameter in a form to submit. If you use onclick, this can make it more difficult because they need to run the Javascript interpreter on it – not just scan the text. It should be as simple as saying:
<form name="forumReplyForm" method="post" onclick="###ACTION_URL###" enctype="multipart/form-data">
Or what you can do is make the form action bogus and put the real action in your submit button like so:
<form name=”forumReplyForm” method=”post” onclick=”www.bogus.com” enctype="multipart/form-data">
<input name="ForumReply" type="submit" value="###SUBMIT_BTN###" onclick=”this.form.action='###ACTION_URL###'” />
As we find other methods, we will add to the extension to help combat spam. If you know of any good techniques, please email us and let us know.
RSS Support
The Discussion Forum supports RSS (Really Simple Syndication). RSS allows you to subscribe to a "feed" (display of new messages). Users can see new messages from a web browser or a software program (feed readers or aggregators) on their computer. Example feed readers include Bloglines, Google reader, NewsGator, My Yahoo, FireFox Live Bookmarks, IE7 Feed reader, etc. RSS feeds are mainly used for blogs although you can use them for a discussion forum or comments. Why users like to subscribe to RSS feeds is that they can get updates about a site without having to go to the site. You can see many blogs at once at a glance without having to visit the pages. If you see an article you want to read, you can then go to the site although many feed readers allow you to read articles without ever having to go to the website.
For RSS feeds, you can use a variety of formats (Atom, RSS 0.92, RSS 2.0, etc.) and for the Discussion Forum, we use RSS 2.0 format for the feed. Most RSS feeds are in the XML format which is a special structure that allows easy definition. If you would like to find out about the RSS 2.0 format, you can go here: http://blogs.law.harvard.edu/tech/rss .
The following will detail the constants, template, and Flexform setup to setup an RSS. While some of the RSS features are mentioned in previous documentation above, the following is a step-by-step guide to implement RSS for your site:
Setup RSS Discussion Forum
There are two ways you can do this. The recommend way is to add the “WEC Discussion RSS 2.0 Feed) static template to the extension template. This will setup the rssFeedOn constant, and allow you to define the constants.
Another way to setup the RSS feed is by going to the existing Discussion Forum and add type=224 to the URL. If it is the first argument, you add a '?' otherwise if it an additional argument, you add a '&'. So http://mysite.com/forum/?type=224 or http://mysite.com/forum/index.php?id=1047&type=224. However, if you use the RSS link, this is the way it will automatically be generated and so you do not need to set this unless you want a custom RSS feed or link. This is the recommended way for most users since it is automatic. The other thing which you must do is set the 'rssFeedOn' to 1 in the Template Constants. You can do this by editing the template directly or go to the Constant Editor.
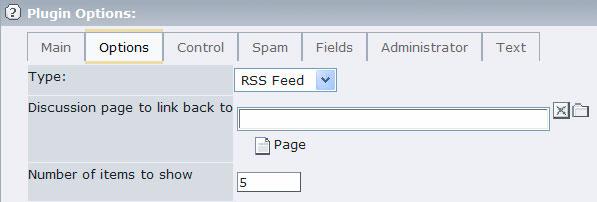
To create a blank template, here are the steps:
- Create a new extension template in the page where the RSS feed is.
- Add the following to the SETUP section of the template:
page = PAGE
page {
 typeNum = 0
 config {
 disableAllHeaderCode = 1
 additionalHeaders = Content-type:application/xml
 xhtml_cleaning = 1
 admPanel = 0
 noPageTitle = 1
 }

 10 < plugin.tx_wecdiscussion_pi1
 10.pid_list = ###STORAGE PID###
 10.type = 6
}
3) Change the ###STORAGE_PID### to the storage page ID where your discussion forum storage is. This will be a number. You can get this by looking at your Backend and hovering your mouse over the page where the discussion forum storage is.
4) Save the template and run it. It should be a strict XML feed. If there are any problems, you may want to clear the Constants and Setup and set to Rootlevel in your template.
Set Flexform Constants
In your Flexform, you can set certain constants for the RSS feed. If you have setup a new page with the Discussion plugin, you need to go to the Main tab being able to set the "Type" to RSS. The other constants to be set are on the Options tab. If you created the plugin on a different page, then you should set the Startingpoint on the Main tab to point to the Storage folder where the Discussion messages are found.
Options tab
Discussion page to link back to
FLEXFORM OPTION
Discussion page to link back to
DESCRIPTION
The page ID to go to for the Discussion page. This will link the Preview/RSS link so that when it is clicked on, it goes to the main Discussion page.
Number of Items To Show
FLEXFORM OPTION
Number of Items To Show
DESCRIPTION
This is only if the Type (set in Main) = Preview or RSS. This is how many items to show. This automatically selects that last #N items that were posted. The default is 5.
It is very important to set the "Original discussion page to link back to" if you have set up the RSS feed on a separate page.
Set Extension Template Constants
To set the constants, you can go to Templates->Constant Editor on the page where the Discussion RSS page is. You may need to create a new extension template in the current page where the Discussion plugin is if none currently exists. And you must add the “WEC Discussion RSS 2.0 Template” to the extension template. The following are the RSS constants:
rssFeedOn
PROPERTY
rssFeedOn
DATA TYPE
boolean
DESCRIPTION
If the RSS feed is on or off. The default is off, but if you want to turn it on, you just need to set this constant.
DEFAULT
0
rssTemplateFile
PROPERTY
rssTemplateFile
DATA TYPE
string
DESCRIPTION
The RSS template file that has the RSS template markers that are filled in to create the XML file. Include the full URL path if you change it from the default (i.e., http://www.yoursite.com/fileadmin/wec_discussion/mytempl.tmpl).
DEFAULT
EXT:wec_discussion/res/rssfeed.tmpl
((Unknown Property))
PROPERTY
DATA TYPE
DESCRIPTION
DEFAULT
xml.rss.generator
PROPERTY
xml.rss.generator
DATA TYPE
string
DESCRIPTION
The generator of the RSS feed. You can name this whatever, it is only used for comments in the RSS feed text.
DEFAULT
TYPO3 v4 CMS
xml.rss.channel_title
PROPERTY
xml.rss.channel_title
DATA TYPE
string
DESCRIPTION
The channel title that is displayed at the top. You should set this to the name of your Discussion Forum or blog.
DEFAULT
Discussion Forum
xml.rss.channel_description
PROPERTY
xml.rss.channel_description
DATA TYPE
string
DESCRIPTION
The description of the channel. Here you can further describe what the Discussion Forum / blog is about. This appears at the top of the RSS feed.
DEFAULT
Discussion Forum feed
xml.rss.channel_category
PROPERTY
xml.rss.channel_category
DATA TYPE
string
DESCRIPTION
This is the category that this RSS feed should be in. This is only used for feed readers/aggregators that use categories. You may want to look at feed readers/aggregators to see what categories they use. Or you can define whatever category name you want that fits your forum / blog best and feed aggregators may use the category as a guide.
DEFAULT
Religion & Spirituality
xml.rss.copyright
PROPERTY
xml.rss.copyright
DATA TYPE
string
DESCRIPTION
If you need to set a copyright, then you can set it here. If you do not need one, then clear out this field and set it to blank.
DEFAULT
℗ & © Your Organization
xml.rss.language
PROPERTY
xml.rss.language
DATA TYPE
string
DESCRIPTION
This is the language the RSS feed is in. It is usually a 2 character country code, although the en-US signifies American English. For a list of valid values, you can go here: http://cyber.law.harvard.edu/rss/languages.html
DEFAULT
en-US
xml.rss.owner_email
PROPERTY
xml.rss.owner_email
DATA TYPE
string
DESCRIPTION
The owner email that you can include if you would like. This email is often for contacting if the RSS feed is not working or has a problem.
DEFAULT
xml.rss.owner_name
PROPERTY
xml.rss.owner_name
DATA TYPE
string
DESCRIPTION
The owner name that you can include if you would like. If you do not, you should clear this.
DEFAULT
Your Name
xml.rss.ttl
PROPERTY
xml.rss.ttl
DATA TYPE
string
DESCRIPTION
The Time To Live -- the number of minutes that a feed can be cached before it needs to be refreshed from the source.
DEFAULT
xml.rss.docs
PROPERTY
xml.rss.docs
DATA TYPE
string
DESCRIPTION
A URL that points to the documentation for the format used in the RSS file. This should not need to be changed unless you use a different RSS format.
xml.rss.icon
PROPERTY
xml.rss.icon
DATA TYPE
string
DESCRIPTION
The icon used to display on the main Discussion page to show the RSS feed link.
DEFAULT
EXT:wecdiscussion/res/feed-icon.gif
xml.rss.link
PROPERTY
xml.rss.link
DATA TYPE
string
DESCRIPTION
The actual link to the RSS feed. The default is set to the current page with +type=224 set. However, if you want to set it to one of your own pages, you will need to enter the full web URL here to that page. An example: http://www.mysite.com/discussion/RSS/
DEFAULT
+type=224
You can change any of the constants through the Constant Editor or by editing the TypoScript constants directly. What is recommended is that you change the following constants because they just have dummy values. For some, you can clear out if you do not want to set any values. You could add this directly into the Constants section of the extension template or change them with the Constant Editor:
tx_wecdiscussion_pi1 {
        xml.rss.channel_title = Your Title
        xml.rss.channel_description = Your Description
        xml.rss.channel_category = Find Category
        xml.rss.copyright = (c) Your Organization
        xml.rss.owner_email = youremail@email.com
        xml.rss.owner_name = your name
}
Add a Link to Your Page
Once you have your RSS feed setup, you then need to provide a way for people to subscribe to it. You can do this by having a link to your RSS page. This is automatically generated in the actionbar or sidebar if it is setup so that the type=224. If this is not the case, then you need to set either an image or text link to the RSS feed.
If you have setup with type=224, then you will see an RSS icon automatically generated in the template. If you want your own icon, you can customize the template to add this.
The constants you can set to change or alter the RSS icon/link are:
xml.rss.icon = EXT:wecdiscussion/res/feed-icon.gif

xml.rss.link = +type=224

xml.rss.link = http://www.feedburner.com/WebEmpoweredChurch.org
The + on the first character of link adds this to the existing page. So it is PAGE_URL+type=224. And it will use either a ? or a & based on if you have other parameters. You do not need to use the +, that is just a feature. You could hardcode it to http://www.yoursite.com/discussion/RSS.
If you would want to change to an RSS page, you would need to change the xml.rss.link to point to the RSS page.
Icons
Besides the default icon, we have several other icons packaged with this extension. To change them, you just need to set the
xml.rss.icon to one of the below values.
ICON
a
ICON
b
URL Location
a
b
EXT:wecdiscussion/res/feed-icon.gif
a
b
EXT:wecdiscussion/res/feed-icon-rss.gif
a
b
EXT:wecdiscussion/res/feed-icon-rss2.gif
a
b
EXT:wecdiscussion/res/feed-icon-xml.gif
You can also set the icon to your own or a different custom style. Just set the xml.rss.icon to the graphic file. If you do use one from another website, please copy the file to your own server and then point it to your own server (i.e., fileadmin/images/myfeedicon.gif).
Advanced Customizations
If you want to further customize the RSS feed, here are a few details:
The RSS 2.0 template is found in typo3conf/ext/wecdiscussion/res/rssfeed.tmpl. This is set by the rssTemplateFile constant which can be changed in TypoScript extension template or through the TypoScript editor . If you would like to change this to an Atom-based feed or RSS 0.9.2 feed, you can create a new file (or edit the existing) and point the rssTemplateFile to your new feed template file.
One additional constant that is not mentioned in the above documentation, and you likely do not need is called ' pid_list '. You can set this if you need to have a special Startingpoint. You can set this in the Template Constant Editor or the extension template TypoScript directly.
Single View
You can allow the user to view just a single discussion post with it's associated comments. With the archive, preview and search list results, when you click on a result, you will go to a single view. You can allow a single view from the normal list view too. The default is now so that if you click on the subject title, you will see the list view. You can enable a view button also that is by the Add Comment | Edit | Delete buttons which when clicked on, the user will see the single view.
You can set the TypoScript constant, singleViewLink, to one of the following values. It can be set in the extension template module directly or through the Constant Editor:
- subject -- only the subject is a link to the single view
- view_link -- a 'view' link is next to the Posted By... section
- subject_and_view -- both of the above are links
- none -- no single view link in the list view
The single view's template is based on the ###TEMPLATE_DISPLAYENTRY### template section. The listing view might include a message length if set, but for the single view the message length and any single view links are not included. The ###DISPLAY_VIEW_ALL_BUTTON### is only included in the single view and so if you do not want that or want to change it, you can.
Archive Support
The Discussion Forum allows you to show archive listing on a page. This is especially useful for a Blog or discussion that is maintained over any length of time. That way you can go back to previous posts easily. The archive is sectioned off by month and will list in Month- Year format all the previous months that have entries in them. To use the Archive display, you need to turn on the 'Show archive' in the Options tab of the Flexform or setup a separate archive display (see below). This will then put the archive in the sidebar and/or actionbar. In the sidebar, it is a list, whereas in the actionbar it is a dropdown menu. When a user clicks on a Month-Year link, the Discussion Forum will only show the entries for that month. If the user wants to see everything again, they can then click on the "Show All" link at the top of the Archive.
Separate Archive Display
You can also set up an Archive as a separate element. This allows you to put an Archive in a different column of your site, such as used in many Blog programs including the TYPO3 extension, TimTab. To do this, you just create a new Discussion plugin and set the Type = Archive on the Main tab of the Flexform. We would recommend you copy an existing Discussion plugin – that way all the settings are the same. If you create a Discussion plugin from scratch, you need to set the Startingpoint. If for some reason, you have the archive on a different page, you can set the Return to page on the Options tab. Otherwise, the Archive listing needs no other setup.
Frontend RTE Support
As of version 1.6.0, you can enable the RTE for posts in the Frontend. This comes enabled by default, and can be turned off. It only works for posts, not comments. Usually you do not want comments to be able to add HTML codes which could be spam. The RTE also works for editing, but you may need special configuration for complex editing (i.e., contains a variety of HTML references). Please refer to the rtehtmlarea manual for information on TypoScript settings for the Frontend (you can get manual at: http://code.typo3.org/v4/browser/TYP O3core/trunk/typo3/sysext/rtehtmlarea/doc/manual.sxw ).
Two things you can change in TypoScript constants is the RTE width and RTE height. The width can be speciifed in pixels (px) or percentage (i.e. 100% or 90%).
An example of setting up buttons for FrontEnd editing is by adding the following to the Page TypoScript (note this goes on the Page not in the extension template). You could also add this in the User TypoScript for the Backend user. Note to make any changes to RTE in TypoScript, you need to address the RTE.default.FE,
Here are some examples...
clear out buttons and add your own:
#clear out the buttons
RTE.default.FE.showButtons >
# then add new ones
RTE.default.FE.showButtons  = blockstyle,fontstyle,fontsize,formatblock,bold,italic,left,center,orderedlist,unorderedlist,outdent,indent,textcolor,link,image
add one button to the list:
RTE.default.FE.showButtons := addToList(line)
You can do other changes to the RTE for the Frontend including how to process the text, and to allow certain HTML tags or not. Please read the manual.
Toggle Hiding/Showing Items
If you want to support toggling of any parts of the Display entry, you can through adding the following template markers. Right now, the "View Comments" supports the hiding/showing, but we have added more generic elements so you can use it for whatever you would like. One use of this is by just having the titles displayed and you click on that to see the rest of the message.
###TOGGLE_HIDE_ONCLICK### - this is added to an <a href="" onclick>...</a> which will show or hide the item.
###TOGGLE_HIDE_START_OFF### -- put this at the start of the section you want to hide. The _OFF means that the initial state is OFF.
###TOGGLE_HIDE_START_ON### -- this is the same as above, but the initial state is ON.
###TOGGLE_HIDE_END### -- This is the ending section of where you want to hide.
Here is the example code for just seeing the title, and having to click on it to see the rest of the message:
<!-- ###POST_ENTRY### begin
        ----------------------------------------------------------------------------------
-->
<!-- ###SHOW_SUBJECT### begin -->
        <div class="tx-wecdiscussion-forumMessageSubject">
          <a href="#" onclick="###TOGGLE_HIDE_ONCLICK###">###SUBJECT###</a>
        </div>
<!-- ###SHOW_SUBJECT### end -->
        ###TOGGLE_HIDE_START_OFF###
        <div class="tx-wecdiscussion-forumMessage" ###MARGIN_LEFT###>
        ...
        </div>
        ###TOGGLE_HIDE_END###

<!-- ###POST_ENTRY### end-->
Convert TimTab Blog to Discussion Forum
We have found that some people like the simplicity of WEC Discussion Forum, and after using the TimTab they want to convert to the Discussion Forum. In order to facilitate this, we have added a converter from TimTab to WEC Discussion. This function does not delete any TimTab records, it just creates WEC Discussion records based on existing TimTab records. You will have to delete, move, or archive the old TimTab records yourself after the conversion. Note that this converts TimTab messages, categories, and comments.
The following method we have setup is not easy-to-use and must be followed exactly. Since this is a rarely used function, we have chosen to not incorporate it into an Admin interface although it does have error checking. The conversion script in the pi1 folder of the extension, class.tx_wecdiscussion_convert.php, could possibly be adapted to convert other blogs or database tables.
The steps to convert a TimTab blog to WEC Discussion Forum are:
1) In the Backend, create a WEC Discussion plugin wherever you would like to set it up. You can add this to a page where a TimTab blog exists or create a new page.
2) Create any Discussion Forum storage folder you would like. Again, you can re-use a TimTab storage folder if one exists. If you use the Global Storage folder, then make sure that if you have more than one Discussion Forum, you do not delete any messages.
3) In the pagetree in the Backend, mouse over - but do not click on -- the page where the TimTab Blog storage folder is and write the pageID number down. If you have created a new storage folder, then do the same for the new discussion storage folder.
4) Go to the page with the new WEC Discussion plugin. Open up this page in the Front-end.
5) In the URL of the Discussion page, add &ttconvert=997 to the URL. If there is no other arguments, then add?ttconvert=997 instead. Some examples:
http://www.mysite.com/forum/?ttconvert=997
     http://www.mysite.com/blog/?uid=105&ttconvert=997
Note that you can change the 997 to something more secure by setting the 'ttconvert' TypoScript variable in the extension template by adding this line to the SETUP section:
plugin.tx_wecdiscussion_pi1.ttconvert = 345
6) You will see a simple form where you need to fill in the following values:Enter storage pageID to convert from: -- where the TimTab blog data isEnter storage pageID to convert to: -- where the new discussion page is (leave blank if on the same storage page)Delete all wec_discussion data on page? -- This will only delete existing wec_discussion data in the storage folder and is only useful if you have tried to convert and there were errors or problems and so you are retrying it.
7) If the conversion is successful, you will see how many messages, categories, and comments are converted. If it is not successful, you may see an error that will help you what went wrong.Please let us know if you run into any problems with using this conversion.Date Formats
You can customize the date formats that are shown. Currently they are supported by locallang.php file with customizations for each language. The English date format is Month Day, Year whereas the European format is along the lines of Day.Month.Year.
If you would like to customize the date format, you can easily by changing the following local language labels. You would set these in the Extension template Setup field (not Constants). The default settings are:
plugin.tx_wecdiscussion_pi1._LOCAL_LANG.default {
        date_format = %b %d, %Y
     datetime_format = %b %d, %Y %I:%M%p
 archive_date_format = %B %Y
}
Note that if you want to change it for your given language. change it from .default above to your language (like .no would be Norwegian or .de would be German/Deutsch).
To set it up in the European format (with 24-hour clock) for German language, you could use:
plugin.tx_wecdiscussion_pi1._LOCAL_LANG.de {
 date_format = %d %B %Y
 datetime_format = %d %B %Y, %H:%M
 archive_date_format = %B %Y
}
To understand what codes you can put in this field, please look at http://php.net/strftime which details all the codes possible and what these ones mean.
Adding Hooks
If you would like to change or add features to the WEC Discussion Forum, you can through programming. We have added what are called hooks in TYPO3 which allow you to build onto the extension. These may include adding fields to what is stored in a post, or adding extra functionality. Please refer to the TYPO3 documentation for further information on hooks. Please also let us know what hooks/functionality you would like to extend, and we will certainly consider adding them. Below are the current hooks we have supported:
1) Marker Array hook
Usage:
$GLOBALS['TYPO3_CONF_VARS']['EXTCONF']['tx_wecdiscussion_pi1']['extraItemMarkerHook']
Allow you to add extra marker items for the display of a post.
2) Marker Array TypoScript hook
Usage in TypoScript:
plugin.tx_wecdiscussion_pi1.itemMarkerArrayFunc
Allow you to add extra marker items for the display of a post, through TYPOSCRIPT. An example would be:
plugin.tx_wecdiscussion_pi1.itemMarkerArrayFunc = user_myMarkers
Then have a function in PHP such that:
function user_myMarkers($markerArray, $conf) {
        $markerArray['###NEW_MARKER###'] = 'My new marker';


        return $markerArray;
}
Multi-language
The text for this extension has been placed in the typo3conf/ext/wecdiscussion/ folder under pi1/locallang.php file and locallang_db.php file. You can extend to support different languages by adding translations to these files.
To configure a different language, you should refer to the TYPO3documentation and check out the one-page tree description in http://typo3.org/documentation/tips-tricks/multi-language-sites-in- typo3/ .
The Discussion Forum plugin now supports multiple languages for posts, comments, and category records.
As an overview to allow different languages, you would set the following in TypoScript in your Page template for your site:
# Set up the language variable "L" to be passed along with links
config.linkVars = L

# For German/Deutsch language, sys_language.uid = 2
config.sys_language_uid = 2
config.language = de
config.locale_all = de_DE

# For Dutch language,
config.sys_language_uid = 1
config.language = dk
config.locale_all = danish
Administration
Known problems
There are no known problems with this plugin at this time. Please report any bugs, suggestions, or comments to the team at devteam(at)webempoweredchurch.org . You can also go to http://www.webempoweredchurch.org/support/ for additional support.
To-Do list
Plans for this extension include:
- Add comment RSS feed
- Administrator functions to see posting & comment stats, cleanup deleted messages, etc.
- Allow to templates for posts
Changelog
0.9.0 -- First version.
Released on 11/2/2005
0.9.1 -- Fixed upload file bug and made form submission more secure. Fixed bug with deleting messages.
Released on 11/11/2005
0.9.2 -- Added Dutch translation (thanks Onno S!). Refined language file and template. Added date formattingoption in language file. Updated doco file – especially Configuration/Template File table.
Released on 11/17/2005
1.0.0 -- Removed tx_wecdiscussion_user table and code – not used. Fixed problem if have a discussionand a preview of a discussion on same page (esp. when used in conjunction with WEC_Devo).Redid template and CSS so better fits. Fixed process moderator bugs.
Released on 1/27/20061.0.1 – Fixed problem with show comments and not needing a subject. Also added a notify_email in Flexformso can get an email everytime a new post or reply is added to forum.
Released on 2/3/2006
1.1.0 – Fixed security issues with Postvars and SQL. Added startingPoint option for Flexform so can specifystorage page. Allow so can add as plugin type for pageContent “new content element”.
Released on 3/15/2006
1.1.1 – Made compatible with XHTML doctype.
Released on 3/24/2006
1.2.0 – Made template XHTML compliant. Made so Post Message button can be turned off (i.e., if Blog and nota user). Added German translation (thanks Franz) and Finnish translation (thanks Katja). Fixedproblems with two htmlspecialchars on post. Fixed issues with formatting of sending out emails. Handle better the images with messages.Released on 5/18/2006
1.2.1 – Fixed problem with previews so now they respect Display Amount (Weekly/Last 7 Days/Last 10/etc).Fixed bug with toggle comments -- now added separate option for that. Changed all locallang doublequotes to single.
Released on 6/23/2006
1.2.2 – Fixed preview so does not show moderated. Fixed bug with dropdown so showcat is appended correctly.Also extension was accidentally set to 'shy' – now it is outgoing!
Released on 9/27/2006
1.3.0 – Revised Flexform (will have to set options again on upgrade – save your options if customized). AddedSpam Control options like image and text captcha, and HTML & link control. Made dates use strftimeinstead of date() so can localize so any date format overrides must be updated. Improved default filterword list. Added search capability. Updated docs. Fixed several minor bugs. Upgraded code accordingto TYPO3 coding guidelines.
Released on 1/31/2007
1.3.1 – Fixed bug with category display and selecting. Fixed bug under certain configs with ReplyForm url.Fixed editing message with image bug. Added Spanish translation (thanks Diego L!). Put spam wordsin constants. Fixed several minor bugs.
Released on 2/23/2007
1.3.2 – Fixed bug with archive listing. Fixed bug with spam control & filtering.
Released on 3/2/2007
1.4.0 – Added RSS feed capability. Added single view of message (with comments) for search and preview.Archive link shows whole month. Can set length to display of posts (adds "more..." if too long). Canspam protect just comments (i.e. for blog). Updated template. Revised manual.
Released on 4/20/2007
1.4.1 -- Fixed subscribe feature -- now sends out emails correctly. Added title to RSS so "Subscribe to<TITLE>". Fixed preview back pid bug. Enhanced character length (More...) so respects div and p tags. Added 'name' to filter.Released on 5/3/2007
1.5.0 -- Added Archive view with template and fixed archive bugs. Updated template including setting for width.Can now restrict posts by usergroup. Records can now be hidden. Added converter from TIMTAB towec_discussion format. Added generic hide/show toggle for messages. Added French translation(thanks Steeve M). Fixed moderation bug, added locallang to moderation form (thanks Markus). Fixedissue so if require login to post, spam cannot get through. Auto-fill in user name & email fields inBackend records. Add image to preview. Content now goes through general_stdWrap.
Released on 6/15/20071.5.1 -- BUGFIX: message length, fixed RSS feeds with RTE content. ADDED: can now have link to single viewin listing. Added title to archive/category listing. Archive shows selected & can put 'subscribe to feed' atbottom. UPDATED: template & CSS. Made XHTML compatible. Updated doco on RSS feed.
Released on 7/4/2007
1.5.2 – UPDATED: changed templates so no inline CSS and more XHTML compliant. BUGFIX: usergroupdetection improved, message length with “more” fixed, text handling better supports HTML and RTEencoded text, and various minor issues.
Released on 9/7/2007
1.5.3 – FIXED: permissions for posting, restricted by usergroup error, better spam handling, post/comment bug,slowdowns on edit/add/delete, some cleanup. ADDED: Chinese language translation (thanks Rocky),updated German translation (thanks Harald).
Released on 10/8/2007
1.6.0 –Redid Flexform(must save & check values). Added Static Templates now (must add to +ext templateto work). Added Front-end RTE as option. Reply Form can now move to current post. Addedpagination. Keeps open comments if reply. Preview has more options and goes to given message.Updated manual. Many other fixes.
Released on 4/2/2008
1.6.1 –Add comments & reply works like most blog systems. Allow preview before post. Can create categories.Improved send email formatting & function.Several RTE/reply fixes. Fixed more tag handling.Fixed spam link checking. Cannot move replies from 1.6.0 (RTE did not support). Removed show_date parameter unless needed. Other minor fixes.
Released on 4/17/2008
1.6.2 – Can turn off “preview before post” or single view in Flexform, ssl/https supported,fix forHTML/RTE encoding, fix for preview cropping, fix for mailing, added customized BE labels,fix RSS feed plus only there when include static template,added single view page title,XHTML improvements, and other minor fixes.
Released on 5/22/2008
1.6.3 – Security fix for input forms – please update! Attached files & image files now follow denyFilePatterns,RSS feed includes charset, new category works if required field, and fixed More... problem.
Released on 6/30/2008
1.7.0 –Multi-language for posts & categories(must Update!), better XSS handling (no more <x> in posts),can send only posts to subscribers, admin can delete posts + all comments, can exclude frommoderation, starttime/endtime supported in BE and FE, locallang files are now XML, can lock inusername/email, UTF-8 supported better, auto cleanup of categories, added hooks, and severalbug fixes.
Released on 12/4/2008
1.7.1 – Fixed security issues. Fixed bug with locallang file and TemplaVoila.
Released on 12/20/2008
1.7.2 – Fixed URL bug with certain configurations. Fixed stripos problem with PHP 4. Minor CSS updates. Minorbug fixes and code updates.Released on 1/30/2009
1.8.0 – FIXED: RSS feed working with IE & Feedburner, sending out emails, login for comments, keepingsurname (namePrefill constant), monthly display, no-RTE posting, working with subdirectory installsagain. Added IP address for admin/moderate emails. Updated German(DE) translation.
Released on 6/19/2009
1.8.1 – Added Spanish and Swedish translations. Changed URL handling so more robust and fixes some issues.Fixed email settings if using different charset (i.e., UTF-8). Subscriber header text in Flexform is clearedand now uses locallang 'subscribeform_header' and 'subscribeform_instructions' as default.Other minor fixes and improvements.
Released on 10/7/2009
1.8.2 – Fixed closing </div> problem that could happen in posts with comments.
Released on 10/9/2009
1.9.0 – Changes:
- Posts and comments are now searchable by indexed_search (site-wide search).
- You can add a “report abuse” button for community to self-monitor discussions. Any messages reported will get sent to administrators.
- The author of a post can receive emails of anyone replying to their post (optional).
- You can embed HTML/Flash in posts for YouTube, Video, etc. – added TypoScript to pageTS.
- The archive shows only last twelve months and folds previous years in a tree (can click to see).
- Other minor fixes and updates.
Released on 1/16/2010
2.0.0 – Changes:
- Brand new templates and CSS. If you are upgrading, you can keep your old template or if you want to use the new templates, please see the Advanced Section for details.
- Supports three different looks to display a post for new templates – can be set in the Flexform.
- Removed all colors and most widths and fonts from TypoScript constants and put in CSS file.
- Refined Archive display even further.
- Refined “More...” link so can go to single or keep default as expand text.
Released on 3/15/2010
2.0.1 – Changes:
- added 'captcha' plugin support
- added sortComments so can set it to latest or earliest
- added categories in archive view
- allow RSS (xml.rss.link) to have link to URL (i.e. work with FeedBurner, etc.)
- fixed delete posts with comments, template issue, and edit post with image
Released on 4/7/2010
2.0.2 – Changes:
- fixed image attachment issue with saving and clearing an image
- fixed image height/width issue. Updated default width/height for large images.
- fixed issue with RSS feed link.
Released on 4/12/2010
2.0.3 – Changes:
- Can choose admin based on usergroup – see Administrator Flexform. Will email to usergroup too if set.
- Added ###SHOW_NOBAR### in template if you do not have actionbar or sidebar.
- Can choose None for Entry Look in Flexform so no entry-# CSS file is loaded.
- When click on moderate email link, notifies user if not logged in, and shows button to login if loginPID is set.
- Fixed some CSS issues.
- Fixed so save posts in right language.
Released on 8/2/2010
2.0.4 – Changes:
- fixed absRefPrefix issue with URLs
- fixed RTE width/height in constants (to get around bug in RTE in 4.4)
- Added German translation (thx Robert M); updated Spanish translation
- Printing works better – CSS change.
- Fixed author receive replies issue
- Fixed links in documentation
Released on 10/1/2010
2.1.0 – Changes:
- Works with caching framework
- RSS feed issues fixed
- Added IP Address display in reply form and list view
- Fixed subscribe/unsubscribe if multiple plugins on page
- Updated locallang files with umlauts(DE) for utf-8 format
Released on 3/3/2011
2.1.1 –Security fix
Released on 4/7/2011
2.1.2 –Security fix
Released on 2/5/2013
 EXT: WEC Discussion Forum - 44