DEPRECATION WARNING
This documentation is not using the current rendering mechanism and is probably outdated. The extension maintainer should switch to the new system. Details on how to use the rendering mechanism can be found here.
EXT: WEC Map
| Author: | Kasper Skårhøj |
|---|---|
| Created: | 2002-11-01T00:32:00 |
| Changed: | 2017-01-06T00:05:13.960000000 |
| Author: | Jan Bartels |
| Email: | j.bartels@arcor.de |
| Info 3: | |
| Info 4: |
EXT: WEC Map
Extension Key: wec_map
Copyright 2009-2010, Christian Technology Ministries International Inc. http://www.CTMIinc.org
Author: Web Empowered Church Team, < map@webempoweredchurch.org > (2009-2010)
Jan Bartels, <j.bartels@arcor.de> (2011-2015)
Support: http://forge.typo3.org/projects/extension-wec_map
This document is published under the Open Content License
available from http://www.opencontent.org/opl.shtml
The content of this document is related to TYPO3
- a GNU/GPL CMS/Framework available from www.typo3.com
((generated))
Table of Contents
`Introduction <#__RefHeading__12808_1279719766>`_ `3 <#__RefHeading__12808_1279719766>`_
`A. Welcome <#__RefHeading__12810_1279719766>`_ `3 <#__RefHeading__12810_1279719766>`_
What is the Web-Empowered Church? 3
`B. About this Manual <#__RefHeading__12814_1279719766>`_ `3 <#__RefHeading__12814_1279719766>`_
`C. How to Use this Manual <#__RefHeading__12816_1279719766>`_ `3 <#__RefHeading__12816_1279719766>`_
`Overview <#__RefHeading__12818_1279719766>`_ `4 <#__RefHeading__12818_1279719766>`_
`A. What does it do? <#__RefHeading__12820_1279719766>`_ `4 <#__RefHeading__12820_1279719766>`_
`B. Screenshots <#__RefHeading__12822_1279719766>`_ `4 <#__RefHeading__12822_1279719766>`_
`Installation <#__RefHeading__12824_1279719766>`_ `5 <#__RefHeading__12824_1279719766>`_
`Step 1: Import and Install the wec_map Extension <#__RefHeading__12826_1279719766>`_ `6 <#__RefHeading__12826_1279719766>`_
`Step 2: Add the WEC Map Static Templates <#__RefHeading__12828_1279719766>`_ `6 <#__RefHeading__12828_1279719766>`_
`Step 3: Add the WEC Map Plugin to a Page <#__RefHeading__12830_1279719766>`_ `8 <#__RefHeading__12830_1279719766>`_
`Upgrade Instructions <#__RefHeading__12832_1279719766>`_ `9 <#__RefHeading__12832_1279719766>`_
`Configuration <#__RefHeading__12846_1279719766>`_ `9 <#__RefHeading__12846_1279719766>`_
`Configuring the WEC Simple Map Plugin <#__RefHeading__12848_1279719766>`_ `9 <#__RefHeading__12848_1279719766>`_
`Configuring the WEC Frontend User Map Plugin <#__RefHeading__12850_1279719766>`_ `13 <#__RefHeading__12850_1279719766>`_
`Configuring the WEC Table Map Plugin <#__RefHeading__12852_1279719766>`_ `15 <#__RefHeading__12852_1279719766>`_
`Advanced Configuration with TypoScript <#__RefHeading__12854_1279719766>`_ `17 <#__RefHeading__12854_1279719766>`_
Simple Map TypoScript Reference 19
FE User Map TypoScript Reference 21
Table Map TypoScript Reference 23
`Customizing the info bubble <#__RefHeading__12862_1279719766>`_ `26 <#__RefHeading__12862_1279719766>`_
`Customizing a Table map <#__RefHeading__4984_1827206915>`_ `27 <#__RefHeading__4984_1827206915>`_
`Customizing a PDF-view <#__RefHeading__12864_1279719766>`_ `28 <#__RefHeading__12864_1279719766>`_
`Troubleshooting <#__RefHeading__12866_1279719766>`_ `29 <#__RefHeading__12866_1279719766>`_
`Administration <#__RefHeading__12868_1279719766>`_ `29 <#__RefHeading__12868_1279719766>`_
`Using the WEC Map API <#__RefHeading__12874_1279719766>`_ `32 <#__RefHeading__12874_1279719766>`_
`Create the Map Object <#__RefHeading__12876_1279719766>`_ `32 <#__RefHeading__12876_1279719766>`_
`Map Object Reference <#__RefHeading__12878_1279719766>`_ `32 <#__RefHeading__12878_1279719766>`_
`Marker Object Reference <#__RefHeading__12880_1279719766>`_ `33 <#__RefHeading__12880_1279719766>`_
`Create Markers <#__RefHeading__12882_1279719766>`_ `34 <#__RefHeading__12882_1279719766>`_
`Hooks <#__RefHeading__12888_1279719766>`_ `40 <#__RefHeading__12888_1279719766>`_
WEC Map API Center and Zoom Hook 41
`Drawing the Map <#__RefHeading__12894_1279719766>`_ `41 <#__RefHeading__12894_1279719766>`_
`Change Log <#__RefHeading__12896_1279719766>`_ `41 <#__RefHeading__12896_1279719766>`_
Introduction
A. Welcome
Welcome to the adventure of doing ministry through technology!
This manual is written for those who are interested in using Web- Empowered Church (WEC) technology and enhancing their website through the use of the WEC Map extension. The WEC Maps extension has been designed to provide churches and ministries an opportunity to display maps on their website...maps to the church, maps to events, even maps that show how many members live in the surrounding towns.
What is the Web-Empowered Church?
The Web-Empowered Church (WEC) is a ministry of Christian Technology Ministries International (www.CTMIinc.org). The mission of WEC is to innovatively apply WEB technology to EMPOWER the worldwide CHURCH for ministry.
WEC helps churches around the world expand evangelism, discipleship, and care through the innovative application of internet technology. WEC web-based tools and training will help make church ministries more efficient and effective, and will extend ministry impact to a world in need of Jesus ( www.webempoweredchurch.org/Jesus ). We want to fuel a worldwide movement using the internet to point the world to Jesus Christ, to grow disciples, and to care for those in need. Our desire is to use the web to empower the Church to become a truly twenty-four hours a day, seven days a week ministry that is not constrained by walls or distance or time.
If you would like to find out more about WEC or our tools, or support us in any way, please go to our websites:
for users: www.webempoweredchurch.com
for developers: www.webempoweredchurch.org .
B. About this Manual
This guide is organized into four main sections:
Overview: What the WEC Map extension does, how it works, and what you can expect from the rest of the manual.
Installation: How to install the WEC Map extension and how to get it running on your website.
Configuration: How to configure the WEC Map extension and plugins for maximum impact on your website.
Advanced: How to modify the extension through TypoScript and other advanced functions.
Please note: not all screenshots have been updated yet.
C. How to Use this Manual
✔ To help make sense of the material on the following pages, we’ve used a few icons in the margin to highlight certain information.
T |img-1| ip : Tips are bits of information that are good to know. They may offer shortcuts to save you time or even make your website better.
N |img-2| ote : These notes are similar to tips, but usually contain information you should pay attention to. It might be details about a step that a whole operation hinges on or it may highlight an essential sequence of tasks.
C |img-3| aution : These notes draw your attention to things that can interrupt your service or website if not done correctly. Some actions can be difficult to undo.
T |img-4| echnical Stuff : These notes will explain how stuff works. If you want to know why certain steps are necessary or are just looking for a fuller explanation, these notes should help answer your questions.
I |img-5| nternet Link : These links will guide you to a website page that will demonstrate How-To do something or link you to more advanced information on the http://webempoweredchurch.com or http://typo3.org websites.
Overview
A. What does it do?
The Web-Empowered Church Map Extension provides an interface for placing maps from Google on a TYPO3-based website. There are two actual plugins provided with the WEC Map extension.
The Simple Map Plugin allows you to show a single address, such as your church address, on a Google map. See Illustration 1. However, by adding TypoScript to configure the WEC Map extension, you can add multiple addresses and multiple markers (see Marker Manager ).
The Frontend Users Map Plugin allows you to show multiple locations on a map. These locations are drawn from a list of Frontend Users and can be limited to a particular Frontend Users Group. See Illustration 2. This provides you with the opportunity to map the location of off-site small groups, multiple site campuses, or even member addresses. A security option is available so that names and addresses can be hidden if desired. When the security option is enabled, only the city, state, and country for each user is located on the map to hide the specific locations of Frontend User addresses.
B. Screenshots
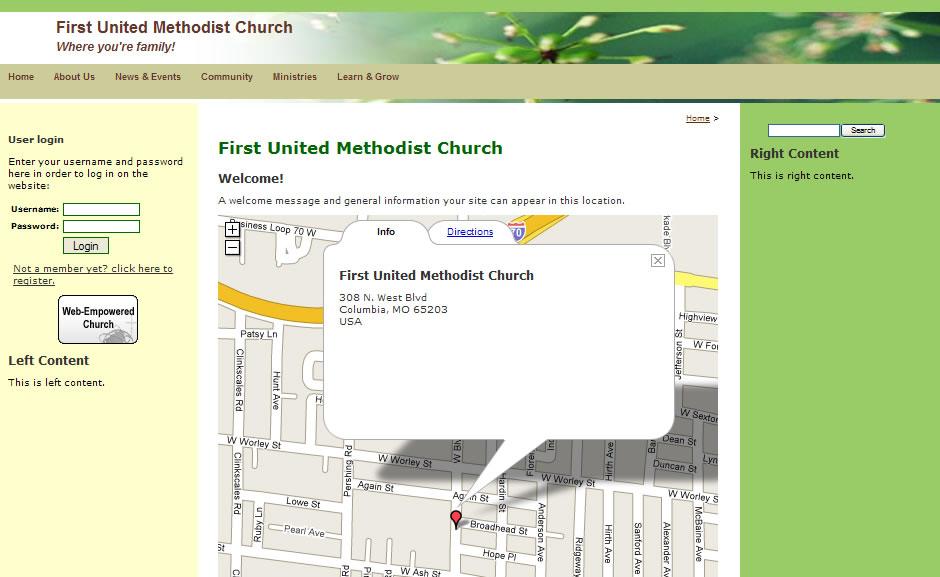 Illustration 1: Simple Map
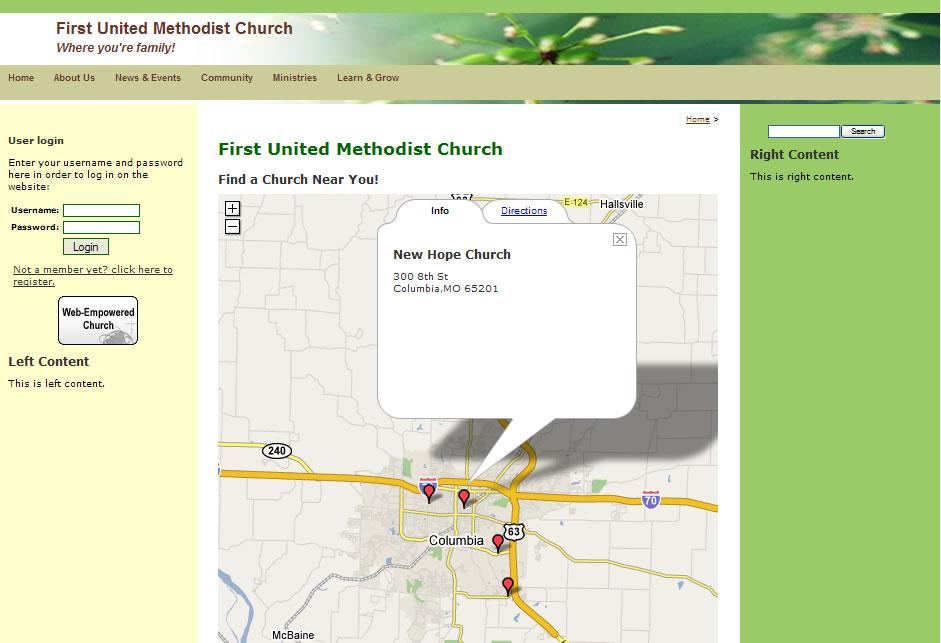 Illustration 2: Frontend Users Map
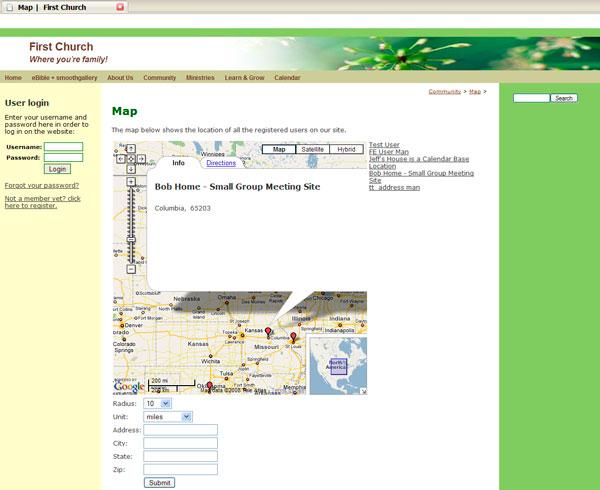 Illustration 3: Table Map
Installation
There are four steps necessary to install the WEC Map extension and plugin onto your website. These steps include:
Importing and installing the WEC Map extension.
Adding the WEC Map Static Templates to your page template.
Adding the WEC Map plugin to a web page.
Step 1: Import and Install the wec_map Extension
To import and install the WEC Map extension, you must be logged in to your website's TYPO3 Backend and have administrative privileges.
Full instructions for uploading and installing extensions can be found in the How-To located on the Web-Empowered Church website: http://webempoweredchurch.com/support/howtos/ . (Use wec_map in your repository search).
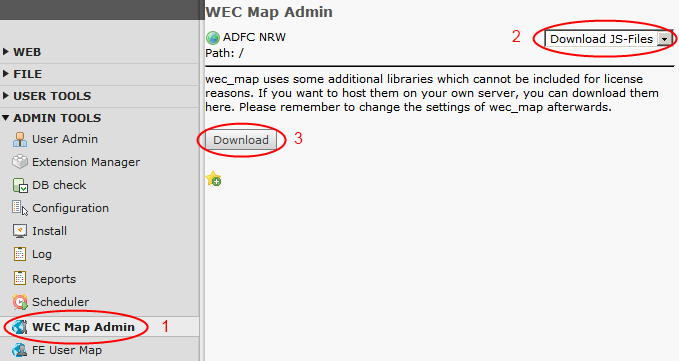 wec_map uses additional JavaScript-libraries that cannot
be included because of license reasons. If you want to host these
files on your own server, you can download them optionally. Go to the
WEC Map Admin -module, select “Download JS-Files” and click on
“Download”.
wec_map uses additional JavaScript-libraries that cannot
be included because of license reasons. If you want to host these
files on your own server, you can download them optionally. Go to the
WEC Map Admin -module, select “Download JS-Files” and click on
“Download”.
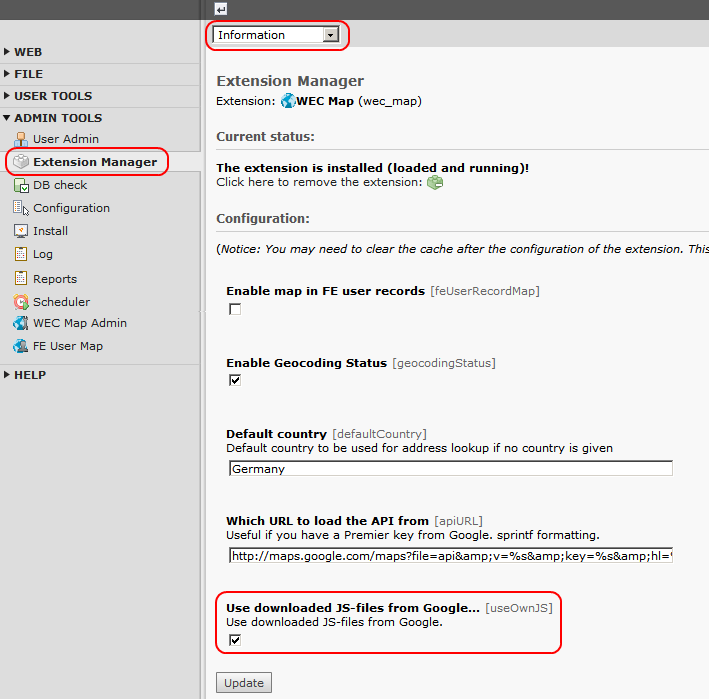 Go to the Extension Manager, select wec_map . Activate
“Use downloaded JS-files from Google...”.
Go to the Extension Manager, select wec_map . Activate
“Use downloaded JS-files from Google...”.
If you don't use this option, the files are includes from their original source.
Step 2: Add the WEC Map Static Templates
I
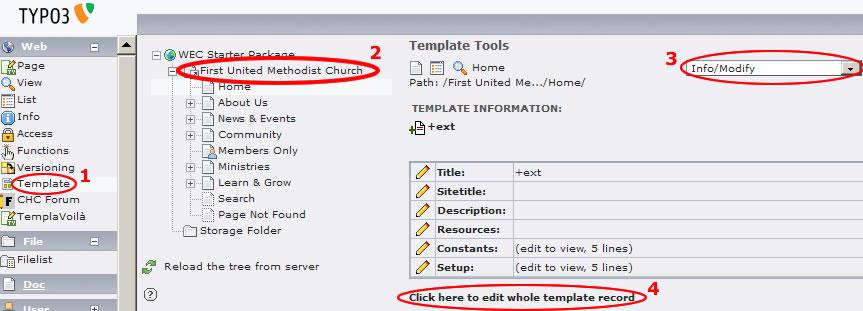 Illustration 4: Adding the WEC Map Static Template 1
n order for the WEC Map extension to display, the WEC Map Static Template should be added to the page template where the Map extension is installed. For most websites, this will mean adding the Static Template to the Root Page; however, if you have created a unique page template for the map page, you may need to add the Static Template there instead. Refer to Illustration 8. Using the Template Module ( 1 ), click on the page where the page template is located--typically, the Root page ( 2 ). In the far right drop-down box, select Info/Modify ( 3 ). Click the Click here to edit the whole template record link ( 4 ).
R
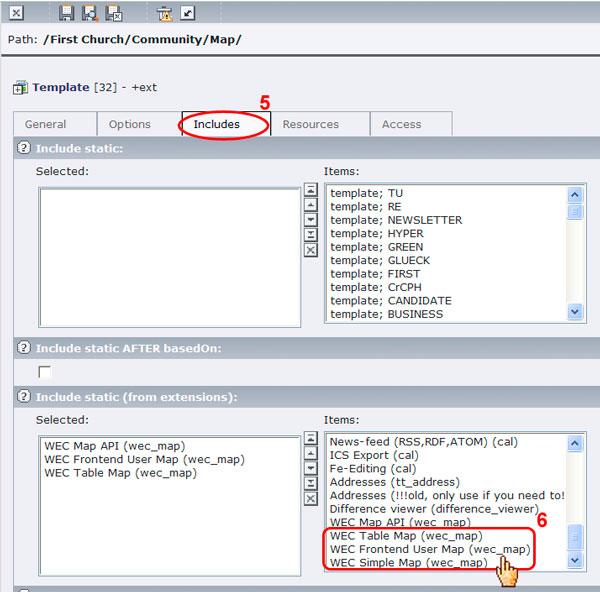 Illustration 5: Choose the Static Template/s
efer to Illustration 9. Click on the Includes tab ( 5 ). In the Include Static field, scroll down the Items list and select any or all of the Map's Static Templates: WEC Table Map, WEC Frontend User Map, and/or WEC Simple Map ( 6 ) depending on the plugin(s) you intend to use. Save and close the form.
Step 3: Add the WEC Map Plugin to a Page
The WEC Map extension can be added to any page as a standard Content Element . However, at this time there can only be one instance of the Map plugin on any single page. If you need to show multiple maps we suggest adding additional pages with one map per page.
To add the WEC Map plugin to a page:
Refer to Illustration 10. Using the Page Module ( 1 ), select the page from the page tree where you'd like to place the map (
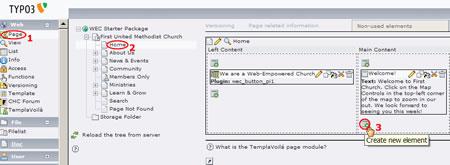 Illustration 6: Adding the WEC Map Plugin to a Page
2 ). Add a Content Element in the Content Container of your choice (
3 ).
Tip: You can add the WEC Map plugin, or any Content Element to a
Content Container by selecting the Create New Element icon These icons
will appear wherever you are allowed to add content such as images,
text, or additional plugins. 

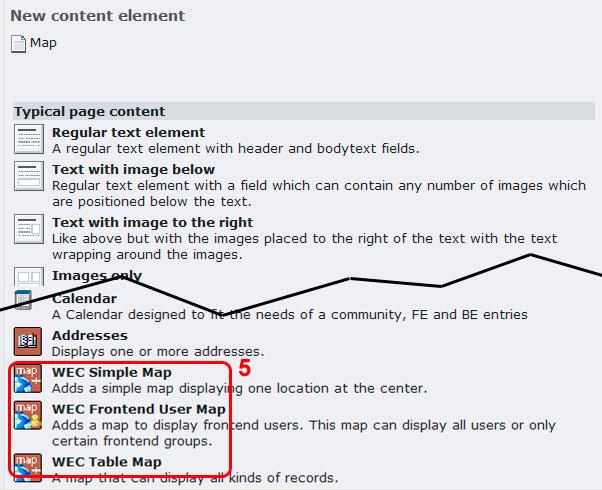 Illustration 7: Selecting the WEC Map Plugin
Refer to Illustration 11. Scroll down the content form and select which of the three WEC Map plugins you'd like to use ( 4 ).
This will complete the installation of the WEC Map plugin on your page. The WEC Map FlexForm that will appear corresponds to either the WEC Simple Map Configuration or the WEC Frontend User Map Configuration .
Upgrade Instructions
wec_map V3 supports the Google Maps API V3 that differs in many details from the API V2. wec_map tries to hide these changes as much as possible. Most TypoScript, PHP- and JavaScript-code of other extensions like cal is running without any changes.
Nevertheless, if you are upgrading wec_map from V2.x to V3.x you have to follow some additional steps:
Optionally download additional JavaScript libraries using the WEC Map Admin-module.
Check constants in the extension manager.
Exclude JavaScript-Files from being compressed if you are using a script-compressor.
Test wec_map.
Configuration
Once you've installed one of the plugins on your page, you will need to configure the plugin so that it will display the map of your choice. Skip to the instructions that correspond to the WEC Map plugin installed on your page.
Configuring the WEC Simple Map Plugin
The WEC Simple Map plugin is used to display a single location on the map such as your church or ministry address. To configure the plugin, use the Page Module and select the page where you've installed the plugin. Then click the Edit Icon (the pencil) associated with the WEC Simple Map plugin. This will open the plugin's FlexForm.
T |img-1| ip: When working with a plugin, the General Tab contains a number of generic fields. it is generally helpful to write the plugin's name or some other descriptive title in the Header field ( 1 ). This makes it easier to select which plugin you want to edit when a page contains multiple Plugin Content Elements . To prevent the header from displaying on the page, change the Header Type to Hidden ( 2 ).
Refer to Illustration 12. Note that there are three Tabs in the Flexform. The first tab, labeled Address prompts you for a description of the address to be mapped, as well as the address
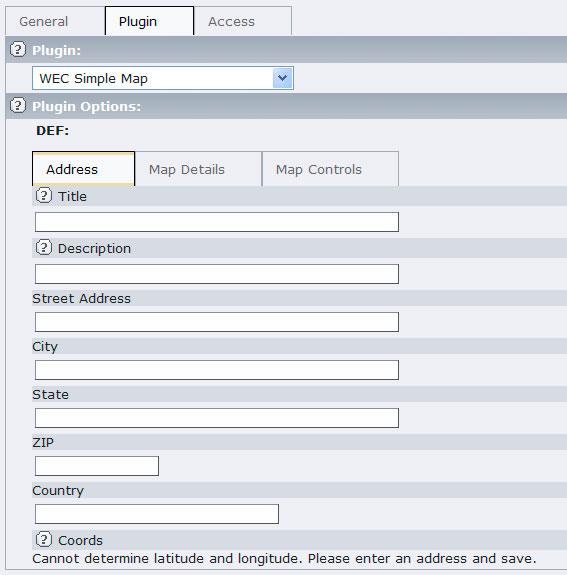 Illustration 8: Configuring the Plugin's General Tab
itself. It will also show the status of finding the coordinates for the address entered (geocoding) at the end.
R
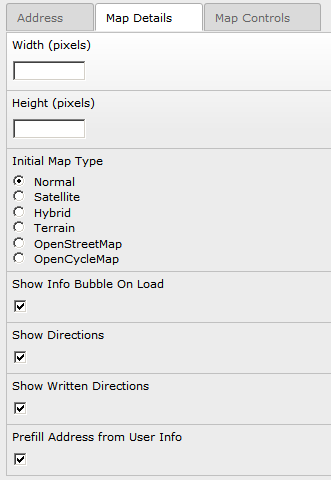 Illustration 9: The Simple Map Display Tab
efer to Illustration 13. The second tab, labeled “Map Details,” requests display information about the map, such as the height and width.One of the enhanced features of the Map extension is that if you enable the Show Directions Tab , Frontend users will have the option to be given directions to and from the location shown on the map. In addition, if they are a registered Frontend user and have logged in, if you have enabled the Prefill Address from User Info , their address will be automatically applied to the directions fields and the user can immediately click for Directions To or From the mapped location.
Caution: In order for the marker balloon information to be
visible, avoid setting the height value at less than 400 pixels.

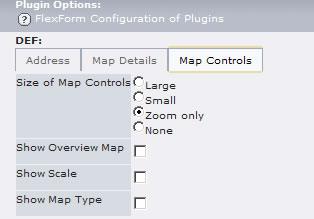 Illustration 10: The Simple Map Controls Tab
Refer to Illustration 14. The third tab, labeled “Map Controls,” allows you to specify which map controls should be shown on the map. Options include the size of the map controls (pan and zoom) if any, whether an overview map is desired, whether a scale should be included, and the map type selection control (satellite, political, or a hybrid of the two). See Illustration 15 for a visual description of these controls.
After saving this form and viewing its
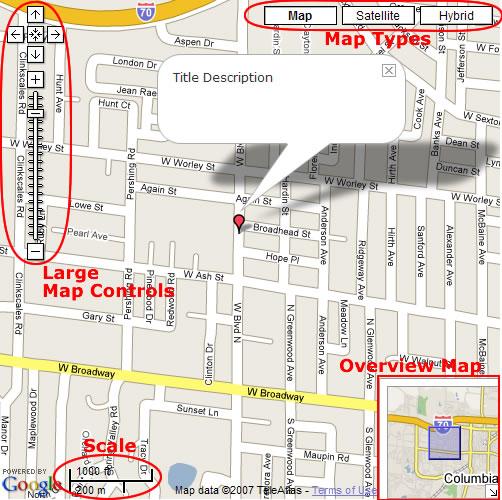 Illustration 11: Map Controls
page in the Frontend, a map will be generated similar to Illustration 1 , depending on the Map Controls you have chosen to display. Configuring the WEC Frontend User Map Plugin --------------------------------------------
The WEC Frontend User Map plugin is used to display a map of all users or all users belonging to one or more Frontend Users Groups. To open the plugin, use the Page Module and select the page where you've installed the plugin. Then click the Edit Icon (the pencil) associated with the WEC Frontend User Map plugin. This will open the plugin's FlexForm.
T |img-1| ip: When working with a plugin, it is generally helpful to write the plugin's name or a descriptive title in the Header field (under the General tab). This makes it easier to select which plugin you want to edit when a page contains multiple Plugin Content Elements . To prevent the header from displaying on the page, change the Header Type to Hidden .
Refer to Illustration 16.
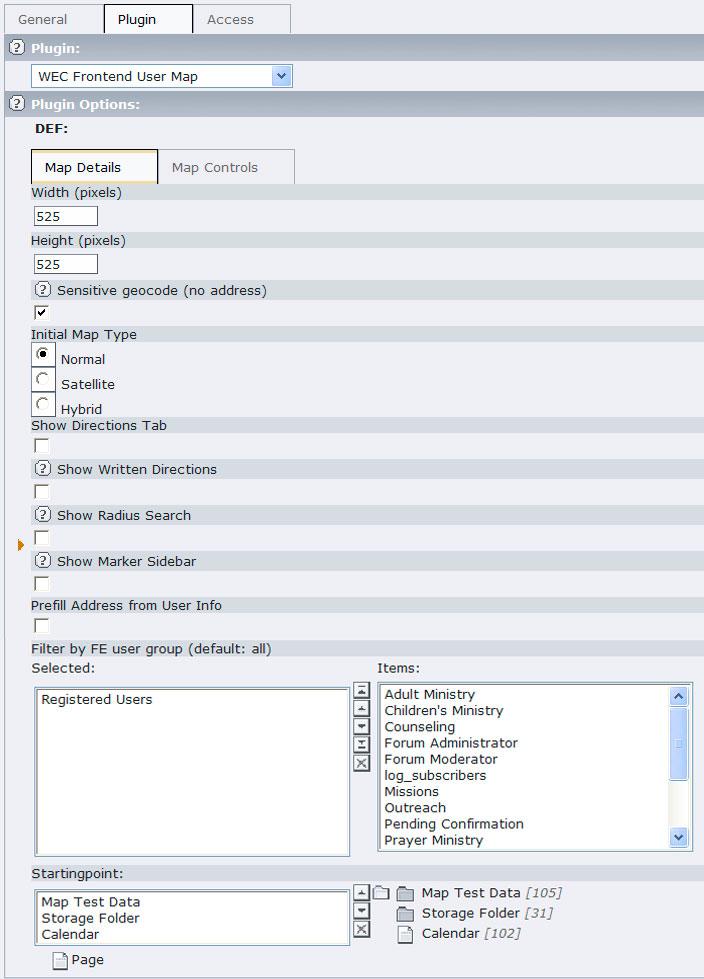 Illustration 12: The Frontend User Map Details Tab
Note that there are two tabs The first tab, labeled “Map Details” prompts you for the following:
Width and Height: The default size of the Frontend map is 500px by 500px. You can change the map size to suit the look and feel of your website here. In order for the marker balloon information to be visible in the Frontend, avoid setting the height value below 400 pixels.
S
|img-21| **Illustration 13: Frontend Users Map With and Without Sensitive Geocoding**
ensitive geocode (no address): Checking this box prevents the map markers from displaying at the precise location of the user address and hides the detailed address information. Instead, Frontend users are shown by city, state, and country; and multiple users in the same city are totaled. (See Illustration 17 for examples of each.)
Initial Map Type: Specifies which map type to show initially. “Normal” will show the street map (default), Satellite will show satellite images, and Hybrid will show satellite images with streets overlayed.
Show Written Directions: Displays an addition tab in the marker popup with two forms to get direction from or to the current location via maps.google.com. Directions are disabled if “Sensitive geocode” is enabled above, no matter the setting here.
Show Radius Search: Displays a Search form that, when completed, will display all markers within a specified radius (10–250 miles) of a user-supplied address. The appropriate markers are listed in the sidebar. When clicked in the list, they open the marker.
Show Marker Sidebar: Displays the usernames as links to the markers of those in the FE user groups that you've selected.
Prefill Address from User Info: If directions are enabled, this will automatically fill in a logged in FE user's address information into the directions form.
Filter by FE user group: This is the key component to the Frontend Users Map plugin. Select the Frontend User Group(s) you would like to include on your map. You may create custom Users and User Groups as necessary to display the locations of a multi-site campus, locations of local churches, small groups, etc. (For information on how to add Frontend Users, see www.webempoweredchurch.com/support/howtos/ ).
Startingpoint: Select the pages/folders where FE user groups are stored. Typically, this would be the site's main Storage Folder, but you choose different or additional folders as desired.
Map Controls Tab. R
 Illustration 14: Frontend User Map Controls Tab
efer to Illustration 18. The third tab, labeled “Map Controls,” allows you to specify which map controls should be shown on the map. Options include the size of the map controls (pan and zoom) if any, whether an overview map is desired, whether a scale should be included, and the map type selection control (satellite, political, or a hybrid of the two). See Illustration 15 for a visual description of these controls.
After saving this form and viewing its page in the Frontend, a map will be generated in a similar to Illustration 2, depending on the Map Controls you have chosen to display.
Configuring the WEC Table Map Plugin
The WEC Table Map plugin is used to display a map of all users or all users or locations associated with specified tables such as the Calendar Base locations table, etc. To open the plugin, use the Page Module and select the page where you've installed the plugin. Then click the Edit Icon (the pencil) associated with the WEC Table map plugin. This will open the plugin's FlexForm.
Tip: When wo rking with a plugin, it is generally helpful
to write the plugin's name or a descriptive title in the Header
field (under the General tab). This makes it easier to select
which plugin you want to edit when a page contains multiple Plugin
Content Elements . To prevent the header from displaying on the
page, change the Header Type to Hidden .
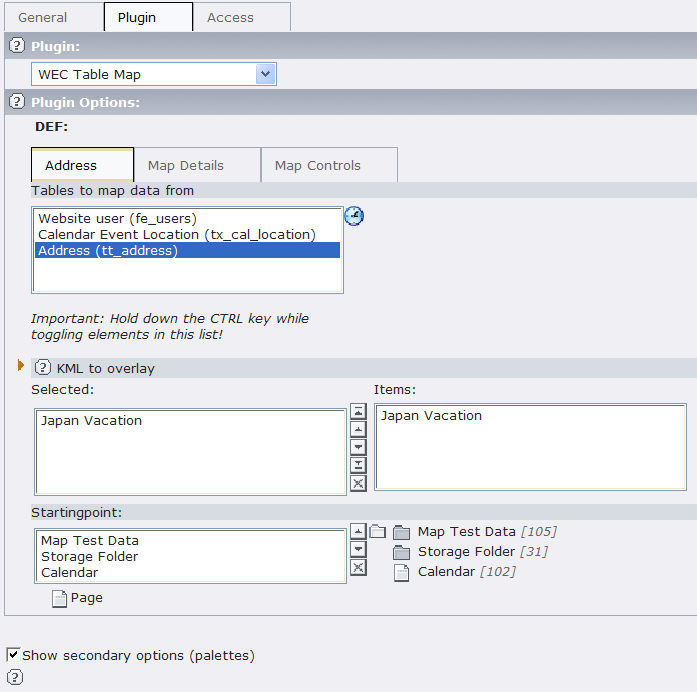 Illustration 15: Configuring the Table Map's Address Tab
Refer to Illustration 19. Note that there are three tabs The first tab, labeled “Address” prompts you for the following:
- Tables to map data from: The items in this list are auto-generated from any extension that has the WEC Map extension enabled. Click on a table to highlight (select) it. Hold down the Control (Mac=Apple) key to make multiple table selections.
- KML to overlay: You can include KML files to customize markers. For an introduction to KML files, see Google's tutorial at http://code.google.com/apis/kml/documentation/kml_tut.html . Add your own KML files by uploading them using the Filelist module and then adding a WEC Map External Resource record to the Map page or a Storage Folder page using the List module and pointing the resource to the uploaded KML's url (fileadmin/images/myKMLfile.kml).
- Startingpoint: Select pages that contain the tables you want mapped by clicking on the file folder icon. For instance, if you want your calendar's location table to be included, select the page that contains the calendar's location records.
- Recursive: Select how many subpage-leves you want mapped.
Se
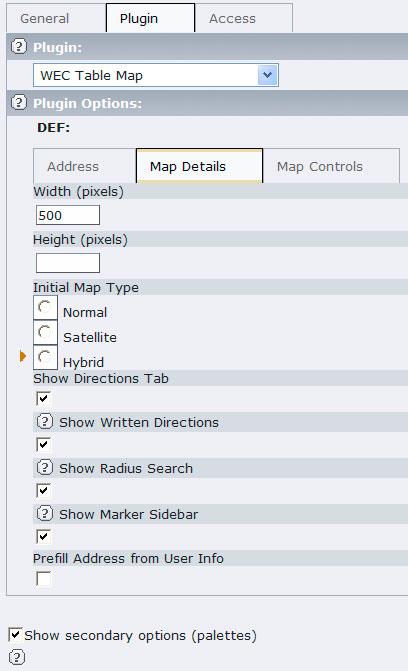 Illustration 16: Configuring the Table Map Details Tab
e Illustration 20.
Width and Height: The default size of the Frontend map is 500px by 500px. You can change the map size to suit the look and feel of your website here. In order for the marker balloon information to be visible in the Frontend, avoid setting the height value below 400 pixels.
- Initial Map Type: Specifies which map type to show initially. “Normal” will show the street map (default), Satellite will show satellite images, and Hybrid will show satellite images with streets overlayed.
- Show Written Directions: Displays an addition tab in the marker popup with two forms to get direction from or to the current location via maps.google.com. Directions are disabled if “Sensitive geocode” is enabled above, no matter the setting here.
- Show Radius Search: Displays a Search form that, when completed, will display all markers within a specified radius (10–250 miles) of a user-supplied address.
- Show Marker Sidebar: Displays the usernames as links to the markers of those in the FE user groups that you've selected.
- Prefill Address from User Info: If directions are enabled, this will automatically fill in a logged in FE user's address information into the directions form.
Map Controls Tab. Refer to Illustration 18. The third tab, labeled “Map Controls,” allows you to specify which map controls should be shown on the map. Options include the size of the map controls (pan and zoom) if any, whether an overview map is desired, whether a scale should be included, and the map type selection control (satellite, political, or a hybrid of the two). See Illustration 15 for a visual description of these controls.
After saving this form and viewing its page in the Frontend, a map will be generated in a similar to Illustration 3, depending on the Map Controls you have chosen to display.
Advanced Configuration with TypoScript
The WEC Map extension can be configured using standard TypoScript and FlexForms. Example TypoScript is provided below for both plugins . Note that for the WEC Simple Map, which is referred to as “tx_wecmap_pi1” in the TypoScript, you can either specify the address in parts or as one string. By using TypoScript to configure this plugin you can also set more than one marker to appear on the map. The WEC Frontend User Map extension is referred to as “tx_wecmap_pi2.”
plugin.tx_wecmap_pi1 {
        height = 500
        width = 500
        showDirections = 1
        prefillAddress = 0
        initialMapType = G_SATELLITE_MAP
        controls.mapControlSize = small
        controls.showOverviewMap = 1
        controls.showMapType = 1
        controls.showScale = 1
        markers.1 {
                                title = TS title
                                description = TS desc
                                street = 1234 Happy Place
                                city = Happy City
                                zip = 12345
                                state = HS
                                country = Happy Country
        }
        markers.2 {
                title = Another title
                description = Another description
                address = 1234 Another Happy Ave, Happy City, HS 12347, Happy Country
        }
        markers.3 {
                #add another marker here
        }
}

plugin.tx_wecmap_pi2 {
        height = 500
        width = 500
        showDirections = 1
        prefillAddress = 0
        initialMapType = G_HYBRID_MAP
        controls.mapControlSize = large
        controls.showOverviewMap = 1
        controls.showMapType = 1
        controls.showScale = 1
        userGroups = 2,3,5
        pid = 2,3,5
}
Simple Map TypoScript Reference
height
Property
height
Data Type
integer
/stdWrap
Description
The height of the map in pixels. Avoid values of less than 400.
Default
500
width
Property
width
Data Type
integer
/stdWrap
Description
The width of the map in pixels
Default
500
showDirections
Property
showDirections
Data Type
boolean
/stdWrap
Description
Toggle whether a directions tab should be shown for map markers. If set to 1, the user can get directions from and to the current marker via maps.google.com directions.
Default
0
prefillAddress
Property
prefillAddress
Data Type
boolean
/stdWrap
Description
If enabled and a FE user is currently logged in, his or her address will automatically be filled into the directions form.
Default
0
initialMapType
Property
initialMapType
Data Type
String
/stdWrap
Description
Specifies whether to show the street map, satellite images, or hybrid view initially. Possible values are the constants defined by Google: G_NORMAL_MAP for the normal street map, G_SATELLITE_MAP for Google Earth satellite images, G_HYBRID_MAP for the hybrid view, G_OSM_MAP for the OpenStreetMap view, and G_OCM_MAP for the OpenCycleMap view.
Default
controls.mapControlSize
Property
controls.mapControlSize
Data Type
String
/stdWrap
Description
Defines the map controls in the top left corner of the map. Possible values are “small”, “large”, or “zoomonly.” “Small” will only show the pan controls with a + and – zoom, “large” will show the pan controls with a zoom scale, and “zoomonly” will only show + and – zoom buttons.
Default
controls.showOverviewMap
Property
controls.showOverviewMap
Data Type
boolean
/stdWrap
Description
Toggles the little mini map in the bottom right corner
Default
0
controls.showMapType
Property
controls.showMapType
Data Type
boolean
/stdWrap
Description
Toggles the map type selectors (Map, Satellite and Hybrid) in the top right corner.
Default
0
controls.showScale
Property
controls.showScale
Data Type
boolean
/stdWrap
Description
Toggles the scale shown in the bottom left.
Default
0
controls.showGoogleEarth
Property
controls.showGoogleEarth
Data Type
boolean
/stdWrap
Description
Toggle the Google Earth map type button. Requires special browser plugin.
Default
0
markers.*.title
Property
markers.*.title
Data Type
String
/cObj
Description
Sets the title for a marker. * is a number starting at 1, which makes it possible to define as many markers as desired.
Default
markers.*.description
Property
markers.*.description
Data Type
String
/cObj
Description
Sets the description for the marker.
Default
markers.*.street
Property
markers.*.street
Data Type
String
/stdWrap
Description
The street name for the marker, i.e. 1234 Happy Lane
Default
markers.*.zip
Property
markers.*.zip
Data Type
String
/stdWrap
Description
The ZIP code for the marker, i.e. 43234
Default
markers.*.city
Property
markers.*.city
Data Type
String
/stdWrap
Description
The city for the marker, i.e. Some City
Default
markers.*.state
Property
markers.*.state
Data Type
String
/stdWrap
Description
The state for the marker, i.e. Montana
Default
markers.*.country
Property
markers.*.country
Data Type
String
/stdWrap
Description
The country for the markers, i.e. USA
Default
markers.*.address
Property
markers.*.address
Data Type
String
/stdWrap
Description
A whole address string. This canbe used instead of the above 5 properties to define the address in one single string, i.e. 1234 Happy Lane, Some City, Montana 43234, USA
Default
markers.*.long
Property
markers.*.long
Data Type
float
/stdWrap
Description
Specify longitude of the marker.
This and the next property can be used instead of “address” above or the fine grained options further up.
Default
markers.*.lat
Property
markers.*.lat
Data Type
float
/stdWrap
Description
Specify latitude of the marker.
Default
markers.*.iconID
Property
markers.*.iconID
Data Type
string
/stdWrap
Description
Use the icon with the given id on this marker. This must be the same iconID that was specified for the icon.
Default
zoomLevel
Property
zoomLevel
Data Type
int
/stdWrap
Description
Sets the initial zoom level for the map. Values range from 0 (zoomed out all the way) to 17 (zoomed in all the way)
Default
maxAutoZoom
Property
maxAutoZoom
Data Type
int
/stdWrap
Description
Sets the max auto zoom level
Default
enableOverlappingMarkerManager
Property
enableOverlappingMarkerManager
Data Type
boolean
/stdWrap
Description
Enables a spiderfier if there are overlapping markers
Default
overlappingMarkerLatDev
Property
overlappingMarkerLatDev
Data Type
float
/stdWrap
Description
Overlapping markers are moved vertically by this amount
Default
0
overlappingMarkerLongDev
Property
overlappingMarkerLongDev
Data Type
float
/stdWrap
Description
Overlapping markers are moved horizontally by this amount
Default
0
icons.*.iconID
Property
icons.*.iconID
Data Type
String
/stdWrap
Description
Unique id of the icon. Can be any unique, arbitrary string
Default
icons.*.imagepath
Property
icons.*.imagepath
Data Type
String
/stdWrap
Description
path to the marker image, relative to the TYPO3 root
Default
icons.*.shadowpath
Property
icons.*.shadowpath
Data Type
String
/stdWrap
Description
path to the shadow image, relative to the TYPO3 root
Default
icons.*.width
Property
icons.*.width
Data Type
int
/stdWrap
Description
icon width in pixels
Default
icons.*.height
Property
icons.*.height
Data Type
int
/stdWrap
Description
icon height in pixels
Default
icons.*.shadowWidth
Property
icons.*.shadowWidth
Data Type
int
/stdWrap
Description
shadow width in pixels
Default
icons.*.shadowHeight
Property
icons.*.shadowHeight
Data Type
int
/stdWrap
Description
shadow height in pixels
Default
icons.*.anchorX
Property
icons.*.anchorX
Data Type
int
/stdWrap
Description
The pixel coordinate relative to the top left corner of the icon image at which this icon is anchored to the map.
Default
icons.*.anchorY
Property
icons.*.anchorY
Data Type
int
/stdWrap
Description
The pixel coordinate relative to the top left corner of the icon image at which this icon is anchored to the map.
Default
icons.*.infoAnchorX
Property
icons.*.infoAnchorX
Data Type
int
/stdWrap
Description
The pixel coordinate relative to the top left corner of the icon image at which the info window is anchored to this icon.
Default
icons.*.infoAnchorY
Property
icons.*.infoAnchorY
Data Type
int
/stdWrap
Description
The pixel coordinate relative to the top left corner of the icon image at which the info window is anchored to this icon.
Default
centerLat
Property
centerLat
Data Type
float
/stdWrap
Description
Set the latitude for the initial center of the map
Default
centerLong
Property
centerLong
Data Type
float
/stdWrap
Description
Set the longitude for the initial center of the map
Default
mapName
Property
mapName
Data Type
String
/stdWrap
Description
Identifies the map uniquely on a page by setting it as the id of the div containing the map. It's also appended to all the javascript variables and functions so as not to conflict with more than one map on a page. Only necessary in special cases, usually the defaults work well enough.
Default
mapXXX, where XXX is the content element's uid or, if not available, a random number.
marker.title
Property
marker.title
Data Type
cObj
Description
cObj for the title of the marker bubble
Default
COA
marker.description
Property
marker.description
Data Type
cObj
Description
cObj for the description of the marker
Default
COA
marker.address
Property
marker.address
Data Type
cObj
Description
cObj for the address formatting in the marker bubble
Default
COA
marker.iconID
Property
marker.iconID
Data Type
String
/stdWrap
Description
Name of the icon defined in icons.*
Default
showSidebar
Property
showSidebar
Data Type
boolean
/stdWrap
Description
Turns the marker sidebar on or off
Default
0
static.enabled
Property
static.enabled
Data Type
boolean
/stdWrap
Description
Enables static maps with the options below at their default
Default
0
static.mode
Property
static.mode
Data Type
String
/stdWrap
Description
Either “automatic” or “force”. Automatic will show the normal map with JS enabled and a static map without JS. Force will always show the static map even if JS is available.
Default
automatic
static.extent
Property
static.extent
Data Type
String
/stdWrap
Description
Either “all” or “each”. All will show all markers that would be visible on the JS map on the static map. Each will show a separate map for each marker found, centered and zoomed on that one marker. Be careful to adjust the limit (see below) for maps that have a large amount of markers.
Default
all
static.urlParam
Property
static.urlParam
Data Type
boolean
/stdWrap
Description
Enables listening for the URL parameter &tx_wecmap_api[static]=1 to show the static map if in automatic mode and JS is available, but not desired by the user.
Default
0
static.limit
Property
static.limit
Data Type
int
/stdWrap
Description
The limit for the # or markers or single maps. If extent is “all”, the limit is 50 and set by Google. A smaller number can be chosen. If the extent is “each”, there is no upper limit. Default is 50 as well.
Default
50
[tsref:plugin.tx_wecmap_pi1]
FE User Map TypoScript Reference
height
Property
height
Data Type
integer
/stdWrap
Description
The height of the map in pixels
Default
500
width
Property
width
Data Type
integer
/stdWrap
Description
The width of the map in pixels
Default
500
showDirections
Property
showDirections
Data Type
boolean
/stdWrap
Description
Toggle whether a directions tab should be shown for map markers. If set to 1, the user can get directions from and to the current marker via maps.google.com directions.
Default
0
prefillAddress
Property
prefillAddress
Data Type
boolean
/stdWrap
Description
If enabled and a FE user is currently logged in, his or her address will automatically be filled into the directions form.
Default
0
controls.mapControlSize
Property
controls.mapControlSize
Data Type
String
/stdWrap
Description
Defines the map controls in the top left corner of the map. Possible values are “small”, “large”, or “zoomonly.” “Small” will only show the pan controls with a + and – zoom, “large” will show the pan controls with a zoom scale, and “zoomonly” will only show + and – zoom buttons.
Default
controls.showOverviewMap
Property
controls.showOverviewMap
Data Type
boolean
/stdWrap
Description
Toggles the little mini map in the bottom right corner
Default
0
controls.showMapType
Property
controls.showMapType
Data Type
boolean
/stdWrap
Description
Toggles the map type selectors (Map, Satellite and Hybrid) in the top right corner.
Default
0
controls.showScale
Property
controls.showScale
Data Type
boolean
/stdWrap
Description
Toggles the scale shown in the bottom left.
Default
0
controls.showGoogleEarth
Property
controls.showGoogleEarth
Data Type
boolean
/stdWrap
Description
Toggle the Google Earth map type button. Requires special browser plugin.
Default
0
userGroups
Property
userGroups
Data Type
integer list
/stdWrap
Description
A comma separated list of FE user group ids. If you would like to restrict the markers shown to users from certain FE user groups, add their ids here. I.e., to only show users from FE user groups with ids 3 and 4, enter “3,4.”
Default
pid
Property
pid
Data Type
integer list
/stdWrap
Description
A comma separated list of storage folder ids. If you would like to restrict the markers shown to users from only certain storage folders, add their ids here. I.e., to only show users from storage folders with pids 5 and 8, enter “5,8.”
Default
zoomLevel
Property
zoomLevel
Data Type
int
/stdWrap
Description
Sets the initial zoom level for the map. Values range from 0 (zoomed out all the way) to 17 (zoomed in all the way)
Default
maxAutoZoom
Property
maxAutoZoom
Data Type
int
/stdWrap
Description
Sets the max auto zoom level
Default
enableOverlappingMarkerManager
Property
enableOverlappingMarkerManager
Data Type
boolean
/stdWrap
Description
Enables a spiderfier if there are overlapping markers
Default
overlappingMarkerLatDev
Property
overlappingMarkerLatDev
Data Type
float
/stdWrap
Description
Overlapping markers are moved vertically by this amount
Default
0
overlappingMarkerLongDev
Property
overlappingMarkerLongDev
Data Type
float
/stdWrap
Description
Overlapping markers are moved horizontally by this amount
Default
0
centerLat
Property
centerLat
Data Type
float
/stdWrap
Description
Set the latitude for the initial center of the map
Default
centerLong
Property
centerLong
Data Type
float
/stdWrap
Description
Set the longitude for the initial center of the map
Default
mapName
Property
mapName
Data Type
String
/stdWrap
Description
Identifies the map uniquely on a page by setting it as the id of the div containing the map. It's also appended to all the javascript variables and functions so as not to conflict with more than one map on a page. Only necessary in special cases, usually the defaults work well enough.
Default
mapXXX, where XXX is the content element's uid or, if not available, a random number.
showRadiusSearch
Property
showRadiusSearch
Data Type
boolean
/stdWrap
Description
Toggles the display of the radius search form
Default
0
groups.*
Property
groups.*
Data Type
string
Description
possible groups are “country”, “city”, and “single”
Default
groups.*.zoom.min
Property
groups.*.zoom.min
Data Type
int
/stdWrap
Description
minimum zoom level for this group.
Default
groups.*.zoom.max
Property
groups.*.zoom.max
Data Type
int
/stdWrap
Description
maximum zoom level for this group
Default
groups.*.icon.iconID
Property
groups.*.icon.iconID
Data Type
String
/stdWrap
Description
Unique id of the icon. Can be any unique, arbitrary string
Default
groups.*.icon.imagepath
Property
groups.*.icon.imagepath
Data Type
String
/stdWrap
Description
path to the marker image, relative to the TYPO3 root
Default
groups.*.icon.shadowpath
Property
groups.*.icon.shadowpath
Data Type
String
/stdWrap
Description
path to the shadow image, relative to the TYPO3 root
Default
groups.*.icon.width
Property
groups.*.icon.width
Data Type
int
/stdWrap
Description
icon width in pixels
Default
groups.*.icon.height
Property
groups.*.icon.height
Data Type
int
/stdWrap
Description
icon height in pixels
Default
groups.*.icon.shadowwidth
Property
groups.*.icon.shadowwidth
Data Type
int
/stdWrap
Description
shadow width in pixels
Default
groups.*.icon.shadowheight
Property
groups.*.icon.shadowheight
Data Type
int
/stdWrap
Description
shadow height in pixels
Default
groups.*.icon.anchorX
Property
groups.*.icon.anchorX
Data Type
int
/stdWrap
Description
The pixel coordinate relative to the top left corner of the icon image at which this icon is anchored to the map.
Default
groups.*.icon.anchorY
Property
groups.*.icon.anchorY
Data Type
int
/stdWrap
Description
The pixel coordinate relative to the top left corner of the icon image at which this icon is anchored to the map.
Default
table.additionalWhere
Property
table.additionalWhere
Data Type
string /stdWrap
Description
An additional SQL WHERE clause that is appended by AND. Can be used to further define which records of the table are mapped.
Default
table.orderBy
Property
table.orderBy
Data Type
string /stdWrap
Description
An optional ORDERBY clause. This will be passed on verbatim to the query.
Default
table.limit
Property
table.limit
Data Type
string /stdWrap
Description
An optional LIMIT clause. This will be passed on verbatim to the query.
Default
marker.title
Property
marker.title
Data Type
cObj
Description
cObj for the title of the marker bubble
Default
TEXT
marker.description
Property
marker.description
Data Type
cObj
Description
cObj for the description of the marker
Default
COA
kml
Property
kml
Data Type
int
/stdWrap
Description
comma separated list of WEC Map External records, used to overlay any KML data onto the map
Default
static.enabled
Property
static.enabled
Data Type
boolean
/stdWrap
Description
Enables static maps with the options below at their default
Default
0
static.mode
Property
static.mode
Data Type
String
/stdWrap
Description
Either “automatic” or “force”. Automatic will show the normal map with JS enabled and a static map without JS. Force will always show the static map even if JS is available.
Default
automatic
static.extent
Property
static.extent
Data Type
String
/stdWrap
Description
Either “all” or “each”. All will show all markers that would be visible on the JS map on the static map. Each will show a separate map for each marker found, centered and zoomed on that one marker. Be careful to adjust the limit (see below) for maps that have a large amount of markers.
Default
all
static.urlParam
Property
static.urlParam
Data Type
boolean
/stdWrap
Description
Enables listening for the URL parameter &tx_wecmap_api[static]=1 to show the static map if in automatic mode and JS is available, but not desired by the user.
Default
0
static.limit
Property
static.limit
Data Type
int
/stdWrap
Description
The limit for the # or markers or single maps. If extent is “all”, the limit is 50 and set by Google. A smaller number can be chosen. If the extent is “each”, there is no upper limit. Default is 50 as well.
Default
50
[tsref:plugin.tx_wecmap_pi2]
Table Map TypoScript Reference
height
Property
height
Data Type
integer /stdWrap
Description
The height of the map in pixels
Default
500
width
Property
width
Data Type
integer
/stdWrap
Description
The width of the map in pixels
Default
500
showDirections
Property
showDirections
Data Type
boolean
/stdWrap
Description
Toggle whether a directions tab should be shown for map markers. If set to 1, the user can get directions from and to the current marker via maps.google.com directions.
Default
0
prefillAddress
Property
prefillAddress
Data Type
boolean
/stdWrap
Description
If enabled and a FE user is currently logged in, his or her address will automatically be filled into the directions form.
Default
0
controls.mapControlSize
Property
controls.mapControlSize
Data Type
String
/stdWrap
Description
Defines the map controls in the top left corner of the map. Possible values are “small”, “large”, or “zoomonly.” “Small” will only show the pan controls with a + and – zoom, “large” will show the pan controls with a zoom scale, and “zoomonly” will only show + and – zoom buttons.
Default
controls.showOverviewMap
Property
controls.showOverviewMap
Data Type
boolean
/stdWrap
Description
Toggles the little mini map in the bottom right corner
Default
0
controls.showMapType
Property
controls.showMapType
Data Type
boolean
/stdWrap
Description
Toggles the map type selectors (Map, Satellite and Hybrid) in the top right corner.
Default
0
controls.showScale
Property
controls.showScale
Data Type
boolean
/stdWrap
Description
Toggles the scale shown in the bottom left.
Default
0
controls.showGoogleEarth
Property
controls.showGoogleEarth
Data Type
boolean
/stdWrap
Description
Toggle the Google Earth map type button. Requires special browser plugin.
Default
0
pid
Property
pid
Data Type
integer list
/stdWrap
Description
A comma separated list of storage folder ids. If you would like to restrict the markers shown to users from only certain storage folders, add their ids here. I.e., to only show users from storage folders with pids 5 and 8, enter “5,8.”
Default
recursive
Property
recursive
Data Type
int
/stdWrap
Description
number of subpage -levels for storage folders
Default
0
zoomLevel
Property
zoomLevel
Data Type
int
/stdWrap
Description
Sets the initial zoom level for the map. Values range from 0 (zoomed out all the way) to 17 (zoomed in all the way)
Default
maxAutoZoom
Property
maxAutoZoom
Data Type
int
/stdWrap
Description
Sets the max auto zoom level
Default
enableOverlappingMarkerManager
Property
enableOverlappingMarkerManager
Data Type
boolean
/stdWrap
Description
Enables a spiderfier if there are overlapping markers
Default
overlappingMarkerLatDev
Property
overlappingMarkerLatDev
Data Type
float
/stdWrap
Description
Overlapping markers are moved vertically by this amount
Default
0
overlappingMarkerLongDev
Property
overlappingMarkerLongDev
Data Type
float
/stdWrap
Description
Overlapping markers are moved horizontally by this amount
Default
0
centerLat
Property
centerLat
Data Type
float
/stdWrap
Description
Set the latitude for the initial center of the map
Default
centerLong
Property
centerLong
Data Type
float
/stdWrap
Description
Set the longitude for the initial center of the map
Default
mapName
Property
mapName
Data Type
String
/stdWrap
Description
Identifies the map uniquely on a page by setting it as the id of the div containing the map. It's also appended to all the javascript variables and functions so as not to conflict with more than one map on a page. Only necessary in special cases, usually the defaults work well enough.
Default
mapXXX, where XXX is the content element's uid or, if not available, a random number.
showRadiusSearch
Property
showRadiusSearch
Data Type
boolean
/stdWrap
Description
Toggles the display of the radius search form
Default
0
tables.*
Property
tables.*
Data Type
int
Description
configuration of the tables whose records will be mapped. The * is a placeholder for any integer, similar to a COA, i.e. tables.10, tables.20, etc.
Default
tables.*.table
Property
tables.*.table
Data Type
String
/stdWrap
Description
The table name that records are taken from
Default
tables.*.select
Property
tables.*.select
Data Type
String
/stdWrap
Description
The SQL SELECT clause. This will be passed on verbatim to the query.
Default
tables.*.where
Property
tables.*.where
Data Type
String
/stdWrap
Description
A SQL WHERE clause. Can be used to further define which records of the table are mapped.
This field is passed through stdWrap so it can be modified with .wrap and other stdWrap properties.
Default
tables.*.join
Property
tables.*.join
Data Type
String
/stdWrap
Description
A optional JOIN clause that will be appended to the query, for mm relations. Needs to be complete, i.e. “INNER JOIN some_table”. Example for tt_address: “JOIN tt_address_group_mm ON tt_address_group_mm.uid_local = tt_address.uid AND tt_address_group_mm.uid_foreign = 2”
Default
tables.*.orderBy
Property
tables.*.orderBy
Data Type
String
/stdWrap
Description
An optional ORDERBY clause. This will be passed on verbatim to the query.
Default
tables.*.groupBy
Property
tables.*.groupBy
Data Type
String
/stdWrap
Description
An optional GROUPBY clause. This will be passed on verbatim to the query.
Default
tables.*.limit
Property
tables.*.limit
Data Type
String
/stdWrap
Description
An optional LIMIT clause. This will be passed on verbatim to the query.
Default
tables.*.icon.iconID
Property
tables.*.icon.iconID
Data Type
String
/stdWrap
Description
Unique id of the icon. Can be any unique, arbitrary string
Default
tables.*.icon.imagepath
Property
tables.*.icon.imagepath
Data Type
String
/stdWrap
Description
path to the marker image, relative to the TYPO3 root
Default
tables.*.icon.shadowpath
Property
tables.*.icon.shadowpath
Data Type
String
/stdWrap
Description
path to the shadow image, relative to the TYPO3 root
Default
tables.*.icon.width
Property
tables.*.icon.width
Data Type
int
/stdWrap
Description
icon width in pixels
Default
tables.*.icon.height
Property
tables.*.icon.height
Data Type
int
/stdWrap
Description
icon height in pixels
Default
tables.*.icon.shadowwidth
Property
tables.*.icon.shadowwidth
Data Type
int
/stdWrap
Description
shadow width in pixels
Default
tables.*.icon.shadowheight
Property
tables.*.icon.shadowheight
Data Type
int
/stdWrap
Description
shadow height in pixels
Default
tables.*.icon.anchorX
Property
tables.*.icon.anchorX
Data Type
int
/stdWrap
Description
The pixel coordinate relative to the top left corner of the icon image at which this icon is anchored to the map.
Default
tables.*.icon.anchorY
Property
tables.*.icon.anchorY
Data Type
int
/stdWrap
Description
The pixel coordinate relative to the top left corner of the icon image at which this icon is anchored to the map.
Default
tables.*.title
Property
tables.*.title
Data Type
cObj
Description
cObj for the title of the marker bubble. If it isn't defined, a default will be used. Change this to customize the title
Default
-blank-
tables.*.description
Property
tables.*.description
Data Type
cObj
Description
cObj for the description of the marker. If it isn't defined, a default will be used. Change this to customize the description.
Default
-blank-
flexformTables.*
Property
flexformTables.*
Data Type
String
Description
render-configuration of the tables whose records will be mapped and be selected in the flexform. The * is a placeholder for the table name, similar to a COA, i.e. flexformTables.tt_address, flexFormtables.tx_cal_location, etc.
Default
flexformTables.*.icon.*
Property
flexformTables.*.icon.*
Data Type
Description
icon-configuration. See tables.*.icon.*
Default
-blank-
flexformTables.*.title
Property
flexformTables.*.title
Data Type
cObj
Description
icon-configuration. See tables.*.title
Default
-blank-
flexformTables.*.description
Property
flexformTables.*.description
Data Type
cObj
Description
icon-configuration. See tables.*.description
Default
-blank-
static.enabled
Property
static.enabled
Data Type
boolean
/stdWrap
Description
Enables static maps with the options below at their default
Default
0
static.mode
Property
static.mode
Data Type
String
/stdWrap
Description
Either “automatic” or “force”. Automatic will show the normal map with JS enabled and a static map without JS. Force will always show the static map even if JS is available.
Default
automatic
static.extent
Property
static.extent
Data Type
String
/stdWrap
Description
Either “all” or “each”. All will show all markers that would be visible on the JS map on the static map. Each will show a separate map for each marker found, centered and zoomed on that one marker. Be careful to adjust the limit (see below) for maps that have a large amount of markers.
Default
all
static.urlParam
Property
static.urlParam
Data Type
boolean
/stdWrap
Description
Enables listening for the URL parameter &tx_wecmap_api[static]=1 to show the static map if in automatic mode and JS is available, but not desired by the user.
Default
0
static.limit
Property
static.limit
Data Type
int
/stdWrap
Description
The limit for the # or markers or single maps. If extent is “all”, the limit is 50 and set by Google. A smaller number can be chosen. If the extent is “each”, there is no upper limit. Default is 50 as well.
Default
50
[tsref:plugin.tx_wecmap_pi3]
See the Installation section for more detailed information about configuring the two plugins via FlexForms.
Customizing the info bubble
Customizing the info bubble of the maps is possible by using TypoScript. The relevant default configuration for the plugins looks as follows:
plugin.tx_wecmap_pi1.marker {
title = COA
title {
10 = TEXT
10.field = name
10.wrap = <h1>|</h1>
}
description = COA
description {
10 = COA
10 {
10 = TEXT
10.field = address
10.wrap = | <br/>
20 = TEXT
20.field = city
20.wrap = |,
30 = TEXT
30.field = zone
30.wrap = |
40 = TEXT
40.field = zip
}
10.wrap = <p>|</p>
20 = TEXT
20.field = phone
20.wrap = <p>|</p>
}
}
Changing the content of the info bubble is now only a matter of adding, removing, or changing the content objects. For example, to add the image of a user and the web address to the info bubble of the WEC FE User Map plugin, add the following snippet to the plugin's TS setup:
plugin.tx_wecmap_pi2.marker.description.10 {
  50 = IMAGE
  50.file.import = uploads/tx_srfeuserregister/
  50.file.import.override.field = image
  60 = TEXT
  60.field = www
}
Customizing a Table map
Configure the infobubble for your record of your DB-table tx_myext (DB-fields mytitle and mydesc) with TypoScript:
plugin.tx_wecmap_pi3.flexformTables.tx_myext {

//  where = some SQL conditions
//  limit = 10

  icon {
    iconID       = myIconID
    imagepath    = fileadmin/myicon.png
    shadowpath   = fileadmin/myshadow.png
    width        = 16
    height       = 16
    shadowWidth  = 25
    shadowHeight = 25
    anchorX      = 0
    anchorY      = 0
    infoAnchorX  = 5
    infoAnchorY  = 1
  }

  title = COA
  title {
    10 = TEXT
    10.field = mytitle
    10.wrap = <h4> | </h4>
  }

  description = COA
  description.10 {
    10 = TEXT
    10.field = mydesc
  }
}
Suppose your record for your DB-table tx_myext contains the fields mylat/mylong for the coordinates your $TCA to map your DB-fields looks like this:
$TCA['tx_myext']['ctrl']['EXT']['wec_map'] = array (
    'isMappable' => 1,
    'latlongFields' => array (
            'lat' => 'mylat',
            'long' => 'mylong',
    ),
);
If you want to display a map in the DB editing tx_myext-records you have to setup the following lines:
$geocodeTCA = array (
    'tx_wecmap_geocode' => array (
            'exclude' => 1,
            'label' => 'LLL:EXT:wec_map/locallang_db.xml:berecord_geocodelabel',
            'config' => array(
                    'type' => 'user',
                    'userFunc' => 'tx_wecmap_backend->checkLatLongStatus',
            'params' => array (
              'latlongFields' => array(
                    'lat' => 'mylat',
                    'long' => 'mylong',
              ),
            ),
            ),
    ),
);

t3lib_extMgm::addTCAcolumns('tx_myext', $geocodeTCA, 1);
$TCA['tx_myext']['interface']['showRecordFieldList'] .= ',tx_wecmap_geocode';
t3lib_extMgm::addToAllTCAtypes('tx_myext', 'tx_wecmap_geocode', '1', 'after:mylat');

$mapTCA = array (
    'tx_wecmap_map' => array (
            'exclude' => 1,
            'label' => 'LLL:EXT:wec_map/locallang_db.xml:berecord_maplabel',
            'config' => array (
                    'type' => 'user',
                    'userFunc' => 'tx_wecmap_backend->drawLatLongMap',
            'params' => array (
              'latlongFields' => array(
                    'lat' => 'mylat',
                    'long' => 'mylong',
              ),
            ),
            ),
    ),
);

t3lib_extMgm::addTCAcolumns('tx_myext', $mapTCA, 1);
$TCA['tx_myext']['interface']['showRecordFieldList'] .= ',tx_wecmap_map';
t3lib_extMgm::addToAllTCAtypes('tx_myext', 'tx_wecmap_map', '1', 'after:tx_wecmap_geocode');
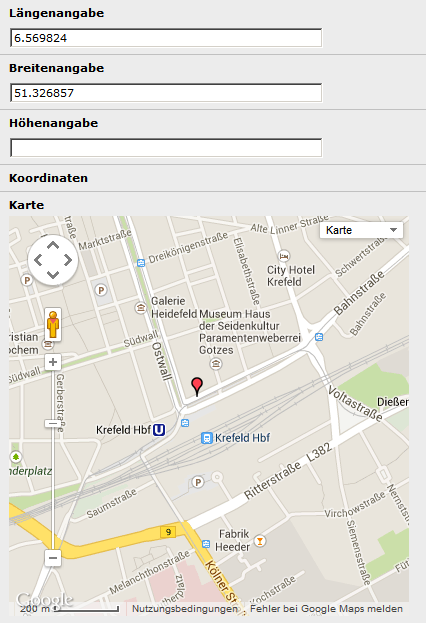 Illustration 17: Editing a BE-record
In the BE you can either edit the coordinates by the numeric input fields or by simply dragging the marker to the correct position.
Customizing a PDF-view
If you are using a PDF-view of your page the wec_map-plugins have to be switched to static-mode as extensions like pdf_generator2 aren't able to execute the JavaScripts of wec_map. You can achieve this automatically by using the following TypoScript:
# special handling for PDF-generation
[globalVar = GP:type={$extension.pdf_generator2.typeNum}]

   # switch wec_map to static maps
   plugin.tx_wecmap_pi1.static {
      enabled = 1
      mode = force
   }
   plugin.tx_wecmap_pi2.static < plugin.tx_wecmap_pi1.static
   plugin.tx_wecmap_pi3.static < plugin.tx_wecmap_pi1.static
[global]
Responsive Design
For a responsive web-design add the following CSS-rule to your stylesheet:
.tx-wecmap-map {
    width: 100% !important;
}
Integration into EXT:cal
The calendar cal can display wec_map right out of the box.
Enable the use of wec_map in cal's constant editor or set the TypoScript constant plugin.tx_cal_controller.view.location.showMap = 1
Add markers ###MODULE__LOCATIONLOADER### and ###LOCATION### in yourevent_model.tmpl, if you're using an own HTML-template.
Adapt module_locationloader.tmpl for your needs, if you're using an own HTML-template. ###MAP### will be replaced by the wec_map.
To display the map in any other view than the location-view use the following TypoScript:
view.{view}.{object}.showMap = 1

and all the map settings too:
view.{view}.{object}.map {
        # Map configuration goes here
}
So to get it working in an event view you should copy the TS to:
view.event.event.showMap = 1
view.event.event.map {
        # Map configuration goes here
}
Troubleshooting
In Internet Explorer 7 (IE7), when using the FE User Map plugin in the Backend, occasionally a slow server connection will cause an error when adding a new Frontend User in your Storage Folder.
Internet Explorer cannot open the site http://www.yoursite.com/typo3/alt_mainOperation aborted.
To work around this issue, open the Ext Manager Module , and ensure you can view Loaded extensions . Scroll down to the WEC Map extension and click on the WEC Map link (the words). Uncheck the Enable map in FE user records and then click the Update button .
Some users who have large numbers of Frontend User records may discover that many of their users do not receive geocoding from Google. This issue may be caused because of your host server's firewall that interprets multiple geocoding requests and replies from Google.com as a Denial of Service Attack.
To work around this issue, contact your host and ask them to whitelist google.com for your domain.
Sometimes the marker bubbles appear to be empty or appear to be missing either a title or a description. The reason for that is the font color used for headlines and body text across the whole website. If either is set to white font color, it will also render the headlines and/or body text white, making the marker bubbles appear empty. To fix it, make sure you change the CSS style for the map element fonts ; it uses the class “tx-wecmap-map”, so you could add the following to your CSS styles file:
.tx-wecmap-map {color: black;}
.tx-wecmap-map p {color: black;}
The Typo3-internal XHTML-cleaning messes up the generated JavaScript. Please disable xhtml-cleaning:
config.xhtml_cleaning= 0
If you are using a script-compressor like scriptmerger you must exclude the wec_map JavaScript-files from being merged:
plugin.tx_scriptmerger {javascript { enable = 1 merge.ignore = markermanager.js,infobubble.js,wecmap.js}}
Administration
Nested within the Subsection Tools Directory, there are two Backend Modules associated with the WEC Map extension.
WEC Map Admin Module
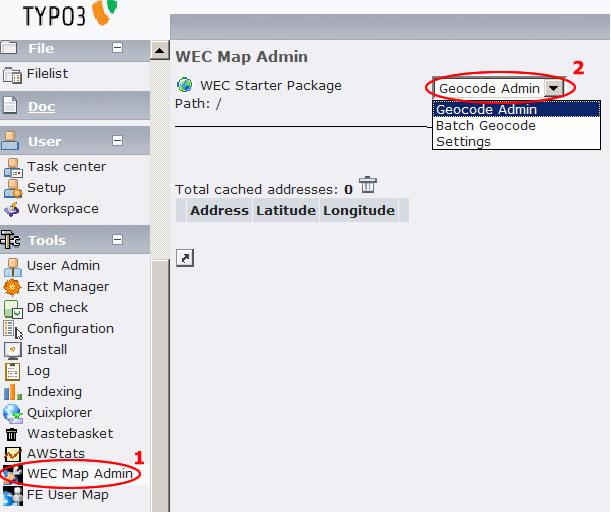 Illustration 18: WEC Map Admin Module
See Illustration 21. The WEC Map Admin Module ( 1 ) includes three tools in the dropdown list ( 2 ):
Geocode Admin: Displays a list of cached (stored) addresses with their longitude and latitude. Using the pencil icon, the latitude and longitude values can be changed manually. You can also use the Trashcan icon next to each entry to delete the entry completely. If there is a need, it will be automatically regenerated the next time the latitude and longitude is needed for a map. These coordinates come from Googleor other geocoding servicesand are stored locally to decrease the display time of the map. A search box at the top allows the list of caches to be filtered by keyword and the record table can now be sorted by clicking on the table headers.
Batch Geocode: Manually initiates processing of assigning latitude and longitude to any records that support geocoding, including website users.This feature is particularly helpful when there are a significant number of users to process and the WEC Map extension was recently installed. You do not need to run the batch geocode because the WEC Map extension will automatically lookup any needed addresses, but using this feature will avoid long delays in the map display caused by many new geocode lookups. If you have over 100 addresses that must be geocoded, then the processing could take several minutes, but once an address is processed it will not need to be geocoded again unless the address changes.
Download JS-Files: See installation section.
API Key Settings: (not used anymore) Allows you to insert a Google Map API Key directly into the extension to allow global access based on domain. This is useful if you are running a site with different domains. Once you have set API keys for each of your domains, the extension will automatically use the right one depending on the domain the user is visiting or logged in from.
FE User Map Module
S
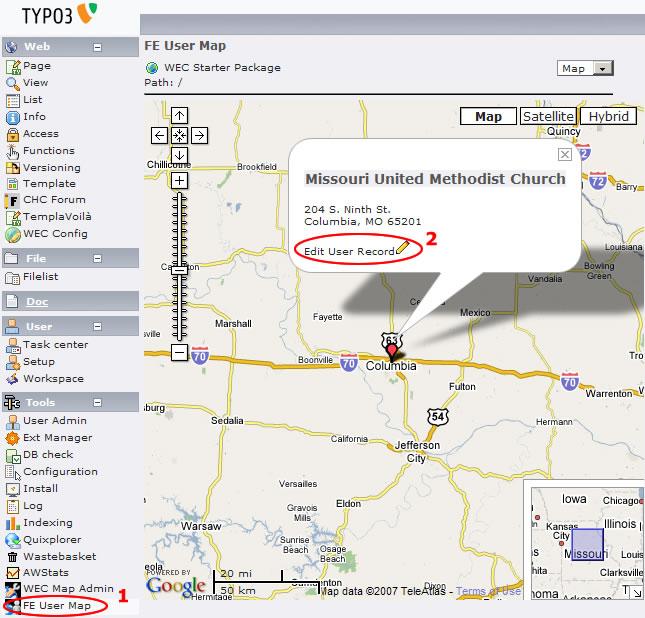 Illustration 19: FE User Map Module
ee Illustration 22. The FE User Map Module ( 1 ) shows a detailed map of all the Frontend Users and is an example of how to use the API in backend development. It works very similar to the Frontend User Map plugin. Zooming in on a user and toggling the information bubble will display the address information for that user along with a link to edit the record directly ( 2 ). Using the WEC Map API =====================
Create the Map Object
The first step in using the WEC Map API is to create a map object. To do that, include the Google Maps class in your code and create an instance of it, passing the API key and the map's height and width as parameters. If the API Key was set through the WEC Map Admin, the value can be left blank.
include_once(t3lib_extMgm::extPath('wec_map').'map_service/google/class.tx_wecmap_map_google.php');
$className = t3lib_div::makeInstanceClassName("tx_wecmap_map_google");
$map = new $className($apiKey, $width, $height);
Map Object Reference
addControl
Method
addControl
Parameters
$control
Data Type
String
Description
The name of the control. The naming of the control strings passed to the addControl method coincides with Google's naming of the control, so 'smallMap' creates Google's GSmallMapControl, 'scale' creates Google's GScaleControl, etc.
setType
Method
setType
Parameters
$type
Data Type
String
Description
$type can be any Google Type Constants specified in the API reference for GmapType ( http://code.google.com/apis/maps/documentation/referen ce.html#GMapType ). The map will default to the G_NORMAL_MAP type.
G_NORMAL_MAP, G_PHYSICAL_MAP, G_SATELLITE_MAP, G_HYBRID_MAP, G_OSM_MAP, G_OCM_MAP
drawMap
Method
drawMap
Parameters
none
Data Type
Description
Returns the map markup to be output from the extension.
enableDirections
Method
enableDirections
Parameters
$prefill = false
Data Type
boolean
Description
$prefill is a boolean to toggle whether or not a logged in FE user's address should be automatically filled in to the directions form of the marker tab.
$directionsContainer = null
Method
$directionsContainer = null
Parameters
String
Data Type
$directionsContainer is a string with the id of a container element that will hold the written out driving instructions. If left at its default value of null, no written directions will be shown.
::
Method
addMarkerIcon
Parameters
$iconData
Data Type
Array
Description
Add an extra icon that can be used as a marker icon. $iconData will have the same format as the array generated from the TS. See below for an example.
$iconData = array(
  'iconID'       => 'default',
  'imagepath'    => 'typo3conf/ext/wec_map/images/mm_20_red.png',
  'shadowpath'   => 'typo3conf/ext/wec_map/images/mm_20_shadow.png',
  'width'        => 12,
  'height'       => 20,
  'shadowWidth'  => 22,
  'shadowHeight' => 20,
  'anchorX'      => 6,
  'anchorY'      => 20,
  'infoAnchorX'  => 5,
  'infoAnchorY'  => 1
);
$cObj=null
Method
$cObj=null
Parameters
CObj
Data Type
optional CObj for interpreting stdWrap of $iconData
::
Method
addKML
Parameters
$url
Data Type
String
Description
Add any custom KML overlay to the map. $url is a standard URL pointing to the kml file, e.g. 'http://somewebsite.com/somekmlfile.kml'
::
Method
setRadius
Parameters
$radius
Data Type
float
Description
The radius beyond which no markers are added to the map.
$kilometers = false
Method
$kilometers = false
Parameters
boolean
Data Type
Sets kilometers or miles as unit.
::
Method
setCenter
Parameters
$lat
Data Type
float
Description
Latitude of the map center
$long
Method
$long
Parameters
float
Data Type
Longitude of the map center
::
Method
setCenterByAddress
Parameters
$street
Data Type
String
Description
Street
$city
Method
$city
Parameters
String
Data Type
City
$state
Method
$state
Parameters
String
Data Type
State
$zip
Method
$zip
Parameters
String
Data Type
Zip
$country = null
Method
$country = null
Parameters
String
Data Type
Country
::
Method
showInfoOnLoad
Parameters
none
Data Type
Description
Shows the first info bubble on load. Recommended for maps with one marker only.
::
Method
setMaxAutoZoom
Parameters
$newZoom = null
Data Type
integer
Description
Sets the maximum auto zoom, defaults to 15.
::
Method
enableStatic
Parameters
$mode = “automatic”
Data Type
String
Description
Sets mode of map, either automatic fallback (automatic) or forced static map (force)
$extent = “all”
Method
$extent = “all”
Parameters
String
Data Type
Shows either one map with all markers, up to 50 (all) or one map per marker, zoomed and centered on that marker (each)
$urlParam = false
Method
$urlParam = false
Parameters
boolean
Data Type
If $mode is automatic, this enables listening for the URL parameter &tx_wecmap_api[static]=1 to let the user select the static map even if JS is available.
$limit = 50
Method
$limit = 50
Parameters
integer
Data Type
Sets the limit of markers per map in “all” mode, up to 50, which is the Google limit. In “each” mode, it can be set higher but defaults to 50 as well.
Marker Object Reference
setTitle
Method
setTitle
Parameters
$title
Data Type
String
Description
Sets the title of the marker
setDescription
Method
setDescription
Parameters
$desc
Data Type
String
Description
Set the description of the marker
setMinzoom
Method
setMinzoom
Parameters
$zoom
Data Type
integer
Description
Set the minimum zoom level this marker is shown on
setMaxzoom
Method
setMaxzoom
Parameters
$zoom
Data Type
integer
Description
Set the maximum zoom level this marker is shown on
addTab
Method
addTab
Parameters
$tabLabel
Data Type
String
Description
The label of the tab
$title
Method
$title
Parameters
String
Data Type
The title of this tab's info window
$description
Method
$description
Parameters
String
Data Type
The description of this tab's info window
getClickJS
Method
getClickJS
Parameters
Data Type
Description
Returns a javascript snippet that can be used in a link to pan and zoom to that marker and show its info bubble.
Create Markers
Available methods
There are several methods that can be used to create markers on the map . This is a list of more available methods on the map object above.
addMarkerByAddress
Method
addMarkerByAddress
Parameters
$street
Description
The street part of the address, e.g., 1234 Memorial Lane
$city
Method
$city
Parameters
The city part of the address, e.g., Oklahoma City
$state
Method
$state
Parameters
The state or region, e.g., Texas
$zip
Method
$zip
Parameters
The zip code, e.g., 41343
$country
Method
$country
Parameters
The name of the country
$title = ''
Method
$title = ''
Parameters
The title that will be displayed in the popup balloon that appears when this marker is clicked.
Default: empty String
$description = ''
Method
$description = ''
Parameters
The description that will be displayed in the popup balloon that appears when this marker is clicked. Note that Google Maps is picky about line breaks in the title and description. The API will automatically replace line breaks with<br />, so if you need your title and description to be processed differently, make sure to do that in your code before you pass it on to this method.
Default: empty String
$minzoom = 0
Method
$minzoom = 0
Parameters
The minimum zoom level that this marker is supposed to appear on. The default is 0, which is the most zoomed out level. See notes on the Marker Manager below for more information on this.
Default: 0
$maxzoom = 17
Method
$maxzoom = 17
Parameters
The maximum zoom level that this marker is supposed to appear on. The default is 17, which is the most zoomed in level. See notes on the Marker Manager below for more information on this.
Default: 17
$iconID = ''
Method
$iconID = ''
Parameters
The name of the icon that has been added with the addMarkerIcon method. If no name is given, will automatically assign the name “default.”
addMarkerByLatLong
Method
addMarkerByLatLong
Parameters
$lat
Description
The latitude coordinate for the marker
$long
Method
$long
Parameters
The longitude coordinate for the marker
$title = ''
Method
$title = ''
Parameters
The title that will be displayed in the popup balloon that appears when this marker is clicked.
Default: empty String
$description = ''
Method
$description = ''
Parameters
The description that will be displayed in the popup balloon that appears when this marker is clicked. Note that Google Maps is picky about line breaks in the title and description. The API will automatically replace line breaks with<br />, so if you need your title and description to be processed differently, make sure to do that in your code before you pass it on to this method.
Default: empty String
$minzoom = 0
Method
$minzoom = 0
Parameters
The minimum zoom level that this marker is supposed to appear on. The default is 0, which is the most zoomed out level. See notes on the Marker Manager below for more information on this.
Default: 0
$maxzoom = 17
Method
$maxzoom = 17
Parameters
The maximum zoom level that this marker is supposed to appear on. The default is 17, which is the most zoomed in level. See notes on the Marker Manager below for more information on this.
Default: 17
$iconID = ''
Method
$iconID = ''
Parameters
The name of the icon that has been added with the addMarkerIcon method. If no name is given, will automatically assign the name “default.”
addMarkerByString
Method
addMarkerByString
Parameters
$string
Description
The complete address as a single string
$title = ''
Method
$title = ''
Parameters
The title that will be displayed in the popup balloon that appears when this marker is clicked.
Default: empty String
$description = ''
Method
$description = ''
Parameters
The description that will be displayed in the popup balloon that appears when this marker is clicked. Note that Google Maps is picky about line breaks in the title and description. The API will automatically replace line breaks with<br />, so if you need your title and description to be processed differently, make sure to do that in your code before you pass it on to this method.
Default: empty String
$minzoom = 0
Method
$minzoom = 0
Parameters
The minimum zoom level that this marker is supposed to appear on. The default is 0, which is the most zoomed out level. See notes on the Marker Manager below for more information on this.
Default: 0
$maxzoom = 17
Method
$maxzoom = 17
Parameters
The maximum zoom level that this marker is supposed to appear on. The default is 17, which is the most zoomed in level. See notes on the Marker Manager below for more information on this.
Default: 17
addMarkerByTCA
Method
addMarkerByTCA
Parameters
$table
Description
Name of the table that contains address data
$uid
Method
$uid
Parameters
The uid of the record to be mapped
$title = ''
Method
$title = ''
Parameters
The title that will be displayed in the popup balloon that appears when this marker is clicked.
Default: empty String
$description = ''
Method
$description = ''
Parameters
The description that will be displayed in the popup balloon that appears when this marker is clicked. Note that Google Maps is picky about line breaks in the title and description. The API will automatically replace line breaks with<br />, so if you need your title and description to be processed differently, make sure to do that in your code before you pass it on to this method.
Default: empty String
$minzoom = 0
Method
$minzoom = 0
Parameters
The minimum zoom level that this marker is supposed to appear on. The default is 0, which is the most zoomed out level. See notes on the Marker Manager below for more information on this.
Default: 0
$maxzoom = 17
Method
$maxzoom = 17
Parameters
The maximum zoom level that this marker is supposed to appear on. The default is 17, which is the most zoomed in level. See notes on the Marker Manager below for more information on this.
Default: 17
$iconID = ''
Method
$iconID = ''
Parameters
The name of the icon that has been added with the addMarkerIcon method. If no name is given, will automatically assign the name “default.”
addMarkerByLatLongWithTabs
Method
addMarkerByLatLongWithTabs
Parameters
$lat
Description
The latitude coordinate for the marker
$long
Method
$long
Parameters
The longitude coordinate for the marker
$tabLabels = null
Method
$tabLabels = null
Parameters
An array of strings that will be used to label the tabs. $tabLabels[0] will be the label of the first tab, etc.
Default: null
$title = null
Method
$title = null
Parameters
An array of strings that will be used as titles in the different tabs. $title[0] will be used in the first tab, $title[1] in the second, etc.
Default: null
$description = null
Method
$description = null
Parameters
An array of descriptions that will be displayed in the popup balloon that appears when this marker is clicked. $description[0] will be the description used in the first tab, $description[1] will be used in the second tab, etc.
Note that Google Maps is picky about line breaks in the title and description. The API will automatically replace line breaks with<br />, so if you need your title and description to be processed differently, make sure to do that in your code before you pass it on to this method.
Default: null
$minzoom = 0
Method
$minzoom = 0
Parameters
The minimum zoom level that this marker is supposed to appear on. The default is 0, which is the most zoomed out level. See notes on the Marker Manager below for more information on this.
Default: 0
$maxzoom = 17
Method
$maxzoom = 17
Parameters
The maximum zoom level that this marker is supposed to appear on. The default is 17, which is the most zoomed in level. See notes on the Marker Manager below for more information on this.
Default: 17
$iconID = ''
Method
$iconID = ''
Parameters
The name of the icon that has been added with the addMarkerIcon method. If no name is given, will automatically assign the name “default.”
addMarkerByAddressWithTabs
Method
addMarkerByAddressWithTabs
Parameters
$street
Description
The street part of the address, e.g., 1234 Memorial Lane
$city
Method
$city
Parameters
The city part of the address, e.g., Oklahoma City
$state
Method
$state
Parameters
The state or region, e.g., Texas
$zip
Method
$zip
Parameters
The zip code, e.g., 41343
$country
Method
$country
Parameters
The name of the country
$tabLabels = null
Method
$tabLabels = null
Parameters
An array of strings that will be used to label the tabs. $tabLabels[0] will be the label of the first tab, etc.
Default: null
$title = null
Method
$title = null
Parameters
An array of strings that will be used as titles in the different tabs. $title[0] will be used in the first tab, $title[1] in the second, etc.
Default: null
$description = null
Method
$description = null
Parameters
An array of descriptions that will be displayed in the popup balloon that appears when this marker is clicked. $description[0] will be the description used in the first tab, $description[1] will be used in the second tab, etc.
Note that Google Maps is picky about line breaks in the title and description. The API will automatically replace line breaks with<br />, so if you need your title and description to be processed differently, make sure to do that in your code before you pass it on to this method.
Default: null
$minzoom = 0
Method
$minzoom = 0
Parameters
The minimum zoom level that this marker is supposed to appear on. The default is 0, which is the most zoomed out level. See notes on the Marker Manager below for more information on this.
Default: 0
$maxzoom = 17
Method
$maxzoom = 17
Parameters
The maximum zoom level that this marker is supposed to appear on. The default is 17, which is the most zoomed in level. See notes on the Marker Manager below for more information on this.
Default: 17
$iconID = ''
Method
$iconID = ''
Parameters
The name of the icon that has been added with the addMarkerIcon method. If no name is given, will automatically assign the name “default.”
addMarkerByStringWithTabs
Method
addMarkerByStringWithTabs
Parameters
$string
Description
The complete address as a single string
$tabLabels = null
Method
$tabLabels = null
Parameters
An array of strings that will be used to label the tabs. $tabLabels[0] will be the label of the first tab, etc.
Default: null
$title = null
Method
$title = null
Parameters
An array of strings that will be used as titles in the different tabs. $title[0] will be used in the first tab, $title[1] in the second, etc.
Default : null
$description = null
Method
$description = null
Parameters
An array of descriptions that will be displayed in the popup balloon that appears when this marker is clicked. $description[0] will be the description used in the first tab, $description[1] will be used in the second tab, etc.
Note that Google Maps is picky about line breaks in the title and description. The API will automatically replace line breaks with<br />, so if you need your title and description to be processed differently, make sure to do that in your code before you pass it on to this method.
Default: null
$minzoom = 0
Method
$minzoom = 0
Parameters
The minimum zoom level that this marker is supposed to appear on. The default is 0, which is the most zoomed out level. See notes on the Marker Manager below for more information on this.
Default: 0
$maxzoom = 17
Method
$maxzoom = 17
Parameters
The maximum zoom level that this marker is supposed to appear on. The default is 17, which is the most zoomed in level. See notes on the Marker Manager below for more information on this.
Default: 17
$iconID = ''
Method
$iconID = ''
Parameters
The name of the icon that has been added with the addMarkerIcon method. If no name is given, will automatically assign the name “default.”
addMarkerByTCAWithTabs
Method
addMarkerByTCAWithTabs
Parameters
$table
Description
$uid
Method
$uid
Parameters
$tabLables
Method
$tabLables
Parameters
An array of strings that will be used to label the tabs. $tabLabels[0] will be the label of the first tab, etc.
Default: null
$title = null
Method
$title = null
Parameters
An array of strings that will be used as titles in the different tabs. $title[0] will be used in the first tab, $title[1] in the second, etc.
Default : null
$description = null
Method
$description = null
Parameters
An array of descriptions that will be displayed in the popup balloon that appears when this marker is clicked. $description[0] will be the description used in the first tab, $description[1] will be used in the second tab, etc.
Note that Google Maps is picky about line breaks in the title and description. The API will automatically replace line breaks with<br />, so if you need your title and description to be processed differently, make sure to do that in your code before you pass it on to this method.
Default: null
$minzoom = 0
Method
$minzoom = 0
Parameters
The minimum zoom level that this marker is supposed to appear on. The default is 0, which is the most zoomed out level. See notes on the Marker Manager below for more information on this.
Default: 0
$maxzoom = 17
Method
$maxzoom = 17
Parameters
The maximum zoom level that this marker is supposed to appear on. The default is 17, which is the most zoomed in level. See notes on the Marker Manager below for more information on this.
Default: 17
$iconID = ''
Method
$iconID = ''
Parameters
The name of the icon that has been added with the addMarkerIcon method. If no name is given, will automatically assign the name “default.”
Marker Manager
The Marker Manager is Google's answer to displaying multiple markers on the map at once, while at the same time keeping loading times low and speed high. The Marker Manager ensures that only those markers that are visible in the viewport are actually rendered. It also adds a “padding” of markers that are not yet visible but right outside the viewport to speed up marker rendering when the map is moved around.
The $minzoom and $maxzoom parameters can be used to specify on which zoom levels a certain group of markers should appear. The FE User Map plugin and the Backend module use this technique to show only a few markers per country on zoom levels 0 through 2, only one marker per city on zoom levels 3 through 7, and all individual markers on levels 8 through 17. See the plugin code and Google's Map API Documentation for more details.
Hooks
WEC Table Map Marker Hook
Available at $GLOBALS['TYPO3_CONF_VARS']['EXTCONF']['tx_wecmap_pi3 ']['markerHook']. It allows processing marker objects as they are added to the map but before the map is rendered. There are two different parameters that are passed into your user function. The second one, the reference, is null and not available. The first is an array of parameters, outlined here.
table
a
table
b
The name of the table that the current record is taken from.
data
a
data
b
The whole database row of the current record.
markerObj
a
markerObj
b
A reference to the actual marker object. See the reference for a list of available methods.
WEC Map API Center and Zoom Hook
Available at $GLOBALS['TYPO3_CONF_VARS']['EXTCONF']['tx_wecmap_api ']['centerAndZoomHook']. It passes zoom level, latitude, and longitude as parameters which can be modified to change the initial center and zoom of the map.
The second parameter, $ref, is null and not available. The first is an array of the parameters:
lat
a
lat
b
latitude of initial map center
long
a
long
b
longitude of initial map center
zoom
a
zoom
b
initial zoom level of the map
Drawing the Map
Rendering of the map is simple. Just call the drawMap() method on the Map objectand it will return the HTML and Javascript necessary to display the map within a Frontend Plugin or Backend Module:
$output = $map->drawMap();
 - 41Modified 02/2013