DEPRECATION WARNING
This documentation is not using the current rendering mechanism and is probably outdated. The extension maintainer should switch to the new system. Details on how to use the rendering mechanism can be found here.
EXT: WEC Servant Connector
| Author: | Kasper Skårhøj |
|---|---|
| Created: | 2002-11-01T00:32:00 |
| Changed: | 2010-07-23T22:21:08 |
| Email: | servantconnectorl@webempoweredchurch.org |
| Info 2: | |
| Info 3: | |
| Info 4: |
EXT: WEC Servant Matcher
Extension Key: wec_servant
Copyright 2006-2010, Christian Technology Ministries International Inc. http://www.CTMIinc.org
Author: Web-Empowered Church Team <devteam(at)webempoweredchurch.org>
Support: http://www.webempoweredchurch.org/support/
This document is published under the Open Content License
available from http://www.opencontent.org/opl.shtml
The content of this document is related to TYPO3
- a GNU/GPL CMS/Framework available from www.typo3.com
Table of Contents
`EXT: WEC Servant Matcher 1 <#1.EXT:%20WEC%20Servant%20Matcher|outline>`_
`Introduction 2 <#1.2.Introduction|outline>`_
What Is The Web-Empowered Church? 4
`Users Manual 5 <#1.3.Users%20Manual|outline>`_
Create Or Set The Data Folder 5
Add New Or Update Existing Contact 8
Add New Ministry Opportunities 9
`Configuration 13 <#1.4.Configuration|outline>`_
Allow to signup for custom ministry 18
Linking directly to ministry or skill(s) 18
Handling Contacts without Emails 18
`Using Version 2.0 Templates 19 <#1.5.Using%20Version%202.0%20Templates|outline>`_
Upgrading an Old Custom Template 19
Using the New Template System 19
`Known Problems 20 <#1.6.Known%20Problems|outline>`_
`To-Do List 20 <#1.7.To-Do%20List|outline>`_
`Changelog 20 <#1.8.Changelog|outline>`_
Introduction
The WEC Servant Matcher is a great way to connect people to service opportunities. Specifically, this extension was created for churches or ministries to connect members and attenders to ministry service opportunities. We name anyone in a church who wants to help – servants – and that is where we get the “Servant Matcher” name. Some churches or ministries may call them volunteers or unpaid servants or helpers or “people to help”. Whatever their title, if you want to connect people who want to help, then this extension can help you do that.
As an example of how this could be used: suppose you are a leader at the First Church of Kasperville and you want to let them know about how they can help out at your church. You find all the ministry opportunities by contacting other leaders or pastors involved. From there, you receive the following opportunities: “Help in Children's Sunday School”, “Help With Yard Work At The Church”, “Teach Youth Club”, “Drive Van For Elderly”, “Be An Usher”, “Be A Greeter”, “Bring Snacks For Sunday Morning”, “Sing In Choir”, etc...and you may have 20 or 30 or more of these. Then, you would simply add each of these, with their appropriate contact person and information. Then you can add this to your website and voilà -- you have a way for people to connect with your service opportunities available 24 hours a day, 7 days a week!
This extension is very flexible and allows you to show and connect servants in various ways:
1) List by Ministry – show users all opportunities under a given ministry. Or you can list by ministries and let them choose several ministries they arted in and see all opportunities under those ministries.
2) Select by Skills -- allow a user to select their skills / spiritual gifts / passion / talents and then it matches them with ministry opportunities that fit those.
3) List by Ministry Needs – let the user pick from ministry opportunities based on a given need/priority (i.e., “urgent”, “special”, “high priority”).
4) List by Last Added – allow user to find the ones that were last added so they can see “new” opportunities.
You can actually mix and match opportunities in any combination you want, depending on the size of your church and the number of opportunities available. If you have a larger number of opportunities (i.e., more than 25), you may want to assign skills/gifts to them so people can match opportunities that fit their “call” and passions.
Since ministry opportunities can be listed by ministry group, this extension will allow every ministry page that would like to have a “Look For Opportunities”/”How Can I Serve?” to then show all the opportunities to serve in that given ministry. So, your Music/Worship ministry can show all Ministry opportunities associated with it.
While in this document, we use the terms servant, ministry, and ministry opportunity, a broader definition might be: servant : person who wants to help ministry : category ministry opportunity : a given opportunity or task that needs someone to help
Features
Major features include:
- Flexible ways to connect people to your ministry opportunities – use whichever way fits your church/ministry.
- Flexible ways to respond – by commitment or contact form and/or by phone/email information listed.
- Easy-to-setup, add, and modify.
- Customizable look, layout, and colors.
- Each ministry area can have a link in its own section that will just show opportunities for its ministry
- Admin support where staff/owner can add/update their own opportunities that they are in charge of
Example Uses
The following are real-working examples of this extension:
http://www.ginghamsburg.org/serve/ -- this uses a variety of skills and is the basis for many of the great features and options
Screenshots
Below are some examples of what the Servant Matcher extension could look like:
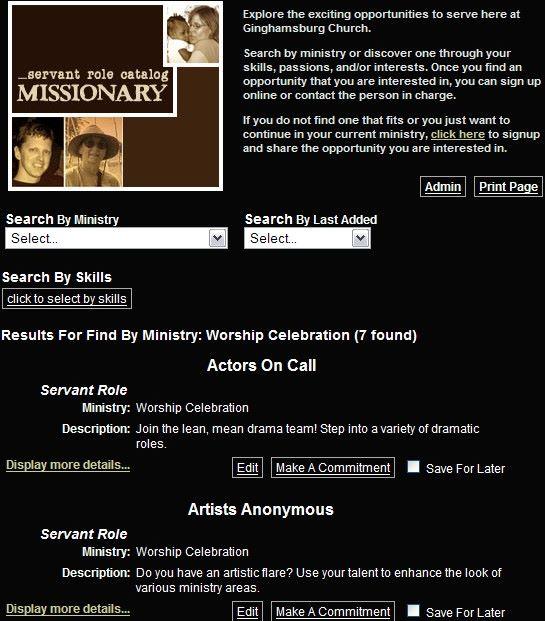
This is the Ginghamsburg Servant Catalog
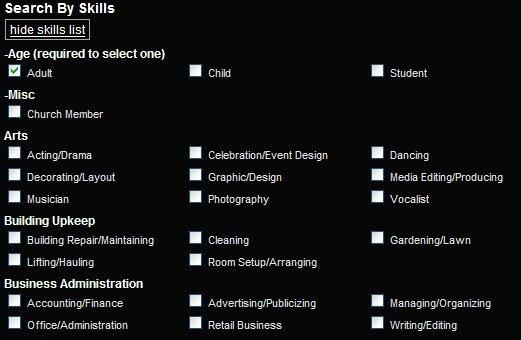
 This shows how you can search by skills/interests
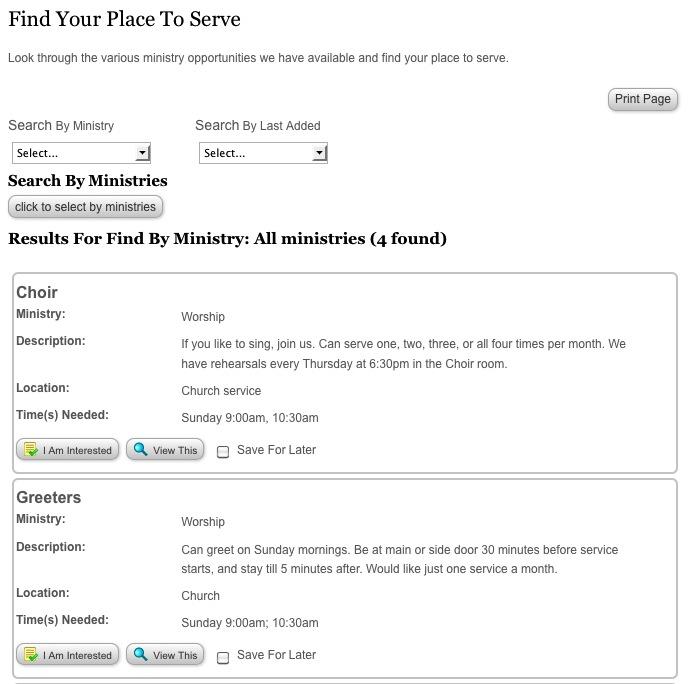
This is the new version 2.0 look for Servant Matcher
What Is The Web-Empowered Church?
The Web-Empowered Church (WEC) is a ministry of Christian Technology Ministries International ( www.CTMI.com ) The mission of WEC is to innovatively apply WEB technology to EMPOWER the worldwide CHURCH for ministry.
WEC is helping churches around the world expand evangelism, discipleship, and care through the innovative application of internet technology. WEC web-based tools and training are helping make church ministries more efficient and effective, and they are extending ministry impact to a world in need of Jesus. We are helping to fuel a worldwide movement using the internet to point the world to Jesus Christ, to grow disciples, and to care for those in need. Our vision is to use the web to empower the Church so it can truly be a twenty- four hours per day, seven days per week ministry that is unconstrained by walls, distance, or time.
If you would like to find out more about WEC or our tools, or support us in any way, please go to our website at: www.WebEmpoweredChurch.org .
Users Manual
To setup and use the Servant Matcher extension, you will need to do the following:
Install The Extension
Create Or Set the Data Folder
Add The Extension
Configure The Options
Add New Or Update Existing Contacts
Add New Ministries
Add New Skills (optional)
Add New Ministry Opportunities
Change The Look
Test It Out
Change Group Type Names
The following will take you through each step:
Install The Extension
The first step you need to do is to install the extension – WEC Servant Matcher (wec_servant) -- with the extension manager. You can get it by going to Tools section and choosing “Ext Manager” on the main action menu (usually on left-side). Then in the dropdown Menu at the top, select “Import Extensions” in the Menu at top. Then type “ wec_servant ” or “ wec ” in the “Extensions in TYPO3 Extension Repository” and click on the “Look up” button. You should then find the Servant Matcher extension.
If you have never installed this, then you will see a red arrow to the left of “ WEC Servant Matcher ” and you can click on that to install. If it has been installed (it may be if using the WEC Starter package, depending on your version), you can click on the green arrow to the left of the extension or the name of the extension and then load the newest version by clicking on the Import/Update button. It is highly recommended to install the new extension in the "local" folder (LOCAL: typo3conf/ext/wec_servant).
When you do install it, please be sure to *Import Static Data* after it is installed. You will see this on the Servant Matcher Information page in the Extension Manager as well as right after you install the extension.
Create Or Set The Data Folder
You can now create a new Storage Folder or use the global Storage Folder that will have your data for the *Servant Matcher* in it. We recommend to use a new Storage Folder because there can be many records and you can keep everything in one place. Also, with separate Storage Folders, you can make different Servant Matchers with different data. It is certainly possible to place all the data in the global Storage Folder too – the extension works with either option.
If you want to put the *Servant Matcher* information in its own Storage Folder, you can do this by: create a new SysFolder by going to the page where the Servant Matcher is installed. Choose “ Create New Record ” and “ Page (inside) ” as the New Record type. At the New Record, choose SysFolder as the type of new record. Add a title like “ Servant Storage ” and you will likely want to un-hide it by clearing the Hide Page checkbox. Once you are done, go ahead and Save this record.
Add The Extension
To add the extension, you can create a new page first by choosing “ Create new record ” and choosing “ Page (inside)” as the New Record type. Unhide the page and name it in the Pagetitle with something appropriate. Or, if you already have an existing page to add it to, just select the page.
Then to actually add the extension to the page, click on “ Create new record ” and choose Pagecontent for the type of New Record . When it brings up the new Pagecontent element, select " Insert Plugin " as the Type, and then choosing “ WEC Servant Matcher ” in the Plugin drop down menu. You can also name it here in the Header and put something just for reference like “ servant matcher ”. So this does not display, be sure to set the Type : under Header to “ *Hidden* ”. When you are done with this, save and close it.
Configure Options
After you create a page and add the extension, you can bring up the Flexform so that you can change options, you must edit the Servant Matcher pagecontent.
One very important setting that you must do is let the extension know about the data storage folder you have set. You can do this by setting the Startingpoint in the Main tab. Set it to the “ Servant Storage ” Folder you just created or the global Storage Folder by clicking on the Choose File buttonand selecting that folder.
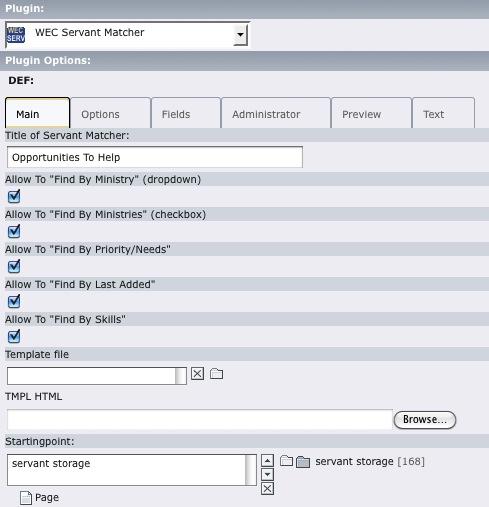 Example of the Servant Matcher FlexForm
The following is a description of each option that is available in the FlexForm:
MAIN
Title of Servant Matcher
FLEXFORM OPTION
Title of Servant Matcher
DESCRIPTION
What you want displayed at the top and used in email description. This is optional but allows you to add it here.
Allow To "Find By Ministry" (dropdown)
FLEXFORM OPTION
Allow To "Find By Ministry" (dropdown)
DESCRIPTION
Can search by drop-down ministry list. This ministry list is based on all ministries that are in fe_groups that are of type=Ministry.
Allow To "Find By Ministries" (checkbox)
FLEXFORM OPTION
Allow To "Find By Ministries" (checkbox)
DESCRIPTION
Can search ministry list shown using checkboxes. User can select multiple ministries. This ministry list is based on all ministries that are in fe_groups that are of type=Ministry.
Allow To "Find By Priority/Needs"
FLEXFORM OPTION
Allow To "Find By Priority/Needs"
DESCRIPTION
Can search by Priority/Needs from drop down list. The values available are: “Normal”, “Urgent”, “High”, “Low”, and “Special”. These priorities can be changed in the pi1/locallang.php and locallang_db file and can be set to any naming convention you would like.
Allow To "Find By Last Added"
FLEXFORM OPTION
Allow To "Find By Last Added"
DESCRIPTION
Can search by “Last added” from a drop down menu. The options are “In Past Week”, “In Past Month”, “In Past 3 Months”, and “In Past 6 Months”.
Allow To "Find By Skills"
FLEXFORM OPTION
Allow To "Find By Skills"
DESCRIPTION
Can search by list of skills. All skills are shown as checkboxes. They can be grouped in sections when set with groupBy field for each skill. If you do not have any skills available or this is not checked, then you will not be able to “select by skills”.
Template File
FLEXFORM OPTION
Template File
DESCRIPTION
Select and choose the template file for this Extension page. If you do not define one, then the default template will be used. You can also define a template through TypoScript constants and/or the Constant Editor (see below).
Startingpoint
FLEXFORM OPTION
Startingpoint
DESCRIPTION
Choose which Data Folder you want the data to be stored in and retrieved from. We highly recommend you set this up and keep all data in one place. If you do not choose a Startingpoint data location, then it will store and pull data from the current page.
OPTIONS
How Can Respond?
FLEXFORM OPTION
How Can Respond?
DESCRIPTION
Will choose how you want people to respond:- No form – if just want them to respond by email, address or phone # given.- Interest form – the user can send an email to contact saying they are interested in opportunity- Commitment form – the user can send an email to contact saying they are committed- Interest + Commitment – if you want both options available
Show Ministry List At First (otherwise hide)
FLEXFORM OPTION
Show Ministry List At First (otherwise hide)
DESCRIPTION
This will show the Ministries list at first (selected by choosing Find By Ministries in Main tab). The default is to show it, but you can have it so it is in the toggled hidden state where the user has to click on it to show the ministries.
Show Skills List At First (otherwise hide)
FLEXFORM OPTION
Show Skills List At First (otherwise hide)
DESCRIPTION
This will show the Skills list at first (selected by choosing Find By Skills in Main tab). The default is not to show it, but you can have it so it is shown right away.
Show All Of Description?
FLEXFORM OPTION
Show All Of Description?
DESCRIPTION
If you want the full description to be listed, choose this. Otherwise, the default is to show a shortened description where they have to click on “More” to see the rest of the description. The More opens up in CSS the full description. The purpose of this option is if you have many opportunities available, you can see and scan 20+ easily in a shortened form.
Can Save For Later?
FLEXFORM OPTION
Can Save For Later?
DESCRIPTION
If you want them to be able to save a ministry opportunity for later, then check this. If they can save it for later, they can browse and choose as many as they want. This is a nice feature to allow, but if you want a simplified interface or do not have many opportunities (i.e., < 30) , then you can disable this.
Require Login For Signup/Commitment?
FLEXFORM OPTION
Require Login For Signup/Commitment?
DESCRIPTION
If you want the user to be logged in before they can signup/commit then check this. If this is checked, then the buttons will not display unless they are signed in – you may want to note that in your instructions.
FIELDS
Fields to DISPLAY for showing opportunities
FLEXFORM OPTION
Fields to DISPLAY for showing opportunities
DESCRIPTION
You can customize which fields will be displayed for opportunities. If this is not set, then all fields in the template will be used.
Fields REQUIRED for signup form
FLEXFORM OPTION
Fields REQUIRED for signup form
DESCRIPTION
You can select certain fields as required for the signup form. If these fields are required, the user must enter something in the field(s) before it can be sent. If this is not set, then no fields are required.
Fields to DISPLAY for signup form
FLEXFORM OPTION
Fields to DISPLAY for signup form
DESCRIPTION
You can select which fields to display for the signup form. If this is not set, then all fields in the template will be displayed.
ADMINISTRATOR
Administrator(s) UID or username (sep. by comma)
FLEXFORM OPTION
Administrator(s) UID or username (sep. by comma)
DESCRIPTION
List of any administrators for this extension. The administrator(s) will have access to the admin menu and all of its functions. You can list the Typo3 fe_user UID or their fe_user username. Separate each by a comma if there is more than one.i.e., jsmith, mswanson, efallow, 214
An additional option is that you can set an admin so that they only have access to a given ministry(s). To do so, you add a : after the username/user_uid and then list the ministry name. If there are spaces in the ministry name add a “_'. This must match exactly with what is in the fe_groups. If you want multiple ministries, then list each one with a | separator. An example should be helpful:i.e., jsmith:cell_group_ministry,mswanson, efallow:childrens_ministry|youth_ministry,214
Contact name for all outgoing email
FLEXFORM OPTION
Contact name for all outgoing email
DESCRIPTION
The contact name for all outgoing email.
Contact email for all outgoing email (i.e., admin@web.com)
FLEXFORM OPTION
Contact email for all outgoing email (i.e., admin@web.com)
DESCRIPTION
The contact email for all outgoing email. If it is left blank, then the contact person for the opportunity will be used. If there is none for that, then the default :underline:`< `nobody@nowhere.com <mailto:nobody@nowhere.com>`_ > i` s used.
Notify email to receive ALL contacts
FLEXFORM OPTION
Notify email to receive ALL contacts
DESCRIPTION
If you want to receive all interest requests and commitments at one email address, you can set this to a valid email address. With this set, all emails will ALSO be sent to here as well as the contact person. If there is no contact person or this is a custom ministry, then the notify email will receive it if set.
PREVIEW
Is This A Preview Only?
FLEXFORM OPTION
Is This A Preview Only?
DESCRIPTION
Mark if this is a preview. A preview is a shortened view of a list of ministry opportunities based on a given ministry. It is useful to put on other pages, not the main Servant Matcher page. Note that if you set this, you will only see a preview and the options below will be used.
Title Of Preview
FLEXFORM OPTION
Title Of Preview
DESCRIPTION
The title that is above the preview.
Preview Button Name
FLEXFORM OPTION
Preview Button Name
DESCRIPTION
The button/link text that is at the bottom of the preview. This will take you to the actual Servant Matcher page that is linked in (see below).
How Many To Preview (0 = just a link)?
FLEXFORM OPTION
How Many To Preview (0 = just a link)?
DESCRIPTION
How many entries for the given “ministry” to show. If you just want a link, you can set this to zero and you will just see a link that will go to the Servant Matcher page.
Length for Description Field?
FLEXFORM OPTION
Length for Description Field?
DESCRIPTION
How many characters of text you want to show for each entry. This is the description field that can be 200+ characters, and so you will likely want to limit it. The default length is 64 characters.
Which Ministry To Preview?
FLEXFORM OPTION
Which Ministry To Preview?
DESCRIPTION
The ministry you want to preview. If you do not choose one, then it will show all ministries.
Choose Servant Matcher Data Folder
FLEXFORM OPTION
Choose Servant Matcher Data Folder
DESCRIPTION
This should be set to where you have the Servant Matcher data located.
Choose Servant Matcher Page To Link To
FLEXFORM OPTION
Choose Servant Matcher Page To Link To
DESCRIPTION
This should be set to the page you want to link to. If it is not set, then there will be no link – you can add your own on the page.
TEXT
Header Text
FLEXFORM OPTION
Header Text
DESCRIPTION
For any header text that goes on the main form, you can add it here. You can include any HTML code that you would like. This is optional.
Contact Form Header/Instructions (optional)
FLEXFORM OPTION
Contact Form Header/Instructions (optional)
DESCRIPTION
You can add any instructions or header that you want on the top of the contact/commitment form.
Contact Email Header text (optional)
FLEXFORM OPTION
Contact Email Header text (optional)
DESCRIPTION
If you want to include a header text before the main contact email that is sent out when a user submits the Contact form. Note that this form is sent to the Contact person(s) email.
Add New Ministry
To add a new ministry, you just go to your “global” Storage Folder and " Create New Record " and choose " *Website usergroup"* . This is a fe_group (front-end group) in the Typo3 terminology. You will want to put this in the “global” folder as opposed to the Servant Storage folder because usergroups are global and can be used in various places.
You will want to create a usergroup that has a Type of Group = Ministry. Note that if you want to change the terminology for calling these Type of Groups, see below for “Change Group Type Names”. Looking at the structure of a record, you will see the following fields:
Grouptitle
Field Name
Grouptitle
Field Description
The title of this ministry.
Description
Field Name
Description
Field Description
Description of what this ministry area is all about [optional]
Access Type
Field Name
Access Type
Field Description
Type of access for this group. Usually will be marked public.
Type of Group
Field Name
Type of Group
Field Description
The type of group this is. You can create your own types. This must be marked Ministry.
Administrator list
Field Name
Administrator list
Field Description
A list of administrators that have access to it.
You can also change a given Website usergroup to a ministry by just setting the “ Type of Group ” to Ministry.
Add New Or Update Existing Contact
To create a new contact, you just go to your “global” Storage Folder and " Create New Record " and choose " *Website user"* . This is a fe_user (front-end user) in the Typo3 terminology. If you create this in your Servant Storage folder, the users will not be accessible outside of this extension and so it is recommended to put these in your global Storage folder. If you already have existing site with Website user s, you can just edit these and set them as Ministry Contacts.
If you are creating new users, you need to set the username, name, password, and select a group(s). There is only one necessary field for the Servant Matcher that you need to set in the Website user field: it is the “Is Ministry Contact” field and is found at the very bottom.
Is Ministry Contact
Field Name
Is Ministry Contact
Field Description
A checkbox where you will set this and this will then allow the extension to know this is a contact and they can be selected.
If you have already created contacts or have existing users, you can then just edit the fields and set the “Is Ministry Contact” field so they are now recognized as Ministry Contacts for the Servant Matcher.
Add New Ministry Skills
Skills can be actual skills or interests (i.e., “Woodwork”, “Teaching”, “Computers”, “Musician”, etc.), or passions (i.e., “Helping Homeless”, “Missions Work”, “Youth”, etc.) or spiritual gifts (“Teaching”, ”Leadership”, ”Administration”,”Giving”, ”Helping”, ”Evangelism”, etc.) or times ("Weekend","Wednesday night", "Saturday", etc). You may also add on demographics or age groups interested in (i.e., “Singles”, “Youth”, “Children”). The Skills system is very flexible, and should suit many needs. However, it will take some thought & planning to set it up well for your church or ministry.
If you are wanting to use “skills” for your ministry opportunities, you will need to create these skill records. To do this, you can just go to your Data Folder and " Create New Record " and choose " Ministry Skills ". Looking at the structure of a Ministry Skill record, you will see the following fields:
Skill Name
Field Name
Skill Name
Field Description
The name of the skill, interest, or spiritual gift.
Any additional description
Field Name
Any additional description
Field Description
Any additional description of the skill/interest/gift [optional]
Group this by
Field Name
Group this by
Field Description
Any grouping to group by – put the group name here. This will put the group name as the header of the list of skills for this group. Note that you must match the text for this exactly for skills to be grouped together. [optional]
Sort order
Field Name
Sort order
Field Description
Any sort order (descending, from highest to lowest) so 1 is lowest and 100 is highest. This sort order will effect the total sort order. If items are grouped, then the item with the highest sort order will be used for sorting. [optional]
Required group
Field Name
Required group
Field Description
If this is a required group. then you can set this. If it is required – what it means that at least one option out of the given skills in this group must be selected. If one is not selected in a required group, then the extension will give an error until one is selected.The values for this are:0 (default) : not required. If this is the case, you do not need to enter anything.1 : yes, this group is required.2: yes, this group is required and this is set on as a default. You can have more than one set as the default in a group.
Add New Ministry Opportunities
To create this content, you just go to your Servant Storage folder and " Create New Record " and choose " Ministry Opportunity ". Note that you can create this in your current page where the wec_servant extension is IF it is used in only one place/page. However, if you have it on more than one page or used throughout your site, then we would recommend to save these Ministry Opportunities in the Global Storage Folder.
Looking at the structure of a Ministry Opportunity record, you will see the following fields:
Name Of Ministry Opportunity
Field Name
Name Of Ministry Opportunity
Field Description
Main title of this ministry opportunity.
Description
Field Name
Description
Field Description
Description of what person will do. You can have linebreaks and HTML tags in this.
Ministry
Field Name
Ministry
Field Description
Selection of all ministries that are available. Points to fe_group table where type is = Ministry.
Contact Person
Field Name
Contact Person
Field Description
Contact person available. You must have people setup as fe_users and then set the is_ministry_contact field.
Location
Field Name
Location
Field Description
Where this is located at.
Days/Times Needed
Field Name
Days/Times Needed
Field Description
What times needed for.
Priority Of Need
Field Name
Priority Of Need
Field Description
Select the priority. Normal / Urgent / High / Low / Special (optional)
Skills / Interests Needed
Field Name
Skills / Interests Needed
Field Description
List of skills available. Whatever has been created as a WEC Ministry Skill will be listed here.
Contact Info (if needed)
Field Name
Contact Info (if needed)
Field Description
Any extra contact info (beyond the contact person)
Misc Description
Field Name
Misc Description
Field Description
Any additional information to describe this opportunity. You can have linebreaks and HTML tags in this.
Qualifications
Field Name
Qualifications
Field Description
Any qualifications needed for this opportunity. You can have linebreaks and HTML tags in this.
Start
Field Name
Start
Field Description
The date the opportunity should start at [optional]. Leave this blank if the ministry opportunity has no start or stop period.
Stop
Field Name
Stop
Field Description
The date the content should finish [optional]. Leave this blank too if the ministry opportunity has no start or stop period.
Note that you can add linebreaks and HTML tags (i.e., <b>, <i>, <span style=”color:#RRGGBB”>...etc) to format some of these fields better. The fields that support this are: description, Misc Description, and Qualifications.
Setup the Template
a. Create an Extension Template Record
In general we recommend installing an extension template record to the Servant Matcher page. This extension template will store the Template constants. To install an extension template record, see the How-To at: http://webempoweredchurch.com/support/howtos/single/add_an_extensio n_template_record .
b. Install the Static Template
The static template contains the information used by the web browser to display the Servant Matcher. The Servant Matcher static template can be installed in your site's main Template Record. The name of the Static Templates required by the Servant Matcher is *WEC Servant Matcher template.*
Internet Link: Instructions for adding the Static Templates can be found in the how at http://webempoweredchurch.com/support/howtos/sin gle_howto_article/add_a_static_template .
Change The Look
You can either refine or totally redo the look for the Servant Matcher to fit your needs. Using the Template system and Constant Editor, you can create a new look for the overall page. You do this by changing the template and by setting the color, font, and CSS constants. The default template is called wecservant.tmpl and is in the extensions folder under /pi1 (typically typo3conf/ext/wec_servant/pi1). You can edit and create your own template file and then upload it using the FlexForm configuration when you set up your page.
If you do edit the template file or create your own CSS file, we recommend that you put it in its own location outside the extension folder. You can edit it and then upload it using the Filelistutility. We also recommend to put it in a location like fileadmin/wec_servant/ . You have to create the wec_servant folder in the root of fileadmin . To let the extension know about this new location, you need to set the templateFile variable. You can do this in one of the following ways:
a. Choose the Template file in the FlexForm
You can open up your pageContent and you will see the FlexForm. On the “Main” link, you can choose the Template file. See above in “Configure Options” for complete details. Note that if you set it this way, that whenever you make a change, you will have to set this file in this way.
b. TypoScript In the template's TypoScriptConstants section, set
page.templateFile = fileadmin/wec_servant/my_wecservant.tmpl
Note that using this way, you can easily change the template and just clear Cache to try different settings.
c. Constant Editor
See below in the Configuration section to see how to change the templateFile constant.
You can also just edit the constants to change the position, color, and text font and size for much of the WEC Servant Matcher extension. The constants that can be changed are listed in the 1.4.2 Configuration section. You can set these in the Constants Editor or directly in TypoScript.
Test It Out
Once you have setup all the previous information, you can now test out the extension. To test it, you can select the page where the wec_servant extension is on, and then click the “View” action in the action bar. Or you can right click on the page with the wec_servant extension, and choose View. This will open it up in a new window.
If you like how it looks, you are ready to go. Most likely, you will want to make changes in the look, layout, or add new ministry opportunities or skills. You can go ahead and add as much as you would like, save it, then test it out over and over until you are happy with it.
Change Group Type Names
The wec_servant extension already comes with three predefined Group types: Ministry , Class , Small Group . If you want to change the name of these or create or delete the given ones, you need to go to your root folder. This is usually done by clicking on the World icon at the very top of the page tree. Then find the listing for “Group Type”. You will see these listed, and you can add more, change these, or even delete these. Note that the Servant Matcher extension is setup to work with the Ministry Group Type so do not delete that – just rename it. The other group types are not currently used but for future extensions.Looking at the structure of a record, you will see the following fields:
Name of Group Type
Field Name
Name of Group Type
Field Description
The title of this group type. Examples of types for churches and ministries might be: Ministry / Small Group / Class / etc.
Description of Group Type
Field Name
Description of Group Type
Field Description
Description of what this group type is [optional]
F.A.Q.
The following are questions that may help you better understand and use this extension:
Q: When I get to creating a new Ministry Opportunity, the Ministry field is blank? Or the Contacts or Skills are blank?
This problem may be caused by one of two problems:1) Make sure that the Group Types are loaded in. Go to the Extension Manager, select the WEC Servant Matcher and Import the Static Data.
2) The Startingpoint page is not set. Go to the Flexform for the Servant Matcher and set the Startingpoint to the folder that has the Ministry data.
Q: How can I setup skills right? I am not sure I understand how that all works.
A: The skills system allows you to set “skills” for each ministry opportunity. These “skills” can be actual skills or interests or passions or spiritual gifts or whatever fits you. You can even mix them together. The goal is to create something that is helpful to people using your website and this Servant Matcher.Perhaps easiest way is for an example or two to explain the “skills”. Also, we would recommend that you check out www.ginghamsburg.org/serve to see how they are used in a variety of ways.
Teach Children's Class on Sunday Morning
Ministry Opportunity
Teach Children's Class on Sunday Morning
Skills / Interests
Teaching, Children.
Church Fix-up Day
Ministry Opportunity
Church Fix-up Day
Skills / Interests
Yardwork, Cleaning, Hauling, Serving, Repairing.
Small Group Leader
Ministry Opportunity
Small Group Leader
Skills / Interests
Teaching, Facilitating, Church Member.
Greeter For Sunday Service
Ministry Opportunity
Greeter For Sunday Service
Skills / Interests
Friendly, Helping Others.
Feed Homeless At Soup Kitchen
Ministry Opportunity
Feed Homeless At Soup Kitchen
Skills / Interests
Helping, (passion for) Homeless/Disadvantaged/Poor,
Usher
Ministry Opportunity
Usher
Skills / Interests
Helping Others, Responsible.
Q: How can I configure for different needs/priorities? Why should I use this?
A: The needs/priorities allow you to alert your ministry group of certain needs that are higher priority than others. So, if you have an immediate need, you can let them know. You may not want to use it, but this is available. It is easy to set and update the priority in the Admin or Backend interface.
If you would like to change the names of the priorities, you would need to change the locallang.php file and the priorityLevel0...priorityLevel5 values. And also change the values in locallang_db.php in the pi1/ folder of the extension under tx_wecservant_minopp.priority.I.***. If you want to shorten the list, you can delete those you do not want, and the system should handle it. You can add up to 9 different needs/priorities.
Q: How do I put the opportunities on my other ministry pages?
A: It is not too difficult. You just need to create a new PageContent element with the wec_servant plugin. And you will go to the Preview section in the Flexform and set it as a Preview. You must point back to the page of the original Servant Matcher data. It should be that easy and definitely check out the options for Preview.
If you would like to make the Preview look different, you can stylize the template of preview in ###TEMPLATE_PREVIEW### in the wecservant.tmpl template file.
Q: I already have a Typo3 site setup, how can I update for existing users and groups?
A: You should go through the “Website user” list which is usually found in the main “Storage Folder” of your website. You can search that for any staff or people who should be contacts. Then edit the user record and set the “Is Ministry Contact” field for each one that is a contact. Once you do that, they will appear in the list of contacts.
Q: How can my staff keep their own opportunities up-to-date?A: If they are set as contacts (Is Ministry Contact), then all they need to do is login to their account on your website, and then go to where the Servant Matcher is setup. They can then look for the ministry opportunities and if they can edit one, they will see an “Edit” button. Once they click on this, they can change and update any of the fields for this opportunity.
Only users who are set to “Admin” can actually add new opportunities or delete existing ones. You can set up Admins in the Admin menu by setting their “Is Ministry Contact”.
Additionally, you can setup in the Backend, so that users can edit the Backend records and create these ministry opportunities. The Front-End way just makes it more flexible for users.
*Q: What if someone wants to signup but no opportunities fit with them ?* A: That is a good question and we added a way to handle this. Please look at the Allowing To Signup for Custom Ministry in the Configuration section below.
*Q: I want to add linebreaks and/or style options to the Description and other fields. How can I do that?* A: You can now add linebreaks and some HTML tags to the Description, Misc Description, and Qualifications fields for the Ministry Opportunity record. An example of this might be:
This is a <b>description</b> of this opportunity. It has three key parts:
#1 part 1 here
#2 part 2 here
#3 part 3 here
This is a <span style=”color:#FF0000”>red lettering</span> here.
*Q: How can I allow to view a single item?* A: You can add the ###VIEW_SINGLE### marker to the template. It is not included by default. Also, if you know the ministry opportunity you want to link to directly, you could hardcode a link such as http://www.mysite.com/serve/?tx_wecservant[single]=42 where 42 is uid of the ministry opportunity you want to link to.
More questions coming as they are received...please send us yours!
Configuration
The following is for site developers/administrators who want to setup this extension on their system.
TypoScript Reference
A number of constants are setup so you can customize the extension to fit your needs.
To change the constants, you can either use the Constants Editor or change them in TypoScript. Both ways are shown below. First though you will need to create a new template. If you already have a template, then proceed to the Edit Constants or Change Constants in TypoScript below.
Create New Template
First, before you edit constants, you will need to create a new template. Creating a template is easy.
Click on the page with the WEC Servant Matcher in the page tree.
Go to the Template action in the main menu. Click on “Info/Modify” in the upper right drop-down menu.
Choose “Click here to create an extension template” under “Create Extension Template”.
You can “edit the whole template record” and setup the name or change constants. See below.
Edit Constants In Constant Editor
Here are the steps to do that:
Select the page where your WEC Servant Matcher is installed
Select the Template icon
Choose Constant Editor in the drop down in the upper right.
Choose PLUGIN.wecservant_pi1 from the Category.
Choose one or more of the constants by clicking on the checkbox. Doing this indicates that you want to change that constant. When you are done selecting items, click the Update button.
Change the values to what you want. Click on Update button again to save them.
You can now preview your page and see the changes.
Change Constants in TypoScript
You need to have a template defined in the installation of your Extension, or you can edit the root template for your site. If you have not created a template, see the above how to create a new template.
- Select the page where your Servant Matcher i s installed.
- Select the Template icon.
- Choose Info/Modify in the drop down in the upper right.
- Choose “Click here to edit the whole template record”.
- Now you can add to the Constants or Setup field.
An example to add would be:
page.templateFile = fileadmin/wec_servant/my_wecservant.tmpl
- You can then preview your page and see the changes.
Constants Available
The following are the constants available to change in the Servant Matcher extension:
templateFile
PROPERTY
templateFile
DATA TYPE
string
DESCRIPTION
The template file.
DEFAULT
EXT:wec_servant/template/wecservant.tmpl
((Unknown Property))
PROPERTY
DATA TYPE
DESCRIPTION
DEFAULT
emailAtSubstitute
PROPERTY
emailAtSubstitute
DATA TYPE
string
DESCRIPTION
The character(s) to replace the @ symbol in the display of any email addresses. This is used for spam protection when email addresses are displayed. The default @ is the @ character. You can also use “(at)” or “.at.” or whatever you would like. This is only for the display – the actual mailto is encoded with Typo3.
DEFAULT
@
maxMatchesToShow
PROPERTY
maxMatchesToShow
DATA TYPE
string
DESCRIPTION
The maximum number of matches to show. This is only useful if you have a large number of entries and want to limit the amount. This was added so that the server does not slowdown too much in doing matches.
DEFAULT
250
staffDirectoryPage
PROPERTY
staffDirectoryPage
DATA TYPE
integer
DESCRIPTION
You can link to the WEC Staff Directory single page of a staff member by setting the page id to the WEC Staff Directory. You can get this page id from the Backend of your site. You may want to link to a single view of the staff directory page if you have setup.Note: If this constant is set, then the extension loads in WEC Staff Directory tables to match the fe_user id with the staff directory id. The link is through tx_wecstaffdirectory_pi1[curstaff]=#.
DEFAULT
viewMinistryOpps
PROPERTY
viewMinistryOpps
DATA TYPE
string
DESCRIPTION
If you would like the Servant Matcher to show Ministry Opportunities right away, and not be concerned with matching, then you can set this constant to the given ministry/usergroup and it will show all matching. If you set it to 'all' or -1 then it will show all ministry opportunities.
DEFAULT
((Unknown Property))
PROPERTY
DATA TYPE
DESCRIPTION
DEFAULT
Template File
The template file is where the template is stored to determine how the Servant Matcher will be displayed. It contains HTML code along with Template Markers that show where the data is inserted. In the template file, you will find several template sections – one for the main page, one for an item view, one for the signup form, and another for the admin menu.
The following details the template sections and template markers. You can modify these to suit your needs. To create your own, just copy the whole template section, rename it to whatever you would like (i.e., ###TEMPLATE_NEWTYPE###) and then alter the content and setup as you would like.
###JAVASCRIPT_CODE###
TEMPLATE MARKERS
###JAVASCRIPT_CODE###
DESCRIPTION
An internal field that must be present for the toggle skills to work.
###TITLE###
TEMPLATE MARKERS
###TITLE###
DESCRIPTION
The title of the page that is from the Flexform Title.
###ADMIN_LINK###
TEMPLATE MARKERS
###ADMIN_LINK###
DESCRIPTION
Where to put an admin button...which only those defined in Administrator will see.
###VIEW_SAVED_MINOPPS_LINK###
TEMPLATE MARKERS
###VIEW_SAVED_MINOPPS_LINK###
DESCRIPTION
The button / link that will allow you to view saved ministry opportunities.
###PRINT_SAVED_MINOPPS_LINK###
TEMPLATE MARKERS
###PRINT_SAVED_MINOPPS_LINK###
DESCRIPTION
The button / link that will allow you to print saved ministry opportunities.
###RESPONSE_MSG_TEXT###
TEMPLATE MARKERS
###RESPONSE_MSG_TEXT###
DESCRIPTION
Any message that is shown for errors or responses on actions that the user made.
**###FIND_BY_MINISTRY_HEADER######FIND_BY_MINISTRIES_HEADER#####
TEMPLATE MARKERS
###FIND_BY_MINISTRY_HEADER######FIND_BY_MINISTRIES_HEADER##### #FIND_BY_NEEDS_HEADER######FIND_BY_LASTADDED_HEADER###
###FIND_BY_SKILLS_HEADER###
DESCRIPTION
These are the headers (text info) for showing the Find By.... The actual text is defined in locallang.php.
###FIND_BY_MINISTRY######FIND_BY_MINISTRIES###
TEMPLATE MARKERS
###FIND_BY_MINISTRY######FIND_BY_MINISTRIES###
###FIND_BY_NEEDS###
###FIND_BY_LASTADDED###
###FIND_BY_SKILLS###
DESCRIPTION
These are the actual selection interface for each. For skills and find_by_ministries, this is checkbox list of options. For all others, it is a drop-down menu list.
###TOGGLE_FIND_SKILLS######TOGGLE_FIND_SKILLS_OFF###
TEMPLATE MARKERS
###TOGGLE_FIND_SKILLS######TOGGLE_FIND_SKILLS_OFF###
DESCRIPTION
If you do use the skills and you have a lot, you may want to hide the skills unless they click on a button. If you wrap these template markers around the FIND_BY_SKILLS, this will allow that.
###TOGGLE_FIND_MINISTRIES######TOGGLE_FIND_MINISTRIES_OFF###
TEMPLATE MARKERS
###TOGGLE_FIND_MINISTRIES######TOGGLE_FIND_MINISTRIES_OFF###
DESCRIPTION
You may want to hide the full ministries list until they click on the “Show...” button. If you wrap these template markers around the FIND_BY_MINISTRIES, this will alow that.
###DISPLAY_RESULTS_HEADER###
TEMPLATE MARKERS
###DISPLAY_RESULTS_HEADER###
DESCRIPTION
This is the header for the display results.
###DISPLAY_RESULTS###
TEMPLATE MARKERS
###DISPLAY_RESULTS###
DESCRIPTION
This is the actual listing of “display items”.
###SIGNUP_BTN###
TEMPLATE MARKERS
###SIGNUP_BTN###
DESCRIPTION
The signup button.
###COMMITMENT_BTN###
TEMPLATE MARKERS
###COMMITMENT_BTN###
DESCRIPTION
The commitment button.
###LAST_10_ADDED_BTN###
TEMPLATE MARKERS
###LAST_10_ADDED_BTN###
DESCRIPTION
A button that when clicked on will show the last 10 updates of ministry opportunities. You may want to use this instead of FIND_BY_LASTADDED for simplicity.
###FIND_URGENT_NEEDS_BTN###
TEMPLATE MARKERS
###FIND_URGENT_NEEDS_BTN###
DESCRIPTION
A button that when clicked on will show the Urgent Needs. You may want to use this instead of the drop-down if you just mark your priorities as Urgent/Normal. Also, you can change the name “Urgent” in the locallang file so this can be “High Priority” or whatever you would want to call it, but will show the highest priority needs.
###VIEW_SINGLE###
TEMPLATE MARKERS
###VIEW_SINGLE###
DESCRIPTION
Allows to view an item separately in its own view. Will put a 'View This' (can change text in locallang -- view_single) link.
((Unknown Property))
TEMPLATE MARKERS
DESCRIPTION
**###TEMPLATE_DISPLAYITEM### -- showing one item (ministry
TEMPLATE MARKERS
###TEMPLATE_DISPLAYITEM### -- showing one item (ministry opportunity)
###ITEM_EVENODD_DISPLAY###
TEMPLATE MARKERS
###ITEM_EVENODD_DISPLAY###
DESCRIPTION
The style that must be attached to the displayItem div if you want to support alternating display colors for each item in the list. If alternating colors are not used, this can still be used for setting the background color.
**###MINISTRY_INFO######NAME######DESCRIPTION######PRIORITY######LOCA
TEMPLATE MARKERS
**###MINISTRY_INFO######NAME######DESCRIPTION######PRIORITY######LOCA TION######TIMES_NEEDED######MISC_DESCRIPTION######QUALIFICATIONS#### ##SKILLS######CONTACT_INFO######CONTACT_PHONE######CONTACT_EMAIL### **
DESCRIPTION
The actual data for the item. This will only display if the field is actually displayed.
**###SHOW_MINISTRY_INFO######SHOW_NAME######SHOW_DESCRIPTION######
TEMPLATE MARKERS
###SHOW_MINISTRY_INFO######SHOW_NAME######SHOW_DESCRIPTION###### SHOW_PRIORITY######SHOW_LOCATION######SHOW_TIMES_NEEDED######SHOW_MISC_DESCRIPTION######SHOW_QUALIFICATIONS######SHOW_SKILLS######SH OW_CONTACT_INFO######SHOW_CONTACT_PHONE######SHOW_CONTACT_EMAIL# ##
DESCRIPTION
Whether to show the field. If the field is turned off / hidden, then the whole field (label + data) will not be shown. The field is hidden through a display:none in the CSS.
**###ITEMLABEL_MINISTRY_INFO######ITEMLABEL_NAME######ITEMLABEL_DE
TEMPLATE MARKERS
###ITEMLABEL_MINISTRY_INFO######ITEMLABEL_NAME######ITEMLABEL_DE SCRIPTION######ITEMLABEL_PRIORITY######ITEMLABEL_LOCATION######ITEML ABEL_TIMES_NEEDED######ITEMLABEL_MISC_DESCRIPTION######ITEMLABEL_ QUALIFICATIONS######ITEMLABEL_SKILLS######ITEMLABEL_CONTACT_INFO### ###ITEMLABEL_CONTACT_PHONE######ITEMLABEL_CONTACT_EMAIL###
DESCRIPTION
The label for an item. The default comes from locallang.php in the extension folder.
###TOGGLE_ITEM######TOGGLE_ITEM_END###
TEMPLATE MARKERS
###TOGGLE_ITEM######TOGGLE_ITEM_END###
DESCRIPTION
If you only want some information shown initially, and then if they want more, they can click a link (i.e., “Display More Info”) to see the rest. This allows shortened display listings without having to go to a new page.
###SIGNUP_BTN###
TEMPLATE MARKERS
###SIGNUP_BTN###
DESCRIPTION
The signup button.
###COMMITMENT_BTN###
TEMPLATE MARKERS
###COMMITMENT_BTN###
DESCRIPTION
The commitment button.
###SAVE_ITEM###
TEMPLATE MARKERS
###SAVE_ITEM###
DESCRIPTION
The link checkbox which will allow the user to save the item for later. In this way, they can look at a variety of items and sections, and save only the ones they are interested in. Note that this function uses cookies to maintain the list.
###EDIT_BTN###
TEMPLATE MARKERS
###EDIT_BTN###
DESCRIPTION
A button that will only show if can edit this ministry opportunity. This will only be available to administrators and the person who is the main contact for the given ministry opportunity.
**###SHOW_CONTACT_STAFFLINK######ITEMLABEL_CONTACT_STAFFLINK######
TEMPLATE MARKERS
###SHOW_CONTACT_STAFFLINK######ITEMLABEL_CONTACT_STAFFLINK###### CONTACT_STAFFLINK###
DESCRIPTION
If the staffDirectoryPage constant is set, then these are filled in. The CONTACT_STAFFLINK is a link to the WEC Staff Directory page. You can change the link text or the label through locallang 'contact_stafflink' and 'itemlabel_contact_stafflink'.
###ACTION_URL###
TEMPLATE MARKERS
###ACTION_URL###
DESCRIPTION
The URL to go back to this page and handle the form. This must be in the template.
###FORM_HEADER###
TEMPLATE MARKERS
###FORM_HEADER###
DESCRIPTION
The title of the signup form and any other header information you may want to include.
###FORM_ERROR###
TEMPLATE MARKERS
###FORM_ERROR###
DESCRIPTION
If there are any errors from submitting a form (i.e., a required field is missing), this will show those errors.
###SIGNUP_TEXT###
TEMPLATE MARKERS
###SIGNUP_TEXT###
DESCRIPTION
The text shown AFTER they signed up for one or more ministry opportunities..
###SIGNUP_INSTRUCTIONS###
TEMPLATE MARKERS
###SIGNUP_INSTRUCTIONS###
DESCRIPTION
The instructions of how to signup.
###SHOW_REQUIRED_TEXT###
TEMPLATE MARKERS
###SHOW_REQUIRED_TEXT###
DESCRIPTION
The instructions shown if there are required fields.
###SHOW_NAME### begin/end###SHOW_EMAIL### begin/end
TEMPLATE MARKERS
###SHOW_NAME### begin/end###SHOW_EMAIL### begin/end
###SHOW_PHONE### begin/end
###SHOW_ADDRESS### begin/end
###SHOW_MESSAGE### begin/end
DESCRIPTION
This is a wrapped area that will be hidden if it is not selected in the display signup field in the Flexform. We use wraps like this (as opposed to ###SHOW_MINISTRY_INFO### above) because some of the sections have multiple fields.
###FORM_NAME###
TEMPLATE MARKERS
###FORM_NAME###
###FORM_EMAIL###
###FORM_PHONE###
###FORM_ADDRESS###
###FORM_CITY###
###FORM_STATE###
###FORM_ZIP###
###FORM_EMAIL###
###FORM_MESSAGE###
###FORM_ATTACHMENT###
DESCRIPTION
This is the form label fields that will show up if the section is shown.
###FORM_NAME_REQUIRED###
TEMPLATE MARKERS
###FORM_NAME_REQUIRED###
###FORM_EMAIL_REQUIRED###
###FORM_PHONE_REQUIRED###
###FORM_ADDRESS_REQUIRED###
###FORM_MESSAGE_REQUIRED###
DESCRIPTION
This is for if the given field is required, then the ###FORM_REQUIRED_MARKER### will be added. By default this is a red * (asterisk).
###VALUE_NAME###
TEMPLATE MARKERS
###VALUE_NAME###
###VALUE_EMAIL###
###VALUE_PHONE###
###VALUE_ADDRESS###
###VALUE_CITY###
###VALUE_STATE###
###VALUE_ZIP###
###VALUE_EMAIL###
###VALUE_MESSAGE###
###VALUE_ATTACHMENT###
DESCRIPTION
This is the given value for the form. These may be filled in by default if any of the information is known. Or if they submitted the form and had incorrect or missing fields, these will be used to keep the values in the form.
###VALUE_RADIO_BUTTON_VALUE###
TEMPLATE MARKERS
###VALUE_RADIO_BUTTON_VALUE###
DESCRIPTION
You can preserve the radio button values in your form (when there is an error) by putting this in the <input> field. The format is all uppercase of radio button NAME + _ + radio button VALUE. For example:
<input name="tx_wecservant[Is_married]" type="radio" value="Yes"  ###VALUE_IS_MARRIED_YES###> Yes

<input name="tx_wecservant[Is_married]" type="radio" value="No"  ###VALUE_IS_MARRIED_NO###> No
###SUBMIT_BTN_TEXT###
TEMPLATE MARKERS
###SUBMIT_BTN_TEXT###
DESCRIPTION
The submit button text value for the form.
###CANCEL_BTN###
TEMPLATE MARKERS
###CANCEL_BTN###
DESCRIPTION
The cancel button for the form.
**###TEMPLATE_PREVIEW### -- allow to setup a preview of a given
TEMPLATE MARKERS
###TEMPLATE_PREVIEW### -- allow to setup a preview of a given servant matcher
###PREVIEW_TITLE###
TEMPLATE MARKERS
###PREVIEW_TITLE###
DESCRIPTION
The title / header for the preview.
###PREVIEW_ITEM_LIST###
TEMPLATE MARKERS
###PREVIEW_ITEM_LIST###
DESCRIPTION
The list of items for the preview
###GO_BTN###
TEMPLATE MARKERS
###GO_BTN###
DESCRIPTION
The name of the button/link to go to the Servant Matcher
###PREVIEW_ITEM###
TEMPLATE MARKERS
###PREVIEW_ITEM###
DESCRIPTION
The wrap for showing a single preview item.
###NAME###
TEMPLATE MARKERS
###NAME###
DESCRIPTION
The name of the given ministry opportunity.
###DESCRIPTION###
TEMPLATE MARKERS
###DESCRIPTION###
DESCRIPTION
The description of the given ministry opportunity.
###ADMIN_>>>>>###
TEMPLATE MARKERS
###ADMIN_>>>>>###
DESCRIPTION
These are the admin sections that are not explicitly detailed for now. You can look at the template code and determine most of them from that. You can change the admin menu by deleting or changing items, but it does not currently support any additions.
Multi-language
The text for this extension has been placed in the typo3conf/ext/wecservant/ folder under pi1/locallang.php file and locallang_dp.php file. You can extend to support different languages by adding translations to this file.
To configure a different language, you should refer to the TYPO3documentation and check out the http://typo3.org/documentation /tips-tricks/multi-language-sites-in-typo3/ one-pagetree.
As an overview, you would set the following in TypoScript:
# Set up the language variable "L" to be passed along with links
config.linkVars = L
# For German/Deutsch language, sys_language.uid = 2
config.sys_language_uid = 2
config.language = de
config.locale_all = de_DE
# For Dutch language,
config.sys_language_uid **=* 1*
config.language = dk
config.locale_all = danish
Extending your signup form
You can add any additional information you want in your signup form. The basic fields of name / address / email / phone can be added to or changed to whatever you would like. You can setup the form to handle input text, checkboxes, radio buttons, text area, or other form inputs.
To do this, all you need to do is:
*1) Add to the template file* You should preferably have your own custom template file – you can add additional fields in the ###TEMPLATE_SIGNUPFORM### *2) Additional fields must be in the format:* ... name=”tx_wecservant[field_name]” ....whatever name you use as field_name, it must use underscores (no spaces). The name you use, will be output in the email sent. So [is_married] will be shown as “Is married” in the email. Or [how_many_children] will be “How many children”.Also, if you want values put in, then you must put ###VALUE_field_name### in. This will only be filled in if it has the value, which is only the case when the user entered in values, and one was required.Some examples of form inputs include:
For selecting radio buttons about what service they attend:
<input name="tx_wecservant[attend_service]" type="radio" value="Sun 9:00am" > 9:00am
<input name="tx_wecservant[attend_service]" type="radio" value="Sun 10:15am" > 10:15am
<input name="tx_wecservant[attend_service]" type="radio" value="Sun 11:30am" > 11:30am
<input name="tx_wecservant[attend_service]" type="radio" value="Sun 6:00pm" > 6:00pm
For whether they are married or not:
<input name="tx_wecservant[Is_married]" type="radio" value="Yes"> Yes
<input name="tx_wecservant[Is_married]" type="radio" value="No"> No
For comments:
Enter Your Comments: <textarea name="tx_wecservant[other_comments]" cols="30" rows="3"></textarea>
*3) Requiring fields* If you want certain fields to be required to be filled in, you can add an asterisk to the end of the field name. So tx_wecservant[is_member+] would mean that the is_member field is required. The plus sign (+) will not be printed out on the field name or in the output email. But if the user does not fill in this field, it will ask them again to fill in the field. An error message that comes back will be like: “The 'Is Member” field needs to be filled in before you submit this”.All text fields will require at least one character of input. A dropdown menu will require a selection other than the default (zero value). For checkbox input, the field being required is not useful and so is not supported as required.
If the field is a radio button, the system will require that the user select one of the radio buttons in the group. However, to make a radio button required, what you need to do is add a hidden one with a + sign in addition to the radio buttons. This will let the system know that this is required. An example required radio button entry is:
<input type="hidden" name="tx_wecservant[Is_married+]">
4) The limitations With this system, you cannot format the email easily. They will be listed in whatever order is in the form. Also, there is no validation on the form values...other than if they have values. Yet you can add whatever fields you want.
Allow to signup for custom ministry
If you want to allow someone to signup to serve but no ministry fits or they want a custom ministry– then this allows that. What you have to do is this:1) Create a link either in your header text (Flexform Text tab under Header Text) or in your template with:#yourURL#/?makeCommitment=-2 or #yourURL#/?showInterest=-2or you can add the makeCommitment or showInterest to your form too.2) Then you need to make sure that the constant in locallang.php is set for 'admin_emai'l and 'admin_name'. If set, then these will be used. An alternative is that you can use the notify_email option in the Administrator tab of the Flexform. This will send to the notify_email instead.
3) You will receive the signups at the 'admin_email' constant or 'notify_email' config. It's that easy!
Linking directly to ministry or skill(s)
You can link directly to all the ministry opportunities associated with one ministry or with one or more skills. You may want to do this so that on a ministry page, you can link to ministry opportunities only associated with that ministry. Or if you want only certain skills/interests/etc. associated (perhaps Weekend Worship or *any* Youth events), you could add a link to those directly. Below is how you can do this:
For Linking To A Ministry:
You just need to add 'showministry=[ministry name]' parameter to your url. First, you must know the URL to your Servant Matcher. In the example below, you must replace 'http://www.yoursite.org/serve/' to where it is on your website. Then you just need to add showministry="ministry name". If your ministry name has spaces, then replace the spaces with the '_' character. If there are other parameters in the URL, you may need to use &showministry=[ministry name] instead of ?showministry=[ministry name]. ? is used for the first parameter and & is used for additional parameters.
http://www.yoursite.com/serve/?showministry=Childrens_Ministry
If you want to add the full code to an HTML element, you could link with something like:
<a href="http://www.yoursite.com/serve/?showministry=Worship">Serve with the Worship Team</a>
For Linking To Skill/Interest/etc.:
You can add showskills_all (have to match all skills) or showskills_any (will match any skills listed). You can just have one skill, or several, depending on your needs. If you do have more than one skill, you can separate them with the | character. If you have characters in the skills/interest name, then use '_' instead of a space. Each skill will be the text representation given in the Skills list. Some examples will clarify:
http://www.yoursite.com/serve/?showskills_all=Youth|Bible_Study
http://www.yoursite.com/serve/?showskills_all=Weekend_Worship|Greeting.
<a href="http://www.yoursite.com/serve/?showskills_any=Gardening|Discipleship">You can grow people or plants</a>
Handling Contacts without Emails
If you do not have or do not want to support emails for your contacts, or you have a generic contact, then you still want to get the emails that are sent. This extension provides two different ways of handling email:
Notify Email in Administrator Tab
In the Flexform for the WEC Servant extension, you can go to the Adminstrator tab and look for the "Notify email to receive ALL contacts". You can set one or more emails here. Make sure they are specified in the right format, i.e. "myemail@email.com".
If you set an email here, you will receive all contacts, including ones that are set. If you have certain contact email's set and others not, you may want to use the method below.
Set adminEmail in Local language
If you want a default email set, then you can set the 'adminEmail' local language variable. This is the fallback/default email. You can set this by editing your extension template on the WEC Servant page -- go to Templates->Info/Modify in the Backend. If an extension template does not exist, you can create a new one. Then you would add the following to the SETUP field in the template:
tx_wecservant_pi1._LOCAL_LANG.default {
    adminEmail = myemail@mail.com
}
Using Version 2.0 Templates
If you were using version v1.x and either used the default template or a custom template, please read the following steps necessary to upgrade or change to the new templates. If you are a new user (i.e., if this is a new install), refer to the above guide.
Changes
All template and CSS files have been moved to the folder wec_servant/template/ . To ensure access to the new template system, TypoScript (TS) has been written into the template’s constants for both the template and CSS files:
plugin_tx_wecservant_pi1.templateFile = EXT:wec_servant/template/wecservant.tmpl

plugin_tx_wecservant_pi1.baseCSSFile =  EXT:wec_servant/template/pluginstyles.css
plugin_tx_wecservant_pi1.cssFile =  EXT:wec_servant/template/wecservant.css
The pluginstyles.css file is used as the CSS foundation for most WEC plugins using new templates. This allows custom styling across many WEC plugins for the site's template. It also simplifies and compacts the CSS when multiple WEC plugins are installed. In addition, if the wec_styles plugin is installed, it accesses the pluginstyles.css from wec_styles first. This ensures improvements in pluginstyles.css are incorporated site-wide. Otherwise, if wec_styles is not installed, then it uses the pluginstyles.css from this plugin.
Upgrading an Old Custom Template
If you have an old custom template, you will need to upgrade it. You can choose to either upgrade using the old templating system or using the new templating system. Upgrading to the new system is work- intensive, but offers a significant improvement in the look. We suggest referring to the new template at: wec_servant/template/wecservant.tmpl and the new CSS in wec_servant/template/wecservant.css .
If you choose to remain with the older system, you can find the template files at wecservant-old.tmpl and the CSS file at wec_servant/static/ts/setup.txt .
To upgrade using the old templating system, the main issues you will likely encounter will be:
- The handling of buttons have changed. If you examine the button code you will see that your current buttons will not work right.
- Everything is more semantic HTML. For instance, list views use <ul><li> instead of multiple <div> tags.
- Each section is appropriately called using a consistent naming convention (plugin[*]), e.g., pluginNav, pluginHeader, pluginFooter, pluginSection, pluginAside. We have used HTML5 tags as the base for class names when possible.
To upgrade to the new template system, we strongly suggest using the new template as a foundation and adding CSS or objects to the template as desired. The CSS and HTML structure of the template has changed so significantly that we advise starting from scratch rather than trying to change an existing template.
Using the New Template System
If you want to use the new default template and have installed v1.x, use the TYPO3 Template tool and access the page where the +ext template for the *WEC Servant Matcher Template* is included (generally on the same page as the WEC Servant Matcher plugin). Click the template's edit icon and select the Includes tab. In the Include Static field, delete the *WEC Servant Matcher (old) Template* (older templates were renamed for easy identification). Next, add the *WEC Servant Matcher Template* .Save the template record and clear the caches (the lightning bolt icon at the top right of the TYPO3 toolbar). Test each page that has a WEC Servant Matcher installation. Once you've included the new template, modify the look by accessing the Plugin's Display tab.
Creating a Custom Template
To create a custom template, we recommend beginning with the *wecservant.tmpl* and *wecservant.css* files as models. To change the look of an entry, use one of the wecentry[1-3].css files in the folder wec_servant/template as a model.
Once you've made your changes, go to the +ext template and in the SETUP section (or you can use the Constant Editor), you can set the *plugin_tx_wecservant_pi1.cssFile* to the location of the new css file, and *plugin_tx_wecservant_pi1.templateFile* to the location of the new template file. The wec_servant extension will then use your new template and/or CSS.
Known Problems
There are no known problems with the extension at this time. Please report any bugs, suggestions, or comments to the developer of this extension at devteam(at)webempoweredchurch.org . You can also go to http://www.webempoweredchurch.org/support/ to find more support.
To-Do List
Plans for this extension include:
Add time-based for ministry opportunities so user can search for opportunities at a given time (i.e., “on Sunday morning”, “on Wednesday night”, “on Saturday morning”)
Changelog
0.9.0 – Initial version released on 3/16/2006
0.9.1 – Made XHTML compliant.
Released on 3/24/2006.
0.9.2 – Fixed bug with signing up. Added address, city, state, zip preloaded for logged in user.
Released on 3/28/2006.
0.9.3 – Added confirm to delete buttons on admin menu. Fixed minor CSS issues. Added 'Show All' for“Search by Ministry” so can see all opportunities easily. Add select all/clear all for list of opportunities.
Released on 5/27/20060.9.4 – Added ability to commit to a ministry (called Custom Ministry), if cannot find one that fits. Also, handlethe notify better and fixed a bug with that if have multiple emails. Added header text in Flexform so you do not have to edit the template.
Released on 6/6/2006
0.9.5 – Added Danish translation (thanks Frederik M);Allow ministry contacts to add a new opportunity. Allow admins to be only over a given ministry (see Administrator in Flexform), added stats tracking & system for admins.
Released on 7/18/2006
0.9.6 – Added print button for page capability. Also receive a signup confirmation – which can print. Fixed the email'from' so if set contact email will be used (handles spam filtering better).
Released on 9/28/20061.0.0 – Renamed from “Servant Connector” to “Servant Matcher”. Fixed problem with no contact foropportunity will go to admin email now. Allow newlines and HTML tags in descriptions and qualificationsfields. Added optional ###FIND_BY_MINISTRIES### which will allow you to select several ministries atonce. Support radio button saving value on errors. Updated and fixed template and CSS. Code nowfollows TYPO3 coding guidelines.
Released on 2/21/2007
1.0.1 – Fixed bug with radio button markers (could cause PHP error) and filling in and validating values.
Released on 2/22/2007
1.0.2 -- Add a single view. Can pass in showskills_any or showskills_all as GET param to show given skills.Link to Staff Directory as option. Description, misc description, and qualifications are RTE fields in BE.Only shows skills/interests that are associated with opportunities. Added admin stats so can see inactiveopportunities.
Released on 6/20/2007
1.0.3 -- Fixed extra div in template and minor template issues. Fixed error reporting formatting. Made XHTMLcompatible.
Released on 7/6/2007
1.0.4 – FIXED: send out notify_email, wiz_icon file missing, handle start/end times. UPDATED: template and CSSfixes for buttons, templates, centering. Print Page prints directly. Removed most inline CSS from templates and code.
Released on 9/18/2007
1.1.0 – Added Static templates (must add to +ext template). Fixed problem with email / contact name. All GetVarsnow are plugin-wrapped.
Released 3/18/2008
1.1.1 – Added option to allow to view all ministries or skills initially. Fixed strlen display issue. XHTML problems fixed.Ministries(fe_usergroups) now can be in multiple folders and only match if have opportunities thatmatch (thanks Matthias G).
Released 6/24/2008
1.2.0 – Support multiple languages in records. Can just show ministry opportunities (no matching) with viewMinistryOpps option. Fixed problem with matching “any” skills. Fixed XHTML validation issues.
Released 10/31/2008
2.0.0 – Changes:
- Updated templates and CSS to new and improved look with standard base CSS. Existing templates should work fine – if you want to upgrade to newer templates, please remove old template and add new template to +ext template. Look at “Using Version 2.0 Templates” section for further details.
- Added support for versioning/workspaces.
- All functions are now PHP 5.x compatible.
Released on 3/13/2010
2.0.1 – Changes:
- Updated CSS so gradients in display, fixed so column list display works better with variable width displays, and other various CSS improvements.
- Fixed viewMinistryOpps so can see all.
- Allow emails in contact_info field (so can do multiple people).
- Removed deprecated functions.
Released on 7/23/2010
 EXT: WEC Servant Connector - 21