DEPRECATION WARNING
This documentation is not using the current rendering mechanism and is probably outdated. The extension maintainer should switch to the new system. Details on how to use the rendering mechanism can be found here.
EXT: WEC Staff Directory
| Author: | Kasper Skårhøj |
|---|---|
| Created: | 2002-11-01T00:32:00 |
| Changed: | 2011-02-07T13:31:16 |
| Email: | staffdirectory (at) webempoweredchurch.org |
| Info 2: | |
| Info 3: | |
| Info 4: |
EXT: WEC Staff Directory
Extension Key: wec_staffdirectory
Copyright 2007-2011, Christian Technology Ministries International Inc. http://www.CTMIinc.org
Author: Web-Empowered Church Team <devteam(at)webempoweredchurch.org>
Support: http://www.webempoweredchurch.org/support/
This document is published under the Open Content License
available from http://www.opencontent.org/opl.shtml
The content of this document is related to TYPO3
a GNU/GPL CMS/Framework available from www.typo3.com
((generated))
Table of Contents
`Introduction <#1.Introduction|outline>`_ `3 <#1.Introduction|outline>`_
`A. Welcome <#1.1.A.%20Welcome|outline>`_ `3 <#1.1.A.%20Welcome|outline>`_
What is the Web-Empowered Church? 3
`B. About this Manual <#1.2.B.%20About%20this%20Manual|outline>`_ `3 <#1.2.B.%20About%20this%20Manual|outline>`_
`C. How to Use this Manual <#1.3.C.%20How%20to%20Use%20this%20Manual|outline>`_ `3 <#1.3.C.%20How%20to%20Use%20this%20Manual|outline>`_
`Overview <#2.Overview|outline>`_ `4 <#2.Overview|outline>`_
`A. What does it do? <#2.1.A.%20What%20does%20it%20do_|outline>`_ `4 <#2.1.A.%20What%20does%20it%20do_|outline>`_
`B. Screenshots <#2.2.B.%20Screenshots|outline>`_ `5 <#2.2.B.%20Screenshots|outline>`_
`Installation <#4.Installation|outline>`_ `7 <#4.Installation|outline>`_
`Install the Extension <#4.1.Install%20the%20Extension|outline>`_ `7 <#4.1.Install%20the%20Extension|outline>`_
`Install the Static Template <#4.2.Install%20the%20Static%20Template|outline>`_ `7 <#4.2.Install%20the%20Static%20Template|outline>`_
`Create a Storage Folder (Optional) <#4.3.Create%20a%20Storage%20Folder%20(Optional)|outline>`_ `8 <#4.3.Create%20a%20Storage%20Folder%20(Optional)|outline>`_
`Add Staff Info Records <#4.4.Add%20Staff%20Info%20Records|outline>`_ `8 <#4.4.Add%20Staff%20Info%20Records|outline>`_
Step 1: Update Staff FE_User Records 8
Step 2: Create Staff Info Records 9
`Add Staff Department Records (optional) <#4.5.Add%20Staff%20Department%20Records%20(optional)|outline>`_ `11 <#4.5.Add%20Staff%20Department%20Records%20(optional)|outline>`_
`Add the Staff Directory Plugin <#4.6.Add%20the%20Staff%20Directory%20Plugin|outline>`_ `12 <#4.6.Add%20the%20Staff%20Directory%20Plugin|outline>`_
`Configuration <#5.Configuration|outline>`_ `13 <#5.Configuration|outline>`_
Staff Directory: Display Tab 16
Staff Directory: Fields Tab 17
`Basic Display Modification <#6.Basic%20Display%20Modification|outline>`_ `19 <#6.Basic%20Display%20Modification|outline>`_
`F.A.Q.s <#7.F.A.Q.s|outline>`_ `21 <#7.F.A.Q.s|outline>`_
`Advanced <#8.Advanced|outline>`_ `24 <#8.Advanced|outline>`_
`Advanced Display Modification <#8.1.Advanced%20Display%20Modification|outline>`_ `24 <#8.1.Advanced%20Display%20Modification|outline>`_
Customizing the Template File 24
Step 1: Obtain the Template File 25
Step 3: Modify the Template File 26
`Using Version 2.0 Templates <#8.2.Using%20Version%202.0%20Templates|outline>`_ `30 <#8.2.Using%20Version%202.0%20Templates|outline>`_
Upgrading an Old Custom Template 30
Using the New Template System 31
`Advanced Image Configuration <#8.3.Advanced%20Image%20Configuration|outline>`_ `31 <#8.3.Advanced%20Image%20Configuration|outline>`_
`Using fe_users or Staff Directory Info Records <#8.4.Using%20fe_us ers%20or%20Staff%20Directory%20Info%20Records|outline>`_ `32 <#8.4.Usi ng%20fe_users%20or%20Staff%20Directory%20Info%20Records|outline>`_
Updating database to get fe_user data 32
`Work with realURL <#8.5.Work%20with%20realURL|outline>`_ `33 <#8.5.Work%20with%20realURL|outline>`_
`Spam Control <#8.6.Spam%20Control%20|outline>`_ `34 <#8.6.Spam%20Control%20|outline>`_
`Adding Search <#8.7.Adding%20Search|outline>`_ `34 <#8.7.Adding%20Search|outline>`_
`Converting Departments to Records <#8.8.Converting%20Departments%20to%20Records|outline>`_ `34 <#8.8.Converting%20Departments%20to%20Records|outline>`_
`Admin Functions <#8.9.Admin%20Functions|outline>`_ `35 <#8.9.Admin%20Functions|outline>`_
`Adding Hooks <#8.10.Adding%20Hooks|outline>`_ `35 <#8.10.Adding%20Hooks|outline>`_
`Support Social Media Services <#8.11.Support%20Social%20Media%20Services|outline>`_ `36 <#8.11.Support%20Social%20Media%20Services|outline>`_
`TypoScript Reference <#8.12.TypoScript%20Reference|outline>`_ `37 <#8.12.TypoScript%20Reference|outline>`_
`Known Problems <#9.Known%20Problems|outline>`_ `39 <#9.Known%20Problems|outline>`_
`To-Do List <#10.To-Do%20List|outline>`_ `39 <#10.To- Do%20List|outline>`_
`Changelog <#11.Changelog|outline>`_ `39 <#11.Changelog|outline>`_
Introduction
A. Welcome
Welcome to the adventure of doing ministry through technology!
This manual is written for those who are interested in using Web- Empowered Church (WEC) technology and enhancing their website through the use of the WEC Staff Directory extension. The WEC Staff Directory extension has been designed to provide churches, ministries and organizations an opportunity to easily display and update information about their staff members on their website...including contact information, photographs, biographies, news, and more.
What is the Web-Empowered Church?
The Web-Empowered Church (WEC) is a ministry of Christian Technology Ministries International ( http://www.CTMIinc.org/ ) The mission of WEC is to innovatively apply WEB technology to EMPOWER the worldwide CHURCH for ministry.
WEC is helping churches around the world expand evangelism, discipleship, and care through the innovative application of internet technology. WEC web-based tools and training are helping make church ministries more efficient and effective, and they are extending ministry impact to a world in need of Jesus. We are helping to fuel a worldwide movement using the internet to point the world to Jesus Christ, to grow disciples, and to care for those in need. Our vision is to use the web to empower the Church so it can truly be a twenty- four hours per day, seven days per week ministry that is unconstrained by walls, distance, or time.
If you would like to find out more about WEC or our tools, or support us in any way, please go to our website at: www.WebEmpoweredChurch.org .
B. About this Manual
This guide is organized into six main sections:
Overview: What the WEC Staff Directory extension does, how it works, and what you can expect from the rest of the manual.
Installation: How to install the WEC Staff Directory extension and how to get it running on your website.
Configuration: How to configure the WEC Staff Directory extension and plugins for maximum impact on your website.
Basic Display Modifications: How to modify the look and feel of the Staff Directory on your website.
FAQs: Frequently asked questions.
Advanced: How to modify the extension through TypoScript and other advanced functions.
C. How to Use this Manual
✔ To help make sense of the material on the following pages, we’ve used a few icons in the margin to highlight certain information.
T |img-1| ip : Tips are bits of information that are good to know. They may offer shortcuts to save you time or even make your website better.
N |img-2| ote : These notes are similar to tips, but usually contain information you should pay attention to. It might be details about a step that a whole operation hinges on or it may highlight an essential sequence of tasks.
C |img-3| aution : These notes draw your attention to things that can interrupt your service or website if not done correctly. Some actions can be difficult to undo.
T |img-4| echnical Stuff : These notes will explain how stuff works. If you want to know why certain steps are necessary or are just looking for a fuller explanation, these notes should help answer your questions.
I |img-5| nternet Link : These links will guide you to a website page that will demonstrate How-To do something or link you to more advanced information on the :underline:``http://webempoweredchurch.org <http://webempoweredchurch.org/>`_` or :underline:``http://typo3.org <http://typo3.org/>`_` websites.
Overview
A. What does it do?
The Staff Directory is an extension that will enable organizations the ability to display information about their staff members on their website. It will also (optionally) let staff members customize and share their own biography/news/information as well as additional and optional photos. This will be a great help so the organization has a “face” of real people, and the public can get to know them. The administrator can easily keep the staff directory up-to-date and it interfaces with the existing TYPO3 user system.
The needs to be met for this extension include:
- Public can know and contact staff.
- Staff can update their section of the website.
- Department directories of staff can be available.
- Quick updating and maintaining of staff directory.
Features
Major features include:
- Display staff with photos and information that is very configurable – four options built-in: list, columns, brief, or verbose listing. An additional display option is provided to facilitate customization.
- Show staff page that supports additional photos, bios, and news that is easily configurable.
- Staff can (optionally) edit their own page easily (with Frontend user account).
- Sort by first name, last name, department, start date, or your own custom options.
- Show just a department – for individual sub-pages of a site.
- Show random staff member – to highlight different people in a department or organization. Can change it daily, weekly, or monthly.
- Easy maintenance and updating of the staff directory by Backend users.
- Many customization options for display, configuration, and usage.
B. Screenshots
You can view a working example of the WEC Staff Directory extension at http://ginghamsburg.org/staff/
Below are some examples of what the Staff Directory page could look like (photos are optional):
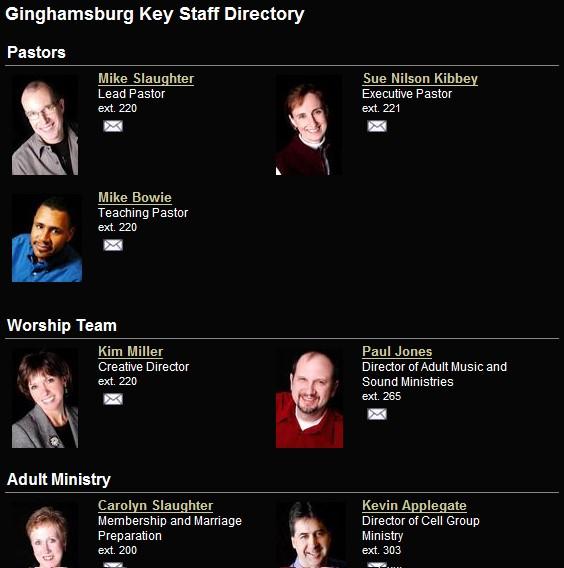 Illustration 1: Ginghamsburg "Key Staff" Directory with
Pictures (List by Columns)
Illustration 1: Ginghamsburg "Key Staff" Directory with
Pictures (List by Columns)
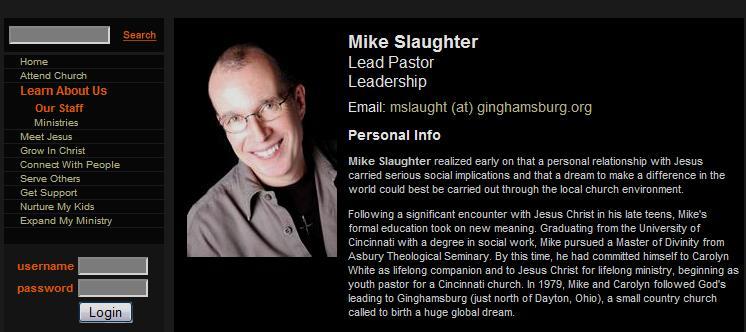 Illustration 2: Single Staff Page
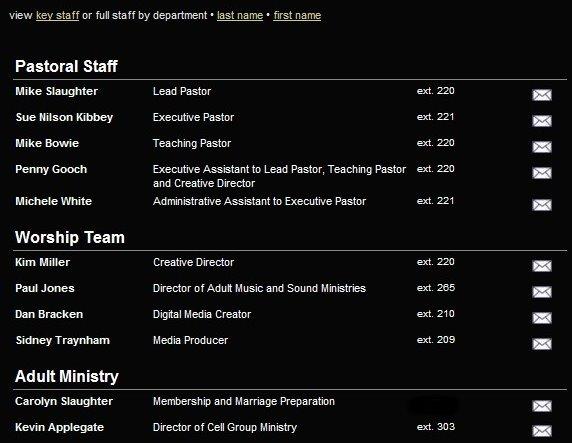 Illustration 3: Full Ginghamsburg Staff Directory (List By
Line)
Illustration 3: Full Ginghamsburg Staff Directory (List By
Line)
Installation
To fully install the Staff Directory extension, you will need to do the following:
Install the Extension
Create a Storage Folder
Add Staff Info Records
Add the Staff Directory Plugin
The following will take you through each step:
Install the Extension
If you do not know how to import and install an extension, please see the How-To at http://webempoweredchurch.org/support/help/tutorial/ins tall_an_extension/ (When importing the extension, type: wec_staffdirectory in the “List or Look Up all extensions” field.)
When you install wec_staffdirectory, you will be given the following options:
Use FE-users to store data[useFEUsers]
If you use FrontEnd Users for your staff you can use that data. If this is NOT selected, then all the information will be stored in the Staff Directory Info record.
If you want to use the fe_user (Frontend User) records to store data, then keep this set. The default is set to on. The plus about using fe_users to store data is that when a staff user makes a change to their info, it is set in one place. However, depending on your website use and if you use fe_users (frontend login), some staff may want to have their personal account and information (like home phone#, email) separate from their work, and so it may be preferred to not use FE- user records. Also, if you do not have user login on your site, then you may want to simplify the record and not use the fe-user data.
Enable Map in Staff records [showMap]
Shows a map and coordinates of the given address. It's only displayed if the above option 'useFEUsers' is disabled. If it is enabled, the map will be displayed in the FE User record.
The WEC Maps extension works with the Google Maps API to display a Google map on a single view for a person if address data is available. Install the WEC Maps extension like any other extension. You will need to consult the extension's manual for instructions on setting up the plugin, including obtaining a Google Maps API Key. Once you have configured the extension, when you create a Staff person, the WEC Maps extension will Geocode the coordinates and provide a map to the person's location for Frontend users. Note that you must select the 'map' field as a Display field in the Flexform.
Use Staff Department Records [useStaffDeptRecords]
Use Staff Directory Department Records(new way). Old way is using strings.
Enables the creation and use of Staff Department Records using using a Database record rather than relying on user-entered strings in the recordForm's Department field. If you will not be assigning staff members to specific departments, you may safely ignore this option.
Install the Static Template
The static template contains the information used by the web browser to display the Staff Directory. The Staff Directory static template can be installed in your site's main Template Record. The name of the Static Templates required by the Staff Directory extension is *WEC Staff Directory template.*
Internet Link: Instructions for adding the Static Templates can be found in the how-to at: http://webempoweredchurch.org/support/help/t utorial/add_an_extension_template_record/ .
Create a Storage Folder (Optional)
You can now create a new Storage Folder or use the global Storage Folder that will have your data for the *Staff Directory* in it. We recommend creating a new Storage Folder to keep your staff records in one place. However, you can place all the data in the global Storage Folder if desired.
See the How-To at http://webempoweredchurch.org/support/help/tutorial /create_a_system_folder/
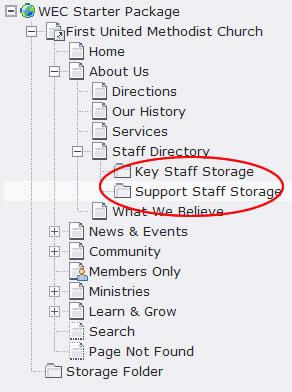 Illustration 4: Example of Multiple Storage Folders
for instruction on how to create a Staff Directory Storage Folder. We recommend placing the new Storage Folder as a subpage (“page inside”) to your Staff page (See Illustration 6 for a typical Page tree example). This extension also supports multiple storage folders. For example, Ginghamsburg UMC has both “key staff” and “other staff.” The “key staff” mostly interact with the public and they wanted to feature their pictures on the website. So they created a “Key Staff Storage Folder” and a “Staff Info Storage Folder.” When they list the Key Staff, they only point to that storage folder. When they list staff by name or department, they show all of the staff and point to BOTH storage folders. See Illustration 4 for an example of multiple storage folders.
Add Staff Info Records
There are two steps necessary to populate the Staff Directory records.
If you have set the extension configuration (when you installed the plugin) to 'useFEUsers', then first, you must either access and update existing staff Frontend User records or create staff Frontend User records if they do not currently exist. Second, you must create Staff Info records.
If the 'useFEUsers' is not set, then you can just go to Step 2 and add that staff information to the Staff Info record.
Step 1: Update Staff FE_User Records
If you have not previously created Frontend User records for your staff members, you will want do so at this time. For detailed instructions on how to manually add Frontend Users, see the How-To at: http://webempoweredchurch.org/support/help/tutorial/manually_add_a_new_frontend_user/
T |img-1| ip: If you must create new Frontend User records and you have already installed the Staff Directory extension, be sure to click the In Staff Directory checkbox at the bottom of the form before you save it.
If Frontend User records have already been created for your staff, then you will need to access those records to make updates.
R
 Illustration 5: Accessing Frontend User Records
efer to Illustration 5. Using the List Module ( 1 ), click on the site's general Storage Folder ( 2 ). Frontend User records are contained in the section called Website user ( 3 ). To edit your staff's Frontend User record, click on the edit record icon (the pencil) to the right of their user name ( 4 ).
Once you have opened a staff member's Frontend User record, complete the information that you want displayed in the website's Staff Directory. *For security's sake, you will probably want to ensure that the church's address and phone numbers are substituted for any personal information the existing record may contain.* Be sure to click the In Staff Directory check box at the bottom of the form before you save it.
The following are fields that can be used from fe_user in the Staff Directory:
name
Field Name
name
Field Description
The full name of the staff person
first_name
Field Name
first_name
Field Description
The first name of the staff person. This is only used for sorting, not display.
last_name
Field Name
last_name
Field Description
The last name of the staff person. This is only used for sorting, not display.
email
Field Name
Field Description
The email of the staff person.
telephone
Field Name
telephone
Field Description
The telephone number of the staff person.
fax
Field Name
fax
Field Description
The fax number.
address
Field Name
address
Field Description
The street address
city
Field Name
city
Field Description
The city
zone (state)
Field Name
zone (state)
Field Description
The zone, which for some countries is the state.
zip
Field Name
zip
Field Description
The zip or postal code.
country
Field Name
country
Field Description
The country
title
Field Name
title
Field Description
The title of the person. Usually Mr., Ms., Mrs., Dr., etc.
Tip :  if your staff members use their fe_user record to
contain personal address, phone and email, you may need to create a
new fe_user record for their work address, email, phone, etc. The new
record will need to have a different username than the original.
if your staff members use their fe_user record to
contain personal address, phone and email, you may need to create a
new fe_user record for their work address, email, phone, etc. The new
record will need to have a different username than the original.
Step 2: Create Staff Info Records
The next step is to create the actual Staff Info records that will be displayed in the Frontend. The Staff Info records includes fields for a biography, news, photos, etc. If you have the 'useFEUsers' install option cleared, then you will see additional fields for name, address, phone, email, etc.
To create a Staff Info record:
Refer to Illustration 6. Using the List Module ( 1 ), click on the Staff Directory Storage Fo
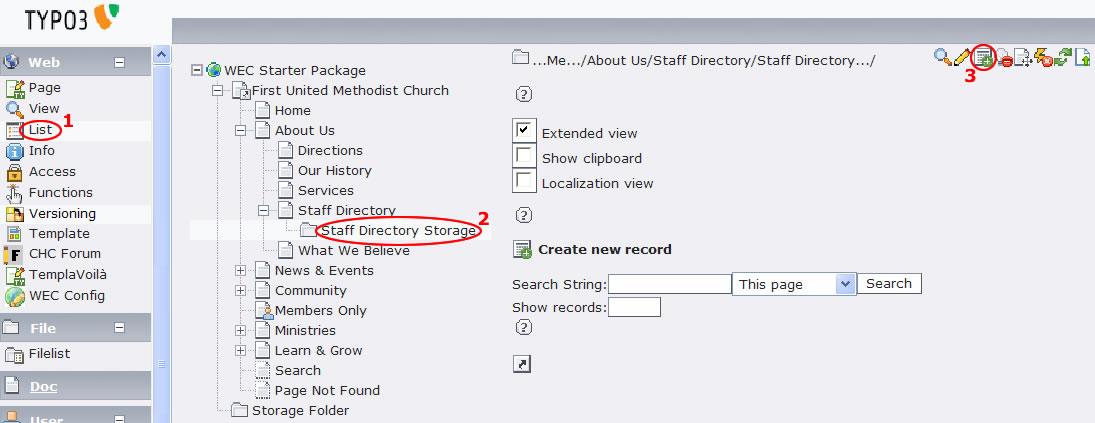 Illustration 6: Adding a Staff Info Record 1
lder ( 2 ) if created, otherwise click on the global Storage Folder. Click on the Create New Record icon ( 3 ).
Refer to Illustration 7. Scroll down the list of New Records and select Staff Info ( 4 ). Th
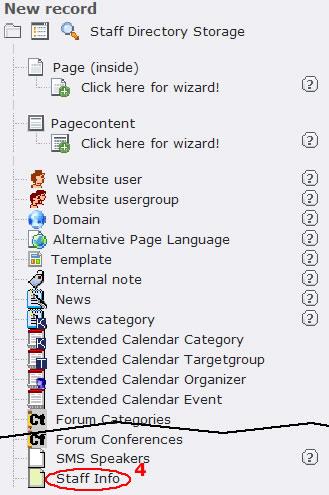 Illustration 7: Adding a Staff Info Record 2
is will open the Staff Info form.
You will now be editing the Staff Info pageContent element. For each staff member, select their name from the Staff Frontend User list and complete the remaining form with relevant information.
No |img-2| te: The Staff Frontend User list includes the Frontend Users who have had the In Staff Directory check box selected (see the previous step). The names that appear in this list are the staff member's Username...not their actual given name (so jsmith instead of “John Smith”).
The following are description of the values that appear in the Staff Info form. The name, address, phone, email are included if the 'useFEUsers' install option is cleared. All are optional – complete those fields you feel necessary or helpful for displaying staff on your website.
Hide
Field Name
Hide
Field Description
If you select this checkbox, the staff record will be hidden. You may want to do this if the staff is gone for an extended time or they have left or quit, and until you have a new person, you want to keep the position information available.
Staff FrontEnd User
Field Name
Staff FrontEnd User
Field Description
The fe_user who is linked to this record. The list is of usernames in alphabetical order.
Position Title
Field Name
Position Title
Field Description
The title for the job position of the staff member.example: “Accountant” or “Web Programmer.”
Position Description
Field Name
Position Description
Field Description
The description for the job of the staff member.example: “Helps build, maintain and implement websites.”
Department(s)
Field Name
Department(s)
Field Description
The department that the person is assigned to. Note that when working with multiple staff members of a single department, the Department name must use the same spelling between Staff Info records. If you don't, two different departments will be displayed when sorting by Directory.
Departments are sorted alphabetically. However, if you need a particular department to appear higher in the list, you can prefix a number to the department names and they will be sorted accordingly, thus 1-Pastoral Staff, 2-Youth Ministry, 3-Education, etc.
You can also have multiple departments listed. You need to separate each department with a | character. So if someone works in Children's Ministry and Youth Ministry, you could have their department be: Children's Ministry|Youth Ministry. The listing should be in alphabetical order.
Employment Start Date
Field Name
Employment Start Date
Field Description
If you want to sort employees by start date you can add that information here.
Team
Field Name
Team
Field Description
If assigned to a ministry team, you may list that team name here.
Biography / About
Field Name
Biography / About
Field Description
If you want to provide biographical information for your staff member, add it here. Biographical information will appear on the individual's Staff Page.
News / Updates
Field Name
News / Updates
Field Description
This field might include life events (births, deaths, marriage, moving, etc) and prayer requests. This could also be used like a mini, simplistic blog. This field is generally set for staff member updating (see Fields To Allow To Edit For Staff Page .)
Main Photo
Field Name
Main Photo
Field Description
This is the main photo that represents the staff member. Usually this will be a head-and-shoulders photo or portrait.
Other Photos
Field Name
Other Photos
Field Description
These could be pictures of family, hobbies, or whatever represents them. These photos will appear on the individual's Staff Page. This field is generally set for staff member updating (see Fields To Allow To Edit For Staff Page .)
Cell Phone #
Field Name
Cell Phone #
Field Description
Complete this field only ifyour staff member wants to display their cell phone number on the website.
Miscellaneous
Field Name
Miscellaneous
Field Description
You can use this field for whatever works best that does not fit above. For example, you could use this field to display phone extensions, hobbies, etc.
Display Order
Field Name
Display Order
Field Description
The Display Order option is only used for sorting the display order when the Default Sort Order in the Display Tab is set to Department. Use this option to order staff members within departments. If you have multiple departments, the numbering can be restarted within each department.
Add Staff Department Records (optional)
If you would like, you can create department records. If you choose not to, but are planning to assign staff members to specific departments, you must manually enter in the department name on each staff record and ensure it is spelled the same. Department records allow you to more easily manage staff records and allow someone to keep up-to-date a larger staff directory. We would recommend using Department records, and they became available in v1.3.0 and later. Also, if you have existing Staff Info records and would like to convert to Department records, you can easily do that (see Appendix below).
To setup your site to use Staff Department records, you must select the “Use Staff Department Records” when you choose “WEC Staff Directory” in Ext Manager->Install Extensions. You will see several options, and you must have the box checked for Use Staff Department, and click on Update.
To create a Staff Department record:
1. Follow the steps #1 and #2 above to create Staff Info records. However, for Step #3, choose “Staff Department” content element type.
2. Then enter in the Name, and you can optionally enter in the Description. If you would like to have a hierarchy of departments, then you can set a Parent Department. If not, then leave blank.
The following are description of the values that appear in the Staff Department record:
Hide
Field Name
Hide
Field Description
If you select this checkbox, the staff department record will be hidden.
Name
Field Name
Name
Field Description
The name of the department that will be shown in the Frontend.
Description
Field Name
Description
Field Description
Any description of the department that you would like to be shown. This is optional.
Parent Department
Field Name
Parent Department
Field Description
This field is used for arranging departments hierarchically. You can choose existing departments or none if at the top level. Note that you can just sort departments instead. However, with hierarchical sorting, you can have indentation in the display.
Add the Staff Directory Plugin
You need to add the Staff Directory plugin to your page. To add the Staff Directory plugin, see the How-To at http://webempoweredchurch.org/support/help/tutorial/add_a_plugin/
Configuration
Once you have installed the extension, created the appropriate storage folder/s, added Staff Info records, and installed the plugin, you are ready to configure the plugin. You do this through the plugin's Flexform (the form that appears after you have added the plugin to the page). The Flexform allows you to change the plugin's options.
Staff Directory: Main Tab
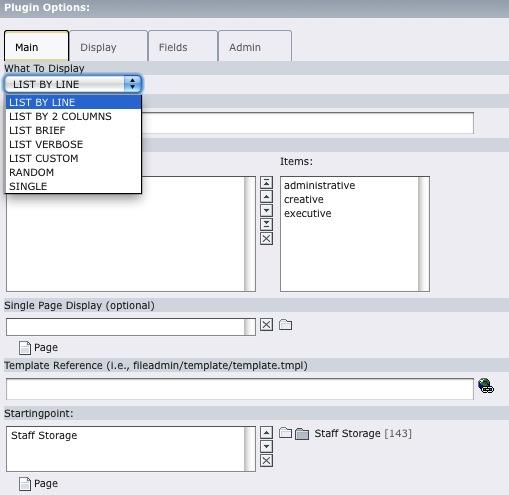 Illustration 8: Staff Directory: Main Tab
What To Display
FLEXFORM OPTION
What To Display
DESCRIPTION
Choose the format of the Staff Directory Frontend List display. Note that when you change this in the Flexform, it will confirm it in a dialog and give you other options below that pertain only to what is appropriate.
LIST BY LINE – list staff members in a vertical list. Displays name, main photo, position, department, phone, email icon, and optionally their cell phone and fax number.LIST BY 2 COLUMNS – list staff members in two columns. Displays name, main photo, position, department, phone, email icon, and optionally their cell phone and fax number.LIST BRIEF – Displays only the staff member's name, position, department, phone, email icon, and optionally their cell phone.LIST VERBOSE – A more robust listing that includes name, large main photo, position, position description, phone, cell phone, fax number, biography, news, and email address.
LIST CUSTOM – This view has been created so you can experiment with changing the template without adversely affecting the other displays.
RANDOM – shows a random staff person. You can set how often the person is updated/randomly selected. This allows you to feature a staff person once a day, once a week or once a month. Note that the Random view type has a unique template that you can customize. Also, if you use this in conjunction with Show Only Departments (see below), then you can feature a different person on a departments home page.
SINGLE – display selected staff records on a page other than the Staff Directory page. This is helpful if you want to modify the layout, header information, etc. without affecting the Staff Directory page. Note that the Single view type has a unique template that you can customize.
Title of Staff Directory
FLEXFORM OPTION
Title of Staff Directory
DESCRIPTION
This title will be displayed at the top of the Content Element.
Show Only Department(s) (must match department field)
FLEXFORM OPTION
Show Only Department(s) (must match department field)
DESCRIPTION
This limits the staff list to only those within a particular department. Type the department name exactly as it appears in the Staff Info records. If you have multiple departments, you can add them to this field separated by commas.
How Often To Display Random [Random view only]
FLEXFORM OPTION
How Often To Display Random [Random view only]
DESCRIPTION
If you select What To Display as Random, then you can choose how often you want this updated:Everytime – every time page is viewed
Every day – unique person a day (same for all users)Every week – starting from Sunday to SaturdayEvery month – starting from beginning of month to end of month
Single Page Display[only see for list views]
FLEXFORM OPTION
Single Page Display[only see for list views]
DESCRIPTION
If you want a special page for displaying a staff page, then you can set that page here. You may want to include a single page if you want your staff listing page to have header information and the staff single page to not. Or if you want the layout to be different for the listing and staff page.
Page To Return To[for Single view]
FLEXFORM OPTION
Page To Return To[for Single view]
DESCRIPTION
If you set What to Display as a Single page, then you should set the page to return to. This would most likely be the main staff directory page.
Template File
FLEXFORM OPTION
Template File
DESCRIPTION
If you do not want to use the default template, you can select your own template file here. You can also set a template through TypoScript constants and/or the Constant Editor (see the Advanced section for alternative methods to use an extension template). Note that your template specified here goes into the uploads/tx_wecstaffdirectory/.
Template Reference
FLEXFORM OPTION
Template Reference
DESCRIPTION
You can specify a template file here that you put in the fileadmin folder. This is the reference to the template and is not copied to the upload folder. This method is for sites with several Staff Directory plugins and so you can have unique instances on a page or throughout the site. If you have just one template for the whole site, we would recommend using the TypoScript constant in the root template.
Startingpoint
FLEXFORM OPTION
Startingpoint
DESCRIPTION
In most cases, choose the Staff Storage folder that you created in Step 2. Otherwise, choose whichever Storage Folder you want the data to come from. If you do not choose a Startingpoint, then the extension will store and retrieve data at the current page location (i.e., the Staff Directory page).
((generated))
Staff Directory: Display Tab
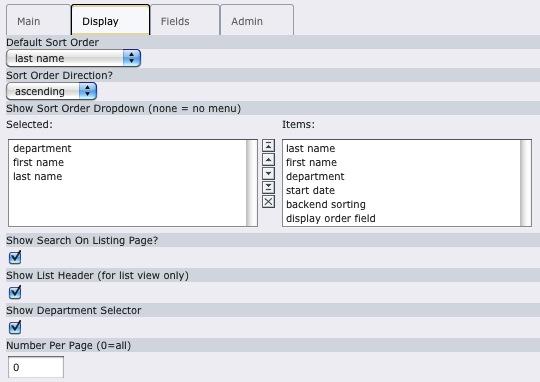 Illustration 9: Staff Directory: Display Tab
Default sort order
FLEXFORM OPTION
Default sort order
DESCRIPTION
You can choose the default sort order for the display of the staff directory:
- backend sorting
- display order field
- last name
- department
- first name
- name
- start date
- team
- misc field
- city
- zone/state/province
- zip / postal code
- country
Most of these are self-explanatory.
Backend sorting: An additional option for ordering the display of staff members in the Frontend. When selected, the Frontend will display the staff members according to the order they appear in the Staff Info records list (generally located in the Staff Directory Storage Folder). To change the order of staff members for this, simply move staff members up or down in the list using the Move Up or Move Down icons.
Display order field: Sorts by “display order” field from the Staff Info record.
Sort Order Direction
FLEXFORM OPTION
Sort Order Direction
DESCRIPTION
You can choose the direction of the sort, ascending (from lowest to highest) or descending (from highest to lowest). For names, ascending would go from A to Z. The descending direction is mostly useful for “display order” or “start date” fields.
Ascending (default)
Descending
Show List Header (for list view only)
FLEXFORM OPTION
Show List Header (for list view only)
DESCRIPTION
If you want a header line on the list view, then you can set this here. You will see the field names displayed at top. You can change them by setting header_<fieldname>_label as in locallang.xml. You can also format them with the given CSS – .tx-wecstaffdirectory- listheader.
Number Per Page (0=all)
FLEXFORM OPTION
Number Per Page (0=all)
DESCRIPTION
Determines the number of staff members you would like listed on one page. If your staff list is extensive, you may want to limit the number of listings on a single page.
Staff Directory: Fields Tab
N |img-2| ote: TheFields Tab of the Staff Directory plugin has the potential for causing consternation and frustration if not understood and used as outlined below. Please read this section carefully before making changes in this tab.
In general, the template and the selected Display List determines the default staff information that will be displayed in the Frontend (see Changing the Display for more information). By using the Fields Tab you can limit the information that is displayed. For example, if you are using the List Brief display and do not want personal cell phone numbers to appear in the Frontend, you can exempt that field by using the selections within this tab.
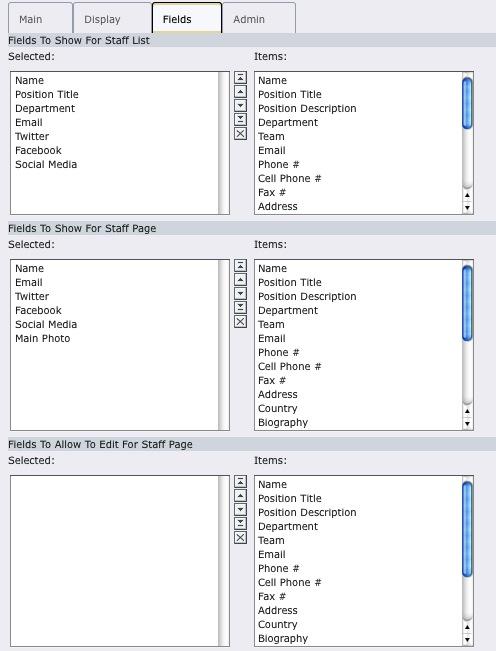 Illustration 10: Staff Directory: Fields Tab
Fields To Show For Staff List
FLEXFORM OPTION
Fields To Show For Staff List
DESCRIPTION
Use this field to limit which fields will be displayed on the Staff Directory page. Select the fields you wish to display on the page from the Items list. Note that you cannot add items to display that have not been included in the Display template. To modify the template, see Modifying the Template .
Fields To Show For Staff Page
FLEXFORM OPTION
Fields To Show For Staff Page
DESCRIPTION
Use this field to limit which fields will be displayed on the Staff page. Select the fields you wish to display on the page from the Items list. Note that you cannot add items to display that have not been included in the Display template. To modify the template, see Modifying the Template .
Fields To Show For Edit Staff Page
FLEXFORM OPTION
Fields To Show For Edit Staff Page
DESCRIPTION
Use this field to limit staff members ability to edit Staff Directory fields from the Frontend. If this is not set, then the default fields will be used. Set this if you want your users to have access only certain fields for editing. The default fields are: 'name', 'email', 'telephone', 'biography', 'news', 'photo_main', 'photos_etc', and 'misc'.
T |img-1| ip: If your Frontend doesn't seem to display the information that you want, check this tab first to see if you've mis- configured it. For instance, if you've selected the List by Line display option and intend to omit only the Department, you must add the following Items to the Staff List: Name, Position Title, Phone, Email, Cell Phone, Fax, and Main Photo.
Staff Directory: Admin Tab
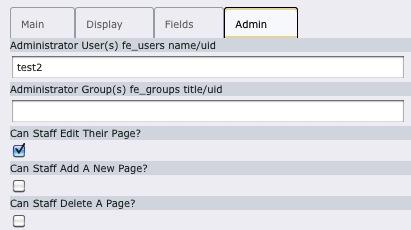 Illustration 11: Staff Directory: Admin Tab
Administrator Users fe_user name/uid(sep. by comma)
FLEXFORM OPTION
Administrator Users fe_user name/uid(sep. by comma)
DESCRIPTION
List of any administrators for this extension. The administrator(s) will have access to edit or update any staff page from the Frontend.
You can list the Typo3 fe_user UID or their fe_user username. Separate each by a comma if there is more than one.i.e., jsmith, mswanson, efallow, 214
Administrator Group fe_groups title/uid(sep. by comma)
FLEXFORM OPTION
Administrator Group fe_groups title/uid(sep. by comma)
DESCRIPTION
List of any administrator groups for this extension. The users in the administrator group(s) will have access to edit or update any staff page from the Frontend.
You can list the Typo3 fe_groups UID or the fe_groups title. Separate each by a comma if there is more than one.i.e., staff,supportstaff,editors
Can Staff Edit Their Page?
FLEXFORM OPTION
Can Staff Edit Their Page?
DESCRIPTION
If you want to allow staff to have full access to edit their own page from the Frontend, then check this box. You can limit which fields they are allowed to edit in the Fields tab (above). When selected, when a staff member is logged into the Frontend, an Edit Link will appear in their listing. By clicking on the edit link, they are directed to a page where they can edit and save their personal information.
Can Staff Add A New Page?
FLEXFORM OPTION
Can Staff Add A New Page?
DESCRIPTION
If you want to allow staff to be able to add a new staff from the Frontend, then check this box. . When selected, when a staff member is logged into the Frontend, an Add Staff Link will appear in their listing. Note that you must know your staff and this option is mostly for internal groups who are either trusted or are closely monitored.
Can Staff Delete A Page?
FLEXFORM OPTION
Can Staff Delete A Page?
DESCRIPTION
If you want to allow staff to be able to delete staff page from the Frontend, then check this box. This allows the staff to maintain their own list and delete as necessary. If for some reason, the staff gets deleted accidentally or need to be restored, you can restore them by editing the database table directly (change the deleted row) or through an extension like the Wastebasket one(mk_wastebasket ) which manages deleted records.
After you are done setting the options in the Flexform, save the data by clicking on the Save or Save & Close icon button.
Basic Display Modification
You can either refine or totally redo the look of the Staff Directory to fit your needs. This extension provides two methods to modify the display: Updating the Constant Editor and editing the extension template. Template modifications are discussed in the Advanced section.
Updating the Constant Editor is by far the easiest method for making basic modifications to the extension's display. Using this setting you can change colors, resize the display, and so on.
To edit the settings in the Constant Editor:
Refer to Illustration 12. Using the Template Module ( 1 ), select the page where the Staff Directory template resides; unless you have created an ext template record, the Staff Directory template is probably located within the root page of the website ( 2 ).
In the far left dropdown menu, select Constant Editor ( 3 ).
Select PLUGIN.TX_WECSTAFFDIRECTORY_PI1 from the Category dropdown menu ( 4 ).
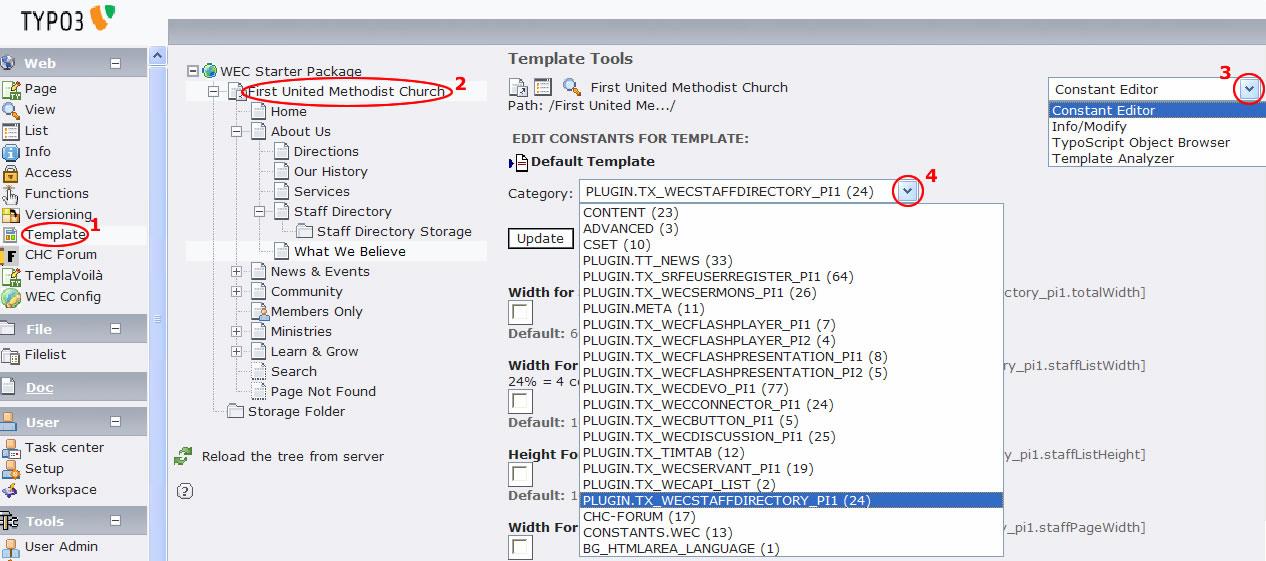 Illustration 12: Accessing the Constant Editor
To change one or more of the Constant Editor's values, see the How-To at http://webempoweredchurch.org/support/help/tutorial/change_values _in_the_constant_editor
The following table is a list of the Staff Directory values you can change through the Constant Editor.
Photo Width
PROPERTY
Photo Width
DATA TYPE
string
DESCRIPTION
The width for the main photo. This photo is normally used on the staff page. Note that the 'm' is for TYPO3 to proportionally size the width and height correctly. You can hardcode it to 200px or 200 to make it fixed at exactly 200 or whatever value you would like.
TS Property: imageWidth
DEFAULT
160m
Photo Height
PROPERTY
Photo Height
DATA TYPE
string
DESCRIPTION
The height for the main photo. This setting is normally used on the staff page. It is recommended to set just the height or width only otherwise pictures may be distorted if the original is not the same size.
TS Property: imageHeight
DEFAULT
Small Photo Width
PROPERTY
Small Photo Width
DATA TYPE
string
DESCRIPTION
The width for the small main photo. This setting is normally used on the staff listing.
TS Property: smallImageWidth
DEFAULT
80m
Small Photo Height
PROPERTY
Small Photo Height
DATA TYPE
string
DESCRIPTION
The height for the small main photo. This setting is normally used on the staff listing.
TS Property: smallImageHeight
DEFAULT
((Unknown Property))
PROPERTY
DATA TYPE
DESCRIPTION
DEFAULT
Template File
PROPERTY
Template File
DATA TYPE
string
DESCRIPTION
The template file. If you want to edit the existing, copy it out of the typo3conf/ext/wec_staffdirectory/ pi1/ folder and then put it in fileadmin and set this constant to where you put it.
TS Property: templateFile
DEFAULT
EXT:wec_staffdirectory/template/wecstaffdirectory.tmpl
Upload folder for images
PROPERTY
Upload folder for images
DATA TYPE
string
DESCRIPTION
The upload folder for images. If you have all your images stored in a different place, you can specify that here. Otherwise, they will be saved and loaded from this folder. TS Property: altImagePath
DEFAULT
uploads/tx_wecstaffdirectory/
Blank Photo
PROPERTY
Blank Photo
DATA TYPE
string
DESCRIPTION
If a staff does not have a picture, this is the default blank image displayed. Clear this if you do not want an image displayed when no photo is available.
TS Property: imagePhotoBlank
DEFAULT
EXT:wec_staffdirectory/res/photoblank.gif
Blank Photo 2 (female)
PROPERTY
Blank Photo 2 (female)
DATA TYPE
string
DESCRIPTION
If a staff does not have a picture and their fe_user gender is selected as female, then this default blank image is displayed. Clear this if you do not want an image displayed when no photo is available.
TS Property: imagePhotoBlank2
DEFAULT
EXT:wec_staffdirectory/res/photoblank_f.gif
Email Icon Image
PROPERTY
Email Icon Image
DATA TYPE
string
DESCRIPTION
If you want to support an email icon, instead of the email address shown, then you can set this. If you do not want it to display an email icon, clear this and the email will be displayed.
TS Property: emailIcon
DEFAULT
EXT:wec_staffdirectory/res/email_icon.jpg
Social Contact 2 Icon
PROPERTY
Social Contact 2 Icon
DATA TYPE
string
DESCRIPTION
Support for second social contact service. It is initially set to Facebook, but can be changed / updated (along with locallang) to what you want.
TS Property: social_contact2Icon
DEFAULT
EXT:wec_staffdirectory/res/facebook_icon.png
Social Contact 3 Icon
PROPERTY
Social Contact 3 Icon
DATA TYPE
string
DESCRIPTION
Support for third social contact service. It is initially set to LinkedIn, but can be changed / updated (along with locallang) to what you want.
TS Property: social_contact3Icon
DEFAULT
EXT:wec_staffdirectory/res/linkedin_icon.png
((Unknown Property))
PROPERTY
DATA TYPE
DESCRIPTION
DEFAULT
Sorting for Listing by Department
PROPERTY
Sorting for Listing by Department
DATA TYPE
string
DESCRIPTION
Enables secondary sorting when sorting by department. Can sort by:sorting_backend: however you sort it in Backenddisplay_order: the field in Staff Info record
last_name: the last name field
first_name: the first name field
name: the name field
TS Property: sortFieldForDept
DEFAULT
last_name
Use FE-User Photo First Instead of...
PROPERTY
Use FE-User Photo First Instead of...
DATA TYPE
string
DESCRIPTION
Uses Frontend User photo instead of the Staff Info photo.
TS Property: useFEPhoto
DEFAULT
0
Have multiple staff directory plugins per page
PROPERTY
Have multiple staff directory plugins per page
DATA TYPE
string
DESCRIPTION
You can allow to have a single view and list view on a page. This will make it so that when you select a staff from the list view, the single view will display it. Note that you should only set this page-specific unless all staff directories perform this way (i.e., if it is set and you do not have a single and list view on the page then the list view will not work correctly).
TS Property: multiplePluginsPerPage
DEFAULT
0
((Unknown Property))
PROPERTY
DATA TYPE
DESCRIPTION
DEFAULT
F.A.Q.s
The following are questions that may help you better understand and use this extension:
Q. I just got the latest Staff Directory and my page is now blank? How can I fix it? A: If you upgraded to v1.1.0 or later from v1.0.3 or earlier, then you need to add a static template wherever the Staff Directory plugin is installed. Please see the above section called “Install the Static Template”.
Q: I am not seeing certain fields from my staff information show up – why not?
A: Please make sure they are set in the FlexForm under the Fields tab. This is most likely the main reason they are not showing up. Also, in the default template, not all fields are included in the template. Especially in the listing, only main_photo, name, department, position title & description, telephone, and email are mostly available (except for STAFF_LIST_FULL setting). So, you may need to edit the template and add the extra fields.
Q: Do I have to use the fe_user records for storing my staff data?
A: As of version 1.0.0, you now have the option to use either the fe_user records or to just use the Staff Directory Info records. This is a setting that is made in the install of the wec_staffdirectory extension. If it is set to 'useFEUsers' then you will see in the Staff Directory Info record a choice to choose which FE_User to use. If it is not set, then you will see the name, address, and other fields in the Staff Directory Info.
If you have been using fe_user records but do not want to anymore, you can copy the data to the Staff Directory records and use those.
Q: I have a staff person in three different departments, how do I support that?
A: As of version 1.0.0, you can now enter in the 'Department' field for a staff person multiple department names. You must separate them with a '|'. So if someone is in Communication and Children's Ministry department, the field may read: Communication|Childrens Ministry.
In the listing by department, you will see the person listed in each department. However, in the listing by name, you will see only the person listed once.
Q: How can I remove the “:” after the labels like position:, name: ?
A: You can set the label_separator in locallang.xml. To set it or clear it, you can add this to your extension template:
plugin.tx_wecstaffdirectory_pi1._LOCAL_LANG.default.label_separator =
Q: I get a Table “<xyz>.C” does not exist? How can I fix that?
A: This is not an actual bug in the Staff Directory, but a bug in TYPO3. If you are logged into the Backend and have the adminPanel open (at bottom of screen) and have the TypoScript section open. Look at the Explain SQL Queries. If that is checked, then uncheck it. The error should go away. The good news is that only admin users will see this error. We hope TYPO3 fixes it in latest version. It happened in v4.2.6 and before.
Q: How can I display last name first and/or change the display of names?
A: As of version 1.8.1, you can now change how names are displayed in the list view. Note that if you sort by last name, the last name will be displayed first. If you want to always make first name first or always make last name first, you can change the following labels. This TypoScript can be added to the SETUP portion of your extension template:
plugin.tx_wecstaffdirectory_pi1._LOCAL_LANG.default.first_last_name = “###FIRST_NAME### ###LAST_NAME###”
plugin.tx_wecstaffdirectory_pi1._LOCAL_LANG.default.last_first_name = “###LAST_NAME###, ###FIRST_NAME###”
which would result in:
Adam Smith – for sort by first name or default searchSmith, Adam – for sort by last name
To always show last name first, you would change it to:
plugin.tx_wecstaffdirectory_pi1._LOCAL_LANG.default.first_last_name = “###LAST_NAME###, ###FIRST_NAME###”
To always show first name first., you would change this to:
plugin.tx_wecstaffdirectory_pi1._LOCAL_LANG.default.last_first_name = “###FIRST_NAME###, ###LAST_NAME###”
More questions posted as they are received...please send us yours.
Advanced
The Advanced section of the manual presumes a basic knowledge of TYPO3, HTML, CSS, and TypoScript. Please see the tutorials, how-tos, and manuals available on the Web-Empowered Church and the TYPO3 websites for more information.
I |img-5| nternet Links: Use the following links to access advanced teaching materials:
Web-Empowered Church: http://www.webempoweredchurch.org/
TYPO3 for Users: www.typo3.com
TYPO3 for Developers: www.typo3.org
Advanced Display Modification
Using advanced display modifications, you can completely change the look and feel of the Staff Directory extension on your website. There are several methods you can use to modify the Staff Directory's display including customizing the template, modifying the CSS, and changing TypoScript properties.
Customizing the Template File
Arguably, the most powerful tool for modifying the look of the Staff Directory extension is by customizing the template file. The following contains a thumbnail sketch of how to customize this file.
C |img-3| aution: Customizing the Staff DirectoryTemplate is not a task for the uninitiated. A knowledge of basic HTML and CSS are essential to make successful modifications. Poor coding can render the template unusable.
There are three steps to modifying the Staff Directory Template file.
Obtain the Template file.
Upload the modified file.
Modify the file.
Step 1: Obtain the Template File
Although there are a variety of methods to access the Staff Directory Template file, the following directions are among the easiest.
Refer to Illustration 13. Using the Extension Manager Module ( 1 ), select Loaded Extensions from the drop
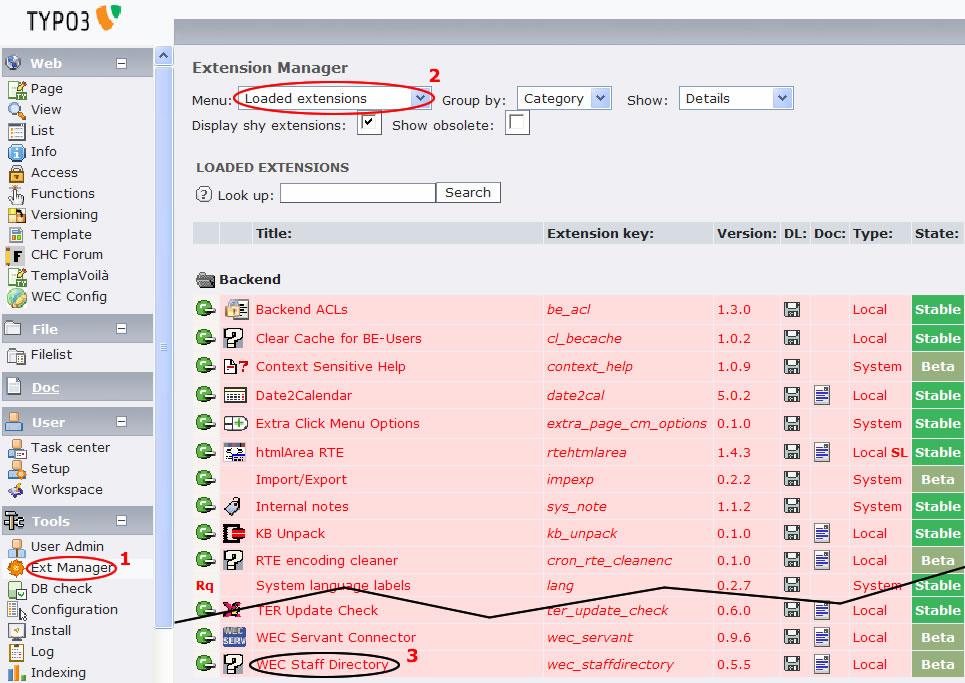 Illustration 13: Obtaining the Template File 1
down menu ( 2 ). Scroll down the list and click on WEC Staff Directory ( 3 ).
Refer to Illustration 14. Select Edit Files from the dropdown menu ( 4 ) and click on the pi1.wecstaffdirectory. tm
|img-19| **Illustration 14: Obtaining the Template File 2**
plfile name ( 5 ). When the popup box asks you what to do with the file, click Save ( 6 ) and save the file to your local computer.
Step 2: Upload the File
If you would prefer to modify the template on your local computer before uploading the file,reverse steps 2 and 3.
To upload the file so that you can modify it within TYPO3, begin by accessing the Constant Editor and selecting the WEC_STAFFDIRECTORY plugin (see the Basic Display Modifications and Illustration 12 if needed).
Select the Template File checkbox and update the form.
The Browse button will appear next to the Template File field. Browse your local computer for the Staff Directory Template file that you downloaded in Step 1 and select it.
Click the Update button. The file will be uploaded and will be displayed immediately in the website's Frontend.
Step 3: Modify the Template File
If you will be modifying the template in TYPO3, as suggested in Step 2, you can access the file through the Template Module (again, see Illustration 12 for how to access the Template Module and the location of the Staff Directory Plugin).
Refer to Illustration 15. S
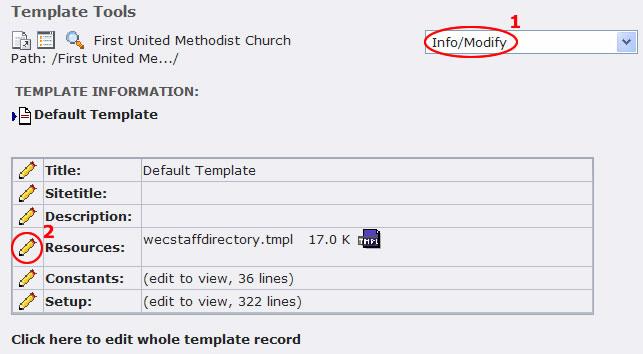 Illustration 15: Accessing the Template File within
TYPO3
Illustration 15: Accessing the Template File within
TYPO3
elect Info/Modify from the dropdown menu on the far left ( 1 ). The Staff Directory Template File will be available as a Resource. Click on the Edit icon to the left of Resources ( 2 ).
Refer to Illustration 16. C
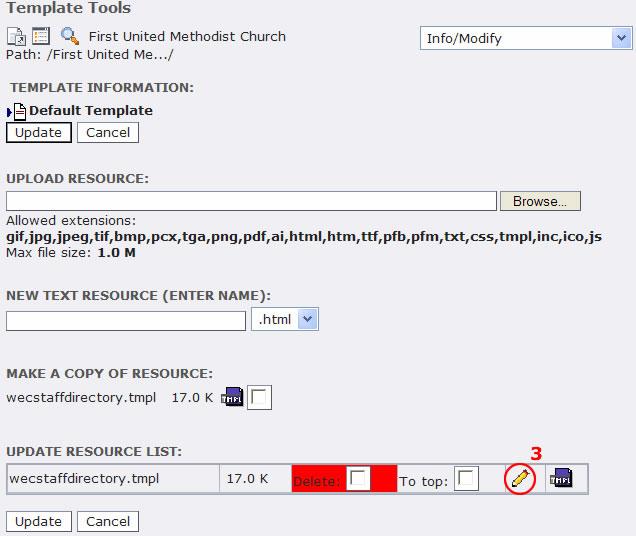 Illustration 16: Accessing the Template File within TYPO3
(2)
Illustration 16: Accessing the Template File within TYPO3
(2)
lick on the Edit icon associated with the Staff Directory Template file ( 3 ) to edit the template file. Modify the template file using standard HTML and the Staff Directory Markers (defined below).
When you have completed the modifications, click the Update button to save your work. The results will be displayed immediately in the Frontend.
T |img-1| ip: We recommend editing only the Staff_List_Custom layout on your first couple of modification attempts in order to preserve the default layouts as models.
T |img-4| echnical Stuff: How the Template Works. As you view the template in your HTML editor, you will see what looks like a “nearly” standard HTML file. The file is wrapped in <html>, <head>, and <body> tags like most web pages. However, the template uses markers to direct TYPO3 to reference and render only relevant portions of the file (for instance, only the Brief Layout, etc.). Each marker is itself wrapped in triple hash marks such as ###BRIEF###. Each of the markers are defined at the top of the template itself for your convenience (see also the table below).
###TITLE###
TEMPLATE MARKERS
###TITLE###
DESCRIPTION
The title of the page given in the Flexform.
###STAFF_LISTING_CONTENT###
TEMPLATE MARKERS
###STAFF_LISTING_CONTENT###
DESCRIPTION
This is the content for the staff listing and includes all staff. It is made up of a ###STAFF_LIST_xyz### for each staff member on the page.
###SHOW_LISTING_HEADER###
TEMPLATE MARKERS
###SHOW_LISTING_HEADER###
DESCRIPTION
This section allows you to define a header for listing view. This only works with listByLine since that view has variable columns. You need to set the show list header under Display tab of the Flexform.
###STAFF_LIST_LINE###
TEMPLATE MARKERS
###STAFF_LIST_LINE###
DESCRIPTION
The template for one staff displayed in the listing. This is a line- by-line version and is the default. It includes a photo, name, phone, email, and position title. Note that to access all the values, you have to set them in the FlexForm.
###STAFF_LIST_COLUMN###
TEMPLATE MARKERS
###STAFF_LIST_COLUMN###
DESCRIPTION
The template for one staff if you want columns. The default setup is for 2 columns. If you would like more than two columns, you can use the STAFF_LIST_LINE and set the staffInfoWidth in the constants to either 22%, 31%, 48% (or about there depending on your template) for 4 across, 3 across, or 2 across. This sub-template uses floats and divs for the column display.
###STAFF_LIST_BRIEF###
TEMPLATE MARKERS
###STAFF_LIST_BRIEF###
DESCRIPTION
This is similar to the line version but has less padding and no photo.
###STAFF_LIST_VERBOSE###
TEMPLATE MARKERS
###STAFF_LIST_VERBOSE###
DESCRIPTION
This is a verbose version of the staff including the regular values plus biography and/or news. Consider using this if you have fewer staff (usually less than 10) and want them to show most of their info on one page.
###PAGELINK_START###
TEMPLATE MARKERS
###PAGELINK_START###
DESCRIPTION
This is for where you want a link to the staff page. This is the start of the link – you must put the _END## tag in also for the link to work. You can put this between the name, photo or any element that you want to link to the staff page.
###PAGELINK_END###
TEMPLATE MARKERS
###PAGELINK_END###
DESCRIPTION
This is the ending tag for the link to the staff page.
###SHOW_nnn######nnn###
TEMPLATE MARKERS
###SHOW_nnn######nnn###
DESCRIPTION
The ###SHOW_... allows the ability for you to turn on or off the option in the FlexForm. If the field is turned off, then it will not be shown at all. Note that these are required to be in the template, and not all of the fields are in the template.The ###nnn### is the actual label and corresponds to all the fields. The following are all the fields:###NAME###
###NAME_TITLE###
###TITLE### (same as NAME_TITLE)
###GENDER######POSITION_TITLE######POSITION_DESCRIPTION######DEPARTM ENT###
###TEAM######START_DATE######BIOGRAPHY###
###NEWS######PHOTO_MAIN######PHOTO_SMALL######PHOTO1###...###PHOTO2# ##...###PHOTO9######MISC######CELLPHONE######FAX###
###ADDRESS###
###COUNTRY###
###NAME_LINK###
TEMPLATE MARKERS
###NAME_LINK###
DESCRIPTION
Allows you to have the name with it linked to the single view. This is basically a short form of ###PAGELINK_START### ###NAME### ###PAGELINK_END###
###PHOTO_SMALL_LINK######PHOTO_LINK###
TEMPLATE MARKERS
###PHOTO_SMALL_LINK######PHOTO_LINK###
DESCRIPTION
Allows you to have the photo or small photo linked to the single view. This is basically a short form of ###PAGELINK_START### ###PHOTO_SMALL### ###PAGELINK_END###
###EMAIL_LINK######EMAIL_ICON###
TEMPLATE MARKERS
###EMAIL_LINK######EMAIL_ICON###
DESCRIPTION
The link is if you want it to display text using TYPO3 configuration, i.e., user@example.com and where you click on it, the user will go to their mail program with that email address filled in for the to: field.The icon will show a graphic icon only, and when you click on it then you will go to the mail program.
###TELEPHONE_OR_CELL######CELL_OR_TELEPHONE###
TEMPLATE MARKERS
###TELEPHONE_OR_CELL######CELL_OR_TELEPHONE###
DESCRIPTION
If you have some staff with telephone and others with cellphone, you may want to just display one contact number. This alllows you to display that. If a staff person has both, then the telephone takes preference for TELEPHONE_OR_CELL, and the cellphone takes preference for CELL_OR_TELEPHONE.
Note that to add this, you must modify the existing template. You can replace the ###TELEPHONE### with either of these.
###SHOW_ADD_BTN###
TEMPLATE MARKERS
###SHOW_ADD_BTN###
DESCRIPTION
For allowing the admin to add a new staff person from the Frontend. This is only shown if it is set in the Flexform. You can move this to the top of the listing – the default is at the bottom of the listing.
###PAGING_PREV###
TEMPLATE MARKERS
###PAGING_PREV###
DESCRIPTION
This is the previous button if paging is enabled and there is a previous page to go to.
###PAGING_NEXT###
TEMPLATE MARKERS
###PAGING_NEXT###
DESCRIPTION
This is the next button if paging is enabled and there is a next page to go to.
###SHOW_EDIT_BTN###
TEMPLATE MARKERS
###SHOW_EDIT_BTN###
DESCRIPTION
For editing of the staff page, this will show up if either the logged- in Front-End user is an administrator or is the staff member who is linked to the given staff page.
###SHOW_ADD_BTN###
TEMPLATE MARKERS
###SHOW_ADD_BTN###
DESCRIPTION
For adding a new staff record, this will show up if either the logged- in Front-End user is an administrator or is a staff member if the Flexform 'staff_can_add' is set.
###SHOW_DELETE_BTN###
TEMPLATE MARKERS
###SHOW_DELETE_BTN###
DESCRIPTION
For deleting a staff record, this will show up if either the logged-in Front-End user is an administrator or is a staff member if the Flexform 'staff_can_delete' is set.
((Unknown Property))
TEMPLATE MARKERS
DESCRIPTION
###BACK_TO_STAFFLIST_BTN###
TEMPLATE MARKERS
###BACK_TO_STAFFLIST_BTN###
DESCRIPTION
This is a link that will take you back to the staff listing.
###STAFF_DROPDOWN_MENU###
TEMPLATE MARKERS
###STAFF_DROPDOWN_MENU###
DESCRIPTION
This is each staff listed in a drop-down menu. Upon selecting a staff member, you will see the staff page for that staff member. This allows quick and easy access to other staff members from the staff page.
###nnn_LABEL###
TEMPLATE MARKERS
###nnn_LABEL###
DESCRIPTION
The label for the field. So ###NAME_LABEL### will be the “Name” or whatever is defined in the LOCALLANG. Each field has a label associated with it.
###nnn###
TEMPLATE MARKERS
###nnn###
DESCRIPTION
The field value. See above for the fields available for nnn.
###SHOW_nnn###
TEMPLATE MARKERS
###SHOW_nnn###
DESCRIPTION
This is wrapped around each display of a value so that fields can be turned on or off in the FlexForm for the staff page.
###nnn_LABEL###
TEMPLATE MARKERS
###nnn_LABEL###
DESCRIPTION
The label for the field. So ###NAME_LABEL### will be the “Name” or whatever is defined in the LOCALLANG. Each field has a label associated with it.
###nnn###
TEMPLATE MARKERS
###nnn###
DESCRIPTION
The field value. See above for the fields available for nnn.
###SHOW_nnn###
TEMPLATE MARKERS
###SHOW_nnn###
DESCRIPTION
This is wrapped around each display of a value so that fields can be turned on or off in the FlexForm for the staff page.
((Unknown Property))
TEMPLATE MARKERS
DESCRIPTION
###FORMTITLE###
TEMPLATE MARKERS
###FORMTITLE###
DESCRIPTION
The title of the form for editing the staff page. Note this was changed from ###FORM_TITLE### in v0.9.6 because of naming conflict.
###ACTION_URL###
TEMPLATE MARKERS
###ACTION_URL###
DESCRIPTION
The URL to go to when submit edit form. This is filled in automatically.
###SAVE_BUTTON###
TEMPLATE MARKERS
###SAVE_BUTTON###
DESCRIPTION
The Save button for the form. You can change the display value in the LOCALLANG.XML file.
###CANCEL_BUTTON###
TEMPLATE MARKERS
###CANCEL_BUTTON###
DESCRIPTION
The Cancel button for the form. You can change the display value in the LOCALLANG.XML file.
###nnn_LABEL###
TEMPLATE MARKERS
###nnn_LABEL###
DESCRIPTION
The label for the field value that is used to display on the left side of the edit form for each field. It describes the field. See the fields available above for nnn.
###VALUE_nnn###
TEMPLATE MARKERS
###VALUE_nnn###
DESCRIPTION
The value of the field that is filled in if it has been set.
###SHOW_nnn###
TEMPLATE MARKERS
###SHOW_nnn###
DESCRIPTION
This is wrapped around each display of a value so that fields can be turned on or off in the FlexForm for the staff page.
Using Version 2.0 Templates
If you were using version v1.x and either used the default template or a custom template, please read the following steps necessary to upgrade or change to the new templates. If you are a new user (i.e., if this is a new install), refer to the above guide.
Changes
All template and CSS files have been moved to the folder wec_staffdirectory/template/ . To ensure access to the new template system, TypoScript (TS) has been written into the template’s constants for both the template and CSS files:
plugin_tx_wecstaffdirectory_pi1.templateFile = EXT:wec_staffdirectory/template/wecstaffdirectory.tmpl

plugin_tx_wecstaffdirectory_pi1.baseCSSFile =  EXT:wec_staffdirectory/template/pluginstyles.css
plugin_tx_wecstaffdirectory_pi1.cssFile =  EXT:wec_staffdirectory/template/wecstaffdirectory.css
The pluginstyles.css file is used as the CSS foundation for most WEC plugins using new templates. This allows custom styling across many WEC plugins for the site's template. It also simplifies and compacts the CSS when multiple WEC plugins are installed. In addition, if the wec_styles plugin is installed, it accesses the pluginstyles.css from wec_styles first. This ensures improvements in pluginstyles.css are incorporated site-wide. Otherwise, if wec_styles is not installed, then it uses the pluginstyles.css from this plugin.
Upgrading an Old Custom Template
If you have an old custom template, you will need to upgrade it. You can choose to either upgrade using the old templating system or using the new templating system. Upgrading to the new system is work- intensive, but offers a significant improvement in the look. We suggest referring to the new template at: wec_staffdirectory/template/wecstaffdirectory.tmpl and the new CSS in wec_staffdirectory/template/wecstaffdirectory.css .
If you choose to remain with the older system, you can find the template files at wecstaffdirectory-old.tmpl and the CSS file at wec_staffdirectory/static/ts/setup.txt .
To upgrade using the old templating system, the main issues you will likely encounter will be:
- The handling of buttons have changed. If you examine the button code you will see that your current buttons will not work right.
- Everything is more semantic HTML. For instance, list views use <ul><li> instead of multiple <div> tags.
- Each section is appropriately called using a consistent naming convention (plugin[*]), e.g., pluginNav, pluginHeader, pluginFooter, pluginSection, pluginAside. We have used HTML5 tags as the base for class names when possible.
To upgrade to the new template system, we strongly suggest using the new template as a foundation and adding CSS or objects to the template as desired. The CSS and HTML structure of the template has changed so significantly that we advise starting from scratch rather than trying to change an existing template.
Using the New Template System
If you want to use the new default template and have installed v1.x, use the TYPO3 Template tool and access the page where the +ext template for the *WEC Staff Directory Template* is included (generally on the same page as the WEC Staff Directory plugin). Click the template's edit icon and select the Includes tab. In the Include Static field, delete the *WEC Staff Directory (old) Template* (older templates were renamed for easy identification). Next, add the *WEC Staff Directory Template* .Save the template record and clear the caches (the lightning bolt icon at the top right of the TYPO3 toolbar). Test each page that has a WEC Staff Directory installation. Once you've included the new template, modify the look by accessing the Plugin's Display tab.
Creating a Custom Template
To create a custom template, we recommend beginning with the *wecstaffdirectory.tmpl* and *wecstaffdirectory.css* files as models. To change the look of an entry, use one of the wecentry[1-3].css files in the folder wec_staffdirectory/template as a model.
Once you've made your changes, go to the +ext template and in the SETUP section (or you can use the Constant Editor), you can set the *plugin_tx_wecstaffdirectory_pi1.cssFile* to the location of the new css file, and *plugin_tx_wecstaffdirectory_pi1.templateFile* to the location of the new template file. The wec_staffdirectory extension will then use your new template and/or CSS.
Advanced Image Configuration
You can easily add/update photos for your staff, and this shares a few more details if you want special customization. The photos dimensions can be set by TypoScript and/or by constants. You will likely want to set height and/or width for the images. Otherwise, you will need to make sure the images are all the same height or width. There is a way to keep all the images in the same proportion – and that is by setting the constants to either width+m (i.e., 100m) or height+m (i.e., 150m). Most likely, if you have columns at all, you want the same width, so setting 100m or 150m or whatever width would work best for you. You can also put in a fixed width by a setting like 120px or 175px. Any valid HTML IMG tag height and width values are accepted.
The photos use the TYPO3 ImageBuilder (GraphicsMagic or ImageMagick) to display, but if you do not have one installed, it should still work fine. With it, you can set various image properties. Look at Tsref section 5.3 - http://typo3.org/documentation/document- library/references/doc_core_tsref/4.0.0/view/5/3/ for more details. The extension has defaults setup in ext_typoscript_setup.txt, but you can override these in the extension template. The quality is set for JPEG files, and so if you want higher or lower quality, you need to set that. The small image is set to lower quality because if you have a lot of staff and are even showing small pictures of many of them, you want smaller size as possible to keep the total page size down.
The setup in ext_typoscript_setup.txt:
plugin.tx_wecstaffdirectory_pi1 {
      main_photo = IMAGE
        main_photo.file {
                height = {$plugin.tx_wecstaffdirectory_pi1.imageWidth}
                width = {$plugin.tx_wecstaffdirectory_pi1.imageWidth}
                quality = 80
        }
        main_photo_small = IMAGE
        main_photo_small.file {
                width = {$plugin.tx_wecstaffdirectory_pi1.smallImageWidth}
                height = {$plugin.tx_wecstaffdirectory_pi1.smallImageHeight}
                quality = 70
        }
        photos_etc = IMAGE
        photos_etc.file {
                width = {$plugin.tx_wecstaffdirectory_pi1.etcImageWidth}
                height = {$plugin.tx_wecstaffdirectory_pi1.etcImageHeight}
                quality = 80
        }
}
The width and heights are retrieved from what is set in constants. You can override these if you would like. If you do put this in your own TypoScript extension template, then you cannot use the {$plugin...} as above because that does not get processed. You can hardcode the values to what you would like them set to and you can use the width+m or height+m as mentioned above.
((generated))
PHOTOS_ETC
It is fairly easy to display multiple photo files using the photos_etc. There are some limitations though. As mentioned earlier, you set the ###PHOTO1###, ###PHOTO2###, etc. in the template to display them.
To allow a user to edit their own, you will need to edit the STAFF_EDIT_FORM template in the wec_staffdirectory.tmpl file. You can add PHOTOS_ETC1...PHOTOS_ETC2...up to PHOTOS_ETC9. So an example may be:
   <span class="label">###PHOTOS_ETC_LABEL1###</span>
    <span class="label">###PHOTOS_ETC1_LABEL###</span><span class="inputBox"><input type="file" name="tx_wecstaffdirectory_pi1[photos_etc][]" size="45" value="###VALUE_PHOTOS_ETC1###"></span>
        <span class="label">###PHOTOS_ETC2_LABEL###</span><span class="inputBox"><input type="file" name="tx_wecstaffdirectory_pi1[photos_etc][]" size="45" value="###VALUE_PHOTOS_ETC2###"></span>
        <span class="label">###PHOTOS_ETC3_LABEL###</span><span class="inputBox"><input type="file" name="tx_wecstaffdirectory_pi1[photos_etc][]" size="45" value="###VALUE_PHOTOS_ETC3###"></span>
<span class="textacross">###PHOTOS_ETC_IMAGE1### ###PHOTOS_ETC_IMAGE2### ###PHOTOS_ETC_IMAGE3###</span>
Note that this will overwrite any name, first_name, and last_name fields that are stored in your Staff Information records. If you want additional fields from fe_users, just look them up and add them on. You can find all the fields in fe_users table in phpMyAdmin or look at ext_table.sql file in the Staff Directory extension folder.
Using fe_users or Staff Directory Info Records
This extension, as of v1.0.0, supports either using fe_users data or to put everything in the Staff Directory Info record. You set this up on install of the plugin. If you want to change it at anytime, you can go to Ext Manager->Loaded Extensions->WEC Staff Directory. You will see a box that says “Use FE-users to store data”. If it is set, then the Staff Directory Info record will link to a user in fe_users that has the staffdirectory_in field set. If the Use FE_users is not set, then the staff data will be stored in the Staff Directory Info record.
Updating database to get fe_user data
One issue that you might have is to update all your Staff information. You can certainly enter it in by hand, but if you have it in fe_users and want to update it to staff directory and use that only, then here is a mySQL query that will allow you to update it. Depending on the fields, you could add additional fields. To run this mySQL query you would need phpMyAdmin installed on either your server or in TYPO3 backend as an extension. You would just need to select the right database for your install, if not already selected. Then enter in something like this:
UPDATE tx_wecstaffdirectory_info, fe_users
SET tx_wecstaffdirectory_info.full_name = fe_users.name, tx_wecstaffdirectory_info.first_name = fe_users.first_name, tx_wecstaffdirectory_info.last_name = fe_users.last_name
WHERE tx_wecstaffdirectory_info.feuser_id = fe_users.uid
Updating realURL
If you have setup your realURL configuration so that they point to fe_users, then you need to make sure to change it to point to Staff Directory Info records instead. This realURL setting will likely be in your localconf.php file in typo3conf/. This is just a reminder because it will cause problems if you have set it and do not change it.
Work with realURL
If you have installed the realURL extension, you can have staff names supported in the Staff Directory. So instead of http://www.mychurch.org/staff/index.php?id=172 , you can have http://www.mychurch.org/staff/Mike_Smith . To set this up for realURL, you need to add something similar to what is below. This is usually added to your typo3conf/localconf.php file. If you have realURL installed, you may find the $TYPO3_CONF_VARS line already and you just need to add it to the fixedPostVars.
You must modify the code below so that '123' represents the page ID where the staff directory is located. If you have multiple staff directories, you will need to copy this config for each page and add it to the fixedPostVars array.
$TYPO3_CONF_VARS['EXTCONF']['realurl']['_DEFAULT'] = array(
    'init' => array(
        'enableCHashCache' => 1,
        'appendMissingSlash' => 'ifNotFile',
        'enableUrlDecodeCache' => 1,
        'enableUrlEncodeCache' => 1,
    ),
    'fixedPostVars' => array(
     '123' => array (
        array (
                'GETvar' => 'tx_wecstaffdirectory_pi1[curstaff]',
                'lookUpTable' => array(
                        'table' => 'tx_wecstaffdirectory_info',
                        'id_field' => 'uid',
                        'alias_field' => 'full_name',
                        'addWhereClause' => ' AND NOT deleted',
                        'useUniqueCache' => 1,
                        'useUniqueCache_conf' => array(
                                'strtolower' => 0,
                                'spaceCharacter' => '_',
                        ),
                ),
        ),
    )
),
After you add this to localconf.php, you may need to clear the realURL cache. You can do this by going to the Staff Directory page in the Backend. Then choosing Info->Speaking URL Management. Select 'Unique Aliases' then click on the tx_wecstaffdirectory_info. You will see all the aliases. You may have to clear out the existing ones by deleting them here.
Note: As of version 1.2.0, the Staff Directory supports realURL better because the full_name was added to Staff Directory records. This was not an issue if you did not link with fe_users – you could have just used 'name' field. However, since v1.2.0, name is no longer a field in the Staff Directory record and has been renamed to 'full_name'.
Spam Control
For the staff directory, not much spam control is needed. However, the one area where you may need to protect is the email addresses. If you have not configured your site, would recommend to add to your main site template the following:
config.spamProtectEmailAddresses = 2
config.spamProtectEmailAddresses_atSubst = (at)
config.removeDefaultJS = external
You can change the _atSubst to something else if you wish. Please read the Core TypoScript documentation. Latest can be found online at: http://typo3.org/documentation/document- library/references/doc_core_tsref/current/view/1/7/
Adding Search
You can add search capability to the Staff Directory if you would like. To add search, go to the Flexform of the plugin and choose the Display tab. Select the “Show Search On Listing Page?” option to turn it on. The default is off. The search is most valuable when you have a larger staff with over 25 people and so it is not as easy to find someone as easily.
The search allows you to search the name, position title, and position description fields. So if someone wanted to find someone quickly in a large organization, they could find them more easily. Plus, certain types of internet users prefer search over scanning.
If you want to customize the display of the search, you can change or move the ###SEARCH###, ###SEARCH_FULLTEXT###, and ###SEARCH_BUTTON### markers to better fit your layout. If search is not enabled, these fields will not be filled in and you can just leave them in your template.
Converting Departments to Records
[For version 1.2.x and before] If you have your departments listed in the Staff Info record as strings, you can convert them to records. We would recommend that as it is more flexible and will soon be the standard for this extension.
To do the conversion from strings to records, you can:
Go to Ext Manager->Installed Extensions,
Choose the “WEC Staff Directory” in the list of extensions,
Choose UPDATE! in the dropdown. If the UPDATE button does not exist, then either you do not have v1.3.x or later installed or have already converted the records.
Click on “Update Departments”. This will convert all your department strings to department records. If this has already been done, then it will let you know.
To make the Department Records active, go back to Information dropdown. Select the “Use Staff Department Records” and click the Update button.
If for some reason, the conversion has a problem and you need to revert, you can clear the “Use Staff Department Records” and Update and you will use your previous Department strings method.
If you need to redo the conversion, you will have to edit the records and likely use mySQL (through phyMyAdmin or mySQL directly). You can clear out department records with an SQL statement such as:
UPDATE tx_staffdirectory_info SET department_rec='' WHERE 1;
TRUNCATE tx_wecstaffdirectory_department;
TRUNCATE tx_wecstaffdirectory_department_mm
Note that the above will clear out department records and the values. Only do this when you are FIRST converting department records because this will clear out all department records values and references.
After you do this, you can run the conversion again.
If you run into any problems with the conversion, please contact us. Also, if you have complex data (like staff in different folders), you may have to manually move all departments records into one folder.
Admin Functions
The following are a brief description of the admin functions. You can also allow Edit Staff as an option to the given staff member for his/her information – this option is set in the Flexform->Admin tab.
Add Staff
If you want to support the ability, you can allow an administrator to add a staff person from the frontend. The add staff link is at the top or bottom of the page, depending on where you put it in the template – the default template puts it at the bottom of the list view. When you click on “Add Staff” you will see the edit form but it will have all the fields listed and you can fill whatever is appropriate for a new staff person. If you want to remove fields here that you never use, you can remove them from the ###TEMPLATE_EDITFORM### template so for both editing and creating they will not be used.
If you have useFEUsers option set, it will create a new Frontend user or allow you to select an existing Frontend user to link to. You will also create a new tx_wecstaffdirectory_info entry with the given information.
Edit Staff
You can edit a staff record by clicking on the Edit link on either the List or Single view. You may change anything you would like here and then when you are done, you can save it. Note that only the fields allowed for editing are shown – for both administrator and staff person.
If you set the option in the Flexform->Admin->Allow Staff To Edit their page, then a staff user can login and edit their own page. They will see the same fields that the admin sees and be able to change them all.
Delete Staff
You can delete a staff record if you are an administrator. If you do delete the record, you will first see a popup confirmation dialog, and once that is accepted, the staff record will just be marked deleted so that it will not show up in the staff listing anymore. If for some reason, you want the staff record permanently deleted you can use a database cleanup tool or go directly into mySQL and delete all tx_wecstaffdirectory_info records that are marked deleted.
Adding Hooks
The Staff Directory supports the following hooks:
1) Adding extra fields to show.
If you have extra fields that you would like to show in the staff listing, you can hook into and add these fields here:
$GLOBALS['TYPO3_CONF_VARS']['EXTCONF']['tx_wecstaffdirectory_pi1']['addExtraFields']
The hook that is called:
$extraDBFields = $_procObj->addExtraFields($this->dbShowFields, $this);
Note that you would have to already add the fields in $TCA and the database. This is for display within the extension.
2) Adding additional global markers
If you add extra fields and then want to process them in the template display, then you need to add a hook and process them through this. You can set
$GLOBALS['TYPO3_CONF_VARS']['EXTCONF']['tx_wecstaffdirectory_pi1']['extraItemMarkerHook']
The hook is called:
$_procObj->extraGlobalMarkerProcessor($markerArray, $item, $this);
This will allow you to add to the $marker[] array that is used to display items in the template.
Support Social Media Services
Social media services like Twitter, Facebook, LinkedIn and MySpace have taken the internet by storm. There are a variety out there and they are typically different in popularity based on the region/country. So, in the Staff Directory, you can define which social media services you want to support. Currently, up to three are available. The default is Twitter, Facebook, and LinkedIn.
When a user enters data for their Twitter, Facebook, etc. account, it must be whatever information is needed to complete the URL. Sometimes this is a number, or the end of a URL. Please look at the setups in static/ts/setup.txt under social_contact1...social_contact3.
To change which services you want to support, you need to do the following. We will change the third one from LinkedIn to MySpace.
Set the constant for a given social media icon either in the Constant Editor or in the +ext template:
plugin.tx_wecstaffdirectory_pi1.social_contact3Icon = fileadmin/icons/myspace.png
and be sure to put the given icon image file wherever you point it in the above reference.
Set the Frontend locallang for the given social media service by adding this to the Setup section in your +ext (or global) template:
plugin.tx_wecstaffdirectory_pi1.social_contact3_label = MySpace
Set the BE locallang for the given social media service. You need to add this to your page TS Config in either the staff directory page or in the root page.
TCEFORM.tx_wecstaffdirectory_info.social_contact3.default = MySpace
Change the TypoScript for defining social_contact3 to set the actual link shown. You can add the following Typoscript in your +ext template.
 social_contact3 = COA
      social_contact3 {
              10 = IMAGE
              10 {
file = {$plugin.tx_wecstaffdirectory_pi1.social_contact3Icon}
width = 16
height = 16
stdWrap.dataWrap = <a href="http://myspace.com/{field:social_contact3}"> | </a>
            }
      }
TypoScript Reference
templateFile
PROPERTY
templateFile
DATA TYPE
string
DESCRIPTION
The template file. If you want to edit the existing, copy it out of the typo3conf/ext/wec_staffdirectory/template/ folder and then put it in fileadmin and set this constant to where you put it.
DEFAULT
EXT:wec_staffdirectory/template/wecstaffdirectory.tmpl
((Unknown Property))
PROPERTY
DATA TYPE
DESCRIPTION
DEFAULT
((Unknown Property))
PROPERTY
DATA TYPE
DESCRIPTION
DEFAULT
imageWidth
PROPERTY
imageWidth
DATA TYPE
string
DESCRIPTION
The width for the main photo. This photo is normally used on the staff page. Note that the 'm' is for TYPO3 to proportionally size the width and height correctly. You can hardcode it to 200px or 200 to make it fixed at exactly 200 or whatever value you would like.
DEFAULT
200m
imageHeight
PROPERTY
imageHeight
DATA TYPE
string
DESCRIPTION
The height for the main photo. This setting is normally used on the staff page. It is recommended to set just the height or width only otherwise pictures may be distorted if the original is not the same size.
DEFAULT
smallImageWidth
PROPERTY
smallImageWidth
DATA TYPE
string
DESCRIPTION
The width for the small main photo. This setting is normally used on the staff listing.
DEFAULT
80m
smallImageHeight
PROPERTY
smallImageHeight
DATA TYPE
string
DESCRIPTION
The height for the small main photo. This setting is normally used on the staff listing.
DEFAULT
etcImageWidth
PROPERTY
etcImageWidth
DATA TYPE
string
DESCRIPTION
The width for the etc photos. This setting is normally used on the staff page.
DEFAULT
120m
etcImageHeight
PROPERTY
etcImageHeight
DATA TYPE
string
DESCRIPTION
The height for the etc photos. This setting is normally used on the staff listing.
DEFAULT
imagePhotoBlank
PROPERTY
imagePhotoBlank
DATA TYPE
string
DESCRIPTION
If a staff does not have a picture, this is the default blank image used. If the staff is a female (as set in fe_user), then the imagePhotoBlank2 is used if it is set. Clear this if you do not want any image displayed when no image is available.
DEFAULT
EXT:wec_staffdirectory/res/photoblank.gif
imagePhotoBlank2
PROPERTY
imagePhotoBlank2
DATA TYPE
string
DESCRIPTION
If a staff does not have a picture and their fe_user record shows them as female, then this blank image is used. Clear this if you do not want an image displayed.
DEFAULT
EXT:wec_staffdirectory/res/photoblank_f.gif
emailIcon
PROPERTY
emailIcon
DATA TYPE
string
DESCRIPTION
If you want to support an email icon, instead of the email address shown, then you can set this. If you do not want it to display an email icon, clear this and the email will be displayed.
DEFAULT
EXT:wec_staffdirectory/res/email_icon.jpg
social_contact1Icon
PROPERTY
social_contact1Icon
DATA TYPE
string
DESCRIPTION
If you want to support social contact services, you can set a given icon here. It is initially set to Twitter, but can be changed / updated (along with locallang) to what you want.
DEFAULT
EXT:wec_staffdirectory/res/twitter_icon.png
social_contact2Icon
PROPERTY
social_contact2Icon
DATA TYPE
string
DESCRIPTION
Support for second social contact service. It is initially set to Facebook, but can be changed / updated (along with locallang) to what you want.
DEFAULT
EXT:wec_staffdirectory/res/facebook_icon.png
social_contact3Icon
PROPERTY
social_contact3Icon
DATA TYPE
string
DESCRIPTION
Support for third social contact service. It is initially set to LinkedIn, but can be changed / updated (along with locallang) to what you want.
DEFAULT
EXT:wec_staffdirectory/res/linkedin_icon.png
sortFieldForDept
PROPERTY
sortFieldForDept
DATA TYPE
string
DESCRIPTION
Enables secondary sorting when the primary sorting is for Department. Can be set to last_name, first_name, name, sorting_backend, or display_order.
DEFAULT
last_name
useFEPhoto
PROPERTY
useFEPhoto
DATA TYPE
string
DESCRIPTION
Use Frontend User photo instead of the Staff Info photo.
DEFAULT
altImagePath
PROPERTY
altImagePath
DATA TYPE
string
DESCRIPTION
The upload folder for images. If you have all your images stored in a different place, you can specify that here. Otherwise, they will be saved and loaded from this folder.
DEFAULT
uploads/tx_wecstaffdirectory/
main_photo
PROPERTY
main_photo
DATA TYPE
IMAGE
DESCRIPTION
This sets the height, width and quality. It uses the TS constants imageHeight and imageWidth for the height and width. The quality default is set to 80. The quality is set for JPEG images only and refers to the compression done on a file. With quality set to 100, there is no compression, whereas quality set below 50 will usually be very noticable. If your photos do not look good, you may want to increase the quality. If you use huge (greater than 1MB each), high- quality photo files, you may want to lower the quality.
DEFAULT
main_photo_small
PROPERTY
main_photo_small
DATA TYPE
IMAGE
DESCRIPTION
This sets the height, width and quality for the small image. It uses the TS constants smallImageHeight and smallImageWidth for the height and width. The quality default is set to 70. You can read above for more information on the quality setting.
DEFAULT
photos_etc
PROPERTY
photos_etc
DATA TYPE
IMAGE
DESCRIPTION
This sets the height, width and quality for the miscellaneous image(s). It uses the TS constants etcImageHeight and etcImageWidth for the height and width. The quality default is set to 80. You can read above for more information on the quality setting.
DEFAULT
biographyShort_stdWrap
PROPERTY
biographyShort_stdWrap
DATA TYPE
string
DESCRIPTION
You can set the string handling for biography short field. You can set the length of the .crop by editting this. You can also do any other TypoScript stdWrap manipulation on the biographyShort_stdWrap that you would like. Please look at the TypoScript Reference manual for more information on stdWrap.
DEFAULT
.crop = 350|...|1
newsShort_stdWrap
PROPERTY
newsShort_stdWrap
DATA TYPE
string
DESCRIPTION
You can set the string handling for news short field. You can set the length of the .crop by editting this. You can also do any other TypoScript stdWrap manipulation on the newsShort_stdWrap that you would like.
DEFAULT
.crop = 350|...|1
substitutePagetitle
PROPERTY
substitutePagetitle
DATA TYPE
integer
DESCRIPTION
When a user goes to the staff person's page, this shows the person's name in the page title of the browser. If you do not want this behavior, set this to 0.
DEFAULT
1
dbShowFields
PROPERTY
dbShowFields
DATA TYPE
string
DESCRIPTION
Comma separated fields to show in front-end.If you have extra fields you want to include, you can do it easily here (no hook needed). You will have to define locallang for each.
DEFAULT
feUserFields
PROPERTY
feUserFields
DATA TYPE
string
DESCRIPTION
If you are using fe_users with staff directory, you can set extra fields to edit here. Comma-separate fields. This can be used along with dbShowFields for extra fields. These need to be a part of the fe_users record.
DEFAULT
((Unknown Property))
PROPERTY
DATA TYPE
DESCRIPTION
DEFAULT
Multi-language
The text used in this extension has been placed in the typo3conf/ext/wecstaffdirectory/ folder under pi1/locallang.xml file (for what you see on-screen/front-end) and locallang_db.xml file (to change the backend labels). You can extend to support different languages by adding translations to this file.
To configure a different language, you should refer to the TYPO3documentation and check out the one-tree-fits-all-languages at http://typo3.org/documentation/tips-tricks/multi-language-sites-in- typo3/ .
As an overview, you would add the multiple languages in the root of the site, and then set something like the following inTypoScript of the site template:
# Set up the language variable "L" to be passed along with links
config.linkVars = L
# For German/Deutsch language, sys_language.uid = 2
config.sys_language_uid = 2
config.language = de
config.locale_all = de_DE
# For Dutch language, ...
config.sys_language_uid **=* 1*
config.language = dk
config.locale_all = danish
Then, an important aspect of multiple languages is being able to edit them. One thing you must do is to set the “Localization view” option box at the bottom of the screen of the List view. This will allow you to see and set the localization (multiple language) options for records.
Known Problems
There are no known problems with the extension at this time. Please report any bugs, suggestions, or comments to the team at devteam(at)webempoweredchurch.org . You can also go to http://www.webempoweredchurch.org/support/ to find additional support.
To-Do List
Plans for this extension include:
Allow import from CSV file (to work with external database)
Changelog
0.9.0 – Initial Version.
Released on 3/21/2007
0.9.1 – Fixed bug with sort order. Added sort direction so could sort ascending/descending.
Released on 3/26/2007
0.9.2 – Fixed some fields so they save in edit form and display. Added title, address,country fields. Added secondary sorting fields for department. Updated staff_singletemplate. Fixed issue with photos/pics always being generated.
Released 4/2/2007
0.9.3 -- Added alternate image path constant. Fixed "small photo" image display bug.Fixed admin editing capability.
Released 4/3/2007
0.9.4 -- Fixed cancel on edit form. Fixed minor bugs with photo display handling.Added female blank image.
Released 4/30/2007
0.9.5 -- Fixed bug when editing staff -- could lockup. Support if noImageMagick/GraphicMagick installed, will set correct image height & width. Alsowhen sort by first name the secondary field is last name.
Released 6/8/2007
1.0.0 – ADDED: Support fe_users or Staff Info record - choose on install. Support multiple departments for staff. Also, thanks to Christian Boltz for: Search capability, admin byusergroup, and delete staff by admin. Updated template. FIXED: minor bugs withdisplaying departments and display_order. Does not require sr_feuser_register anymore. Improved XHTML compliance.
Released 8/24/2007
1.0.1 – ADDED: Add Staff in Frontend, added team and address2 fields. All fields forediting/adding and more fields in list view. FIXED: wec_staffdirectory_in error, bad character in code, blank name in BE, delete staff, and minor template updates.
Released 8/31/2007
1.0.2 – FIXED: saving all fields for add/edit staff whether using fe_user or staffdirectory_info. Add/Edit/Delete for staff non-admin. Bio/news fields editing works better.ADDED: Photo clearing/erasing. TELEPHONE_OR_CELL### marker, hook forextending markers in display.
Released 9/19/2007
1.0.3 – FIXED: basicfilefunc included (could cause error). ADDED: exclude set for fields(so can change permissions), added zone to fe_users, added Spanishtranslation (thanks Roman). Other minor fixes.
Released 10/26/2007
1.1.0 – Made templates static – now must include (see doco). Added multi-languagecapability so can switch between languages on each page. Minor fixes forshow-by-departments and label separators.Released 12/12/2007
1.2.0 – Now supports full_name in staffdirectory_info (run UPDATE in ext mgr) for realURL.Added WEC Map support. Added versioning support. Minor fixes.
Released 3/20/2008
1.2.1 – Fixed error with sorting by name in frontend. Fixed staff listing title in backend.Changed mail link so uses TYPO3 core. Fixed Update script in Ext Manager.Other minor fixes.
Released 4/2/2008
1.2.2 – Fixed city,state, zip in list view. New backend labels if full_name not exists,verbose template now has small images, fixed 'edit' link, fixed crash if paging on andno records, fixed charset (utf-8) display issues.
Released 6/24/2008
1.3.0 – Support department as a record. Can show random staff (feature by day, week,month). Updated template and added markers. Can cache staff directory listing so can see in search results. More sort by fields added. Can use template reference.Added Greek and Dutch languages. Supports 'start date' and address in template.Search is now exact name/department. Updated manual.
Released 2/3/2009
1.4.0 – Added social media support (Twitter, Facebook, LinkedIn, mySpace, or whatever).Added department dropdown (enable in template). Added cHash support.FIXED: multiple department display, single view linking, alt tags for pictures, PHP 4fixes, adding as a new plugin. Added hook for extra db fields. Support first & lastname in display and form.Released 6/30/2009
1.4.1 – Added an optional header for list-by-line view. Support two plugins on a page –list view and single view (set multiplePluginsPerPage constant). Can format first/lastname by changing locallang labels (see FAQ). Department records now supportlanguages. German umlauts compatible with locallang XML file. Minor improvements& fixes.
Released 10/7/2009
1.4.2 – Changes and fixes:
- If a person is listed in multiple departments, it is now shown correctly.
- You can customize the department separator (was a comma).
- Can add fields for gender(male/female) and title in the list and single view. Add this to the display fields in the flexform and add to your template if you have customized it.
- display_order can now handle more than 128 people.
- Fixed multilanguage issues.
Released 12/11/2009
2.0.0 – Changes:
- New templates and CSS with underlying base CSS. If you are upgrading, will be compatible with old templates. To use new template, remove old template and add new one in +ext template file.
- Can now select departments by dropdown (set option in Flexform).
- All functions are now PHP 5.x compatible.
Released 3/15/2010
2.0.1 – Changes:
- fixed photo image sizing for certain configurations
- fixed 2-column view (bad CSS)
- department names can have quotes, list of departments use separators
- handle empty search results better
Released 4/23/2010
2.1.0 – Changes:
- allow 'name' to be selected for sorting(in flexform Fields) or sortByDept (TS constant) – this is especially useful if you do not use first_name/last_name.
- updated CSS for 2-column view so uses specific class names (i.e. nameDisplay). Also no fixed-width for 2-column so wider widths work better. Fixed other CSS issues too. Please update any custom templates.
- CSS is more specific so should not interfere with other wec_styled items
- fixed department editing issues in frontend form.
- variety of minor fixes and improvements.
Released 7/27/2010
2.1.1 – Changes:
- Fixed map in single view & for feusers
- Fixed verbose old template
- updated links in documentation
- Added French translation (thanks Laurent B)
Released 10/1/2010
2.1.2 – Changes:
- Can add extra fields through TypoScript (dbShowFields, feUserFields)
- Fixed TCA error
- Fixed front-end photo upload security issue
Released 2/7/2011
 EXT: WEC Staff Directory - 40
Social Contact 1 Icon
PROPERTY
Social Contact 1 Icon
DATA TYPE
string
DESCRIPTION
If you want to support social contact services, you can set a given icon here. It is initially set to Twitter, but can be changed / updated (along with locallang) to what you want.
TS Property: social_contact1Icon
DEFAULT
EXT:wec_staffdirectory/res/twitter_icon.png