DEPRECATION WARNING
This documentation is not using the current rendering mechanism and is probably outdated. The extension maintainer should switch to the new system. Details on how to use the rendering mechanism can be found here.
EXT: xflextemplate
| Author: | Christopher |
|---|---|
| Created: | 2010-12-18T19:57:23 |
| Changed by: | Federico Bernardin |
| Changed: | 2011-11-08T14:53:49 |
| Classification: | xflextemplate |
| Keywords: | forEditors, forAdmins, forIntermediates, forAdvanced |
| Author: | Federico Bernardin |
| Email: | federico@bernardin.it |
| Language: | en |

 EXT: xflextemplate
Extension Key: xflextemplate
Language: en
Version: x.y.z
Keywords: forEditors, forAdmins, forIntermediates, forAdvanced
Copyright 2006-2011, Author Name, <your@email.com>
This document is published under the Open Content License
available from http://www.opencontent.org/opl.shtml
The content of this document is related to TYPO3
- a GNU/GPL CMS/Framework available from www.typo3.org
Table of Contents
`EXT: xflextemplate 1 <#__RefHeading__5708_1738894311>`_
`Introduction 3 <#__RefHeading__5710_1738894311>`_
`Users manual 7 <#__RefHeading__467_413120346>`_
`Administration 12 <#__RefHeading__31511_818911409>`_
`Configuration 13 <#__RefHeading__31515_818911409>`_
`Tutorial 14 <#__RefHeading__31523_818911409>`_
`Known problems 15 <#__RefHeading__31525_818911409>`_
`To-Do list 16 <#__RefHeading__477_413120346>`_
`ChangeLog 17 <#__RefHeading__31623_818911409>`_
Introduction
What does it do?
XFlexTemplate is a new method to build content element. You can create a complete customized template as container for your content element.
You can create a new type of content element. This element adds a new way to think the HTML integration with TYPO3. If you want to customize the HTML behavior of TYPO3 content element in a different way for each element in the same page, you have to use a complex typoscript code. Xflextemplate wants simplify the tasks of TYPO3 editor, restricting work to HTML code and inserting the markers for each subelement part of a single content element.
Features:
- Web interface for creation of basic structure for content publishing with a simple drag an drop operation.
- Fully compatibility with standard TYPO3 structure by means of tt_content table expansion.
- You can choose a template from the specific web interface in the tools menu. You can insert contents in the template structure. You can use the interface to create a complex back-end form to insert content with palette advanced function.
- We can easily insert contents in the same way of standard TYPO3 objects by means of the strict integration between extension and the visualization engine for contents (TCEForms). We can put in any specific position inside html code of template an image, a multimedia, text or cobject object.
- We can easily insert and place every content element in any point of html template using marker.
- We can use personalized field (advanced feature of field) using the concept of palletes. For example we can insert a checkbox inside image field to indicate the zoom.
- The number of subparts of a content element of xflextemplate element is infinite with use of flex data type.
- The usage of typoscript code inside each xflextemplate element. We can linked each subparts with other, we can define a wrap code for any element. Each element can interact with others.
- We can insert a generic description for the template,
The extension requires TYPO3 version 4 or next, it is due of using of hook in TCEForms.
Information on this template file
To get an overview about the formatting templates, which you can use in this template, hit F11. In the box, which will open, you will see the different styles.
Before you upload an extension to TER, you should do the following:
- Check that there is no empty line between a header and a paragraph.
- Change special paragraph styles to standard (with "Clear formatting").
- Update the Table of Contents with a right click (when you hover over the TOC-items you see the numbering).

 Users manual
------------
Users manual
------------Installation
The installation of extension follows the standard rules for all TYPO3 extensions.
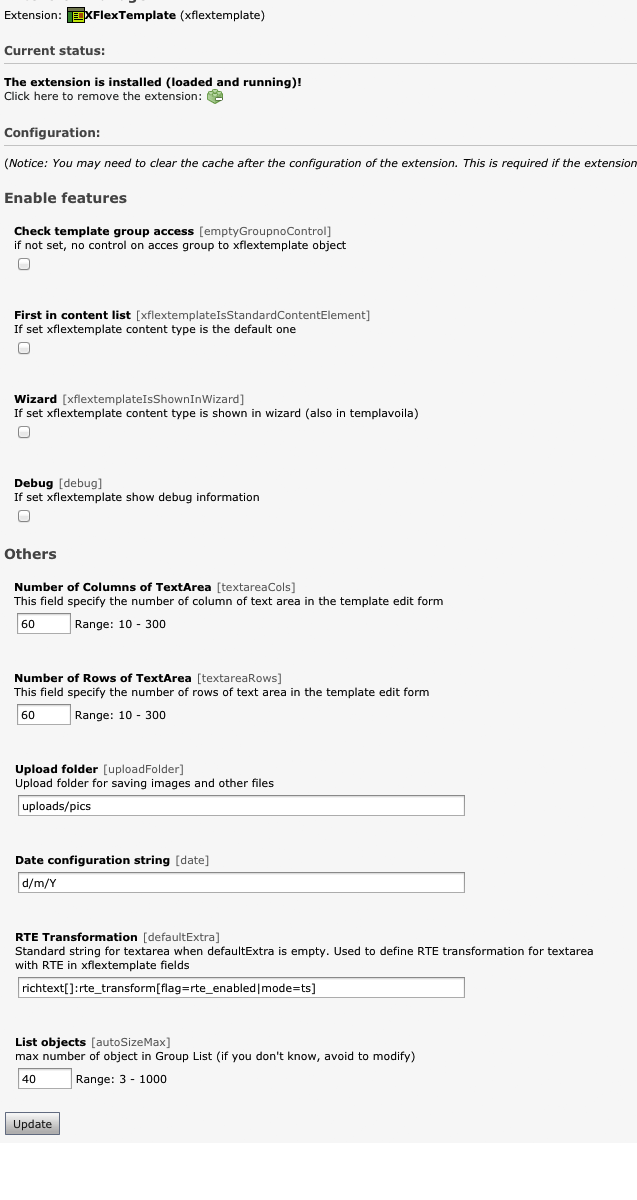
After installation you can configure some features:
Checkbox for enabling control on accessing feature based on group policy. If you check it, xft verifies the groups you choose on template, and only users belong to the specified groups can access the template.
Checkbox for enabling xflextemplate as default content element in TYPO3 installation. With this feature xft becomes the default content element when you open a new content element.
Checkbox for showing xflextemplate element as single content element in wizard.
Checkbox for enabling debug information. If you check it, debug information are shown on the frontend page.
Columns and rows number in the default textarea inside xflextemplate field. You can specify the width and height in column of the textarea.
Folder used for uploading images, multimedia or general files. You can change it, but I suggest to maintain it.
Date and time configuration string for formatting date/time value in list of templates.
Standard configuration parameter defaultExtra for textarea in TCE form visualization. If you change it, the textarea will be without RTE.
Max number of element inside group form field in TCE form (autoSizeMax)
 Manage templates
^^^^^^^^^^^^^^^^
Manage templates
^^^^^^^^^^^^^^^^
In the tool Menu, choose xflexTemplate, so you can view the list of templates as shown in figure Errore: sorgente del riferimento non trovata. You can view the title, description, creation date and updated date. In the last column there is an icon in the main bar, you can create a new template with it. There are three icons for each line of the table, the first one, a pencil open the selected template in the modify mode. The second one, a lamp with a no entry sign, hide or show (if the icon is a light bulb turned on) the template. Then there is a trash box icon for deleting template. The last icon exports the selected template in an external file for using in other TYPO3 installation (or in the same).
At the top of the list there is two icons: one for create a new xflextemplate and the other one for importing template in the TYPO3 installation. The template have to be compatible with xflextemplate installed version (for more informations you can see apendix A).
New or modify template
If you click on pencil or new template icon, you can view a new page with some tabs: general, description, typoscript, html, elements.
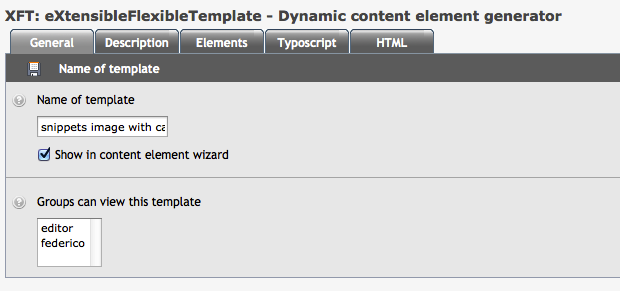
General
The first one is general: you can insert the name of template. This field must be unique in the list of templates, no other template should exist with the same name. You can show this template into content element wizard when create a new content element, todo this check the show in wizard checkbox.
If you want to allow access to the template only to specific BE group, you can choose the specified group.
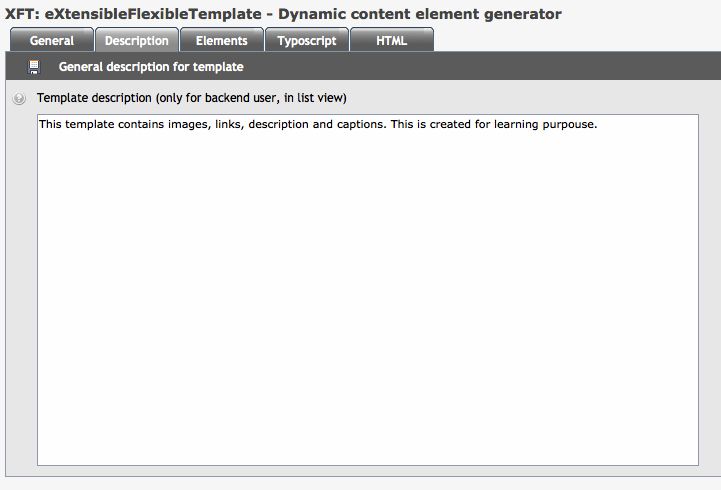
Description
The second one is description: you can insert a text for describing the template. This field is optional and it's no shown in any part of front-end but only in the template list.
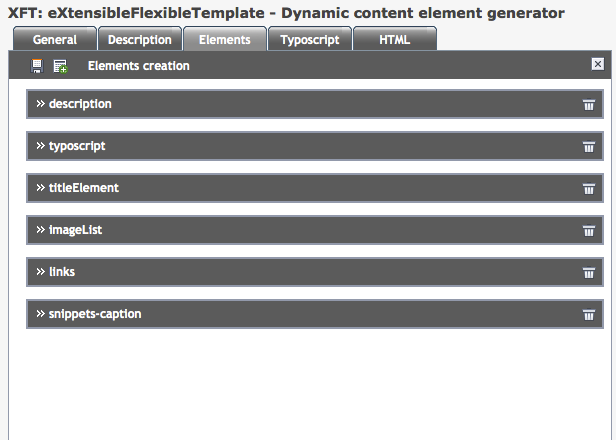
Elements
The third tab is the most important: you can insert each template field.
In each tab you have the icon of disk to save the template (this action performs an ajax call and a black layer blocks the window during this process). In the elements tab you have a “new element” icon too. If you click in this icon you can create a new element. Each element contains a title, an element type, a palette, a render type and some element specific features.
The title have to be a unique name inside the same template.
The element type is the TYPO3 standard TCE Form back-end rendering. The possible values are:
1. Input: the field will be a simpe input box with some features (example size, maxlength, default value and so on).
2. Text: the field will be a textarea with possible some features (HTMLArea, rows and columns and so on).
3. Radio: the field will be a radio box options with some features (items are a comma separated value rows of title, value).
4. Check: the field will be a check box options with some features (items are a comma separated value rows of title, value, cols are the numebr of column of checkbox).
5. Group: the field will be a TYPO3 area with function of load file from Back-end or page from tree of website or content element and so on. The features are the extensions of element, for file is the real extension (example jpg, pdf, gif)., for database type the extensions are the table of database where object are stored. Maxelements and minelements specify the maximum number of elements in the list and the minimum number of element. For a complete description of feature you can read TCA Reference manual.
Element type modifies number and type of features for sub element of template, for example input box has size, max length, evaluation and so on, instead textarea has columns, rows, and so on, changing type of field this subpart changes. The possible values are: input, text, radio, check, group, cObject. cObject haven't any feature but it can be configured by typoscript.
Palette is a specific feature described in detail inside the TCA Reference. You can use it to specify the main field in which this one will be shown.
RenderType defines the render object in typoscript (xft uses content object function to render each element), it can be override in typoscript as shown above:
You suppose ImagesBlock is image as renderType, but in your typoscript you write:
imagesBlock = TEXT
imagesBlock.value = new text
In this case you change type of render mode by typoscript.
Each element can be order with drag n'drop clicking in the title bar of element (it's a better way to drag if you close, with minus icon, the element before). The first icon in the title bar (double arrow) reduces the element, instead the other double arrow icon explodes the element. The icon on the right side of the title bar close template (without saving!!) and shows the list of templates.
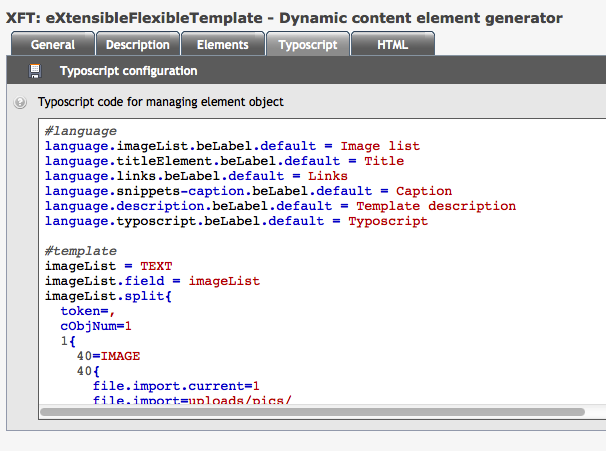
Typoscript tabs
The fourth one is typoscript: you can customize the behavior of your template, each field in the template is shown as field and you can use all typoscript methods and functions.
Inside the text area you can write all typoscript standard function and properties.
Xflextemplate adds some new values for back-end functionality:
Language
The labels for fields inside the TYPO3 standard back-end form are defined int this way:
language.NAME_OF_FIELD.beLabel.LANGUAGE = xxxxxx
NAME_OF_FIELD is the name defined in the elements tab of xflextemplate for the specific field (see the example chapter).
The LANGUAGE part could be the two character language name for back- end (for example uk for United Kingdom, us for United States, it for Italy, de for Germany and so on, the default value is used if language is not defined).
The value after equal symbol is the translation.
As you can see in the elements tab explanation you can select for each field a specific render type (ex. Text). This value specifies the TYPO3 content_object used for rendering the field, if you specify none, the field will not be render. Inside typoscript textarea you can override the render type:
Suppose that in the element field you selected “image” as render type for element “test”, in typoscript you can override it writing:
test = TEXT
test.field = test
The result is a text with the content of test field.
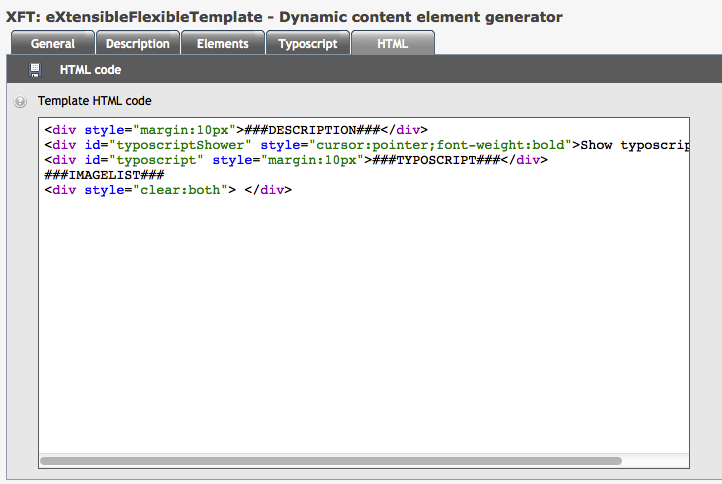
HTML
The fifth tab contains HTML layout. The usage is similar as typoscript templateFile attribute except for marker of main block. In fact for HTML tab you mustn't insert marker, but you have to insert only HTML code with marker of subparts, as shown above:
###TITLETEXT###
<hr/>
###IMAGESBLOCK###
###MULTIMEDIABLOCK###
<hr/>
###FILESLIST###
Each marker (as in the previous typoscript block) defines a element field (the usage is very easy).
FAQ
How can I define the italian translation label for the field with name: textBlock?
Answer: language.textBlock.beLabel.it = Blocco di testo
How can I insert a new field inside an other one (similar to header link into header block)?
You can choose from palette select box the name of the field in which you want insert the new field.
Administration
As you can read from the previous section, the most powerful feature of extension is the dynamic assembling of elements inside of template. But another important feature is the usage of typoscript for extending the simple and standard working mode.
For example you can create a template with a title, a description textarea, a photo and some documents. You simply create 4 elements, one for each part described and then you can create HTML code in the specified tab with markers for each element.
This approach is not unique, because you can also create a single COA object and you can use it for rendering your template. In this case you have to write more typoscript than in the other case. You have to overwrite the type of element.
TitleText = COA
TitleText.10 = TEXT
TitleText.10.field = TitleText
TitleText.20 = IMAGE
TitleText.20.import = uploads/pics
TitleText.20.import.field = imagesBlock
You can reuse a element otherwise you can create a element of type cObject and use it to define the COA Object. The cObject type is not visible in the TCE form.
The type in version 2.0.0 are:
TEXT: the element is render with TEXT function of content object of tslib and so you can use all typoscript reference functionality for customization of element.
IMAGE: the element is render with IMAGE function of content object of tslib and so you can use all typoscript reference functionality for customization of element.
MULTIMEDIA: the element is render with MULTIMEDIA function of content object of tslib and so you can use all typoscript reference functionality for customization of element.
COBJECT: the element is render with COBJECT function of content object of tslib and so you can use all typoscript reference functionality for customization of element, this element is not render with TCE form, it uses only for typoscript definition.
Configuration
The typoscript code you insert into typoscript tab is standard code and you can find the reference in TSRef (typoscript reference) in the typo3.org site.The only part that is new is the definition of label for single element name into the form to create the content element. The language label of TCE form (BE form) is defined in this mode:
language.title_of_field.beLabel.language_in_two_character = label
The key language and key beLabel is reserved, instead the title_of_field is the key of field you have defined into elements tab, the languag_in_two_character is the country iso code, for german is de for italy is it, and so on.Suppose you have just defined into the elements tab a textbox with title “nameBox”. If you want to define in the backend form when you create the content element into a specific page a label for nameBox, you have to insert this code in your typoscript tab of xflextemplate element:
language.nameBox.beLabel.default = Title
if you want a different label for italian translation (defined on backend user), you can write:
language.nameBox.beLabel.it = Titolo
From version 2.1.0 typoscript accepts all typoscript defined into the destination page. For example you can insert:
0: nameBox < tt_content.text.20
1: nameBox.field = nameBox
The first line contains a reference to typoscript code defined into css_styled_content extension, so if you have included into the template of the destination xflextemplate page the css_styled_content template, this xflextemplate shows the text of nameBox like bodytext of standard text content element. This behavior can include all typoscript code like plugins, or specific typoscript defined in frontend environment.
Tutorial
Since version 2.1 greatly increase the possibilities of this extension because the use of external typoscript code. In previous version you have to write all typoscript code to manage the fields from xflextemplate, so if you wanted create a gallery you had to create a split cycle and elaborate each image. Now you can use the tt_content object in order to facilitate the task.However you can continue to use a your customized code.
Above you can find an example to implement a gallery of images with link and caption with old method, creating your customized code, and a code using tt_content typoscript object.
 0: imageBlock = TEXT
 1: imageBlock.field = imageBlock
 2: imageBlock.split{
 3:   token=,
 4:   cObjNum=1
 5:   1{
 6:     40=IMAGE
 7:     40{
 8:       file.import.current=1
 9:       file.import=uploads/pics/
10:       file.width=250
11:       stdWrap.typolink.parameter.field = links
12:       stdWrap.typolink.parameter.split{
13:         token.char = 10
14:         cObjNum=1
15:         returnKey.data=register:SPLIT_COUNT
16:       }
17:     }
18:     30=TEXT
19:     30{
20:       field=titleBlock
21:       split{
22:         token=10
23:         cObjNum=2
24:         returnKey.data=register:SPLIT_COUNT
25:       }
26:       wrap=<h4 class="snippet-titolo" style="text-align:center"><strong>|</strong></h4>
27:       typolink.parameter.field = links
28:       typolink.parameter.split{
29:         token.char = 10
30:         cObjNum=1
31:         returnKey.data=register:SPLIT_COUNT
32:       }
33:     }
34:     50=TEXT
35:     50{
36:       field=descriptionBlock
37:       split{
38:         token.char = 10
39:         cObjNum=2
40:         returnKey.data=register:SPLIT_COUNT
41:       }
42:       wrap=<div class="snippet-caption" style="text-align:left;font-style:italic">|</div>
43:     }
44:     wrap = <div class="snippets" style="float:left;margin:10px;" >|</div>
45:   }
46:   wrap = <div class="element">|</div>
47: }
This is a complex typoscript code. Suppose that you have create a element with 3 fields: imageBlock that contains images, links a textarea with link list (one line for each image), titleBlock that contains caption of each image (line feed separator), and finally a descriptionBlock with text separated with line feed.A similar behavior can be created using css_styled_content typoscript. If you use tt_content.image.20, you can create a gallery similar to image content element standard.
0: imageBlock < tt_content.image.20
1: imageBlock{
2: imgList.field = imageBlock
3: 1.imageLinkWrap.enable.field = 1
4: caption.1.field = titleBlock
5: 1.imageLinkWrap.typolink.parameter.field = links
6: cols>
7: cols = 3
8: }
With this code you can do a similar effect.
Known problems
None