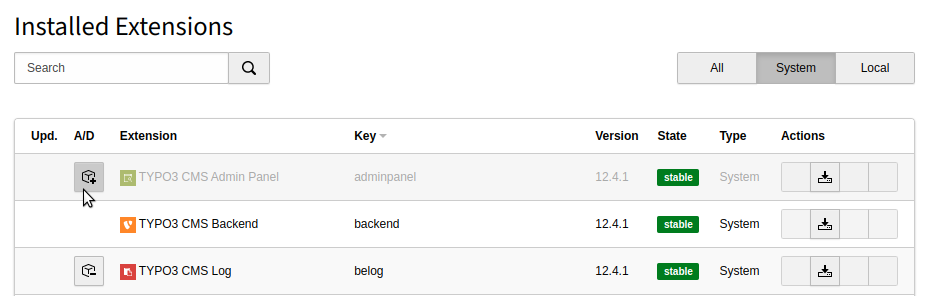
TYPO3 Admin Panel 

Extension key

adminpanel

Package name

typo3/cms-adminpanel

Version

12.4

Language

en

Author

Felicity Brand & TYPO3 contributors

License

This document is published under the Creative Commons BY-NC-SA 4.0 license.

Rendered

Tue, 02 Dec 2025 11:43:21 +0000


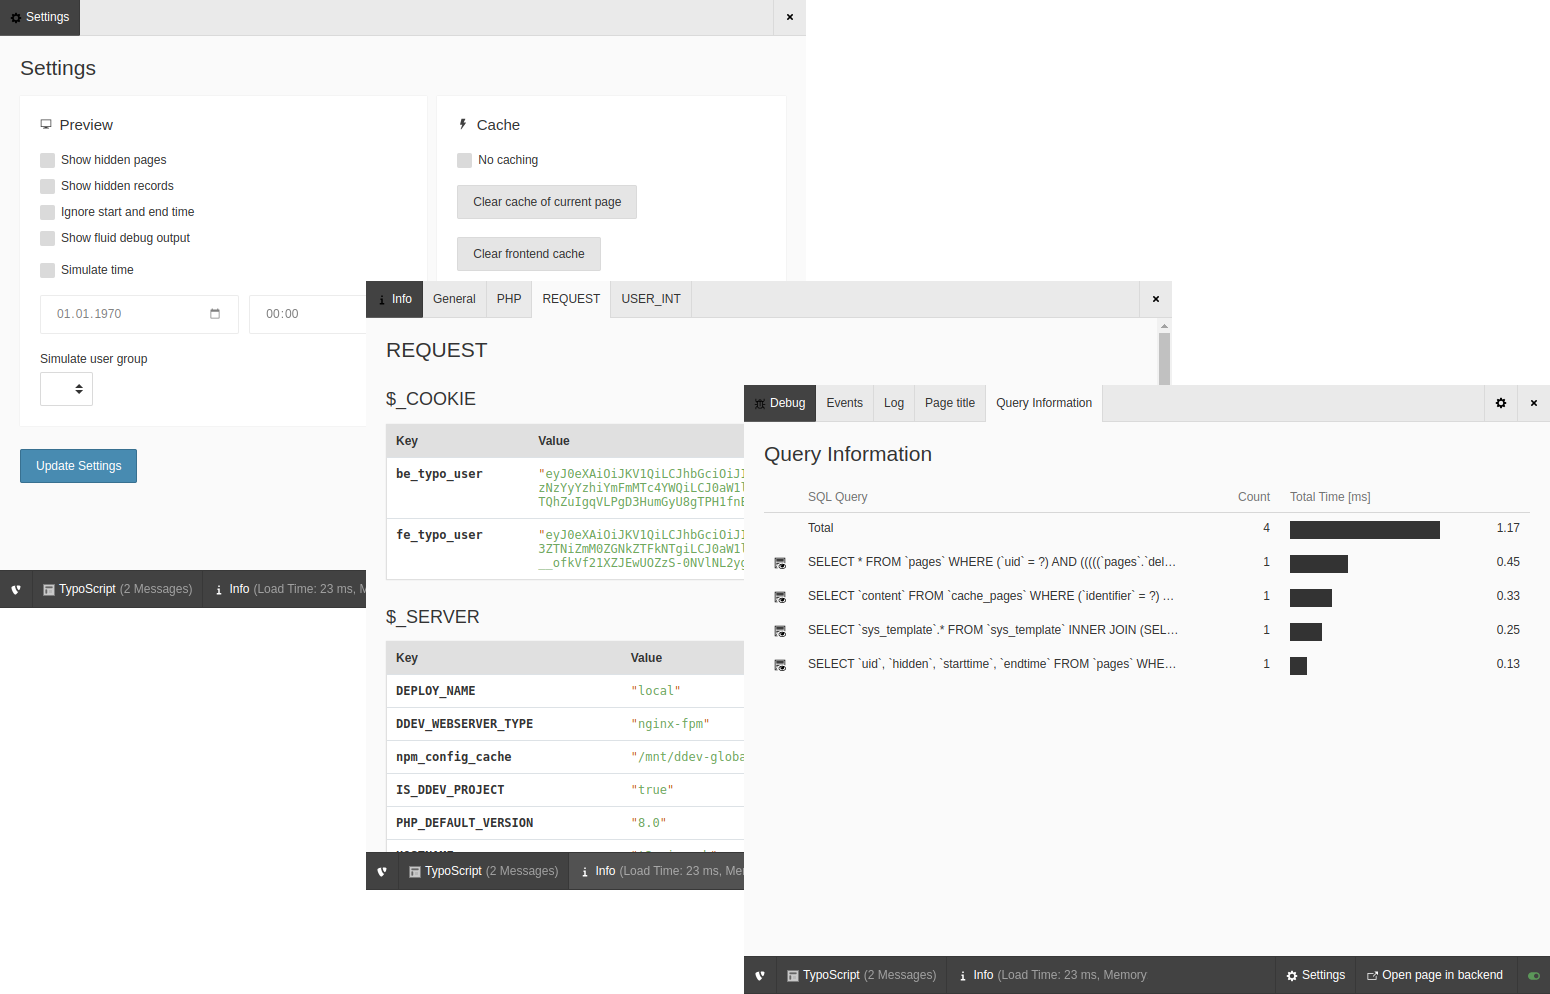
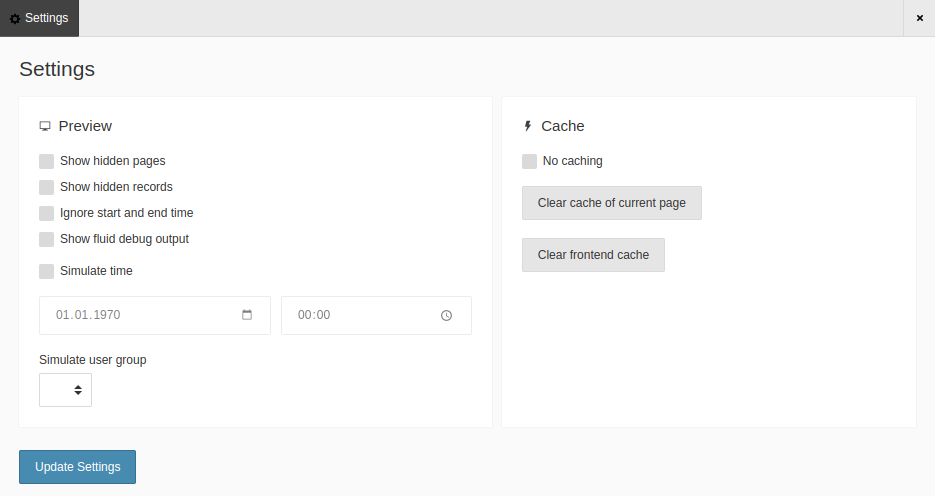
The Admin Panel displays information about your site in the frontend and contains a range of metrics including debug and caching information.


Table of Contents:

Introduction 

What does it do? 

This extension displays a bar at the bottom of the screen on the frontend, from which you can access information per page.

You can use it to simulate scenarios to test page content, for example, user groups, time-restricted content or showing hidden content. You can also use it for general debugging.

The bar shows a summary of information about the page, an option to adjust the settings and a link to the according page in the backend.

The admin panel bar

The admin panel bar displayed at the bottom of the page on the frontend

Some important metrics are displayed right in the admin panel bar:

  • TypoScript: number of messages
  • Info: page load time / peak memory usage
  • Debug: number of errors and warnings / amount of SQL queries / time spent executing SQL queries

From the bar you can open a larger panel to access detailed information about the page.

Three cascading screenshots of different pages of the admin panel

A selection of screenshots showing different pages of the admin panel.

There is a switcher at the bottom right of the admin panel bar to turn it on and off for the page.

See it in action 

This TYPO3 Feature Demo video from August 2018 shows the admin panel in action.

Installation 

This extension is part of the TYPO3 Core, but not installed by default.

Table of contents

Installation with Composer 

Check whether you are already using the extension with:

composer show | grep adminpanel
Copied!

This should either give you no result or something similar to:

typo3/cms-adminpanel       v12.4.11
Copied!

If it is not installed yet, use the composer require command to install the extension:

composer require typo3/cms-adminpanel
Copied!

The given version depends on the version of the TYPO3 Core you are using.

Installation without Composer 

In an installation without Composer, the extension is already shipped but might not be activated yet. Activate it as follows:

  1. In the backend, navigate to the Admin Tools > Extensions module.
  2. Click the Activate icon for the Admin Panel extension.
Extension manager showing Admin Panel extension

Extension manager showing Admin Panel extension

Next steps 

Configure the Admin Panel to be displayed to logged-in backend admins the TypoScript configuration config.admPanel = 1.

By default, the admin panel is displayed to logged-in admins only. This behaviour can be changed by setting admPanel.enable for certain backend users or groups.

Configuration 

If the TypoScript property config.admPanel is set, the admin panel is displayed at the bottom of pages in the frontend for logged-in backend users.

By default, the Admin Panel is displayed to logged-in admins only. This behaviour can be changed by setting User TSconfig settings for certain backend users or groups.

Available settings

TypoScript settings 

The following settings can be made in the project's TypoScript setup. See also Using and setting TypoScript.

config.admPanel 

config.admPanel

config.admPanel
Type

boolean

Default

false

If set, the Admin Panel displays at the bottom of pages. This applies only to logged-in admins or backend users with User TSconfig settings enabled.

Example
EXT:my_sitepackage/Configuration/TypoScript/setup.typoscript
config.admPanel = 1
Copied!

User TSconfig settings 

The options below can be set in the user TSconfig of a backend user or backend user group. See also Using and setting user TSconfig.

admPanel.enable

admPanel.enable
Type

array<string, boolean>

Default

For admin users, admPanel.enable.all = 1 is default.

Used to enable the various parts of the Admin Panel for users. The keyword all can be used to enable all options for the user:

EXT:my_sitepackage/Configuration/user.tsconfig
admPanel.enable.all = 1
Copied!

To enable or disable single parts of the Admin Panel, use the following array keys:

EXT:my_sitepackage/Configuration/user.tsconfig
admPanel.enable {
  cache = 1
  debug = 1
  edit = 0
  info = 1
  preview = 1
  publish = 0
  tsdebug = 1
}
Copied!

admPanel.hide

admPanel.hide
Type

boolean

If set, the Admin Panel will not be displayed at the bottom of the page. This only has a visual effect.

EXT:site_package/Configuration/user.tsconfig
admPanel.hide = 1
Copied!

admPanel.override

admPanel.override
Type

object

Override single Admin Panel settings:

EXT:site_package/Configuration/user.tsconfig
admPanel.override.[modulename].[propertyname]
Copied!

You have to activate a module first by setting

EXT:site_package/Configuration/user.tsconfig
admPanel.override.[modulename] = 1
Copied!
Most common options with example values
EXT:site_package/Configuration/user.tsconfig
admPanel.override {
    preview {
        showFluidDebug = 1
        showHiddenPages = 1
        showHiddenRecords = 1
        simulateDate = 1673688448
        simulateUserGroup = 42
    }
    cache.noCache = 1
    tsdebug.forceTemplateParsing = 1
}
Copied!

TypoScript 

Click TypoScript on the Admin Panel bar to show the TypoScript (TS) Tree. The TypoScript Tree view shows information about the loaded TypoScript that is used for rendering the current page.

The TypoScript Tree of the Admin Panel

The TypoScript Tree of the Admin Panel

Click the cog icon at the top right of the Admin Panel bar to configure the settings.

The settings for the TypoScript Tree

The settings for the TypoScript Tree

Tree display
Displays TypoScript in a tree structure
Display all times
Adds rendering times to each area. This is helpful when debugging performance issues.
Display messages
Displays messages/details (if any). This can help to figure out what exactly is being rendered - but it does make the display quite big.
Track content rendering
Tracks each step in the content rendering process. This is most useful in combination with “Force TS Rendering”, because a page from cache may well be loaded without any content being individually rendered.
Display content
Displays the loaded content. This is especially helpful in the context of content rendering, because the content of each content element is displayed.
Force TS Rendering
Instead of loading the TypoScript from cache, this setting forces the full rendering of the TypoScript.

Information about a page 

Click Info on the Admin Panel bar to show general information about the page. There are four tabs in the Info section.

The General tab of the Info section of the Admin Panel

The General tab of the Info section of the Admin Panel

General 

The General tab displays general TYPO3 related information about the current page.

Document Size
The size of the loaded HTML document
Page
The current page ID and type.
Frontend User Group
The current frontend user group restriction. Default is 0,-1 (no login required).
Cache
Whether the current page is cached or not.
UserIntObjects
Whether there are any USER_INT objects (uncached plugins) on the page. This is useful for performance analysis. See the USER_INT tab for more details.
Total Parsetime
The total parsetime TYPO3 needed to render the page.

PHP 

Information about the PHP installation on the server. This helps developers to quickly analyze available PHP Extensions, global constants or version constraints.

REQUEST 

This tab contains global PHP request information, for example the current content of the $_COOKIE variable and the $_SERVER variable.

This information helps developers to analyze the server environment further and find ini file paths or the IP address with which a user accesses the site.

USER_INT 

This is the detail view of the UserIntObjects section of the General tab. If there are USER_INT objects, an integrator or developer can see details here and use it to figure out which plugins are impacting the caching behavior.

Debugging a page 

Click Debug on the Admin Panel bar to show general information about the page.

The Events tab of the Debug section of the Admin Panel

The Events tab of the Debug section of the Admin Panel

There are four tabs in the Debug section.

Events 

The Events list shows all events that were dispatched while the current page was rendered. A developer can use this list while extending TYPO3 to find out which event to use on any given page.

Click the arrow to expand the details for an event to see basic information about the event's parameters.

An expanded event showing extra detail

An expanded event showing extra detail

Log 

The log tab shows all log entries that were generated during the current request. You can adjust the log levels and grouping in the settings.

Click the cog icon at the top right of the Admin Panel bar to configure the settings.

The settings for the Log tab of the Admin Panel

The settings for the Log entries

Page title 

TYPO3 has a concept of “Page Title Providers”. The section “Page title” displays all registered providers that were checked for the current page. This helps to debug where the currently used page title is coming from.

Query Information 

Displays a list of SQL queries that were generated on the current page and their performance.

The Query tab of the Debug section

The Query tab of the Debug section of the Admin Panel

Click on a query to open a detail view with the values used for the placeholders.

The values used in a query on the page

The values used in a query run on the page

Settings 

The Settings section of the Admin Panel can be useful for editors and integrators to simulate user groups and times, and to show hidden content. It also lets you work with the cache.

The Settings screen of the Admin Panel

The Settings screen of the Admin Panel

Show hidden content 

Use Show hidden pages and Show hidden records to reload the page and see any content that is set to 'disabled' in the backend.

The Ignore start and end time to view all records on a page regardless of the start and end time.

The Show fluid debug output reloads the page with an overlay indicating the Fluid sections and partials in use.

Simulate users and times 

Use the Simulate time control to specify a time for the page. This is particularly useful for editors who want to verify the display of scheduled or seasonal content.

Use the Simulate user group control to impersonate a particular user group when viewing the page. This is useful for editors who want to verify the display of restricted or permissions-based content.

Work with the cache 

Use the controls in this section to clear the current page from the cache, to clear the entire frontend cache or to turn off caching altogether.

Extending the Admin Panel 

Extension authors can write their own modules or add submodules to existing modules.

Creating additional modules 

An admin panel module commonly has:

  • An icon, an identifier, a short info and a label
  • initializeModule and onSubmit methods for initialization (done early in the TYPO3 Request) and for reacting to changes (onSubmit is executed when the settings are updated)
  • Settings that influence page rendering or page display
  • Methods to provide custom CSS and JavaScript files
  • Submodules

To create your own Admin Panel module 

  1. Create a new PHP class extending \TYPO3\CMS\Adminpanel\ModuleApi\AbstractModule and implementing TYPO3\CMS\Adminpanel\ModuleApi\ShortInfoProviderInterface. If you don't implement the ShortInfoProviderInterface, your module will not be shown in the module menu.
  2. Implement at least the following methods:

    • getIdentifier - A unique identifier for your module. For example mynamespace_modulename
    • getIconIdentifier - An icon identifier which is resolved via the icon API. Make sure to use a registered icon here.
    • getLabel - Speaking label for the module. You can access language files via $this->getLanguageService()
    • getShortInfo - Displayed next to the module label, may contain aggregated infos (such as Total Parse Time: 200ms)
  3. Register your module by adding the following in your ext_localconf.php. Using before or after you can influence where your module will be

displayed in the module menu by referencing the identifier / array key of other modules.

$GLOBALS['TYPO3_CONF_VARS']['EXTCONF']['adminpanel']['modules']['mynamespace_modulename'] = [
    'module' =>  \Your\Namespace\Adminpanel\Modules\YourModule::class,
    'before' => ['cache'],
];
Copied!
  1. Ensure that your module class is defined as 'public' in the Services.yaml file.

Modules themselves do provide settings for the page rendering and global actions (like preview settings, clearing caches or adding action buttons for editing the page) but do not provide further content.

If you want to display additional content in the Admin Panel (like rendering times or backtraces), you have to add a submodule to your main module.

Adding settings 

Page settings 

Page settings, like "Preview" or "Cache", are accessible via the "Settings" section in the module menu.

To provide custom page settings, your main module needs to implement the \TYPO3\CMS\Adminpanel\ModuleApi\PageSettingsProviderInterface interface. The corresponding method getPageSettings() returns rendered HTML form elements (but without the form tag).

Examples 

  • \TYPO3\CMS\Adminpanel\Modules\CacheModule
  • \TYPO3\CMS\Adminpanel\Modules\PreviewModule

Module settings 

Module settings are accessible via the cogwheel-button in the opened module.

To provide settings, your submodule needs to implement the \TYPO3\CMS\Adminpanel\ModuleApi\ModuleSettingsProviderInterface interface. The respective method getSettings() returns rendered HTML form elements (but without the form tag).

Examples 

  • \TYPO3\CMS\Adminpanel\Modules\Debug\Log
  • \TYPO3\CMS\Adminpanel\Modules\TsDebug\TypoScriptWaterfall

Adding a sub-module 

An Admin Panel submodule has:

  • An identifier and a label.
  • initializeModule and onSubmit methods for initialization (done early in the TYPO3 Request) and reacting to changes (onSubmit is executed when the settings are updated).
  • Module content (for example the Info submodules display information about the current page or server configuration).
  • Settings influencing their module content (for example the TypoScript Time / Rendering sub module has settings that influence whether to display messages or not).

As soon as a module has a submodule it will be displayed in the main Admin Panel. Modules without submodules may only provide settings, and are only displayed in the Settings overview.

Adding a submodule is similar to adding a module.

  1. First, create a new class that extends AbstractSubModule. Implement at least the following methods:

    • getIdentifier - A unique identifier for your sub module (for example submodulename)
    • getLabel - Speaking label for the module - you can access language files via $this->getLanguageService()
    • getContent - The rendered HTML content for your module
  2. Register your sub module by adding the following in your ext_localconf.php

    $GLOBALS['TYPO3_CONF_VARS']['EXTCONF']['adminpanel']['modules']['mynamespace_modulename']['submodules']['submodulename'] = [
        'module' => \Your\Namespace\Adminpanel\Modules\YourModule\Submodule::class
    ];
    Copied!

Where mynamespace_modulename references the main module where you want to add your submodule, and submodulename is the identifier of your sub module. This way, you can also register new custom sub modules to existing main modules.

Examples 

You can find examples for main and sub modules and their registration in the Admin Panel extension. Short ones for a quick look are:

  • adminpanel/Classes/Modules/Info/PhpInformation.php (Submodule)
  • adminpanel/Classes/Modules/InfoModule.php (Main module, serves as submodule wrapper only)
  • adminpanel/Classes/Modules/CacheModule.php (Main module, custom rendering settings)

Sitemap