Configuration Examples
Tip
Use the CKEditor Toolbar Configurator to assist you in creating your custom configuration.
How Do I Use a Different Preset?
Instead of using the default “default” preset, you can change this, for example to “full”, using Page TSconfig:
RTE.default.preset = full
Of course, the preset must already exist, or you must define it. rte_ckeditor ships with presets “minimal”, “default” and “full”.
Additionally, you can set specific presets for specific types of textfields.
For example to use preset “full” for the field “bodytext” of all content elements:
RTE.config.tt_content.bodytext.preset = full
To use preset “minimal” for the field “bodytext” of only content elements with ctype=”text”:
RTE.config.tt_content.bodytext.types.text.preset = minimal
For more examples, see RTE in “TSconfig Reference”.
How Do I Create My Own Preset?
In your sitepackage extension:
In ext_localconf.php, replace my_extension with your extension key, replace my_preset and MyPreset.yaml
with the name of your preset.
$GLOBALS['TYPO3_CONF_VARS']['RTE']['Presets']['my_preset'] = 'EXT:my_extension/Configuration/RTE/MyPreset.yaml';
In Configuration/RTE/MyPreset.yaml, create your configuration, for example:
# Import basic configuration
imports:
 - { resource: "EXT:rte_ckeditor/Configuration/RTE/Processing.yaml" }
 - { resource: "EXT:rte_ckeditor/Configuration/RTE/Editor/Base.yaml" }
 - { resource: "EXT:rte_ckeditor/Configuration/RTE/Editor/Plugins.yaml" }
# Add configuration for the editor
# For complete documentation see http://docs.ckeditor.com/#!/api/CKEDITOR.config
editor:
  config:
    # Include custom CSS
    contentsCss: "EXT:my_extension/Resources/Public/Css/rte.css"
How Do I Customize the Toolbar?
Since CKEditor 4, there are 2 ways to customize the toolbar buttons:
- Using editor.config.toolbar : This has the advantage, that each button is configured individually and it gives you more control over what is displayed in the toolbar.
- Using editor.config.toolbarGroups : This has the advantage, that new buttons that have been added by plugins will automatically appear.
This is explained in the Toolbar documentation
Configuration Using the toolbarGroups Method
Each button is in a specific toolbarGroup. You can configure various toolbars, containing one or more toolbarGroups.
Example:
toolbarGroups:
  - { name: clipboard, groups: [ clipboard, cleanup, undo ] }
In the example, the toolbar “clipboard” will contain the toolbarGroups “clipboard”, “cleanup” and “undo” and all buttons which are assigned to these groups will be displayed in the toolbar in the defined order.
To find out which buttons exist and which are in which toolbar group, you can go to the toolbar configurator.
While you hover over the various toolbars, a selection box corresponding to the toolbar will be displayed in the sample toolbar at the top.
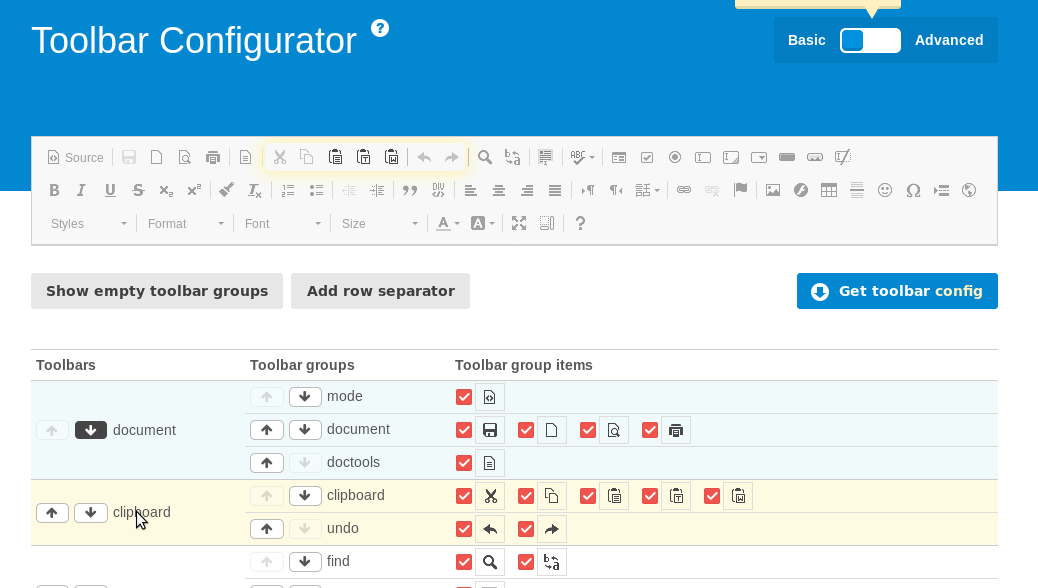
When you are ready, click “Get toolbar config” to see the configuration.
How do I add Custom Plugins?
See EXT:rte_ckeditor/Configuration/RTE/Editor/Plugins.yml
for a list of plugins, that are already integrated in rte_ckeditor. Besides this, the wordcount plugin was added as
npm package. You can find it within typo3/sysext/rte_ckeditor/Resources/Public/JavaScript/Contrib/plugins/wordcount/.
Additionally, a large number of plugins are available and can be freely used.
In this example, we integrate the plugin codesnippet.
Go to the start page of the plugin
For example: codesnippet.
Click Download
Unzip the plugin zip archive,
For example extract the files to the directory
my_extension/Resources/Public/CKeditor/Plugins/codesnippet/Include the path to the plugin in your Yaml configuration, for example:
EXT:my_extension/Configuration/RTE/MyPreset.yaml:editor: externalPlugins: codesnippet: resource: "EXT:my_extension/Resources/Public/CKeditor/Plugins/codesnippet/"
Tip
Each CKEditor plugin must have a javascript file called
plugin.jsper convention. If this is not the case, you must reference the whole path including the javascript file.Configure
Check if further configuration is necessary, by looking in the plugin documentation
Make sure the new button is visible in the toolbar
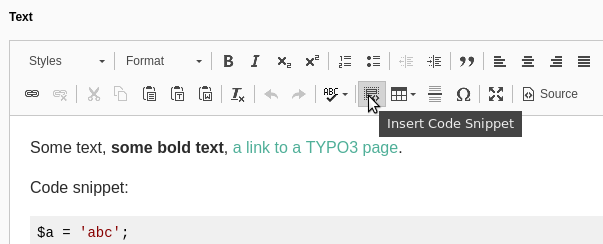
Now, remove cache and reopen a text element, look for the new button “Insert Code Snippet”.
If the button is not displayed, it is possible, that the toolbarGroup has not been activated. Search for “toolbar” in the plugin to find out which toolbarGroup is being used, in the case of the plugin “codesnippet”, it is the toolbarGroup “insert”. This should be activated by default.
Use the plugin