Configuration Examples
How do I use a different preset?
Instead of using the default "default" preset, you can change this, for example to "full", using page TSconfig:
RTE.default.preset = fullOf course, the preset must already exist, or you must define it. rte_
ships with presets "minimal", "default" and "full".
Additionally, you can set specific presets for specific types of textfields.
For example to use preset "full" for the field "bodytext" of all content elements:
RTE.config.tt_content.bodytext.preset = fullTo use preset "minimal" for the field "bodytext" of only content elements with ctype="text":
RTE.config.tt_content.bodytext.types.text.preset = minimalFor more examples, see RTE in "TSconfig Reference".
How do I create my own preset?
In your sitepackage extension:
In ext_, replace my_ with your extension key, replace my_ and My
with the name of your preset.
$GLOBALS['TYPO3_CONF_VARS']['RTE']['Presets']['my_preset']
= 'EXT:my_extension/Configuration/RTE/MyPreset.yaml';In Configuration/, create your configuration, for example:
# Import basic configuration
imports:
  - { resource: "EXT:rte_ckeditor/Configuration/RTE/Processing.yaml" }
  - { resource: "EXT:rte_ckeditor/Configuration/RTE/Editor/Base.yaml" }
  - { resource: "EXT:rte_ckeditor/Configuration/RTE/Editor/Plugins.yaml" }
# Add configuration for the editor
# For complete documentation see http://docs.ckeditor.com/#!/api/CKEDITOR.config
editor:
  config:
    # Include custom CSS
    contentsCss:
      - "EXT:my_extension/Resources/Public/Css/rte.css"
See also the note for editor.config.contentsCss.
How do I customize the toolbar?
The toolbar can be customized individually by configuring required toolbar
items in the YAML configuration. The following configuration shows the toolbar
configuration of the minimal editor setup included in file
EXT::
# Minimal configuration for the editor
editor:
  config:
    toolbar:
      items:
        - bold
        - italic
        - '|'
        - clipboard
        - undo
        - redo
The
' can be used as a separator between groups of toolbar items.
Additional configuration options are available in the official CKEditor 5 Toolbar documentation
Grouping toolbar items in drop-downs
To save space in the toolbar or to arrange the features thematically, it is possible to group several items into a dropdown as shown in the following example:
How do I allow a specific tag?
Allowed content in CKEditor 5 is to be configured via the General HTML Support
plugin option
config..
# Allow the <iframe> tag with all attributes, all classes and all styles,
# as well as demonstrating class restrictions to the <i> tag
editor:
  config:
    htmlSupport:
      # if you want to allow that an inline tag like `<i>` can also be empty
      allowEmpty: ['i']
      allow:
        - { name: 'iframe', attributes: true, classes: true, styles: true }
        # multiple definitions for the same tag name are possible
        - { name: 'i', classes: [ 'fa-brands', 'fa-typo3' ] }
        # allows any repetitive class name, that starts with `fa-`
        # (the regular expression has to be defined in `pattern`)
        - { name: 'i', classes: { pattern: '^((fa-[^\h]+)(\h+|$))+' } }
Note
config. only applies to elements that are "known" to
CKEditor 5. Tags like
<svg> or custom elements like
<my- are not configurable this way as
html can only handle
elements that are defined in the CKEditor 5 schema.
How do I configure the font plugin?
New in version 12.4.12
In order to use the font plugin, the RTE configuration needs to be adapted:
editor:
  config:
    toolbar:
      items:
        # add button to select font family
        - fontFamily
        # add button to select font size
        - fontSize
        # add button to select font color
        - fontColor
        # add button to select font background color
        - fontBackgroundColor

    fontColor:
      colors:
        - { label: 'Orange', color: '#ff8700' }
        - { label: 'Blue', color: '#0080c9' }
        - { label: 'Green', color: '#209d44' }

    fontBackgroundColor:
      colors:
        - { label: 'Stage orange light', color: '#fab85c' }

    fontFamily:
      options:
        - 'default'
        - 'Arial, sans-serif'

    fontSize:
      options:
        - 'default'
        - 18
        - 21

    importModules:
      - { 'module': '@ckeditor/ckeditor5-font', 'exports': [ 'Font' ] }
More information can be found in the official documentation of CKEditor.
How do I enable the fullscreen plugin?
New in version 13.4.16
In order to use the fullscreen plugin, the RTE configuration needs to be adapted:
editor:
  config:
    toolbar:
      items:
        # add button to enable fullscreen view
        - fullscreen

    fullscreen:
      menuBar:
        # Disable menu bar in fullscreen view
        isVisible: false

    importModules:
      - { module: '@ckeditor/ckeditor5-fullscreen', exports: [ 'Fullscreen' ] }
More information can be found in the official documentation of CKEditor.
How do I configure the Link Browser?
The TYPO3 Link Browser can be utilized in both the RTE and for FormEngine TCA fields. The latter
is configured through TCA settings, and the RTE editor itself is configured via the central
YAML file.
There are several configuration options available. Please see Link Browser specific options for the detailed reference, and EXT:rte_ckeditor/Configuration/RTE/Editor/LinkBrowser.yaml (GitHub) for an example configuration.
How do I create a custom plugin?
With CKEditor 5 the plugin architecture has changed and CKEditor 4 plugins are not compatible with CKEditor 5. It is advised to read the CKEditor 4 to 5 migration to understand the conceptual changes, also related to plugins.
Writing a custom plugin for CKEditor 5 can be done in TypeScript or JavaScript, using the CKEditor 5 plugin system.
In this example, we integrate a simple timestamp plugin to CKEditor 5.
Make sure to replace <my_ with your extension key.
-
Create the plugin file
Add the following ES6 JavaScript code:
EXT:<my_extension>/Resources/Public/JavaScript/Ckeditor/timestamp-plugin.jsimport { Plugin } from '@ckeditor/ckeditor5-core'; import { ButtonView } from '@ckeditor/ckeditor5-ui'; export class Timestamp extends Plugin { static pluginName = 'Timestamp'; init() { const editor = this.editor; // The button must be registered among the UI components of the editor // to be displayed in the toolbar. editor.ui.componentFactory.add(Timestamp.pluginName, () => { // The button will be an instance of ButtonView. const button = new ButtonView(); button.set({ label: 'Timestamp', withText: true }); // Execute a callback function when the button is clicked button.on('execute', () => { const now = new Date(); // Change the model using the model writer editor.model.change(writer => { // Insert the text at the user's current position editor.model.insertContent(writer.createText(now.toString())); }); }); return button; }); } }Copied! -
Register the ES6 JavaScript
EXT:<my_extension>/Configuration/JavaScriptModules.php -
Include the plugin in the CKEditor configuration
EXT:<my_extension>/Configuration/RTE/MyPreset.yamleditor: config: importModules: - { module: '@my-vendor/my-package/timestamp-plugin.js', exports: [ 'Timestamp' ] } toolbar: items: - bold - italic - '|' - clipboard - undo - redo - '|' - timestamp- The
importitem in line 4 imports the previously registered ES6Modules - module. The
timestampitem in line 14 adds the plugin to the toolbar.
- The
-
Use the plugin
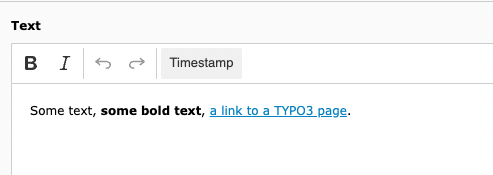
The custom timestamp plugin in the editor