mosparo Form 

The mosparo Form extension integrates the mosparo spam protection system into TYPO3 Form and Extbase forms <f:form>, allowing for easy and effective spam prevention across various form implementations.

Introduction 

Get an overview of the extension and its key features.

Installation 

Explains how to install this extension in Composer-based and Classic TYPO3 installations.

Configuration 

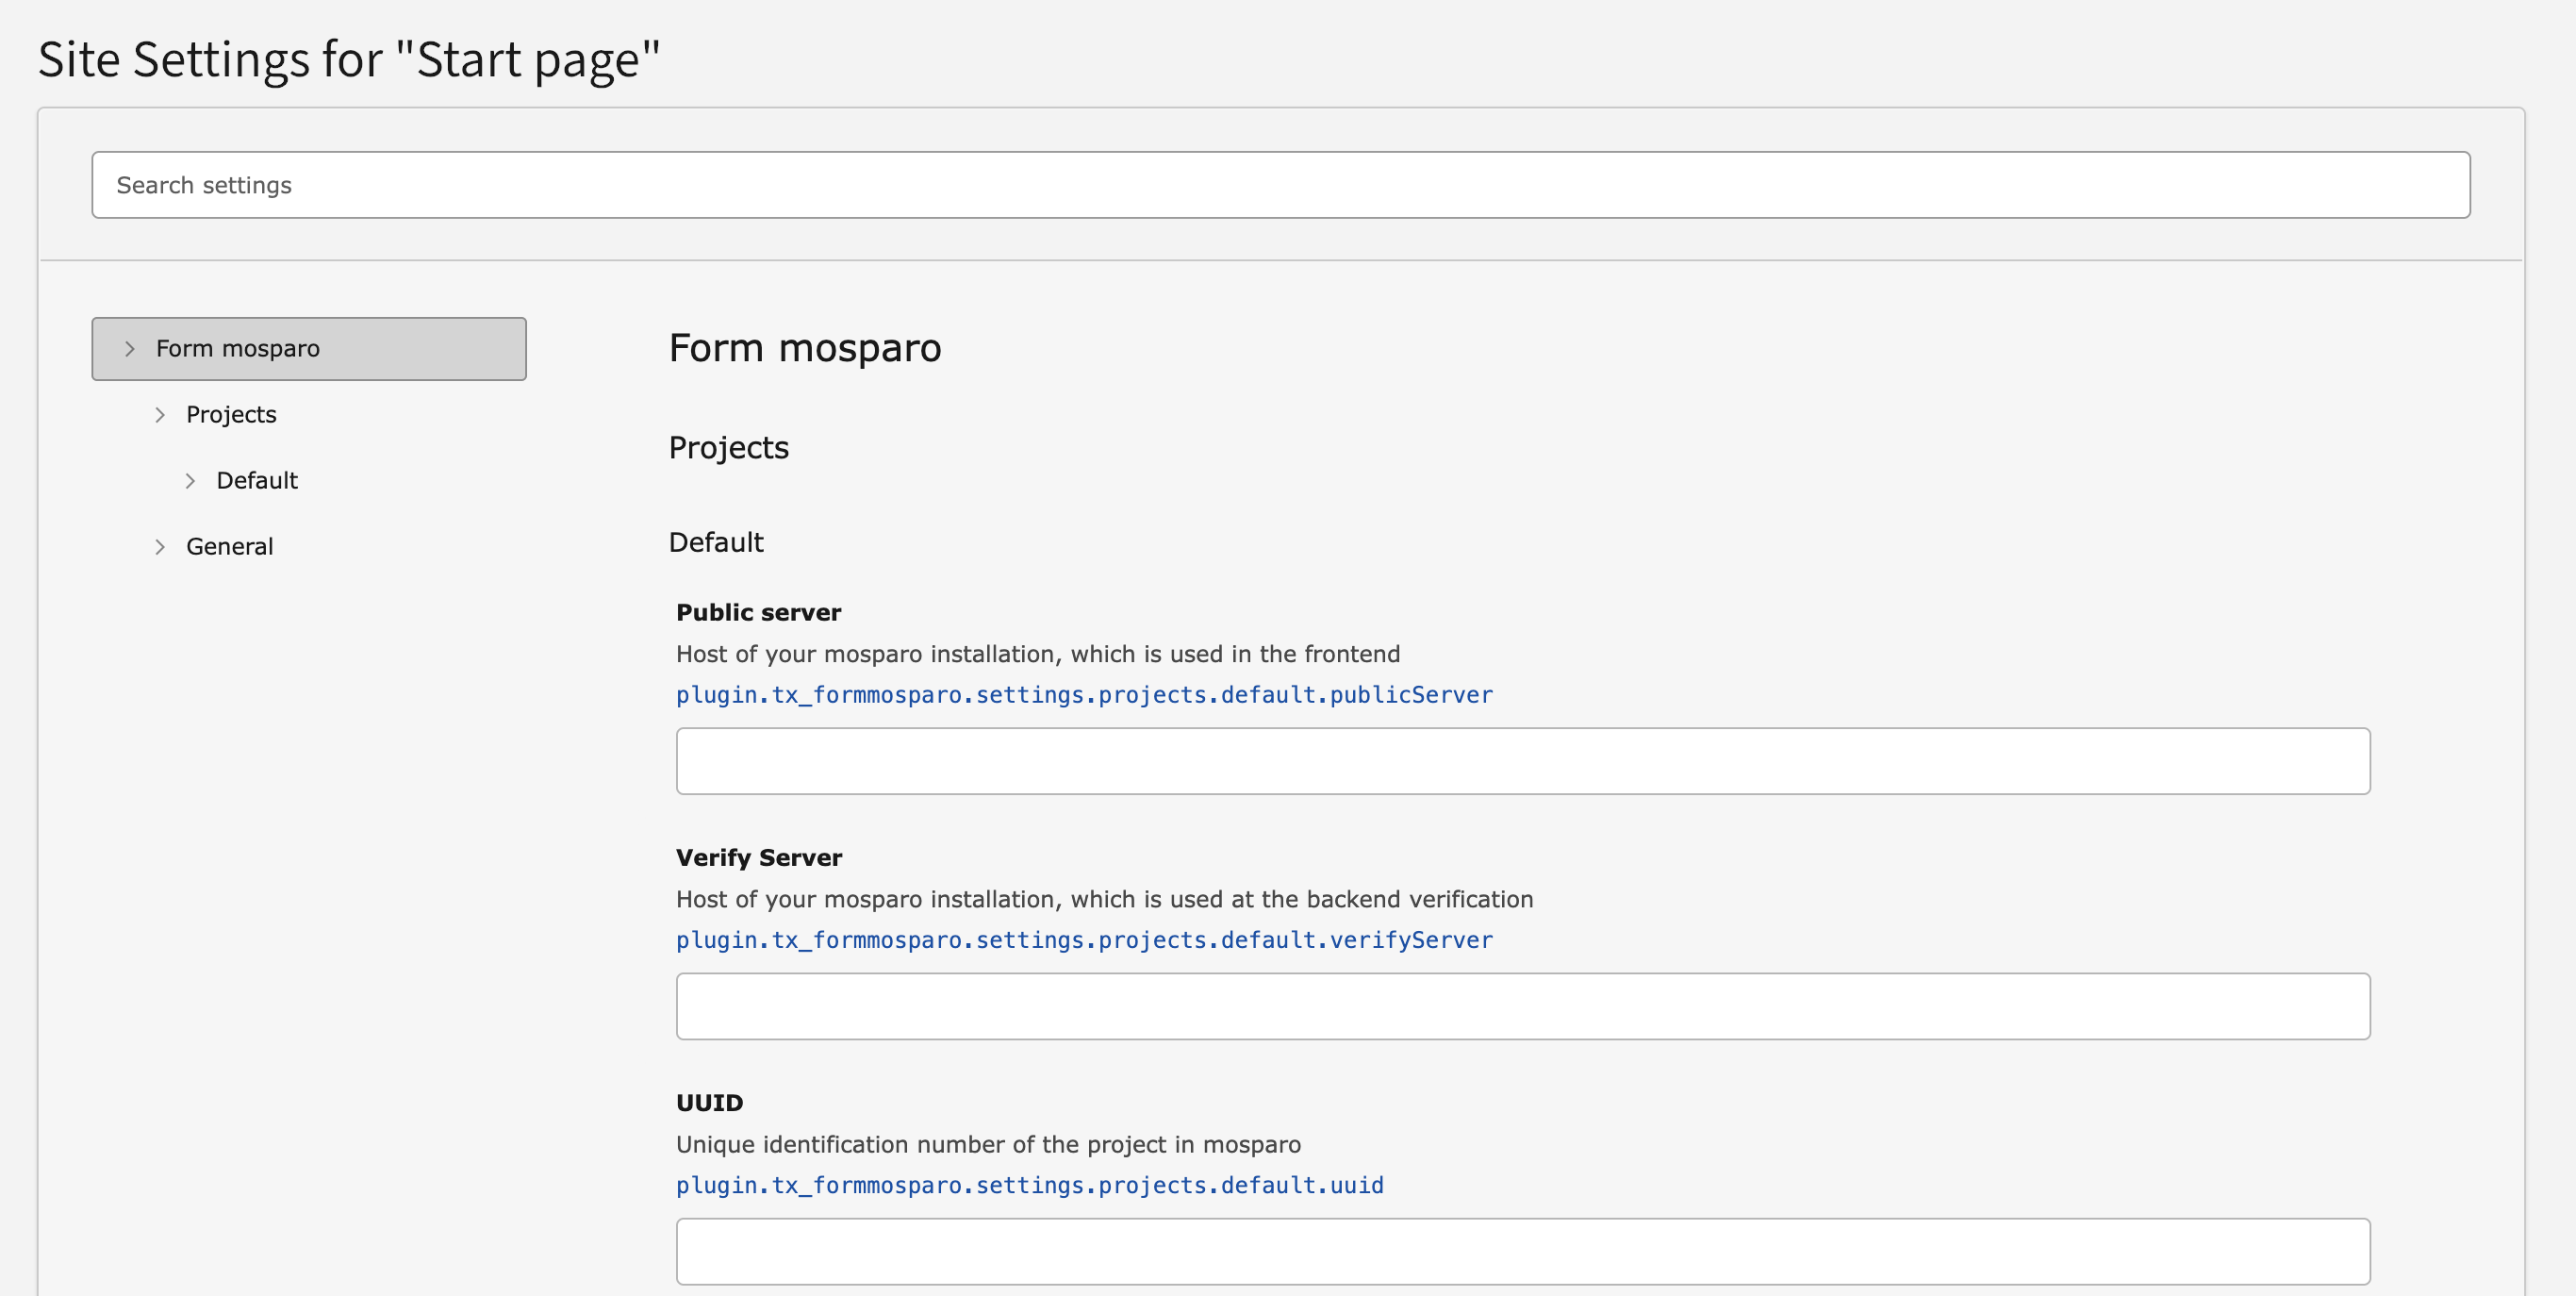
Learn how to use settings to configure this extension.

How to use 

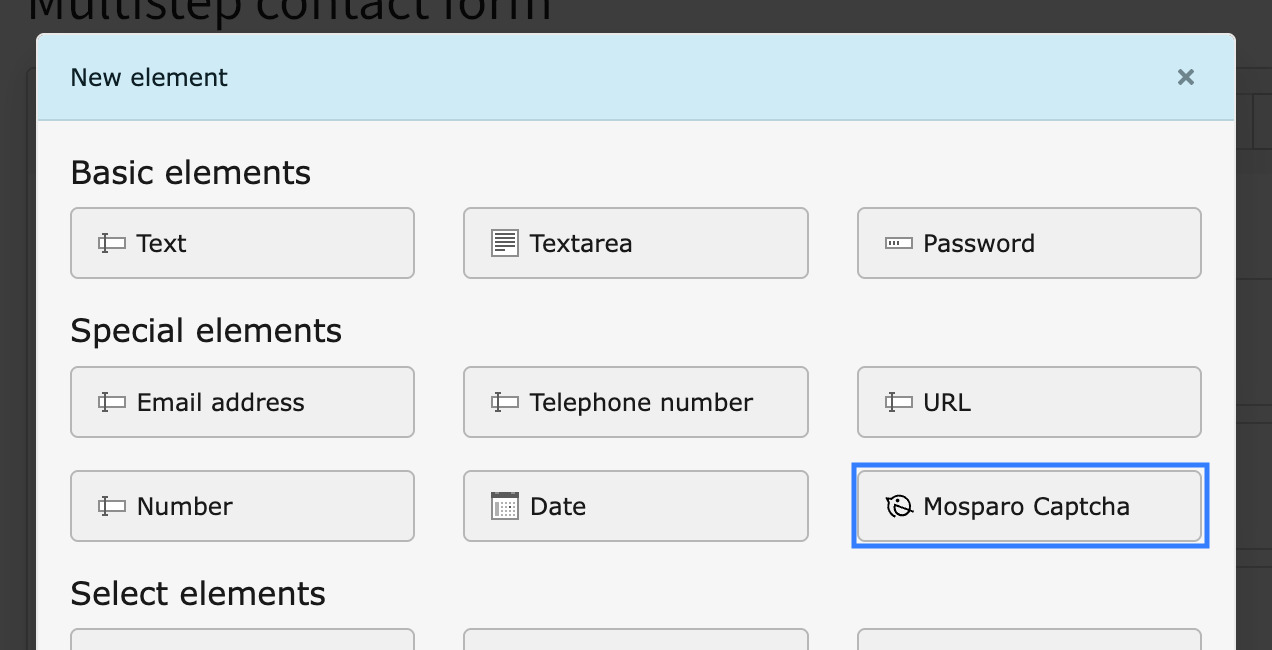
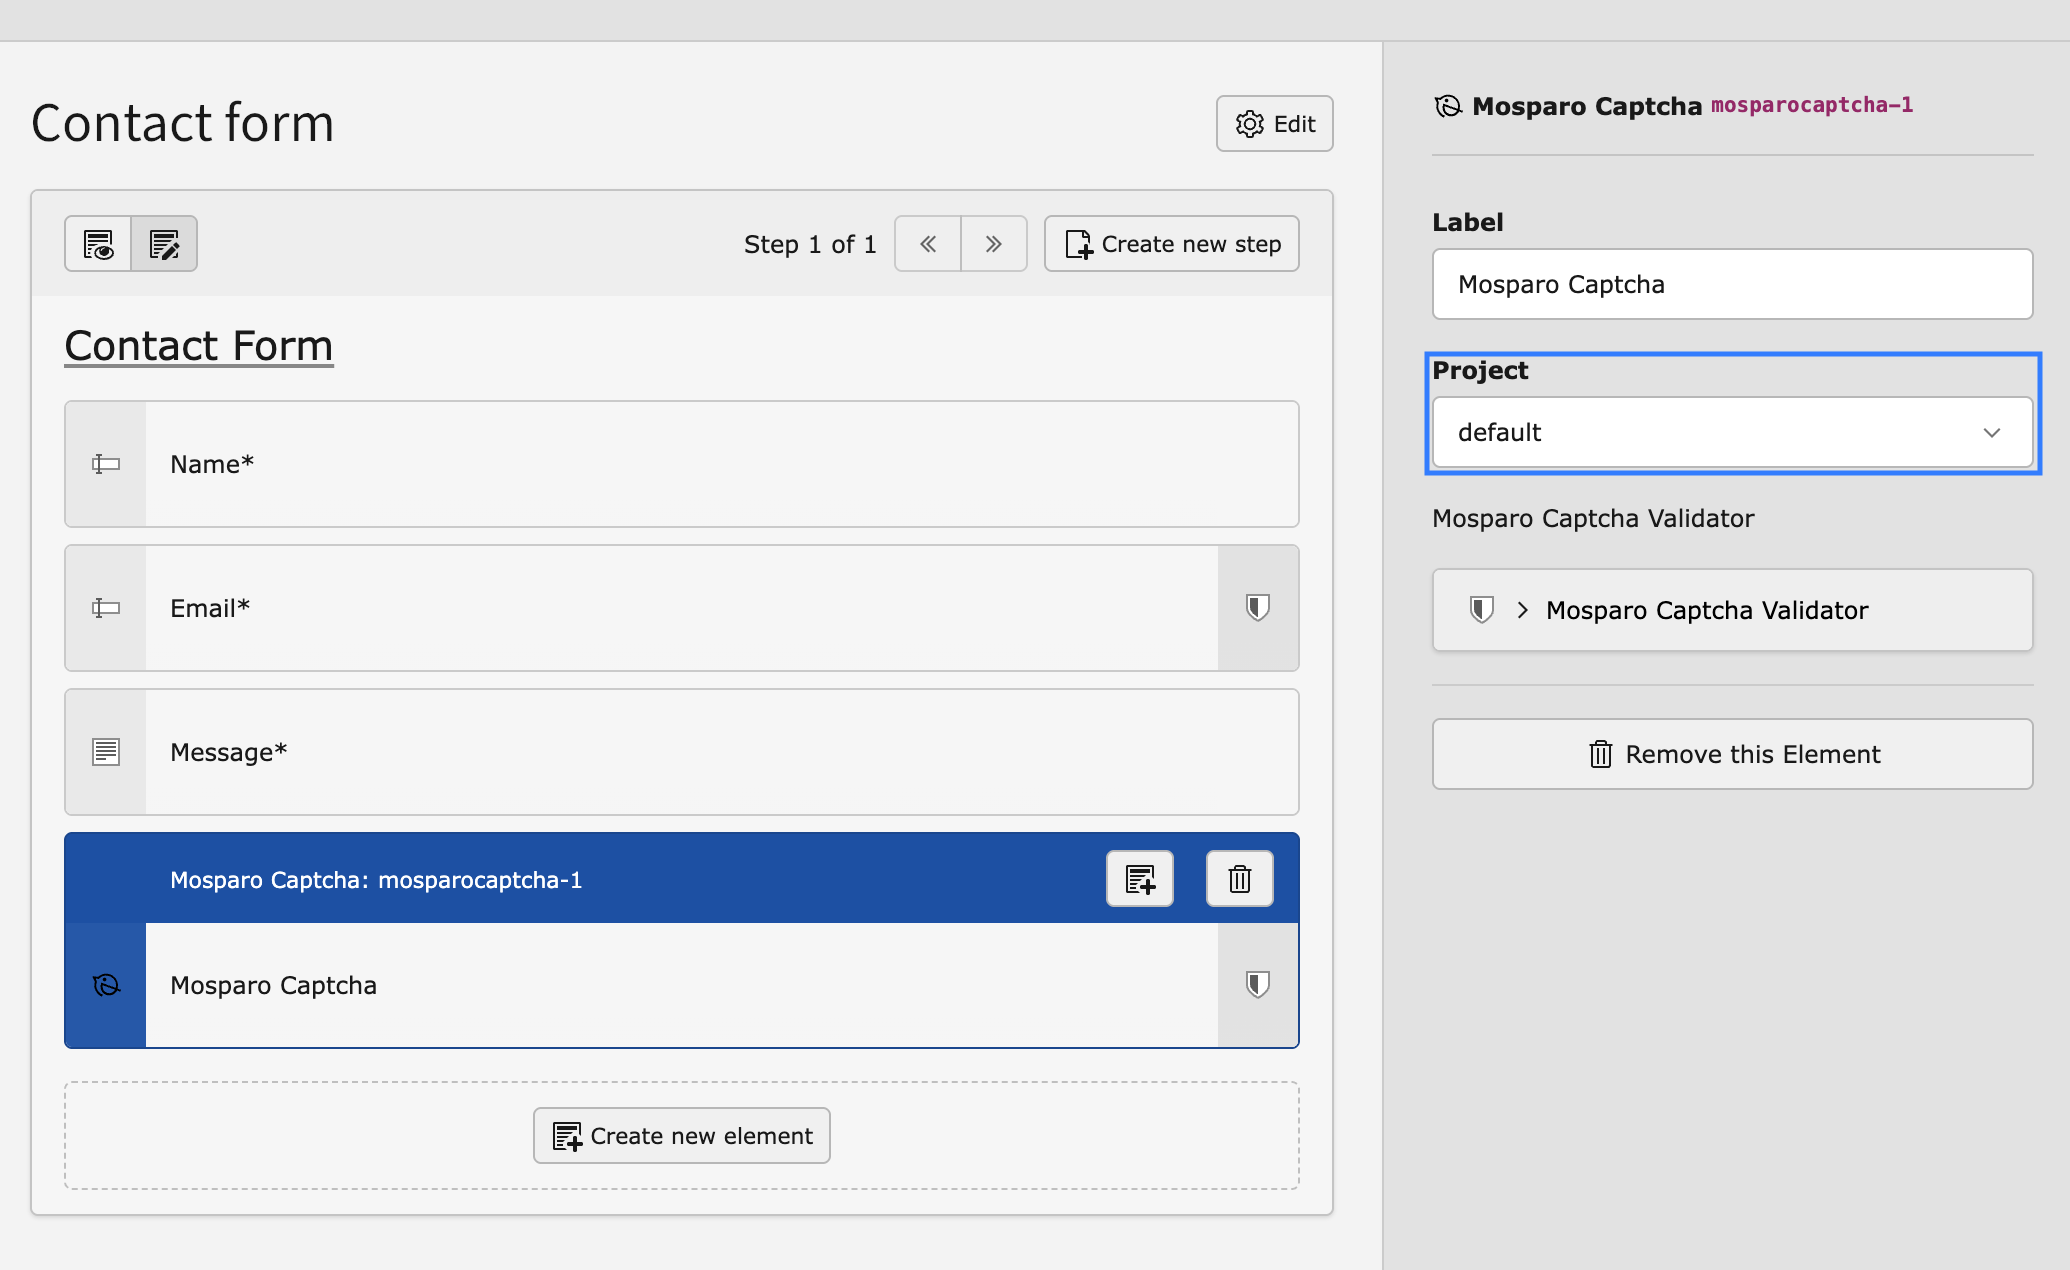
Learn how to integrate the mosparo form element into TYPO3 Form Framework or Extbase forms <f:form>.

Frequently Asked Questions (FAQ) 

These questions have been frequently asked.

How to get help 

Learn where to get help and how to report issues you found.

Introduction 

What does it do? 

The mosparo Form extension integrates the mosparo spam protection system into TYPO3 Form and Extbase forms <f:form>, allowing for easy and effective spam prevention across various form implementations.

Features 

Features for TYPO3 Form 

For the TYPO3 frontend form framework, this extension adds the following features:

  • A new form element called "Mosparo Captcha" that allows editors to easily add mosparo spam protection to forms
  • A mosparo validator that works together with the new form element.
  • Ready-to-use JavaScript to properly load the captcha

Features for TYPO3 Extbase forms 

For Extbase forms, this extension provides the following features:

  • A mosparo validator that can be used in the controller action
  • An HTML partial that can be embedded into your own Fluid Styled Content Twig form
  • Ready-to-use JavaScript to properly load the captcha

Installation 

Installation and configuration 

  1. Install mosparo form with Composer or Install mosparo form in Classic Mode.
  2. Include static TypoScript via site set (TYPO3 v13 and above) or Include static TypoScript via TypoScript module.
  3. Configure the mosparo Form via site set settings (TYPO3 v13 and above) or Configure the mosparo Form via TypoScript (TypoScript File)
  4. (Optional) Add additional project
  5. Start adding mosparo to your forms!

Install mosparo form with Composer 

Install the extension via Composer:

composer req denkwerk/mosparo-form
Copied!

See also Installing extensions, TYPO3 Getting started.

Install mosparo form in Classic Mode 

Or download the extension from https://extensions.typo3.org/extension/mosparo_form and install it in the Extension Manager.
The extension depends on the PHP package mosparo/php-api-client.
Make sure this package is installed in your TYPO3 environment or otherwise available so the extension can function properly.

Integrate mosparo Form into your TYPO3 

Include static TypoScript via site set (TYPO3 v13 and above) 

This extension comes with a site set called denkwerk/mosparo-form. To use it include this set in your site configuration via

config/sites/my-site/config.yaml (diff)
 base: 'https://example.com/'
 rootPageId: 1
+dependencies:
+  - denkwerk/mosparo-form
Copied!

See also: TYPO3 Explained, Using a site set as dependency in a site.

Include site set via Site Manager 

It is also possible to include mosparo Form as site dependency directly in the backend:

  1. Got to module Site Management > Sites
  2. Edit your site configuration.
  3. In section Sets for this Site chose site set denkwerk/mosparo-form.

Include static TypoScript via TypoScript module 

This extension comes with static TypoScript that should be included if it has not been set in the site set.

  1. Go to section Includes > Include static (from extensions).
  2. You should find the item "denkwerk - mosparo integration for EXT:form and Extbase-based forms" in the list Available Items. Click on this item to make it appear in the list Selected Items.
  3. Now save your changes by clicking the Save button at the top.

Configure extension 

Configure the mosparo Form via site set settings (TYPO3 v13 and above) 

You can configure projects and validation settings through the Site settings editor in the TYPO3 backend.

  1. Got to module Site Management > Settings and edit your site configuration.
  2. Under the category "mosparo Form" you can than enter your project configuration.
Site settings for mosparo forms

Environment variables in site settings 

Site settings are defined in config/sites/my-site/settings.yaml, where environment variables can be used to provide the mosparo configuration.

config/sites/my-site/settings.yaml (diff)
 plugin:
   tx_mosparoform:
     settings:
       projects:
         default:
+          publicServer: '%env(MOSPARO_FORM_DEFAULT_PUBLIC_SERVER)%'
+          verifyServer: '%env(MOSPARO_FORM_DEFAULT_VERIFY_SERVER)%'
+          uuid: '%env(MOSPARO_FORM_DEFAULT_UUID)%'
+          publicKey: '%env(MOSPARO_FORM_DEFAULT_PUBLIC_KEY)%'
+          privateKey: '%env(MOSPARO_FORM_DEFAULT_PRIVATE_KEY)%'
Copied!

Site set settings to configure the extension 

mosparoForm

mosparoForm
Label
Mosparo form

mosparoForm.general

mosparoForm.general
Label
General

plugin.tx_mosparoform.settings.defaultProject

plugin.tx_mosparoform.settings.defaultProject
Type
string
Default
"default"
Label
Default project
Category
Mosparo form > General

Default mosparo project configuration that is used.

mosparoForm.projects

mosparoForm.projects
Label
Projects

mosparoForm.projects.default

mosparoForm.projects.default
Label
Default

plugin.tx_mosparoform.settings.projects.default.publicServer

plugin.tx_mosparoform.settings.projects.default.publicServer
Type
string
Label
Public server
Category
Mosparo form > Projects > Default

Host of your mosparo installation, which is used in the frontend

plugin.tx_mosparoform.settings.projects.default.verifyServer

plugin.tx_mosparoform.settings.projects.default.verifyServer
Type
string
Label
Verify Server
Category
Mosparo form > Projects > Default

Host of your mosparo installation, which is used at the backend verification

plugin.tx_mosparoform.settings.projects.default.uuid

plugin.tx_mosparoform.settings.projects.default.uuid
Type
string
Label
UUID
Category
Mosparo form > Projects > Default

Unique identification number of the project in mosparo

plugin.tx_mosparoform.settings.projects.default.publicKey

plugin.tx_mosparoform.settings.projects.default.publicKey
Type
string
Label
Public key
Category
Mosparo form > Projects > Default

Public key of the project in mosparo

plugin.tx_mosparoform.settings.projects.default.privateKey

plugin.tx_mosparoform.settings.projects.default.privateKey
Type
string
Label
Private key
Category
Mosparo form > Projects > Default

Private key of the project in mosparo

Configure the mosparo Form via TypoScript (TypoScript File) 

You can add the settings over a TypoScript file like this:

EXT:site_package/Configuration/TypoScript/constants.typoscript
plugin.tx_mosparoform.settings {
    defaultProject=<Default mosparo project configuration that is used>

    projects {
        default {
            publicServer=<Host of your mosparo installation, which is used in the frontend>
            verifyServer=<Host of your mosparo installation, which is used at the backend verification>
            uuid=<Unique identification number of the project in mosparo>
            publicKey=<Public key of the project in mosparo>
            privateKey=<Private key of the project in mosparo>
        }
    }
}
Copied!

Configure the mosparo Form via TypoScript (Constants Editor) 

The settings for the projects and validation themselves can be set via the Submodule "Constant Editor".

  1. This can be opened under the Sites > TypoScript module using the Constant Editor.
  2. You only have to select the entry “mosparo form” under Selected category in the editor.

Add additional project 

mosparo enables you to define multiple independent projects, each with its own settings, rules, and style that can be used across multiple websites or forms. Before these projects can be selected by editors in TYPO3, they need to be configured.

Add projects to site set settings (TYPO3 v13 and above) 

To configure custom projects in the site settings, perform the following steps.

  1. Create an additional site set in your provider extension.

    EXT:site_package/Configuration/Sets/ExtendMospraoForm/config.yaml
    name: exapmle/extendMosparo
    label: Extend mosparo project list
    Copied!
  2. Now add a settings.definitions.yaml file to define additional projects in the Site settings editor.

    EXT:site_package/Configuration/Sets/ExtendMospraoForm/settings.definitions.yaml
    categories:
        mosparoForm:
            label: 'Form mosparo'
        mosparoForm.projects:
            label: 'Projects'
            parent: mosparoForm
        mosparoForm.projects.EXAMPLE:
            label: 'EXAMPLE'
            parent: mosparoForm.projects
    
        settings:
            plugin.tx_mosparoform.settings.projects.EXAMPLE.publicServer:
                type: string
                default: ''
                category: mosparoForm.projects.EXAMPLE
                label: 'Public server'
                description: 'Host of your mosparo installation, which is used in the frontend'
            plugin.tx_mosparoform.settings.projects.EXAMPLE.verifyServer:
                type: string
                default: ''
                category: mosparoForm.projects.EXAMPLE
                label: 'Verify Server'
                description: 'Host of your mosparo installation, which is used at the backend verification'
            plugin.tx_mosparoform.settings.projects.EXAMPLE.uuid:
                type: string
                default: ''
                category: mosparoForm.projects.EXAMPLE
                label: 'UUID'
                description: 'Unique identification number of the project in mosparo'
            plugin.tx_mosparoform.settings.projects.EXAMPLE.publicKey:
                type: string
                default: ''
                category: mosparoForm.projects.EXAMPLE
                label: 'Public key'
                description: 'Public key of the project in mosparo'
            plugin.tx_mosparoform.settings.projects.EXAMPLE.privateKey:
                type: string
                default: ''
                category: mosparoForm.projects.EXAMPLE
                label: 'Private key'
                description: 'Private key of the project in mosparo'
    Copied!
  3. Now add the new set as “dependencies” to your base site set. The same way as for Include static TypoScript via site set (TYPO3 v13 and above).
  4. Clear the TYPO3 cache through the 'Maintenance' module Admin Tools > Maintenance > Flush TYPO3 and PHP Cache > Flush cache to apply the changes.
  5. Go to Site Management > Settings in the TYPO3 backend, choose a site and enter the values for the newly created project configuration fields.
  6. The additional project is now set up and can be referenced by its name using the "selectedProject"-option.

Add projects via TypoScript 

To add an additional project, you only need to include the following in your setup.typoscript file:

EXT:site_package/Configuration/TypoScript/setup.typoscript
plugin.tx_mosparoform.settings.projects.EXAMPLE {
    publicServer=
    verifyServer=
    uuid=
    publicKey=
    privateKey=
}
Copied!

Add projects to TypoScript Constants Editor 

You can also configure it to appear in the backend Submodule "Constant Editor". To do so, add the following configuration to your constants.typoscript file:

EXT:site_package/Configuration/TypoScript/constants.typoscript
# customsubcategory=02_EXAMPLE=EXAMPLE project settings

plugin.tx_mosparoform.settings.projects.EXAMPLE {
    # cat=Form mosparo/02_EXAMPLE/EXAMPLE/10; type=string; label=Host of your mosparo installation, which is used in the frontend
    publicServer=
    # cat=Form mosparo/02_EXAMPLE/EXAMPLE/20; type=string; label=Host of your mosparo installation, which is used at the backend verification
    verifyServer=
    # cat=Form mosparo/02_EXAMPLE/EXAMPLE/30; type=string; label=Unique identification number of the project in mosparo
    uuid=
    # cat=Form mosparo/02_EXAMPLE/EXAMPLE/40; type=string; label=Public key of the project in mosparo
    publicKey=
    # cat=Form mosparo/02_EXAMPLE/EXAMPLE/50; type=string; label=Private key of the project in mosparo
    privateKey=
}
Copied!

and then in the setup.typoscript, we need to set the following:

EXT:site_package/Configuration/TypoScript/setup.typoscript
plugin.tx_mosparoform.settings.projects.EXAMPLE {
    publicServer={$plugin.tx_mosparoform.settings.projects.EXAMPLE.publicServer}
    verifyServer={$plugin.tx_mosparoform.settings.projects.EXAMPLE.verifyServer}
    uuid={$plugin.tx_mosparoform.settings.projects.EXAMPLE.uuid}
    publicKey={$plugin.tx_mosparoform.settings.projects.EXAMPLE.publicKey}
    privateKey={$plugin.tx_mosparoform.settings.projects.EXAMPLE.privateKey}
}
Copied!

Add projects to the mosparo element in the Form Framework editor 

Editors can select from a list of projects in the mosparo form element's select box. To expand this list, do the following:

  1. Create a new Form Framework configuration file in your provider extension at Configuration/Yaml/ExtendMosparoCaptchaFormField.yaml.

    EXT:site_package/Configuration/Yaml/ExtendMosparoCaptchaFormField.yaml
    prototypes:
      standard:
        formElementsDefinition:
          MosparoCaptcha:
            formEditor:
              editors:
                300:
                  selectOptions:
                    20:
                      value: 'EXAMPLE'
                      label: 'EXAMPLE'
                    30:
                      value: 'EXAMPLE_2'
                      label: 'EXAMPLE_2'
                    ...
    Copied!
  2. Register your Form Framework configuration by adding the following to your ext_localconf.php file in your provider extension:

    EXT:site_package/ext_localconf.php
    \TYPO3\CMS\Core\Utility\ExtensionManagementUtility::addTypoScriptSetup(
        trim(
            '
                module.tx_form {
                    settings {
                        yamlConfigurations {
                            1916293528 = EXT:EXAMPLE/Configuration/Yaml/ExtendMosparoCaptchaFormField.yaml
                        }
                    }
                }
            '
        )
    );
    Copied!
  3. Clear the TYPO3 cache through the 'Maintenance' module Admin Tools > Maintenance > Flush TYPO3 and PHP Cache > Flush cache to apply the changes.

Form Normalizer 

In order to verify form submissions correctly with mosparo, the form data must be structured in a specific way. This includes:

  • The field names (keys) must exactly match the name attributes used in the frontend form, e.g. tx_contact_contact_form[contact][topic]
  • All visible and verifiable fields must be included to allow mosparo to confirm the integrity of the submission

Since different extensions or custom form setups store form data differently, a dedicated form normalizer must be implemented to extract and prepare this data.

When the MosparoCaptchaValidator is executed, it queries all registered normalizers (tagged as mosparo.form_normalizer) in the order of registration and uses the first normalizer whose supports(...) method returns true.

That normalizer is then responsible for transforming the raw $_POST data into a structured NormalizedData object. This includes assigning the verifiable and required fields, which mosparo uses to verify whether the submitted data has been tampered with or is valid.

Create a custom form normalizer 

This section explains how to create and register a custom form normalizer so that it can be picked up by the MosparoCaptchaValidator.

  1. You need to implement the interface MosparoFormDefinitionInterface to provide a wrapper around your specific form structure.

    EXT:my_extension/Classes/Domain/Model/Form/MyCustomFormDefinition.php
    namespace Vendor\MyExtension\Domain\Model\Form;
    
    use Denkwerk\MosparoForm\Domain\Model\Form\MosparoFormDefinitionInterface;
    use Vendor\MyExtension\Domain\Model\Form\YourFormDefinition;
    
    class MyCustomFormDefinition implements MosparoFormDefinitionInterface
    {
       public function __construct(protected YourFormDefinition $yourFormDefinition)
       {
       }
    
       public function getYourFormDefinition(): YourForm
       {
           return $this->yourFormDefinition;
       }
    
       public function setYourFormDefinition(YourForm $yourFormDefinition): void
       {
           $this->yourFormDefinition = $yourFormDefinition;
       }
    }
    Copied!
  2. Implement FormNormalizerInterface to create your form normalizer which handles your form structure accordingly.

    EXT:my_extension/Classes/FormNormalizer/MyCustomFormNormalizer.php
    namespace Vendor\MyExtension\FormNormalizer;
    
    use Vendor\MyExtension\Domain\Model\Form\MyCustomFormDefinition;
    use Denkwerk\MosparoForm\Domain\Model\Form\MosparoFormDefinitionInterface;
    use Denkwerk\MosparoForm\Domain\Model\Dto\NormalizedData;
    use Denkwerk\MosparoForm\FormNormalizer\FormNormalizerInterface;
    
    final class MyCustomFormNormalizer implements FormNormalizerInterface
    {
       protected array $ignoredFieldTypes = [
           'password',
           'submit',
           'reset',
           // add your ignored field types here
       ];
    
       protected array $verifiableFieldTypes = [
           'input',
           'textarea',
           'select',
           // add your verifiable field types here
       ];
    
       public function supports(?MosparoFormDefinitionInterface $formDefinition): bool
       {
           // Return true if this normalizer should handle the given form definition
           return $formDefinition instanceof MyCustomFormDefinition;
       }
    
       public function normalize(array $postData, MosparoFormDefinitionInterface $formDefinition): NormalizedData
       {
           // Your normalization logic here...
           $normalized = new NormalizedData();
           // e.g. filter, transform $postData...
           $normalized->setFormData($filteredData);
           return $normalized;
       }
    }
    Copied!
  3. To register the normalizer service, add the following configuration to your custom provider extension Services.yaml file:

    EXT:my_extension/Configuration/Services.yaml
    services:
       Vendor\MyExtension\FormNormalizer\MyCustomFormNormalizer:
         tags:
           - { name: 'mosparo.form_normalizer' }
    Copied!
  4. After implementing your own MosparoFormDefinitionInterface and FormNormalizerInterface, you typically want to integrate mosparo spam protection in your form validation logic.
    For example, in a Powermail spam shield class, the mosparo captcha validator can be used like this:
    EXT:mosparo-powermail/FormNormalizer/PowermailFormNormalizer.php
    use Denkwerk\MosparoForm\Validation\Validator\MosparoCaptchaValidator;
    use Vendor\Extension\Domain\Model\Form\PowermailMosparoFormDefinition;
    use TYPO3\CMS\Core\Utility\GeneralUtility;
    use TYPO3\CMS\Core\Configuration\Exception\ExtensionConfigurationExtensionNotConfiguredException;
    use TYPO3\CMS\Core\Configuration\Exception\ExtensionConfigurationPathDoesNotExistException;
    
    /**
     * mosparo spam protection
     *
     * @return bool
     * @throws ExtensionConfigurationExtensionNotConfiguredException
     * @throws ExtensionConfigurationPathDoesNotExistException
     */
    public function spamCheck(): bool
    {
        // Skip spam check if the mosparo field is not present or the check should be skipped
        if (!$this->hasMosparoField() || $this->shouldSkipMosaproValidatorCheck()) {
            return false;
        }
    
        /** @var MosparoCaptchaValidator $captchaValidator */
        $captchaValidator = GeneralUtility::makeInstance(MosparoCaptchaValidator::class);
        $captchaValidator->setOptions([
            'formDefinition' => new PowermailMosparoFormDefinition($this->mail->getForm()),
            'selectedProject' => $this->getSelectedProject(),
        ]);
    
        $captchaValidationResult = $captchaValidator->validate('');
        if (!$captchaValidationResult->hasErrors()) {
            // No spam detected
            return false;
        }
    
        // Spam detected
        return true;
    }
    Copied!
  5. That's it! Your custom form setup is now seamlessly protected by mosparo, ensuring all relevant fields are verified server-side.

Extending Field Type Lists in the FormNormalizer (Form Framework) 

This extension provides a FormNormalizer for the TYPO3 Form Framework that helps with processing submitted form data. It allows specific field types to be ignored or verified during validation.

If you are using custom form field types, you need to register them via the event \Denkwerk\MosparoForm\Event\ModifyFormFieldTypeListsEvent to ensure proper validation behavior.

ModifyFormFieldTypeListsEvent 

This event is triggered when the FormNormalizer is instantiated.

You can use this event to:

getIgnoredFieldTypes() / setIgnoredFieldTypes()

getIgnoredFieldTypes() / setIgnoredFieldTypes()
Type
array of strings

Add field types to the ignore list

getVerifiableFieldTypes() / setVerifiableFieldTypes()

getVerifiableFieldTypes() / setVerifiableFieldTypes()
Type
array of strings

Add field types to the verifiable list

Adding your own Event Listener 

To register your own field types for the FormNormalizer, follow these steps:

  1. In your custom provider extension, create a new PHP file at: Classes/EventListener/ModifyFormFieldTypesForFormListener.php
  2. Add the following implementation.
    This example adds custom field types to both the ignored and verifiable lists:
    EXT:site_package/Classes/EventListener/ModifyFormFieldTypesForFormListener.php
    namespace Vendor\MyExtension\EventListener;
    
    use Denkwerk\MosparoForm\Event\ModifyFormFieldTypeListsEvent;
    
    final class ModifyFormFieldTypesForFormListener
    {
        public function __invoke(ModifyFormFieldTypeListsEvent $event): void
        {
            // Add custom field types to the ignore list
            $ignored = $event->getIgnoredFieldTypes();
            $ignored[] = 'customFormElementToIgnore';
            $event->setIgnoredFieldTypes($ignored);
    
            // Add custom field types to the verifiable list
            $verifiable = $event->getVerifiableFieldTypes();
            $verifiable[] = 'customFormInputElement';
            $event->setVerifiableFieldTypes($verifiable);
        }
    }
    Copied!
  3. Register the listener in your custom provider extension Services.yaml:

    EXT:site_package/Configuration/service.yaml
    ...
    
    services:
      Vendor\MyExtension\EventListener\ModifyFormFieldTypesForFormListener:
        tags:
          - name: event.listener
            event: Denkwerk\MosparoForm\Event\ModifyFormFieldTypeListsEvent
    Copied!

How to use (Extbase forms <f:form>) 

This section explains how to integrate the mosparo form element into an Extbase form <f:form>.

  1. Add the validator to your controller

    EXT:my_extension/Classes/Controller/SearchController.php
    use TYPO3\CMS\Extbase\Annotation\Validate;
    use Denkwerk\MosparoForm\Validation\Validator\MosparoCaptchaValidator;
    
    ...
    
    #[Validate(['param' => 'form', 'validator' => MosparoCaptchaValidator::class, 'options' => [
        'selectedProject' => 'example',
        'requiredFields' => 'tx_exampleform_exampleform[form][name],tx_exampleform_exampleform[form][email],'
    ]])]
    public function searchAction(array $search = []): ResponseInterface
    Copied!
    • You can specify the mosparo project to be used by setting the selectedProject option.
    • To ensure that all relevant form fields are checked by mosparo, use the requiredFields and optionally verifiableFields options.
  2. Include the mosparo Extbase partials in your TypoScript configuration
    We include the partials because mosparo provides a custom Fluid partial /Resources/Private/Frontend/Partials/ExtbaseForms/MosparoCaptcha.html that renders the required HTML container, loads the JavaScript, and applies the selected configuration automatically.
    EXT:my_extension/Configuration/TypoScript/setup.typoscript
    plugin.tx_blogexample {
       view {
         templateRootPaths.10 = {$plugin.tx_blogexample.view.templateRootPath}
         partialRootPaths.10 = {$plugin.tx_blogexample.view.partialRootPath}
         partialRootPaths.20 = EXT:mosparo_form/Resources/Private/Frontend/Partials/ExtbaseForms/
         layoutRootPaths.10 = {$plugin.tx_blogexample.view.layoutRootPath}
       }
    }
    Copied!
  3. Render the mosparo partial in your form template
    Minimal:
    EXT:my_extension/Resources/Private/Templates/Form/Form.html
    <f:render partial="MosparoCaptcha" />
    Copied!

    Full configuration:

    EXT:my_extension/Resources/Private/Templates/Form/Form.html
    <f:render partial="MosparoCaptcha" arguments="{
        selectedProject: 'default',
        formId: 'form'
    }" />
    Copied!
    • Use the selectedProject argument to choose a specific mosparo project.
      If omitted, the default project will be used.
    • To enable dynamic enabling/disabling of the submit button based on mosparo validation, pass the form’s HTML id as the formId argument.
      The JavaScript included by the partial will then control the first submit button found in the form.
      If formId is not set or empty, this functionality will be disabled.
    • When using Invisible Mode, the submit button will automatically be enabled after mosparo is initialized.
  4. Display validation errors
    If validation fails and you don't render the error output, users won't see any feedback.
    EXT:my_extension/Resources/Private/Templates/Form/Form.html
    <f:form.validationResults for="form">
        <f:if condition="{validationResults.errors}">
            <ul>
                <f:for each="{validationResults.errors}" as="error">
                    <li>{error.message}</li>
                </f:for>
            </ul>
        </f:if>
    </f:form.validationResults>
    Copied!

How to use (Form Framework) 

This section explains how to integrate the mosparo form element into a TYPO3 Form Framework form.

  1. Go in the Web > Forms module and create or edit a form.
  2. Click the Create new element button. The New element window displays.
  3. Select now the element "Mosparo Captcha"

    TYPO3 Form Framework interface with the “Mosparo Captcha” element highlighted in the “New element” dialog
  4. (Optional) Select now the new created element and select the mosparo project what do you want to use in this form.

    “Mosparo Captcha” form element settings, showing the dropdown to select the mosparo project

FormNormalizerInterface 

interface FormNormalizerInterface
Fully qualified name
\Denkwerk\MosparoForm\FormNormalizer\FormNormalizerInterface

Interface for normalizing form POST data into a NormalizedData object, used by mosparo for validation.

supports ( ?MosparoFormDefinitionInterface $formDefinition) : bool

Returns whether this normalizer supports processing the given form definition.

param MosparoFormDefinitionInterface|null $formDefinition

The form definition to check.

returntype

bool

normalize ( array $postData, MosparoFormDefinitionInterface $formDefinition) : NormalizedData

Normalize the raw POST data according to the form definition and return a NormalizedData instance ready for mosparo validation.

param array<int|string, mixed> $postData

The raw $_POST data.

param MosparoFormDefinitionInterface $formDefinition

The form structure definition.

returntype

NormalizedData

ModifyFormFieldTypeListsEvent 

class ModifyFormFieldTypeListsEvent
Fully qualified name
\Denkwerk\MosparoForm\Event\ModifyFormFieldTypeListsEvent

This event allows extensions to modify which form field types should be ignored or considered verifiable by the Form Framework Normalizer (\Denkwerk\MosparoForm\FormNormalizer\FormNormalizer).

__construct ( array $ignoredFieldTypes, array $verifiableFieldTypes)

Constructor.

param array<string> $ignoredFieldTypes

Initial list of field types to ignore.

param array<string> $verifiableFieldTypes

Initial list of field types to verify.

getIgnoredFieldTypes ( ) : array

Get the list of field types to be ignored by the FormNormalizer.

returntype

array<string>

setIgnoredFieldTypes ( array $types) : void

Set the list of field types to ignore.

param array<string> $types

New list of field types to ignore.

returntype

void

getVerifiableFieldTypes ( ) : array

Get the list of field types that should be verified by the FormNormalizer.

returntype

array<string>

setVerifiableFieldTypes ( array $types) : void

Set the list of field types that can be verified.

param array<string> $types

New list of field types to verify.

returntype

void

MosparoCaptchaValidator 

class MosparoCaptchaValidator
Fully qualified name
\Denkwerk\MosparoForm\Validation\Validator\MosparoCaptchaValidator

Validator class that integrates mosparo verification into TYPO3 Extbase and Form Framework forms.

Validates form submissions by sending normalized data to a mosparo server using the configured project credentials.

Supported options:

option string selectedProject

The mosparo project configuration key to be used.

option string requiredFields

Comma-separated list of field names that must be verified.

option string verifiableFields

Comma-separated list of additional field names that should be checked.

option Denkwerk\MosparoForm\Domain\Model\Form\MosparoFormDefinitionInterface formDefinition

Used to extract and normalize form structure.

__construct ( FormNormalizerManager $formNormalizerManager)
param FormNormalizerManager $formNormalizerManager

The form normalizer manager service.

isValid ( mixed $value)

Validates the submitted form data using mosparo.

  • Normalizes submitted form data via the registered normalizer.
  • Sends verification request to mosparo.
  • Checks that required and verifiable fields are included in the result.
  • Adds validation errors if verification fails or fields are missing.
param mixed $value

Not used; required by interface.

Returns

void

MosparoConfiguration ViewHelper <mosparoform:mosparoConfiguration> 

@package: Denkwerk\MosparoForm\ViewHelpers

ViewHelper to retrieve the public mosparo project configuration from the TypoScript setup.

This ViewHelper returns configuration values (publicServer, uuid, publicKey) for a specific mosparo project defined in TypoScript. The project can be specified via the selectedProject argument. If no project is specified, or the given project is not configured in TypoScript, the configuration of the defaultProject (as defined in TypoScript) will be used instead.

Example usage in a Fluid template: <mosparoform:mosparoConfiguration selectedProject="projectA" />

Expected TypoScript structure: plugin.tx_mosparoform.settings.projects { defaultProject = projectA projectA { publicServer = https://... verifyServer = https://... uuid = ... publicKey = ... privateKey = ... } }

Class MosparoConfigurationViewHelper

Arguments

The following arguments are available for the mosparoConfiguration ViewHelper:

selectedProject

selectedProject
Type
string
The mosparo project configuration to be used

MosparoFormDefinitionInterface 

interface MosparoFormDefinitionInterface
Fully qualified name
\Denkwerk\MosparoForm\Domain\Model\Form\MosparoFormDefinitionInterface

Interface for form definitions used by the mosparo integration.

Implement this interface in your custom form definition class to allow compatibility with the mosparo FormNormalizer.

This marker interface is used to identify supported form definition types for mosparo integration.

NormalizedData 

class NormalizedData
Fully qualified name
\Denkwerk\MosparoForm\Domain\Model\Dto\NormalizedData

A data container class holding normalized $_POST data for mosparo validation.

setFormData ( array $formData)

Set the list of form data fields.

param array<string, mixed> $formData

The form data.

Returns

void

getFormData ( )

Get the list of form data fields.

Returns

Normalized $_POST data as an array<string, mixed> ready to be validated by mosparo, or an empty array if not applicable.

addFormData ( string $key, mixed $value)

Add a field to the form data.

param string $key

The field key.

param mixed $value

The field value.

Returns

void

setRequiredFields ( array $requiredFields)

Set the list of required fields.

param array<string> $requiredFields

The list of required fields.

Returns

void

getRequiredFields ( )

Get the list of required fields.

Returns

An array of field names that must be validated by mosparo.

addRequiredField ( string $value)

Add a field to the required fields list.

param string $value

The field key.

Returns

void

setVerifiableFields ( array $verifiableFields)

Set the list of verifiable fields.

param array<string> $verifiableFields

The verifiable field names.

Returns

void

getVerifiableFields ( )

Get the list of verifiable fields.

Returns

An array of field names that are eligible for mosparo validation.

addVerifiableField ( string $value)

Add a field to the verifiable fields list.

param string $value

The field name.

Returns

void

UniqueId ViewHelper <mosparoform:uniqueId> 

@package: Denkwerk\MosparoForm\ViewHelpers

Generates a unique ID for mosparo captchas on pages with multiple forms.

Example: <div id="mosparo-{mosparoform:uniqueId()}" ...></div>

Class UniqueIdViewHelper

Frequently Asked Questions (FAQ) 

See chapter Installation.

If your form setup is not supported by default, you can write a custom form normalizer to prepare the submitted data for mosparo validation.

See chapter Create a custom form normalizer for step-by-step instructions.

Currently, mosparo validation only works in multi-step forms if all fields to be validated are located on the same step as the mosparo form element. If the fields are spread across multiple steps, validation will not be triggered correctly.

This limitation is known and currently being worked on. See the related issue on GitHub:

See chapter Where to get help.