Form finisher
Target group: Integrators, Developers
Table of Contents
Configuring JobRouter®
Before you can start instances successfully you have to configure your JobRouter® installation to execute steps automatically. The command for starting instances only saves the step. To send the step you need a JobRobot configuration and add the robot user to the Job Function of the start step.
-
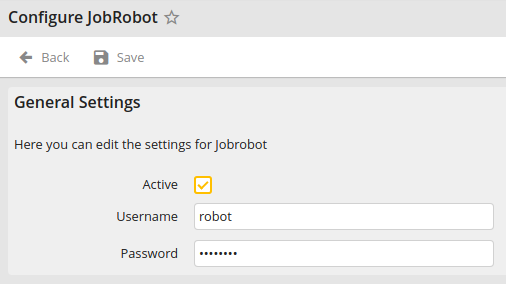
Configure JobRobot module
If you haven't an activated JobRobot configuration create a new user in your JobRouter® installation and configure it under System > Configuration > Modules > JobRobot. You see the following screen:
JobRobot configuration
After activating and saving the form the JobRobot user is available.
-
Add JobRobot user to Job Function of start step
Then add the robot user to the Job Function of the start step. It can then look like this:
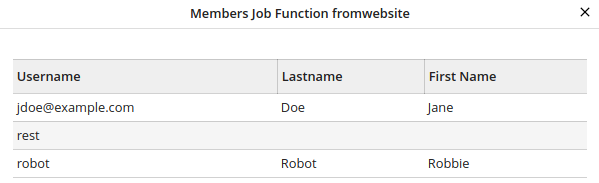
Robot user in Job Function of start step
Note
Make sure to add the JobRobot username to your finisher configuration, so the instance can be sent correctly.
Start instances
A form finisher JobRouterStartInstance is available to start a JobRouter®
process instance. After submitting a form, the form values are stored in a
transfer table. A command, hopefully executed regularly,
takes these transfer records and start a process instance. This is due the fact,
that a JobRouter® installation can temporarily not available due to maintenance
or network problems. Also the submitting of a form on the website should be as
fast as possible for a good user experience.
Note
The finisher can only be used in the YAML form definition, not in the Form backend module.
Start one instance
So, let's start with an example. The form finisher is defined in the YAML configuration of the specific form:
finishers:
   -
      identifier: JobRouterStartInstance
      options:
         handle: 'start_website_contact'
         type: 'Demo'
         summary: 'Demo Contact'
         # It is important to add the JobRobot username.
         # The concrete name depends on your configuration above,
         # we assume "robot" here:
         username: 'robot'
         processtable:
            name: '{preName} {lastName}'
            company: '{company}'
            email_address: '{email}'
            phone_number: '{phone}'
            message: '{message}'
form_identifier: 'www.example.com/demo'As you can see, you can define some options. These are:
handle(required): The step handle defined in the Processes module.type: The type can be used for statistical evaluation in the according dashboard widget.summary: The summary of the instance.initiator: The initiator of the instance.username: The username the instance should be assigned to.jobfunction: The Job Function the instance should be assigned to.priority: The priority of the instance (number between 1 and 3).pool: The pool of the instance (positive number).processtable: You can map the form fields to the process table fields. As you can see in the example above, you define the process table field as the key (e.gemail_address) and then map it with the to the form field identifier which is enclosed in curly brackets (for example,{email}). You can also set a static value, combine a static value with a form field or map multiple form fields to a process table field.
Note
Only process table fields that are configured in the process link are possible. If a process table field is used that is not defined, an exception is thrown.
Inputs that are longer than the defined process table field length are shortened to the maximum length.
If the value of a form field is an array, like from a multi checkbox, the array is converted to a csv string and stored in the given process table field. The value can be reconverted to an array, for example, in a JobRouter® rule, with the PHP function str_getcsv().
Start multiple instances
It is also possible to start multiple instances – even on different JobRouter®
installations. Just use the array notation in options:
finishers:
   -
      identifier: JobRouterStartInstance
      options:
         -
            handle: 'start_website_contact'
            summary: 'Demo Contact'
            username: 'robot'
            processtable:
               name: '{preName} {lastName}'
               company: '{company}'
               email_address: '{email}'
               phone_number: '{phone}'
               message: '{message}'
               form_identifier: 'www.example.com/demo'
         -
            handle: 'collect_anonymous_messages'
            summary: 'Demo Contact'
            username: 'robot'
            processtable:
               ANON_MESSAGE: '{message}'
FROM_URL: 'https://www.example.com/demo'Attachments
New in version 2.0.0
One or more attachments (files) can be added to a form and processed with the
JobRouterStartInstance form finisher. By default, the files are stored
in the first file storage 1:/user_upload/, for example
fileadmin/user_upload, but can be overwritten in your form configuration, for instance:
renderables:
  -
    # ...
    renderables:
      -
        properties:
        saveToFileMount: '3:/my_form_uploads/'
        allowedMimeTypes:
          - application/pdf
        type: FileUpload
        identifier: the_pdf_file
label: 'The PDF file'In this example, the files are stored in the file storage with the ID 3, and
there in a folder named my_form_uploads.
Attention
By default, the files are stored in a publicly accessible folder by the TYPO3
form framework. Although the parent folder is named something like
form_946c84e75f5f118798ccb5e86ac5ca0153f8d82c and the risk for
retrieving a file by guessing the folder and file name may be low, it is
recommended to create a custom file storage outside the web root or to apply
web server restrictions on that storage folder.
When running the "clean up transfers" command, the files are deleted alongside the according transfer records.
Variables
You can use variables in the common parameters, such as summary or
initiator, and in the process table fields.
For more information have a look into the available variable resolvers. You can also write your own variable resolvers.